QWizard使用
- 描述
- 方法
- 枚举:enum QWizard::WizardButton
- 枚举:enum QWizard::WizardOption
- 枚举:enum QWizard::WizardStyle
- 枚举:enum QWizard::WizardPixmap
- 常用成员方法
- 槽函数
- 信号
- 示例
- 设置标题
- 添加page页
- 设置按钮文本
- 设置自定义按钮文本
- 设置page页
- 设置帮助 按钮
- 设置像素图
- registerField(const QString &name, QWidget *widget, const char *property = Q_NULLPTR, const char *changedSignal = Q_NULLPTR)方法
- QWizardPage::setCommitPage(bool commitPage)方法
- 创建QWizardPage
- 调用
- 完整示例
- 解释
描述
QWizard类为向导提供了一个框架。
向导(在macOS上也称为助手)是一种特殊类型的输入对话框,由一系列页面组成。向导的目的是一步一步地指导用户完成流程。对于用户可能难以学习的复杂或不常见的任务,向导非常有用。
QWizard继承QDialog并表示向导。每个页面都是一个QWizardPage (QWidget的子类)。要创建您自己的向导,您可以直接使用这些类,或者您可以创建它们的子类以获得更多的控制。
方法
枚举:enum QWizard::WizardButton
此enum指定向导中的按钮。
关联函数:
可使用setButton(),setButtonText(),setButtonLayout()等函数进行设置。
| 常量 | 值 | 描述 | 解释 |
|---|---|---|---|
| QWizard::BackButton | 0 | The Back button (Go Back on macOS) | 后退按钮(在macOS上返回) |
| QWizard::NextButton | 1 | The Next button (Continue on macOS) | Next按钮(macOS上的Continue) |
| QWizard::CommitButton | 2 | The Commit button | 提交按钮 |
| QWizard::FinishButton | 3 | The Finish button (Done on macOS) | 完成按钮(在macOS上完成) |
| QWizard::CancelButton | 4 | The Cancel button (see also NoCancelButton) | 取消按钮(参见NoCancelButton) |
| QWizard::HelpButton | 5 | The Help button (see also HaveHelpButton) | 帮助按钮(参见HaveHelpButton) |
| QWizard::CustomButton1 | 6 | The first user-defined button (see also HaveCustomButton1) | 第一个用户定义的按钮(参见HaveCustomButton1) |
| QWizard::CustomButton2 | 7 | The second user-defined button (see also HaveCustomButton2) | 第二个用户定义的按钮(参见HaveCustomButton2) |
| QWizard::CustomButton3 | 8 | The third user-defined button (see also HaveCustomButton3) | 第三个用户定义按钮(参见HaveCustomButton3) |
以下值只有在使用setButtonLayout()方法的时候有效:
| 常量 | 值 | 描述 | 解释 |
|---|---|---|---|
| QWizard::Stretch | 9 | A horizontal stretch in the button layout | 水平伸缩在按钮布局中 |
枚举:enum QWizard::WizardOption
此enum指定影响向导外观的各种选项。
关联函数:
setOptions(), setOption(), 和 testOption().
| 常量 | 值 | 描述 | 解释 |
|---|---|---|---|
| QWizard::IndependentPages | 0x00000001 | The pages are independent of each other (i.e., they don’t derive values from each other). | 各页面相互独立(即,它们不从彼此中派生值)。 |
| QWizard::IgnoreSubTitles | 0x00000002 | Don’t show any subtitles, even if they are set. | 即使已设置,也不显示任何副标题。 |
| QWizard::ExtendedWatermarkPixmap | 0x00000004 | Extend any WatermarkPixmap all the way down to the window’s edge. | 将任何水印位图一直扩展到窗口边缘。 |
| QWizard::NoDefaultButton | 0x00000008 | Don’t make the Next or Finish button the dialog’s default button. | 不要将“下一步”或“完成”按钮设置为对话框的默认按钮。 |
| QWizard::NoBackButtonOnStartPage | 0x00000010 | Don’t show the Back button on the start page. | 在起始页面上不显示“返回”按钮。 |
| QWizard::NoBackButtonOnLastPage | 0x00000020 | Don’t show the Back button on the last page. | 在最后一页上不显示“返回”按钮。 |
| QWizard::DisabledBackButtonOnLastPage | 0x00000040 | Disable the Back button on the last page. | 禁用最后一页上的“返回”按钮。 |
| QWizard::HaveNextButtonOnLastPage | 0x00000080 | Show the (disabled) Next button on the last page. | 在最后一页上显示(禁用)的“下一步”按钮。 |
| QWizard::HaveFinishButtonOnEarlyPages | 0x00000100 | Show the (disabled) Finish button on non-final pages. | 在非最终页面上显示(禁用)的“完成”按钮。 |
| QWizard::NoCancelButton | 0x00000200 | Don’t show the Cancel button. | 不显示“取消”按钮。 |
| QWizard::CancelButtonOnLeft | 0x00000400 | Put the Cancel button on the left of Back (rather than on the right of Finish or Next). | 将“取消”按钮放在“返回”按钮的左侧(而不是“完成”或“下一步”按钮的右侧)。 |
| QWizard::HaveHelpButton | 0x00000800 | Show the Help button. | 显示“帮助”按钮。 |
| QWizard::HelpButtonOnRight | 0x00001000 | Put the Help button on the far right of the button layout (rather than on the far left). | 将“帮助”按钮放在按钮布局的最右边(而不是最左边)。 |
| QWizard::HaveCustomButton1 | 0x00002000 | Show the first user-defined button (CustomButton1). | 显示第一个用户定义的按钮(CustomButton1)。 |
| QWizard::HaveCustomButton2 | 0x00004000 | Show the second user-defined button (CustomButton2). | 显示第二个用户定义的按钮(CustomButton2)。 |
| QWizard::HaveCustomButton3 | 0x00008000 | Show the third user-defined button (CustomButton3). | 显示第三个用户定义的按钮(CustomButton3)。 |
| QWizard::NoCancelButtonOnLastPage | 0x00010000 | Don’t show the Cancel button on the last page. | 在最后一页上不显示“取消”按钮。 |
WizardOptions类型是qflag的类型定义。它存储了WizardOption值的OR组合。
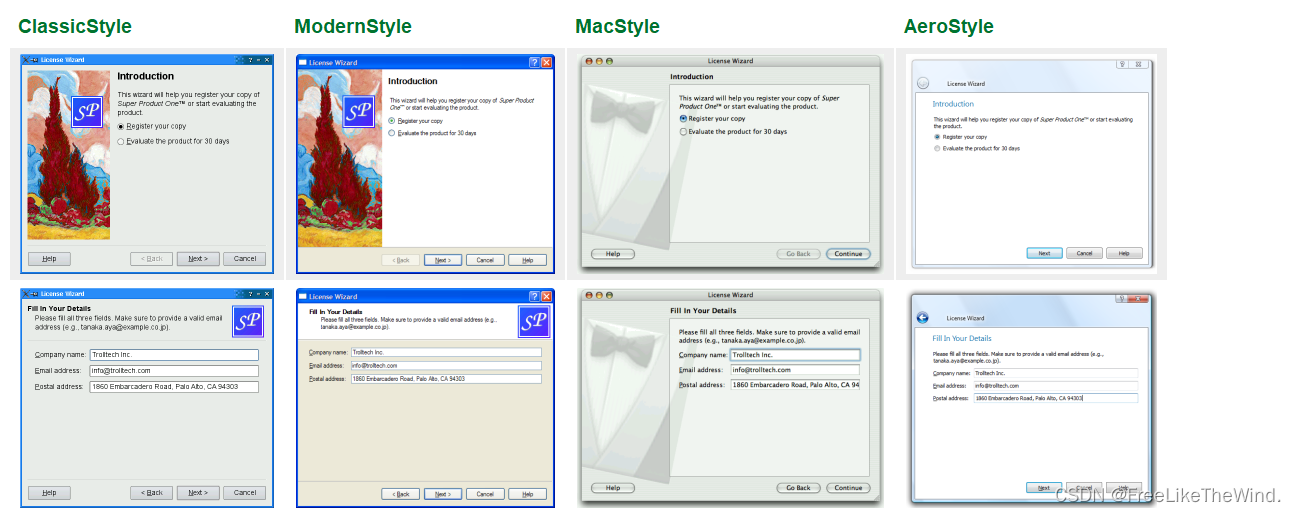
枚举:enum QWizard::WizardStyle
此enum指定QWizard支持的不同外观。
关联函数:
可通过setWizardStyle()进行外观设置,如果不设置,使用setPixmap()方法设置位图无效。
| 常量 | 值 | 描述 | 解释 |
|---|---|---|---|
| QWizard::ClassicStyle | 0 | Classic Windows look | 经典的 Windows 外观 |
| QWizard::ModernStyle | 1 | Modern Windows look | 现代的 Windows 外观 |
| QWizard::MacStyle | 2 | macOS look | macOS 外观 |
| QWizard::AeroStyle | 3 | Windows Aero look | Windows Aero 外观 |
| QWizard::NStyles | 4 | 默认 |
枚举:enum QWizard::WizardPixmap
此enum指定可以与页面关联的像素图。
关联函数:
通过 setPixmap(), QWizardPage::setPixmap()等方法设置像素图。
| 常量 | 值 | 描述 | 解释 |
|---|---|---|---|
| QWizard::WatermarkPixmap | 0 | The tall pixmap on the left side of a ClassicStyle or ModernStyle page | ClassicStyle或ModernStyle页面左侧的高度较高的像素图 |
| QWizard::LogoPixmap | 1 | The small pixmap on the right side of a ClassicStyle or ModernStyle page header | ClassicStyle或ModernStyle页面标题栏右侧的小像素 |
| QWizard::BannerPixmap | 2 | The pixmap that occupies the background of a ModernStyle page header | 占用ModernStyle页面标题栏背景的像素图 |
| QWizard::BackgroundPixmap | 3 | The pixmap that occupies the background of a MacStyle wizard | 占用MacStyle向导背景的像素图 |
| QWizard::NPixmaps | 4 | 默认 |
常用成员方法
int addPage(QWizardPage *page):将给定的页面添加到向导中,返回新页面的ID。QAbstractButton *button(WizardButton which) const:返回指定按钮类型的按钮(如下一步、上一步、完成等)。QString buttonText(WizardButton which) const:返回指定按钮类型的文本。int currentId() const:返回当前页面的ID。QWizardPage *currentPage() const:返回当前页面。QVariant field(const QString &name) const:返回具有给定名称的字段的值。bool hasVisitedPage(int id) const:检查页面ID是否已经被访问过。virtual int nextId() const:返回下一个要显示的页面的ID。WizardOptions options() const:返回当前设置的选项。QWizardPage *page(int id) const:返回指定ID的页面。QList<int> pageIds() const:返回添加到向导中的所有页面的ID的列表。QPixmap pixmap(WizardPixmap which) const:返回指定像素图类型的像素图(如向导标志、向导背景等)。void removePage(int id):从向导中删除指定ID的页面。void setButton(WizardButton which, QAbstractButton *button):设置指定按钮类型的按钮。void setButtonLayout(const QList<WizardButton> &layout):设置按钮布局。void setButtonText(WizardButton which, const QString &text):设置指定按钮类型的文本。void setDefaultProperty(const char *className, const char *property, const char *changedSignal):设置默认属性。void setField(const QString &name, const QVariant &value):设置字段的值。void setOption(WizardOption option, bool on = true):设置指定选项的开启或关闭状态。void setOptions(WizardOptions options):设置选项。void setPage(int id, QWizardPage *page):设置指定ID的页面。void setPixmap(WizardPixmap which, const QPixmap &pixmap):设置指定像素图类型的像素图。void setSideWidget(QWidget *widget):设置侧边栏小部件。void setStartId(int id):设置向导的起始ID。void setSubTitleFormat(Qt::TextFormat format):设置副标题的格式。void setTitleFormat(Qt::TextFormat format):设置标题的格式。void setWizardStyle(WizardStyle style):设置向导的风格。QWidget *sideWidget() const:返回侧边栏小部件。int startId() const:返回向导的起始ID。Qt::TextFormat subTitleFormat() const:返回副标题的格式。bool testOption(WizardOption option) const:检查指定选项是否已启用。Qt::TextFormat titleFormat() const:返回标题的格式。virtual bool validateCurrentPage():验证当前页面是否符合要求。QList<int> visitedPages() const:返回已访问的页面的ID列表。WizardStyle wizardStyle() const:返回向导的风格。
槽函数
- void back():显示前一个页面。
- void next():显示下一个页面。
- void restart():从头开始显示向导的第一个页面。
信号
- void currentIdChanged(int id):当前页面的ID已更改。
- void customButtonClicked(int which):单击自定义按钮时发射。
- void helpRequested():当用户请求帮助时发射。
- void pageAdded(int id):向导中添加了新页面。
- void pageRemoved(int id):从向导中删除了页面。
示例
c
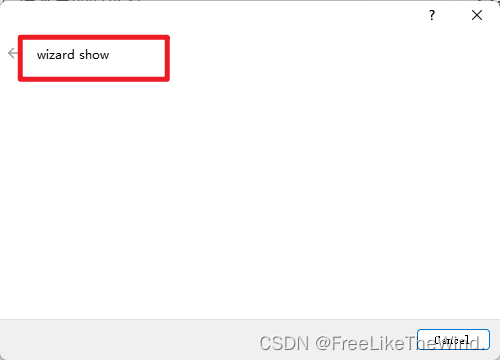
设置标题
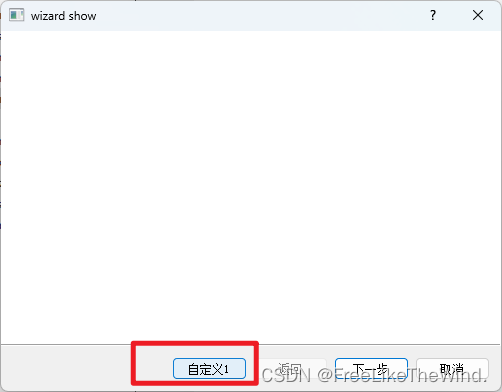
setWindowTitle(QStringLiteral("wizard show"));
添加page页
QWizard wizard;wizard.addPage(createIntroPage());wizard.addPage(createRegistrationPage());wizard.addPage(createConclusionPage());
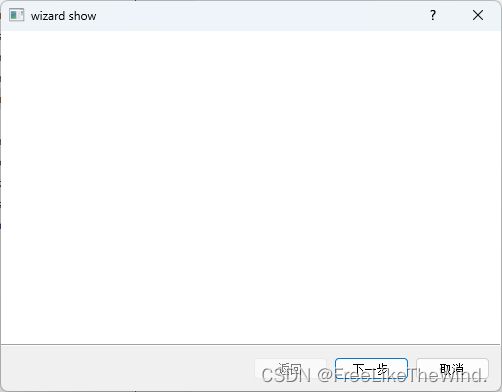
设置按钮文本
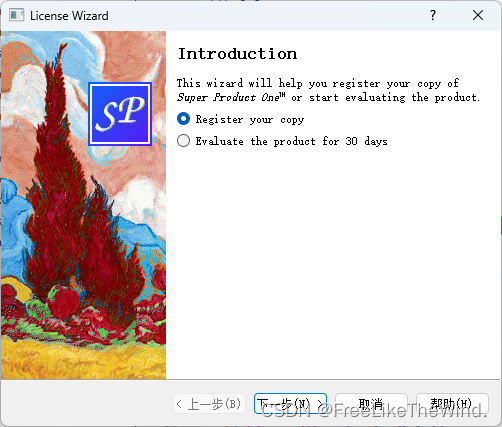
setButtonText(QWizard::NextButton, "下一步");setButtonText(QWizard::CancelButton, "取消");setButtonText(QWizard::BackButton, "返回");
这个是只有设置了setWizardStyle(QWizard::ModernStyle);样式后,才会显示回退按钮,只有添加了page页之后,才会显示下一步按钮,如果啥都没添加,界面只有 cancel,如果是最后一页,显示是finish,而不是"下一步"。
设置自定义按钮文本
setButtonText(QWizard::CustomButton1, "自定义1");setOptions(options() | QWizard::HaveCustomButton1);
设置自定义按钮文本后,不会显示,只有设置setOptions()后,才显示,这个自定义按钮是每页都显示,可以根据是否需要,自行控制显隐。
设置page页
setPage(Page_Intro, new IntroPage);setPage(Page_Evaluate, new EvaluatePage);setPage(Page_Register, new RegisterPage);setPage(Page_Details, new DetailsPage);setPage(Page_Conclusion, new ConclusionPage);
第一个参数为自定义id,可以重写QWizard 的 nextId()方法,自定义上一步下一步,具体跳到某页。
设置帮助 按钮
setOption(HaveHelpButton, true);
设置像素图
setPixmap(QWizard::LogoPixmap, QPixmap(":/images/logo.png"));
registerField(const QString &name, QWidget *widget, const char *property = Q_NULLPTR, const char *changedSignal = Q_NULLPTR)方法
registerField("details.company*", companyLineEdit);registerField("details.email*", emailLineEdit);registerField("details.postal*", postalLineEdit);
创建一个名为name的字段,该字段与给定小部件的给定属性关联。从那时起,可以使用field()和setField()访问该属性。
字段对于整个向导来说是全局的,并且使任何单个页面都可以轻松访问由另一个页面存储的信息,而不必将所有逻辑放在QWizard中,也不必让页面显式地了解彼此。
“name”以“*”结尾时为必填字段。当页面有强制字段时,Next和/或Finish按钮只有在所有强制字段都填满时才启用。这需要指定一个changedSignal,以告诉QWizard重新检查由必填字段存储的值。
调用,不加后面的*
field("details.email").toString();
QWizardPage::setCommitPage(bool commitPage)方法
如果commitPage为true,则将该页设置为提交页;否则,将其设置为普通页面。
提交页是表示不能通过单击“返回”或“取消”来撤消的操作的页面。
提交按钮取代提交页面上的Next按钮。单击此按钮只调用QWizard::next(),就像单击next一样。
直接从提交页面进入的页面会禁用后退按钮。
创建QWizardPage
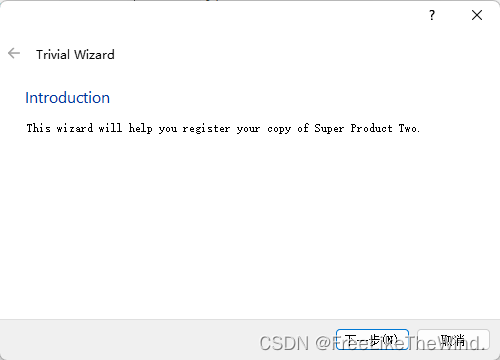
QWizardPage *createIntroPage(){QWizardPage *page = new QWizardPage;page->setTitle("Introduction");QLabel *label = new QLabel("This wizard will help you register your copy ""of Super Product Two.");label->setWordWrap(true);QVBoxLayout *layout = new QVBoxLayout;layout->addWidget(label);page->setLayout(layout);return page;}
调用
int main(int argc, char *argv[]){QApplication app(argc, argv);// 以下是翻译,根据不同style,可以显示不同的最下方按钮为中文#ifndef QT_NO_TRANSLATIONQString translatorFileName = QLatin1String("qt_");translatorFileName += QLocale::system().name();QTranslator *translator = new QTranslator(&app);if (translator->load(translatorFileName, QLibraryInfo::location(QLibraryInfo::TranslationsPath)))app.installTranslator(translator);#endifQWizard wizard;wizard.addPage(createIntroPage());wizard.addPage(createRegistrationPage());wizard.addPage(createConclusionPage());wizard.setWindowTitle("Trivial Wizard");wizard.show();return app.exec();}
完整示例
#include <QtWidgets>
#include <QTranslator>
#include <QLocale>
#include <QLibraryInfo>// 创建Intro页
QWizardPage *createIntroPage()
{QWizardPage *page = new QWizardPage;page->setTitle("Introduction");QLabel *label = new QLabel("This wizard will help you register your copy ""of Super Product Two.");label->setWordWrap(true);QVBoxLayout *layout = new QVBoxLayout;layout->addWidget(label);page->setLayout(layout);return page;
}
// 创建Registration页
QWizardPage *createRegistrationPage()
{QWizardPage *page = new QWizardPage;page->setTitle("Registration");page->setSubTitle("Please fill both fields.");QLabel *nameLabel = new QLabel("Name:");QLineEdit *nameLineEdit = new QLineEdit;QLabel *emailLabel = new QLabel("Email address:");QLineEdit *emailLineEdit = new QLineEdit;QGridLayout *layout = new QGridLayout;layout->addWidget(nameLabel, 0, 0);layout->addWidget(nameLineEdit, 0, 1);layout->addWidget(emailLabel, 1, 0);layout->addWidget(emailLineEdit, 1, 1);page->setLayout(layout);return page;
}
// 创建Conclusion页
QWizardPage *createConclusionPage()
{QWizardPage *page = new QWizardPage;page->setTitle("Conclusion");QLabel *label = new QLabel("You are now successfully registered. Have a ""nice day!");label->setWordWrap(true);QVBoxLayout *layout = new QVBoxLayout;layout->addWidget(label);page->setLayout(layout);return page;
}
// 调用
int main(int argc, char *argv[])
{QApplication app(argc, argv);// 翻译
#ifndef QT_NO_TRANSLATIONQString translatorFileName = QLatin1String("qt_");translatorFileName += QLocale::system().name();QTranslator *translator = new QTranslator(&app);if (translator->load(translatorFileName, QLibraryInfo::location(QLibraryInfo::TranslationsPath)))app.installTranslator(translator);
#endifQWizard wizard;wizard.addPage(createIntroPage());wizard.addPage(createRegistrationPage());wizard.addPage(createConclusionPage());wizard.setWindowTitle("Trivial Wizard");wizard.show();return app.exec();
}
解释
代码定义了一个简单的 Qt 向导,包括三个页面:Intro(介绍)、Registration(注册)和Conclusion(结论),并提供了一些翻译支持。
在 createIntroPage() 函数中,创建了一个 QWizardPage 对象,设置了页面的标题和一个 QLabel,用于显示介绍文字。
在 createRegistrationPage() 函数中,同样创建了一个 QWizardPage 对象,并设置了页面的标题和子标题。然后添加了两个 QLineEdit 和两个 QLabel,用于输入和显示用户的姓名和电子邮件地址。
在 createConclusionPage() 函数中,也创建了一个 QWizardPage 对象,并设置了页面的标题和一个 QLabel,用于显示注册成功的消息。
在 main() 函数中,首先创建了一个 QApplication 对象,用于运行整个 Qt 应用程序。然后检查是否启用了翻译功能,如果是,则加载相应的翻译文件,并将其安装到应用程序中。
接下来创建了一个 QWizard 对象,并添加了三个页面。设置了向导的标题,并显示出来。最后,调用 app.exec() 运行应用程序,进入 Qt 的事件循环,直到应用程序关闭或者通过主动退出来结束。