创建conan包-Understanding Packaging
- 1 Understanding Packaging
- 1.1 Creating and Testing Packages Manually
- 1.2 Package Creation Process
本文是基于对conan官方文档Understanding Packaging翻译而来, 更详细的信息可以去查阅conan官方文档。
1 Understanding Packaging
1.1 Creating and Testing Packages Manually
The previous create approach using test_package subfolder, is not strictly necessary, though very strongly recommended. If we didn’t want to use the test_package functionality, we could just write our recipe ourselves or use the conan new command without the -t. command line argument.
之前使用 test_package 子文件夹的创建方法并非绝对必要,但强烈建议使用。如果不想使用 test_package 功能,我们可以自己编写配方,或者使用不带 -t. 命令行参数的 conan new 命令。
$ mkdir mypkg && cd mypkg
$ conan new hello/0.1
This will create just the conanfile.py recipe file. Now we can create our package:
这将只创建 conanfile.py 配方文件。现在我们可以创建软件包了:
$ conan create . demo/testing
This is equivalent to:
这相当于:
$ conan export . demo/testing
$ conan install hello/0.1@demo/testing --build=hello
Once the package is created, it can be consumed like any other package, by adding hello/0.1@demo/testing to a project conanfile.txt or conanfile.py requirements and running:
创建软件包后,可以像使用其他软件包一样,在项目 conanfile.txt 或 conanfile.py 要求中添加 "hello/0.1@demo/testing "并运行:
$ conan install .
# build and run your project to ensure the package works
1.2 Package Creation Process
It is very useful for package creators and Conan users in general to understand the flow for creating a package inside the conan local cache, and all about its layout.
对于软件包创建者和一般conan用户来说,了解在conan本地缓存中创建软件包的流程及其布局非常有用。
Each package recipe contains five important folders in the local cache:
每个软件包配方都包含本地缓存中的五个重要文件夹:
export: The folder in which the package recipe is stored.export:存储软件包配方的文件夹。export_source: The folder in which code copied with the recipeexports_sourcesattribute is stored.export_source:存储使用exports_sources属性复制的代码的文件夹。- source: The folder in which the source code for building from sources is stored.
- source: 源代码存储从源代码构建源代码的文件夹。
- build: The folder in which the actual compilation of sources is done. There will typically be one subfolder for each different binary configuration
- build:实际编译源代码的文件夹。通常每个不同的二进制配置都有一个子文件夹
- package: The folder in which the final package artifacts are stored. There will be one subfolder for each different binary configuration
- package:存储最终软件包工件的文件夹。每个不同的二进制配置将有一个子文件夹
The source and build folders only exist when the packages have been built from sources.
源文件夹和构建文件夹只有在软件包从源文件夹构建时才会存在。
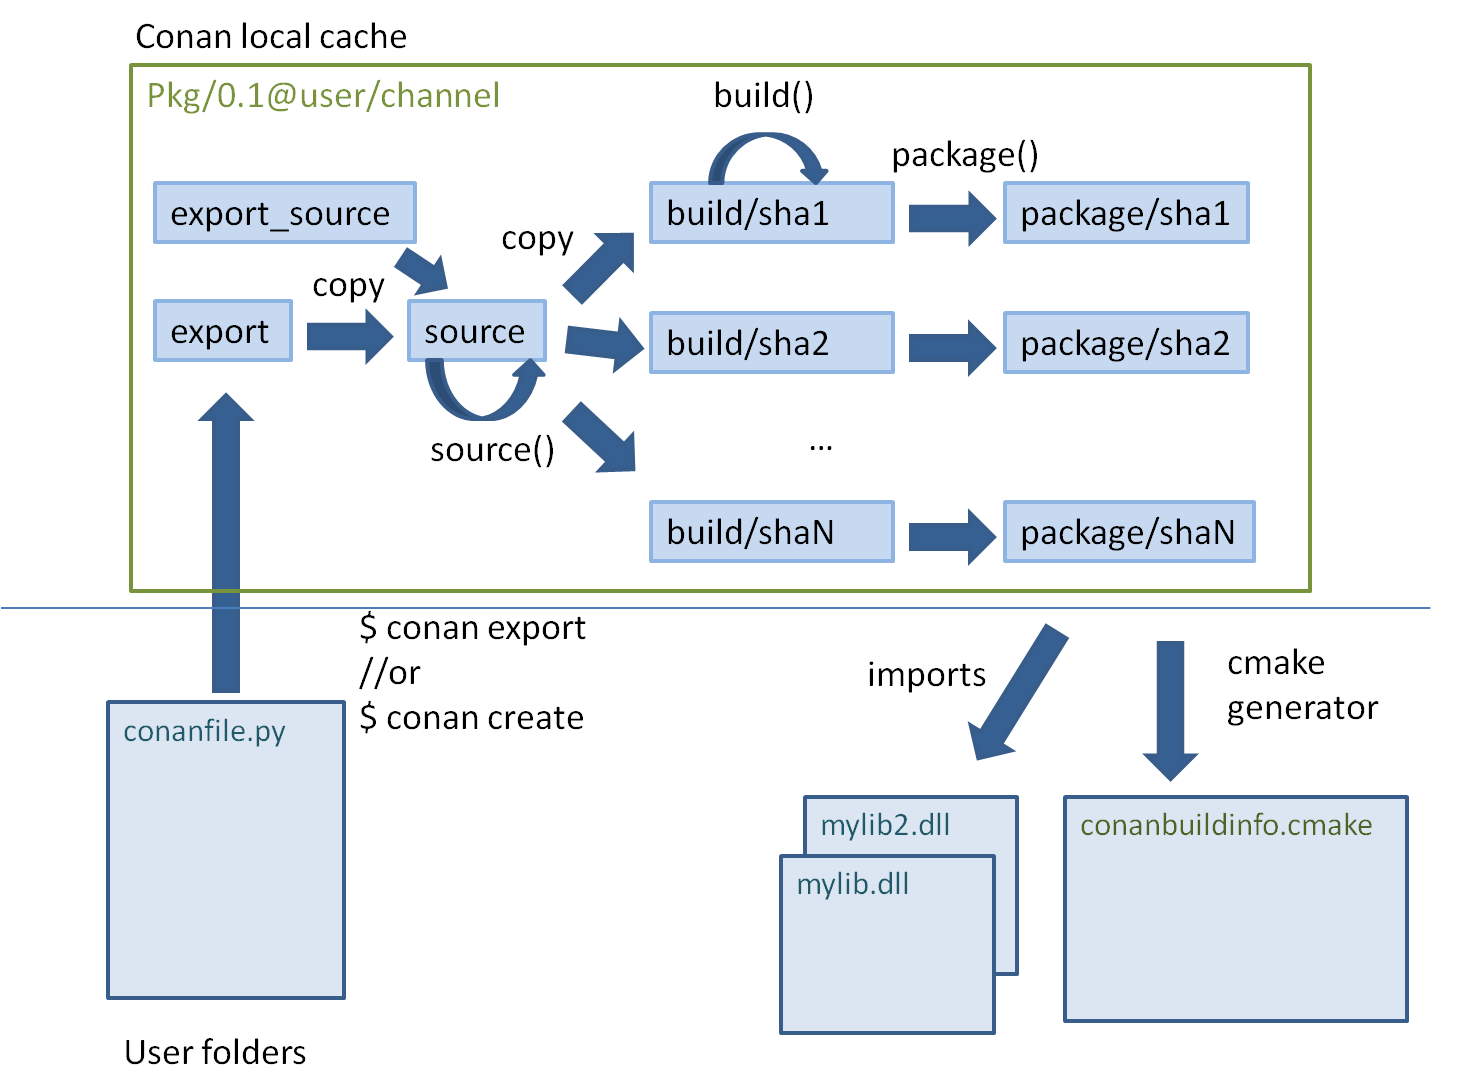
The process starts when a package is “exported”, via the conan export command or more typically, with the conan create command. The conanfile.py and files specified by the exports_sources field are copied from the user space to the local cache.
当通过 conan export 命令或更常见的 conan create 命令 "导出 "软件包时,该过程就开始了。conanfile.py 和 exports_sources 字段指定的文件会从用户空间复制到本地缓存。
The export and export_source files are copied to the source folder, and then the source() method is executed (if it exists). Note that there is only one source folder for all the binary packages. If when generating the code, there is source code that varies for the different configurations, it cannot be generated using the source() method, but rather needs to be generated using the build() method.
导出和 export_source 文件会被复制到源文件夹,然后执行 source() 方法(如果存在)。请注意,所有二进制软件包都只有一个源代码文件夹。如果在生成代码时,不同配置有不同的源代码,则不能使用 source() 方法生成,而需要使用 build() 方法生成。
Then, for each different configuration of settings and options, a package ID will be computed in the form of a SHA-1 hash for this configuration. Sources will be copied to the build/hashXXX folder, and the build() method will be triggered.
然后,针对每个不同的设置和选项配置,以 SHA-1 哈希形式计算出该配置的软件包 ID。源代码将被复制到 build/hashXXX 文件夹,并触发 build() 方法。
After that, the package() method will be called to copy artifacts from the build/hashXXX folder to the package/hashXXX folder.
之后,将调用 package() 方法将build/hashXXX 文件夹中的工件复制到 package/hashXXX 文件夹中。
Finally, the package_info() methods of all dependencies will be called and gathered so you can generate files for the consumer build system, as the conanbuildinfo.cmake for the cmake generator. Also the imports feature will copy artifacts from the local cache into user space if specified.
最后,所有依赖项的 package_info() 方法都会被调用和收集,这样你就可以为用户编译系统生成文件,就像为 cmake 生成器生成 conanbuildinfo.cmake 文件一样。如果指定了导入功能,它还会将本地缓存中的工件复制到用户空间。


![全文检索[ES系列] - 第495篇](https://img-blog.csdnimg.cn/img_convert/880d863c11479bc7084d22b7b0b1b11f.png)