一、简介
kubernetes中,在存储层面,我们常用到的两个资源是pv和pvc,其中pv是实际创建出来的一致性卷,我们可以通过pv将容器中的数据进行持久化保存,而pvc则可以理解为pod使用pv的中间控制器,通过pvc将pv绑定到pod上。但是在生产环境下,我们需要按照顺序先创建pv,再创建pvc,然后在pod中进行绑定。此外,在某些场景下,我们甚至需要在对应的pod所在的目录上创建目录,但是由于kubernetes的调度规则是黑盒制度,一般情况下,不好进行控制。
而动态卷则可以自动对持久化卷进行管理,当我们直接定义了pvc后,kubernetes则可以自动创建相应的pv并进行bond。
二、nfs-storageClass使用
使用动态卷,我们需要用到storageClass,其中每一个storageClass都会存在一个制备器(Provisioner),其支持的插件包括AzureFile、CephFS、NFS等,其中有一些是内制Provisioner,具体可以参考官网:
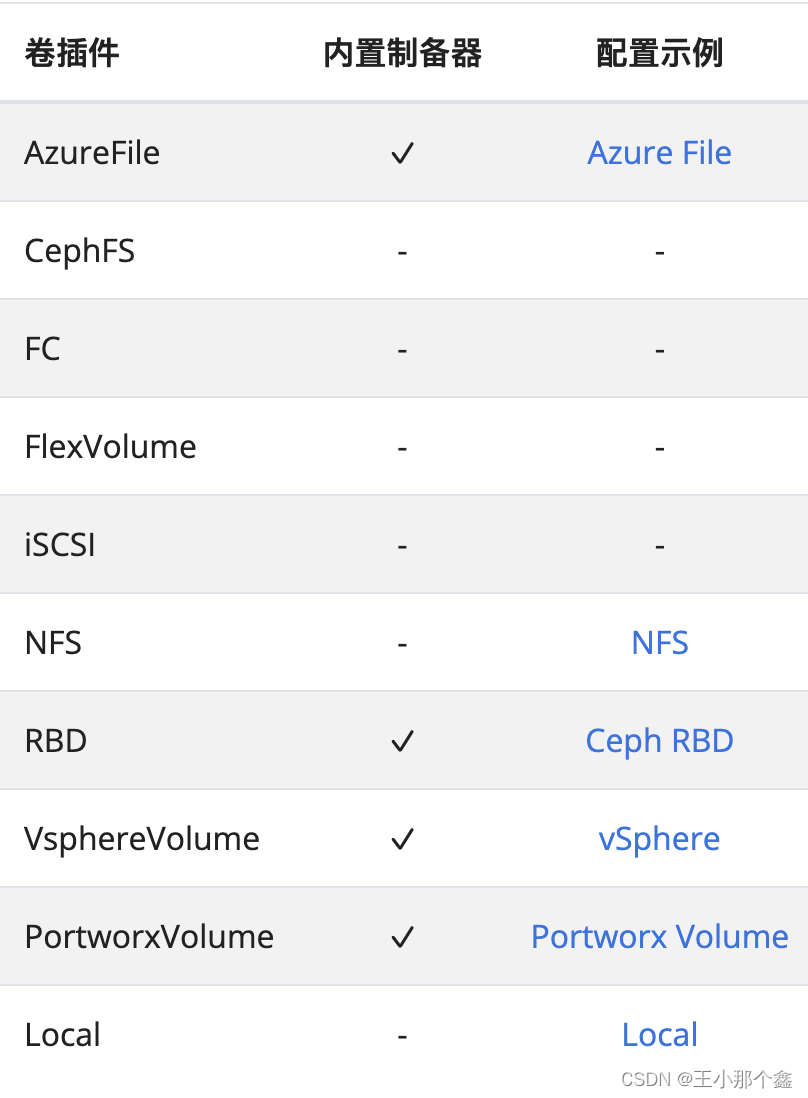
在我们测试甚至使用来说,nfs的方式是最方便的,但是从上图可以看出,nfs的Proisioner不是内置制备器。因此,我们需要使用外部驱动器来创建storageClass,这里我们根据官网的推荐,部署了NFS subdir外部驱动:
1.配置nfs服务(可以使用nas存储,测试则可以使用服务器充当nas,这里我们用服务器来用作nas):
#安装nfs服务
yum -y install rpcbind nfs-utils
#写入配置文件
echo '/home/nfsdata/k8s_public *(rw,no_root_squash,no_all_squash,sync)' >> /etc/exportfs
#启动服务
systemctl enable --now nfs
#验证挂载
showmount -e
2.安装驱动:
从github上的项目中的deploy中找到rbac.yaml、deployment.yaml、class.yaml,这里我们可以将驱动放在一个单独的namespace中,所以我们需要先创建一个namespace:
apiVersion: v1
kind: Namespace
metadata:name: nfs-provisioner
修改项目中的rbac.yaml文件,加入namespace配置:
#rbac.ymal
apiVersion: v1
kind: ServiceAccount
metadata:name: nfs-client-provisioner# replace with namespace where provisioner is deployednamespace: nfs-provisioner
---
kind: ClusterRole
apiVersion: rbac.authorization.k8s.io/v1
metadata:name: nfs-client-provisioner-runner
rules:- apiGroups: [""]resources: ["nodes"]verbs: ["get", "list", "watch"]- apiGroups: [""]resources: ["persistentvolumes"]verbs: ["get", "list", "watch", "create", "delete"]- apiGroups: [""]resources: ["persistentvolumeclaims"]verbs: ["get", "list", "watch", "update"]- apiGroups: ["storage.k8s.io"]resources: ["storageclasses"]verbs: ["get", "list", "watch"]- apiGroups: [""]resources: ["events"]verbs: ["create", "update", "patch"]
---
kind: ClusterRoleBinding
apiVersion: rbac.authorization.k8s.io/v1
metadata:name: run-nfs-client-provisioner
subjects:- kind: ServiceAccountname: nfs-client-provisioner# replace with namespace where provisioner is deployednamespace: nfs-provisioner
roleRef:kind: ClusterRolename: nfs-client-provisioner-runnerapiGroup: rbac.authorization.k8s.io
---
kind: Role
apiVersion: rbac.authorization.k8s.io/v1
metadata:name: leader-locking-nfs-client-provisioner# replace with namespace where provisioner is deployednamespace: nfs-provisioner
rules:- apiGroups: [""]resources: ["endpoints"]verbs: ["get", "list", "watch", "create", "update", "patch"]
---
kind: RoleBinding
apiVersion: rbac.authorization.k8s.io/v1
metadata:name: leader-locking-nfs-client-provisioner# replace with namespace where provisioner is deployednamespace: nfs-provisioner
subjects:- kind: ServiceAccountname: nfs-client-provisioner# replace with namespace where provisioner is deployednamespace: nfs-provisioner
roleRef:kind: Rolename: leader-locking-nfs-client-provisionerapiGroup: rbac.authorization.k8s.io
修改deployment.yaml文件,加入namespace,修改镜像仓库位置,加入namespace,修改镜像仓库,修改nas的ip和目录:
apiVersion: apps/v1
kind: Deployment
metadata:name: nfs-client-provisionerlabels:app: nfs-client-provisioner# replace with namespace where provisioner is deployednamespace: nfs-provisioner
spec:replicas: 1strategy:type: Recreateselector:matchLabels:app: nfs-client-provisionertemplate:metadata:labels:app: nfs-client-provisionerspec:serviceAccountName: nfs-client-provisionercontainers:- name: nfs-client-provisioner#image: registry.k8s.io/sig-storage/nfs-subdir-external-provisioner:v4.0.2image: dyrnq/nfs-subdir-external-provisioner:v4.0.2volumeMounts:- name: nfs-client-rootmountPath: /persistentvolumesenv:- name: PROVISIONER_NAMEvalue: k8s-sigs.io/nfs-subdir-external-provisioner- name: NFS_SERVERvalue: 172.16.220.3- name: NFS_PATHvalue: /home/nfsdata/k8s_publicvolumes:- name: nfs-client-rootnfs:server: 172.16.220.3path: /home/nfsdata/k8s_public
查看stroageClass
apiVersion: storage.k8s.io/v1
kind: StorageClass
metadata:name: nfs-client
provisioner: k8s-sigs.io/nfs-subdir-external-provisioner # or choose another name, must match deployment's env PROVISIONER_NAME'
parameters:archiveOnDelete: "false"
依次执行上述文件:
kubectl apply -f namespace.yaml && \
kubectl apply -f rbac.yaml && \
kubectl apply -f deployment.yaml && \
kubectl apply -f class.yaml
查看验证:
kubectl get deployment -A|grep nfs && \
kubectl get pods -A|grep nfs && \
kubectl get storageclass


