目录
Nginx简介
概述
Nginx和Apache 的比较
nginx相对于apache的优点
apache相对于nginx的优点
Nginx作为web服务器与Apache比较
Linux 中的 I/O
磁盘 I/O buff/cache的区别
同步/异步
阻塞/非阻塞
异步非阻塞 I/O模型
nginx 实验操作举例,优先将防火墙和安全终端全部关闭
编译安装 nginx
添加 nginx服务脚本
nginx平滑升级的步骤
临时/永久修改最大并发
修改配置文件最大文件打开数
nginx 的 root和alias 指定路径的区别
nginx 访问状态统计
nginx 授权访问控制
基于域名的 Nginx 虚拟主机
基于IP 的 Nginx 虚拟主机
基于端口的 Nginx 虚拟主机
nginx 客户端访问控制
Nginx简介
概述
-
Nginx是一个高性能的HTTP和反向代理服务器。
-
是一款轻量级的高性能的web服务器/反向代理服务器/电子邮件(IMAP/POP3)代理服务器
-
单台物理服务器可支持30 000~50 000个并发请求。
Nginx和Apache 的比较
nginx相对于apache的优点
-
轻量级,同样起web服务,比apache占用更少的内存及资源
-
抗并发,nginx处理请求是异步非阻塞的,而apache是阻塞型的在高并发下,nginx能保持低资
-
源低消耗高性能
-
高度模块化的设计,编写模块相对简
apache相对于nginx的优点
-
Rewrite比nginx的rewrite强大 (rewrite的主要功能就是实现统一资源定位符URL的跳转)
-
模块多,基本想到的都可以找到
-
少bug, nginx的bug相对较多
-
超稳定
—— 存在的理由:一般来说,需要性能的web服务,用nginx;若不需要性能只求稳定,就选用apache
Nginx作为web服务器与Apache比较
相比apache,nginx使用更少的资源,支持更多的并发连接,体现更高的效率
-
Nginx 作为负载均衡服务器:nginx既可以在内部直接支持 rails和php 程序对外进行服务,也可以支持http代理服务器对外进行服务
-
Nginx 采用 C进行编写,不论是系统资源开销还是 CPU使用效率都比较好
-
作为邮件代理服务器:最早开发这个产品的目的之一也是作为邮件代理服务器
-
apache 是同步多进程模型,一个连接对应一个进程,nginx是异步的,多个连接可以对应一个进程
-
Nginx 处理静态文件好,耗费内存少,只适合静态和反向
-
Apache 在处理动态有优势
-
nginx 并发性比较好,CPU占用内存低,如果 rewrite频繁,选用 apache最佳
-
总的来说,apache依然是大部分公司的首选
Linux 中的 I/O
—— I/O在计算机中指 Input/Output,lOPS (Input/Output Per Second)即每秒的输入输出量(或读写次数),是衡量磁盘性能的主要指标之一。IOPS是指单位时间内系统能处理的I/O请求数量,一般以每秒处理的 I/O请求数量为单位,I/O请求通常为读或写数据操作请求
—— 一次完整的 I/O是用户空间的进程数据与内核空间的内核数据的报文的完整交换,但是由于内核空间与用户空间是严格隔离的,所以其数据交换过程中不能由用户空间的进程直接调用内核空间的内存数据,而是需要经历一次从内核空间中的内存数据 copy到用户空间的进程内存当中,所以简单说 I/O就是把数据从内核空间中的内存数据复制到用户空间中进程的内存当中
磁盘 I/O buff/cache的区别

—— 网络 I/O:一切皆文件,本质为对 socket文件的读写 ——
获取请求数据,客户端与服务器建立连接发出请求,服务器接受请求(1-3)
构建响应,当服务器接收完请求,并在用户空间处理客户端的请求,直到构建响应完成(4)
返回数据,服务器将已构建好的响应再通过内核空间的网络I/0发还给客户端(5-7)
同步/异步
关注的是消息通信机制,即调用者在等待一件事情的处理结果时,被调用者是否提供完成状态的通知。
—— 同步:synchronous,被调用者并不提供事件的处理结果相关的通知消息,需要调用者主动询问事情是否处理完成
—— 异步:asynchronous,被调用者通过状态、通知或回调机制主动通知调用者被调用者的运行状态
阻塞/非阻塞
关注调用者在等待结果返回之前所处的状态
—— 阻塞:blocking,指 IO操作需要彻底完成后才返回到用户空间,调用结果返回之前,调用者被挂起,干不了别的事情。
—— 非阻塞:nonblocking,指 IO操作被调用后立即返回给用户一个状态值,而无需等到 IO操作彻底完成,在最终的调用结果返回之前,调用者不会被挂起,可以去做别的事情
异步非阻塞 I/O模型

nginx 实验操作举例,优先将防火墙和安全终端全部关闭
编译安装 nginx
#从官网中下载 nginx安装包
[root@localhost opt]# ls
nginx-1.24.0.tar.gz#解压安装包
[root@localhost opt]# tar xf nginx-1.24.0.tar.gz
[root@localhost opt]# ls
nginx-1.24.0 nginx-1.24.0.tar.gz#yum安装编译环境
[root@localhost opt]# yum -y install pcre-devel zlib-devel openssl-devel gcc gcc-c++ make#新建程序用户
[root@localhost opt]# useradd -M -s /sbin/nologin nginx#创建文件夹
[root@localhost opt]# mkdir -p /apps/nginx#cd到 nginx-1.24.0目录,并进行编译安装
[root@localhost opt]# cd nginx-1.24.0/
[root@localhost nginx-1.24.0]# ./configure --prefix=/usr/local/nginx --user=nginx --group=nginx --with-http_stub_status_module
[root@localhost nginx-1.24.0]# make -j 4 && make install#给 nginx建立软链接
[root@localhost nginx-1.24.0]# ln -s /usr/local/nginx/sbin/nginx /usr/local/sbin/#检查 nginx配置文件是否正确
[root@localhost nginx-1.24.0]# nginx -t
nginx: the configuration file /usr/local/nginx/conf/nginx.conf syntax is ok
nginx: configuration file /usr/local/nginx/conf/nginx.conf test is successful#开启 nginx服务,并查看 nginx服务是否开启以及 nginx的PID号
[root@localhost nginx-1.24.0]# nginx
[root@localhost nginx-1.24.0]# ss -natp|grep nginx
LISTEN 0 128 *:80 *:* users:(("nginx",pid=46089,fd=6),("nginx",pid=46088,fd=6))
添加 nginx服务脚本
#进入目录编写脚本
[root@localhost nginx-1.24.0]# vim /etc/init.d/nginx#添加脚本
#!/bin/bash
#chkconfig: - 99 20
#description:Nginx Service Control Script
COM="/usr/local/nginx/sbin/nginx"
PID="/usr/local/nginx/logs/nginx.pid"
case "$1" in
start)
$COM
;;stop)
kill -s QUIT $(cat $PID)
;;restart)
$0 stop
$0 start
;;reload)
kill -s HUP $(cat $PID)
;;*)
echo "Usage: $0 {start|stop|restart|reload}"
exit 1esac
exit 0#赋予服务运行权限
[root@localhost nginx-1.24.0]# chmod +x /etc/init.d/nginx#将 nginx服务添加到系统的服务
[root@localhost nginx-1.24.0]# chkconfig --add nginx#重启 nginx服务
[root@localhost nginx-1.24.0]# systemctl restart nginx#查看 nginx服务是否开启
[root@localhost nginx-1.24.0]# systemctl status nginx
● nginx.service - SYSV: Nginx Service Control Script
Loaded: loaded (/etc/rc.d/init.d/nginx; bad; vendor preset: disabled)
Active: active (exited) since 日 2023-12-10 14:40:52 CST; 35s ago
Docs: man:systemd-sysv-generator(8)
Process: 46199 ExecStart=/etc/rc.d/init.d/nginx start (code=exited, status=0/SUCCESS)
nginx平滑升级的步骤
#查看 nginx服务的当前版本 [root@localhost ~]# nginx -v nginx version: nginx/1.24.0 #从官网中下载 1.25.3的版本,并解压 [root@localhost opt]# ls nginx-1.24.0 nginx-1.24.0.tar.gz nginx-1.25.3.tar.gz [root@localhost opt]# tar xf nginx-1.25.3.tar.gz [root@localhost opt]# ls nginx-1.24.0 nginx-1.24.0.tar.gz nginx-1.25.3 nginx-1.25.3.tar.gz #cd到 nginx-1.25.3目录,并进行编译安装 [root@localhost opt]# cd nginx-1.25.3/ [root@localhost nginx-1.25.3]# ./configure --prefix=/usr/local/nginx --user=nginx --group=nginx --with-http_stub_status_module [root@localhost nginx-1.25.3]# make -j 4 #将旧版本改名 [root@localhost nginx-1.25.3]# mv /usr/local/nginx/sbin/nginx /usr/local/nginx/sbin/nginx_old #将新版本 nginx复制到之前的 nginx下 [root@localhost nginx-1.25.3]# cp objs/nginx /usr/local/nginx/sbin/nginx #要保证当前 nginx 进程是通过 /usr/local/nginx/sbin/nginx 启动的,而不是通过查找环境变量中那个 nginx 命令启动的 [root@localhost nginx-1.25.3]# make upgrade /usr/local/nginx/sbin/nginx -t nginx: the configuration file /usr/local/nginx/conf/nginx.conf syntax is ok nginx: configuration file /usr/local/nginx/conf/nginx.conf test is successful kill -USR2 `cat /usr/local/nginx/logs/nginx.pid` sleep 1 test -f /usr/local/nginx/logs/nginx.pid.oldbin #查看版本是否更新成功 [root@localhost nginx-1.25.3]# nginx -v nginx version: nginx/1.25.3
临时/永久修改最大并发
#临时修改,重启虚拟机就会恢复默认 #查看当前最大并发 [root@localhost ~]# ulimit -a core file size (blocks, -c) 0 data seg size (kbytes, -d) unlimited scheduling priority (-e) 0 file size (blocks, -f) unlimited pending signals (-i) 14974 max locked memory (kbytes, -l) 64 max memory size (kbytes, -m) unlimited open files (-n) 1024 #默认为1024 pipe size (512 bytes, -p) 8 POSIX message queues (bytes, -q) 819200 real-time priority (-r) 0 stack size (kbytes, -s) 8192 cpu time (seconds, -t) unlimited max user processes (-u) 14974 virtual memory (kbytes, -v) unlimited file locks (-x) unlimited #临时修改最大并发为 6000 [root@localhost ~]# ulimit -n 6000 [root@localhost ~]# ulimit -a core file size (blocks, -c) 0 data seg size (kbytes, -d) unlimited scheduling priority (-e) 0 file size (blocks, -f) unlimited pending signals (-i) 14974 max locked memory (kbytes, -l) 64 max memory size (kbytes, -m) unlimited open files (-n) 6000 #修改成功 pipe size (512 bytes, -p) 8 POSIX message queues (bytes, -q) 819200 real-time priority (-r) 0 stack size (kbytes, -s) 8192 cpu time (seconds, -t) unlimited max user processes (-u) 14974 virtual memory (kbytes, -v) unlimited file locks (-x) unlimited #永久修改 #进入配置文件永久修改 [root@localhost ~]# vim /etc/security/limits.conf #在文件的最后一行添加两行 #硬限制最大并发 * hard nofile 65535 #软限制最大并发 * soft nofile 65535 #重启虚拟机 [root@localhost ~]# reboot #查看 [root@localhost ~]# ulimit -a core file size (blocks, -c) 0 data seg size (kbytes, -d) unlimited scheduling priority (-e) 0 file size (blocks, -f) unlimited pending signals (-i) 14974 max locked memory (kbytes, -l) 64 max memory size (kbytes, -m) unlimited open files (-n) 65535 #修改成功 pipe size (512 bytes, -p) 8 POSIX message queues (bytes, -q) 819200 real-time priority (-r) 0 stack size (kbytes, -s) 8192 cpu time (seconds, -t) unlimited max user processes (-u) 14974 virtual memory (kbytes, -v) unlimited file locks (-x) unlimited
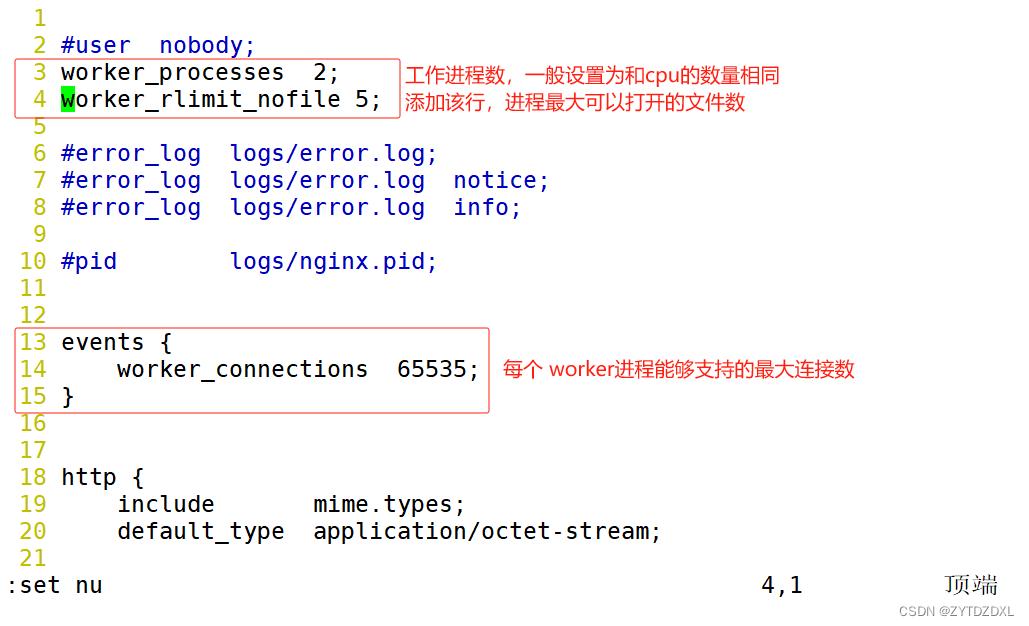
修改配置文件最大文件打开数
#进入配置文件并进行修改添加
[root@localhost nginx-1.25.3]# vim /usr/local/nginx/conf/nginx.conf
#检查配置文件语法是否有误
[root@localhost nginx-1.25.3]# nginx -t
nginx: the configuration file /usr/local/nginx/conf/nginx.conf syntax is ok
nginx: configuration file /usr/local/nginx/conf/nginx.conf test is successful
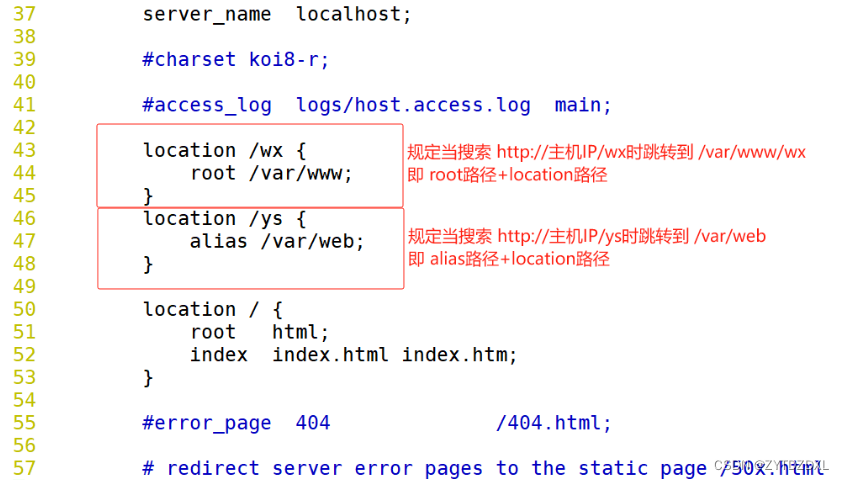
nginx 的 root和alias 指定路径的区别
#进入 nginx配置文件,并进行添加修改
[root@localhost ~]# vim /usr/local/nginx/conf/nginx.conf
#重新加载 nginx
[root@localhost ~]# systemctl reload nginx#进入目录 var
[root@localhost ~]# cd /var#递归创建目录
[root@localhost var]# mkdir -p /var/www/wx
[root@localhost var]# mkdir -p /var/web#进入目录 www
[root@localhost var]# cd www
[root@localhost www]# ls
wx#往目录 www/wx中添加文件 1.html并自定义内容
[root@localhost www]# echo 'this is wx' > wx/1.html#进入目录 web
[root@localhost www]# cd /var/web#往目录 web中添加文件 1.html并自定义内容
[root@localhost web]# echo 'this is alias' > 1.html
[root@localhost web]# ls
1.html
—— 实验结果 ——


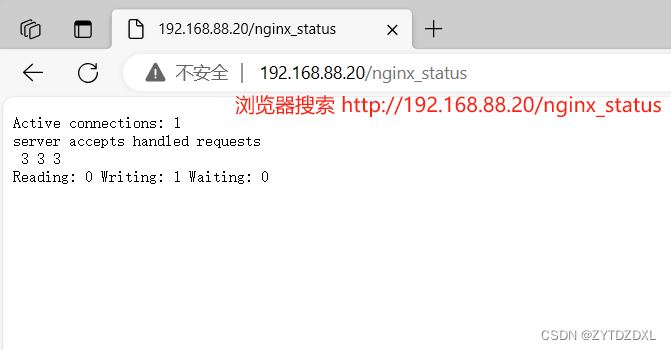
nginx 访问状态统计
#查看 nginx是否有--with-http_stub_status_module模块,若没有重新编译此模块 [root@localhost ~]# nginx -V nginx version: nginx/1.25.3 built by gcc 4.8.5 20150623 (Red Hat 4.8.5-44) (GCC) configure arguments: --prefix=/usr/local/nginx --user=nginx --group=nginx --with-http_stub_status_module #进入配置文件 [root@localhost ~]# vim /usr/local/nginx/conf/nginx.conf

#重新加载 nginx
[root@localhost ~]# systemctl reload nginx
—— 实验结果 ——
注释
-
Active connections :表示当前的活动连接数,即当前与 Nginx 服务器建立的连接数。
-
server accepts handled requests :表示已经处理的连接信息
-
三个数字依次表示服务器已接收的连接数;服务器成功处理的连接数;服务器累计处理的总请求数(在保持连接模式下,请求数量可能会大于连接数量)
-
Reading :表示当前正在从客户端读取数据的连接数
-
Writing :表示当前正在向客户端写入数据的连接数
-
Waiting :表示当前空闲并等待请求的连接数
nginx 授权访问控制
#安装密码认证文件 [root@localhost ~]# yum install -y httpd-tools #添加自定义用户 [root@localhost ~]# htpasswd -c /usr/local/nginx/passwd.db wx New password:#输入密码 Re-type new password:#确认密码 Adding password for user wx #设置密码文件所属 [root@localhost ~]# chown nginx /usr/local/nginx/passwd.db #赋权 [root@localhost ~]# chmod 400 /usr/local/nginx/passwd.db #进入配置文件 [root@localhost ~]# vim /usr/local/nginx/conf/nginx.conf

#重启服务
[root@localhost ~]# systemctl restart nginx#检查文件格式是否有误
[root@localhost ~]# nginx -t
nginx: the configuration file /usr/local/nginx/conf/nginx.conf syntax is ok
nginx: configuration file /usr/local/nginx/conf/nginx.conf test is successful
—— 实验结果 ——
—— 浏览器搜索 http://192.168.88.20 出现以下界面实验成功


基于域名的 Nginx 虚拟主机
为虚拟主机提供域名解析
echo "192.168.80.10 www.kgc.com www.benet.com" >> /etc/hosts
为虚拟主机准备网页文档
mkdir -p /var/www/html/benet
mkdir -p /var/www/html/kgc
echo "<h1>www.kgc.com</h1>" > /var/www/html/kgc/index.html
echo "<h1>www.benet.com</h1>" > /var/www/html/benet/index.html
修改Nginx的配置文件
vim /usr/local/nginx/conf/nginx.conf
http {
......server {listen 80;server_name www.kgc.com; #设置域名www.kgc.comcharset utf-8;access_log logs/www.kgc.access.log; #设置日志名location / {root /var/www/html/kgc; #设置www.kgc.com 的工作目录index index.html index.php;}server {listen 80;server_name www.benet.com; #设置域名www.benet.comcharset utf-8;access_log logs/www.benet.access.log; location / {root /var/www/html/benet;index index.html index.php;}重启服务,访问测试
systemctl restart nginx
浏览器访问
http://www.kgc.com
http://www.benet.com
基于IP 的 Nginx 虚拟主机
ifconfig ens33:0 192.168.80.11 netmask 255.255.255.0
修改Nginx的配置文件
vim /usr/local/nginx/conf/nginx.conf
http {
......
server {
listen 192.168.80.10:80; #设置监听地址192.168.80.10
server_name www.kgc.com;
charset utf-8;
access_log logs/www.kgc.access.log;
location / {
root /var/www/html/kgc;
index index.html index.php;
}server {
listen 192.168.80.11:80; #设置监听地址192.168.80.11
server_name www.benet.com;
charset utf-8;
access_log logs/www.benet.access.log;
location / {
root /var/www/html/benet;
index index.html index.php;
}重启服务,访问测试
systemctl restart nginx浏览器访问
http://192.168.80.10
http://192.168.80.11
基于端口的 Nginx 虚拟主机
修改Nginx的配置文件
vim /usr/local/nginx/conf/nginx.conf
http {
......server {listen 192.168.80.10:8080; #设置监听 8080 端口server_name www.kgc.com;charset utf-8;access_log logs/www.kgc.access.log; location / {root /var/www/html/kgc;index index.html index.php;}
server {listen 192.168.80.10:8888; #设置监听 8888 端口server_name www.benet.com;charset utf-8;access_log logs/www.benet.access.log; location / {root /var/www/html/benet;index index.html index.php;}
重启服务,访问测试
systemctl restart nginx
浏览器访问
http://192.168.80.11:8080
http://192.168.80.11:8888
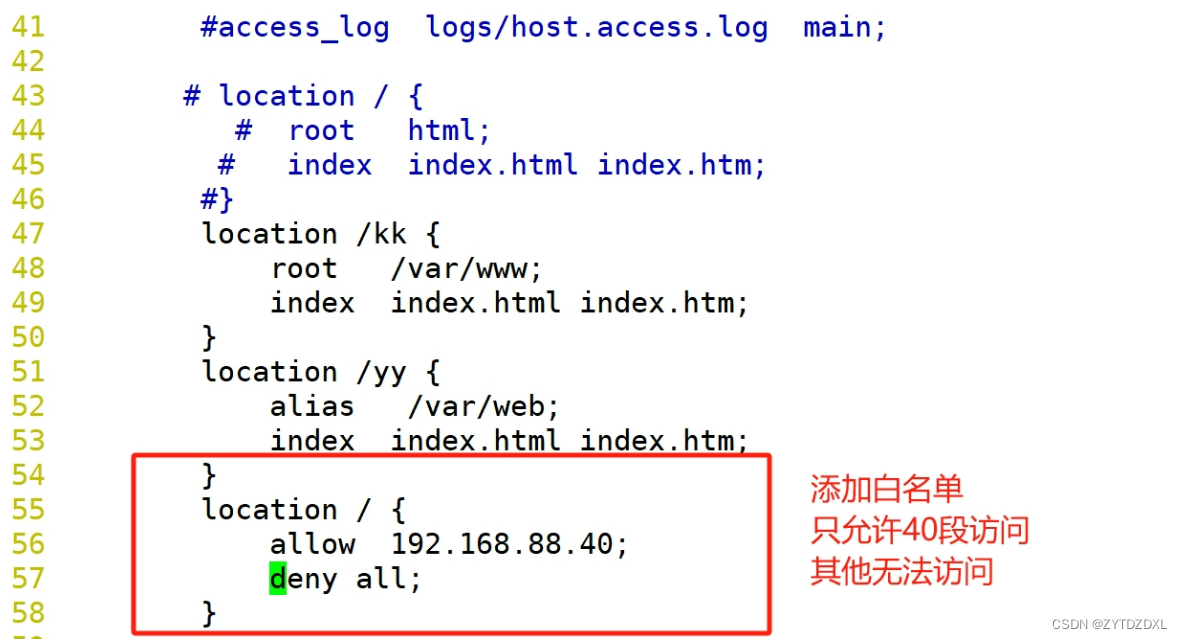
nginx 客户端访问控制
—— 规则从上往下执行,如匹配则停止,不再往下匹配
-
deny IP/IP 段 :拒绝某个 IP 或 IP 段的客户端访问
-
allow IP/IP 段 :允许某个 IP 或 IP 段的客户端访问
#进入配置文件
[root@localhost ~]# vim /usr/local/nginx/conf/nginx.conf
#重启服务
[root@localhost ~]# systemctl restart nginx


