Use Pre-trained models for Image Classification.
# This post is rectified on the base of https://learnopencv.com/pytorch-for-beginners-image-classification-using-pre-trained-models/# And we have re-orginaized the code script.
预训练模型(Pre-trained models)是在ImageNet等大型基准数据集上训练的神经网络模型。深度学习社区从这些开源模型中受益匪浅。此外,预训练模型也是计算机视觉研究取得快速进展的一个重要因素。其他研究人员和从业人员可以使用这些最先进的模型,而不是从头开始重新训练。
# Here are some examples of classic pre-trained models.

在详细介绍如何使用预训练模型进行图像分类之前,我们先来看看有哪些预训练模型。我们将以 AlexNet 和 ResNet101 为例进行讨论。这两个网络都在 ImageNet 数据集上训练过。
ImageNet 数据集拥有超过 1400 万张由斯坦福大学维护的图像。它被广泛用于各种与图像相关的深度学习项目。这些图像属于不同的类别或标签。预训练模型(如 AlexNet 和 ResNet101)的目的是将图像作为输入并预测其类别。
这里的 "预训练 "是指,深度学习架构 AlexNet 和 ResNet101 已经在某个(庞大的)数据集上进行过训练,因此带有由此产生的权重和偏差。架构与权重和偏置之间的区别应该非常明显,因为我们将在下一节看到,TorchVision 同时拥有架构和预训练模型。
1.1 Model Inference Process
由于我们将重点讨论如何使用预先训练好的模型来预测输入的类别(标签),因此我们也来讨论一下其中涉及的过程。这个过程被称为模型推理。整个过程包括以下主要步骤:
(1) 读取输入图像;
(2) 对图像进行转换;例如resize、center crop、normalization等;
(3) 前向传递:使用预训练的模型权重来获得输出向量,而输出向量中的每个元素都描述了模型对于输入图像属于特定类别的置信度预测结果;
(4) 预测结果:基于获得的置信度分数,显示预测结果。
1.2 Loading Pre-Trained Network using TorchVision
# [Optinal Step]
# %pip install torchvision
# Load necessary packages.
from PIL import Image
import torch
import torchvision
from torchvision import models
from torchvision import transformsprint(torch.__version__)
print(torchvision.__version__)
2.0.0
0.15.0
# Check the different models and architectures available to us.
dir(models)
['AlexNet','AlexNet_Weights','ConvNeXt','ConvNeXt_Base_Weights','ConvNeXt_Large_Weights','ConvNeXt_Small_Weights','ConvNeXt_Tiny_Weights','DenseNet','DenseNet121_Weights','DenseNet161_Weights','DenseNet169_Weights','DenseNet201_Weights','EfficientNet','EfficientNet_B0_Weights','EfficientNet_B1_Weights','EfficientNet_B2_Weights','EfficientNet_B3_Weights','EfficientNet_B4_Weights','EfficientNet_B5_Weights','EfficientNet_B6_Weights','EfficientNet_B7_Weights','EfficientNet_V2_L_Weights','EfficientNet_V2_M_Weights','EfficientNet_V2_S_Weights','GoogLeNet','GoogLeNetOutputs','GoogLeNet_Weights','Inception3','InceptionOutputs','Inception_V3_Weights','MNASNet','MNASNet0_5_Weights','MNASNet0_75_Weights','MNASNet1_0_Weights','MNASNet1_3_Weights','MaxVit','MaxVit_T_Weights','MobileNetV2','MobileNetV3','MobileNet_V2_Weights','MobileNet_V3_Large_Weights','MobileNet_V3_Small_Weights','RegNet','RegNet_X_16GF_Weights','RegNet_X_1_6GF_Weights','RegNet_X_32GF_Weights','RegNet_X_3_2GF_Weights','RegNet_X_400MF_Weights','RegNet_X_800MF_Weights','RegNet_X_8GF_Weights','RegNet_Y_128GF_Weights','RegNet_Y_16GF_Weights','RegNet_Y_1_6GF_Weights','RegNet_Y_32GF_Weights','RegNet_Y_3_2GF_Weights','RegNet_Y_400MF_Weights','RegNet_Y_800MF_Weights','RegNet_Y_8GF_Weights','ResNeXt101_32X8D_Weights','ResNeXt101_64X4D_Weights','ResNeXt50_32X4D_Weights','ResNet','ResNet101_Weights','ResNet152_Weights','ResNet18_Weights','ResNet34_Weights','ResNet50_Weights','ShuffleNetV2','ShuffleNet_V2_X0_5_Weights','ShuffleNet_V2_X1_0_Weights','ShuffleNet_V2_X1_5_Weights','ShuffleNet_V2_X2_0_Weights','SqueezeNet','SqueezeNet1_0_Weights','SqueezeNet1_1_Weights','SwinTransformer','Swin_B_Weights','Swin_S_Weights','Swin_T_Weights','Swin_V2_B_Weights','Swin_V2_S_Weights','Swin_V2_T_Weights','VGG','VGG11_BN_Weights','VGG11_Weights','VGG13_BN_Weights','VGG13_Weights','VGG16_BN_Weights','VGG16_Weights','VGG19_BN_Weights','VGG19_Weights','ViT_B_16_Weights','ViT_B_32_Weights','ViT_H_14_Weights','ViT_L_16_Weights','ViT_L_32_Weights','VisionTransformer','Weights','WeightsEnum','Wide_ResNet101_2_Weights','Wide_ResNet50_2_Weights','_GoogLeNetOutputs','_InceptionOutputs','__builtins__','__cached__','__doc__','__file__','__loader__','__name__','__package__','__path__','__spec__','_api','_meta','_utils','alexnet','convnext','convnext_base','convnext_large','convnext_small','convnext_tiny','densenet','densenet121','densenet161','densenet169','densenet201','detection','efficientnet','efficientnet_b0','efficientnet_b1','efficientnet_b2','efficientnet_b3','efficientnet_b4','efficientnet_b5','efficientnet_b6','efficientnet_b7','efficientnet_v2_l','efficientnet_v2_m','efficientnet_v2_s','get_model','get_model_builder','get_model_weights','get_weight','googlenet','inception','inception_v3','list_models','maxvit','maxvit_t','mnasnet','mnasnet0_5','mnasnet0_75','mnasnet1_0','mnasnet1_3','mobilenet','mobilenet_v2','mobilenet_v3_large','mobilenet_v3_small','mobilenetv2','mobilenetv3','optical_flow','quantization','regnet','regnet_x_16gf','regnet_x_1_6gf','regnet_x_32gf','regnet_x_3_2gf','regnet_x_400mf','regnet_x_800mf','regnet_x_8gf','regnet_y_128gf','regnet_y_16gf','regnet_y_1_6gf','regnet_y_32gf','regnet_y_3_2gf','regnet_y_400mf','regnet_y_800mf','regnet_y_8gf','resnet','resnet101','resnet152','resnet18','resnet34','resnet50','resnext101_32x8d','resnext101_64x4d','resnext50_32x4d','segmentation','shufflenet_v2_x0_5','shufflenet_v2_x1_0','shufflenet_v2_x1_5','shufflenet_v2_x2_0','shufflenetv2','squeezenet','squeezenet1_0','squeezenet1_1','swin_b','swin_s','swin_t','swin_transformer','swin_v2_b','swin_v2_s','swin_v2_t','vgg','vgg11','vgg11_bn','vgg13','vgg13_bn','vgg16','vgg16_bn','vgg19','vgg19_bn','video','vision_transformer','vit_b_16','vit_b_32','vit_h_14','vit_l_16','vit_l_32','wide_resnet101_2','wide_resnet50_2']
以AlexNet为例,我们可以看到还有一个名称为alexnet的条目。其中,大写的名称是Python类(AlexNet),而alexnet是一个便于操作的函数(convenience function),用于从AlexNet类返回实例化的模型。
这些方便函数也可以有不同的参数集,例如:densenet121、densenet161、densenet169以及densenet201,都是DenseNet的实例,但层数分别为121,161,169和201.
1.3. Using AlexNet for Image Classification
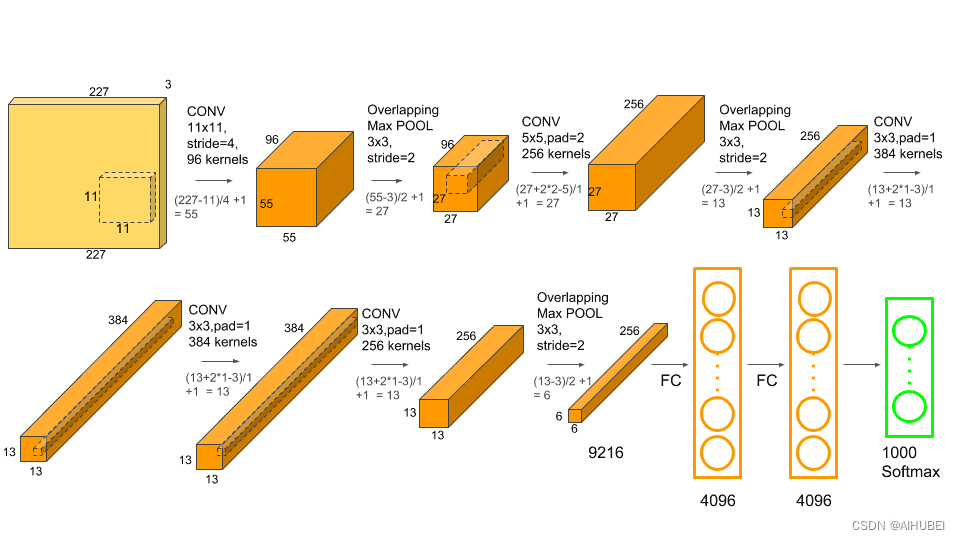
AlexnetNet是图像识别领域早期的一个突破性网络结构,相关文章可以参考Understanding Alexnet。该网络架构如下:
Step 1: Load the pre-trained model
# Create an instance of the network.
alexnet = models.alexnet(pretrained=True)
/home/wsl_ubuntu/anaconda3/envs/xy_trans/lib/python3.8/site-packages/torchvision/models/_utils.py:208: UserWarning: The parameter 'pretrained' is deprecated since 0.13 and may be removed in the future, please use 'weights' instead.warnings.warn(
/home/wsl_ubuntu/anaconda3/envs/xy_trans/lib/python3.8/site-packages/torchvision/models/_utils.py:223: UserWarning: Arguments other than a weight enum or `None` for 'weights' are deprecated since 0.13 and may be removed in the future. The current behavior is equivalent to passing `weights=AlexNet_Weights.IMAGENET1K_V1`. You can also use `weights=AlexNet_Weights.DEFAULT` to get the most up-to-date weights.warnings.warn(msg)
# Note: Pytorch模型的扩展名通常为.pt或.pth
# Check the model details.
print(alexnet)
AlexNet((features): Sequential((0): Conv2d(3, 64, kernel_size=(11, 11), stride=(4, 4), padding=(2, 2))(1): ReLU(inplace=True)(2): MaxPool2d(kernel_size=3, stride=2, padding=0, dilation=1, ceil_mode=False)(3): Conv2d(64, 192, kernel_size=(5, 5), stride=(1, 1), padding=(2, 2))(4): ReLU(inplace=True)(5): MaxPool2d(kernel_size=3, stride=2, padding=0, dilation=1, ceil_mode=False)(6): Conv2d(192, 384, kernel_size=(3, 3), stride=(1, 1), padding=(1, 1))(7): ReLU(inplace=True)(8): Conv2d(384, 256, kernel_size=(3, 3), stride=(1, 1), padding=(1, 1))(9): ReLU(inplace=True)(10): Conv2d(256, 256, kernel_size=(3, 3), stride=(1, 1), padding=(1, 1))(11): ReLU(inplace=True)(12): MaxPool2d(kernel_size=3, stride=2, padding=0, dilation=1, ceil_mode=False))(avgpool): AdaptiveAvgPool2d(output_size=(6, 6))(classifier): Sequential((0): Dropout(p=0.5, inplace=False)(1): Linear(in_features=9216, out_features=4096, bias=True)(2): ReLU(inplace=True)(3): Dropout(p=0.5, inplace=False)(4): Linear(in_features=4096, out_features=4096, bias=True)(5): ReLU(inplace=True)(6): Linear(in_features=4096, out_features=1000, bias=True))
)
Step 2: Specify image transformations
# Use transforms to compose all the data transformations.
transform = transforms.Compose([transforms.Resize(256), transforms.CenterCrop(224),transforms.ToTensor(),transforms.Normalize(mean=[0.485, 0.456, 0.406],std=[0.229, 0.224, 0.225])])     # Three numbers for RGB Channels.
# transforms.Resize: Resize the input images to 256x256 pixels.
# transforms.CenterCrop: Crop the image to 224×224 pixels about the center.
# transforms.Normalize: Normalize the image by setting its mean and standard deviation to the specified values.
# transforms.ToTensor: Convert the image to Pytorch tensor datatype.
Step 3: Load the input image and pre-process it.
# Download image
# !wget https://upload.wikimedia.org/wikipedia/commons/2/26/YellowLabradorLooking_new.jpg -O dog.jpg
img = Image.open("./dog.jpg")
img

# Pre-process the image.
trans_img = transform(img)img_batch = torch.unsqueeze(trans_img, 0)
Step 4: Model Inference
# Set the model to eval model.
alexnet.eval()out = alexnet(img_batch)
print(out.shape)
torch.Size([1, 1000])
# Download classes text file
!wget https://raw.githubusercontent.com/Lasagne/Recipes/master/examples/resnet50/imagenet_classes.txt
--2023-12-14 21:30:09--  https://raw.githubusercontent.com/Lasagne/Recipes/master/examples/resnet50/imagenet_classes.txt
Resolving raw.githubusercontent.com (raw.githubusercontent.com)... 0.0.0.0, ::
Connecting to raw.githubusercontent.com (raw.githubusercontent.com)|0.0.0.0|:443... failed: Connection refused.
Connecting to raw.githubusercontent.com (raw.githubusercontent.com)|::|:443... failed: Connection refused.
# Load labels.
with open('imagenet_classes.txt') as f:classes = [line.strip() for line in f.readlines()]
# Find out the maximum score.
_, index = torch.max(out, 1)
percentage = torch.nn.functional.softmax(out, dim=1)[0] * 100
print(classes[index[0]], percentage[index[0]].item())
Labrador retriever 41.58513259887695
# The model predicts the image to be of a Labrador Retriever with a 41.58% confidence.
_, indices = torch.sort(out, descending=True)
[(classes[idx], percentage[idx].item()) for idx in indices[0][:5]]
[('Labrador retriever', 41.58513259887695),('golden retriever', 16.59164810180664),('Saluki, gazelle hound', 16.286897659301758),('whippet', 2.8539111614227295),('Ibizan hound, Ibizan Podenco', 2.39247727394104)]
1.4. Using ResNet for Image Classification
# Load the resnet101 model.
resnet = models.resnet101(pretrained=True)# Set the model to eval mode.
resnet.eval()# carry out model inference.
out = resnet(img_batch)# Print the top 5 classes predicted by the model.
_, indices = torch.sort(out, descending=True)
percentage = torch.nn.functional.softmax(out, dim=1)[0] * 100
[(classes[idx], percentage[idx].item()) for idx in indices[0][:5]]
Downloading: "https://download.pytorch.org/models/resnet101-63fe2227.pth" to /home/wsl_ubuntu/.cache/torch/hub/checkpoints/resnet101-63fe2227.pth
100%|██████████| 171M/171M [00:51<00:00, 3.47MB/s] [('Labrador retriever', 48.255577087402344),('dingo, warrigal, warragal, Canis dingo', 7.900773048400879),('golden retriever', 6.91691780090332),('Eskimo dog, husky', 3.6434390544891357),('bull mastiff', 3.046128273010254)]