气泡提示框应用举例
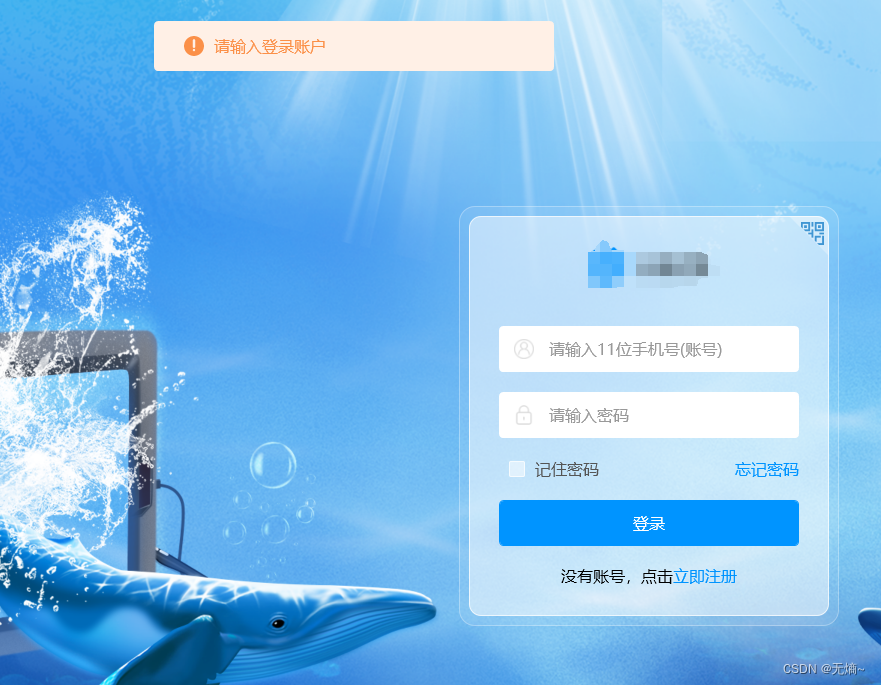
有时候在我们开发的软件经常会遇到需要提示用户的地方,为了让用户更直观,快速了解提示信息,使用简洁、好看又方便的气泡提示框显得更加方便,更具人性化。如下面例子:(当用户未输入账号时,气泡提示会在登录页面上方提示用户“请输入登录账号”,用户点击其他地方或者在无操作一段时间后,气泡会自动消失。根据不同类型的提示框,字体颜色和图标也不一样。本例的气泡提示框可在不同窗体上显示。)
接下来就开始做一个有趣的气泡提示框吧(形状可自定义)
气泡提示框代码创建
新建气泡提示框窗体
新建一个气泡提示框窗体(之所以选择窗体是因为可以让它不附属于其他窗体,可在任意窗体上运行),使用Popup控件作为提示框主体。在Popup控件中添加提示图标和提示信息,通过InfoType依赖属性来设置其图标和信息背景颜色。
<Window x:Class="BubblePrompt.PopupMessageWindow"xmlns="http://schemas.microsoft.com/winfx/2006/xaml/presentation"xmlns:x="http://schemas.microsoft.com/winfx/2006/xaml"xmlns:d="http://schemas.microsoft.com/expression/blend/2008"xmlns:mc="http://schemas.openxmlformats.org/markup-compatibility/2006"xmlns:local="clr-namespace:BubblePrompt"mc:Ignorable="d"Name="own" AllowsTransparency="True" ShowInTaskbar="False"Title="PopupMessageWindow" Height="60" Width="410" WindowStyle="None"   Background="{x:Null}" ><Popup Name="popupInfo" Opened="popupInfo_Opened"  StaysOpen="False" IsOpen="False" AllowsTransparency="True" VerticalOffset="60" HorizontalOffset="100"  Placement="Top"  PlacementTarget="{Binding Element,ElementName=own}"><Border CornerRadius="4" Background="{Binding BackColor,ElementName=own}" Height="50" Width="400" ><Grid><Image Width="20" Height="20" Source="{Binding ImageSource,ElementName=own}" HorizontalAlignment="Left" Margin="30,0,0,0"/><TextBlock x:Name="txtbInfo" VerticalAlignment="Center" HorizontalAlignment="Left" Margin="60,0,0,0" FontSize="16"Text="{Binding Info,ElementName=own}" Foreground="{Binding InfoTextColor,ElementName=own}"/></Grid></Border></Popup>
</Window>
/// <summary>/// PopupMessageWindow.xaml 的交互逻辑/// </summary>public partial class PopupMessageWindow : Window{private static BitmapImage NormalInfoImg = new BitmapImage(new Uri("/BubblePrompt;component/Images/ic_pop_normal.png", UriKind.RelativeOrAbsolute));private static BitmapImage WarnInfoImg = new BitmapImage(new Uri("/BubblePrompt;component/Images/ic_pop_warn.png", UriKind.RelativeOrAbsolute));private static BitmapImage ErrorInfoImg = new BitmapImage(new Uri("/BubblePrompt;component/Images/ic_pop_fail.png", UriKind.RelativeOrAbsolute));private static Brush NormalBackColor = new SolidColorBrush((Color)ColorConverter.ConvertFromString("#DEF4FF"));private static Brush WarnBackColor = new SolidColorBrush((Color)ColorConverter.ConvertFromString("#FFF0E6"));private static Brush ErrorBackColor = new SolidColorBrush((Color)ColorConverter.ConvertFromString("#FFF0E6"));private static Brush NormalInfoColor = new SolidColorBrush((Color)ColorConverter.ConvertFromString("#0094FF"));private static Brush WarnInfoColor = new SolidColorBrush((Color)ColorConverter.ConvertFromString("#FB9048"));private static Brush ErrorInfoColor = new SolidColorBrush((Color)ColorConverter.ConvertFromString("#FB9048"));System.Windows.Threading.DispatcherTimer uiTimer;public FrameworkElement Element{get { return (FrameworkElement)GetValue(ElementProperty); }set { SetValue(ElementProperty, value); }}// Using a DependencyProperty as the backing store for Element. This enables animation, styling, binding, etc...public static readonly DependencyProperty ElementProperty =DependencyProperty.Register("Element", typeof(FrameworkElement), typeof(Window), new PropertyMetadata(null));public string Info{get { return (string)GetValue(InfoProperty); }set { SetValue(InfoProperty, value); }}// Using a DependencyProperty as the backing store for Info. This enables animation, styling, binding, etc...public static readonly DependencyProperty InfoProperty =DependencyProperty.Register("Info", typeof(string), typeof(Window), new PropertyMetadata(""));public int Delay{get { return (int)GetValue(DelayProperty); }set { SetValue(DelayProperty, value); }}// Using a DependencyProperty as the backing store for Delay. This enables animation, styling, binding, etc...public static readonly DependencyProperty DelayProperty =DependencyProperty.Register("Delay", typeof(int), typeof(Window), new PropertyMetadata(3));public Brush BackColor{get { return (Brush)GetValue(BackColorProperty); }set { SetValue(BackColorProperty, value); }}// Using a DependencyProperty as the backing store for BackColor. This enables animation, styling, binding, etc...public static readonly DependencyProperty BackColorProperty =DependencyProperty.Register("BackColor", typeof(Brush), typeof(Window), new PropertyMetadata(NormalBackColor));public Brush InfoTextColor{get { return (Brush)GetValue(InfoTextColorProperty); }set { SetValue(InfoTextColorProperty, value); }}// Using a DependencyProperty as the backing store for BackColor. This enables animation, styling, binding, etc...public static readonly DependencyProperty InfoTextColorProperty =DependencyProperty.Register("InfoTextColor", typeof(Brush), typeof(Window), new PropertyMetadata(NormalInfoColor));/// <summary>/// 0:Normal 1:Warn 2:Error/// </summary>public int InfoType{get { return (int)GetValue(InfoTypeProperty); }set{SetValue(InfoTypeProperty, value);if (value == 0){ImageSource = NormalInfoImg;BackColor = NormalBackColor;InfoTextColor = NormalInfoColor;}else if (value == 1){ImageSource = WarnInfoImg;BackColor = WarnBackColor;InfoTextColor = WarnInfoColor;}else if (value == 2){ImageSource = ErrorInfoImg;BackColor = ErrorBackColor;InfoTextColor = ErrorInfoColor;}}}// Using a DependencyProperty as the backing store for InfoType. This enables animation, styling, binding, etc...public static readonly DependencyProperty InfoTypeProperty =DependencyProperty.Register("InfoType", typeof(int), typeof(Window), new PropertyMetadata(0));public BitmapImage ImageSource{get { return (BitmapImage)GetValue(ImageSourceProperty); }set { SetValue(ImageSourceProperty, value); }}// Using a DependencyProperty as the backing store for ImageSource. This enables animation, styling, binding, etc...public static readonly DependencyProperty ImageSourceProperty =DependencyProperty.Register("ImageSource", typeof(BitmapImage), typeof(Window), new PropertyMetadata(null));DateTime startTime;public PopupMessageWindow(){InitializeComponent();}private void UITimerTick(object sender, EventArgs e){if (popupInfo.IsOpen == false){uiTimer.Stop();return;}if ((DateTime.Now - startTime).TotalSeconds >= Delay){this.Hide();popupInfo.IsOpen = false;}}private void popupInfo_Opened(object sender, EventArgs e){if (uiTimer == null || uiTimer.IsEnabled == false){uiTimer = new System.Windows.Threading.DispatcherTimer();uiTimer.Interval = TimeSpan.FromMilliseconds(1000);uiTimer.Tick += UITimerTick;startTime = DateTime.Now;uiTimer.Start();}else{startTime = DateTime.Now;}}}新建气泡提示框管理类
新建气泡提示框管理类作为公共类,使其可以被全局访问和使用。
public class MessageManager{private PopupMessageWindow mPopupMessageWindow = new PopupMessageWindow();/// <summary>/// Poup消息提示/// </summary>public PopupMessageWindow PopupMessageWindow { set { mPopupMessageWindow = value; } get { return mPopupMessageWindow; } }/// <summary>/// type: 0:常规 1:注意 2:警告/// </summary>/// <param name="element"></param>/// <param name="type"></param>public void ShowMessageTip(string info, FrameworkElement element = null, int type = 0, int delaytime = 3){if (PopupMessageWindow != null && info.Length <= 30){PopupMessageWindow.Element = element;PopupMessageWindow.InfoType = type;PopupMessageWindow.popupInfo.IsOpen = true;PopupMessageWindow.Info = info;PopupMessageWindow.Delay = delaytime;PopupMessageWindow.Show();}}}窗体中应用气泡提示框
在任意窗体中使用气泡提示管理类中气泡提示框方法,设置其信息和信息类型,在该窗体中显示气泡提示。
/// <summary>/// MainWindow.xaml 的交互逻辑/// </summary>public partial class MainWindow : Window{/// <summary>/// 消息提醒管理/// </summary>public MessageManager MessageManager { get { return new MessageManager(); } }public MainWindow(){InitializeComponent();}private void btnTip_Click(object sender, RoutedEventArgs e){MessageManager.ShowMessageTip("当前资源为最新", this, 1);}}气泡提示框项目实例效果
项目实例链接:https://download.csdn.net/download/lvxingzhe3/88677901