1. 总览
在之前的练习中,我们实现了 Whitted-Style Ray Tracing 算法,并且用 BVH等加速结构对于求交过程进行了加速。在本次实验中,我们将在上一次实验的基础上实现完整的 Path Tracing 算法。至此,我们已经来到了光线追踪版块的最后一节内容。
请认真阅读本文档,按照本文档指示的流程完成本次实验。
2. 调通框架
2.1 修改的内容
相比上一次实验,本次实验对框架的修改较大,主要在以下几方面:
- 修改了
main.cpp,以适应本次实验的测试模型 CornellBox - 修改了
Render,以适应 CornellBox 并且支持 Path Tracing 需要的同一 Pixel多次 Sample - 修改了
Object,Sphere,Triangle,TriangleMesh,BVH,添加了area属性与Sample方法,以实现对光源按面积采样,并在Scene中添加了采样光源的接口sampleLight - 修改了
Material并在其中实现了sample,eval,pdf三个方法用于 Path Tracing 变量的辅助计算
2.2 你需要迁移的内容
你需要从上一次编程练习中直接拷贝以下函数到对应位置:
Triangle::getIntersectioninTriangle.hpp: 将你的光线-三角形相交函数粘贴到此处,请直接将上次实验中实现的内容粘贴在此。IntersectP(const Ray& ray, const Vector3f& invDir, const std::array<int, 3>& dirIsNeg)inBounds3.hpp: 这个函数的作用是判断包围盒 BoundingBox 与光线是否相交,请直接将上次实验中实现的内容粘贴在此处,并且注意检查 t_enter = t_exit 的时候的判断是否正确。getIntersection(BVHBuildNode* node, const Ray ray)inBVH.cpp: BVH
查找过程,请直接将上次实验中实现的内容粘贴在此处.
3. 开始实现
在本次实验中,你只需要修改这一个函数:
castRay(const Ray ray, int depth)inScene.cpp: 在其中实现 Path Tracing 算法
可能用到的函数有:
intersect(const Ray ray)inScene.cpp: 求一条光线与场景的交点sampleLight(Intersection pos, float pdf)inScene.cpp: 在场景的所有光源上按面积 uniform 地 sample 一个点,并计算该 sample 的概率密度sample(const Vector3f wi, const Vector3f N)inMaterial.cpp: 按照该材质的性质,给定入射方向与法向量,用某种分布采样一个出射方向pdf(const Vector3f wi, const Vector3f wo, const Vector3f N)inMaterial.cpp: 给定一对入射、出射方向与法向量,计算 sample 方法得到该出射方向的概率密度eval(const Vector3f wi, const Vector3f wo, const Vector3f N)inMaterial.cpp: 给定一对入射、出射方向与法向量,计算这种情况下的 f_r 值可能用到的变量有:RussianRouletteinScene.cpp: P_RR, Russian Roulette 的概率
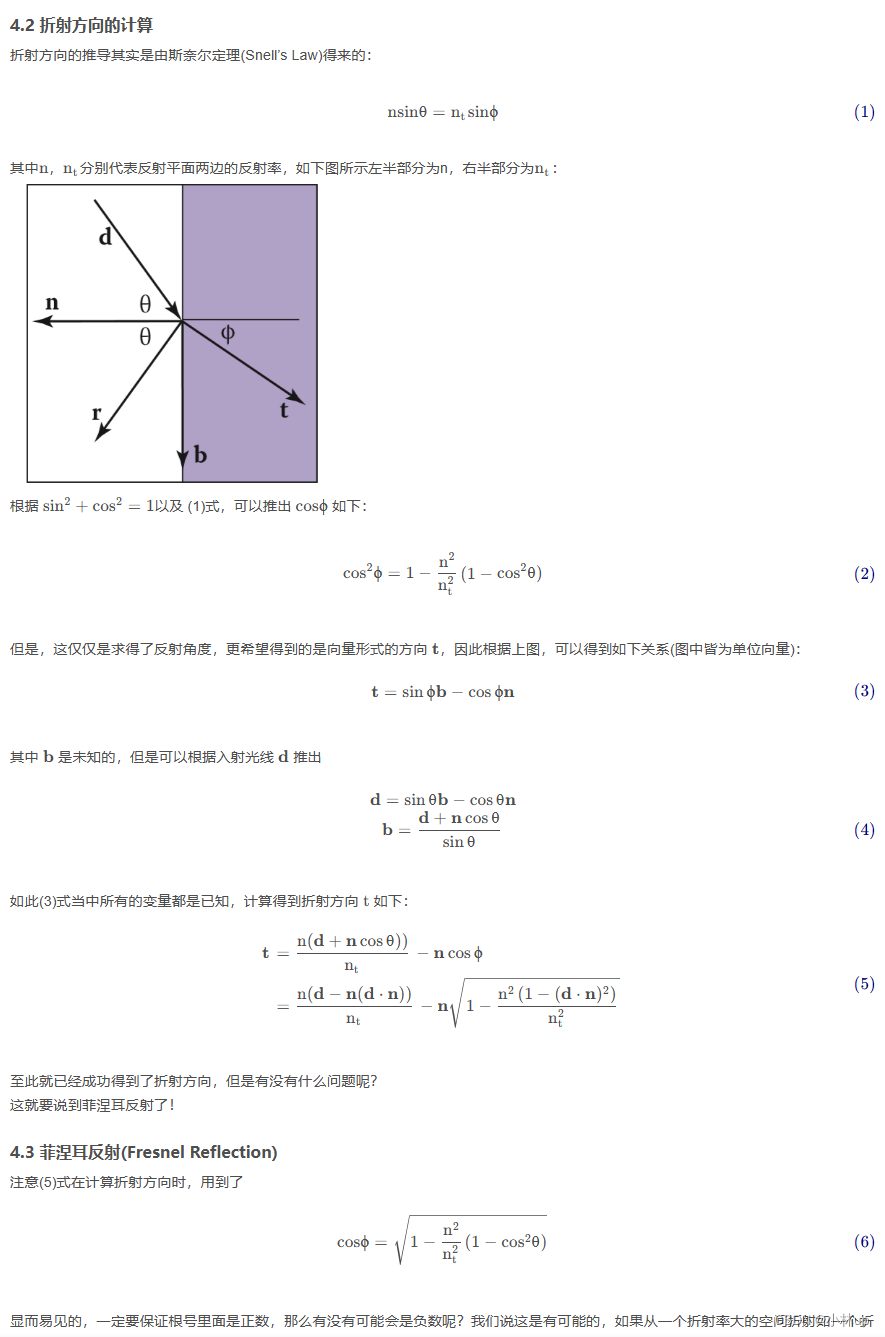
4. 实现
4.1 Triangle::getIntersection() in Triangle.hpp代码迁移
上一节的内容拷贝下来。
inline Intersection Triangle::getIntersection(Ray ray)
{Intersection inter;if (dotProduct(ray.direction, normal) > 0)return inter;double u, v, t_tmp = 0;Vector3f pvec = crossProduct(ray.direction, e2);double det = dotProduct(e1, pvec);if (fabs(det) < EPSILON)return inter;double det_inv = 1. / det;Vector3f tvec = ray.origin - v0;u = dotProduct(tvec, pvec) * det_inv;if (u < 0 || u > 1)return inter;Vector3f qvec = crossProduct(tvec, e1);v = dotProduct(ray.direction, qvec) * det_inv;if (v < 0 || u + v > 1)return inter;t_tmp = dotProduct(e2, qvec) * det_inv;if (t_tmp < 0)return inter;// TODO find ray triangle intersectioninter.happened = true;inter.coords = ray.origin + t_tmp * ray.direction;inter.normal = this->normal;inter.distance = t_tmp;inter.obj = this;inter.m = this->m;return inter;
}
4.2 IntersectP(const Ray& ray, const Vector3f& invDir, const std::array<int, 3>& dirIsNeg) in Bounds3.hpp代码迁移
注意这里最后的判断使用的是tEnter <= tExit
inline bool Bounds3::IntersectP(const Ray& ray, const Vector3f& invDir,const std::array<int, 3>& dirIsNeg) const
{// invDir: ray direction(x,y,z), invDir=(1.0/x,1.0/y,1.0/z), use this because Multiply is faster that Division// dirIsNeg: ray direction(x,y,z), dirIsNeg=[int(x>0),int(y>0),int(z>0)], use this to simplify your logic// TODO test if ray bound intersectsVector3f vec_tEnter = (pMin - ray.origin) * invDir;Vector3f vec_tExit = (pMax - ray.origin) * invDir;if (!dirIsNeg[0])std::swap(vec_tEnter.x, vec_tExit.x);if (!dirIsNeg[1])std::swap(vec_tEnter.y, vec_tExit.y);if (!dirIsNeg[2])std::swap(vec_tEnter.z, vec_tExit.z);float tEnter = std::max(vec_tEnter.x, std::max(vec_tEnter.y, vec_tEnter.z));float tExit = std::min(vec_tExit.x, std::min(vec_tExit.y, vec_tExit.z));if (tEnter <=  tExit && tExit >= 0)return true;elsereturn false;}
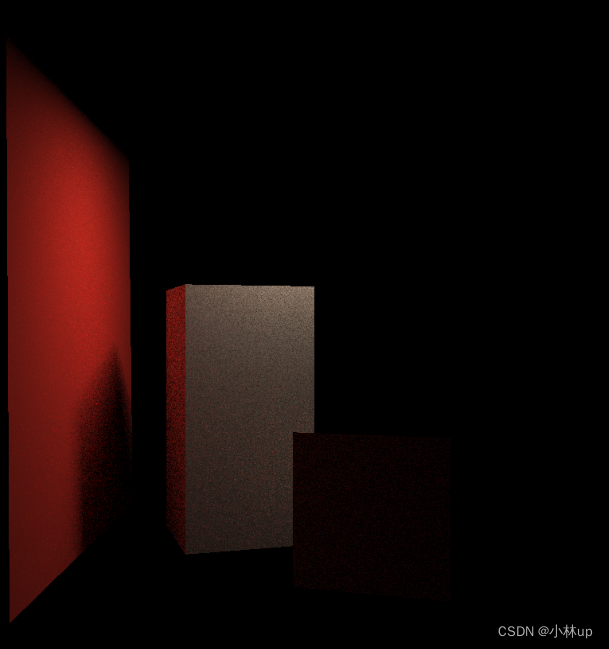
如果没有加等于号,有的光线擦过物体了,但是没有返回颜色。于是渲染会变成这样:
4.3 getIntersection(BVHBuildNode* node, const Ray ray)in BVH.cpp 代码迁移
Intersection BVHAccel::getIntersection(BVHBuildNode* node, const Ray& ray) const
{// TODO Traverse the BVH to find intersectionif (!node->bounds.IntersectP(ray, ray.direction_inv, std::array<int, 3>({ray.direction.x > 0, ray.direction.y > 0, ray.direction.z > 0})))return Intersection();if (node->left == nullptr && node->right == nullptr)return node->object->getIntersection(ray);Intersection hitLeft = BVHAccel::getIntersection(node->left, ray);Intersection hitRight = BVHAccel::getIntersection(node->right, ray);return hitLeft.distance < hitRight.distance ? hitLeft : hitRight;
}
4.4 castRay(const Ray ray, int depth) in Scene.cpp实现
基本按照伪代码来实现了:
Path Tracing 的实现说明伪代码:
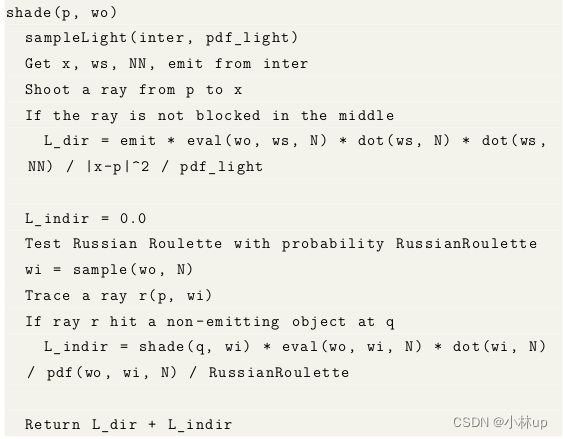
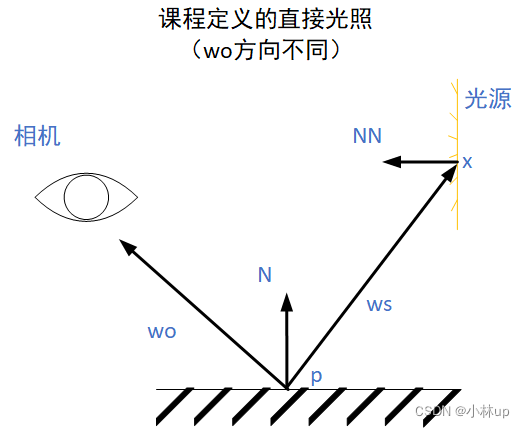
这里注意处理两个边界条件,一是光线没有打到物体,则返回黑色,二是光纤打到了光源,则返回光源的颜色。这里的变量都是按照伪代码来编写的可以一一对应,下面是伪代码的直接光照和间接光照的示意图:
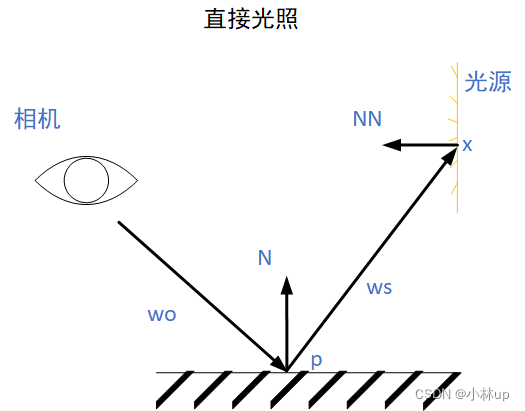
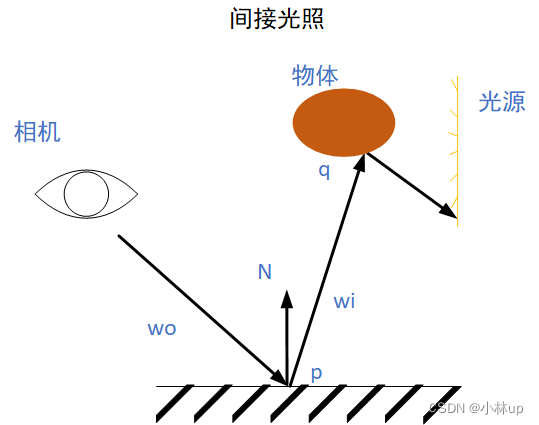
之所以说wo 定义与课程介绍相反,是因为课程上是这样定义wo的(间接光照也是差不多的):
Vector3f Scene::castRay(const Ray &ray, int depth) const
{Intersection p = intersect(ray);if (!p.happened)return Vector3f(0.0);if (p.m->hasEmission())return p.m->getEmission(); Vector3f L_dir(0.0, 0.0, 0.0);Vector3f L_indir(0.0, 0.0, 0.0);Intersection x;float pdf_light = 0.0;sampleLight(x, pdf_light);Vector3f vec_pTox = x.coords - p.coords;Vector3f ws = vec_pTox.normalized();float dist_pTox2 = dotProduct(vec_pTox, vec_pTox);Vector3f emit = x.m->getEmission();Vector3f N = p.normal;Vector3f NN = x.normal;Vector3f wo = ray.direction;Ray ray_pTox(p.coords, ws);Intersection interRay_pTox = intersect(ray_pTox);if (interRay_pTox.distance  + 0.01 > vec_pTox.norm()){L_dir = emit * p.m->eval(wo, ws, N) * dotProduct(ws, N) * dotProduct(-ws, NN) / dist_pTox2 / pdf_light;}if (get_random_float() <= RussianRoulette){Vector3f wi = p.m->sample(wo, N);Ray rayWi(p.coords, wi);Intersection q =intersect(rayWi);if (q.happened && !q.m->hasEmission())L_indir = castRay(rayWi, depth + 1) * p.m->eval(wo, wi, N) * dotProduct(wi, N) / p.m->pdf(wo, wi, N) / RussianRoulette;}return L_dir + L_indir;}
要注意对光源采样的交点x里只是设置了交点的emit,如果代码要统一通过x.m->getEmission()(x是一个Intersection的变量,是p到x光线的交点),我们需要跳到sampleLight看一下:
void Scene::sampleLight(Intersection &pos, float &pdf) const
{...for (uint32_t k = 0; k < objects.size(); ++k) {if (objects[k]->hasEmit()){...objects[k]->Sample(pos, pdf);break;...}}
}
再转到Sample函数看一下,Sphere.hpp、Triangle.hpp的Sample函数做个小小的更改,都加上一句pos.m=m:
Sphere.hpp
void Sample(Intersection &pos, float &pdf){float theta = 2.0 * M_PI * get_random_float(), phi = M_PI * get_random_float();Vector3f dir(std::cos(phi), std::sin(phi)*std::cos(theta), std::sin(phi)*std::sin(theta));pos.coords = center + radius * dir;pos.normal = dir;pos.emit = m->getEmission();pos.m = m;pdf = 1.0f / area;}
Triangle.hpp
void Sample(Intersection &pos, float &pdf){float x = std::sqrt(get_random_float()), y = get_random_float();pos.coords = v0 * (1.0f - x) + v1 * (x * (1.0f - y)) + v2 * (x * y);pos.normal = this->normal;pos.m = m;pdf = 1.0f / area;}
void Sample(Intersection &pos, float &pdf){bvh->Sample(pos, pdf);pos.emit = m->getEmission();pos.m = m;}
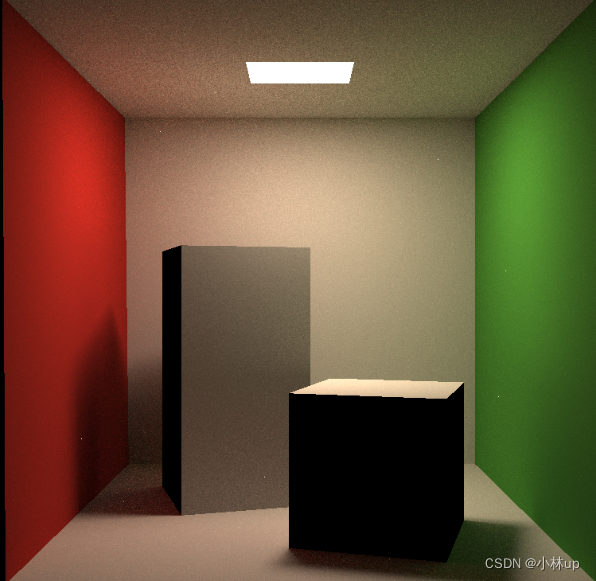
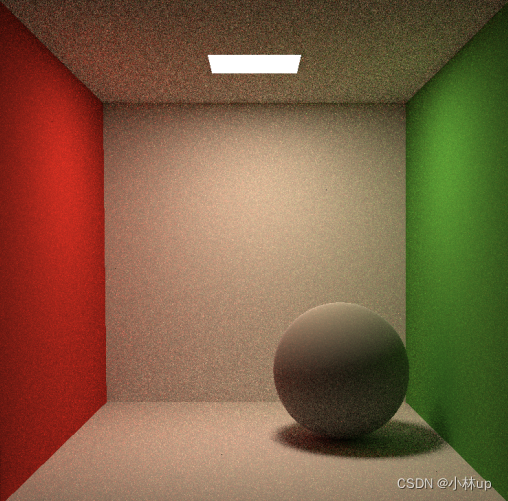
spp=16(渲染46min)

spp=256(耗时14h多好像)
4.5 提高部分:多线程
另外要加快渲染的速度,可以把global.hpp里的get_random_float函数的变量dev、rng和dist前面都加上static,这样就不用每次调用函数的时候重复建立,提高计算的速度。
使用多线程推荐先看一下教程:C++11 多线程(std::thread)详解
这里参考了大佬ycr的帐号的博客【GAMES101】作业7(提高)路径追踪 多线程、Microfacet(全镜面反射)、抗锯齿
思路:我们可以将屏幕像素分成多块给多个线程执行,比如我们的scene尺寸为784*784,要用32个线程并发执行时,就将每块设置为(784/32) * 784的大小。
原来的Render代码:
void Renderer::Render(const Scene& scene)
{std::vector<Vector3f> framebuffer(scene.width * scene.height);float scale = tan(deg2rad(scene.fov * 0.5));float imageAspectRatio = scene.width / (float)scene.height;Vector3f eye_pos(278, 273, -800);int m = 0;// change the spp value to change sample ammountint spp = 1;std::cout << "SPP: " << spp << "\n";for (uint32_t j = 0; j < scene.height; ++j) {for (uint32_t i = 0; i < scene.width; ++i) {// generate primary ray directionfloat x = (2 * (i + 0.5) / (float)scene.width - 1) *imageAspectRatio * scale;float y = (1 - 2 * (j + 0.5) / (float)scene.height) * scale;Vector3f dir = normalize(Vector3f(-x, y, 1));for (int k = 0; k < spp; k++){framebuffer[m] += scene.castRay(Ray(eye_pos, dir), 0) / spp;  }m++;}UpdateProgress(j / (float)scene.height);}UpdateProgress(1.f);...
}
4.5.1 使用std::thread库
头文件添加:
#include <thread>
#include <mutex>
添加全局变量:
const float EPSILON = 0.00001;//添加下面的变量
std::mutex mtx;
int progress = 0;
这里写的是按行划分
void Renderer::Render(const Scene& scene)
{std::vector<Vector3f> framebuffer(scene.width * scene.height);float scale = tan(deg2rad(scene.fov * 0.5));float imageAspectRatio = scene.width / (float)scene.height;Vector3f eye_pos(278, 273, -800);int m = 0;// change the spp value to change sample ammountint spp = 16;std::cout << "SPP: " << spp << "\n";int nums_threads = 32;int theread_height = scene.height / nums_threads;std::vector<std::thread> th;//定义renderRows 函数作为多线程的入口auto renderRows = [&](int start_height, int end_height){for (uint32_t j = start_height; j < end_height; ++j) {for (uint32_t i = 0; i < scene.width; ++i) {// generate primary ray directionfloat x = (2 * (i + 0.5) / (float)scene.width - 1) *imageAspectRatio * scale;float y = (1 - 2 * (j + 0.5) / (float)scene.height) * scale;Vector3f dir = normalize(Vector3f(-x, y, 1));for (int k = 0; k < spp; k++){framebuffer[j * scene.width + i] += scene.castRay(Ray(eye_pos, dir), 0) / spp;  }}//添加锁锁住进度条更新相关语句,避免多线程同时访问全局变量的时候出现冲突mtx.lock();progress++;UpdateProgress(progress / (float)scene.height);mtx.unlock();}};for (int i = 0; i < nums_threads; ++i){th.emplace_back(std::thread(renderRows, i * theread_height, (i + 1) * theread_height));}for (int i = 0; i < nums_threads; ++i){th[i].join();//用join方法等待所有线程结束,防止有的线程还没结束主程序就结束了}...
}
使用std::thread库来实现多线程的时候CMakeLists.txt也要修改否则会报错:
cmake_minimum_required(VERSION 3.10)
project(RayTracing)set(CMAKE_CXX_STANDARD 17)set(THREADS_PREFER_PTHREAD_FLAG ON) # 新添加语句
find_package(Threads REQUIRED) # 新添加语句add_executable(RayTracing main.cpp Object.hpp Vector.cpp Vector.hpp Sphere.hpp global.hpp Triangle.hpp Scene.cppScene.hpp Light.hpp AreaLight.hpp BVH.cpp BVH.hpp Bounds3.hpp Ray.hpp Material.hpp Intersection.hppRenderer.cpp Renderer.hpp)target_link_libraries(RayTracing ${CMAKE_THREAD_LIBS_INIT}) # 新添加语句
spp为16耗时1分多钟就渲染完了:

上面是按行分,也可以按行列分块,我这里按行分了32块,列分了32块:
void Renderer::Render(const Scene& scene)
{std::vector<Vector3f> framebuffer(scene.width * scene.height);float scale = tan(deg2rad(scene.fov * 0.5));float imageAspectRatio = scene.width / (float)scene.height;Vector3f eye_pos(278, 273, -800);int m = 0;// change the spp value to change sample ammountint spp = 16;std::cout << "SPP: " << spp << "\n";int nums_threads = 32;int thread_height = scene.height / nums_threads;int thread_width = scene.width / nums_threads;std::vector<std::thread> th;//定义renderBlocks 函数作为多线程的入口auto renderBlocks = [&](int start_height, int end_height, int start_width, int end_width){for (uint32_t j = start_height; j < end_height; ++j) {for (uint32_t i = start_width; i < end_width; ++i) {// generate primary ray directionfloat x = (2 * (i + 0.5) / (float)scene.width - 1) *imageAspectRatio * scale;float y = (1 - 2 * (j + 0.5) / (float)scene.height) * scale;Vector3f dir = normalize(Vector3f(-x, y, 1));for (int k = 0; k < spp; k++){framebuffer[j * scene.width + i] += scene.castRay(Ray(eye_pos, dir), 0) / spp;  }progress++;}//添加锁锁住进度条更新相关语句,避免多线程同时访问全局变量的时候出现冲突mtx.lock();UpdateProgress(progress / (float)scene.height / (float)scene.width);mtx.unlock();}};for (int i = 0; i < nums_threads; ++i){for (int j = 0; j < nums_threads; ++j){th.emplace_back(std::thread(renderBlocks, i * thread_height, (i + 1) * thread_height, j * (thread_width), (j + 1) * thread_width));}}for (int i = 0; i < nums_threads * nums_threads; ++i){th[i].join();//用join方法等待所有线程结束,防止有的线程还没结束主程序就结束了}UpdateProgress(1.f);...
}
不过好像差别不是很大。
4.5.2 openmp加速
Games101 作业7 绕坑引路 (Windows)提到了使用openmp
使用openmp操作简单,只需要在需要并行化的for前面加上:
#pragma omp parallel for
添加头文件:
#include <omp.h>
和前面一样定义全局变量:
const float EPSILON = 0.00001;//添加下面的变量
omp_lock_t lock;
int progress = 0;Render函数:```cpp
void Renderer::Render(const Scene& scene)
{std::vector<Vector3f> framebuffer(scene.width * scene.height);float scale = tan(deg2rad(scene.fov * 0.5));float imageAspectRatio = scene.width / (float)scene.height;Vector3f eye_pos(278, 273, -800);int m = 0;// change the spp value to change sample ammountint spp = 16;std::cout << "SPP: " << spp << "\n";int nums_thread = 32;int thread_height = scene.height / nums_thread;//定义renderRows 函数作为多线程的入口auto renderRows = [&](int start_height, int end_height){for (uint32_t j = start_height; j < end_height; ++j) {for (uint32_t i = 0; i < scene.width; ++i) {// generate primary ray directionfloat x = (2 * (i + 0.5) / (float)scene.width - 1) *imageAspectRatio * scale;float y = (1 - 2 * (j + 0.5) / (float)scene.height) * scale;Vector3f dir = normalize(Vector3f(-x, y, 1));for (int k = 0; k < spp; k++){framebuffer[j * scene.width + i] += scene.castRay(Ray(eye_pos, dir), 0) / spp;  }}//添加锁锁住进度条更新相关语句,避免多线程同时访问全局变量的时候出现冲突omp_set_lock(&lock);progress++;UpdateProgress(progress / (float)scene.height);omp_unset_lock(&lock);}};#pragma omp parallel forfor (int i = 0; i < nums_thread; ++i){renderRows(i * thread_height, (i + 1) * thread_height);}UpdateProgress(1.f);...
}
然后对应的CMakeLists.txt设置为:
cmake_minimum_required(VERSION 3.10)
project(RayTracing)set(CMAKE_CXX_STANDARD 17)set(CMAKE_CXX_FLAGS "${CAMKE_CXX_FLAGS} -O3 -fopenmp")add_executable(RayTracing main.cpp Object.hpp Vector.cpp Vector.hpp Sphere.hpp global.hpp Triangle.hpp Scene.cppScene.hpp Light.hpp AreaLight.hpp BVH.cpp BVH.hpp Bounds3.hpp Ray.hpp Material.hpp Intersection.hppRenderer.cpp Renderer.hpp)
spp16耗时15s渲染完成,spp256耗时3min多钟,真的很快了:

4.6. 提高部分:微表面材质
主要的参考资料,强烈建议看完,结合它的代码一起看会搞懂其中的原理:
- 微平面模型-理论
在Material.cpp修改enum数组添加MICROFACET材质。
主要使用公式:

eval函数就是编写fr的(上面括号里的项,一项是散射项,一项是镜面反射项):
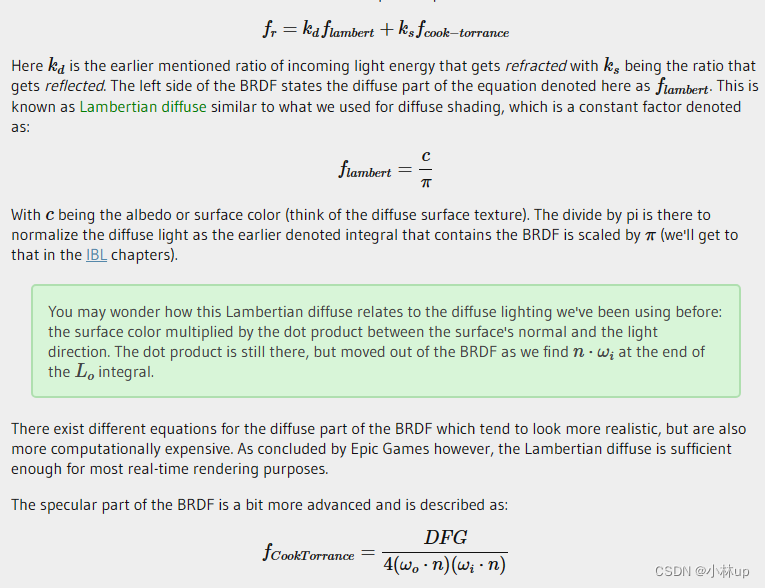
我们分别求上面的D、F、G
D项选择的是( α \alpha α是粗糙度, h \mathbf{h} h是半程向量, h = ( v + l ) / ∣ ∣ v + l ∣ ∣ \mathbf{h}=(\mathbf{v}+\mathbf{l})/||\mathbf{v}+\mathbf{l}|| h=(v+l)/∣∣v+l∣∣, l \mathbf{l} l和 v \mathbf{v} v是物体上点到光源的单位向量(对应-wi,wi和wo其实作业有点混乱,不过理解含义就好)和物体点到相机的单位向量(对应wo), n \mathbf n n是宏观法向量):
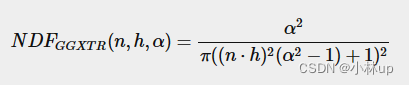
对应的D函数写在eval函数里:
Vector3f Material::eval(const Vector3f &wi, const Vector3f &wo, const Vector3f &N){switch(m_type){case DIFFUSE:{...}case MICROFACET:{...auto DistFunc = [&]() -> float{float alpha2 = alpha * alpha;Vector3f h = (-wi + wo).normalized();float dotNH = std::max(dotProduct(N, h), 0.0f);float dnorm = M_PI * std::pow((dotNH * dotNH * (alpha2 - 1) + 1), 2);return alpha2 / dnorm;};...float D = DistFunc();  ...}}
}
G项选择的是( k k k和上面的 α \alpha α有关):
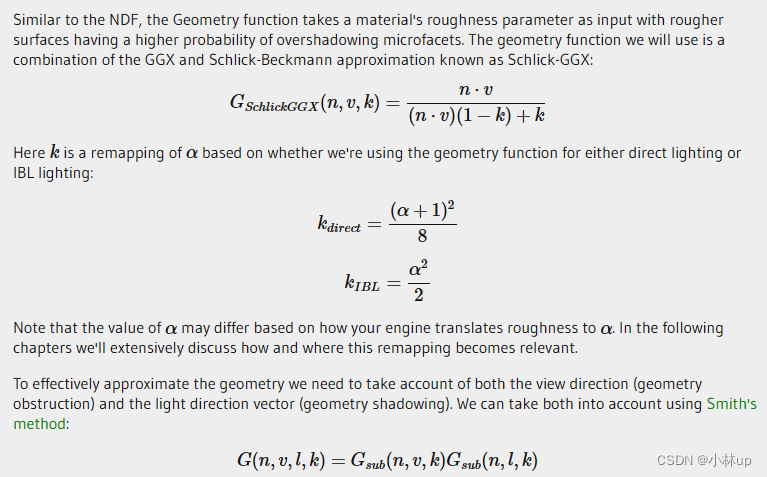
对应的G函数写在eval函数里:
Vector3f Material::eval(const Vector3f &wi, const Vector3f &wo, const Vector3f &N){switch(m_type){case DIFFUSE:{...}case MICROFACET:{...auto GeoFunc = [&alpha](const Vector3f& w, const Vector3f& n) -> float{float k = (alpha+ 1.0) * (alpha + 1.0) / 8;float dotNw = dotProduct(n, w);return dotNw / (dotNw * (1 - k) + k);};...float G = GeoFunc(N, -wi) * GeoFunc(N, wo);...}}
}
F项对应的是菲涅尔项(参考了计算机图形学十二:Whitted-Style光线追踪原理详解及实现细节):
上面的菲涅尔项已经帮我们写好了:
void fresnel(const Vector3f &I, const Vector3f &N, const float &ior, float &kr) const{float cosi = clamp(-1, 1, dotProduct(I, N));float etai = 1, etat = ior;if (cosi > 0) { std::swap(etai, etat); }// Compute sini using Snell's lawfloat sint = etai / etat * sqrtf(std::max(0.f, 1 - cosi * cosi));// Total internal reflectionif (sint >= 1) {kr = 1;}else {float cost = sqrtf(std::max(0.f, 1 - sint * sint));cosi = fabsf(cosi);float Rs = ((etat * cosi) - (etai * cost)) / ((etat * cosi) + (etai * cost));float Rp = ((etai * cosi) - (etat * cost)) / ((etai * cosi) + (etat * cost));kr = (Rs * Rs + Rp * Rp) / 2;}// As a consequence of the conservation of energy, transmittance is given by:// kt = 1 - kr;}
Vector3f Material::eval(const Vector3f &wi, const Vector3f &wo, const Vector3f &N){switch(m_type){case DIFFUSE:{...}case MICROFACET:{float F;fresnel(wi, N, 1.9, F);//注意这里传入的是wi,不是-wi,传入的是相机到视点的向量...}}
}
OK我们可以开始编写了
枚举量里加入微表面材质:
enum MaterialType { DIFFUSE, MICROFACET};
根据提示:
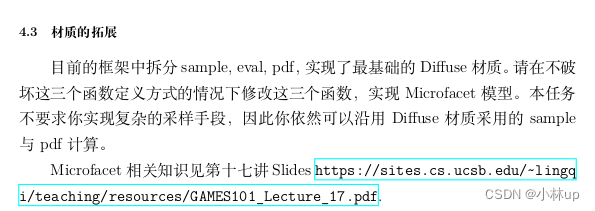
sample和pdf可以沿用,都是加一行case的事:
sample函数:
Vector3f Material::sample(const Vector3f &wi, const Vector3f &N){switch(m_type){case DIFFUSE:case MICROFACET:{// uniform sample on the hemispherefloat x_1 = get_random_float(), x_2 = get_random_float();float z = std::fabs(1.0f - 2.0f * x_1);float r = std::sqrt(1.0f - z * z), phi = 2 * M_PI * x_2;Vector3f localRay(r*std::cos(phi), r*std::sin(phi), z);return toWorld(localRay, N);break;}}
}
pdf函数:
float Material::pdf(const Vector3f &wi, const Vector3f &wo, const Vector3f &N){switch(m_type){case DIFFUSE:case MICROFACET:{// uniform sample probability 1 / (2 * PI)if (dotProduct(wo, N) > 0.0f)return 0.5f / M_PI;elsereturn 0.0f;break;}}
}
eval函数我们根据公式写代码就行了:
Vector3f Material::eval(const Vector3f &wi, const Vector3f &wo, const Vector3f &N){switch(m_type){case DIFFUSE:{// calculate the contribution of diffuse   modelfloat cosalpha = dotProduct(N, wo);if (cosalpha > 0.0f) {Vector3f diffuse = Kd / M_PI;return diffuse;}elsereturn Vector3f(0.0f);break;}case MICROFACET:{float cosalpha = dotProduct(N, wo);if (cosalpha > 0.0f) {Vector3f diffuse = Kd / M_PI;Vector3f spectacular;float alpha = 0.9;//粗糙度可以修改auto DistFunc = [&]() -> float{float alpha2 = alpha * alpha;Vector3f h = (-wi + wo).normalized();float dotNH = std::max(dotProduct(N, h), 0.0f);float dnorm = M_PI * std::pow((dotNH * dotNH * (alpha2 - 1) + 1), 2);return alpha2 / dnorm;};auto GeoFunc = [&alpha](const Vector3f& w, const Vector3f& n) -> float{float k = (alpha+ 1.0) * (alpha + 1.0) / 8;float dotNw = dotProduct(n, w);return dotNw / (dotNw * (1 - k) + k);};float D = DistFunc();float G = GeoFunc(N, -wi) * GeoFunc(N, wo);float F;fresnel(wi, N, ior, F);spectacular = D * F * G / (4 * std::max(dotProduct(wo, N) * dotProduct(-wi, N), 0.001f));return spectacular + ( Vector3f(1.0f) - F) * diffuse;}elsereturn Vector3f(0.0);}}
}
在main函数我们加个球:
Material* light = new Material(DIFFUSE, (8.0f * Vector3f(0.747f+0.058f, 0.747f+0.258f, 0.747f) + 15.6f * Vector3f(0.740f+0.287f,0.740f+0.160f,0.740f) + 18.4f *Vector3f(0.737f+0.642f,0.737f+0.159f,0.737f)));light->Kd = Vector3f(0.65f);Material* ball = new Material(MICROFACET, Vector3f(0.0f));ball->ior = 1.6; //设置折射率ball->Kd = Vector3f(0.3, 0.3, 0.25);Sphere sphere(Vector3f(150, 100, 300), 100, ball);MeshTriangle floor("../models/cornellbox/floor.obj", white);/* MeshTriangle shortbox("../models/cornellbox/shortbox.obj", white);MeshTriangle tallbox("../models/cornellbox/tallbox.obj", white); */MeshTriangle left("../models/cornellbox/left.obj", red);MeshTriangle right("../models/cornellbox/right.obj", green);MeshTriangle light_("../models/cornellbox/light.obj", light);scene.Add(&floor);/* scene.Add(&shortbox);scene.Add(&tallbox); */scene.Add(&sphere);scene.Add(&left);scene.Add(&right);scene.Add(&light_);scene.buildBVH();
另外看到有博客说要修改球与光线相交的判断,否则会有很多噪点。
Intersection getIntersection(Ray ray){Intersection result;result.happened = false;Vector3f L = ray.origin - center;float a = dotProduct(ray.direction, ray.direction);float b = 2 * dotProduct(ray.direction, L);float c = dotProduct(L, L) - radius2;float t0, t1;if (!solveQuadratic(a, b, c, t0, t1)) return result;if (t0 < 0) t0 = t1;if (t0 < 0) return result;if (t0 > 0.5){result.happened=true;result.coords = Vector3f(ray.origin + ray.direction * t0);result.normal = normalize(Vector3f(result.coords - center));result.m = this->m;result.obj = this;result.distance = t0;}return result;}
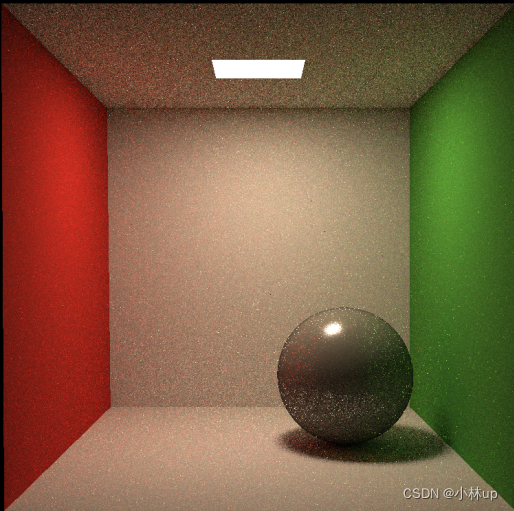
α = 0.2 , i o r = 1.6 \alpha=0.2,ior=1.6 α=0.2,ior=1.6

把折射率调高一点,粗糙度设置低一些:
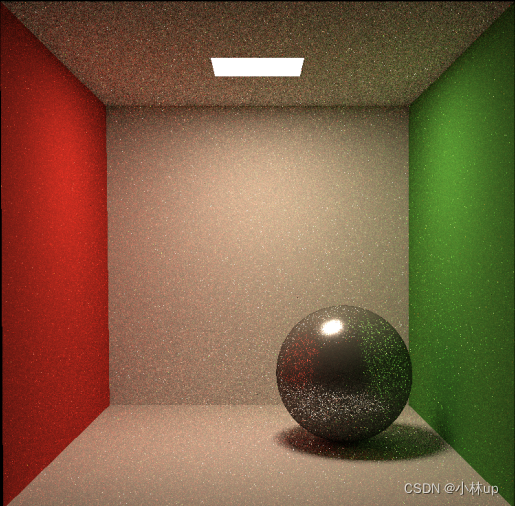
α = 0.05 , i o r = 1.9 \alpha=0.05,ior=1.9 α=0.05,ior=1.9
把折射率再调高一点
α = 0.05 , i o r = 4 \alpha=0.05,ior=4 α=0.05,ior=4
α = 0.9 , i o r = 1.6 \alpha=0.9,ior=1.6 α=0.9,ior=1.6,已经很接近使用diffuse材质了
而使用diffuse材质没有镜面反射:

这篇文章还做了镜面材质【GAMES101】作业7(提高)路径追踪 多线程、Microfacet(全镜面反射)、抗锯齿,有兴趣可以看看,镜面材质只考虑反射项,没有散射项,全镜面反射只有一个方向的光线能被眼睛接收,所以pdf就设置为1,frenel函数里要去掉散射项的影响,直接光照设置为0(防止过曝),间接光照把非发光物体的判断条件给去掉,接收所有物体入射的光。