文章目录
- 一、概述
- 二、开机启动Launcher
- 2.1、开机启动Launcher流程图
- 2.2、开机启动流程源码分析
- 三、短压Home键启动Launcher
- 3.1、短压Home键启动Launcher流程图
- 3.2、短压Home键启动Launcher源码分析
- 四、Launcher异常崩溃后的自启动
- 4.1、Launcher异常崩溃后的自启动流程图
- 4.2、Launcher异常崩溃后的自启动源码分析
团队博客: 汽车电子社区
一、概述
Launcher3是Android系统提供的默认桌面应用(Launcher),它的源码路径在**“packages/apps/Launcher3/”**。Launcher3的启动场景主要包括:
1、开机后启动:开机时,android ams服务拉起Launcher。
2、按键启动:比如短压home键,android wms中的PhoneWindowManager拉起Launcher。
3、异常崩溃后启动:Launcher异常崩溃后,android ams再次拉起Launcher。
针对这三种情况,分析一下Aosp源码如何实现。
二、开机启动Launcher
2.1、开机启动Launcher流程图

2.2、开机启动流程源码分析
Launcher的开机启动由Android的AMS服务完成。AMS在SystemReady阶段会调用startHomeOnAllDisplays函数。Android支持多Display(虚拟Display或者由硬件上报的实际Display),多Display情况下一般Launcher会针对不同Display做不同的效果。
// frameworks/base/services/core/java/com/android/server/am/ActivityManagerService.java
public void systemReady(final Runnable goingCallback, TimingsTraceLog traceLog) {traceLog.traceBegin("PhaseActivityManagerReady");synchronized(this) {if (mSystemReady) {// If we're done calling all the receivers, run the next "boot phase" passed in// by the SystemServerif (goingCallback != null) {goingCallback.run();}return;}mLocalDeviceIdleController= LocalServices.getService(DeviceIdleController.LocalService.class);mActivityTaskManager.onSystemReady();// Make sure we have the current profile info, since it is needed for security checks.mUserController.onSystemReady();mAppOpsService.systemReady();mSystemReady = true;}try {sTheRealBuildSerial = IDeviceIdentifiersPolicyService.Stub.asInterface(ServiceManager.getService(Context.DEVICE_IDENTIFIERS_SERVICE)).getSerial();} catch (RemoteException e) {}ArrayList<ProcessRecord> procsToKill = null;synchronized(mPidsSelfLocked) {for (int i=mPidsSelfLocked.size()-1; i>=0; i--) {ProcessRecord proc = mPidsSelfLocked.valueAt(i);if (!isAllowedWhileBooting(proc.info)){if (procsToKill == null) {procsToKill = new ArrayList<ProcessRecord>();}procsToKill.add(proc);}}}synchronized(this) {if (procsToKill != null) {for (int i=procsToKill.size()-1; i>=0; i--) {ProcessRecord proc = procsToKill.get(i);Slog.i(TAG, "Removing system update proc: " + proc);mProcessList.removeProcessLocked(proc, true, false, "system update done");}}// Now that we have cleaned up any update processes, we// are ready to start launching real processes and know that// we won't trample on them any more.mProcessesReady = true;}Slog.i(TAG, "System now ready");EventLog.writeEvent(EventLogTags.BOOT_PROGRESS_AMS_READY, SystemClock.uptimeMillis());mAtmInternal.updateTopComponentForFactoryTest();mAtmInternal.getLaunchObserverRegistry().registerLaunchObserver(mActivityLaunchObserver);watchDeviceProvisioning(mContext);retrieveSettings();mUgmInternal.onSystemReady();final PowerManagerInternal pmi = LocalServices.getService(PowerManagerInternal.class);if (pmi != null) {pmi.registerLowPowerModeObserver(ServiceType.FORCE_BACKGROUND_CHECK,state -> updateForceBackgroundCheck(state.batterySaverEnabled));updateForceBackgroundCheck(pmi.getLowPowerState(ServiceType.FORCE_BACKGROUND_CHECK).batterySaverEnabled);} else {Slog.wtf(TAG, "PowerManagerInternal not found.");}if (goingCallback != null) goingCallback.run();// Check the current user here as a user can be started inside goingCallback.run() from// other system services.final int currentUserId = mUserController.getCurrentUserId();Slog.i(TAG, "Current user:" + currentUserId);if (currentUserId != UserHandle.USER_SYSTEM && !mUserController.isSystemUserStarted()) {// User other than system user has started. Make sure that system user is already// started before switching user.throw new RuntimeException("System user not started while current user is:"+ currentUserId);}traceLog.traceBegin("ActivityManagerStartApps");mBatteryStatsService.noteEvent(BatteryStats.HistoryItem.EVENT_USER_RUNNING_START,Integer.toString(currentUserId), currentUserId);mBatteryStatsService.noteEvent(BatteryStats.HistoryItem.EVENT_USER_FOREGROUND_START,Integer.toString(currentUserId), currentUserId);// On Automotive, at this point the system user has already been started and unlocked,// and some of the tasks we do here have already been done. So skip those in that case.// TODO(b/132262830): this workdound shouldn't be necessary once we move the// headless-user start logic to UserManager-landfinal boolean bootingSystemUser = currentUserId == UserHandle.USER_SYSTEM;if (bootingSystemUser) {mSystemServiceManager.startUser(currentUserId);}synchronized (this) {// Only start up encryption-aware persistent apps; once user is// unlocked we'll come back around and start unaware appsstartPersistentApps(PackageManager.MATCH_DIRECT_BOOT_AWARE);// Start up initial activity.mBooting = true;// Enable home activity for system user, so that the system can always boot. We don't// do this when the system user is not setup since the setup wizard should be the one// to handle home activity in this case.if (UserManager.isSplitSystemUser() &&Settings.Secure.getInt(mContext.getContentResolver(),Settings.Secure.USER_SETUP_COMPLETE, 0) != 0) {ComponentName cName = new ComponentName(mContext, SystemUserHomeActivity.class);try {AppGlobals.getPackageManager().setComponentEnabledSetting(cName,PackageManager.COMPONENT_ENABLED_STATE_ENABLED, 0,UserHandle.USER_SYSTEM);} catch (RemoteException e) {throw e.rethrowAsRuntimeException();}}if (bootingSystemUser) {// 启动Home,也就是LaunchermAtmInternal.startHomeOnAllDisplays(currentUserId, "systemReady");}mAtmInternal.showSystemReadyErrorDialogsIfNeeded();if (bootingSystemUser) {final int callingUid = Binder.getCallingUid();final int callingPid = Binder.getCallingPid();long ident = Binder.clearCallingIdentity();try {Intent intent = new Intent(Intent.ACTION_USER_STARTED);intent.addFlags(Intent.FLAG_RECEIVER_REGISTERED_ONLY| Intent.FLAG_RECEIVER_FOREGROUND);intent.putExtra(Intent.EXTRA_USER_HANDLE, currentUserId);broadcastIntentLocked(null, null, intent,null, null, 0, null, null, null, OP_NONE,null, false, false, MY_PID, SYSTEM_UID, callingUid, callingPid,currentUserId);intent = new Intent(Intent.ACTION_USER_STARTING);intent.addFlags(Intent.FLAG_RECEIVER_REGISTERED_ONLY);intent.putExtra(Intent.EXTRA_USER_HANDLE, currentUserId);broadcastIntentLocked(null, null, intent,null, new IIntentReceiver.Stub() {@Overridepublic void performReceive(Intent intent, int resultCode, String data,Bundle extras, boolean ordered, boolean sticky, int sendingUser)throws RemoteException {}}, 0, null, null,new String[] {INTERACT_ACROSS_USERS}, OP_NONE,null, true, false, MY_PID, SYSTEM_UID, callingUid, callingPid,UserHandle.USER_ALL);} catch (Throwable t) {Slog.wtf(TAG, "Failed sending first user broadcasts", t);} finally {Binder.restoreCallingIdentity(ident);}} else {Slog.i(TAG, "Not sending multi-user broadcasts for non-system user "+ currentUserId);}mAtmInternal.resumeTopActivities(false /* scheduleIdle */);if (bootingSystemUser) {mUserController.sendUserSwitchBroadcasts(-1, currentUserId);}BinderInternal.nSetBinderProxyCountWatermarks(BINDER_PROXY_HIGH_WATERMARK,BINDER_PROXY_LOW_WATERMARK);BinderInternal.nSetBinderProxyCountEnabled(true);BinderInternal.setBinderProxyCountCallback(new BinderInternal.BinderProxyLimitListener() {@Overridepublic void onLimitReached(int uid) {Slog.wtf(TAG, "Uid " + uid + " sent too many Binders to uid "+ Process.myUid());BinderProxy.dumpProxyDebugInfo();if (uid == Process.SYSTEM_UID) {Slog.i(TAG, "Skipping kill (uid is SYSTEM)");} else {killUid(UserHandle.getAppId(uid), UserHandle.getUserId(uid),"Too many Binders sent to SYSTEM");}}}, mHandler);traceLog.traceEnd(); // ActivityManagerStartAppstraceLog.traceEnd(); // PhaseActivityManagerReady}
}
调用ActivityTaskManagerInternal类型的接口startHomeOnAllDisplays,这个接口ActivityTaskManagerService.java文件中实现。
// android/frameworks/base/services/core/java/com/android/server/wm/ActivityTaskManagerService.java
final class LocalService extends ActivityTaskManagerInternal {@Overridepublic boolean startHomeOnAllDisplays(int userId, String reason) {synchronized (mGlobalLock) {// 这个对象是RootActivityContainer类型return mRootActivityContainer.startHomeOnAllDisplays(userId, reason);}}
}
接下来调用RootActivityContainer的接口startHomeOnAllDisplays,第二个参数reson的值为“systemReady”。
// frameworks/base/services/core/java/com/android/server/wm/RootActivityContainer.java
boolean startHomeOnAllDisplays(int userId, String reason) {boolean homeStarted = false;for (int i = mActivityDisplays.size() - 1; i >= 0; i--) {final int displayId = mActivityDisplays.get(i).mDisplayId;homeStarted |= startHomeOnDisplay(userId, reason, displayId);}return homeStarted;
}
遍历mActivityDisplays对于所有处于Active状态的Display调用startHomeOnDisplay,在每个Display上都启动Home(Launcher)。
boolean startHomeOnDisplay(int userId, String reason, int displayId) {// allowInstrumenting :false// fromHomeKey : falsereturn startHomeOnDisplay(userId, reason, displayId, false /* allowInstrumenting */,false /* fromHomeKey */);
}boolean startHomeOnDisplay(int userId, String reason, int displayId, boolean allowInstrumenting,boolean fromHomeKey) {// 如果DisplayID是非法的,使用当前处于顶层焦点的 Display// Fallback to top focused display if the displayId is invalid.if (displayId == INVALID_DISPLAY) {displayId = getTopDisplayFocusedStack().mDisplayId;}// 构建一个IntentIntent homeIntent = null;ActivityInfo aInfo = null;if (displayId == DEFAULT_DISPLAY) {// 如果DisplayID是默认的Display(一般是主屏)// 调用ActivityTaskManagerService的getHomeIntent,拿到用来启动Home的IntenthomeIntent = mService.getHomeIntent();// 查找当前系统里包含 android.intent.category.HOME的Activity。// 择优选择使用哪个ActivityaInfo = resolveHomeActivity(userId, homeIntent);} else if (shouldPlaceSecondaryHomeOnDisplay(displayId)) {// 如果不是默认Display屏幕Pair<ActivityInfo, Intent> info = resolveSecondaryHomeActivity(userId, displayId);aInfo = info.first;homeIntent = info.second;}if (aInfo == null || homeIntent == null) {return false;}// 判断是否运行启动Homeif (!canStartHomeOnDisplay(aInfo, displayId, allowInstrumenting)) {return false;}// 更新Home Intent// Updates the home component of the intent.homeIntent.setComponent(new ComponentName(aInfo.applicationInfo.packageName, aInfo.name));homeIntent.setFlags(homeIntent.getFlags() | FLAG_ACTIVITY_NEW_TASK);// 如果是从HomeKey启动的,添加额外参数、// Updates the extra information of the intent.if (fromHomeKey) {homeIntent.putExtra(WindowManagerPolicy.EXTRA_FROM_HOME_KEY, true);}// Update the reason for ANR debugging to verify if the user activity is the one that// actually launched.final String myReason = reason + ":" + userId + ":" + UserHandle.getUserId(aInfo.applicationInfo.uid) + ":" + displayId;// 启动HomemService.getActivityStartController().startHomeActivity(homeIntent, aInfo, myReason,displayId);return true;
}
startHomeOnDisplay函数中查询当前系统中包含 android.intent.category.HOME信息的Activity(resolveHomeActivity),如果找到了多个Activity则选择高优先级的。根据查找的Activity信息构建Intent,使用ActivityTaskManagerService的ActivityStartController启动Home对应的Activity。
getHomeIntent函数在ActivityTaskManagerService中实现。
// frameworks/base/services/core/java/com/android/server/wm/ActivityTaskManagerService.java
Intent getHomeIntent() {// String mTopAction = Intent.ACTION_MAIN;Intent intent = new Intent(mTopAction, mTopData != null ? Uri.parse(mTopData) : null);intent.setComponent(mTopComponent);intent.addFlags(Intent.FLAG_DEBUG_TRIAGED_MISSING);if (mFactoryTest != FactoryTest.FACTORY_TEST_LOW_LEVEL) {// 非FactoryTest模式下走这里。// android.intent.category.HOMEintent.addCategory(Intent.CATEGORY_HOME);}return intent;
}
resolveHomeActivity函数用于查找包含android.intent.category.HOME信息的Activity。实现上是通过PMS完成的。
// frameworks/base/services/core/java/com/android/server/wm/RootActivityContainer.java
/*** This resolves the home activity info.* @return the home activity info if any.*/
@VisibleForTesting
ActivityInfo resolveHomeActivity(int userId, Intent homeIntent) {final ComponentName comp = homeIntent.getComponent();try {if (comp != null) {// Factory test.} else {final String resolvedType =homeIntent.resolveTypeIfNeeded(mService.mContext.getContentResolver());// 调用PMS查找信息final ResolveInfo info = AppGlobals.getPackageManager().resolveIntent(homeIntent, resolvedType, flags, userId);if (info != null) {aInfo = info.activityInfo;}}} catch (RemoteException e) {// ignore}aInfo = new ActivityInfo(aInfo);aInfo.applicationInfo = mService.getAppInfoForUser(aInfo.applicationInfo, userId);return aInfo;
}
当找到所需信息后,调用ActivityStartController的startHomeActivity启动Home。该接口与AMS的startActivity和startActivityAsUser实现上基本原理一样,都是通过Intent启动Activity(fork一个进程出来)。
// frameworks/base/services/core/java/com/android/server/wm/ActivityStartController.java
void startHomeActivity(Intent intent, ActivityInfo aInfo, String reason, int displayId) {final ActivityOptions options = ActivityOptions.makeBasic();options.setLaunchWindowingMode(WINDOWING_MODE_FULLSCREEN);if (!ActivityRecord.isResolverActivity(aInfo.name)) {// The resolver activity shouldn't be put in home stack because when the foreground is// standard type activity, the resolver activity should be put on the top of current// foreground instead of bring home stack to front.options.setLaunchActivityType(ACTIVITY_TYPE_HOME);}options.setLaunchDisplayId(displayId);// 启动ActivitymLastHomeActivityStartResult = obtainStarter(intent, "startHomeActivity: " + reason).setOutActivity(tmpOutRecord).setCallingUid(0).setActivityInfo(aInfo).setActivityOptions(options.toBundle()).execute();mLastHomeActivityStartRecord = tmpOutRecord[0];final ActivityDisplay display =mService.mRootActivityContainer.getActivityDisplay(displayId);final ActivityStack homeStack = display != null ? display.getHomeStack() : null;if (homeStack != null && homeStack.mInResumeTopActivity) {// If we are in resume section already, home activity will be initialized, but not// resumed (to avoid recursive resume) and will stay that way until something pokes it// again. We need to schedule another resume.mSupervisor.scheduleResumeTopActivities();}
}
三、短压Home键启动Launcher
3.1、短压Home键启动Launcher流程图
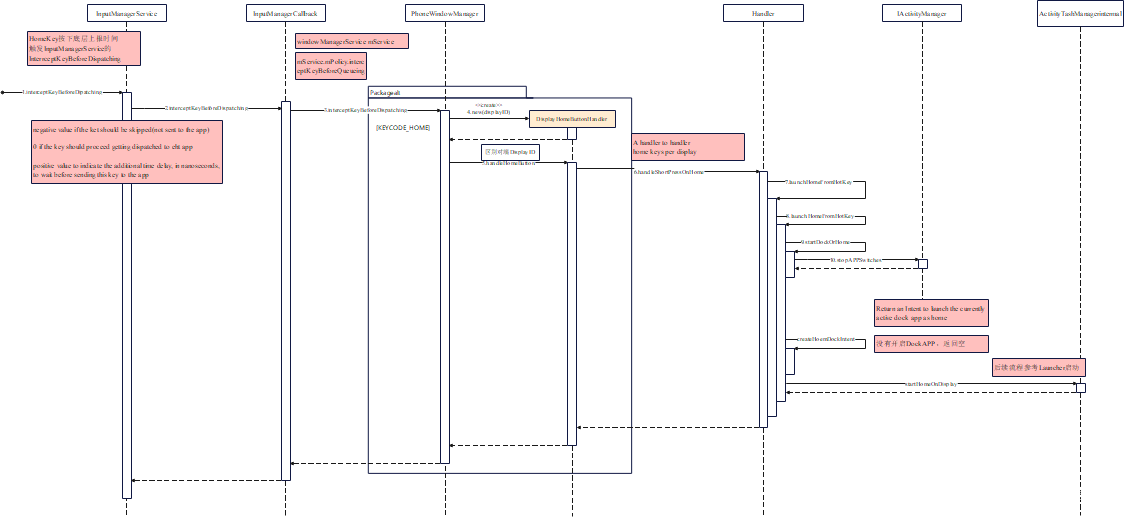
3.2、短压Home键启动Launcher源码分析
短压与长按区分,点一下Home键就属于短压。短压Home键后,Android会启动Home。
// frameworks/base/services/core/java/com/android/server/input/InputManagerService.java// Native callback.
private long interceptKeyBeforeDispatching(IBinder focus, KeyEvent event, int policyFlags) {// native层的 inputservice,通过这个接口上报回调return mWindowManagerCallbacks.interceptKeyBeforeDispatching(focus, event, policyFlags);
}
// frameworks/base/services/core/java/com/android/server/wm/InputManagerCallback.java
/**
Provides an opportunity for the window manager policy to process a key before
ordinary dispatch.
*/
@Override
public long interceptKeyBeforeDispatching(IBinder focus, KeyEvent event, int policyFlags) {WindowState windowState = mService.windowForClientLocked(null, focus, false);return mService.mPolicy.interceptKeyBeforeDispatching(windowState, event, policyFlags);
}
mService是WindowManagerService类型,WindowManagerService中的mPolicy是PhoneWindowManager。PhoneWindowManager作为WMS的Policy配置文件,专门用来处理与UI行为有关的事件。PhoneWindowManager会拦截HomeKey事件进行相应处理后选择不再派发Home(PhoneWindowManager处理完就不需要其他人处理了),或者继续派发HomeKey给当前焦点View。
// frameworks/base/services/core/java/com/android/server/policy/PhoneWindowManager.java
private long interceptKeyBeforeDispatchingInner(WindowState win, KeyEvent event,int policyFlags) {final boolean keyguardOn = keyguardOn();final int keyCode = event.getKeyCode();final int repeatCount = event.getRepeatCount();final int metaState = event.getMetaState();final int flags = event.getFlags();final boolean down = event.getAction() == KeyEvent.ACTION_DOWN;final boolean canceled = event.isCanceled();final int displayId = event.getDisplayId();// First we always handle the home key here, so applications// can never break it, although if keyguard is on, we do let// it handle it, because that gives us the correct 5 second// timeout.if (keyCode == KeyEvent.KEYCODE_HOME) {// 处理HomeKeyDisplayHomeButtonHandler handler = mDisplayHomeButtonHandlers.get(displayId);if (handler == null) {handler = new DisplayHomeButtonHandler(displayId);mDisplayHomeButtonHandlers.put(displayId, handler);}return handler.handleHomeButton(win, event);} else if (keyCode == KeyEvent.KEYCODE_MENU) {// 省略}
}/** A handler to handle home keys per display */
private class DisplayHomeButtonHandler {int handleHomeButton(WindowState win, KeyEvent event) {final boolean keyguardOn = keyguardOn();final int repeatCount = event.getRepeatCount();final boolean down = event.getAction() == KeyEvent.ACTION_DOWN;final boolean canceled = event.isCanceled();// If we have released the home key, and didn't do anything else// while it was pressed, then it is time to go home!if (!down) {// 省略// Post to main thread to avoid blocking input pipeline.// 处理短压HomemHandler.post(() -> handleShortPressOnHome(mDisplayId));return -1;}// 省略return -1;}
}private void handleShortPressOnHome(int displayId) {// Turn on the connected TV and switch HDMI input if we're a HDMI playback device.final HdmiControl hdmiControl = getHdmiControl();if (hdmiControl != null) {hdmiControl.turnOnTv();}// If there's a dream running then use home to escape the dream// but don't actually go home.if (mDreamManagerInternal != null && mDreamManagerInternal.isDreaming()) {mDreamManagerInternal.stopDream(false /*immediate*/);return;}// 启动Home// Go home!launchHomeFromHotKey(displayId);
}
PhoneWindowManager针对每个Display创建一个DisplayHomeButtonHandler ,通过它处理HomeKey。在启动Home期间如果开始了dream模式(类似于屏保),会先退出dream。最后调用launchHomeFromHotKey来启动Home,后续流程基本上与Home开机启动一致了。
四、Launcher异常崩溃后的自启动
4.1、Launcher异常崩溃后的自启动流程图
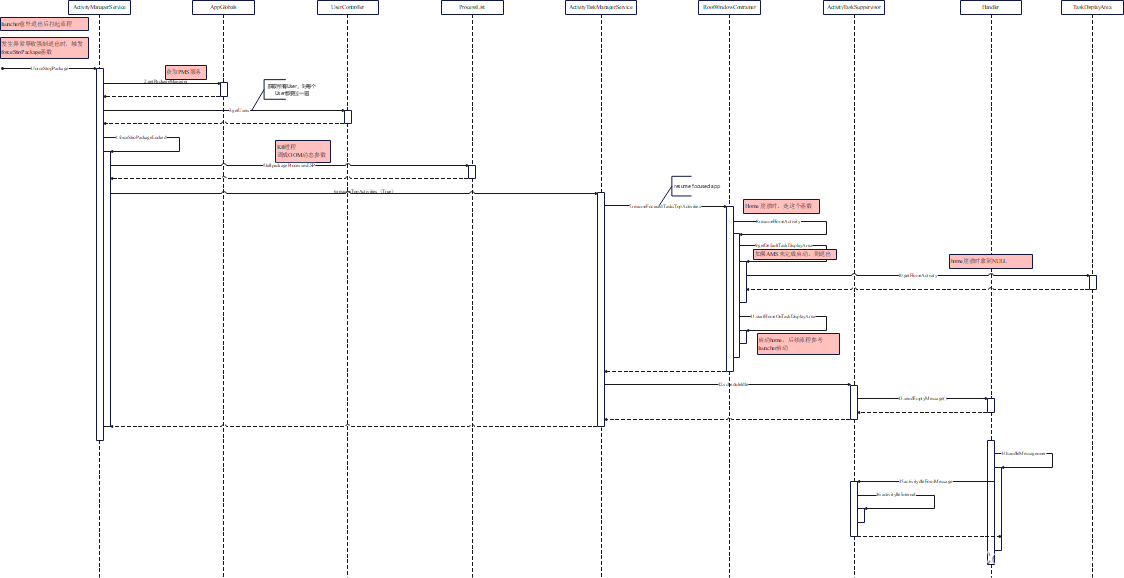
4.2、Launcher异常崩溃后的自启动源码分析
Launcher意外退出(比如崩溃了)时,会触发AMS的forceStopPackage。AMS会再次将Home拉起。
//frameworks/base/services/core/java/com/android/server/am/ActivityManagerService.java
@Override
public void forceStopPackage(final String packageName, int userId) {try {IPackageManager pm = AppGlobals.getPackageManager();synchronized(this) {int[] users = userId == UserHandle.USER_ALL? mUserController.getUsers() : new int[] { userId };for (int user : users) {if (mUserController.isUserRunning(user, 0)) {// 对每个运行的User,停掉 packageName对应的应用forceStopPackageLocked(packageName, pkgUid, "from pid " + callingPid);finishForceStopPackageLocked(packageName, pkgUid);}}}} finally {Binder.restoreCallingIdentity(callingId);}
}
forceStopPackageLocked函数中,会先Kill掉应用对应的进程。然后 resume focused app,在resume的过程中会拉起Home。
//frameworks/base/services/core/java/com/android/server/am/ActivityManagerService.java
@GuardedBy("this")
final boolean forceStopPackageLocked(String packageName, int appId,boolean callerWillRestart, boolean purgeCache, boolean doit,boolean evenPersistent, boolean uninstalling, int userId, String reason) {// kill进程boolean didSomething = mProcessList.killPackageProcessesLocked(packageName, appId, userId,ProcessList.INVALID_ADJ, callerWillRestart, true /* allowRestart /, doit,
*                        evenPersistent, true /* setRemoved */,packageName == null ? ("stop user " + userId) : ("stop " + packageName));if (doit) {if (purgeCache && packageName != null) {AttributeCache ac = AttributeCache.instance();if (ac != null) {ac.removePackage(packageName);}}if (mBooted) {// resume focused app// 通过这个函数重新拉起HomemAtmInternal.resumeTopActivities(true /* scheduleIdle */);}}return didSomething;
}
调用ActivityTaskManagerServiced的resumeTopActivities函数。在 Home崩溃的情况下,调用这个函数,可以保证Home重新被拉起(这个函数最终会调用到RootActivityContainer 的resumeHomeActivity函数。感兴趣的可以继续顺着代码往下看)
//frameworks/base/services/core/java/com/android/server/wm/ActivityTaskManagerService.java
@Override
public void resumeTopActivities(boolean scheduleIdle) {synchronized (mGlobalLock) {mRootActivityContainer.resumeFocusedStacksTopActivities();if (scheduleIdle) {mStackSupervisor.scheduleIdleLocked();}}
}
// frameworks/base/services/core/java/com/android/server/wm/RootActivityContainer.java
boolean resumeFocusedStacksTopActivities(ActivityStack targetStack, ActivityRecord target, ActivityOptions targetOptions) {for (int displayNdx = mActivityDisplays.size() - 1; displayNdx >= 0; --displayNdx) {// 省略if (!resumedOnDisplay) {// In cases when there are no valid activities (e.g. device just booted or launcher// crashed) it's possible that nothing was resumed on a display. Requesting resume// of top activity in focused stack explicitly will make sure that at least home// activity is started and resumed, and no recursion occurs.final ActivityStack focusedStack = display.getFocusedStack();if (focusedStack != null) {focusedStack.resumeTopActivityUncheckedLocked(target, targetOptions);}}}return result;
}


![[足式机器人]Part2 Dr. CAN学习笔记-Ch04 Advanced控制理论](https://img-blog.csdnimg.cn/direct/d133933db11248f5a59dae0d309219fa.png#pic_center)


![[C#]利用paddleocr进行表格识别](https://img-blog.csdnimg.cn/direct/ddca10cd7ff844ceac57722395c9d97c.jpeg)
