文章目录
- 拓扑图
- 推荐步骤
- 在Centos01上安装Nginx,设置网站根目录/www使用域名www.h.com访问
- 配置Nginx
- 配置DNS
- 验证Nginx日志切割
- 在www.h.com网站配置防盗链防止www.hy.com盗www.h.com的连接
注:本文提到的网址仅不是实际存在的网站,仅作为技术学习举例之用。
前几天,有个读者向我吐槽,找了很久的工作,好不容易熬到到了二面(技术面,如果过了就基本定了)。谁知道没有准备充分,被一道题给直接挂掉了。
这道题就是:Nginx的优化思路有哪些?网站的防盗链如何做?实际工作中有哪些类似的安全经验?结果支支吾吾半天没讲到重点,结果就可想而知了。。。
所以,今天就带大家来一起重新复习一下这方面的知识点。
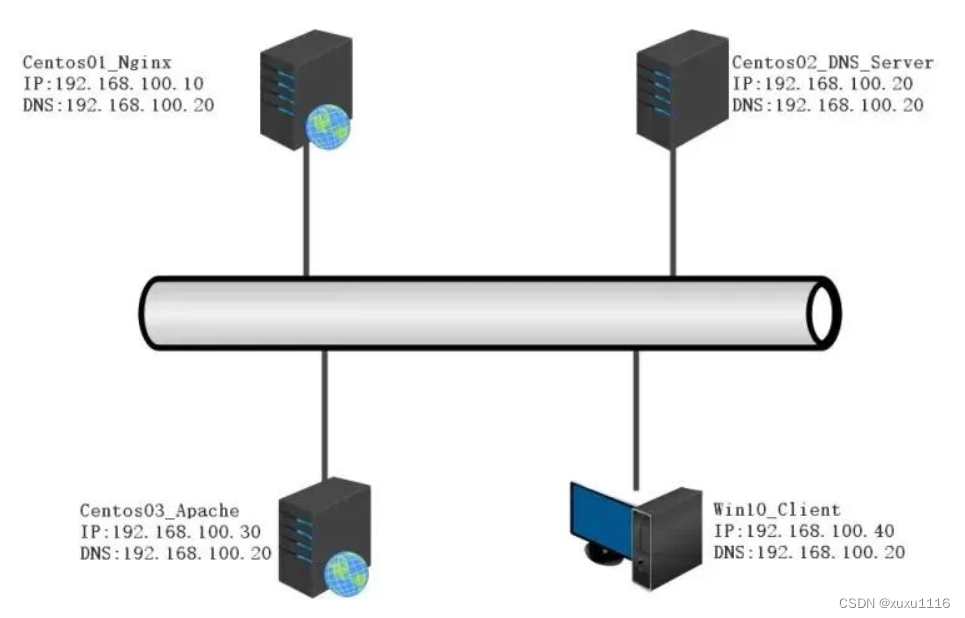
拓扑图
推荐步骤
1、在Centos01上安装Nginx,设置网站根目录/www使用域名www.h.com访问
2、在Centos02上安装DNS使用域名访问Centos01上使用域名www.h.com访问,Centos03使用yum安装apache使用域名www.hy.com访问
3、在www.h.com域名的网站隐藏Nginx版本、查看Nginx管理用户、设置网页缓存、配置日志切割、配置Nginx日志切割、设置超时时间
4、在www.h.com网站配置防盗链防止www.hy.com盗 www.h.com的连接
在Centos01上安装Nginx,设置网站根目录/www使用域名www.h.com访问
挂载Centos7系统光盘
[root@centos01 ~]# mount /dev/cdrom /mnt/
mount: /dev/sr0 写保护,将以只读方式挂载
创建nginx管理账户
[root@centos01 ~]# useradd -M -s /sbin/nologin nginx
传输nginx1.16.1文件
[root@centos01 ~]# rz
z waiting to receive.**B0100000023be50
安装依赖文件
[root@centos01 ~]# yum -y install pcre-devel zlib-devel
解压nginx配置文件
[root@centos01 ~]# yum -y install pcre-devel zlib-devel
修改源代码程序
[root@centos01 ~]# vim /usr/src/nginx-1.16.1/src/core/nginx.h
13 #define NGINX_VERSION    "7.0"
14 #define NGINX_VER      "IIS/" NGINX_VERSION
22 #define NGINX_VAR      "IIS"
修改Nginx数据包请求头部
[root@centos01 ~]# vim/usr/src/nginx-1.16.1/src/http/ngx_http_header_filter_module.c 49 static u_char ngx_http_server_string[] = "Server: IIS" CRLF;li
配置Nginx
[root@centos01 ~]# cd /usr/src/nginx-1.16.1/
[root@centos01 nginx-1.16.1]# ./configure --prefix=/usr/local/nginx --user=nginx --group=nginx --with-http_stub_status_module
#编译安装Nginx
[root@centos01 nginx-1.16.1]# make && make install  # 优化命令
[root@centos01 nginx-1.16.1]# ln -s /usr/local/nginx/sbin/* /usr/local/sbin/
[root@centos01 nginx-1.16.1]# cd
[root@centos01 ~]# nginx -t
nginx: the configuration file /usr/local/nginx/conf/nginx.conf syntax is ok
nginx: configuration file /usr/local/nginx/conf/nginx.conf test is successful  # 创建网站根目录www 设置网站主页
[root@centos01 ~]# mkdir /www/
[root@centos01 ~]# echo "www.h.com" > /www/index.html
在 Centos03 上安装 DNS 使用域名访问 Centos01 上使用域名http://www.bdqn___.com/访问,Centos02 使用 yum 安装 apache 使用域名http://www.benet___.com/访问。
配置DNS
centos01配置DNS,重启网卡服务
[root@centos01 ~]# vim /etc/sysconfig/network-scripts/ifcfg-ens32
[root@centos01 ~]# cat /etc/sysconfig/network-scripts/ifcfg-ens32
TYPE=Ethernet
BOOTPROTO=static
NAME=ens32
DEVICE=ens32
ONBOOT=yes
IPADDR=192.168.100.10
NATMACK=255.255.255.0
DNS1=192.168.100.30  [root@centos01 ~]# systemctl restart network
[root@centos01 ~]# cat /etc/resolv.conf
# Generated by NetworkManager
nameserver 192.168.100.30
centos02配置DNS 重启网卡服务
[root@centos02 ~]# vim /etc/sysconfig/network-scripts/ifcfg-ens32
[root@centos02 ~]# cat /etc/sysconfig/network-scripts/ifcfg-ens32
TYPE=Ethernet
BOOTPROTO=static
NAME=ens32
DEVICE=ens32
ONBOOT=yes
IPADDR=192.168.100.20
NATMACK=255.255.255.0
DNS1=192.168.100.30  [root@centos02 ~]# systemctl restart network
[root@centos02 ~]# cat /etc/resolv.conf
# Generated by NetworkManager
nameserver 192.168.100.30
centos03配置DNS 重启网卡服务
[root@centos03 ~]# vim /etc/sysconfig/network-scripts/ifcfg-ens32
[root@centos03 ~]# cat /etc/sysconfig/network-scripts/ifcfg-ens32
TYPE=Ethernet
BOOTPROTO=static
NAME=ens32
DEVICE=ens32
ONBOOT=yes
IPADDR=192.168.100.30
NATMACK=255.255.255.0
DNS1=192.168.100.30
[root@centos03 ~]# systemctl restart network
[root@centos03 ~]# cat /etc/resolv.conf
# Generated by NetworkManager
nameserver 192.168.100.30
挂载centos7系统光盘 安装DNS
[root@centos03 ~]# mount /dev/cdrom /mnt/
mount: /dev/sr0 写保护,将以只读方式挂载
[root@centos03 ~]# ls /mnt/
CentOS_BuildTag  EULA  images   LiveOS   repodata        RPM-GPG-KEY-CentOS-Testing-7
EFI        GPL  isolinux  Packages  RPM-GPG-KEY-CentOS-7  TRANS.TBL
root@centos03 ~]# rpm -ivh /mnt/Packages/bind-9.9.4-50.el7.x86_64.rpm
[root@centos03 ~]# rpm -ivh /mnt/Packages/bind-chroot-9.9.4-50.el7.x86_64.rpm
配置DNS主配置文件
[root@centos03 ~]# echo "" > /etc/named.conf
[root@centos03 ~]# vim /etc/named.conf
options {  listen-on port 53 { any; };  directory "/var/named/";
};
zone "h.com" IN {  type master;  file "/var/named/h.com.zone";
};
zone "hy.com" IN {  type master;  file "/var/named/hy.com.zone";
};
配置DNS区域配置文件第一台服务器
[root@centos03 ~]# vim /var/named/h.com.zone
$TTL       86400
@        SOA       h.com.    root.h.com. (  2023021015  1H  15M  1W  1D
)
@        NS        centos03.h.com.
centos03     A        192.168.100.30
www       A        192.168.100.10
[root@centos03 ~]# named-checkzone h.com /var/named/h.com.zone
zone h.com/IN: loaded serial 2023021015
OK
配置第二台DNS区域配置文件
[root@centos03 ~]# vim /var/named/hy.com.zone
$TTL       86400
@        SOA       hy.com.    root.hy.com. (  2023021015  1H  15M  1W  1D
)
@        NS        centos03.hy.com.
centos03     A        192.168.100.30
www       A        192.168.100.20
[root@centos03 ~]# named-checkzone hy.com /var/named/hy.com.zone
zone hy.com/IN: loaded serial 2023021015
OK
启动DNS服务监听端口
[root@centos03 ~]# systemctl stop named
[root@centos03 ~]# systemctl start named
[root@centos03 ~]# netstat -anptu | grep named
tcp     0    0 192.168.100.30:53    0.0.0.0:*        LISTEN    2430/named
tcp     0    0 127.0.0.1:53       0.0.0.0:*        LISTEN    2430/named
tcp     0    0 127.0.0.1:953      0.0.0.0:*        LISTEN    2430/named
tcp6    0    0 ::1:953         :::*           LISTEN    2430/named
udp     0    0 192.168.122.1:53     0.0.0.0:*              2430/named
udp     0    0 192.168.100.30:53    0.0.0.0:*              2430/named
udp     0    0 127.0.0.1:53       0.0.0.0:*              2430/named
验证访问 www.h.com

挂centos7系统光盘 yum安装apache
[root@centos02 ~]# mount /dev/cdrom /mnt/
mount: /dev/sr0 写保护,将以只读方式挂载
[root@centos02 ~]# ls mn
ls: 无法访问mn: 没有那个文件或目录
[root@centos02 ~]# ls /mnt/
CentOS_BuildTag  EFI  EULA  GPL  images  isolinux  LiveOS  Packages  repodata  RPM-GPG-KEY-CentOS-7  RPM-GPG-KEY-CentOS-Testing-7  TRANS.TBL
[root@centos02 ~]# yum -y install httpd
设置开机自启 设置网站主页
[root@centos02 ~]# systemctl restart httpd
[root@centos02 ~]# systemctl enable httpd
Created symlink from /etc/systemd/system/multi-user.target.wants/httpd.service to /usr/lib/systemd/system/httpd.service.
[root@centos02 ~]# echo "www.hy.com" > /var/www/html/index.html
验证访问www.hy.com

在www.h.com域名的网站隐藏Nginx版本、查看Nginx管理用户、设置网页缓存、配置日志切割、配置Nginx日志切割、设置超时时间。
#隐藏版本和优化管理Nginx进程用户 修改Nginx主配置文件
vim /usr/local/nginx/conf/nginx.conf
user  nginx;
worker_processes  1;
pid     logs/nginx.pid;
events {  worker_connections  1024;
}
http {  include    mime.types;  default_type  application/octet-stream;  sendfile     on;  keepalive_timeout  65;  server_tokens Off;  server {  listen    192.168.100.10:80;  server_name  www.h.com;  charset utf-8;  access_log  logs/www.h.com.access.log;  location / {  root  /www/;  index  index.html index.htm;  }  }
}
[root@centos01 ~]# nginx -t
nginx: the configuration file /usr/local/nginx/conf/nginx.conf syntax is ok
nginx: configuration file /usr/local/nginx/conf/nginx.conf test is successful  #查看Nginx进程
[root@centos01 ~]# ps -ef | grep nginx
root    5469    1  0 00:03 ?     00:00:00 nginx: master process nginx
nginx    5470  5469  0 00:03 ?     00:00:00 nginx: worker process
root    5472  1186  0 00:03 pts/0   00:00:00 grep --color=auto nginx
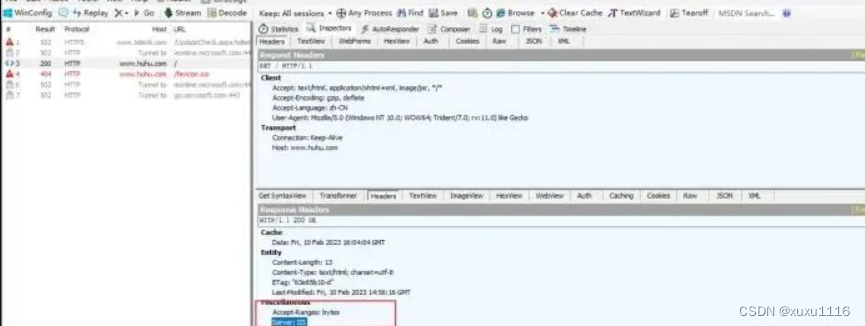
验证隐藏版本
# 设置网页缓存时间 修改Nginx主配置文件支持图片缓存
[root@centos01 ~]# vim /usr/local/nginx/conf/nginx.conf
user  nginx;
worker_processes  1;
pid     logs/nginx.pid;
events {  worker_connections  1024;
}
http {  include    mime.types;  default_type  application/octet-stream;  sendfile     on;  keepalive_timeout  65;  server_tokens Off;  server {  listen    192.168.100.10:80;  server_name  www.h.com;  charset utf-8;  access_log  logs/www.h.com.access.log;  location ~ \.(gif|jpg|png|jpeg|bmp|swf)$ {  root /www;  expires 1d;  }  location / {  root  /www;  index  index.html index.htm;  }  }
}
[root@centos01 ~]# nginx -t
nginx: the configuration file /usr/local/nginx/conf/nginx.conf syntax is ok
nginx: configuration file /usr/local/nginx/conf/nginx.conf test is successful  #设置网页加载图片
[root@centos01 ~]# cd /www/
[root@centos01 www]# rz
[root@centos01 www]# ls
index.html  logo.jpg  #重启Nginx服务
[root@centos01 www]# killall nginx
[root@centos01 www]# killall nginx
nginx: no process found
[root@centos01 www]# nginx
[root@centos01 www]# cd
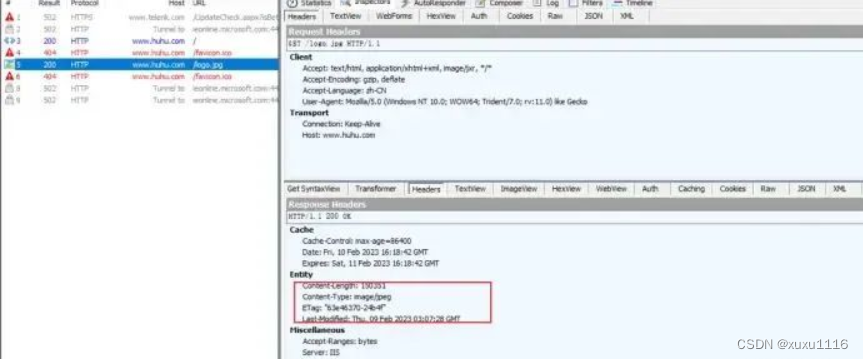
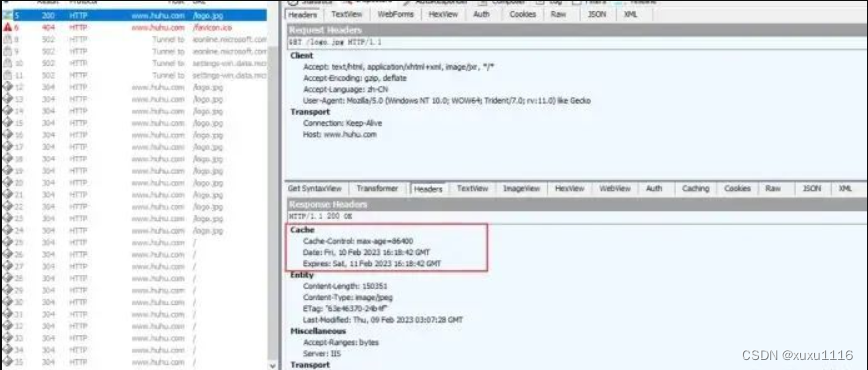
验证网页缓存
#配置Nginx日志切割、设置超时时间 创建存储日志切割目录
[root@centos01 ~]# mkdir /nginx_log  #编写日志切割脚本
[root@centos01 ~]# vim /opt/nginx_log_.sh
#!/bin/bash
d=$(date -d "-1 day" "+%Y%m%d")
logs_path="/nginx_log/"
pid_path="/usr/local/nginx/logs/nginx.pid"
[ -d $logs_path ] || mkdir -p $logs_path
mv /usr/local/nginx/logs/www.h.com.access.log ${logs_path}/www.h.com-access.log-$d
kill -USR1 $(cat $pid_path)
find $logs_path -mtime +30 |xargs rm -rf  #添加执行权限
[root@centos01 ~]# chmod +x /opt/nginx_log_.sh  #执行脚本
[root@centos01 ~]# sh /opt/nginx_log_.sh  #验证切割
[root@centos01 ~]# ls /nginx_log/
www.h.com-access.log-20230210  #编辑计划任务,十分钟切割一次
[root@centos01 ~]# crontab -e
*/10   *    *    *    *    /opt/nginx_log_.sh
验证Nginx日志切割
#优化Nginx保持连接 修改Nginx主配置文件
[root@centos01 ~]# vim /usr/local/nginx/conf/nginx.conf
user  nginx;
worker_processes  2;
pid     logs/nginx.pid;
events {  worker_connections  2048;
}
http {  include    mime.types;  default_type  application/octet-stream;  sendfile     on;  keepalive_timeout  5;  server_tokens Off;  client_header_timeout 5;  client_body_timeout 5;  server {  listen    192.168.100.10:80;  server_name  www.h.com;  charset utf-8;  access_log  logs/www.h.com.access.log;  location ~ \.(gif|jpg|png|jpeg|bmp|swf)$ {  root /www;  expires 1d;  }  location / {  root  /www;  index  index.html index.htm;  }  }
}  #重新启动Nginx
[root@centos01 ~]# killall nginx
[root@centos01 ~]# killall nginx
nginx: no process found
[root@centos01 ~]#
[root@centos01 ~]# nginx  #验证优化Nginx保持连接
[root@centos01 ~]# curl -I www.h.com
HTTP/1.1 200 OK
Server: IIS
Date: Fri, 10 Feb 2023 16:45:44 GMT
Content-Type: text/html; charset=utf-8
Content-Length: 13
Last-Modified: Fri, 10 Feb 2023 14:56:16 GMT
Connection: keep-alive
ETag: "63e65b10-d"
Accept-Ranges: bytes
在www.h.com网站配置防盗链防止www.hy.com盗www.h.com的连接
#上传错误图片
[root@centos01 ~]# cd /www/
[root@centos01 www]# ls
index.html  logo.jpg
[root@centos01 www]# rz
z waiting to receive.**B0100000023be50
[root@centos01 www]# ls
error.png  index.html  logo.jpg  #修改Nginx主配置文件
user  nginx;
worker_processes  2;
pid     logs/nginx.pid;
events {  worker_connections  2048;
}
http {  include    mime.types;  default_type  application/octet-stream;  sendfile     on;  server {  listen    192.168.100.10:80;  server_name  www.h.com;  charset utf-8;  access_log  logs/www.h.com.access.log;  location ~* \.(gif|jpg|swf)$ {  valid_referers none blocked *.h.com h.com;  if ($invalid_referer) {  rewrite ^/ http://www.h.com/error.png;  }
}  location / {  root  /www;  index  index.html index.htm;  }  }
}
[root@centos01 ~]# nginx -t
nginx: the configuration file /usr/local/nginx/conf/nginx.conf syntax is ok
nginx: configuration file /usr/local/nginx/conf/nginx.conf test is successful  #重新启动Nginx
[root@centos01 ~]# killall nginx
[root@centos01 ~]# killall nginx
nginx: no process found
[root@centos01 ~]#
[root@centos01 ~]# nginx  #centos02模拟盗取centos01链接
[root@centos02 ~]# vim /var/www/html/index.html
www.hy.com
<img src="http://www.h.com/logo.jpg" />
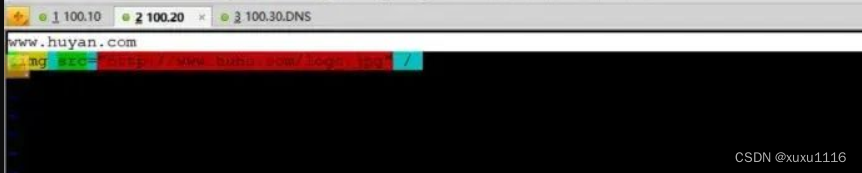
重启服务
[root@centos02 ~]# systemctl restart httpd
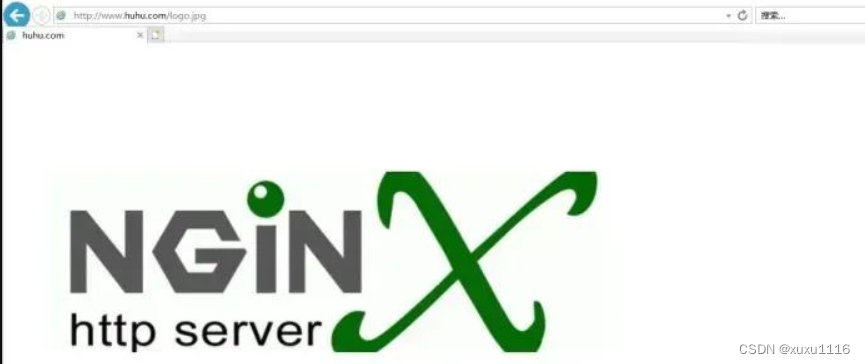
验证防盗链
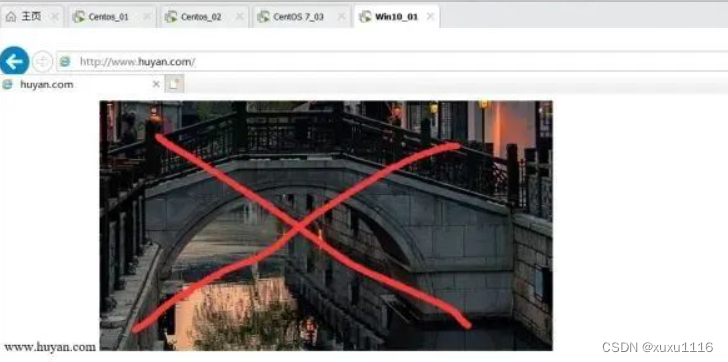
centos01图片