绪论:
“我这个人走得很慢,但是我从不后退。——亚伯拉罕·林肯”,本章是接上一章搜索二叉树中红黑树的后续文章,若没有看过强烈建议观看,否则后面模拟实现部分很看懂其代码原理。本章主要讲了map、set是如何使用的,以及map、set如何底层实现相较于前面的章节本章更加考验你的逻辑能力来进行封装,还能帮助对大体框架的有更加好的了解。下一章将进入哈希表的学习,同样也是STL中非常重要且难以学习的章节敬请期待(早关注不迷路!)。话不多说安全带系好,发车啦(建议电脑观看)。
1.set
1.1set的概念
set其底层就是红黑树,所以其很多特性也和红黑树一样也就表明了他就是一个二叉搜索树。set看起来只是存着value,但是set是关联式容器容器内部的元素都是pair<key,value>构成的键值对,所以set的value元素其实就是pair<value,value>它两个元素是相同的且只存了一个值value,但我们在使用的时候并不用管底层只需要插入正常的value值即可,并且在set中所有元素值value都是唯一的不能重复出现,在set中不能修改元素的值,但可以正常增删元素,同二叉搜索树一样他可以通过迭代器遍历出有序对。
set常用来:去重(去掉一个序列的相同值)、排序、查找。
1.2set常使用的方法
- set的模板参数:

Compare默认缺省为less也就表示其默认是其底层是 x < y,这样如果用迭代器遍历出来就是一个升序。 x < y 返回真进行交换,反之x>y的话返回假(和vector等若干容器中一样)。
- set的构造:
 上图123如何使用对应下图123的具体方法:
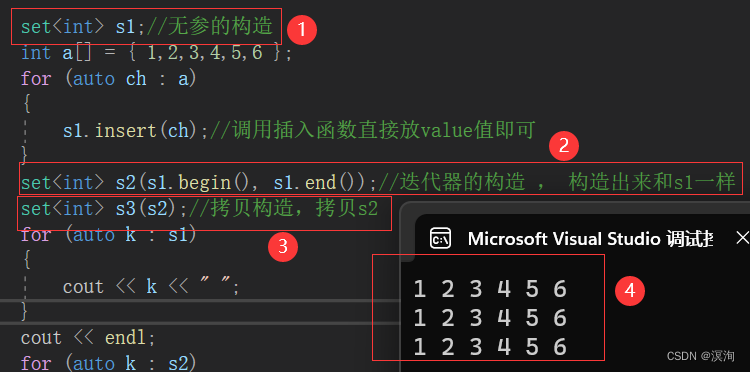 源码:
源码:
void test1()
{set<int> s1;//无参的构造int a[] = { 1,2,3,4,5,6 };for (auto ch : a){s1.insert(ch);//调用插入函数直接放value值即可}set<int> s2(s1.begin(), s1.end());//迭代器的构造 , 构造出来和s1一样set<int> s3(s2);//拷贝构造,拷贝s2for (auto k : s1){cout << k << " ";}cout << endl;for (auto k : s2){cout << k << " ";}cout << endl;for (auto k : s3){cout << k << " ";}cout << endl;
}
- set的插入:

下图123对应着上图123的使用方法:
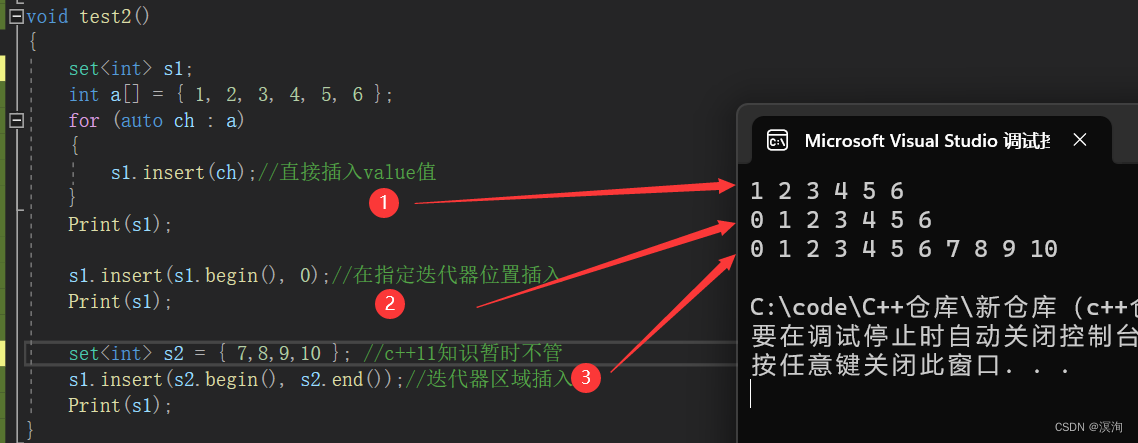
- 在方法1中的返回值一个pair<iterator,bool>类型,其中iterator指向插入的节点,bool表示true表示不存在该元素插入成功,false表示已经存在该元素则插入失败。
- 在方法2中返回的是新插入节点的迭代器。
源码:
void Print(const set<int>& s1)
{for (auto k : s1){cout << k << " ";}cout << endl;
}
void test2()
{set<int> s1;int a[] = { 1, 2, 3, 4, 5, 6 };for (auto ch : a){s1.insert(ch);//直接插入value值}Print(s1);s1.insert(s1.begin(), 0);//在指定迭代器位置插入Print(s1);set<int> s2 = { 7,8,9,10 }; //c++11知识暂时不管s1.insert(s2.begin(), s2.end());//迭代器区域插入Print(s1);
}
- set的删除:

下图123对应着上图123的使用方法:
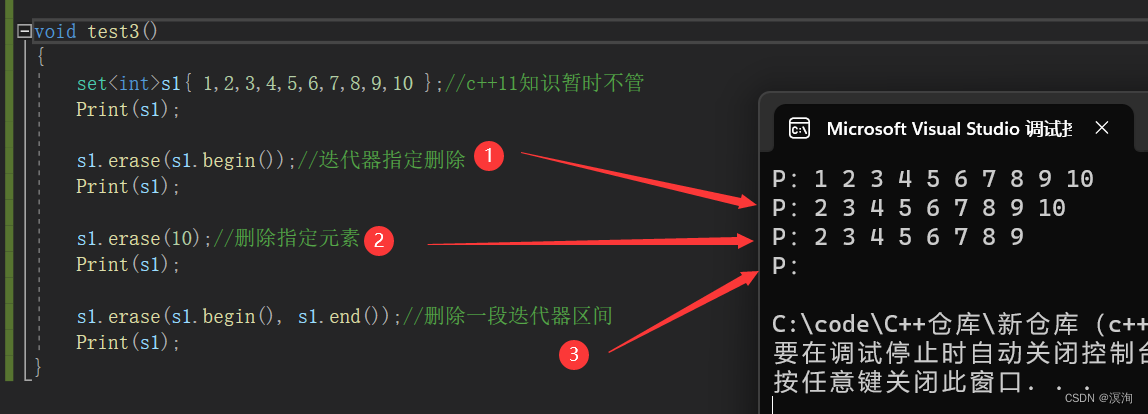
- 在2方法中返回的是删除元素的个数(size_type 就是 size_t 无符号整形)
源码:
- 在2方法中返回的是删除元素的个数(size_type 就是 size_t 无符号整形)
void Print(const set<int>& s1)
{cout << "P:";for (auto k : s1){cout << k << " ";}cout << endl;
}
void test3()
{set<int>s1{ 1,2,3,4,5,6,7,8,9,10 };//c++11知识暂时不管Print(s1);s1.erase(s1.begin());//迭代器指定删除Print(s1);s1.erase(10);//删除指定元素Print(s1);s1.erase(s1.begin(), s1.end());//删除一段迭代器区间Print(s1);
}
- set的查找find、查看个数size、是否为空empty、是否存在count、清空元素clear:
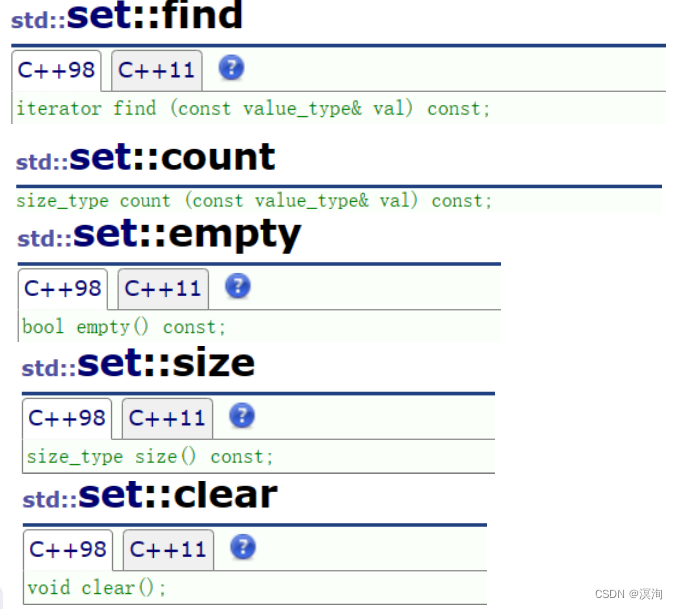
下面通过代码解释:
- find,返回迭代器,如找到则返回找到的元素的迭代器,反之返回nullptr的迭代器
- size,返回该容器的元素个数
- empty,返回0表示非空,返回1表示空
- count,返回1表示存在,返回0表示是不存在
源码:
void test4()
{set<int>s1{ 1,2,3,4,5,6,7,8,9,10 };//c++11知识暂时不管set<int>::iterator it1 = s1.find(8);if (it1 != s1.end())cout << "find的返回值(指向该元素):" << *it1 << endl;else cout << "返回Nullptr" << endl;cout << "8值是否存在(返回1表示存在0表示不存在):" << s1.count(8) << endl;cout <<"s1的元素个数(返回元素个数):" << s1.size() << " | s1是否为空(0表示非空反之1为空):" << s1.empty() << endl;cout << endl;s1.clear();//清空元素set<int>::iterator it2 = s1.find(8);if(it2 != s1.end())cout << "find的返回值(指向该元素):" << *it2 << endl;else cout << "返回Nullptr" << endl;cout << "8值是否存在(返回1表示存在0表示不存在):" << s1.count(8) << endl;cout << "s1的元素个数(返回元素个数):" << s1.size() << " | s1是否为空(0表示非空反之1为空):" << s1.empty() << endl;
}
- set的交换swap、指定区间的lower_bound、upper_bound:
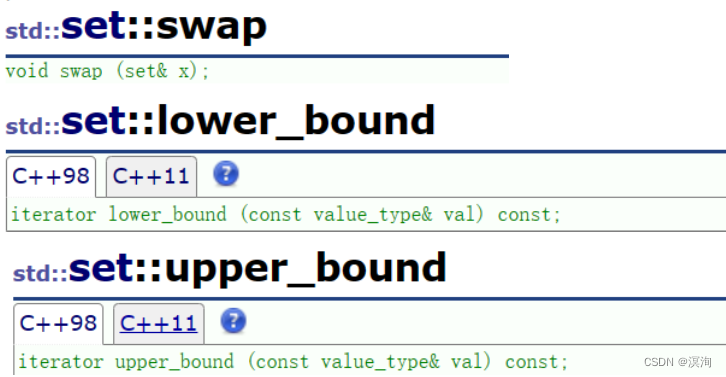
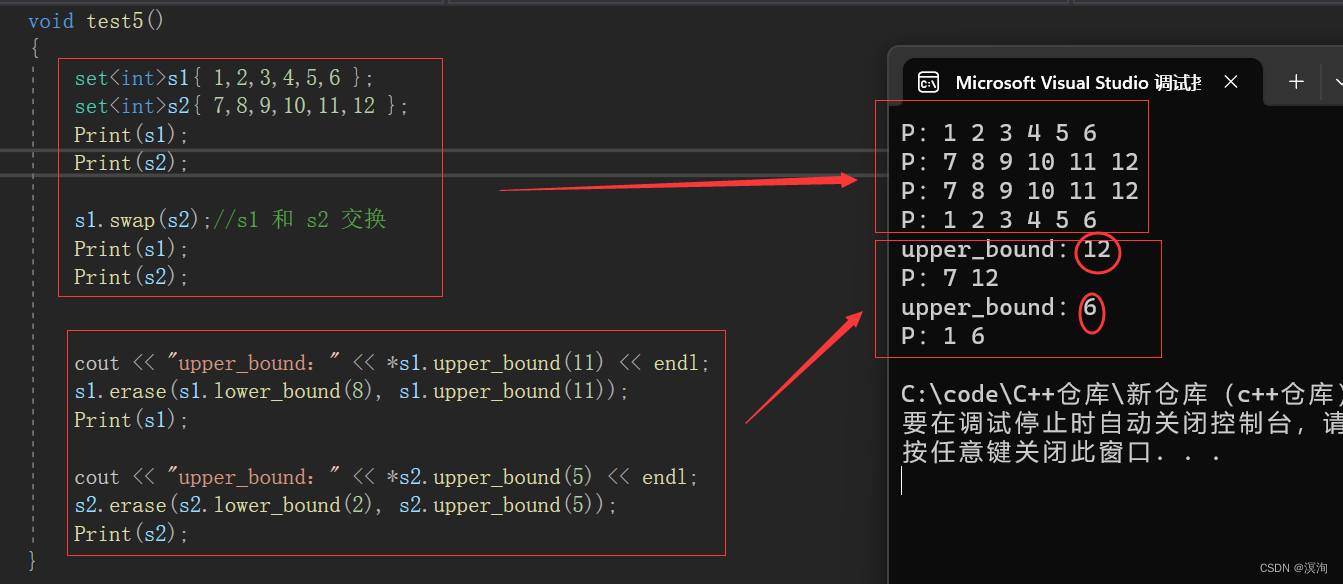
lower_bound和upper_bound是通过指定数值来确定迭代器区间,常用来指定删除数据的区间,如:1 2 3 4 5 6 , lower_bound(2),upper_bound(5),这样取出来的区间lower_bound指向的就是2(取>=value的值),而upper_bound指向的是6(取>value的值),但因为迭代器区间是左闭右开的所以即使删除也不会删到6!
源码:
void Print(const set<int>& s1)
{cout << "P:";for (auto k : s1){cout << k << " ";}c
void test5()
{set<int>s1{ 1,2,3,4,5,6 };set<int>s2{ 7,8,9,10,11,12 };Print(s1);Print(s2);s1.swap(s2);//s1 和 s2 交换Print(s1);Print(s2);cout << "upper_bound:" << *s1.upper_bound(11) << endl;s1.erase(s1.lower_bound(8), s1.upper_bound(11));Print(s1);cout << "upper_bound:" << *s2.upper_bound(5) << endl;s2.erase(s2.lower_bound(2), s2.upper_bound(5));Print(s2);
}
1.3 multiset的概念和使用
其原理和set几乎一致,只是multiset能存多个相同的值了
注意点:是find查找时是返回第一个遇到的value,count将返回该值存在的个数
其中还要交代一个函数(set中也有不过不够实用)
他返回的是pair<iterator,iterator>,这两个迭代器分别表示的就是value值的lower_bound和upper_bound,这样就能一次性删除所有相同的元素!
void Print(const multiset<int>& s1)
{cout << "P:";for (auto k : s1){cout << k << " ";}cout << endl;
}
void test6()
{multiset<int> s{ 1,1,2,2,2,3,3 };Print(s);cout << "lower_bound:" << *s.equal_range(2).first << endl;cout << "upper_bound:" << *s.equal_range(2).second << endl;s.erase(s.equal_range(2).first, s.equal_range(2).second);Print(s);
}
2.map
2.1map的概念
map底层也是红黑树,同理也就表明了他就是一个二叉搜索树。map不同于set他的K,V两个值都是有用的,map也是关联式容器,
1. 容器内部的元素都是pair<K,V>构成的一个个键值对
2. 如果是比较大小的话通常是用key值来进行
3. 在map中所有元素的值都是唯一的(指的是key值不能重复)
4. 在map中不能修改元素的值(即是不能修改K值的,只能修改value值)
2.2map常使用的方法
- map的模板参数:

同样Compare默认缺省为less
- map的构造:

对照着set几乎一样,直接通过代码展示了
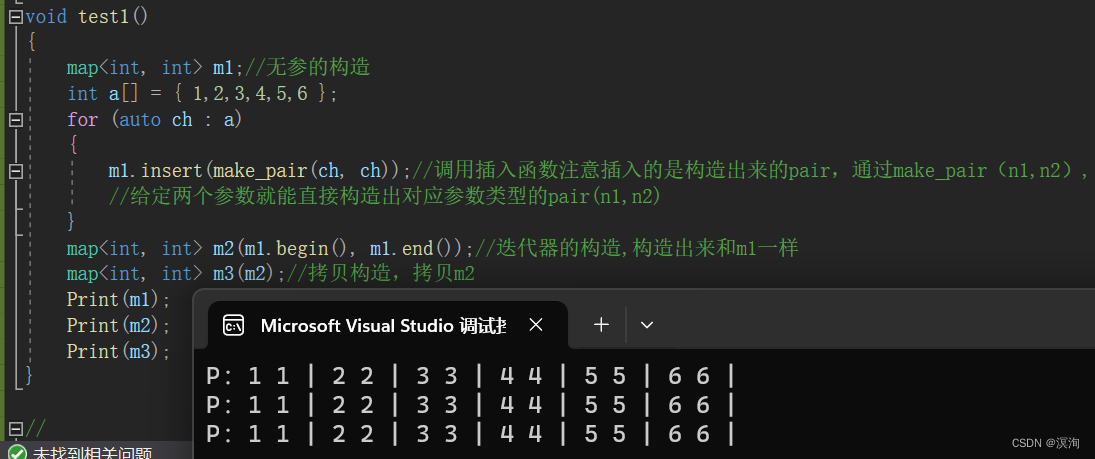
注意点:- 范围for打印时给kv的是迭代器,迭代器的类型是pair<K,V>所以kv.first指向Key,kv.second指向value
- 插入的数据必须是键值对,用make_pair()函数直接构造
源码:
void Print(const map<int,int>& m1)
{cout << "P:";for (auto kv : m1){cout << kv.first << " " << kv.second << " | ";}cout << endl;
}
void test1()
{map<int, int> m1;//无参的构造int a[] = { 1,2,3,4,5,6 };for (auto ch : a){m1.insert(make_pair(ch, ch));//调用插入函数注意插入的是构造出来的pair,通过make_pair(n1,n2),//给定两个参数就能直接构造出对应参数类型的pair(n1,n2)}map<int, int> m2(m1.begin(), m1.end());//迭代器的构造,构造出来和m1一样map<int, int> m3(m2);//拷贝构造,拷贝m2Print(m1);Print(m2);Print(m3);
}
- set的插入:


其中插入函数参数的value_type的实际类型是pair<const K,V>
注意点:- 用make_pair(key,value)构造出K,V类型的pair<K,V>当参数传递进去,或者写成用pair的构造pair<K,V>(key,value)(具体如下)


- 返回pair<iterator,bool>。
- 若返回的iterator,需要注意的是其类型是pair<K,V>型
- 用make_pair(key,value)构造出K,V类型的pair<K,V>当参数传递进去,或者写成用pair的构造pair<K,V>(key,value)(具体如下)
map<int, int> m1;
m1.insert(make_pair(1,1));//构造出pair(1,1) 或m1.insert(pair<int,int>(1,1));
- map的删除:

同理使用迭代器部分是一样的,此处删除时就不用在使用pair了,直接通过确定key即可删除。
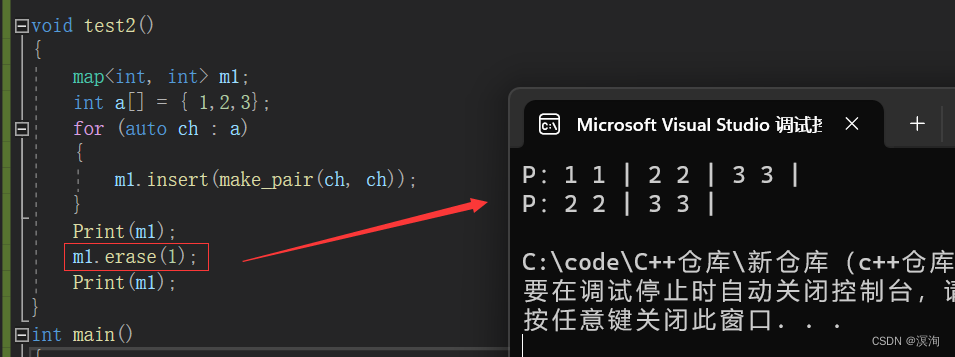
void test2()
{map<int, int> m1;int a[] = { 1,2,3};for (auto ch : a){m1.insert(make_pair(ch, ch));}Print(m1);m1.erase(1);Print(m1);
}
- map的查找find、查看个数size、是否为空empty、是否存在count、清空元素clear、交换swap:
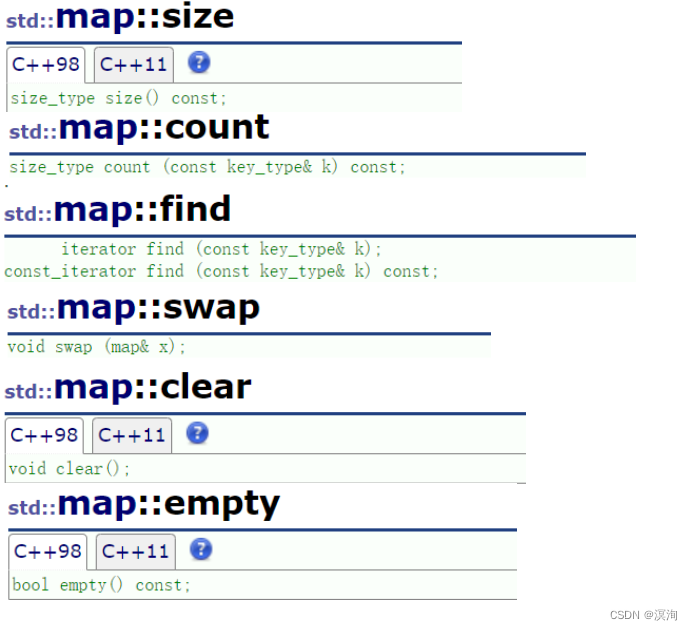
此处find、count的参数同样用key即可使用、其余函数和set完全一样。
- map的重载operator[](极其重要)
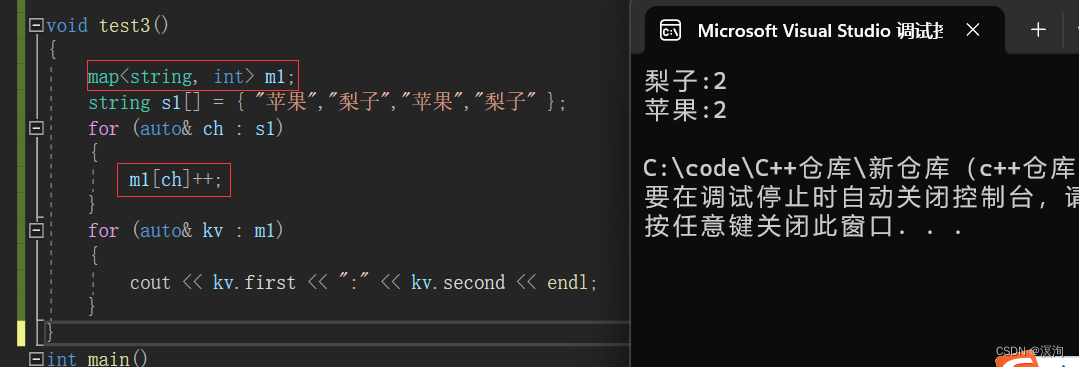
通过代码和底层来解释:
其中我们operator[]的底层是:
(*((this->insert(make_pair(k,mapped_type()))).first)).second
其中能看到他是调用了插入函数,所以[]能实现插入功能
而我们map的插入返回的类型是:pair<iterator,bool>
所以就能简化为:(*pair<iterator,bool>.first).second//此处.的优先级高于*所以是先访问,得到iterator后,再(*iterator).second得到其迭代器的value值,也就是插入时的第二个参数
所以分析上面代码:m1[ch]++;第一次进去的时候插入成功并且返回来他的second++,这样就能不断的插入,即使后面是插入失败也能返回second进行++,所以就能形成计数器。(其中注意点我们虽然没有初始化int,但其实其内部会默认为0开始,也就是上面的mapped_type()他会自动构造出该类型的初始值,int为0,string为"")
2.3 multimap的概念和使用
与multiset一样,都是可以出现重复的值,只是其中没有了map的operator[ ],就不过诉了。
3.map、set的底层实现
3.1红黑树的修改
为了给set、map做底层,我们需要完善一下红黑树在里面主要是
- 模板的改变:将原本第二个参数V改成T,T代表的是K,V组成成的键值对pair<K,V>
- 添加迭代器以及begin、end函数,让map、set也能用迭代器
- 修改插入的返回值:将原本的iterator改成pair<iterator,bool>,(这是STL源码内的设计,也是为了map的[]做准备)
修改后的源码:
#pragma once
#include<iostream>
using namespace std;
enum Color
{BLACK,RED
};template<class T>
struct RBTreeNode {RBTreeNode<T>* _left = nullptr;RBTreeNode<T>* _right = nullptr;RBTreeNode<T>* _parent = nullptr;T _data;Color _col = RED;//默认生成的节点颜色是红色RBTreeNode(const T& data):_data(data){}
};//迭代器
template<class T, class Ptr, class Ref>
struct _TreeIterator
{typedef _TreeIterator<T, Ptr, Ref> Self;typedef RBTreeNode<T> Node;Node* _node;//迭代器的成员变量_TreeIterator(Node* node):_node(node){}Self& operator++(){Node* cur = _node;if (cur->_right)//若右边不为空,则找到其左边的右边节点{cur = cur->_right;while (cur->_left){cur = cur->_left;}_node = cur;}else{Node* parent = cur->_parent;while (parent && parent->_left != cur){cur = parent;parent = parent->_parent;}_node = parent;}return *this;}Ref operator*(){return _node->_data;}Ptr operator->(){return &_node->_data;}bool operator==(const Self & it){return _node == it._node;}bool operator!=(const Self & it){return _node != it._node;}};template<class K, class T, class Compare>
class RBTree
{typedef RBTreeNode<T> Node;Compare kot;
public:typedef _TreeIterator<T,T*,T&> iterator;typedef _TreeIterator<T,const T*,const T&> const_iterator;//typedef typename RBTree<K, pair<K, V>, Mapofkey>::iterator iterator;// 在红黑树中插入值为data的节点,插入成功返回true,否则返回false// 注意:为了简单起见,本次实现红黑树不存储重复性元素iterator begin(){Node* cur = _root;while (cur && cur->_left){cur = cur->_left;}return iterator(cur);}iterator end(){return iterator(nullptr);//end指向最后数据的后面故为空}const_iterator begin() const{Node* cur = _root;while (cur && cur->_left){cur = cur->_left;}return const_iterator(cur);}const_iterator end() const{return const_iterator(nullptr);//end指向最后数据的后面故为空}//此处用Node* 的原因set处的iterator为了防止被修改所以set内的iterator本质还是const_iterator,//所以这里用了 Node* 来代替iterator 的返回pair<Node*, bool> Insert(const T& data){//此处和AVL平衡二叉树的性质一样找到所要插入节点的位置 大的在右 、 小的在左Node* parent = nullptr;Node* cur = _root;if (cur == nullptr){_root = new Node(data);_root->_col = BLACK;return make_pair(_root, true);}//找到插入的位置!while (cur)//当为null时表示此处就是要插入的位置!{if (kot(cur->_data) > kot(data)){parent = cur;cur = cur->_left;}else if (kot(cur->_data) < kot(data)){parent = cur;cur = cur->_right;}else{return make_pair(nullptr, false);}}//找到位置后,插入cur = new Node(data);//建立新节点Node* ret = cur;//建立链接if (kot(parent->_data) > kot(data)){parent->_left = cur;}else{parent->_right = cur;}cur->_parent = parent;//插入时要判断插入后是否会导致不平衡!对于红黑树来说主要问题有//1. 不能出现连续的红节点//2. 最长路径不超过最短路径的两倍//判断是否需要变色/旋转// //1.当父亲节点为黑色时,当新增了一个红色节点时就结束插入了// //2.当父为红时://	情况一(仅变色即可):当parent为红 grandfather为黑 uncle存在且为黑 插入一个新节点while (parent && parent->_col == RED){Node* g = parent->_parent;//grandfatherif (g->_left == parent){Node* u = g->_right;//uncleif (u && u->_col == RED)//u存在且为红{//变色即可u->_col = parent->_col = BLACK;g->_col = RED;//向上调整cur = g;parent = g->_parent;//当g 的 父亲为黑时或者为null时停止调整}else //u不存在或者为黑{if (cur == parent->_left)//此处u不存在和当插入节点在左边时的情况一样直接右旋加变色即可{//旋转加变色RotateR(g);parent->_col = BLACK;g->_col = RED;}else{//旋转加变色RotateL(parent);RotateR(g);cur->_col = BLACK;g->_col = RED;}}}else{Node* u = g->_left;//uncleif (u && u->_col == RED)//u存在且为红{//变色即可u->_col = parent->_col = BLACK;g->_col = RED;//向上调整cur = g;parent = g->_parent;//当g 的 父亲为黑时或者为null时停止调整}else //u不存在或者为黑{if (cur == parent->_right)//此处u不存在和当插入节点在左边时的情况一样直接右旋加变色即可{RotateL(g);parent->_col = BLACK;g->_col = RED;}else{RotateR(parent);RotateL(g);cur->_col = BLACK;g->_col = RED;}}}}_root->_col = BLACK;return make_pair(ret, true);}void Inorder(){_Inorder(_root);cout << endl;}// 获取红黑树最左侧节点Node* LeftMost(){Node* cur = _root;while (cur){if (cur->_left == nullptr){return cur;}cur = cur->_left;}return nullptr;}// 获取红黑树最右侧节点Node* RightMost(){Node* cur = _root;while (cur){if (cur->_right == nullptr){return cur;}cur = cur->_right;}return nullptr;}//  检测红黑树是否为有效的红黑树,注意:其内部主要依靠_IsValidRBTRee函数检测//	1.每条路径中的黑色节点个数是否一样//	2.最长路径不超过最短路径的两倍//	3.不能出现连续的红色节点//	4.根节点为黑色bool IsValidRBTRee(){if (_root == nullptr) return true;if (_root->_col == RED) return false;Node* cur = _root;int blackCount = 0;while (cur){if (cur->_col == BLACK){blackCount++;}cur = cur->_left;}return _IsValidRBTRee(_root, blackCount, 0);}int Height(){if (_root == nullptr) return 0;return _Height(_root);}int Size(){if (_root == nullptr) return 0;return _Size(_root);}//检测红黑树中是否存在值为data的节点,存在返回该节点的地址,否则返回nullptrNode* Find(const K& val){Node* cur = _root;while (cur){if (kot(cur->_data) == val){return cur;}else if (kot(cur->_data) > val){cur = cur->_left;}else {cur = cur->_right;}}return nullptr;}
private:int _Size(Node* root){if (root == nullptr)return 0;return _Size(root->_left) +_Size(root->_right) + 1;}int _Height(Node* root){if (root == nullptr)return 0;int lefthight = _Height(root->_left);int righthight = _Height(root->_right);return lefthight > righthight ? lefthight + 1 : righthight + 1;}void _Inorder(Node* root){if (root == nullptr)return;_Inorder(root->_left);cout << root->_data.first << " ";_Inorder(root->_right);}bool _IsValidRBTRee(Node* root, size_t blackCount, size_t pathBlack){if (root == nullptr){if (blackCount != pathBlack)//当为null时表示该路径已经结束,那么判断改路径的黑色节点(pathblack) 和其他路径的黑色节点(blacCount)是否相同{return false;}return true;}if (root->_col == RED){if (root->_left && root->_right && (root->_left->_col == RED || root->_right->_col == RED)){cout << "有连续的红色节点" << endl;return false;}}if (root->_col == BLACK){pathBlack++;}return _IsValidRBTRee(root->_left, blackCount, pathBlack) &&_IsValidRBTRee(root->_right, blackCount, pathBlack);}//	// 为了操作树简单起见:获取根节点//Node*& GetRoot();void RotateR(Node* parent){Node* SubL = parent->_left;//此处就为 curNode* SubLR = SubL->_right;//parent的左换成cur的右parent->_left = SubLR;//把cur的右孩子换成parentSubL->_right = parent;//注意还要修改其父指针Node* Ppnode = parent->_parent;parent->_parent = SubL;if (SubLR)//cur的右边可能为空SubLR->_parent = parent;if (_root == parent)//如果parent为根节点,则需要把subR改变成根节点并且其父亲为nullptr{_root = SubL;SubL->_parent = nullptr;}else{//同时还要考虑父亲 是祖先的左或右if (Ppnode->_left == parent){Ppnode->_left = SubL;}else{Ppnode->_right = SubL;}SubL->_parent = Ppnode;}}// 左单旋// 同理void RotateL(Node* parent){Node* SubR = parent->_right;//此处就为 curNode* SubRL = SubR->_left;//parent的右换成cur的左parent->_right = SubRL;//把cur的左孩子换成parentSubR->_left = parent;Node* Ppnode = parent->_parent;//注意 还要修改其父指针parent->_parent = SubR;if (SubRL)//右边可能为空SubRL->_parent = parent;if (_root == parent)//如果parent为根节点,则需要把subR改变成根节点并且其父亲为nullptr{_root = SubR;SubR->_parent = nullptr;}else{//同时还要考虑父亲 是祖先的左或右if (Ppnode->_left == parent){Ppnode->_left = SubR;}else{Ppnode->_right = SubR;}SubR->_parent = Ppnode;}}private:Node* _root = nullptr;
};
为了让set、map能实现迭代器所以还要写好迭代器常用的重载operator*、operator++、operator!=、…
下面是实现过程也就是再将以及写好的红黑树进行再一次的封装,实现set、map所需要的功能。
3.2set的实现
#pragma once
#include"RBTree.h"template<class K>
class MySet
{
public:struct Setofkey{//自己所写的适配器用来从pair中调出key值const K& operator()(const K& key){return key;}};//通过红黑树的迭代器来重定义生成自己的
//typename的意思是声明他是类型名typedef typename RBTree<K, K, Setofkey>::const_iterator iterator;typedef typename RBTree<K, K, Setofkey>::const_iterator const_iterator;pair<iterator, bool> Insert(const K& key){return _rb.Insert(key);// pair<Node*, bool> 给 pair<iterator, bool>// pair的构造函数: template<class U, class V> pair (const pair<U,V>& pr);// 这样就能通过一个pair去构造另外一个pair// 所以返回来的pair<Node*,bool> 就会对应给到要返回的pair<iterator,bool>的 iterator 和 bool 来进行构造// 这样就能iterator避免内外的不一样,外部的是iterator其实是const_iterator}pair<iterator, bool> Insert(const K& key)const{return _rb.Insert(key);//pair<iterator, bool>  }//普通对象、const对象都能调用iterator begin() const{return _rb.begin();}iterator end() const{return _rb.end();}private:RBTree<K,K,Setofkey> _rb;
};
3.3map的实现
#pragma once
#include"RBTree.h"template<class K,class V>
class MyMap
{
public:
//自己所写的适配器用来从pair中调出key值struct Mapofkey{const K& operator()(const pair<K, V>& kv){return kv.first;}};typedef typename RBTree<K, pair<const K, V>,Mapofkey>::iterator iterator;typedef typename RBTree<K, pair<const K, V>, Mapofkey>::const_iterator const_iterator;pair<iterator, bool> Insert(const pair<K,V>& kv){return _rb.Insert(kv);}iterator begin(){return _rb.begin();}iterator end(){return _rb.end();}const_iterator begin() const{return _rb.begin();}const_iterator end() const{return _rb.end();}V& operator[](const K& key){pair<iterator, bool> ret = Insert(make_pair(key,V()));return ret.first->second;}private:RBTree<K, pair<const K,V>,Mapofkey> _rb;
};
本章完。预知后事如何,暂听下回分解。
如果有任何问题欢迎讨论哈!
如果觉得这篇文章对你有所帮助的话点点赞吧!
持续更新大量C++细致内容,早关注不迷路。











![[GXYCTF2019]BabyUpload1](https://img-blog.csdnimg.cn/direct/a883e9d1d67943b78533ee0a3728e177.png)

