Maven构建OSGI+HttpServer应用
官网(https://eclipse.dev/equinox/server/http_in_equinox.php)介绍有两种方式:
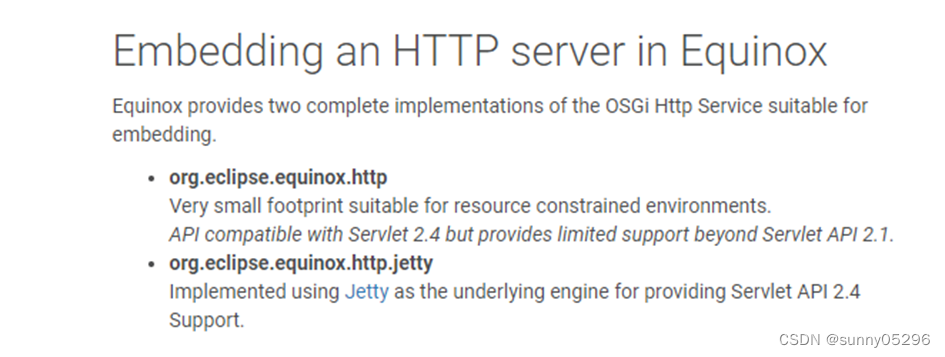
一种是基于”org.eclipse.equinox.http”包的轻量级实现,另一种是基于”org.eclipse.equinox.http.jetty”包(基于jetty的Servlet)实现。
使用 "org.eclipse.equinox.http" 包(例如:http-1.0.100-v20070423.jar),可以将我们自定义的服务(servlet或静态资源页面)注册到这个 HttpService 中去,实现自定义的HTTP服务。
"org.osgi.service.http" 包(例如:org.osgi.service.http-1.2.2.jar)内部会内嵌一个 HttpService Interface,而"org.eclipse.equinox.http" 包(http-1.0.100-v20070423.jar)提供了一个上述Interface的 HttpService实现类,因此,一旦这个osgi bundle (http-1.0.100-v20070423.jar)启动了,就会有一个内嵌的 http 服务被启动,默认地址是 http://localhost,端口为 80,可以通过指定参数 “org.osgi.service.http.port”来修改默认端口。
"org.eclipse.equinox.http" 包(http-1.0.100-v20070423.jar)内有一个上面那个 HttpService Interface 的实现类:

想要提供我们自定义的 HttpService服务,就要将我们的服务(servlet或静态资源页面)注册到这个 HttpService 中去,需要用到 "org.osgi.service.http" 包中的 HttpService 类的两个注册方法:
1)注册静态资源:
registerResources(String alias, String name, HttpContext httpContext)
2)注册 Servlet 类:
registerServlet(String alias, Servlet servlet, Dictionary initparams, HttpContext httpContext)
所以要想提供我自己的WebService实现,我们就需要:
提供自定义的WebService实现的步骤如下:
1)获取 httpService 对象;
2)编码提供 servlet 和 webpage 的实现;
3)将 servlet 和 webpage 注册到 HttpService 服务中去(同时指定对应的 alias);
4)访问;
新建manve项目:
创建package、class、和编码:
1)Java package:com.xxx.osgi.httpserver.demo、com.xxx.osgi.httpserver.servlet
2)Java class文件:Activator.java、MyServlet.java
Activator.java:
package com.xxx.osgi.httpserver.demo;import com.xxx.osgi.httpserver.servlet.MyServlet;
import org.osgi.framework.Bundle;
import org.osgi.framework.BundleActivator;
import org.osgi.framework.BundleContext;
import org.osgi.framework.BundleException;
import org.osgi.framework.ServiceReference;
import org.osgi.service.http.HttpContext;
import org.osgi.service.http.HttpService;import java.util.LinkedList;
import java.util.List;/*** @author Frank* @date 2023/12/26*/
public class Activator implements BundleActivator {private static BundleContext bundleContext;private HttpService httpService;private List<Bundle> bundles;static BundleContext getBundleContext() {return bundleContext;}public void start(BundleContext bundleContext) throws Exception {Activator.bundleContext = bundleContext;installBundles(bundleContext, false); // install other bundlesServiceReference serviceReference = bundleContext.getServiceReference(HttpService.class.getName());httpService = (HttpService) bundleContext.getService(serviceReference);// 注册HttpContext httpContext = httpService.createDefaultHttpContext();// 注册静态页面,设置别名"/osgi",所有对"/osgi"的请求映射到"/webpage/index.html"httpService.registerResources("/osgi", "/webpage/index.html", httpContext);System.out.println("start ok");// 注册 servlet,设置servlet别名"/test",所有对'/test"的请求映射到myServlet的实现MyServlet myServlet = new MyServlet();httpService.registerServlet("/test", myServlet, null, httpContext);}public void stop(BundleContext bundleContext) throws Exception {installBundles(bundleContext, true); //uninstall other bundleshttpService.unregister("/osgi");httpService.unregister("/test");Activator.bundleContext = null;System.out.println("stop ok");}public void installBundles(BundleContext context, boolean uninstall) {List<String> bundleFiles = new LinkedList<String>();List<Bundle> installedBundles = new LinkedList<Bundle>();//install my other bundles// System.out.printf("1 %s\n", FileLocator.getBundleFile(FrameworkUtil.getBundle(Activator.class)).getAbsolutePath());// System.out.printf("2 %s\n", FileLocator.getBundleFile(context.getBundle()).getAbsolutePath());// System.out.printf("3 %s\n", context.getBundle().getLocation());// String baseDir = FileLocator.getBundleFile(context.getBundle()).getParentFile().getAbsolutePath();String baseDir = context.getBundle().getLocation().replaceFirst("/[^/]*.jar","/");bundleFiles.add(baseDir + "helloworld-server-1.0.0-SNAPSHOT.jar");if (!uninstall) {// install & start bundlesfor (String bundleFile : bundleFiles) {try {Bundle bundle = context.installBundle(bundleFile);installedBundles.add(bundle);bundle.start();} catch (BundleException e) {if (!e.getMessage().contains("A bundle is already installed")) {throw new RuntimeException(e);}}}bundles = installedBundles;System.out.printf("all bundles (cnt = %d) installed and started!", bundles.size());} else {// stop & uninstall bundlesfor (Bundle bundle : bundles) {try {context.getBundle(bundle.getBundleId()).stop();context.getBundle(bundle.getBundleId()).uninstall();} catch (BundleException e) {throw new RuntimeException(e);}}System.out.printf("all bundles (cnt = %d) stopped and uninstalled!", bundles.size());}}
}
MyServlet.java:
package com.xxx.osgi.httpserver.servlet;import javax.servlet.Servlet;
import javax.servlet.ServletException;
import javax.servlet.http.HttpServlet;
import javax.servlet.http.HttpServletRequest;
import javax.servlet.http.HttpServletResponse;
import java.io.IOException;
import java.util.logging.Logger;public class MyServlet extends HttpServlet implements Servlet {private Logger logger = Logger.getLogger(this.getClass().getName());@Overrideprotected void doGet(HttpServletRequest req, HttpServletResponse resp) throws ServletException, IOException {resp.getWriter().write("MyServlet return: Method=" + req.getMethod() + ", URI=" + req.getRequestURI());}@Overrideprotected void doPost(HttpServletRequest req, HttpServletResponse resp) throws ServletException, IOException {resp.getWriter().write("MyServlet return: Method=" + req.getMethod() + ", URI=" + req.getRequestURI());}
}
3)创建静态页面文件:webpage/index.html
<!DOCTYPE html>
<html>
<head><meta charset="UTF-8"><title>jetty test</title>
</head>
<body>
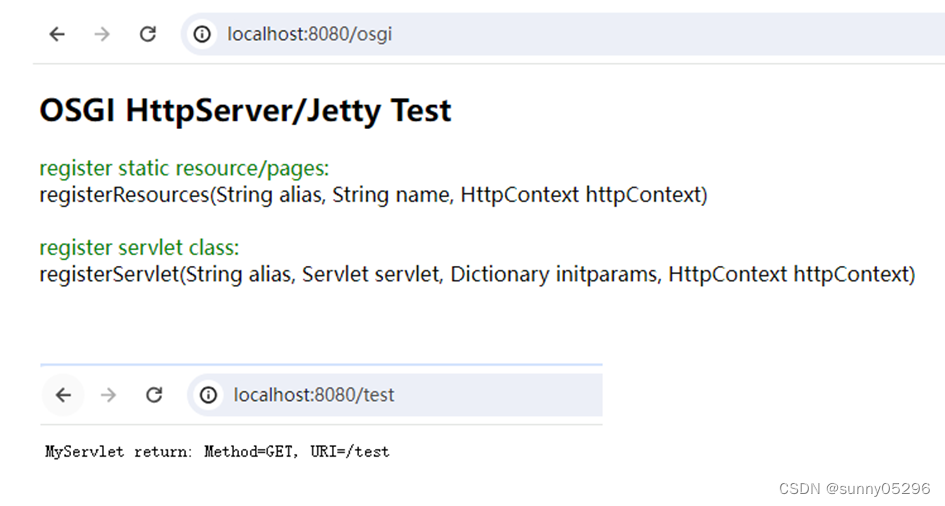
<h2>OSGI HttpServer/Jetty Test</h2>
<font color="green"> register static resource/pages: </font><br>
registerResources(String alias, String name, HttpContext httpContext) <br><br><font color="green">register servlet class: </font><br>
registerServlet(String alias, Servlet servlet, Dictionary initparams, HttpContext httpContext)
</body>
</html>
4)创建&编辑 pom.xml 文件
pom文件中定义了OSGI框架和版本、编码中所需的依赖以及osgi menifest和osgi打包配置:
<project xmlns="http://maven.apache.org/POM/4.0.0" xmlns:xsi="http://www.w3.org/2001/XMLSchema-instance"xsi:schemaLocation="http://maven.apache.org/POM/4.0.0 http://maven.apache.org/xsd/maven-4.0.0.xsd"><modelVersion>4.0.0</modelVersion><groupId>com.xxx.osgi</groupId><artifactId>osgi-httpserver-demo</artifactId><version>1.0.0-SNAPSHOT</version><packaging>bundle</packaging><name>osgi-httpserver-demo</name><url>http://maven.apache.org</url><properties><project.build.sourceEncoding>UTF-8</project.build.sourceEncoding><java.version>1.8</java.version><maven.compiler.source>1.8</maven.compiler.source><maven.compiler.target>1.8</maven.compiler.target></properties><dependencies><dependency><!-- 该版本 maven 仓库找不到,如果要用该版本可以在 Project Structure->Project Settings->Modules 中设置:--><!-- 设置 OSGI:General->Configure OSGI Core Library->Use Library 指定本地 jar 文件静态添加 osgi lib  --><!--<groupId>org.eclipse</groupId><artifactId>osgi</artifactId><version>3.18.600.v20231110-1900</version><scope>provided</scope>--><!-- 该版本maven仓库可以找到,可以用这个版本。在 pom 中指定 osgi lib 的 dependency 依赖 --><groupId>org.eclipse</groupId><artifactId>osgi</artifactId><version>3.10.0-v20140606-1445</version><scope>provided</scope></dependency><!-- START: httpServer required bundles --><!-- org.osgi.service.cm_1.6.1.202109301733.jar --><dependency><groupId>org.osgi</groupId><artifactId>org.osgi.service.cm</artifactId><version>1.6.1</version></dependency><!-- javax.servlet-3.0.0.v201112011016.jar --><dependency><groupId>org.eclipse.jetty.orbit</groupId><artifactId>javax.servlet</artifactId><version>3.0.0.v201112011016</version></dependency><!-- http-1.0.100-v20070423.jar --><dependency><groupId>org.eclipse.equinox</groupId><artifactId>http</artifactId><version>1.0.100-v20070423</version></dependency><!-- org.osgi.service.http-1.2.2.jar --><dependency><groupId>org.osgi</groupId><artifactId>org.osgi.service.http</artifactId><version>1.2.2</version></dependency><!-- END: httpServer required bundles --><!-- for: org.eclipse.core.runtime.FileLocator --><!-- common-3.6.200-v20130402-1505.jar / org.eclipse.equinox.common.source_3.18.200.v20231106-1826.jar --><dependency><groupId>org.eclipse.equinox</groupId><artifactId>common</artifactId><version>3.6.200-v20130402-1505</version></dependency></dependencies><build><plugins><plugin><!-- osgi 打包配置,使用 maven-bundle-plugin 插件进行 osgi 打包 bundle jar --><!-- 使用maven-bundle-plugin打包方式时指定manifest文件不生效,但可在 instructions 中配置 manifest 参数 --><groupId>org.apache.felix</groupId><artifactId>maven-bundle-plugin</artifactId><version>3.5.0</version><extensions>true</extensions><configuration><instructions><!-- 把依赖的普通jar和bundle jar也一起打包进去(/lib目录下),bundle jar 服务依赖还要在 Import-Package 中指定 --><Embed-Dependency>*;scope=compile|runtime</Embed-Dependency><Embed-Directory>lib</Embed-Directory><Embed-Transitive>true</Embed-Transitive><!-- BEGIN: 把本地静态资源目录也打包进去 --><Include-Resource>webpage=webpage</Include-Resource><!-- END: 把本地静态资源目录webpage也打包进去(到webpage目录、相当于目录拷贝) --><Bundle-ClassPath>.,{maven-dependencies}</Bundle-ClassPath><Bundle-Name>${project.name}</Bundle-Name><Bundle-SymbolicName>$(replace;${project.artifactId};-;_)</Bundle-SymbolicName><Bundle-Version>${project.version}</Bundle-Version><Bundle-Activator>com.xxx.osgi.httpserver.demo.Activator</Bundle-Activator><DynamicImport-Package>*</DynamicImport-Package><Import-Package>javax.servlet,javax.servlet.http,org.osgi.service.http;resolution:="optional"</Import-Package><Export-Package></Export-Package></instructions></configuration></plugin></plugins></build>
</project>
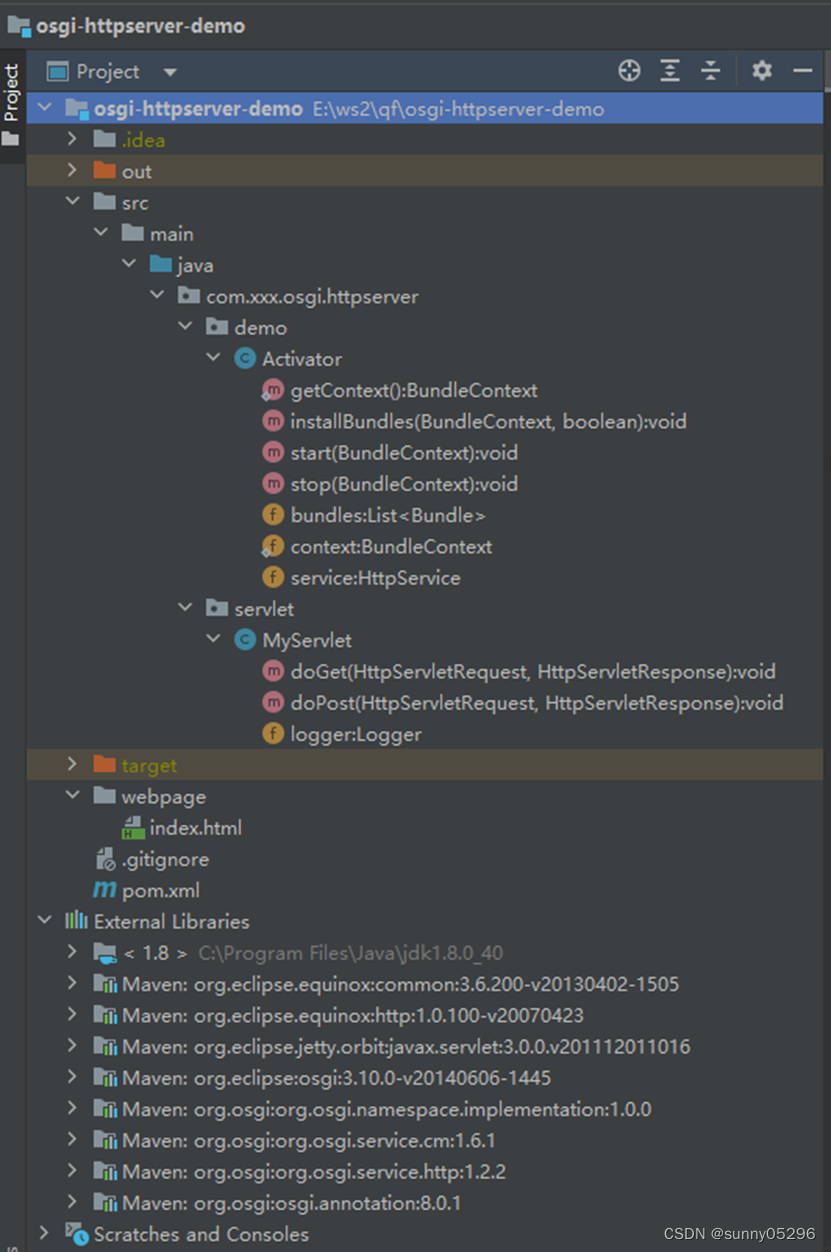
整体项目的代码结构如下:
准备运行依赖的bundles:
org.osgi.service.cm_1.6.1.202109301733.jar
javax.servlet-3.0.0.v201112011016.jar
org.osgi.service.http-1.2.2.jar
http-1.0.100-v20070423.jar
直接在 configuration/config.ini 初始化启动配置中加入依赖 bundles 或者启动 osgi 以后执行 install 安装依赖 bundles:
install plugins/org.osgi.service.cm_1.6.1.202109301733.jar
install other_bundles/javax.servlet-3.0.0.v201112011016.jar
install other_bundles/org.osgi.service.http-1.2.2.jar
install other_bundles/http-1.0.100-v20070423.jar
start 5 6 7 8
注意,多条命名install时有先后顺序依赖,也可以放在一条命令执行多个 bundle 的install(无顺序依赖)
install plugins/org.osgi.service.cm_1.6.1.202109301733.jar other_bundles/javax.servlet-3.0.0.v201112011016.jar other_bundles/org.osgi.service.http-1.2.2.jar other_bundles/http-1.0.100-v20070423.jar

“org.osgi.service.http”的HttpService Interface的实现类bundle “org.eclipse.equinox.http”启动后,HttpService服务就启动了、查看HttpService监听端口已开启(如果equinox的配置文件或启动参数没有指定 org.osgi.service.http.port=8080 的话,默认是监听的是 80 端口):

项目编译打包:
执行命令打包
mvn clean package
拷贝项目编译打包生成的jar文件到osgi运行环境:
执行osgi-httpserver-demo jar包(install & start):

项目bundle 9已经启动、bundle9内代码install & start 的其他bundel 10 也都start成功,状态为ACTIVE了。
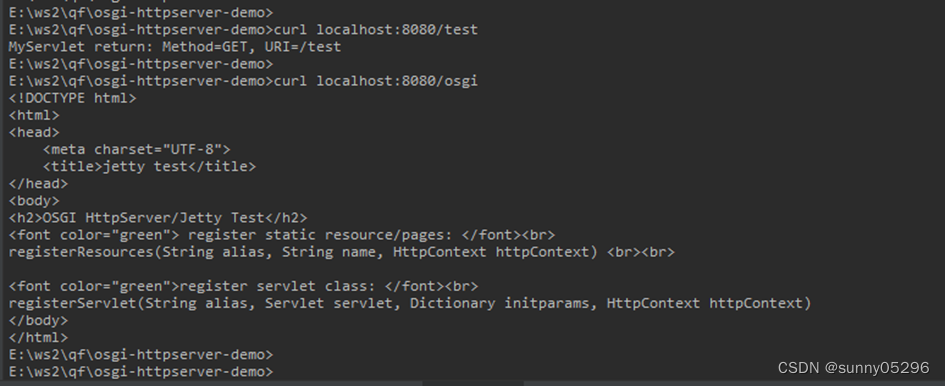
httpServer 访问测试(访问 localhost:8080/osgi 和 localhost:8080/test):
命令行访问页面:
浏览器访问页面: