文章目录
- 一、前端要学的测试课
- 1.前端要学的测试
- 2.前端工程化的一部分
- 3.前端自动化测试的例子
- 4.前端为什么需要自动化测试?
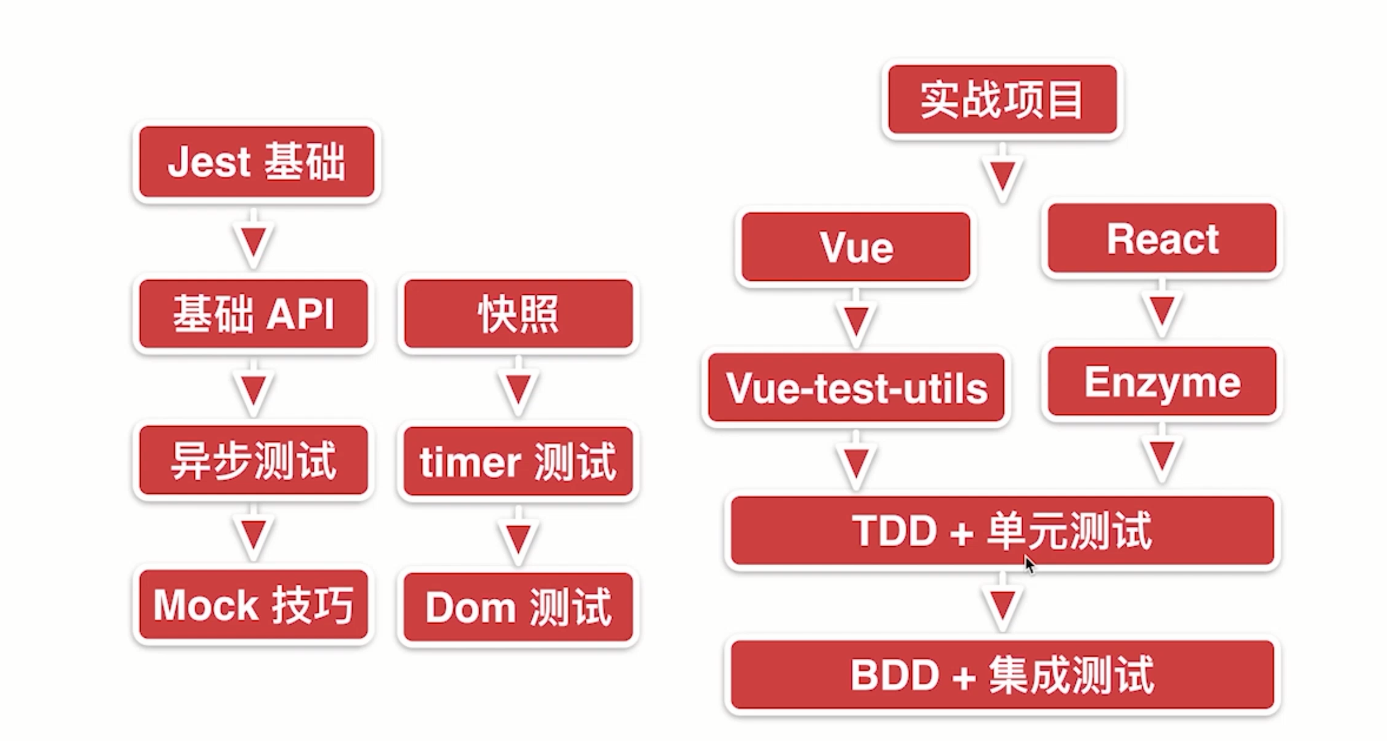
- 5.课程涵盖内容
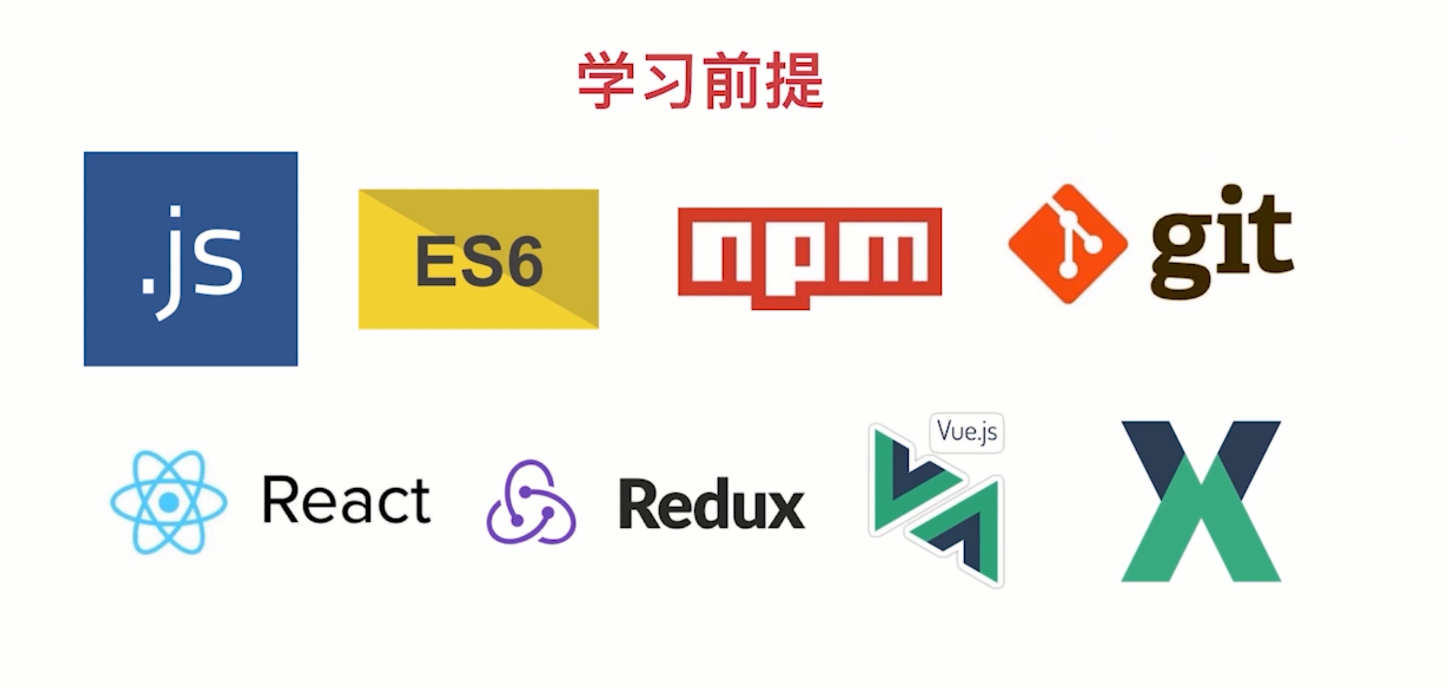
- 6.前置技能
- 7.学习收获
- 二、Jest 前端自动化测试框架基础入门
- 1. 自动化测试背景及原理
- 前端自动化测试产生的背景及原理
- 2.前端自动化测试框架
- 3.使用 Jest 修改自动化测试样例
- 4.Jest 的简单配置
学习内容来源:Jest入门到TDD/BDD双实战_前端要学的测试课
相对原教程,我在学习开始时(2023.08)采用的是当前最新版本:
| 项 | 版本 |
|---|---|
| @babel/core | ^7.16.0 |
| @pmmmwh/react-refresh-webpack-plugin | ^0.5.3 |
| @svgr/webpack | ^5.5.0 |
| @testing-library/jest-dom | ^5.17.0 |
| @testing-library/react | ^13.4.0 |
| @testing-library/user-event | ^13.5.0 |
| babel-jest | ^27.4.2 |
| babel-loader | ^8.2.3 |
| babel-plugin-named-asset-import | ^0.3.8 |
| babel-preset-react-app | ^10.0.1 |
| bfj | ^7.0.2 |
| browserslist | ^4.18.1 |
| camelcase | ^6.2.1 |
| case-sensitive-paths-webpack-plugin | ^2.4.0 |
| css-loader | ^6.5.1 |
| css-minimizer-webpack-plugin | ^3.2.0 |
| dotenv | ^10.0.0 |
| dotenv-expand | ^5.1.0 |
| eslint | ^8.3.0 |
| eslint-config-react-app | ^7.0.1 |
| eslint-webpack-plugin | ^3.1.1 |
| file-loader | ^6.2.0 |
| fs-extra | ^10.0.0 |
| html-webpack-plugin | ^5.5.0 |
| identity-obj-proxy | ^3.0.0 |
| jest | ^27.4.3 |
| jest-enzyme | ^7.1.2 |
| jest-resolve | ^27.4.2 |
| jest-watch-typeahead | ^1.0.0 |
| mini-css-extract-plugin | ^2.4.5 |
| postcss | ^8.4.4 |
| postcss-flexbugs-fixes | ^5.0.2 |
| postcss-loader | ^6.2.1 |
| postcss-normalize | ^10.0.1 |
| postcss-preset-env | ^7.0.1 |
| prompts | ^2.4.2 |
| react | ^18.2.0 |
| react-app-polyfill | ^3.0.0 |
| react-dev-utils | ^12.0.1 |
| react-dom | ^18.2.0 |
| react-refresh | ^0.11.0 |
| resolve | ^1.20.0 |
| resolve-url-loader | ^4.0.0 |
| sass-loader | ^12.3.0 |
| semver | ^7.3.5 |
| source-map-loader | ^3.0.0 |
| style-loader | ^3.3.1 |
| tailwindcss | ^3.0.2 |
| terser-webpack-plugin | ^5.2.5 |
| web-vitals | ^2.1.4 |
| webpack | ^5.64.4 |
| webpack-dev-server | ^4.6.0 |
| webpack-manifest-plugin | ^4.0.2 |
| workbox-webpack-plugin | ^6.4.1" |
具体配置、操作和内容会有差异,“坑”也会有所不同。。。
一、前端要学的测试课
1.前端要学的测试
- Jest入门
- TDD实战
- BDD实战
2.前端工程化的一部分
- 前端自动化测试
- 高质量代码设计
- 高质量代码实现
3.前端自动化测试的例子
Vue、Echarts、React、Ant-Design…这些都有使用到自动化测试
4.前端为什么需要自动化测试?
- 改需求时,代码重构:导致修复时间长,成本高
- 自动化测试,修复时间少,难度低
5.课程涵盖内容
学习安排:
- 第1章 课程介绍
- 第2章 Jest 基础
- 第3章 Jest 进阶
- 第4&6章 React 测试
- 第5&7章 Vue 测试
- 第8章 前端自动化测试的思考总结
6.前置技能
7.学习收获
- 彻底入门前端自动化测试
- 根据项目完成测试方案选型
- 主流前端测试工具使用
- 完成前端自动化测试项目落地
- 形成多维度前端架构思维
二、Jest 前端自动化测试框架基础入门
1. 自动化测试背景及原理
前端自动化测试产生的背景及原理
作为一名前端开发开发者,每天都会遇到各种各样的 bug,比如安全性的 bug,逻辑 bug,性能 bug,展示 bug 等,在日常开发过程中想要不出 bug 几乎是不可能的。
当遇到复杂的业务场景或对代码进行修补的时候出现 bug 其实是非常正常的事情,bug 本身并不可怕,可怕的是把 bug 真正的带到线上。
所以为了防止 bug 上线,可以做些 比如 codeview 的整合,通过测试同学的测试,帮助发现代码潜在的问题,或者通过灰度发布这样的机制帮助在代码上线之前进行局部的验证,这些方法都可以很好地帮助降低 bug 上线的概率。
但是对于前端来说还有没有更好的办法降低代码中 bug 出现的频率呢?是有的,一些简单错误可以通过以下几种工具来规避:
TypeScript、 Flow、 EsLint、 StyleLint…
它们都可以帮助提高前端代码质量,减少 bug 数量,当然这还不够,还可以使用前端自动化测试工具来进一步避免 bug 的产生。
说到自动化测试,在后端自动化测试已经很普遍被应用了,但是在前端领域目前被普及的情况并不是很好,因此学习前端测试刻不容缓
常见测试种类:
- 单元测试
- 集成测试
- end To end 端到端测试
- 回归测试
- 性能测试
- 压力测试
- …
.
拓展学习
- 前端自动化测试探索 - FEX
为了更好的理解,接下来进入代码环节
-
新建文件夹(
mkdir lesson1) -
打开新建的文件夹(
cd lesson1) -
创建文件(
touch math.js)
function add(a,b) {return a + b;
}function minus(a,b) {return a - b;
}
- 创建文件(
touch index.html),引入math.js
<!DOCTYPE html>
<html lang="en">
<head><meta charset="UTF-8"><meta http-equiv="X-UA-Compatible" content="IE=edge"><meta name="viewport" content="width=device-width, initial-scale=1.0"><title>math.js</title><script src="math.js"></script>
</head>
<body></body>
</html>
- 创建文件(
touch math.test.js)
let result = add(3, 7);
let expected = 10;if(result !== expected) {throw Error(`3 + 7 应该等于 ${expected},但是结果却是${result}`);
}result = minus(3, 3);
expected = 0;if(result !== expected) {throw Error(`3 - 3 应该等于 ${expected},但是结果却是${result}`);
}
直接打开页面在浏览器的控制台,输入 math.test.js 中的测试代码并执行
index.html已经引入了math.js这个函数库,可以通过直接在控制台执行的方式调用- 测试过程中若是修改了原代码,需要刷新页面再执行测试代码

我们写的测试的例子基本上都是一个套路,就是 先预期一个结果,然后在执行计算出真正的结果,然后两个结果进行比较是否相同,如果相同就可以通过,如果不相同就抛出异常错误信息。
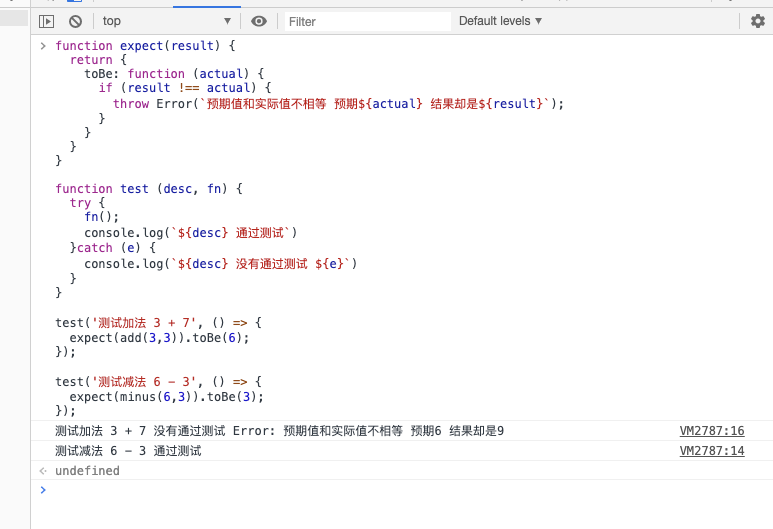
优化测试代码,单独封装一个 expect 函数,方便使用:
function expect(result) {return {toBe: function (actual) {if (result !== actual) {throw Error('预期值和实际值不相等');}}}
}expect(add(3,3)).toBe(6);
expect(minus(6,3)).toBe(3);

但是有个问题就是测试结果报错后从报错信息上看并不知道具体是函数库中的哪个方法错了。所以进一步优化:
function expect(result) {return {toBe: function (actual) {if (result !== actual) {throw Error(`预期值和实际值不相等 预期${actual} 结果却是${result}`);}}}
}function test (desc, fn) {try {fn();console.log(`${desc} 通过测试`)}catch (e) {console.log(`${desc} 没有通过测试 ${e}`)}
}test('测试加法 3 + 7', () => {expect(add(3,3)).toBe(6);
});test('测试减法 6 - 3', () => {expect(minus(6,3)).toBe(3);
});
2.前端自动化测试框架
在实际项目中只有 except 和 test 两个方法显然是不够的,同时还有很多自动化测试机制需要集成。
现在业界已经有很多前端自动化测试框架,这些框架里面集成了非常多的方法和机制供选用,在使用过程中的可以方便快捷的进行项目级别的前端自动化测试了。
目前业界主流的几个前端自动化测试框架包括 Jasmine、Mocha+Chai、Jest。
一个好的前端自动化测试框架应该在以下几个方面比较突出:
- 性能好
- 功能丰富
- 易用性高
Jest 优势:
- 速度快(在编辑过程中可以自动运行修改部分的测试代码)
- API 简单
- 易配置
- 隔离性好
- 监控模式
- IDE 整合
- 快照 Snapshot
- 多项目并行
- 覆盖率报告快速生成
- Mock 丰富
- 支持拓展性强,如:Babel、TypeScript、Node.js、React、Angular、Vue
3.使用 Jest 修改自动化测试样例
接下来开始使用 Jest,在这之前需要提前安装好 Node 环境,具体可参见
【笔记】Node.js概述和开发环境搭建
- 新建文件夹(
mkdir lesson2) - 进入新建的目录(
cd lesson2) - 初始化 npm 包管理环境(
npm init) - 一路回车后可以看到目录下生成一个文件 ——
package.json - 安装 Jest (
npm i jest@24.8.0 -D)-D表示只有在开发的时候才会运行测试用例
- 安装好后将上节代码复制过来并作如下修改:
math.js 作为 node 模块导出
function add(a,b) {return a + b;
}function minus(a,b) {return a - b;
}function multi(a,b) {return a * b;
}module.exports = {add,minus,multi
}
math.test.js 中 math.js 作为 node 模块导入并使用
const math = require('./math')
const {add,minus,multi
} = mathtest('测试加法 3 + 7', () => {expect(add(3,3)).toBe(6);
});test('测试减法 6 - 3', () => {expect(minus(6,3)).toBe(3);
});test('测试乘法 3 * 3', () => {expect(multi(3,3)).toBe(9);
});
修改配置 package.json:
{..."scripts": {"test": "jest --watchAll"},...
}
--watchAll表示监听所有测试用例,当有发生变化时,自动运行 jest 重跑所有测试用例
控制台运行 npm run test,结果如下:
> lesson2@1.0.0 test
> jestPASS  ./math.test.js√ 测试加法 3 + 7 (4ms)√ 测试减法 6 - 3√ 测试乘法 3 * 3 (1ms)Test Suites: 1 passed, 1 total
Tests:       3 passed, 3 total
Snapshots:   0 total
Time:        5.468s
Ran all test suites.
若是测试代码写错,结果如下:
> lesson2@1.0.0 test
> jestFAIL  ./math.test.js√ 测试加法 3 + 7 (6ms)√ 测试减法 6 - 3 (1ms)× 测试乘法 3 * 3 (7ms)● 测试乘法 3 * 3expect(received).toBe(expected) // Object.is equalityExpected: 3Received: 915 |16 | test('测试乘法 3 * 3', () => {> 17 |   expect(multi(3,3)).toBe(3);|                      ^18 | });at Object.<anonymous> (math.test.js:17:22)Test Suites: 1 failed, 1 total
Tests:       1 failed, 2 passed, 3 total
Snapshots:   0 total
Time:        4.258s
Ran all test suites.
为什么
math中的方法必须导出来呢?
因为 Jest 在前端项目中帮助我们完成两类内容:
- 单元测试(模块测试)
- 集成测试(多个模块测试)
因此必须要以模块的方式来使用
不论是按照 CommonJS 还是 Es Module 改造,都需要符合 Jest 才能进行自动化测试
但是这样的话在 html 文件中使用会产生报错:
Uncaught ReferenceError: module is not defined
可以小改造一下(math.js):
...
try {module.exports = {add,minus,multi}
} catch (e) {}
这种报错一般是不会出现在项目中的,现在的项目基本都是模块化编码
4.Jest 的简单配置
jest 有默认配置,下面来自定义配置,在这之前需要生成配置文件,运行 npx jest --init (Jest\lesson2\jest.config.js 完整如下) :
// For a detailed explanation regarding each configuration property, visit:
// https://jestjs.io/docs/en/configuration.htmlmodule.exports = {// All imported modules in your tests should be mocked automatically// automock: false,// Stop running tests after `n` failures// bail: 0,// Respect "browser" field in package.json when resolving modules// browser: false,// The directory where Jest should store its cached dependency information// cacheDirectory: "C:\\Users\\AImooc-Oliver\\AppData\\Local\\Temp\\jest",// Automatically clear mock calls and instances between every testclearMocks: true,// Indicates whether the coverage information should be collected while executing the test// collectCoverage: false,// An array of glob patterns indicating a set of files for which coverage information should be collected// collectCoverageFrom: null,// The directory where Jest should output its coverage filescoverageDirectory: "coverage",// An array of regexp pattern strings used to skip coverage collection// coveragePathIgnorePatterns: [//   "\\\\node_modules\\\\"// ],// A list of reporter names that Jest uses when writing coverage reports// coverageReporters: [//   "json",//   "text",//   "lcov",//   "clover"// ],// An object that configures minimum threshold enforcement for coverage results// coverageThreshold: null,// A path to a custom dependency extractor// dependencyExtractor: null,// Make calling deprecated APIs throw helpful error messages// errorOnDeprecated: false,// Force coverage collection from ignored files using an array of glob patterns// forceCoverageMatch: [],// A path to a module which exports an async function that is triggered once before all test suites// globalSetup: null,// A path to a module which exports an async function that is triggered once after all test suites// globalTeardown: null,// A set of global variables that need to be available in all test environments// globals: {},// The maximum amount of workers used to run your tests. Can be specified as % or a number. E.g. maxWorkers: 10% will use 10% of your CPU amount + 1 as the maximum worker number. maxWorkers: 2 will use a maximum of 2 workers.// maxWorkers: "50%",// An array of directory names to be searched recursively up from the requiring module's location// moduleDirectories: [//   "node_modules"// ],// An array of file extensions your modules use// moduleFileExtensions: [//   "js",//   "json",//   "jsx",//   "ts",//   "tsx",//   "node"// ],// A map from regular expressions to module names that allow to stub out resources with a single module// moduleNameMapper: {},// An array of regexp pattern strings, matched against all module paths before considered 'visible' to the module loader// modulePathIgnorePatterns: [],// Activates notifications for test results// notify: false,// An enum that specifies notification mode. Requires { notify: true }// notifyMode: "failure-change",// A preset that is used as a base for Jest's configuration// preset: null,// Run tests from one or more projects// projects: null,// Use this configuration option to add custom reporters to Jest// reporters: undefined,// Automatically reset mock state between every test// resetMocks: false,// Reset the module registry before running each individual test// resetModules: false,// A path to a custom resolver// resolver: null,// Automatically restore mock state between every test// restoreMocks: false,// The root directory that Jest should scan for tests and modules within// rootDir: null,// A list of paths to directories that Jest should use to search for files in// roots: [//   "<rootDir>"// ],// Allows you to use a custom runner instead of Jest's default test runner// runner: "jest-runner",// The paths to modules that run some code to configure or set up the testing environment before each test// setupFiles: [],// A list of paths to modules that run some code to configure or set up the testing framework before each test// setupFilesAfterEnv: [],// A list of paths to snapshot serializer modules Jest should use for snapshot testing// snapshotSerializers: [],// The test environment that will be used for testing// testEnvironment: "jest-environment-jsdom",// Options that will be passed to the testEnvironment// testEnvironmentOptions: {},// Adds a location field to test results// testLocationInResults: false,// The glob patterns Jest uses to detect test files// testMatch: [//   "**/__tests__/**/*.[jt]s?(x)",//   "**/?(*.)+(spec|test).[tj]s?(x)"// ],// An array of regexp pattern strings that are matched against all test paths, matched tests are skipped// testPathIgnorePatterns: [//   "\\\\node_modules\\\\"// ],// The regexp pattern or array of patterns that Jest uses to detect test files// testRegex: [],// This option allows the use of a custom results processor// testResultsProcessor: null,// This option allows use of a custom test runner// testRunner: "jasmine2",// This option sets the URL for the jsdom environment. It is reflected in properties such as location.href// testURL: "http://localhost",// Setting this value to "fake" allows the use of fake timers for functions such as "setTimeout"// timers: "real",// A map from regular expressions to paths to transformers// transform: null,// An array of regexp pattern strings that are matched against all source file paths, matched files will skip transformation// transformIgnorePatterns: [//   "\\\\node_modules\\\\"// ],// An array of regexp pattern strings that are matched against all modules before the module loader will automatically return a mock for them// unmockedModulePathPatterns: undefined,// Indicates whether each individual test should be reported during the run// verbose: null,// An array of regexp patterns that are matched against all source file paths before re-running tests in watch mode// watchPathIgnorePatterns: [],// Whether to use watchman for file crawling// watchman: true,
};
常见的配置里面都有,可以按需求选择注释或放开
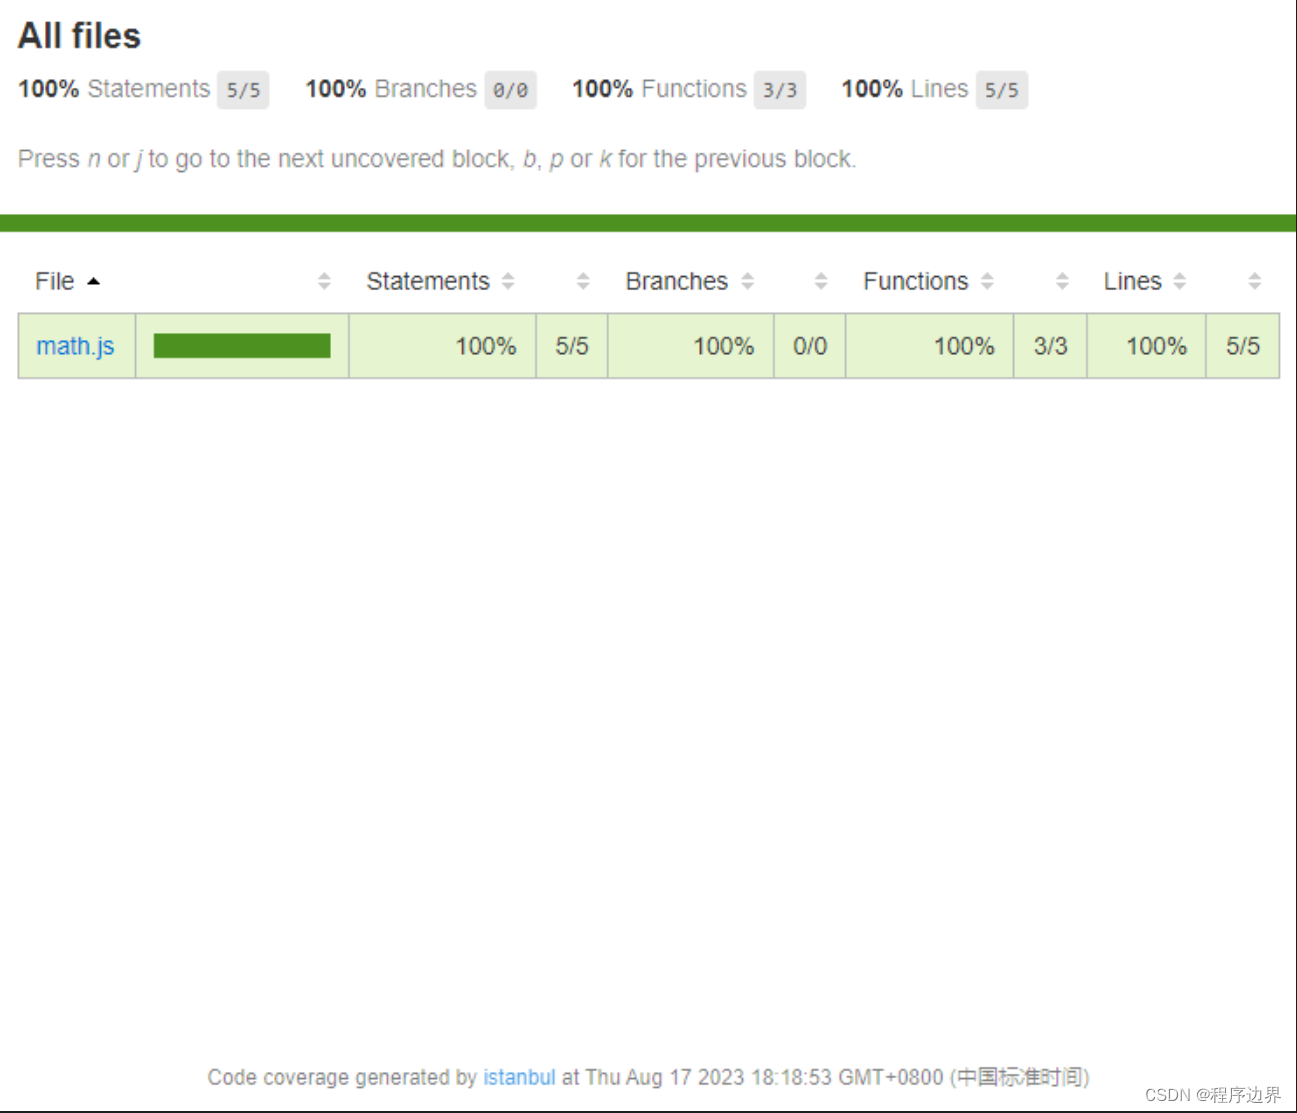
- 运行
npx jest --coverage可以查看覆盖率
 PASS  ./math.test.js√ 测试加法 3 + 7 (13ms)√ 测试减法 6 - 3 (1ms)√ 测试乘法 3 * 3 (1ms)----------|----------|----------|----------|----------|-------------------|
File      |  % Stmts | % Branch |  % Funcs |  % Lines | Uncovered Line #s |
----------|----------|----------|----------|----------|-------------------|
All files |      100 |      100 |      100 |      100 |                   |math.js  |      100 |      100 |      100 |      100 |                   |
----------|----------|----------|----------|----------|-------------------|
Test Suites: 1 passed, 1 total
Tests:       3 passed, 3 total
Snapshots:   0 total
Time:        4.569s
Ran all test suites.
不仅在控制台有,在根目录也生成了相应文件:
.
|-- clover.xml
|-- coverage-final.json
|-- lcov-report
|   |-- base.css
|   |-- block-navigation.js
|   |-- index.html
|   |-- math.js.html
|   |-- prettify.css
|   |-- prettify.js
|   |-- sort-arrow-sprite.png
|   `-- sorter.js
`-- lcov.info1 directory, 11 files
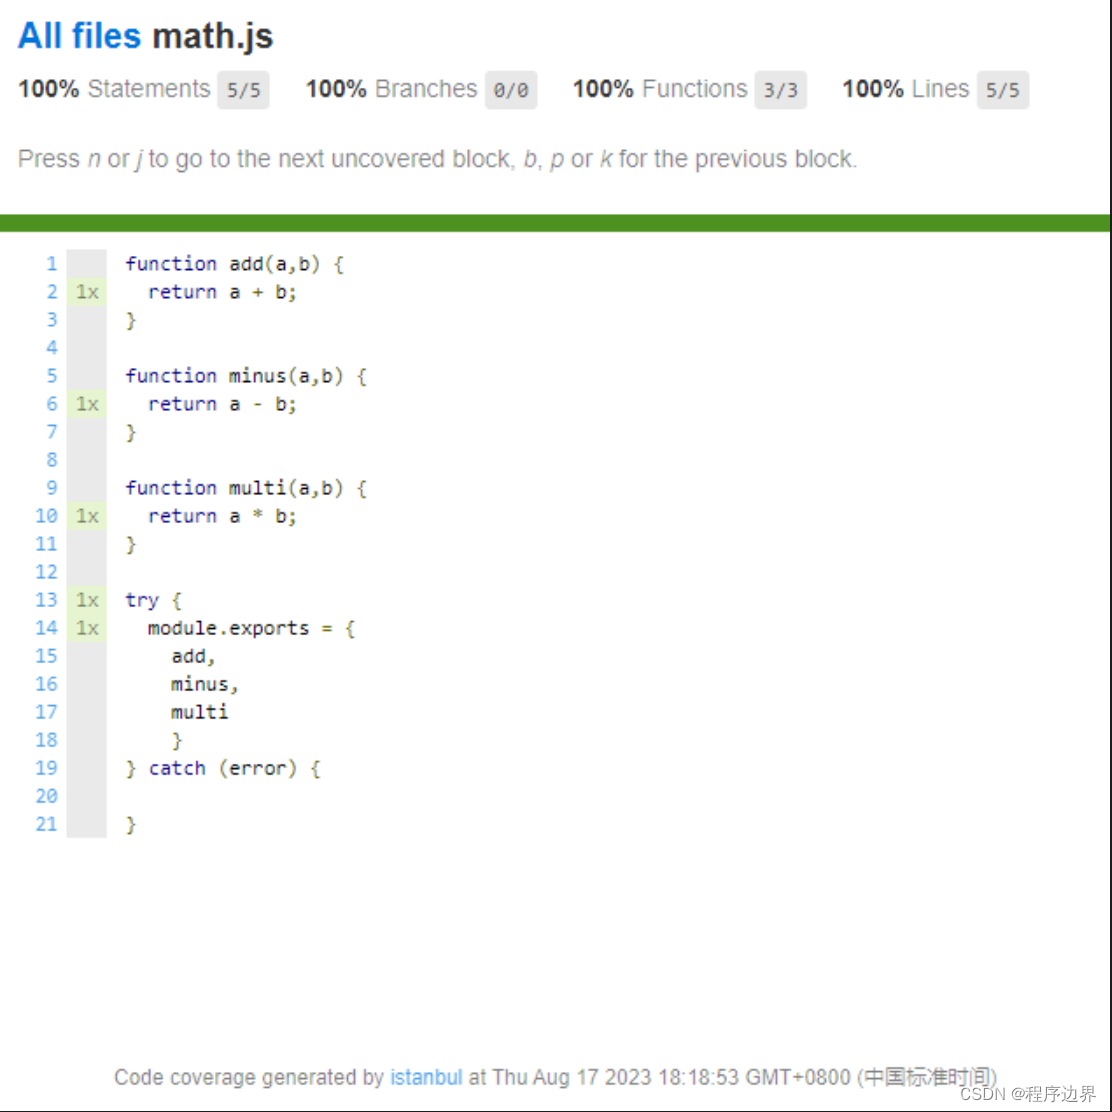
Jest/lesson2/coverage/lcov-report/index.html 可以直接访问:
可以修改配置 package.json:
{..."scripts": {"coverage": "jest --coverage"},...
}
之后运行 npm run coverage,也是一样的效果
修改
Jest\lesson2\jest.config.js中的coverageDirectory可以指定生成目录名称
一般前端项目中都是使用 ESModule 的语法,按 ESModule 改一下:
math.js
function add(a,b) {return a + b;
}function minus(a,b) {return a - b;
}function multi(a,b) {return a * b;
}export {add,minus,multi
}
math.test.js
import {add,minus,multi
} from './math'test('测试加法 3 + 7', () => {expect(add(3,3)).toBe(6);
});test('测试减法 6 - 3', () => {expect(minus(6,3)).toBe(3);
});test('测试乘法 3 * 3', () => {expect(multi(3,3)).toBe(9);
});
改完代码之后,运行 jest 会有报错产生,这是因为 jest 是运行在 node 环境,并不能直接识别 ESModule 的语法,这就要用到 babel 了
安装 babel 相关依赖:
npm i @babel/core@7.4.5 @babel/preset-env@7.4.5 -D
在根目录新建 babel 配置文件 .babelrc
{"presets": [["@babel/preset-env", {"targets": {"node": "current"}}]]
}
再次运行 jest ,成功!
jest 运行底层机制:
- npm run jest
- jest (babel-jest)
- babel-core
- 取 .babelrc 配置
- 在运行测试之前,结合 babel,先把代码做一次转化
- 运行转化过的测试用例代码
- Jest中文文档 | Jest中文网 · 🃏 Jest - 令人愉快的 JavaScript 测试框架
本文仅作记录, 实战要点待后续专文总结,敬请期待。。。


![[嵌入式系统-27]:RT-Thread -14- 操作系统配置:rtconfig.h文件与menuconfig命令](https://img-blog.csdnimg.cn/direct/0fc0ffec3e264829a4fee7f1d85b1343.png)