🏆作者简介:|康有为| ,大四在读,目前在小米安卓实习,毕业入职。
🏆安卓学习资料推荐:
视频:b站搜动脑学院 视频链接 (他们的视频后面一部分没再更新,看看前面也挺好的)
书籍:《第一行代码》(第3版) by 郭霖 (z-lib.org)
思维导图: https://www.processon.com/view/link/62427cb2e0b34d0730e20e00(来自动脑学院)
🏆持续学习安卓知识中,共勉,我的【安卓】专栏中还有其他文章,持续更新中,欢迎关注
目录
一、文本显示
设置文本内容
设置文本大小
设置文本颜色
二、视图基础
设置视图的宽高
设置视图间距
三、常用布局
线性布局LinearLayout
orientation属性:水平排列、垂直排列
layout_weight属性:权重占比
相对布局RelativeLayout
参照物为 平级视图
参照物为 父级属性
网格布局GridLayout
滚动视图ScrollView
四、按钮触控
不同类型的按钮
一、文本显示
设置文本内容
先将要用的字符串写到 res/values/strings.xml 里面,然后外面就能调用这个字符串了,也可以直接在外面调用字符串,但是规范的操作还是写到strings.xml里面的。
设置文本内容有两种方式:
- 在XML文件中通过属性android:text设置文本
android:text="@string/hello"android:text="也可以直接在这里写字符串"
- 在Java代码中调用文本视图对象的setText方法设置文本
TextView tv_hello = findViewById(R.id.tv_hello);
tv_hello.setTextSize(R.string.hello);
演示
1.快速创建一个Activity
2.res/values/strings.xml
<string name="hello">你好 世界</string>3. 两种方式
方式一:在layout的xml文件中
<?xml version="1.0" encoding="utf-8"?>
<LinearLayout xmlns:android="http://schemas.android.com/apk/res/android"xmlns:app="http://schemas.android.com/apk/res-auto"xmlns:tools="http://schemas.android.com/tools"android:layout_width="match_parent"android:layout_height="match_parent"tools:context=".activity_text_view"><TextViewandroid:layout_width="wrap_content"android:layout_height="wrap_content"android:id="@+id/tv_hello"android:text="@string/hello"/>
</LinearLayout>
方式二:在java代码中的onCreate方法里面加上
@Override
protected void onCreate(Bundle savedInstanceState) {super.onCreate(savedInstanceState);setContentView(R.layout.activity_text_view);TextView tv_hello = findViewById(R.id.tv_hello);tv_hello.setText(R.string.hello);
}
设置文本大小
两种方法:
1.在XML文件中则通过属性 android:textSize指定文本大小,此时需要指定字号单位。
android:Size="30sp"2.在Java代码中调用setTextSize方法,即可指定文本大小。
TextView tv_hello = findViewById(R.id.tv_hello);
tv_hello.setTextSize(30);
单位
px:它是手机屏幕的最小显示单位,与设备的显示屏有关。
dp:它是与设备无关的显示单位,只与屏幕的尺寸有关。
sp:它专门用来设置字体大小,在系统设置中可以调整字体大小。
设置文本颜色
两种方法
1.在XML布局文件中设置文本颜色
在XML布局文件中,你可以使用android:textColor属性为文本设置颜色。例如
<TextViewandroid:id="@+id/myTextView"android:layout_width="wrap_content"android:layout_height="wrap_content"android:text="Hello, World!"android:textColor="#FF0000" /> <!-- 这里的"#FF0000"表示红色 -->
2.在Java代码中调用setTextColor方法即可设置文本颜色,具体色值可从 Color类取。
TextView tv_hello = findViewById(R.id.tv_hello);
tv_hello.setTextColor(Color.GREEN);
色值有八位十六进制数与六位十六进制数两种表达方式,例如八位编码FFEEDDCC中,
表示透明度,EE表示红色的浓度,DD表示绿色的浓度,CC表示蓝色的浓度。
透明度为FF表示完全不透明,为00表示完全透明。RGB三色的数值越大表示颜色越浓,也就越亮;数值越小,表示颜色越淡,也就越暗。
二、视图基础
设置视图的宽高
视图宽度通过属性android:layout_width表达
视图高度通过属性android:layout_height表达
宽高的取值主要有下列三种:
- match_parent:表示与上级视图保持一致,最上级的容器就是屏幕。
- wrap_content:表示与内容自适应,也就是包裹内容。
- 以dp为单位的具体尺寸。
方法一:在XML布局文件中设置宽高
在XML布局文件中,你可以使用android:layout_width和android:layout_height属性来设置视图的宽度和高度。例如:
<Buttonandroid:id="@+id/myButton"android:layout_width="100dp"android:layout_height="50dp"android:text="Click me" />
上面的例子中,android:layout_width和android:layout_height属性分别设置了按钮的宽度和高度为100dp和50dp。你可以根据需要修改这些值。
方法二:在Java代码中动态设置宽高
在Java代码中,你可以使用setLayoutParams方法来动态设置视图的宽度和高度。例如:
// 在Activity或Fragment中的Java代码中
Button myButton = findViewById(R.id.myButton);// 设置宽度和高度
int widthInPixels = 200; // 宽度,以像素为单位
int heightInPixels = 100; // 高度,以像素为单位ViewGroup.LayoutParams params = new ViewGroup.LayoutParams(widthInPixels, heightInPixels);
myButton.setLayoutParams(params);上述代码中,我们创建了一个ViewGroup.LayoutParams对象,并设置了宽度和高度,然后使用setLayoutParams方法将其应用到按钮上。你可以根据需要使用不同的LayoutParams类,例如RelativeLayout.LayoutParams或LinearLayout.LayoutParams,具体取决于你的布局类型。
请注意,动态设置视图宽高时,你可以选择使用像素(pixels)或者其他单位(如dp、sp等),具体取决于你的设计需求。
设置视图间距
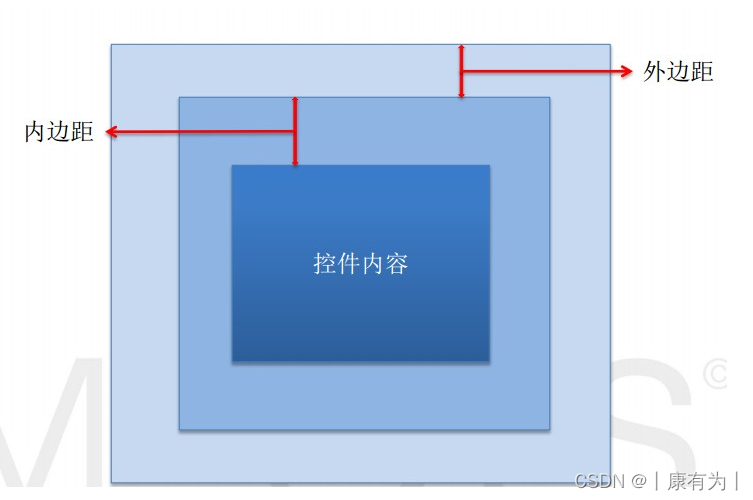
主要有 外边距 和 内边距两种
外边距与内边距的区别
- 外边距:layout_margin是用于控制视图与其父容器或相邻视图之间的距离,影响视图在布局中的位置。外边距定义了视图的外部空白区域,它不影响视图内部的内容。
包括layout_margin、layout_marginLeft、layout_marginTop、layout_marginRight、layout_marginBottom
- 内边距:padding是用于控制视图内部内容与视图边界之间的距离。它影响视图内部的内容区域,但不会影响视图本身在布局中的位置和大小。
包括padding、paddingLeft、paddingTop、 paddingRight、 paddingBottom
总结:控件和控件之间的距离我们称之为外边距,控件中的内容与控件之间的距离我们称之为内边距。
方法一:在XML布局文件中设置间距
在XML布局文件中,你可以使用android:layout_margin属性设置视图的外边距(margin)。android:layout_margin属性是一个四个值的集合,分别表示视图的上、下、左、右外边距。例如:
<Buttonandroid:id="@+id/button1"android:layout_width="wrap_content"android:layout_height="wrap_content"android:text="Button 1"android:layout_margin="16dp" />
上述例子中,android:layout_margin被设置为16dp,表示上、下、左、右四个方向的外边距都为16dp。你可以根据需要设置不同的值。
方法二:在Java代码中动态设置间距
在Java代码中,你可以使用setMargins方法动态设置视图的外边距。例如:
// 在Activity或Fragment中的Java代码中
Button button1 = findViewById(R.id.button1);// 设置上、下、左、右外边距(以像素为单位)
int marginInPixels = 20;
ViewGroup.MarginLayoutParams params = (ViewGroup.MarginLayoutParams) button1.getLayoutParams();
params.setMargins(marginInPixels, marginInPixels, marginInPixels, marginInPixels);
button1.setLayoutParams(params);
上述代码中,我们获取了LayoutParams对象,并使用setMargins方法设置了上、下、左、右四个方向的外边距。你可以根据需要调整外边距的值和方向。
请注意,动态设置间距时,需要确保你的LayoutParams类型是MarginLayoutParams或其子类。如果使用的是RelativeLayout.LayoutParams或LinearLayout.LayoutParams等特定的LayoutParams类型,你可能需要将其转换为MarginLayoutParams。
设置视图的对齐方式
设置视图的对齐方式有两种途径:
- 采用layout_gravity属性,它指定了当前视图相对于上级视图的对齐方式。
- 采用gravity属性,它指定了下级视图相对于当前视图的对齐方式。
示例
在xml文件中
android:layout_gravity="right"layout_gravity
- 它指定了当前视图相对于上级视图的对齐方式。
- 取值:(可以用 “|” 组合)
- left:左对齐
- right:右对齐
- top:顶部对齐
- bottom:底部对齐
- center:居中对齐
- center_vertical:垂直居中对齐
- center_horizontal:水平居中对齐
- start:起始位置(依赖于布局的方向,通常是左对齐)
- end:结束位置(依赖于布局的方向,通常是右对齐)
gravity
- 它指定了下级视图相对于当前视图的对齐方式。
- 取值:(可以用 “|” 组合)
- left:左对齐
- right:右对齐
- top:顶部对齐
- bottom:底部对齐
- center:居中对齐
- center_vertical:垂直居中对齐
- center_horizontal:水平居中对齐
- start:起始位置(依赖于布局的方向,通常是左对齐)
- end:结束位置(依赖于布局的方向,通常是右对齐)
- fill_vertical:垂直方向填充
- fill_horizontal:水平方向填充
- clip_vertical:垂直方向裁剪
- clip_horizontal:水平方向裁剪
三、常用布局
线性布局LinearLayout
基本结构(布局是可以嵌套的):
<LinearLayoutandroid:layout_width="match_parent"android:layout_height="match_parent"android:orientation="horizontal"><!-- 子视图按照水平方向排列 --></LinearLayout>
orientation属性:水平排列、垂直排列
线性布局内部的各视图有两种排列方式:
- orientation属性值为horizontal时,内部视图在水平方向从左往右排列
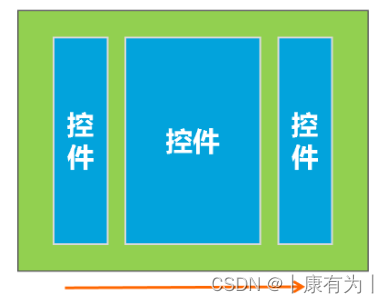
- orientation属性值为vertical时,内部视图在垂直方向从上往下排列。
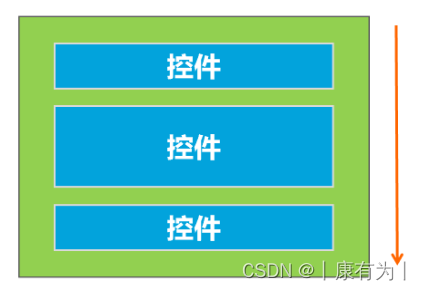
- 如果不指定orientation属性,则LinearLayout默认水平方向排列。
例如实现效果:

可以外部LinearLayout 垂直,里面嵌套两个子LinearLayout ,子1水平(按钮1、2),子2垂直(按钮3、4)
<?xml version="1.0" encoding="utf-8"?>
<LinearLayout xmlns:android="http://schemas.android.com/apk/res/android"xmlns:tools="http://schemas.android.com/tools"android:layout_width="match_parent"android:layout_height="match_parent"tools:context=".activity_text_view"android:orientation="vertical"><LinearLayoutandroid:layout_width="wrap_content"android:layout_height="wrap_content"><Buttonandroid:id="@+id/button1"android:layout_width="wrap_content"android:layout_height="wrap_content"android:text="按钮1" /><Buttonandroid:id="@+id/button2"android:layout_width="wrap_content"android:layout_height="wrap_content"android:text="按钮2" /></LinearLayout><LinearLayoutandroid:layout_width="wrap_content"android:layout_height="wrap_content"android:orientation="vertical">><Buttonandroid:id="@+id/button3"android:layout_width="wrap_content"android:layout_height="wrap_content"android:text="按钮3" /><Buttonandroid:id="@+id/button4"android:layout_width="wrap_content"android:layout_height="wrap_content"android:text="按钮4" /></LinearLayout></LinearLayout>
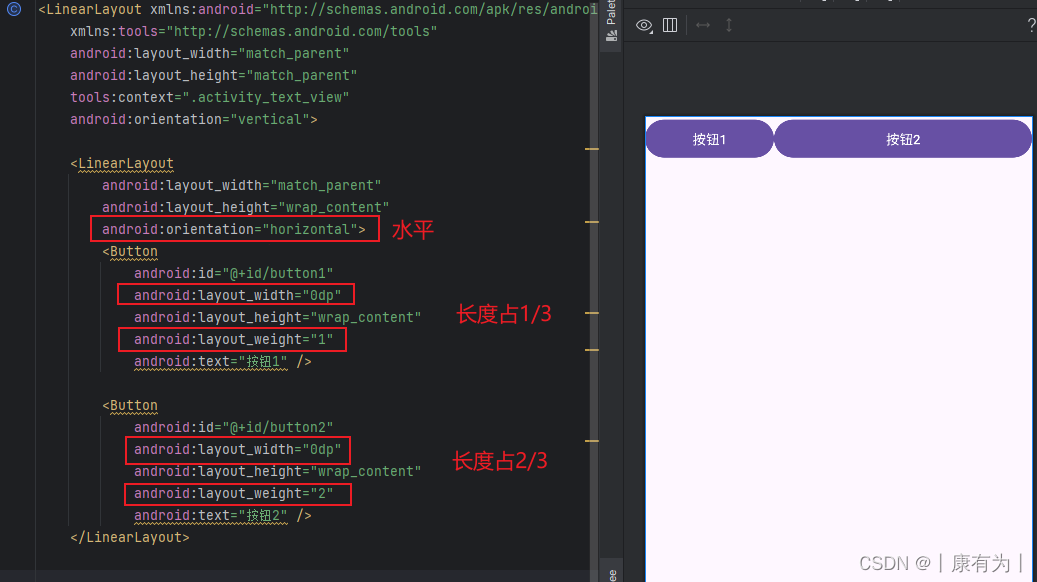
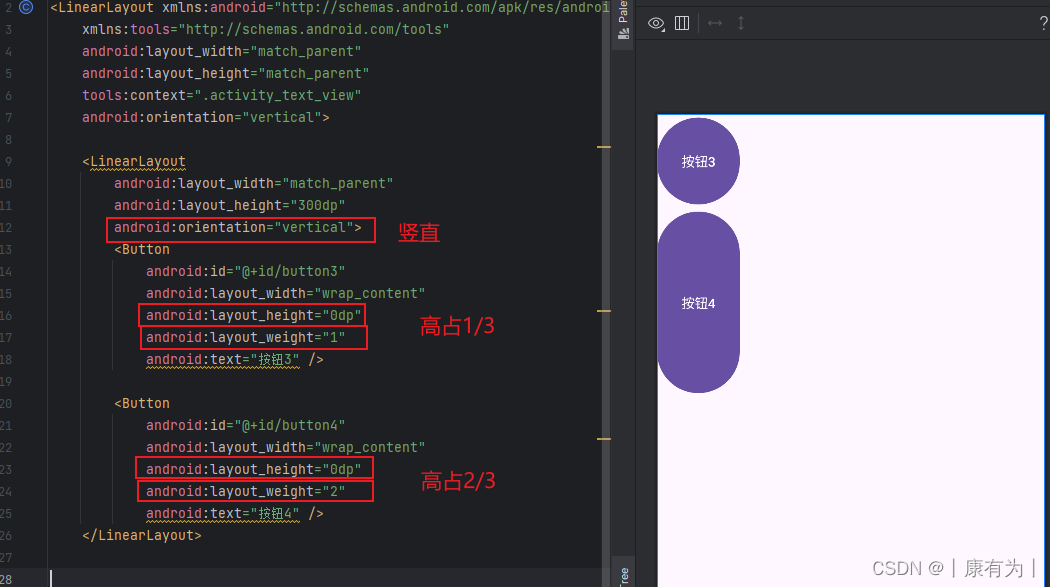
layout_weight属性:权重占比
android:layout_weight="1"
<LinearLayoutandroid:layout_width="match_parent"android:layout_height="wrap_content"android:orientation="horizontal"><Buttonandroid:layout_width="0dp"android:layout_height="wrap_content"android:layout_weight="1"android:text="Button 1" /><Buttonandroid:layout_width="0dp"android:layout_height="wrap_content"android:layout_weight="2"android:text="Button 2" /></LinearLayout>layout_weight通常需要配合0dp(或者0dip,0sp等)的设置来实现权重的分配。这是因为在LinearLayout中,layout_weight属性通常用于控制视图在布局中相对于其他视图的权重,而实际的尺寸则由layout_width或layout_height来控制。
使用0dp的目的是告诉LinearLayout在相应的方向上要根据权重进行分配,而不是根据实际的固定尺寸。
如果宽度为0dp,weight权重指的就是水平方向上的占比
如果高度为0dp,weight权重指的就是竖直方向上的占比
相对布局RelativeLayout
参考文章:11_Android的相对布局(RelativeLayout)
相对布局的下级视图位置由其他视图决定。用于确定下级视图位置的参照物分两种:
- 与该视图自身平级的视图;
- 该视图的上级视图(也就是它归属的RelativeLayout)
如果不设定下级视图的参照物,那么下级视图默认显示在RelativeLayout内部的左上角。
<RelativeLayoutxmlns:android="http://schemas.android.com/apk/res/android"android:layout_width="match_parent"android:layout_height="match_parent"><!-- 子视图定义在这里 --></RelativeLayout>
参照物为 平级视图
平级的有两组属性
第一组属性:
android:layout_below:
- 含义: 指定该视图应该位于另一个视图的下方。
- 取值: 引用其他视图的ID。
android:layout_above:
- 含义: 指定该视图应该位于另一个视图的上方。
- 取值: 引用其他视图的ID。
android:layout_toLeftOf:
- 含义: 指定该视图应该位于另一个视图的左侧。
- 取值: 引用其他视图的ID。
android:layout_toRightOf:
- 含义: 指定该视图应该位于另一个视图的右侧。
- 取值: 引用其他视图的ID。
<RelativeLayoutxmlns:android="http://schemas.android.com/apk/res/android"android:layout_width="match_parent"android:layout_height="match_parent"><Buttonandroid:id="@+id/button1"android:layout_width="wrap_content"android:layout_height="wrap_content"android:text="Button 1" /><Buttonandroid:id="@+id/button2"android:layout_width="wrap_content"android:layout_height="wrap_content"android:layout_below="@id/button1"android:text="Button 2" /><Buttonandroid:id="@+id/button3"android:layout_width="wrap_content"android:layout_height="wrap_content"android:layout_toRightOf="@id/button2"android:text="Button 3" /></RelativeLayout>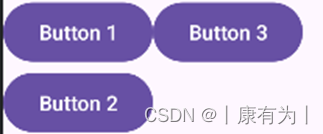
第二组属性:
这组属性用于在相对布局 (RelativeLayout) 中指定视图相对于另一个视图的对齐位置。以下是这些属性的含义:
android:layout_alignLeft:
- 含义: 指定该视图的左侧边缘与另一个视图的左侧边缘对齐。
- 取值: 引用其他视图的ID。
android:layout_alignRight:
- 含义: 指定该视图的右侧边缘与另一个视图的右侧边缘对齐。
- 取值: 引用其他视图的ID。
android:layout_alignTop:
- 含义: 指定该视图的顶部边缘与另一个视图的顶部边缘对齐。
- 取值: 引用其他视图的ID。
android:layout_alignBottom:
- 含义: 指定该视图的底部边缘与另一个视图的底部边缘对齐。
- 取值: 引用其他视图的ID。
示例
<RelativeLayoutxmlns:android="http://schemas.android.com/apk/res/android"android:layout_width="match_parent"android:layout_height="match_parent"><Buttonandroid:id="@+id/button1"android:layout_width="wrap_content"android:layout_height="wrap_content"android:text="Button 1" /><Buttonandroid:id="@+id/button2"android:layout_width="wrap_content"android:layout_height="wrap_content"android:layout_below="@id/button1"android:layout_alignLeft="@id/button1"android:text="Button 2" /></RelativeLayout>在这个例子中,Button 2 被放置在 Button 1 的下方,并且其左侧边缘与 Button 1 的左侧边缘对齐。

参照物为 父级属性
android:layout_alignParentLeft:
- 含义: 指定该视图的左侧边缘与其父容器的左侧边缘对齐。
- 取值: true 或 false。
android:layout_alignParentRight:
- 含义: 指定该视图的右侧边缘与其父容器的右侧边缘对齐。
- 取值: true 或 false。
android:layout_alignParentTop:
- 含义: 指定该视图的顶部边缘与其父容器的顶部边缘对齐。
- 取值: true 或 false。
android:layout_alignParentBottom:
- 含义: 指定该视图的底部边缘与其父容器的底部边缘对齐。
- 取值: true 或 false。
android:layout_centerInParent:
- 含义: 指定该视图在其父容器中居中显示,无论是水平还是垂直方向。
- 取值: true 或 false。
android:layout_centerHorizontal:
- 含义: 指定该视图在其父容器中水平居中显示。
- 取值: true 或 false。
android:layout_centerVertical:
- 含义: 指定该视图在其父容器中垂直居中显示。
- 取值: true 或 false。
示例
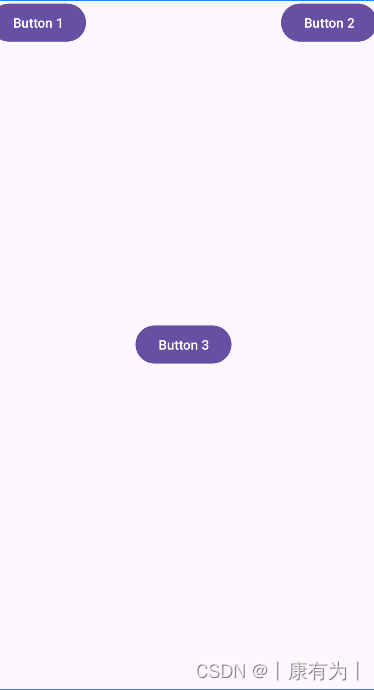
<RelativeLayoutxmlns:android="http://schemas.android.com/apk/res/android"android:layout_width="match_parent"android:layout_height="match_parent"><Buttonandroid:id="@+id/button1"android:layout_width="wrap_content"android:layout_height="wrap_content"android:layout_alignParentLeft="true"android:text="Button 1" /><Buttonandroid:id="@+id/button2"android:layout_width="wrap_content"android:layout_height="wrap_content"android:layout_alignParentRight="true"android:text="Button 2" /><Buttonandroid:id="@+id/button3"android:layout_width="wrap_content"android:layout_height="wrap_content"android:layout_centerInParent="true"android:text="Button 3" /></RelativeLayout>
在这个例子中,Button 1 被放置在其父容器的左侧边缘, Button 2 则被放置在 其父容器的右侧边缘,Button 3 被居中显示在其父容器中。
网格布局GridLayout
详情可以看这篇博客: AndroidStudio网格布局(制作计算机界面)
网格布局支持多行多列的表格排列。
网格布局默认从左往右、从上到下排列,它新增了两个属性:
- columnCount属性,它指定了网格的列数,即每行能放多少个视图;
- rowCount属性,它指定了网格的行数,即每列能放多少个视图;
网格定义: GridLayout将布局划分为行和列,每个单元格称为一个网格。通过android:rowCount和android:columnCount属性,你可以定义行数和列数。
<GridLayoutxmlns:android="http://schemas.android.com/apk/res/android"android:layout_width="match_parent"android:layout_height="match_parent"android:rowCount="2"android:columnCount="3"><!-- 网格中的视图将会被放置在 2 行 3 列的网格中 --></GridLayout>对齐和间距: GridLayout支持通过layout_gravity属性设置子视图的对齐方式,以及通过layout_margin属性设置视图之间的间距。
权重: 类似于LinearLayout,GridLayout也支持layout_rowWeight和layout_columnWeight属性,用于指定行或列的权重,以实现灵活的大小调整。

滚动视图ScrollView
>滚动视图有两种:
- ScrollView,它是垂直方向的滚动视图;垂直方向滚动时,layout_width属性值设置为match_parent,layout_height属性值设置为wrap_content。
- HorizontalScrollView,它是水平方向的滚动视图;水平方向滚动时,layout_width属性值设置为wrap_content,layout_height属性值设置为match_parent。
详情学习这篇博客: 由浅入深 细细体会Android的视图滚动
四、按钮触控
按钮控件Button由TextView派生而来,它们之间的区别有:
- Button拥有默认的按钮背景,而TextView默认无背景;
- Button的内部文本默认居中对齐,而TextView的内部文本默认靠左对齐;
- Button会默认将英文字母转为大写,而TextView保持原始的英文大小写;
<Buttonandroid:id="@+id/myButton"android:layout_width="wrap_content"android:layout_height="wrap_content"android:text="Click me" />下面java代码写到onCreate方法里面,用于处理点击事件
Button myButton = findViewById(R.id.myButton);
myButton.setOnClickListener(new View.OnClickListener() {@Overridepublic void onClick(View v) {// 处理按钮点击事件的代码Toast.makeText(MainActivity.this, "Button Clicked!", Toast.LENGTH_SHORT).show();}
});
在这个示例中,当按钮被点击时,会显示一个短时期的Toast消息。
不同类型的按钮
Android提供了不同类型的按钮,包括但不限于:
- 普通按钮: 使用 <Button> 元素定义,可自定义样式和外观。
- 图像按钮: 使用 <ImageButton> 元素定义,可以显示图像而不是文本。
- 切换按钮: 使用 <ToggleButton> 元素定义,具有两种状态,例如开关。
- 复选框: 使用 <CheckBox> 元素定义,表示两种状态之间的选择。
- 单选按钮: 使用 <RadioButton> 元素定义,通常用于单选组。
- 浮动操作按钮(FAB): 使用 FloatingActionButton 类定义,通常用于主要操作。
详情:动脑学院视频-p27-p33