什么是NoSQL?
NoSQL,指的是非关系型的数据库。NoSQL有时也称作Not Only SQL的缩写,是对不同于传统的关系型数据库的数据库管理系统的统称。
NoSQL用于超大规模数据的存储。(例如谷歌或Facebook每天为他们的用户收集万亿比特的数据)。这些类型的数据存储不需要固定的模式,无需多余操作就可以横向扩展。
为什么使用NoSQL ?
今天我们可以通过第三方平台(如:Google,Facebook等)可以很容易的访问和抓取数据。用户的个人信息,社交网络,地理位置,用户生成的数据和用户操作日志已经成倍的增加。我们如果要对这些用户数据进行挖掘,那SQL数据库已经不适合这些应用了, NoSQL 数据库的发展却能很好的处理这些大的数据。
RDBMS vs NoSQL
RDBMS - 高度组织化结构化数据 - 结构化查询语言(SQL) - 数据和关系都存储在单独的表中。 - 数据操纵语言,数据定义语言 - 严格的一致性 - 基础事务
NoSQL - 代表着不仅仅是SQL - 没有声明性查询语言 - 没有预定义的模式 -键 - 值对存储,列存储,文档存储,图形数据库 - 最终一致性,而非ACID属性 - 非结构化和不可预知的数据 - CAP定理 - 高性能,高可用性和可伸缩性
NoSQL的优点/缺点
优点:
-
- 高可扩展性
-
- 分布式计算
-
- 低成本
-
- 架构的灵活性,半结构化数据
-
- 没有复杂的关系
缺点:
-
- 没有标准化
-
- 有限的查询功能(到目前为止)
-
- 最终一致是不直观的程序
Redis 简介
Redis(Remote Dictionary Server ),即远程字典服务,是一个开源的使用ANSI C语言编写、支持网络、可基于内存亦可持久化的日志型、Key-Value数据库 从2013年5月开始,Redis的开发由Pivotal(Spring生态)赞助。
Redis 是一个开源(BSD许可)的,内存中的数据结构存储系统,它可以用作数据库、缓存和消息中间件。 它支持多种类型的数据结构,如 字符串(strings), 散列(hashes), 列表(lists), 集合(sets), 有序集合(sorted sets) 与范围查询, bitmaps, hyperloglogs 和地理空间 geospatial 索引半径查询。 Redis 内置了 复制(replication),LUA 脚本(Lua scripting), LRU 驱动事件(LRU eviction),事务(transactions)和不同级别的 磁盘持久化(persistence), 并通过 Redis哨兵(Sentinel)和自动 分区(Cluster)提供高可用性(high availability)。
安装
1.下载
官网:Redis
中文:http://redis.cn/
本教程使用版本:redis-6.0.6.tar.gz
2.上传到服务器
/opt/soft/redis 目录下
3.更新升级GCC
gcc的全称是GNU Compiler Collection,它是由GNU推出的一款功能强大的、性能优越的多平台编译器,是一个能够编译多种语言的编译器。最开始gcc是作为C语言的编译器(GNU C Compiler),现在除了c语言,还支持C++、java、Pascal等语言。gcc支持多种硬件平台。
gcc的特点
- gcc是一个可移植的编译器,支持多种硬件平台。例如ARM、X86等等。
- gcc不仅是个本地编译器,它还能跨平台交叉编译。所谓的本地编译器,是指编译出来的程序只能够在本地环境进行运行。而gcc编译出来的程序能够在其他平台进行运行。例如嵌入式程序可在x86上编译,然后在arm上运行。
- gcc有多种语言前端,用于解析不同的语言。
- gcc是按模块化设计的,可以加入新语言和新CPU架构的支持。
- gcc是自由软件。任何人都可以使用或更改这个软件
查看GCC版本
[root@zhang redis]# gcc -v
Using built-in specs.
COLLECT_GCC=gcc
COLLECT_LTO_WRAPPER=/usr/libexec/gcc/x86_64-redhat-linux/4.8.5/lto-wrapper
Target: x86_64-redhat-linux
Configured with: ../configure --prefix=/usr --mandir=/usr/share/man --infodir=/usr/share/info --with-bugurl=http://bugzilla.redhat.com/bugzilla --enable-bootstrap --enable-shared --enable-threads=posix --enable-checking=release --with-system-zlib --enable-__cxa_atexit --disable-libunwind-exceptions --enable-gnu-unique-object --enable-linker-build-id --with-linker-hash-style=gnu --enable-languages=c,c++,objc,obj-c++,java,fortran,ada,go,lto --enable-plugin --enable-initfini-array --disable-libgcj --with-isl=/builddir/build/BUILD/gcc-4.8.5-20150702/obj-x86_64-redhat-linux/isl-install --with-cloog=/builddir/build/BUILD/gcc-4.8.5-20150702/obj-x86_64-redhat-linux/cloog-install --enable-gnu-indirect-function --with-tune=generic --with-arch_32=x86-64 --build=x86_64-redhat-linux
Thread model: posix
gcc version 4.8.5 20150623 (Red Hat 4.8.5-44) (GCC)
默认版本一般都是 4.8.* 的。
准备 SCL
scl软件集(Software Collections),是为了给 RHEL/CentOS 用户提供一种以方便、安全地安装和使用应用程序和运行时环境的多个(而且可能是更新的)版本的方式
1.安装scl源:
yum install centos-release-scl scl-utils-build2.列出scl有哪些源可以用
yum list all --enablerepo='centos-sclo-rh'|grep gcc[root@zhang redis]# yum list all --enablerepo='centos-sclo-rh' |grep gcc
gcc.x86_64 4.8.5-44.el7 @base
libgcc.x86_64 4.8.5-44.el7 @base
compat-gcc-44.x86_64 4.4.7-8.el7 base
compat-gcc-44-c++.x86_64 4.4.7-8.el7 base
compat-gcc-44-gfortran.x86_64 4.4.7-8.el7 base
devtoolset-10-gcc.x86_64 10.2.1-11.1.el7 centos-sclo-rh
devtoolset-10-gcc-c++.x86_64 10.2.1-11.1.el7 centos-sclo-rh
devtoolset-10-gcc-gdb-plugin.x86_64 10.2.1-11.1.el7 centos-sclo-rh
devtoolset-10-gcc-gfortran.x86_64 10.2.1-11.1.el7 centos-sclo-rh
devtoolset-10-gcc-plugin-devel.x86_64 10.2.1-11.1.el7 centos-sclo-rh
devtoolset-10-libgccjit.x86_64 10.2.1-11.1.el7 centos-sclo-rh
devtoolset-10-libgccjit-devel.x86_64 10.2.1-11.1.el7 centos-sclo-rh
devtoolset-10-libgccjit-docs.x86_64 10.2.1-11.1.el7 centos-sclo-rh
devtoolset-7-gcc.x86_64 7.3.1-5.16.el7 centos-sclo-rh
devtoolset-7-gcc-c++.x86_64 7.3.1-5.16.el7 centos-sclo-rh
devtoolset-7-gcc-gdb-plugin.x86_64 7.3.1-5.16.el7 centos-sclo-rh
devtoolset-7-gcc-gfortran.x86_64 7.3.1-5.16.el7 centos-sclo-rh
devtoolset-7-gcc-plugin-devel.x86_64 7.3.1-5.16.el7 centos-sclo-rh
devtoolset-7-libgccjit.x86_64 7.3.1-5.16.el7 centos-sclo-rh
devtoolset-7-libgccjit-devel.x86_64 7.3.1-5.16.el7 centos-sclo-rh
devtoolset-7-libgccjit-docs.x86_64 7.3.1-5.16.el7 centos-sclo-rh
devtoolset-8-gcc.x86_64 8.3.1-3.2.el7 centos-sclo-rh
devtoolset-8-gcc-c++.x86_64 8.3.1-3.2.el7 centos-sclo-rh
devtoolset-8-gcc-gdb-plugin.x86_64 8.3.1-3.2.el7 centos-sclo-rh
devtoolset-8-gcc-gfortran.x86_64 8.3.1-3.2.el7 centos-sclo-rh
devtoolset-8-gcc-plugin-devel.x86_64 8.3.1-3.2.el7 centos-sclo-rh
devtoolset-8-libgccjit.x86_64 8.3.1-3.2.el7 centos-sclo-rh
devtoolset-8-libgccjit-devel.x86_64 8.3.1-3.2.el7 centos-sclo-rh
devtoolset-8-libgccjit-docs.x86_64 8.3.1-3.2.el7 centos-sclo-rh
devtoolset-9-gcc.x86_64 9.3.1-2.el7 centos-sclo-rh *******
devtoolset-9-gcc-c++.x86_64 9.3.1-2.el7 centos-sclo-rh *******
devtoolset-9-gcc-gdb-plugin.x86_64 9.3.1-2.el7 centos-sclo-rh *******
devtoolset-9-gcc-gfortran.x86_64 9.3.1-2.el7 centos-sclo-rh
devtoolset-9-gcc-plugin-devel.x86_64 9.3.1-2.el7 centos-sclo-rh
devtoolset-9-libgccjit.x86_64 9.3.1-2.el7 centos-sclo-rh
devtoolset-9-libgccjit-devel.x86_64 9.3.1-2.el7 centos-sclo-rh
devtoolset-9-libgccjit-docs.x86_64 9.3.1-2.el7 centos-sclo-rh
gcc-c++.x86_64 4.8.5-44.el7 base
gcc-gfortran.x86_64 4.8.5-44.el7 base
3.选择高版本的进行安装
这里选择的是上面列表中 devtoolset-9 前三个: -gcc.x86_64 、-gcc-c++.x86_64、-gcc-gdb-plugin.x86_64
yum install devtoolset-9-gcc.x86_64 devtoolset-9-gcc-c++.x86_64 devtoolset-9-gcc-gdb-plugin.x86_64 等待一段时间,安装成功后:
Installed:devtoolset-9-gcc.x86_64 0:9.3.1-2.el7 devtoolset-9-gcc-c++.x86_64 0:9.3.1-2.el7 devtoolset-9-gcc-gdb-plugin.x86_64 0:9.3.1-2.el7 Dependency Installed:devtoolset-9-binutils.x86_64 0:2.32-16.el7 devtoolset-9-libstdc++-devel.x86_64 0:9.3.1-2.el7 devtoolset-9-runtime.x86_64 0:9.1-0.el7 Complete!
4.查看从 SCL 中安装的包的列表:
scl --list 或 scl -l[root@zhang redis]# scl --list
devtoolset-9
5.切换版本
gcc -v 查看版本后,发现并没有切换版本。
可以使用 scl enable devtoolset-9 bash 切换。
[root@zhang redis]# scl enable devtoolset-9 bash
[root@zhang redis]# gcc -v
Using built-in specs.
COLLECT_GCC=gcc
COLLECT_LTO_WRAPPER=/opt/rh/devtoolset-9/root/usr/libexec/gcc/x86_64-redhat-linux/9/lto-wrapper
Target: x86_64-redhat-linux
Configured with: ../configure --enable-bootstrap --enable-languages=c,c++,fortran,lto --prefix=/opt/rh/devtoolset-9/root/usr --mandir=/opt/rh/devtoolset-9/root/usr/share/man --infodir=/opt/rh/devtoolset-9/root/usr/share/info --with-bugurl=http://bugzilla.redhat.com/bugzilla --enable-shared --enable-threads=posix --enable-checking=release --enable-multilib --with-system-zlib --enable-__cxa_atexit --disable-libunwind-exceptions --enable-gnu-unique-object --enable-linker-build-id --with-gcc-major-version-only --with-linker-hash-style=gnu --with-default-libstdcxx-abi=gcc4-compatible --enable-plugin --enable-initfini-array --with-isl=/builddir/build/BUILD/gcc-9.3.1-20200408/obj-x86_64-redhat-linux/isl-install --disable-libmpx --enable-gnu-indirect-function --with-tune=generic --with-arch_32=x86-64 --build=x86_64-redhat-linux
Thread model: posix
gcc version 9.3.1 20200408 (Red Hat 9.3.1-2) (GCC)
上面最后一行可以到切换后的版本已经更新完成
4.解压 redis-6.0.6.tar.gz
tar -xvf redis-6.0.6.tar.gz5. 安装
cd redis-6.0.6
切换到解压的目录 redis-6.0.6下,执行make
make
需要等待一段时间,完成后,再进入src。
(可以不需要:make 后,可以使用 make test,
出现错误:You need tcl 8.5 or newer in order to run the Redis test。
解决办法:yum install tcl )
注意: 此时,在 src 下已经出现 redis-server 和 redis-cli
[root@zhang src]# ./redis-server
71047:C 04 Aug 2021 21:48:07.535 # oO0OoO0OoO0Oo Redis is starting oO0OoO0OoO0Oo
71047:C 04 Aug 2021 21:48:07.535 # Redis version=6.0.6, bits=64, commit=00000000, modified=0, pid=71047, just started
71047:C 04 Aug 2021 21:48:07.535 # Warning: no config file specified, using the default config. In order to specify a config file use ./redis-server /path/to/redis.conf
71047:M 04 Aug 2021 21:48:07.536 * Increased maximum number of open files to 10032 (it was originally set to 1024).
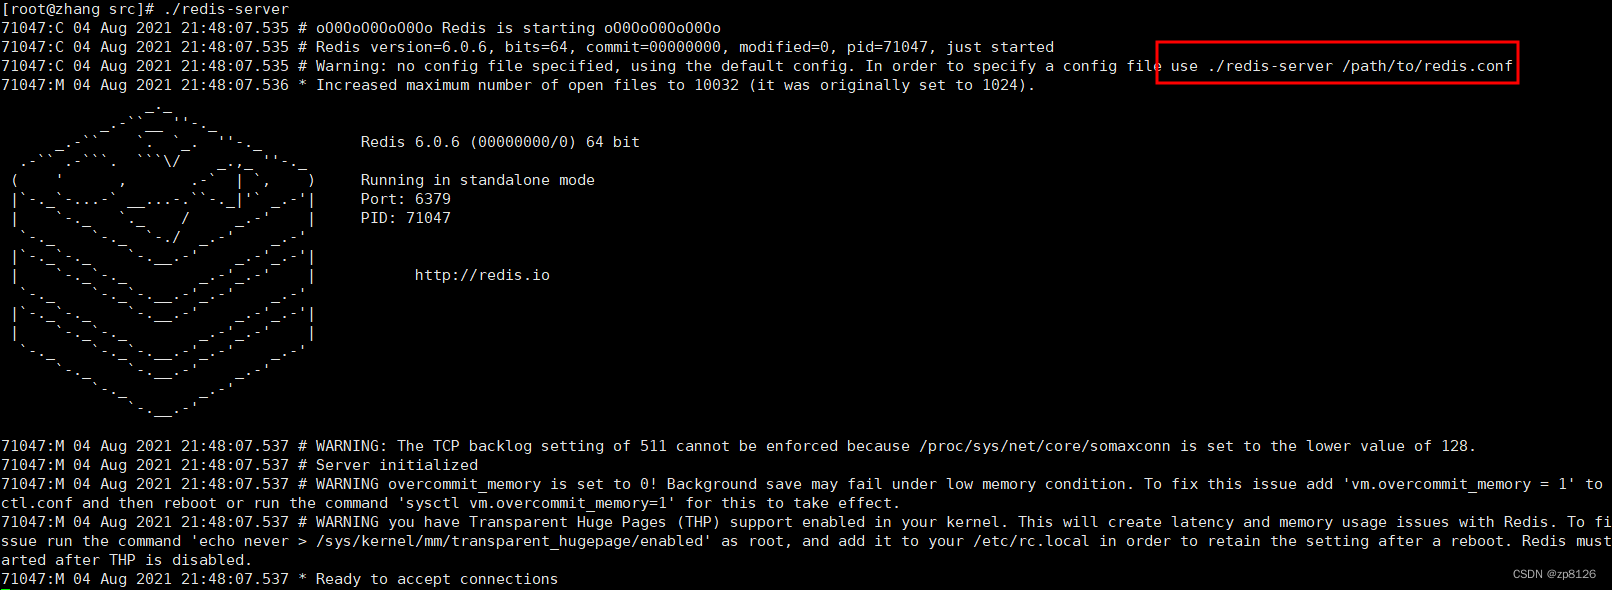
这样操作不是很方便,一般我们还会继续下面操作:make install 。把关键的执行文件存放到指定的目录。
cd src
make install PREFIX=/usr/redis
PREFIX参数指定redis的安装目录。一般软件安装到 /usr/redis 目录下。
如下:先到 src 目录下
直接执行 make install 会默认安装到 /usr/local/bin 目录下。可以直接在任意目录下使用命令。
[root@zhang src]# make install PREFIX=/usr/redis   ####这一步想简单的话,直接make install即可Hint: It's a good idea to run 'make test' ;)INSTALL installINSTALL installINSTALL installINSTALL installINSTALL install
[root@zhang src]#
make install 后,查看指定的安装目录,执行结果如下:
[root@zhang src]# ls /usr/redis/bin
redis-benchmark  redis-check-aof  redis-check-rdb  redis-cli  redis-sentinel  redis-server
[root@zhang src]#
拷贝配置文件到安装目录 /usr/redis/bin
[root@zhang redis-6.0.6]# cp redis.conf /usr/redis/bin/
[root@zhang redis-6.0.6]# cd /usr/redis/bin
[root@zhang bin]# ls
redis-benchmark  redis-check-aof  redis-check-rdb  redis-cli  redis.conf  redis-sentinel  redis-server
[root@zhang bin]#
修改配置文件后台启动,vi 编辑,底行模式 :/daemonize 搜索。
修改 redis.conf 文件,把 daemonize no 改为 daemonize yes
默认情况下,在任意目录是不能直接执行redis-server的,必须要使用 ./usr/redis/redis-server 才能访问,我们为了方便访问,可以放到 /usr/local/bin 目录下。
其实,如果上面 make install 不指定目录时,默认也会放到此目录下的。
[root@zhang bin]# redis-server   #####此时还不可以
bash: redis-server: command not found...
[root@zhang bin]# cp redis-cli /usr/local/bin
[root@zhang bin]# cp redis-server /usr/local/bin
[root@zhang bin]# redis-server  #####此时 可以
6. 启动和停止
如果配置了后台启动后,再次启动 redis-server 使用指定的配置文件启动,则可以后台运行,不再出现界面
[root@zhang bin]# redis-cli                    ###**通过客户端登录
127.0.0.1:6379> shutdown                       ###** 发送停机命令
not connected> quit                               ###** 退出redis 客户端
[root@zhang bin]# redis-server redis.conf      ### 使用配置文件启动 后台启动
73312:C 04 Aug 2021 22:20:59.748 # oO0OoO0OoO0Oo Redis is starting oO0OoO0OoO0Oo
73312:C 04 Aug 2021 22:20:59.748 # Redis version=6.0.6, bits=64, commit=00000000, modified=0, pid=73312, just started
73312:C 04 Aug 2021 22:20:59.748 # Configuration loaded
[root@zhang bin]# redis-cli        ###** 再次登录
127.0.0.1:6379> ping            ###** 测试登录成功
PONG
12


![[leetcode] 37. 解数独](https://img-blog.csdnimg.cn/direct/a36c1b59f2eb48eebd27dc7ba26116ca.png)


