目录
一、重写功能——rewrite
1.if
1.1 if
2. return
2.1状态码301和302的区别
301
302
3. set
4. break
5. rewrite
5.1 rewrite flag使用
5.2 flag说明
5.3举例
5.3.1访问 bj 跳转 beijing
5.3.2举例——break
5.3.3 http 转 https
5.3.4 break 与 last
5.3.5 更换目录访问方式,目录转换为对象存储
5.3.6多目录转换访问方式
5.4 防盗链
5.4.1盗链
5.4.2防盗链
5.5其他相关高级功能
5.6拓展
二、反向代理
1.反向代理定义
2.Nginx反向代理配置文件
3.反向代理举例
3.1反向代理服务器
3.2反向代理服务器规则/状态码
3.3拓展——追加、替换
3.3.1追加 "不加/"
3.3.2 替换 “加/”
3.3.3小拓展追加和替换
3.4指定location 实现反向代理 动静分离
3.5缓存功能
3.5.1缓存示例
3.5.2扩展——清理缓存
3.6添加首部字段
3.7IP透传
3.7.1IP透传定义
3.7.2IP透传示例——单向透传
3.7.3IP透传——多级代理
3.8反向代理——负载均衡
3.8.1示例——负载均衡 轮询
3.8.2加权轮询
3.8.3指定最大连接数
3.8.4 backup——备份代理服务器
3.8.5hash算法
3.8.6 URL hash
3.8.7 Cookie hash
3.8.8 fair
三、小总结
1.负载均衡
2.http——Upstream——调度算法
3.IP透传
一、重写功能——rewrite
我们访问www.360buy.com也就是访问www.jd.com
Nginx的重写功能可以实现,我们访问192.168.241.11就是访问www.baidu.com
location  / {root  /apps/nginx/html;if ( $scheme = http) {rewrite ^/(.*)$ https://www.kgc.com/$1 redirect;}
}#scheme协议;redirect代表跳转;$1代表(.*)
Nginx服务器利用 ngx_http_rewrite_module 模块解析和处理rewrite请求,此功能依靠 PCRE(perl compatible regular expression),因此编译之前要安装PCRE库,rewrite是nginx服务器的重要功能之一,用于实现URL的重写,URL的重写是非常有用的功能,比如它可以在我们改变网站结构之后,不需要客户端修改原来的书签,也无需其他网站修改我们的链接,就可以设置为自动访问,另外还可以在一定程度上提高网站的安全性。
gx_http_rewrite_module模块指令
官方文档: https://nginx.org/en/docs/http/ngx_http_rewrite_module.html1.if
用于条件匹配判断,并根据条件判断结果选择不同的Nginx配置,可以配置在server或location块中进行配置,Nginx的if语法仅能使用if做单次判断,不支持使用if else或者if elif这样的多重判断
if (条件匹配) {   action
}
1.1 if
使用正则表达式对变量进行匹配,匹配成功时if指令认为条件为true,否则认为false,变量与表达式之间使用以下符号链接
| 符号 | 含义 |
|---|---|
| = | 比较变量和字符串是否相等,相等时if指令认为该条件为true,反之为false |
| != | 比较变量和字符串是否不相等,不相等时if指令认为条件为true,反之为false |
| ~ | 区分大小写字符,可以通过正则表达式匹配,满足匹配条件为真,不满足匹配条件为假 |
| !~ | 区分大小写字符,判断是否匹配,不满足匹配条件为真,满足匹配条件为假 |
| ~* | 不区分大小写字符,可以通过正则表达式匹配,满足匹配条件为真,不满足匹配条件为假 |
| !~* | 不区分大小字符,判断是否匹配,满足匹配条件为假,不满足匹配条件为真 |
| -f 和 !-f | 判断请求的文件是否存在和是否不存在 |
| -d 和 !-d | 判断请求的目录是否存在和是否不存在 |
| -x 和 !-x | 判断文件是否可执行和是否不可执行 |
| -e 和 !-e | 判断请求的文件或目录是否存在和是否不存在(包括文件,目录,软链接) |
注意:如果$变量的值为空字符串或0,则if指令认为该条件为false,其他条件为true;
nginx 1.0.1之前$变量的值如果以0开头的任意字符串会返回false;
注意Nginx中的if和Shell脚本中的区别(Nginx中if格式为();Shell脚本中if格式为[] )
[root@localhost conf.d]#vim pc.conf
[root@localhost conf.d]#nginx -t
nginx: the configuration file /apps/nginx/conf/nginx.conf syntax is ok
nginx: configuration file /apps/nginx/conf/nginx.conf test is successful
[root@localhost conf.d]#nginx -s reload
![]()
2. return
return用于完成对请求的处理,并直接向客户端返回响应状态码,比如:可以指定重定向URL(对于特殊重定向状态码,301/302等) 或者是指定提示文本内容(对于特殊状态码403/500等),处于此指令后的所有配置都将不被执行,return可以在server、if 和 location块进行配置
[root@localhost conf.d]#vim pc.conf
[root@localhost conf.d]#nginx -t
nginx: the configuration file /apps/nginx/conf/nginx.conf syntax is ok
nginx: configuration file /apps/nginx/conf/nginx.conf test is successful
[root@localhost conf.d]#nginx -s reload
[root@localhost conf.d]#cat /opt/index.html
test

[root@localhost conf.d]#vim pc.conf
[root@localhost conf.d]#nginx -t
nginx: the configuration file /apps/nginx/conf/nginx.conf syntax is ok
nginx: configuration file /apps/nginx/conf/nginx.conf test is successful
[root@localhost conf.d]#nginx -s reload

[root@localhost conf.d]#vim pc.conf
[root@localhost conf.d]#nginx -t
nginx: the configuration file /apps/nginx/conf/nginx.conf syntax is ok
nginx: configuration file /apps/nginx/conf/nginx.conf test is successful
[root@localhost conf.d]#nginx -s reload


2.1状态码301和302的区别
| 状态码 | 区别 |
|---|---|
| 301 | 永久重定向(读取过一次,就会将此条配置缓存到客户端,即使nginx服务器宕机,在缓存时间内,还是可以跳转) |
| 302 | 临时重定向(不会有缓存在客户端,每次跳转都需要nginx解析,一旦服务器宕机,就无法跳转) |
301
[root@localhost conf.d]#vim pc.conf
[root@localhost conf.d]#nginx -t
nginx: the configuration file /apps/nginx/conf/nginx.conf syntax is ok
nginx: configuration file /apps/nginx/conf/nginx.conf test is successful
[root@localhost conf.d]#nginx -s reload


如果在服务器宕机之后,在缓存时间内还是可以访问该主页

302
[root@localhost conf.d]#vim pc.conf
[root@localhost conf.d]#nginx -t
nginx: the configuration file /apps/nginx/conf/nginx.conf syntax is ok
nginx: configuration file /apps/nginx/conf/nginx.conf test is successful
[root@localhost conf.d]#nginx -s reload


如果我们将nginx服务关闭
[root@localhost conf.d]#systemctl stop nginx

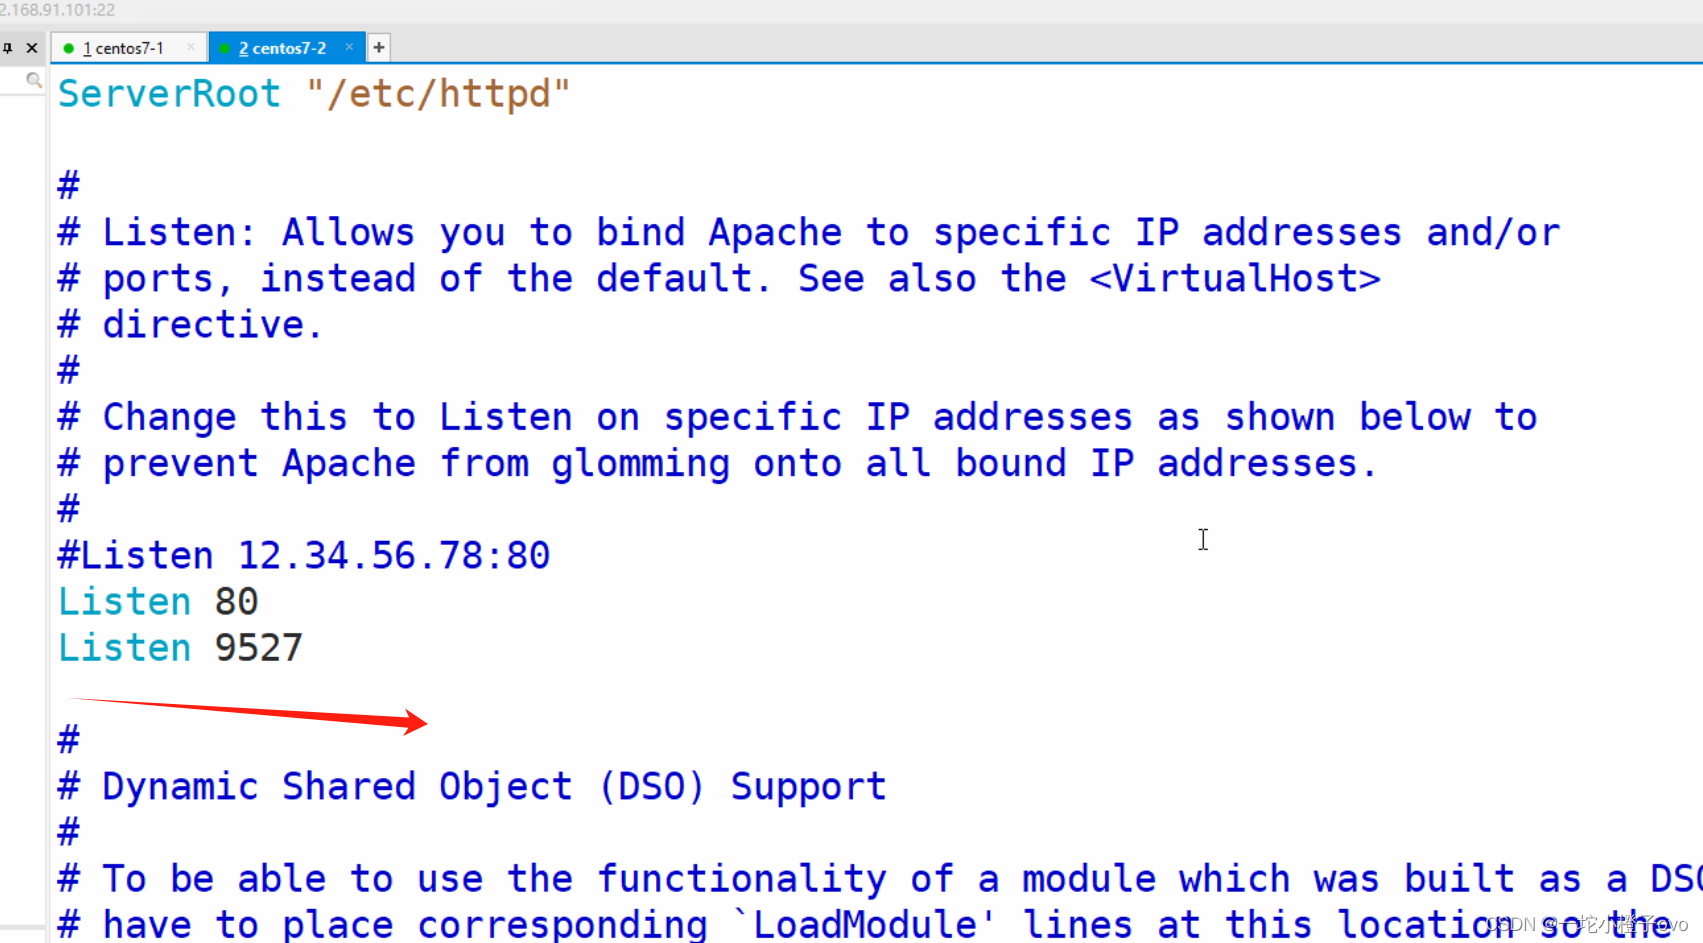
3. set
指定key并给其定义一个变量,变量可以调用Nginx内置变量赋值给key,另外set定义格式为set $key value,value可以是text, variables和两者的组合。
location /main {root /data/nginx/html/pc;index index.html;default_type text/html;set $name kgc;echo $name;set $my_port $server_port(nginx  自带的变量  服务端口 一般80);echo $my_port;
}
4. break
用于中断当前相同作用域(location)中的其他Nginx配置,与该指令处于同一作用域的Nginx配置中,位于它前面的配置生效,位于后面的 ngx_http_rewrite_module 模块中指令就不再执行,Nginx服务器在根据配置处理请求的过程中遇到该指令的时候,回到上一层作用域继续向下读取配置,该指令可以在server块和locationif块中使用
注意: 如果break指令在location块中后续指令还会继续执行,只是不执行 ngx_http_rewrite_module 模块的指令,其它指令还会执行
语法如下:
if ($slow) {limit_rate 10k;break;
}
location /main {root /data/nginx/html/pc;index index.html;default_type text/html;set $name kgc;echo $name;break;  #location块中break后面指令还会执行set $my_port $server_port;echo $my_port;}
5. rewrite
通过正则表达式的匹配来改变URI,可以同时存在一个或多个指令,按照顺序依次对URI进行匹配,rewrite主要是针对用户请求的URL或者是URI做具体处理
官方文档:https://nginx.org/en/docs/http/ngx_http_rewrite_module.html#rewriterewrite可以配置在Server、location、if中
语法格式:rewrite    regex               replacement(www.baidu.com)        [flag];正则匹配原始访问url    替代你想让客户访问的     标志  ()premanent301  redirect  302
#标志(flag)代表跳转的规则,还可以写break last  break是匹配一次;last是多次匹配
#rewrite 正则表达式  替代你想替代的链接#举例:访问http://www.bj.com  跳转到 https://www.beijing.com
#格式:rewrite /www.bj.com/  https://www.beijing.com
rewrite将用户请求的URI基于regex所描述的模式进行检查,匹配到时将其替换为表达式指定的新的URI
注意:如果在同一级配置块中存在多个rewrite规则,那么会自下而下逐个检查;被某条件规则替换完成后,会重新一轮的替换检查,隐含有循环机制,但不超过10次;如果超过,提示500响应码,[flag]所表示的标志位用于控制此循环机制如果替换后的URL是以http://或https://开头,则替换结果会直接以重定向返回给客户端, 即永久重定向 301
| 正则表达式 | 含义 |
|---|---|
| . | 匹配除换行符以外的任意字符 |
| \w | 匹配字母或数字或下划线或汉字 |
| \s | 匹配任意的空白符 |
| \d | 匹配数字 [0-9] |
| \b | 匹配单词的开始或结束 |
| ^ | 匹配字符串的开始 |
| $ | 匹配字符串的结束 |
| * | 匹配重复零次或更多次 |
| + | 匹配重复一次或更多次 |
| ? | 匹配重复零次或一次 |
| (n) | 匹配重复n次 |
| {n,} | 匹配重复n次或更多次 |
| {n,m} | 匹配重复n到m次 |
| *? | 匹配重复任意次,但尽可能少重复 |
| +? | 匹配重复1次或更多次,但尽可能少重复 |
| ?? | 匹配重复0次或1次,但尽可能少重复 |
| {n,m}? | 匹配重复n到m次,但尽可能少重复 |
| {n,}? | 匹配重复n次以上,但尽可能少重复 |
| \W | 匹配任意不是字母,数字,下划线,汉字的字符 |
| \S | 匹配任意不是空白符的字符 |
| \D | 匹配任意非数字的字符 |
| \B | 匹配不是单词开头或结束的位置 |
| [^x] | 匹配除了x以外的任意字符 |
| [^cxk] | 匹配除了cxk 这几个字母以外的任意字符 |
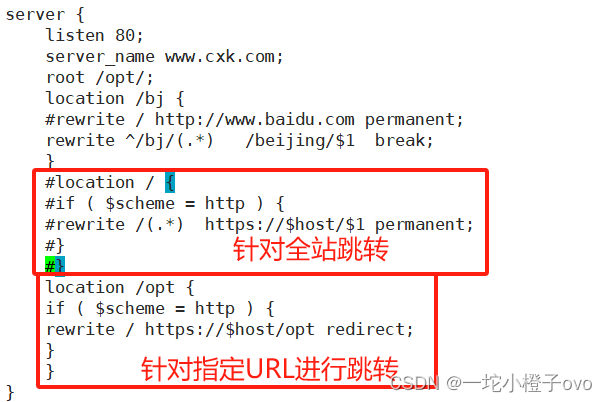
5.1 rewrite flag使用
利用nginx的rewrite的指令,可以实现url的重新跳转,rewrtie有四种不同的flag,分别是redirect(临时重定向302)、permanent(永久重定向301)、break和last。其中前两种是跳转型的flag,后两种是代理型
- 跳转型指由客户端浏览器重新对新地址进行请求
- 代理型是在WEB服务器内部实现跳转
5.2 flag说明
redirect;302
#临时重定向,重写完成后以临时重定向方式直接返回重写后生成的新URL给客户端,由客户端重新发起请求;使用相对路径,或者http://或https://开头,状态码:302permanent;301       www.bj.com     www.beijing.com
#重写完成后以永久重定向方式直接返回重写后生成的新URL给客户端,由客户端重新发起请求,状态码:301break;       www.bj.com
#重写完成后,停止对当前URL在当前location中后续的其它重写操作,而后直接跳转至重写规则配置块之后的其它配置;结束循环,建议在location中使用
#适用于一个URL一次重写last;
#重写完成后,停止对当前URI在当前location中后续的其它重写操作,而后对新的URL启动新一轮重写检查,不建议在location中使用
#适用于一个URL多次重写,要注意避免出现超过十次以及URL重写后返回错误的给用户301
#last有可能会造成死循环  不太建议使用#break匹配一次  last匹配多次
5.3举例
5.3.1访问 bj 跳转 beijing
[root@localhost ~]#vim /apps/nginx/conf.d/pc.conf
[root@localhost ~]#nginx -t
nginx: the configuration file /apps/nginx/conf/nginx.conf syntax is ok
nginx: configuration file /apps/nginx/conf/nginx.conf test is successful
[root@localhost ~]#nginx -s reload

[root@localhost opt]#mkdir beijing
[root@localhost opt]#ls
beijing                       m.html.gz            ssl
echo-nginx-module-master      nginx-1.18.0
echo-nginx-module-master.zip  nginx-1.18.0.tar.gz
[root@localhost opt]#echo Welcome Beijing > beijing/index.html
[root@localhost opt]#cat beijing/index.html
Welcome Beijing
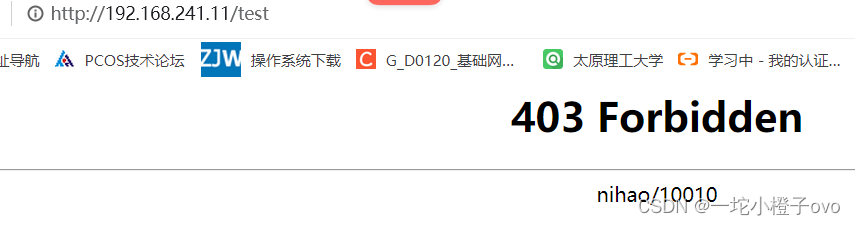
[root@node2 ~]#curl 192.168.241.11/bj
<html>
<head><title>404 Not Found</title></head>
<body>
<center><h1>404 Not Found</h1></center>
<hr><center>nihao/10010</center>
</body>
</html>
[root@node2 ~]#curl 192.168.241.11/bj/
<html>
<head><title>301 Moved Permanently</title></head>
<body>
<center><h1>301 Moved Permanently</h1></center>
<hr><center>nihao/10010</center>
</body>
</html>
[root@node2 ~]#curl 192.168.241.11/bj/ -L
Welcome Beijing
[root@localhost opt]#vim /apps/nginx/conf.d/pc.conf
[root@localhost opt]#nginx -t
nginx: the configuration file /apps/nginx/conf/nginx.conf syntax is ok
nginx: configuration file /apps/nginx/conf/nginx.conf test is successful
[root@localhost opt]#nginx -s reload
还支持跳转到其他网页


[root@node2 ~]#curl 192.168.241.11/bj/ -L
<!DOCTYPE html>
<!--STATUS OK--><html> <head><meta http-equiv=content-type content=text/html;charset=utf-8><meta http-equiv=X-UA-Compatible content=IE=Edge><meta content=always name=referrer><link rel=stylesheet type=text/css href=http://s1.bdstatic.com/r/www/cache/bdorz/baidu.min.css><title>百度一下,你就知道</title></head> <body link=#0000cc> <div id=wrapper> <div id=head> <div class=head_wrapper> <div class=s_form> <div class=s_form_wrapper> <div id=lg> <img hidefocus=true src=//www.baidu.com/img/bd_logo1.png width=270 height=129> </div> <form id=form name=f action=//www.baidu.com/s class=fm> <input type=hidden name=bdorz_come value=1> <input type=hidden name=ie value=utf-8> <input type=hidden name=f value=8> <input type=hidden name=rsv_bp value=1> <input type=hidden name=rsv_idx value=1> <input type=hidden name=tn value=baidu><span class="bg s_ipt_wr"><input id=kw name=wd class=s_ipt value maxlength=255 autocomplete=off autofocus></span><span class="bg s_btn_wr"><input type=submit id=su value=百度一下 class="bg s_btn"></span> </form> </div> </div> <div id=u1> <a href=http://news.baidu.com name=tj_trnews class=mnav>新闻</a> <a href=http://www.hao123.com name=tj_trhao123 class=mnav>hao123</a> <a href=http://map.baidu.com name=tj_trmap class=mnav>地图</a> <a href=http://v.baidu.com name=tj_trvideo class=mnav>视频</a> <a href=http://tieba.baidu.com name=tj_trtieba class=mnav>贴吧</a> <noscript> <a href=http://www.baidu.com/bdorz/login.gif?login&tpl=mn&u=http%3A%2F%2Fwww.baidu.com%2f%3fbdorz_come%3d1 name=tj_login class=lb>登录</a> </noscript> <script>document.write('<a href="http://www.baidu.com/bdorz/login.gif?login&tpl=mn&u='+ encodeURIComponent(window.location.href+ (window.location.search === "" ? "?" : "&")+ "bdorz_come=1")+ '" name="tj_login" class="lb">登录</a>');</script> <a href=//www.baidu.com/more/ name=tj_briicon class=bri style="display: block;">更多产品</a> </div> </div> </div> <div id=ftCon> <div id=ftConw> <p id=lh> <a href=http://home.baidu.com>关于百度</a> <a href=http://ir.baidu.com>About Baidu</a> </p> <p id=cp>©2017 Baidu <a href=http://www.baidu.com/duty/>使用百度前必读</a> <a href=http://jianyi.baidu.com/ class=cp-feedback>意见反馈</a> 京ICP证030173号 <img src=//www.baidu.com/img/gs.gif> </p> </div> </div> </div> </body> </html>
5.3.2举例——break
[root@localhost opt]#vim /apps/nginx/conf.d/pc.conf
[root@localhost opt]#nginx -t
nginx: the configuration file /apps/nginx/conf/nginx.conf syntax is ok
nginx: configuration file /apps/nginx/conf/nginx.conf test is successful
[root@localhost opt]#nginx -s reload

[root@node2 ~]#curl 192.168.241.11/bj/
Welcome Beijing
[root@node2 ~]#curl 192.168.241.11/beijing/
Welcome Beijing
301和302的区别:请求后,服务器告诉你需要重定向域名,需要重新发起请求
break:服务器缓存好网页直接让你访问,直接给你结果
5.3.3 http 转 https
[root@localhost opt]#vim /apps/nginx/conf.d/pc.conf
[root@localhost opt]#nginx -t
nginx: the configuration file /apps/nginx/conf/nginx.conf syntax is ok
nginx: configuration file /apps/nginx/conf/nginx.conf test is successful
[root@localhost opt]#nginx -s reload
![]()
![]()


5.3.4 break 与 last
[root@localhost opt]#vim /apps/nginx/conf.d/pc.conf
[root@localhost opt]#nginx -t
nginx: the configuration file /apps/nginx/conf/nginx.conf syntax is ok
nginx: configuration file /apps/nginx/conf/nginx.conf test is successful
[root@localhost opt]#nginx -s reload
[root@localhost opt]#echo test > /test/index.html
[root@localhost opt]#cat /test/index.html
test


break代表匹配单词,last匹配多次
5.3.5 更换目录访问方式,目录转换为对象存储
要求:/20240226/static -> /static?id=20240226
/20240226/image -> /image?id=20240226
rewrite ^/(\d+)/(.*)/ /$2?id=$1 last;5.3.6多目录转换访问方式
要求:www.lucky.com/images/20240226/1.jpg -> www.lucky.com/index.do?name=images&dir=20240226=&file=1.jpg
if ( $host ~* (.*)\.lucky.com ){
rewrite ^/(.*)/(\d+)/(.*)$ /index.do?name=$1&dir=$2&file=$3 last;
}
5.4 防盗链
防盗链基于客户端携带的referer实现,referer是记录打开一个页面之前记录是从哪个页面跳转过来的标记信息,如果别人只链接了自己网站图片或某个单独的资源,而不是打开了网站的整个页面,这就是盗链
5.4.1盗链
[root@localhost opt]#vim /apps/nginx/conf.d/pc.conf
[root@localhost opt]#nginx -t
nginx: the configuration file /apps/nginx/conf/nginx.conf syntax is ok
nginx: configuration file /apps/nginx/conf/nginx.conf test is successful
[root@localhost opt]#nginx -s reload

[root@node2 ~]#yum install httpd -y
[root@node2 ~]#cd /var/www/html/
[root@node2 html]#ls
[root@node2 html]#vim index.html<html>
<body>
<h1>this is Genshin  </h1>
<img src="http://www.cxk.com/a.jpg"/>
</body>
</html>
[root@node2 html]#systemctl restart httpd
进入真机的C:\Windows\System32\drivers\etc路径,打开hosts文件

[root@localhost ~]#cd /opt
[root@localhost opt]#ls
beijing                       m.html.gz            ssl
echo-nginx-module-master      nginx-1.18.0
echo-nginx-module-master.zip  nginx-1.18.0.tar.gz
[root@localhost opt]#rz -E
rz waiting to receive.
[root@localhost opt]#ls
beijing                       IMG_3475.PNG  nginx-1.18.0.tar.gz
echo-nginx-module-master      m.html.gz     ssl
echo-nginx-module-master.zip  nginx-1.18.0
[root@localhost opt]#mv IMG_3475.PNG a.jpg
[root@localhost opt]#ls
a.jpg    echo-nginx-module-master      m.html.gz     nginx-1.18.0.tar.gz
beijing  echo-nginx-module-master.zip  nginx-1.18.0  ssl
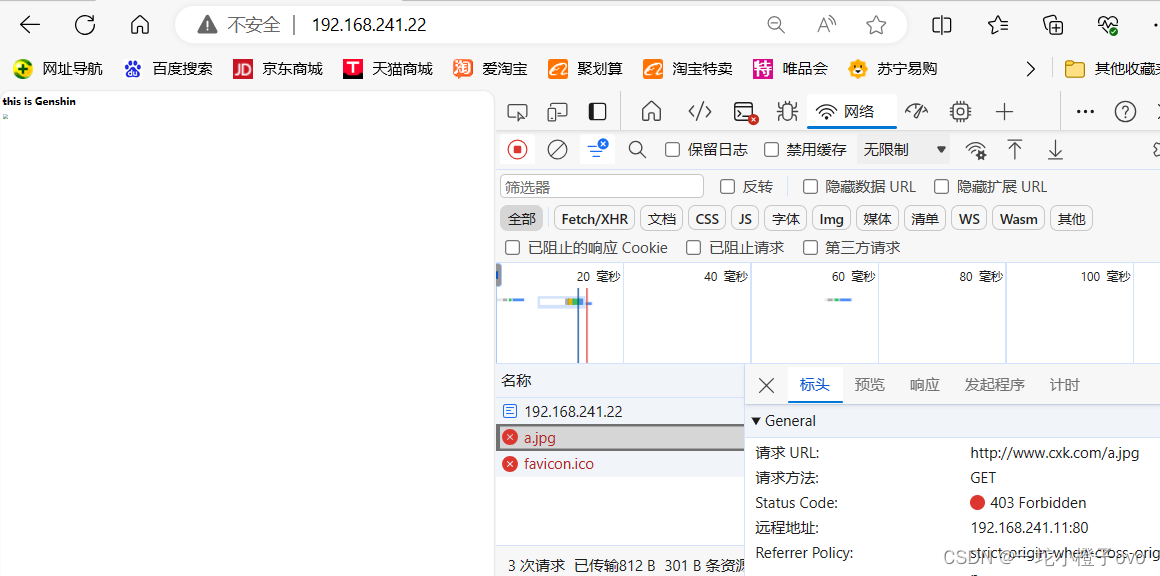
referer就是之前的那个网站域名,正常的referer信息有以下几种

referer就是之前的那个网站域名,正常的referer信息有以下几种:
none:#请求报文首部没有referer首部,比如用户直接在浏览器输入域名访问web网站,就没有referer信息。
blocked:#请求报文有referer首部,但无有效值,比如为空。
server_names:#referer首部中包含本主机名及即nginx 监听的server_name。
#如果访问www.cxk.com/test  www.cxk.com/a.jpg是属于正常访问
#如果访问192.168.241.22/test  实际访问www.cxk.com/a.jpg就是盗链arbitrary_string:#自定义指定字符串,但可使用*作通配符。示例: *.cxk.org www.cxk.*
#blog.cxk.com/index.html   实际访问www.cxk.com/a.jpg是正常的   也就是我们所说的所属同公司的页面跳转
#相当于blog.sina.com  news.sina.com   sports.sina.com 都支持相互之间的跳转regular expression:#被指定的正则表达式模式匹配到的字符串,要使用~开头,例如:~.*\.kgc\.com
支持你在配置文件中修改

[root@localhost opt]#vim index.html<html>
<head>
<meta http-equiv=Content-Type content="text/html;charset=utf-8">
<title>HTML语言</title>
</head>
<body>
<img src="http://bdpc.hfbdqnedu.com/new/2019img/logo.png">
<h1 style="color:red">欢迎</h1>
<p><a href=http://www.kgc.com>课工场</a>欢迎您</p>
</body>
</html>[root@localhost opt]#nginx -t
nginx: the configuration file /apps/nginx/conf/nginx.conf syntax is ok
nginx: configuration file /apps/nginx/conf/nginx.conf test is successful
[root@localhost opt]#nginx -s reloa
5.4.2防盗链
[root@localhost opt]#vim /apps/nginx/conf.d/pc.conf
[root@localhost opt]#nginx -t
nginx: the configuration file /apps/nginx/conf/nginx.conf syntax is ok
nginx: configuration file /apps/nginx/conf/nginx.conf test is successful
[root@localhost opt]#nginx -s reload

[root@localhost opt]#vim /apps/nginx/conf.d/pc.conf
[root@localhost opt]#nginx -s reload
[root@localhost opt]#nginx -t
nginx: the configuration file /apps/nginx/conf/nginx.conf syntax is ok
nginx: configuration file /apps/nginx/conf/nginx.conf test is successful


5.5其他相关高级功能
- 自动生成Nginx配置文件:https://www.digitalocean.com/community/tools/nginx
- 第三方模块:https://github.com/agile6v/awesome-nginx/
- lua帮助:https://www.runoob.com/lua/lua-tutorial.html
5.6拓展
今天公司的新业务新版本上线,要求所有的IP访问任何内容都显示一个固定维护页面,只让公司IP:192.168.241.1访问正常
[root@localhost opt]#vim /apps/nginx/conf.d/pc.conf
[root@localhost opt]#nginx -t
nginx: the configuration file /apps/nginx/conf/nginx.conf syntax is ok
nginx: configuration file /apps/nginx/conf/nginx.conf test is successful
[root@localhost opt]#nginx -s reload


二、反向代理
正向代理:代理的是客户端,去访问服务端(科学上网)
反向代理:代理的是服务端(负载均衡、安全)
官方文档: https://nginx.org/en/docs/http/ngx_http_proxy_module.html1.反向代理定义
反向代理:reverse proxy,指的是代理外网用户的请求到内部的指定的服务器,并将数据返回给用户的一种方式,这是用的比较多的一种方式。
Nginx 除了可以在企业提供高性能的web服务之外,另外还可以将 nginx 本身不具备的请求通过某种预定义的协议转发至其它服务器处理,不同的协议就是Nginx服务器与其他服务器进行通信的一种规范,主要在不同的场景使用以下模块实现不同的功能
ngx_http_proxy_module
#将客户端的请求以http协议转发至指定服务器进行处理
#nginx作为代理服务器不止能支持同构服务器还能支持异构服务器ngx_http_upstream_module
#用于定义为proxy_pass,fastcgi_pass,uwsgi_pass等指令引用的后端服务器分组ngx_stream_proxy_module
#将客户端的请求以tcp协议转发至指定服务器处理
#4层代理ngx_http_fastcgi_module
#将客户端对php的请求以fastcgi协议转发至指定服务器助理ngx_http_uwsgi_module
#将客户端对Python的请求以uwsgi协议转发至指定服务器处理异构处理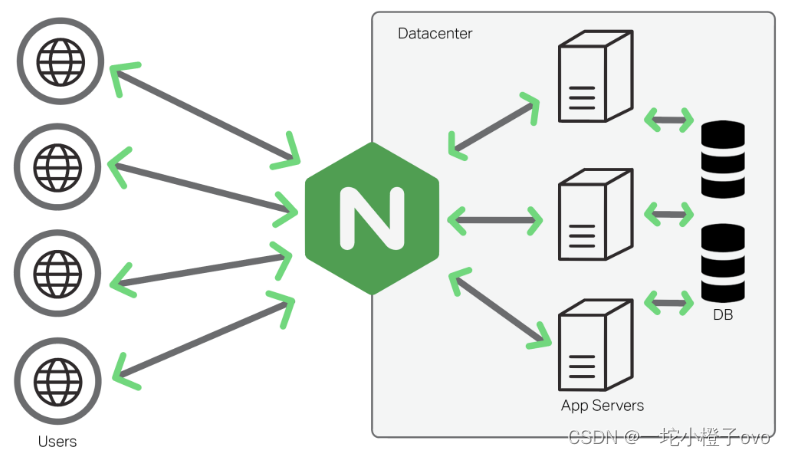

同构代理:客户端——代理服务器——后端服务器均为同一种软件程序;
异构代理:客户端——代理服务器——后端服务器为不同软件程序。
2.Nginx反向代理配置文件
[root@localhost ~]#vim /apps/nginx/conf/nginx.conf

proxy_pass;
#用来设置将客户端请求转发给的后端服务器的主机,可以是主机名(将转发至后端服务做为主机头首部)、IP地址:端口的方式
#也可以代理到预先设置的主机群组,需要模块ngx_http_upstream_module支持示例:
10.0.0.8/weblocation /web {index index.html;proxy_pass http://10.0.0.18:8080;
#8080后面无uri,即无 / 符号,需要将location后面url 附加到proxy_pass指定的url后面,此行为类似于root
#proxy_pass指定的uri不带斜线将访问的/web,等于访问后端服务器http://10.0.0.18:8080/web/index.html,即后端服务器配置的站点根目录要有web目录才可以被访问http://nginx/web/index.html ==> http://10.0.0.18:8080/web/index.htmlproxy_pass http://10.0.0.18:8080/;
#8080后面有uri,即有 / 符号,相当于置换,即访问/web时实际返回proxy_pass后面uri内容.此行为类似于alias
#proxy_pass指定的uri带斜线,等于访问后端服务器的http://10.0.0.18:8080/index.html 内容返回给客户端
# http://nginx/web/index.html ==> http://10.0.0.18:8080#如果location定义其uri时使用了正则表达式模式(包括~,~*,但不包括^~),则proxy_pass之后必须不能使用uri; 即不能有/ ,用户请求时传递的uri将直接附加至后端服务器之后
server {...server_name HOSTNAME;location ~|~* /uri/ {proxy_pass http://host:port; #proxy_pass后面的url 不能加/}...}http://HOSTNAME/uri/ --> http://host/uri/proxy_hide_header field;
#用于nginx作为反向代理的时候,在返回给客户端http响应时,隐藏后端服务器相应头部的信息,可以设置
在http,server或location块#示例: 隐藏后端服务器ETag首部字段location /web {index index.html;proxy_pass http://10.0.0.18:8080/; proxy_hide_header ETag;}proxy_pass_header field;
#默认nginx在响应报文中不传递后端服务器的首部字段Date, Server, X-Pad, X-Accel等参数,如果
要传递的话则要使用 proxy_pass_header field声明将后端服务器返回的值传递给客户端
#field 首部字段大小不敏感
#示例:透传后端服务器的Server和Date首部给客户端,同时不再响应报中显示前端服务器的Server字段
proxy_pass_header Server;
proxy_pass_header Date;
proxy_pass_request_body on | off;
#是否向后端服务器发送HTTP实体部分,可以设置在http,server或location块,默认即为开启proxy_pass_request_headers on | off;
#是否将客户端的请求头部转发给后端服务器,可以设置在http,server或location块,默认即为开启3.反向代理举例
3.1反向代理服务器
[root@node2 ~]#cd /var/www/html/
[root@node2 html]#ls
index.html
[root@node2 html]#vim index.html
[root@node2 html]#curl 192.168.241.22
<html>
<body>
<h1>this is Genshin</h1>
<img src="http://www.cxk.com/a.jpg">
</body>
</html>
这个作为我们的后端服务器,我们访问代理服务器的时候应该访问的是后端服务器的This is Genshin的页面
[root@localhost ~]#vim /apps/nginx/conf.d/pc.conf server {listen 80;server_name www.cxk.com;root /opt;location / {proxy_pass http://192.168.241.22;}
}[root@localhost ~]#nginx -t
nginx: the configuration file /apps/nginx/conf/nginx.conf syntax is ok
nginx: configuration file /apps/nginx/conf/nginx.conf test is successful
[root@localhost ~]#nginx -s reload

此时我们通过代理服务器访问后端服务器
如果想修改端口号进行访问
[root@localhost opt]#vim /apps/nginx/conf.d/pc.conf
[root@localhost opt]#nginx -t
nginx: the configuration file /apps/nginx/conf/nginx.conf syntax is ok
nginx: configuration file /apps/nginx/conf/nginx.conf test is successful
[root@localhost opt]#nginx -s reload

3.2反向代理服务器规则/状态码


3.3拓展——追加、替换
3.3.1追加 "不加/"
[root@localhost opt]#vim /apps/nginx/
[root@localhost opt]#nginx -t
nginx: the configuration file /apps/nginx/conf/nginx.conf syntax is ok
nginx: configuration file /apps/nginx/conf/nginx.conf test is successful
[root@localhost opt]#nginx -s reloa
[root@node2 html]#ls
index.html
[root@node2 html]#mkdir api
[root@node2 html]#echo api > api/index.html
[root@node2 html]#ls
api  index.html
[root@node2 html]#cat index.html
<html>
<body>
<h1>this is Genshin</h1>
<img src="http://www.cxk.com/a.jpg">
</body>
</html>
[root@node2 html]#cat api/index.html
api
[root@node2 html]#curl 192.168.241.11/api/
api
3.3.2 替换 “加/”
[root@localhost opt]#vim /apps/nginx/conf.d/pc.conf
[root@localhost opt]#nginx -t
nginx: the configuration file /apps/nginx/conf/nginx.conf syntax is ok
nginx: configuration file /apps/nginx/conf/nginx.conf test is successful
[root@localhost opt]#nginx -s reload

[root@node2 html]#curl 192.168.241.11//api/
<html>
<body>
<h1>this is Genshin</h1>
<img src="http://www.cxk.com/a.jpg">
</body>
</html>
3.3.3小拓展追加和替换
#追加
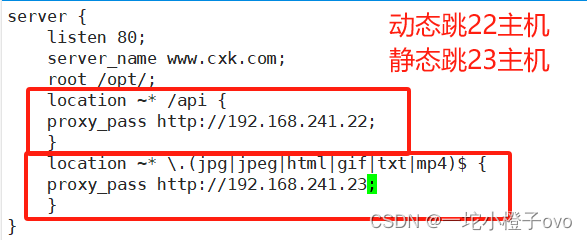
[root@localhost ~]#cat /apps/nginx/conf.d/pc.confserver {listen 80;server_name www.cxk.com;location ~* /api {proxy_pass http://192.168.241.22;#追加 访问192.168.241.11/api/ 相当于访问192.168.241.22/api/ }
}#替换
server {listen 80;server_name www.cxk.com;location ~* /api {proxy_pass http://192.168.241.22/;#追加 访问192.168.241.11/api/ 相当于访问192.168.241.22/api/ }
}3.4指定location 实现反向代理 动静分离
[root@node3 ~]#yum install httpd -y
[root@node3 ~]#cd /var/www/html/
[root@node3 html]#ls
[root@node3 html]#vim index.html
[root@node3 html]#cat index.html
static
[root@node3 html]#systemctl start httpd
[root@node2 html]#ls
api  index.html
[root@node2 html]#vim index.html
[root@node2 html]#cat index.html
Dynamic
[root@localhost opt]#vim /apps/nginx/conf.d/pc.conf
[root@localhost opt]#nginx -t
nginx: the configuration file /apps/nginx/conf/nginx.conf syntax is ok
nginx: configuration file /apps/nginx/conf/nginx.conf test is successful
[root@localhost opt]#nginx -s reload
[root@localhost opt]#curl 192.168.241.11/api/
api[root@localhost opt]#curl 192.168.241.11/index.html
static
3.5缓存功能
关闭后端服务器后,图片无法访问
缓存功能默认关闭,需要开启
proxy_cache zone_name | off; 默认off
#指明调用的缓存,或关闭缓存机制;Context:http, server, location
#zone_name 表示缓存的名称.需要由proxy_cache_path事先定义  可以自定义为cxkproxy_cache_key string;
#缓存中用于“键”的内容,默认值:proxy_cache_key $scheme$proxy_host$request_uri;proxy_cache_valid [code ...] time;
#定义对特定响应码的响应内容的缓存时长,定义在http{...}中示例:proxy_cache_valid 200 302 10m;proxy_cache_valid 404 1m;proxy_cache_path;
#定义可用于proxy功能的缓存;Context:http   必须放在http语句中
proxy_cache_path path [levels=levels] [use_temp_path=on|off]
keys_zone=zone_name:size [inactive=time] [max_size=size] [manager_files=number]
[manager_sleep=time] [manager_threshold=time] [loader_files=number]
[loader_sleep=time] [loader_threshold=time] [purger=on|off]
[purger_files=number] [purger_sleep=time] [purger_threshold=time];#示例:在http配置定义缓存信息proxy_cache_path /var/cache/nginx/proxy_cache #定义缓存保存路径,proxy_cache会自动创建levels=1:2:2 #定义缓存目录结构层次,1:2:2可以生成2^4x2^8x2^8=2^20=1048576个目录keys_zone=proxycache:20m #指内存中缓存的大小,主要用于存放key和metadata(如:使用次数),一般1M可存放8000个左右的keyinactive=120s  #缓存有效时间  max_size=10g; #最大磁盘占用空间,磁盘存入文件内容的缓存空间最大值#调用缓存功能,需要定义在相应的配置段,如server{...};或者location等
proxy_cache proxycache;
proxy_cache_key $request_uri; #对指定的数据进行MD5的运算做为缓存的key
proxy_cache_valid 200 302 301 10m; #指定的状态码返回的数据缓存多长时间
proxy_cache_valid any 1m;   #除指定的状态码返回的数据以外的缓存多长时间,必须设置,否则不会缓存proxy_cache_use_stale error | timeout | invalid_header | updating | http_500 | http_502 | http_503 | http_504 | http_403 | http_404 | off ; #默认是off
#在被代理的后端服务器出现哪种情况下,可直接使用过期的缓存响应客户端#示例
proxy_cache_use_stale error http_502 http_503;proxy_cache_methods GET | HEAD | POST ...;
#对哪些客户端请求方法对应的响应进行缓存,GET和HEAD方法总是被缓存
3.5.1缓存示例
[root@localhost opt]#vim /apps/nginx/conf/nginx.conf
[root@localhost opt]#nginx -t
nginx: the configuration file /apps/nginx/conf/nginx.conf syntax is ok
nginx: [emerg] mkdir() "/opt/nginx/proxycache/" failed (2: No such file or directory)
nginx: configuration file /apps/nginx/conf/nginx.conf test failed
[root@localhost opt]#mkdir /opt/nginx
[root@localhost opt]#nginx -t
nginx: the configuration file /apps/nginx/conf/nginx.conf syntax is ok
nginx: configuration file /apps/nginx/conf/nginx.conf test is successful

[root@localhost opt]#nginx -t
nginx: the configuration file /apps/nginx/conf/nginx.conf syntax is ok
nginx: configuration file /apps/nginx/conf/nginx.conf test is successful
[root@localhost opt]#nginx -s reload

[root@localhost opt]#ls /opt/nginx
proxycache
[root@node3 html]#rz -E
rz waiting to receive.
[root@node3 html]#mv f32b966ddaf1002dfa4b2f6c556e57f0.jpg a.jpg
[root@node3 html]#ls
a.jpg index.html

[root@localhost opt]#ls -R /opt/nginx/proxycache/
/opt/nginx/proxycache/:
a/opt/nginx/proxycache/a:
2/opt/nginx/proxycache/a/2:
4/opt/nginx/proxycache/a/2/4: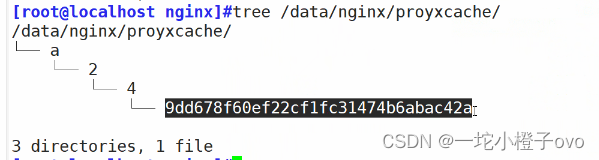
3.5.2扩展——清理缓存
方法1: rm -rf 缓存目录
方法2: 第三方扩展模块ngx_cache_purge
[root@localhost conf.d]#cd /opt/nginx
[root@localhost nginx]#ls
proxycache
[root@localhost nginx]#rm -rf /opt/nginx/proxycache/*
[root@localhost nginx]#ls
proxycache
3.6添加首部字段
nginx基于模块ngx_http_headers_modules可以实现对后端服务器响应给客户端的报文中添加指定的响应首部字段
参考链接:https://nginx.org/en/docs/http/ngx_http/headers_modules.html格式:
Syntax:add_header name value [always];
Default:
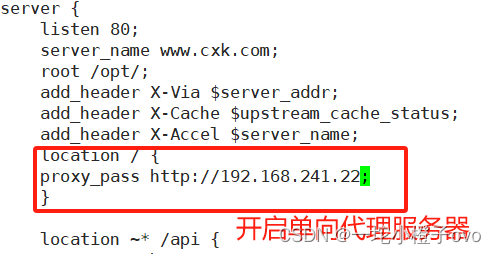
Context:http,server,location,if in location[root@localhost ~]#vim /apps/nginx/conf.d/pc.conf
[root@localhost ~]#nginx -t
nginx: the configuration file /apps/nginx/conf/nginx.conf syntax is ok
nginx: configuration file /apps/nginx/conf/nginx.conf test is successful
[root@localhost ~]#nginx -s reload#添加响应报文的自定义首部
add_header name value [always];
#示例
add_header X-via $server_addr;
#当前nginx主机的IP
add_header X-Cache $upstream_cache_status;
#是否缓存命中
add_header X-Cache $upstream_name;
#客户机访问的FQDN[root@node2 ~]#curl 192.168.241.11 -I
HTTP/1.1 200 OK
Server: nihao/10010
Date: Mon, 26 Feb 2024 13:34:37 GMT
Content-Type: text/html
Content-Length: 4
Last-Modified: Mon, 26 Feb 2024 13:30:55 GMT
Connection: keep-alive
ETag: "65dc928f-4"
X-Via: 192.168.241.11
X-Cache:MISS
X-Accel: www.cxk.com
Accept-Ranges: bytes[root@node2 ~]#curl 192.168.241.11/ -I
HTTP/1.1 200 OK
Server: nihao/10010
Date: Mon, 26 Feb 2024 13:34:37 GMT
Content-Type: text/html
Content-Length: 4
Last-Modified: Mon, 26 Feb 2024 13:30:55 GMT
Connection: keep-alive
ETag: "65dc928f-4"
X-Via: 192.168.241.11
X-Cache:HIT
X-Accel: www.cxk.com
Accept-Ranges: bytes3.7IP透传
官方文档:http://nginx.org/en/docs/http/ngx_http_proxy_module.html#var_proxy_add_x_forwarded_for3.7.1IP透传定义

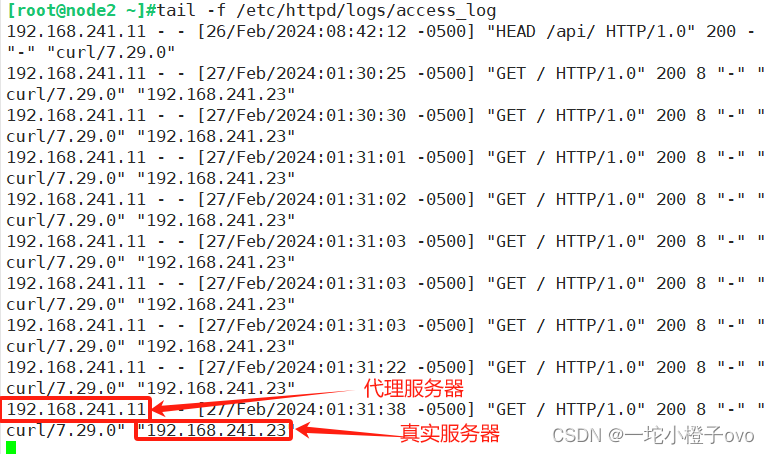
IP透传的定义:Client客户端192.168.241.23通过http服务访问192.168.241.22的代理服务器,代理服务器通过proxy跳转至192.168.241.11后端真实服务器,最后在Web后端真实服务器应该可以看到真实客户端的访问IP和代理服务器的IP。
[root@localhost ~]#vim /apps/nginx/conf/nginx.conf

IP透传变量是默认开启的
3.7.2IP透传示例——单向透传
[root@localhost ~]#vim /apps/nginx/conf.d/pc.conf
[root@localhost ~]#nginx -t
nginx: the configuration file /apps/nginx/conf/nginx.conf syntax is ok
nginx: configuration file /apps/nginx/conf/nginx.conf test is successful
[root@localhost ~]#nginx -s reload
当前访问192.168.241.11代理服务器跳转的是192.168.241.22后端真实服务器


[root@node2 ~]#vim /etc/httpd/conf/httpd.conf 
当前为日志显示格式
我们使用第三台机器作为客户端,通过代理服务器去访问后端真实服务器


发现,真实服务器并不能看到真实访问的客户端IP;如果想看到真实的客户端IP,需要修改主配置文件
[root@localhost ~]#vim /apps/nginx/conf.d/pc.conf
[root@localhost ~]#nginx -t
nginx: the configuration file /apps/nginx/conf/nginx.conf syntax is ok
nginx: configuration file /apps/nginx/conf/nginx.conf test is successful
[root@localhost ~]#nginx -s reload
[root@node2 ~]#vim /etc/httpd/conf/httpd.conf
[root@node2 ~]#systemctl restart httpd

3.7.3IP透传——多级代理
[root@node2 ~]#vim /etc/nginx/nginx.conf
[root@node2 ~]#nginx -t
nginx: the configuration file /usr/local/nginx/conf/nginx.conf syntax is ok
nginx: configuration file /usr/local/nginx/conf/nginx.conf test is successful
[root@node2 ~]#nginx -s reload
nginx: [error] invalid PID number "" in "/usr/local/nginx/logs/nginx.pid"
[root@node2 ~]#systemctl start nginx
[root@node2 ~]#nginx -s reload

[root@node3 html]#tail -f /usr/local/nginx/logs/access.log 
使用真机访问其实是可以看到真机的IP地址和代理服务器1、代理服务器2的地址,这里有点问题
3.8反向代理——负载均衡
在上一个节中Nginx可以将客户端的请求转发至单台后端服务器但是无法转发至特定的一组的服务器,而且不能对后端服务器提供相应的服务器状态监测,Nginx 可以基于ngx_http_upstream_module模块提供服务器分组转发、权重分配、状态监测、调度算法等高级功能
官方文档: https://nginx.org/en/docs/http/ngx_http_up[root@localhost ~]#cd /opt/nginx-1.18.0/
[root@localhost nginx-1.18.0]#./configure --help|grep upstream
#所有的upstream都是默认安装--without-http_upstream_hash_moduledisable ngx_http_upstream_hash_module--without-http_upstream_ip_hash_moduledisable ngx_http_upstream_ip_hash_module--without-http_upstream_least_conn_moduledisable ngx_http_upstream_least_conn_module--without-http_upstream_random_moduledisable ngx_http_upstream_random_module--without-http_upstream_keepalive_moduledisable ngx_http_upstream_keepalive_module--without-http_upstream_zone_moduledisable ngx_http_upstream_zone_module--without-stream_upstream_hash_moduledisable ngx_stream_upstream_hash_module--without-stream_upstream_least_conn_moduledisable ngx_stream_upstream_least_conn_module--without-stream_upstream_random_moduledisable ngx_stream_upstream_random_module--without-stream_upstream_zone_moduledisable ngx_stream_upstream_zone_module#用法格式#自定义一组服务器,配置在http块内
upstream web { #指定web组server 192.168.241.11 调度算法#server指令 指代单台服务器server 192.168.241.22
}location / {
pass_proxy http://web/
}
#反向代理 单向代理server address [parameters];
#配置一个后端web服务器,配置在upstream内,至少要有一个server服务器配置。
#server 192.168.241.22;
#server支持的parameters如下:
weight=number #设置权重,默认为1,实现类似于LVS中的WRR,WLC等 可以设置3,也就是加权轮询,访问指定代理服务器之后,每三次轮询一次另一台代理服务器
max_conns=number #给当前后端server设置最大活动链接数,默认为0表示没有限制
max_fails=number #后端服务器的下线条件,当客户端访问时,对本次调度选中的后端服务器连续进行检测多少次,如果都失败就标记为不可用,默认为1次,当客户端访问时,才会利用TCP触发对探测后端服务器健康性检查,而非周期性的探测
fail_timeout=time #后端服务器的上线条件,对已经检测到处于不可用的后端服务器,每隔此时间间隔再次进行检测是否恢复可用,如果发现可用,则将后端服务器参与调度,默认为10秒
backup #设置为备份服务器,当所有后端服务器不可用时,才会启用此备用服务器 sorry server 自己不能转自己
down #标记为down状态
resolve #当server定义的是主机名的时候,当A记录发生变化会自动应用新IP而不用重启Nginxhash KEY [consistent];
#基于指定请求报文中首部字段或者URI等key做hash计算,使consistent参数,将使用ketama一致性3.8.1示例——负载均衡 轮询
[root@node2 ~]#systemctl stop nginx
[root@node2 ~]#systemctl start httpd
[root@node3 html]#systemctl stop nginx
[root@node3 html]#systemctl start httpd
[root@localhost nginx-1.18.0]#vim /apps/nginx/conf/nginx.conf
[root@localhost nginx-1.18.0]#nginx -t
nginx: the configuration file /apps/nginx/conf/nginx.conf syntax is ok
nginx: configuration file /apps/nginx/conf/nginx.conf test is successful
[root@localhost nginx-1.18.0]#nginx -s reload

如果有一天服务器宕机或者挂了
[root@node3 html]#systemctl stop httpd

那么只会跳转到另外一台服务器(正常服务器;此被称为nginx 的健康性检查)
[root@node3 html]#tcpdump -i ens33 host 192.168.241.11

根据抓包我们可以看到,nginx服务会根据tcp三次握手对代理服务器进行健康性检查,查看代理服务器是否可以处理客户端访问Web页面服务的请求
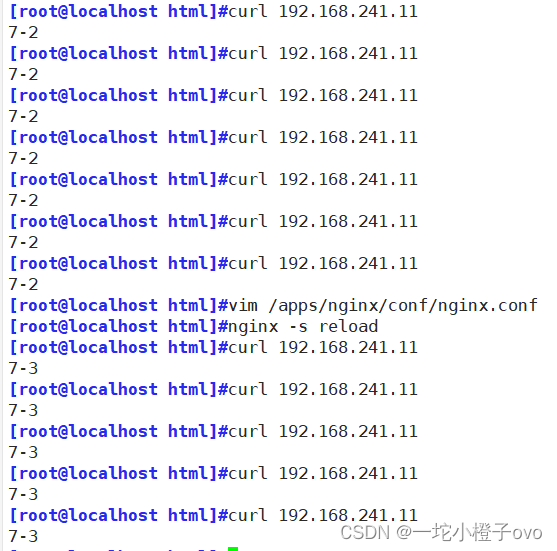
3.8.2加权轮询
[root@localhost nginx-1.18.0]#vim /apps/nginx/conf/nginx.conf
[root@localhost nginx-1.18.0]#nginx -s reload


3.8.3指定最大连接数
[root@localhost nginx-1.18.0]#vim /apps/nginx/conf/nginx.conf
[root@localhost nginx-1.18.0]#nginx -s reload

我们可以看到代理服务器7-2的最大连接数在10个左右,而代理服务器7-3的连接数很多很多
3.8.4 backup——备份代理服务器
[root@localhost nginx-1.18.0]#vim /apps/nginx/conf/nginx.conf
[root@localhost nginx-1.18.0]#nginx -s reload

[root@G ~]#systemctl start httpd
[root@G ~]#echo Sorry > /var/www/html/index.html
[root@G ~]#cat /var/www/html/index.html
Sorry
[root@node2 html]#systemctl stop httpd
[root@node3 html]#systemctl stop httpd

3.8.5hash算法
[root@localhost nginx-1.18.0]#cd /apps/nginx/html/
[root@localhost html]#ls
50x.html  index.html  m.img
[root@localhost html]#md5sum index.html
#对文件进行hash运算
e3eb0a1df437f3f97a64aca5952c8ea0  index.html
#如何使用hash
http {upstream web {hash $remote_addr#hash运行server 192.168.241.22:80server 192.168.241.23:80}
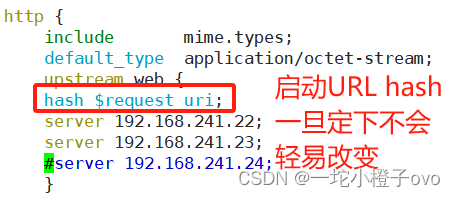
}http {upstream web {hash $request_uri;
#发送请求地址,一旦定下来就不会轻易改变server 192.168.241.22:80;server 192.168.241.23:80;}
}[root@localhost html]#vim /apps/nginx/conf/nginx.conf
[root@localhost html]#nginx -s reload


hash算法会将Web页面访问的缓存定在某一个代理服务器;但是hash算法有一个缺点就是hash还要除以权重,下次重载配置会更换Web服务的代理服务器
[root@localhost html]#vim /apps/nginx/conf/nginx.conf
[root@localhost html]#nginx -s reload

3.8.6 URL hash
http {upstream web {hash $request_uri;
#发送请求地址,一旦定下来就不会轻易改变server 192.168.241.22:80;server 192.168.241.23:80;}
}
[root@localhost html]#vim /apps/nginx/conf/nginx.conf
[root@localhost html]#nginx -s reload

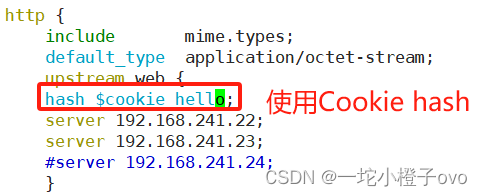
3.8.7 Cookie hash
http {upstream web {hash $cookie_hello;server 192.168.241.22:80;server 192.168.241.23:80;}
}
[root@localhost html]#vim /apps/nginx/conf/nginx.conf
[root@localhost html]#nginx -s reload

3.8.8 fair
此种算法可以依据页面大小和加载时间长短智能地进行负载均衡,也就是根据后端服务器的响应时间来分配请求,响应时间段的优先分配
upstream web_test {server 10.10.2.100:80;weight=1;server 10.10.3.100:80;weight=2;fair;#实现响应时间短的优先分配}fair模块还需要额外安装;
unzip nginx-upstream-fair-master.zip
# 只需要在 ./configure 时额外增加 fair 模块
--add-module=/usr/local/nginx-upstream-fair-master
再调用fair算法即可
三、小总结
1.负载均衡
http {upstream web {server 192.168.241.22;server 192.168.241.23;}server {location / {proxy_pass http://web/;}
}
}
2.http——Upstream——调度算法
| 调度算法 | 介绍 |
|---|---|
| 轮询(round-robin) | 这是一种简单的调度方式,它会将请求均匀地分配给所有后端服务器。 |
| 加权轮询(weighted round-robin) | 根据服务器的权重分配请求,具有更高权重的服务器将接收到更多请求,这可以用来平衡不同服务器的工作量。 |
| IP哈希(IP hash) | 根据客户端的IP地址,将请求直接路由到同一台后端服务器上,这样可以确保同一客户端的所有请求都由同一台服务器处理,有助于维持会话状态。 |
| URL哈希(URL hash) | 根据用户访问的url的hash结果,使每个url定向到同一个后端服务器上 |
| Cookie hash | 通过将客户端发送的HTTP Cookie与服务器上配置的后端节点进行关联来确定选择哪台服务器处理请求。 |
| 最少连接数(least connections) | 将请求发送到当前连接数最少的后端服务器,这种方法可以提高并发连接的数量。 |
| 响应时间(fair) | 更加智能的负载均衡算法,可以根据页面大小的和加载时间长短智能的进行负载均衡 |
3.IP透传
IP透传的定义:Client客户端192.168.241.23通过http服务访问192.168.241.22的代理服务器,代理服务器通过proxy跳转至192.168.241.11后端真实服务器,最后在Web后端真实服务器应该可以看到真实客户端的访问IP和代理服务器的IP。