专栏介绍:YOLOv9改进系列 | 包含深度学习最新创新,主力高效涨点!!!
一、改进点介绍
使用ICCV2023中的动态蛇形卷积替换YOLOv9网络中的Conv模块。
二、Dynamic Snake Convolution模块详解
2.1 模块简介
应用场景: 适合 具有细长微弱的局部结构特征与复杂多变的全局形态特征的场景。
三、 Dynamic Snake Convolution模块使用教程
3.1 Dynamic Snake Convolution模块的代码
import torch
import torch.nn as nn
from conv import Conv__all__ = ['DySnakeConv']class DySnakeConv(nn.Module):def __init__(self, inc, ouc, k=3) -> None:super().__init__()c_ = ouc // 3 // 16 * 16self.conv_0 = Conv(inc, ouc - 2 *c_, k)self.conv_x = DSConv(inc, c_, 0, k)self.conv_y = DSConv(inc, c_, 1, k)def forward(self, x):return torch.cat([self.conv_0(x), self.conv_x(x), self.conv_y(x)], dim=1)class DSConv(nn.Module):def __init__(self, in_ch, out_ch, morph, kernel_size=3, if_offset=True, extend_scope=1):"""The Dynamic Snake Convolution:param in_ch: input channel:param out_ch: output channel:param kernel_size: the size of kernel:param extend_scope: the range to expand (default 1 for this method):param morph: the morphology of the convolution kernel is mainly divided into two typesalong the x-axis (0) and the y-axis (1) (see the paper for details):param if_offset: whether deformation is required, if it is False, it is the standard convolution kernel"""super(DSConv, self).__init__()# use the <offset_conv> to learn the deformable offsetself.offset_conv = nn.Conv2d(in_ch, 2 * kernel_size, 3, padding=1)self.bn = nn.BatchNorm2d(2 * kernel_size)self.kernel_size = kernel_size# two types of the DSConv (along x-axis and y-axis)self.dsc_conv_x = nn.Conv2d(in_ch,out_ch,kernel_size=(kernel_size, 1),stride=(kernel_size, 1),padding=0,)self.dsc_conv_y = nn.Conv2d(in_ch,out_ch,kernel_size=(1, kernel_size),stride=(1, kernel_size),padding=0,)self.gn = nn.GroupNorm(out_ch // 4, out_ch)self.act = Conv.default_actself.extend_scope = extend_scopeself.morph = morphself.if_offset = if_offsetdef forward(self, f):offset = self.offset_conv(f)offset = self.bn(offset)# We need a range of deformation between -1 and 1 to mimic the snake's swingoffset = torch.tanh(offset)input_shape = f.shapedsc = DSC(input_shape, self.kernel_size, self.extend_scope, self.morph)deformed_feature = dsc.deform_conv(f, offset, self.if_offset)if self.morph == 0:x = self.dsc_conv_x(deformed_feature.type(f.dtype))x = self.gn(x)x = self.act(x)return xelse:x = self.dsc_conv_y(deformed_feature.type(f.dtype))x = self.gn(x)x = self.act(x)return x# Core code, for ease of understanding, we mark the dimensions of input and output next to the code
class DSC(object):def __init__(self, input_shape, kernel_size, extend_scope, morph):self.num_points = kernel_sizeself.width = input_shape[2]self.height = input_shape[3]self.morph = morphself.extend_scope = extend_scope  # offset (-1 ~ 1) * extend_scope# define feature map shape"""B: Batch size  C: Channel  W: Width  H: Height"""self.num_batch = input_shape[0]self.num_channels = input_shape[1]"""input: offset [B,2*K,W,H]  K: Kernel size (2*K: 2D image, deformation contains <x_offset> and <y_offset>)output_x: [B,1,W,K*H]   coordinate mapoutput_y: [B,1,K*W,H]   coordinate map"""def _coordinate_map_3D(self, offset, if_offset):device = offset.device# offsety_offset, x_offset = torch.split(offset, self.num_points, dim=1)y_center = torch.arange(0, self.width).repeat([self.height])y_center = y_center.reshape(self.height, self.width)y_center = y_center.permute(1, 0)y_center = y_center.reshape([-1, self.width, self.height])y_center = y_center.repeat([self.num_points, 1, 1]).float()y_center = y_center.unsqueeze(0)x_center = torch.arange(0, self.height).repeat([self.width])x_center = x_center.reshape(self.width, self.height)x_center = x_center.permute(0, 1)x_center = x_center.reshape([-1, self.width, self.height])x_center = x_center.repeat([self.num_points, 1, 1]).float()x_center = x_center.unsqueeze(0)if self.morph == 0:"""Initialize the kernel and flatten the kernely: only need 0x: -num_points//2 ~ num_points//2 (Determined by the kernel size)!!! The related PPT will be submitted later, and the PPT will contain the whole changes of each step"""y = torch.linspace(0, 0, 1)x = torch.linspace(-int(self.num_points // 2),int(self.num_points // 2),int(self.num_points),)y, x = torch.meshgrid(y, x, indexing = 'ij')y_spread = y.reshape(-1, 1)x_spread = x.reshape(-1, 1)y_grid = y_spread.repeat([1, self.width * self.height])y_grid = y_grid.reshape([self.num_points, self.width, self.height])y_grid = y_grid.unsqueeze(0)  # [B*K*K, W,H]x_grid = x_spread.repeat([1, self.width * self.height])x_grid = x_grid.reshape([self.num_points, self.width, self.height])x_grid = x_grid.unsqueeze(0)  # [B*K*K, W,H]y_new = y_center + y_gridx_new = x_center + x_gridy_new = y_new.repeat(self.num_batch, 1, 1, 1).to(device)x_new = x_new.repeat(self.num_batch, 1, 1, 1).to(device)y_offset_new = y_offset.detach().clone()if if_offset:y_offset = y_offset.permute(1, 0, 2, 3)y_offset_new = y_offset_new.permute(1, 0, 2, 3)center = int(self.num_points // 2)# The center position remains unchanged and the rest of the positions begin to swing# This part is quite simple. The main idea is that "offset is an iterative process"y_offset_new[center] = 0for index in range(1, center):y_offset_new[center + index] = (y_offset_new[center + index - 1] + y_offset[center + index])y_offset_new[center - index] = (y_offset_new[center - index + 1] + y_offset[center - index])y_offset_new = y_offset_new.permute(1, 0, 2, 3).to(device)y_new = y_new.add(y_offset_new.mul(self.extend_scope))y_new = y_new.reshape([self.num_batch, self.num_points, 1, self.width, self.height])y_new = y_new.permute(0, 3, 1, 4, 2)y_new = y_new.reshape([self.num_batch, self.num_points * self.width, 1 * self.height])x_new = x_new.reshape([self.num_batch, self.num_points, 1, self.width, self.height])x_new = x_new.permute(0, 3, 1, 4, 2)x_new = x_new.reshape([self.num_batch, self.num_points * self.width, 1 * self.height])return y_new, x_newelse:"""Initialize the kernel and flatten the kernely: -num_points//2 ~ num_points//2 (Determined by the kernel size)x: only need 0"""y = torch.linspace(-int(self.num_points // 2),int(self.num_points // 2),int(self.num_points),)x = torch.linspace(0, 0, 1)y, x = torch.meshgrid(y, x, indexing = 'ij')y_spread = y.reshape(-1, 1)x_spread = x.reshape(-1, 1)y_grid = y_spread.repeat([1, self.width * self.height])y_grid = y_grid.reshape([self.num_points, self.width, self.height])y_grid = y_grid.unsqueeze(0)x_grid = x_spread.repeat([1, self.width * self.height])x_grid = x_grid.reshape([self.num_points, self.width, self.height])x_grid = x_grid.unsqueeze(0)y_new = y_center + y_gridx_new = x_center + x_gridy_new = y_new.repeat(self.num_batch, 1, 1, 1)x_new = x_new.repeat(self.num_batch, 1, 1, 1)y_new = y_new.to(device)x_new = x_new.to(device)x_offset_new = x_offset.detach().clone()if if_offset:x_offset = x_offset.permute(1, 0, 2, 3)x_offset_new = x_offset_new.permute(1, 0, 2, 3)center = int(self.num_points // 2)x_offset_new[center] = 0for index in range(1, center):x_offset_new[center + index] = (x_offset_new[center + index - 1] + x_offset[center + index])x_offset_new[center - index] = (x_offset_new[center - index + 1] + x_offset[center - index])x_offset_new = x_offset_new.permute(1, 0, 2, 3).to(device)x_new = x_new.add(x_offset_new.mul(self.extend_scope))y_new = y_new.reshape([self.num_batch, 1, self.num_points, self.width, self.height])y_new = y_new.permute(0, 3, 1, 4, 2)y_new = y_new.reshape([self.num_batch, 1 * self.width, self.num_points * self.height])x_new = x_new.reshape([self.num_batch, 1, self.num_points, self.width, self.height])x_new = x_new.permute(0, 3, 1, 4, 2)x_new = x_new.reshape([self.num_batch, 1 * self.width, self.num_points * self.height])return y_new, x_new"""input: input feature map [N,C,D,W,H];coordinate map [N,K*D,K*W,K*H] output: [N,1,K*D,K*W,K*H]  deformed feature map"""def _bilinear_interpolate_3D(self, input_feature, y, x):device = input_feature.devicey = y.reshape([-1]).float()x = x.reshape([-1]).float()zero = torch.zeros([]).int()max_y = self.width - 1max_x = self.height - 1# find 8 grid locationsy0 = torch.floor(y).int()y1 = y0 + 1x0 = torch.floor(x).int()x1 = x0 + 1# clip out coordinates exceeding feature map volumey0 = torch.clamp(y0, zero, max_y)y1 = torch.clamp(y1, zero, max_y)x0 = torch.clamp(x0, zero, max_x)x1 = torch.clamp(x1, zero, max_x)input_feature_flat = input_feature.flatten()input_feature_flat = input_feature_flat.reshape(self.num_batch, self.num_channels, self.width, self.height)input_feature_flat = input_feature_flat.permute(0, 2, 3, 1)input_feature_flat = input_feature_flat.reshape(-1, self.num_channels)dimension = self.height * self.widthbase = torch.arange(self.num_batch) * dimensionbase = base.reshape([-1, 1]).float()repeat = torch.ones([self.num_points * self.width * self.height]).unsqueeze(0)repeat = repeat.float()base = torch.matmul(base, repeat)base = base.reshape([-1])base = base.to(device)base_y0 = base + y0 * self.heightbase_y1 = base + y1 * self.height# top rectangle of the neighbourhood volumeindex_a0 = base_y0 - base + x0index_c0 = base_y0 - base + x1# bottom rectangle of the neighbourhood volumeindex_a1 = base_y1 - base + x0index_c1 = base_y1 - base + x1# get 8 grid valuesvalue_a0 = input_feature_flat[index_a0.type(torch.int64)].to(device)value_c0 = input_feature_flat[index_c0.type(torch.int64)].to(device)value_a1 = input_feature_flat[index_a1.type(torch.int64)].to(device)value_c1 = input_feature_flat[index_c1.type(torch.int64)].to(device)# find 8 grid locationsy0 = torch.floor(y).int()y1 = y0 + 1x0 = torch.floor(x).int()x1 = x0 + 1# clip out coordinates exceeding feature map volumey0 = torch.clamp(y0, zero, max_y + 1)y1 = torch.clamp(y1, zero, max_y + 1)x0 = torch.clamp(x0, zero, max_x + 1)x1 = torch.clamp(x1, zero, max_x + 1)x0_float = x0.float()x1_float = x1.float()y0_float = y0.float()y1_float = y1.float()vol_a0 = ((y1_float - y) * (x1_float - x)).unsqueeze(-1).to(device)vol_c0 = ((y1_float - y) * (x - x0_float)).unsqueeze(-1).to(device)vol_a1 = ((y - y0_float) * (x1_float - x)).unsqueeze(-1).to(device)vol_c1 = ((y - y0_float) * (x - x0_float)).unsqueeze(-1).to(device)outputs = (value_a0 * vol_a0 + value_c0 * vol_c0 + value_a1 * vol_a1 +value_c1 * vol_c1)if self.morph == 0:outputs = outputs.reshape([self.num_batch,self.num_points * self.width,1 * self.height,self.num_channels,])outputs = outputs.permute(0, 3, 1, 2)else:outputs = outputs.reshape([self.num_batch,1 * self.width,self.num_points * self.height,self.num_channels,])outputs = outputs.permute(0, 3, 1, 2)return outputsdef deform_conv(self, input, offset, if_offset):y, x = self._coordinate_map_3D(offset, if_offset)deformed_feature = self._bilinear_interpolate_3D(input, y, x)return deformed_featureif __name__ == "__main__":model = DySnakeConv(32, 32)print(model(torch.zeros(2, 32, 640, 320)).shape)
3.2 在YOlO v9中的添加教程
阅读YOLOv9添加模块教程或使用下文操作
1. 将YOLOv9工程中models下common.py文件中的最下行增加模块的代码。

2. 将YOLOv9工程中models下yolo.py文件中的第681行(可能因版本变化而变化)增加以下代码。

RepNCSPELAN4, SPPELAN, DySnakeConv}:
3.3 运行配置文件
# YOLOv9
# Powered bu https://blog.csdn.net/StopAndGoyyy
# parameters
nc: 80 # number of classes
depth_multiple: 1 # model depth multiple
width_multiple: 1 # layer channel multiple
#activation: nn.LeakyReLU(0.1)
#activation: nn.ReLU()# anchors
anchors: 3# YOLOv9 backbone
backbone:[[-1, 1, Silence, []], # conv down[-1, 1, Conv, [64, 3, 2]], # 1-P1/2# conv down[-1, 1, Conv, [128, 3, 2]], # 2-P2/4# elan-1 block[-1, 1, RepNCSPELAN4, [256, 128, 64, 1]], # 3# avg-conv down[-1, 1, ADown, [256]], # 4-P3/8# elan-2 block[-1, 1, RepNCSPELAN4, [512, 256, 128, 1]], # 5# avg-conv down[-1, 1, ADown, [512]], # 6-P4/16# elan-2 block[-1, 1, RepNCSPELAN4, [512, 512, 256, 1]], # 7# avg-conv down[-1, 1, ADown, [512]], # 8-P5/32# elan-2 block[-1, 1, RepNCSPELAN4, [512, 512, 256, 1]], # 9]# YOLOv9 head
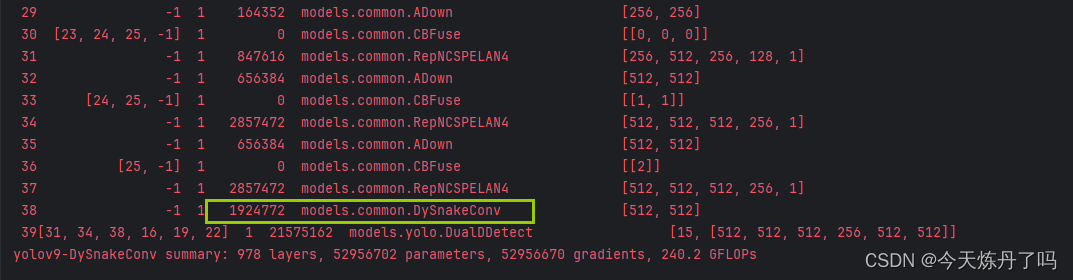
head:[# elan-spp block[-1, 1, SPPELAN, [512, 256]], # 10# up-concat merge[-1, 1, nn.Upsample, [None, 2, 'nearest']],[[-1, 7], 1, Concat, [1]], # cat backbone P4# elan-2 block[-1, 1, RepNCSPELAN4, [512, 512, 256, 1]], # 13# up-concat merge[-1, 1, nn.Upsample, [None, 2, 'nearest']],[[-1, 5], 1, Concat, [1]], # cat backbone P3# elan-2 block[-1, 1, RepNCSPELAN4, [256, 256, 128, 1]], # 16 (P3/8-small)# avg-conv-down merge[-1, 1, ADown, [256]],[[-1, 13], 1, Concat, [1]], # cat head P4# elan-2 block[-1, 1, RepNCSPELAN4, [512, 512, 256, 1]], # 19 (P4/16-medium)# avg-conv-down merge[-1, 1, ADown, [512]],[[-1, 10], 1, Concat, [1]], # cat head P5# elan-2 block[-1, 1, RepNCSPELAN4, [512, 512, 256, 1]], # 22 (P5/32-large)# multi-level reversible auxiliary branch# routing[5, 1, CBLinear, [[256]]], # 23[7, 1, CBLinear, [[256, 512]]], # 24[9, 1, CBLinear, [[256, 512, 512]]], # 25# conv down[0, 1, Conv, [64, 3, 2]], # 26-P1/2# conv down[-1, 1, Conv, [128, 3, 2]], # 27-P2/4# elan-1 block[-1, 1, RepNCSPELAN4, [256, 128, 64, 1]], # 28# avg-conv down fuse[-1, 1, ADown, [256]], # 29-P3/8[[23, 24, 25, -1], 1, CBFuse, [[0, 0, 0]]], # 30 # elan-2 block[-1, 1, RepNCSPELAN4, [512, 256, 128, 1]], # 31# avg-conv down fuse[-1, 1, ADown, [512]], # 32-P4/16[[24, 25, -1], 1, CBFuse, [[1, 1]]], # 33 # elan-2 block[-1, 1, RepNCSPELAN4, [512, 512, 256, 1]], # 34# avg-conv down fuse[-1, 1, ADown, [512]], # 35-P5/32[[25, -1], 1, CBFuse, [[2]]], # 36# elan-2 block[-1, 1, RepNCSPELAN4, [512, 512, 256, 1]], # 37[-1, 1, DySnakeConv, [512]], # 38# detection head# detect[[31, 34, 38, 16, 19, 22], 1, DualDDetect, [nc]], # DualDDetect(A3, A4, A5, P3, P4, P5)]
3.4 训练过程
欢迎关注!


![[业务系统]人物坐骑系统介绍I](https://img-blog.csdnimg.cn/img_convert/7436abf21e1a796fb747dc41ab7db860.png)