用户列表的实现与操作
- 一、创建用户页面和路由
- 二、表格优化
- 1、表头自定义
- 2、表格滚动
- 3、加入数据索引
- 4、利用插槽自定义显示
- 三、功能
- 1、查询功能
- 3、增加
- 4、删除
- 5、修改
一、创建用户页面和路由
- 创建用户页面
在 src/components/Main 下创建文件夹user,创建文件UserList.vue,文件内容如下:
页面中数据的请求代码:
- 定义方法getUserData,使用axios 去请求数据,并将请求的数据设置给userData。
- 在created钩子函数中调用getUserData方法。
<template><el-table:data="userData"style="width: 100%"border:default-sort="{ prop: 'date', order: 'descending' }"><el-table-column prop="date" label="日期" sortable width="180"></el-table-column><el-table-column prop="name" label="姓名" sortable width="180"></el-table-column><el-table-column prop="address" label="地址"> </el-table-column></el-table>
</template><script>
export default {name: "UserList",data() {return {userData: [],};},methods: {getUserData() {this.$axios.post("/post/userList").then((res) => {this.userData = res.data.userData;});},},created() {this.getUserData();},
};
</script><style scoped>
.el-table {width: 100%;height: auto;
}
</style>
- 在之前使用的mockjs中,将菜单数据进行修改,然后加入用户管理的数据
Mock.mock('/post/menuList', 'get', function () {const menu_data = [{name: '用户管理',icon: 'el-icon-user',path: '/index/userList',component: 'user/UserList'},{name: '一级菜单1',icon: 'el-icon-location',path: '/index/menu1',component: 'Main1'},{name: '一级菜单2',icon: 'el-icon-document',path: '/index/menu2',component: 'Main2'}]return {menu_data}
});Mock.mock('/post/userList', 'post', function () {const userData = [{date: "2022-05-02",name: "牛3号",address: "北京市XXXXXX路1号",},{date: "2022-05-04",name: "牛4号",address: "北京市XXXXXX路2号",},{date: "2022-05-01",name: "牛5号",address: "北京市XXXXXX路3号",},]return {userData}
});
页面效果

二、表格优化
1、表头自定义
el-table增加属性header-row-class-name值为table_header_class- 设置样式,注意使用:
/deep/ .table-header-class th
参考代码:
<template><el-table:data="userData"style="width: 100%"border:default-sort="{ prop: 'date', order: 'descending' }"header-row-class-name="table-header-class"><el-table-column prop="date" label="日期" sortable width="180"></el-table-column><el-table-column prop="name" label="姓名" sortable width="180"></el-table-column><el-table-column prop="address" label="地址"> </el-table-column></el-table>
</template><script>
export default {name: "UserList",data() {return {userData: [],};},methods: {getUserData() {this.$axios.post("/post/userList").then((res) => {this.userData = res.data.userData;});},},created() {this.getUserData();},
};
</script><style scoped>.el-table {width: 100%;height: auto;
}/deep/ .table-header-class th{background-color: #91a8b1 !important;color: white;
}
</style>
页面效果

2、表格滚动
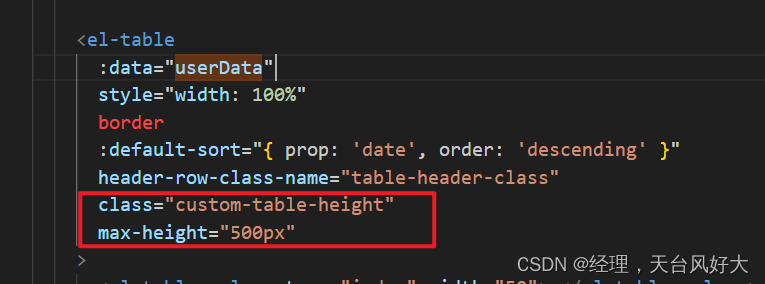
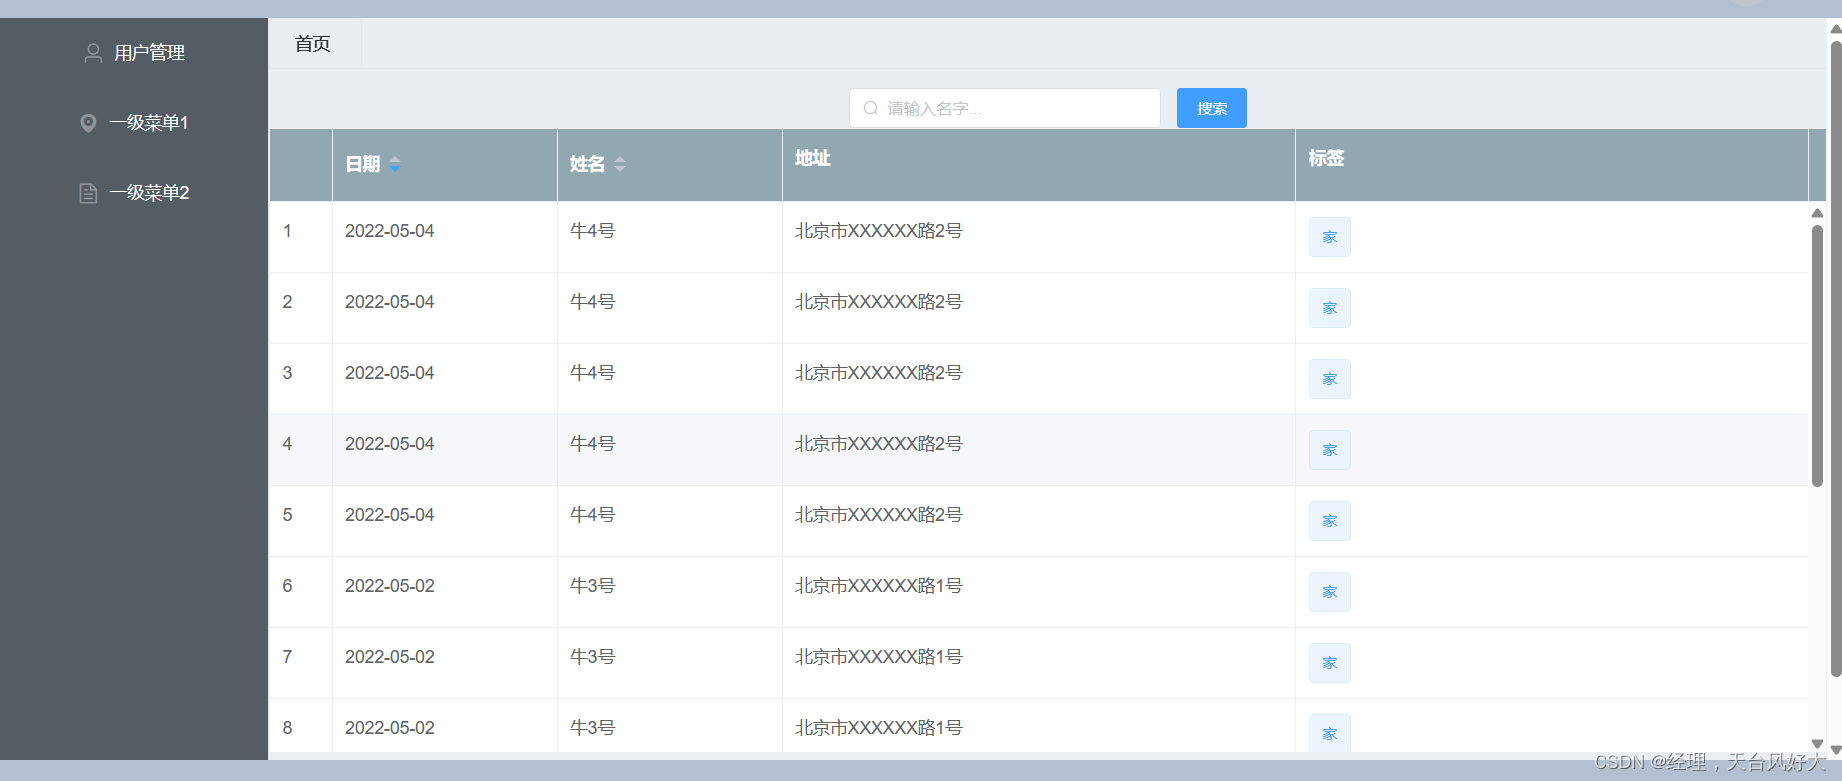
如果数据过多则需要加入表格滚动,否则是外部滚动很难看,这种情况处理起来比较简单,在el-table加入max-height属性即可,比如我设置值为500px
效果展示
3、加入数据索引
加入数据索引
给表格加上一列即可,设置 type=“index”
<el-table-column type="index" width="50"></el-table-column>

4、利用插槽自定义显示
让数据看起来更显眼、分类更明确,比如 userData 加了tag,表示地址是工作地址,还是家
<el-table-column prop="tag" label="标签"></el-table-column>
页面效果

只加个标签的话,很平淡,我们用插槽试一下
<el-table-column prop="tag" label="标签"><template slot-scope="scope"><el-tag:type="scope.row.tag === '家' ? 'primary' : 'success'"disable-transitions>{{ scope.row.tag }}</el-tag></template></el-table-column>
页面效果

三、功能
1、查询功能
- 页面添加搜索框和搜索按钮,在table的前面加入代码
- 在data里面定义search_name,对应el-input的v-model
userList代码
<template><div id="button_div"><el-inputid="search-input"size="small"label-width="100px"prefix-icon="el-icon-search"placeholder="请输入名字..."v-model="search_name"style="height: auto; width: 20%"></el-input> <el-buttontype="primary"size="small"class="search-button"@click="search"style="height: auto">搜索</el-button><el-table:data="userData"style="width: 100%"border:default-sort="{ prop: 'date', order: 'descending' }"header-row-class-name="table-header-class"class="custom-table-height"max-height="500px"><el-table-column type="index" width="50"> </el-table-column><el-table-column prop="date" label="日期" sortable width="180"></el-table-column><el-table-column prop="name" label="姓名" sortable width="180"></el-table-column><el-table-column prop="address" label="地址"> </el-table-column><el-table-column prop="tag" label="标签"><template slot-scope="scope"><el-tag:type="scope.row.tag === '家' ? 'primary' : 'success'"disable-transitions>{{ scope.row.tag }}</el-tag></template></el-table-column></el-table></div>
</template><script>
export default {name: "UserList",data() {return {userData: [],search_name: "",};},methods: {getUserData() {this.$axios.post("/post/userList").then((res) => {this.userData = res.data.userData;});},search() {console.log('this.search_name',this.search_name)this.$axios.post("/post/searchUser", { name: this.search_name }).then((res) => {console.log('name===',name)this.userData = res.data.userData;});},},created() {this.getUserData();},
};
</script><style scoped>
/* .el-table {width: 100%;height: 300px !important;
} *//deep/ .table-header-class th {background-color: #91a8b1 !important;color: white;
}
.custom-table-height {height: auto !important; /* 或指定一个固定高度,例如 400px */
}
</style>
mockjs代码
const userData = [{date: "2022-05-02",name: "牛3号",address: "北京市XXXXXX路1号",tag: '家'},{date: "2022-05-04",name: "牛4号",address: "北京市XXXXXX路2号",tag: '家'},{date: "2022-05-01",name: "牛5号",address: "北京市XXXXXX路3号",tag: '家'},
]
Mock.mock('/post/searchUser', 'post', function (param) {console.log('param',param.body);let body = JSON.parse(param.body);let name = body.name;let newData = []if (name) {newData = userData.filter((item) => {console.log('*******',item.name.indexOf(name))return item.name.indexOf(name) > -1;})console.log('eeee',newData)} else {newData = userData;console.log('eeee2',newData)}return {userData: newData}
});
测试如下

3、增加
4、删除
5、修改
休息一会,继续补充~






![[技巧]Arcgis之图斑四至范围批量计算](https://img-blog.csdnimg.cn/direct/550e39bdb5ae48cb8ee4bec4d59f70f1.png)