ARM开发板实现24位BMP图片缩放
一、linux平台bmp图片缩放
最近想在ARM开发板实现BMP图片的缩放,查看了一些资料,大家部分理论知识可参考:
akynazh博主 ,这位博主程序以window平台为主进行显示,发现在linux平台下编译时有些错误,经过疯狂的修改好,终于能在linux下运行,并实现了缩放。
先放代码吧,代码就看注释了,代码名字:test.c
#include <math.h>
#include <stdio.h>
#include <stdlib.h>
#include <string.h>// 文件头
struct tagBITMAPFILEHEADER {unsigned short bfType;	  //// 保存图片类型,读取时需要注释掉,文本标识符只能单独进行读写unsigned int bfSize;         // 文件大小unsigned short bfReserved1;  // 保留,设置为0unsigned short bfReserved2;  // 保留,设置为0unsigned int   bfOffBits;  // 从文件头到实际的图像数据之间的字节的偏移量(没调色板的话是54)
} __attribute__((packed));
// 信息头
struct tagBITMAPINFOHEADER {unsigned int biSize;      // 此结构体的大小unsigned int biWidth;     // 图像的宽unsigned int biHeight;    // 图像的高unsigned short biPlanes;  // 颜色平面数 恒为1unsigned short biBitCount;  // 一像素所占的位数 Windows系统有8,16,24unsigned int biCompression;  // 说明图象数据压缩的类型,0为不压缩unsigned int biSizeImage;  // 图像大小, 值等于上面文件头结构中bfSize-bfOffBitsint biXPelsPerMeter;  // 说明水平分辨率,用像素/米表示 一般为0int biYPelsPerMeter;  // 说明垂直分辨率,用像素/米表示 一般为0unsigned int biClrUsed;  // 说明位图实际使用的彩色表中的颜色索引数(设为0的话,则说明使用所有调色板项)unsigned int biClrImportant;  // 说明对图象显示有重要影响的颜色索引的数目// 如果是0表示都重要
} __attribute__((packed));
// 调色板
struct tagRGBQUAND {unsigned char r;unsigned char g;unsigned char b;unsigned char rgbReserved;
} __attribute__((packed));int main(int argc, char *argv[])
{// 打开图片char *oldPhoto = argv[1], *newPhoto = argv[3];FILE *fp1 = fopen(oldPhoto, "r+");double pzoom = atof(argv[2]);printf("pzoom:%f\n", pzoom);if (fp1 == NULL ) {printf("Opening photos failed!\n");if (fp1 == NULL) fclose(fp1);return -1;}// 单独读取bmp图片文本标识符0x4d42unsigned short fileType;fread(&fileType, sizeof(unsigned short), 1, fp1);if (fileType != 0x4d42) {  // 如果不是的话证明不是bmp图片printf("The photo is not of bmp type!\n");return -1;}fseek(fp1, 0, SEEK_SET);// 读取原图信息struct tagBITMAPFILEHEADER fileHeader;  // 原图文件头struct tagBITMAPINFOHEADER infoHeader;  // 原图消息头fread(&fileHeader, sizeof(struct tagBITMAPFILEHEADER), 1, fp1);fread(&infoHeader, sizeof(struct tagBITMAPINFOHEADER), 1, fp1);int byte = infoHeader.biBitCount / 8;  // 每个像素的字节数struct tagRGBQUAND *palette = (struct tagRGBQUAND *)malloc((int)pow(2, infoHeader.biBitCount) *4);  // 分配调色板空间if (infoHeader.biBitCount != 24)  // 如果是24位图的没有调色板fread(palette, sizeof(struct tagRGBQUAND), (int)pow(2, infoHeader.biBitCount),fp1);// 得到原图宽高和修改后的宽高unsigned int oldWidth, oldHeight, newWidth, newHeight;oldWidth = infoHeader.biWidth;oldHeight = infoHeader.biHeight;printf("Oldphoto's height:%d\n", oldHeight);printf("Oldphoto's width:%d\n", oldWidth);// 图像显示不出来原因在于图像长或宽不是4的倍数// 下面这一步可以保证得到的宽高是4的倍数newHeight = ((int)(oldHeight * pzoom) + 3) / 4 * 4;newWidth = ((int)(oldWidth * pzoom) + 3) / 4 * 4;//newHeight = (int)(oldHeight * pzoom);//newWidth = (int)(oldWidth * pzoom);printf("Newphoto's height:%d\n", newHeight);printf("Newphoto's width:%d\n", newWidth);unsigned int oldsize = oldWidth * oldHeight * byte,  //byte = 3newsize = newWidth * newHeight * byte;// 获取原图位图数据unsigned char *sourceData = (unsigned char *)malloc(oldsize);if (infoHeader.biBitCount == 24) {  // 无调色板时fseek(fp1, 54, SEEK_SET);  // 文件指针指向文件的第54个字节fread(sourceData, oldsize, 1, fp1);} else if (infoHeader.biBitCount ==8) {  // 有调色板是要加上分配调色板所需要的空间fseek(fp1, 1078, SEEK_SET);  // 文件指针指向文件的第54+2^8*4=1078个字节fread(sourceData, oldsize, 1, fp1);}// 修改两个header的数据并把修改后的header(及调色板信息)写入新图片中infoHeader.biWidth = newWidth;infoHeader.biHeight = newHeight;if (infoHeader.biBitCount == 24) {fileHeader.bfSize = 54 + newsize;infoHeader.biSizeImage = newsize;printf("fileHeader.bfSize:%#x\n", fileHeader.bfSize);} else if (infoHeader.biBitCount == 8) {fileHeader.bfSize = 1078 + newsize;infoHeader.biSizeImage = newsize;}FILE *fp2 = fopen(newPhoto, "w+");	fseek(fp2, 0, SEEK_SET);// fwrite(&fileType, sizeof(unsigned short), 1, fp2);fwrite(&fileHeader, sizeof(struct tagBITMAPFILEHEADER), 1, fp2);fwrite(&infoHeader, sizeof(struct tagBITMAPINFOHEADER), 1, fp2);if (infoHeader.biBitCount != 24){fwrite(palette, sizeof(struct tagRGBQUAND), pow(2, infoHeader.biBitCount), fp2);printf("error\n");}// 使用双线性差值法进行图片缩放double p, q;unsigned int x1, y1, x2, y2;  // 原图所在像素点的宽高unsigned int X, Y;unsigned char *pDestination;  // 修改像素的位置(即字节偏移量)unsigned char a, b, c;unsigned char *pSource1=&a, *pSource2=&b;  // 获取像素的位置(即字节偏移量)unsigned char *destinationData =(unsigned char *)malloc(newsize);  // 开好新图片的位图数据所需空间for (Y = 0; Y < newHeight; Y++) {y1 = Y / pzoom;y2 = Y / pzoom + 1;q = Y / pzoom - y1;pDestination = destinationData + Y * newWidth * byte;pSource1 = sourceData + y1 * oldWidth * byte;pSource2 = sourceData + y2 * oldWidth * byte;for (X = 0; X < newWidth; X++) {x1 = X / pzoom;x2 = X / pzoom + 1;p = X / pzoom - x1;if (byte == 3) {*(pDestination + X * byte) =*(pSource1 + x1 * byte) * (1 - p) * (1 - q) +*(pSource1 + x2 * byte) * p * (1 - q) +*(pSource2 + x1 * byte) * (1 - p) * q +*(pSource2 + x2 * byte) * p * q;*(pDestination + X * byte + 1) =*(pSource1 + x1 * byte + 1) * (1 - p) * (1 - q) +*(pSource1 + x2 * byte + 1) * p * (1 - q) +*(pSource2 + x1 * byte + 1) * (1 - p) * q +*(pSource2 + x2 * byte + 1) * p * q;*(pDestination + X * byte + 2) =*(pSource1 + x1 * byte + 2) * (1 - p) * (1 - q) +*(pSource1 + x2 * byte + 2) * p * (1 - q) +*(pSource2 + x1 * byte + 2) * (1 - p) * q +*(pSource2 + x2 * byte + 2) * p * q;} else if (byte == 1) {*(pDestination + X * byte) =*(pSource1 + x1 * byte) * (1 - p) * (1 - q) +*(pSource1 + x2 * byte) * p * (1 - q) +*(pSource2 + x1 * byte) * (1 - p) * q +*(pSource2 + x2 * byte) * p * q;}}}// 将位图数据写入新的图片并进行后续处理fwrite(destinationData, newsize, 1, fp2);printf("success!\n");free(destinationData);free(sourceData);free(palette);fclose(fp1);fclose(fp2);return 0;
}
编译时记得加上链接上数学库,编译如下:
gcc test.c -o test -lm
执行
./test aa.bmp 1.5 bb.bmp
aa.bmp:原图
1.5:放大1.5位
bb.生成的新图
原图

放大1.5倍

二、ARM开板显示bmp图片缩放
功能实现:通过点击Y轴坐标,实现(0.1~1倍的缩放),想要实现缩放,先了解硬件平台信息
屏幕坐标:800480
触摸屏坐标:1024600
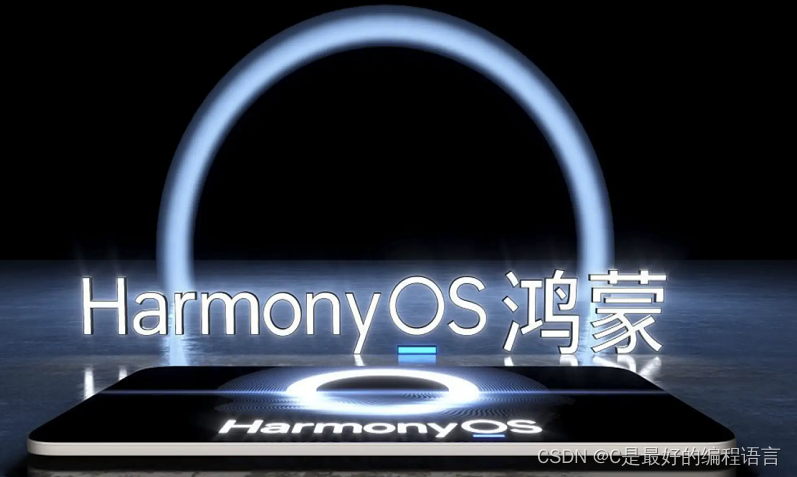
接上来放一张800*480的24位bmp图片。
代码部分加入了触摸屏,事个程序做了较大的改变,代码proiect.c如下
#include <math.h>
#include <stdio.h>
#include <stdlib.h>
#include <string.h>
#include <sys/types.h>
#include <sys/stat.h>
#include <fcntl.h>
#include <sys/mman.h>
#include <linux/input.h>
#include <unistd.h>#define LCD_PATH "/dev/fb0" //屏幕文件#define TS_PATH "/dev/input/event0" //触摸屏文件unsigned char *mmap_p;
int lcd_fd;
int ts_fd;// 文件头
struct tagBITMAPFILEHEADER {unsigned short bfType; //// 保存图片类型,读取时需要注释掉,文本标识符只能单独进行读写unsigned int bfSize; // 文件大小unsigned short bfReserved1; // 保留,设置为0unsigned short bfReserved2; // 保留,设置为0unsigned int bfOffBits; // 从文件头到实际的图像数据之间的字节的偏移量(没调色板的话是54)
} __attribute__((packed));
// 信息头
struct tagBITMAPINFOHEADER {unsigned int biSize; // 此结构体的大小unsigned int biWidth; // 图像的宽unsigned int biHeight; // 图像的高unsigned short biPlanes; // 颜色平面数 恒为1unsigned short biBitCount; // 一像素所占的位数 Windows系统有8,16,24unsigned int biCompression; // 说明图象数据压缩的类型,0为不压缩unsigned int biSizeImage; // 图像大小, 值等于上面文件头结构中bfSize-bfOffBitsint biXPelsPerMeter; // 说明水平分辨率,用像素/米表示 一般为0int biYPelsPerMeter; // 说明垂直分辨率,用像素/米表示 一般为0unsigned int biClrUsed; // 说明位图实际使用的彩色表中的颜色索引数(设为0的话,则说明使用所有调色板项)unsigned int biClrImportant; // 说明对图象显示有重要影响的颜色索引的数目// 如果是0表示都重要
} __attribute__((packed));
// 调色板
struct tagRGBQUAND {unsigned char r;unsigned char g;unsigned char b;unsigned char rgbReserved;
} __attribute__((packed));void Lcd_Init(void);
void Lcd_Uninit(void);
void TS_Init(void);
void TS_UnInit(void);
void Get_XY(int *X, int *Y);
void Show_bmp(const char *pathname);void Lcd_Init(void)
{lcd_fd = open(LCD_PATH, O_RDWR);if(lcd_fd == -1){printf("open lcd failure\n");}//lcd映射mmap_p = (unsigned char *)mmap(NULL,800*480*4, PROT_READ|PROT_WRITE, MAP_SHARED, lcd_fd, 0);if(mmap == MAP_FAILED){printf("mmap failure\n");close(lcd_fd);return ;}
}
void Lcd_Uninit(void)
{//撤消映射munmap(mmap_p, 800*480*4);close(lcd_fd);
}void TS_Init(void)
{ts_fd = open(TS_PATH, O_RDWR);if(ts_fd == -1){printf("open ts failure\n");} }void TS_UnInit(void)
{close(ts_fd);}int main(int argc, char *argv[])
{Lcd_Init();TS_Init();//24位bmp格式图片。Show_bmp("aa.bmp");Lcd_Uninit();TS_UnInit();return 0;
}void Get_XY(int *X, int *Y)
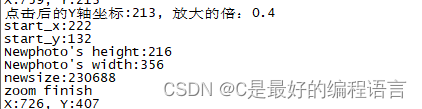
{int xx, yy;struct input_event ts;//松开触摸后,再打印while (1){read(ts_fd, &ts, sizeof(struct input_event));//判断类型if(ts.type == EV_ABS && ts.code == ABS_X){xx = ts.value;}if(ts.type == EV_ABS && ts.code == ABS_Y){yy = ts.value;}//判断按下if(ts.type == EV_KEY && ts.code == BTN_TOUCH && ts.value == 1){} //判断是否松开if(ts.type == EV_KEY && ts.code == BTN_TOUCH && ts.value == 0){//开发板坐标为800*480, 点击时得到的坐标是:1024*600,所以按比例做了缩放 *X = xx*(800.0/1024.0); *Y = yy*(480.0/600.0);break;} }printf("X:%d, Y:%d\n", *X, *Y); }void Show_bmp(const char *pathname)
{int XX, YY; //X与Y轴坐标// 打开图片FILE *fp1 = fopen(pathname, "r+");if (fp1 == NULL ) {printf("Opening photos failed!\n");if (fp1 == NULL) fclose(fp1);return ;}// 单独读取bmp图片文本标识符0x4d42unsigned short fileType;fread(&fileType, sizeof(unsigned short), 1, fp1);if (fileType != 0x4d42) { // 如果不是的话证明不是bmp图片printf("The photo is not of bmp type!\n");return ;}fseek(fp1, 0, SEEK_SET);// 读取原图信息struct tagBITMAPFILEHEADER fileHeader; // 原图文件头struct tagBITMAPINFOHEADER infoHeader; // 原图消息头fread(&fileHeader, sizeof(struct tagBITMAPFILEHEADER), 1, fp1);fread(&infoHeader, sizeof(struct tagBITMAPINFOHEADER), 1, fp1);int byte = infoHeader.biBitCount / 8; // 每个像素的字节数struct tagRGBQUAND *palette = (struct tagRGBQUAND *)malloc((int)pow(2, infoHeader.biBitCount) *4); // 分配调色板空间if (infoHeader.biBitCount != 24) // 如果是24位图的没有调色板fread(palette, sizeof(struct tagRGBQUAND), (int)pow(2, infoHeader.biBitCount),fp1);// 得到原图宽高和修改后的宽高unsigned int oldWidth, oldHeight, newWidth, newHeight;oldWidth = infoHeader.biWidth;oldHeight = infoHeader.biHeight;printf("Oldphoto's height:%d\n", oldHeight);printf("Oldphoto's width:%d\n", oldWidth);unsigned int oldsize = oldWidth * oldHeight * byte, //byte = 3newsize = newWidth * newHeight * byte; // 获取原图位图数据unsigned char *sourceData = (unsigned char *)malloc(oldsize);if (infoHeader.biBitCount == 24) { // 无调色板时fseek(fp1, 54, SEEK_SET); // 文件指针指向文件的第54个字节fread(sourceData, oldsize, 1, fp1);} else if (infoHeader.biBitCount ==8) { // 有调色板是要加上分配调色板所需要的空间fseek(fp1, 1078, SEEK_SET); // 文件指针指向文件的第54+2^8*4=1078个字节fread(sourceData, oldsize, 1, fp1);}//unsigned char *destinationData; // 开好新图片的位图数据所需空间 while(1){//获取坐标Get_XY(&XX, &YY);//先黑屏for(int i=0; i<800*480; i++){mmap_p[4*i+0] = 0x00;mmap_p[4*i+1] = 0x00;mmap_p[4*i+2] = 0x00;}//点击右上角,退出图片绽放if(XX > 700 && XX<800 && YY>0 && YY<100)break;//计算放大倍数,以YY轴坐标做为倍数,y轴坐标:0~480//由于暂定设置的图片全屏,所以图片只能设置为缩小显示,编放比例:double pzoom = YY/480.0;printf("点击后的Y轴坐标:%d, 放大的倍:%0.1f\n", YY, pzoom);if(pzoom < 0.1)pzoom = 0.1; //最低缩小为0.1倍// 图像显示不出来原因在于图像长或宽不是4的倍数// 下面这一步可以保证得到的宽高是4的倍数newHeight = ((int)(oldHeight * pzoom) + 3) / 4 * 4;newWidth = ((int)(oldWidth * pzoom) + 3) / 4 * 4;int start_x = (800-newWidth)/2;int start_y = (480-newHeight)/2;printf("start_x:%d\n", start_x);printf("start_y:%d\n", start_y);//newHeight = (int)(oldHeight * pzoom);//newWidth = (int)(oldWidth * pzoom);printf("Newphoto's height:%d\n", newHeight);printf("Newphoto's width:%d\n", newWidth);unsigned int oldsize = oldWidth * oldHeight * byte; //byte = 3newsize = newWidth * newHeight * byte;// 使用双线性差值法进行图片缩放double p, q;unsigned int x1, y1, x2, y2; // 原图所在像素点的宽高unsigned int X, Y;unsigned char a, b, c;unsigned char *pDestination = &a; // 修改像素的位置(即字节偏移量)unsigned char *pSource1 = &b, *pSource2 = &c; // 获取像素的位置(即字节偏移量)//destinationData = (unsigned char *)malloc(newsize); // 开好新图片的位图数据所需空间 unsigned char destinationData[newsize];printf("newsize:%d\n", newsize);for (Y = 0; Y < newHeight; Y++) {y1 = Y / pzoom;y2 = Y / pzoom + 1;q = Y / pzoom - y1;pDestination = destinationData + Y * newWidth * byte;pSource1 = sourceData + y1 * oldWidth * byte;pSource2 = sourceData + y2 * oldWidth * byte;for (X = 0; X < newWidth; X++) {x1 = X / pzoom;x2 = X / pzoom + 1;p = X / pzoom - x1;if (byte == 3) {*(pDestination + X * byte) =*(pSource1 + x1 * byte) * (1 - p) * (1 - q) +*(pSource1 + x2 * byte) * p * (1 - q) +*(pSource2 + x1 * byte) * (1 - p) * q +*(pSource2 + x2 * byte) * p * q;*(pDestination + X * byte + 1) =*(pSource1 + x1 * byte + 1) * (1 - p) * (1 - q) +*(pSource1 + x2 * byte + 1) * p * (1 - q) +*(pSource2 + x1 * byte + 1) * (1 - p) * q +*(pSource2 + x2 * byte + 1) * p * q;*(pDestination + X * byte + 2) =*(pSource1 + x1 * byte + 2) * (1 - p) * (1 - q) +*(pSource1 + x2 * byte + 2) * p * (1 - q) +*(pSource2 + x1 * byte + 2) * (1 - p) * q +*(pSource2 + x2 * byte + 2) * p * q;} else if (byte == 1) {*(pDestination + X * byte) =*(pSource1 + x1 * byte) * (1 - p) * (1 - q) +*(pSource1 + x2 * byte) * p * (1 - q) +*(pSource2 + x1 * byte) * (1 - p) * q +*(pSource2 + x2 * byte) * p * q;}}}printf("zoom finish\n");for(int yyy=0; yyy<newHeight; yyy++){for(int xxx=0; xxx<newWidth; xxx++){//mmap_p[(start_y+y)*800+start_x+x] = buff[(high-y)*width+x];mmap_p[(start_y+yyy)*800*4 + 4*start_x+4*xxx + 0] = destinationData[(newHeight-1-yyy)*newWidth*3+3*xxx+2];mmap_p[(start_y+yyy)*800*4 + 4*start_x+4*xxx + 1] = destinationData[(newHeight-1-yyy)*newWidth*3+3*xxx+1];mmap_p[(start_y+yyy)*800*4 + 4*start_x+4*xxx + 2] = destinationData[(newHeight-1-yyy)*newWidth*3+3*xxx+0];}}}// free(destinationData);free(sourceData);free(palette);fclose(fp1);}
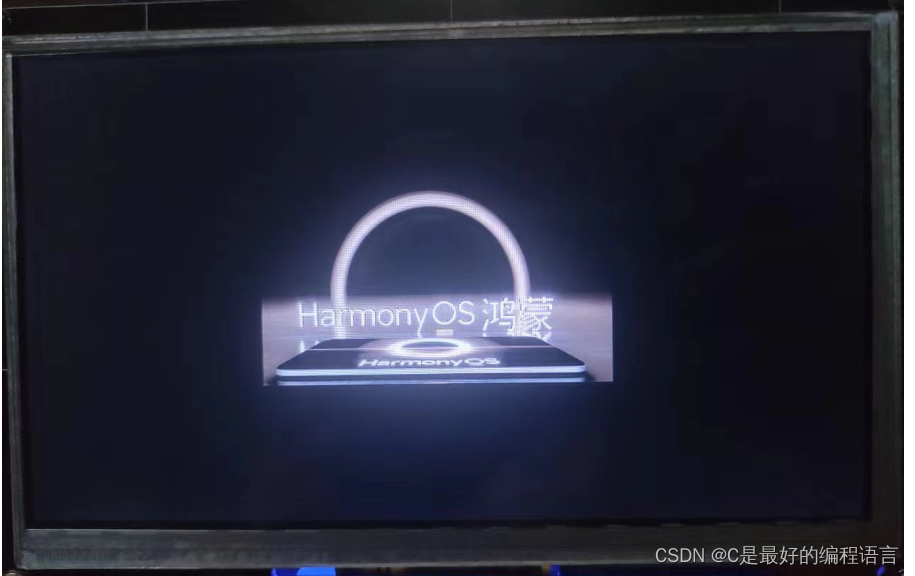
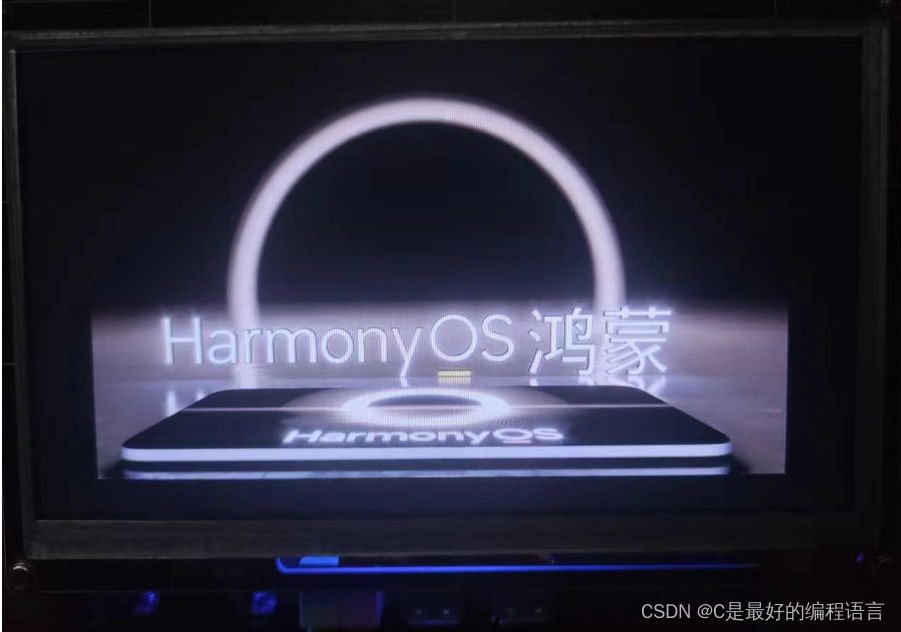
三、验证
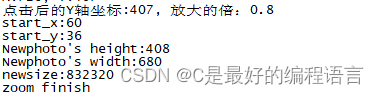
0.4倍缩放效果
缩放0.8倍效果
就写到这里吧,程序由于要先刷新黑屏再显示图片,看起来不是很流畅,需要加入帧缓冲与多线程协同处理可解决问题。如果需要的这种写的话,看评论来吧,多了就写下。


![[Qt学习笔记]QT下获取Halcon图形窗口鼠标事件并执行相应操作](https://img-blog.csdnimg.cn/img_convert/94320e1a515d13b0871b2cb6f5379f06.webp?x-oss-process=image/format,png)


![[Qt学习笔记]QGraphicsView实现背景的绘制和前景图像的绘制](https://img-blog.csdnimg.cn/img_convert/f5750c22716d468be7de087658625c7e.webp?x-oss-process=image/format,png)