1、基础yaml文件格式
1.1、namespace
apiVersion: v1
kind: Namespace
metadata:name: namelabels:name: name
kubectl apply -f namespace.yaml
1.2、Service
service示例
apiVersion: v1
kind: Service
metadata:name: ilanni-httpd-svcnamespace: ilanni-namespace
spec:type: NodePortports:- name: http-portnodePort: 30000port: 80targetPort: 80selector:app: ilanni-httpd-dm
apiVersion: v1
kind: Service
metadata:name: nginx-servicenamespace: dev
spec:selector:app: nginx-podclusterIP: Nonetype: ClusterIPports:- port: 80targetPort: 80
service示例
apiVersion: apps/v1
kind: Deployment
metadata:name: nginx-app
spec:replicas: 2selector:matchLabels:app: nginxtemplate:metadata:labels:app: nginxspec:containers:- name: nginximage: nginx:latestports:- containerPort: 80---
apiVersion: v1
kind: Service
metadata:name: nginx-app-svc
spec:type: ClusterIPports:- protocol: TCPport: 80 # service 端口targetPort: 80 # pod容器端口selector:app: nginx
可通过日志中记录的http访问信息查看service负载
Service类型
- ClusterIP:在集群内部使用、也是默认值
- ExternalName:通过返回定义的 CNAME 别名
- NodePort:在所有安装了 kube-proxy 的节点上打开一个端口,此端口可以代理至后端 pod
nodeport 端口范围是 30000-32767
- LoadBalance:使用云服务器商提供的负载均衡服务(例如阿里的 SLB)
备注:用的最多的就是 ingress 配置域名和 nodePort 这两种方式—>ClusterIP–>service–>pod
1.3、Headless
https://zhuanlan.zhihu.com/p/654328148
一句话总结:Headless服务就是一组Pod组成的只供集群内访问(没有ClusterIP)的Service,一般结合StatefulSet用于部署有状态应用的场景。
语法格式如下:
apiVersion: v1
kind: Service
metadata:name: redis-servicenamespace: redislabels:app: redis
spec:ports:- name: redis-portport: 6379clusterIP: Noneselector:app: redisappCluster: redis-cluster
1.4、deployment
#apiVersion: extensions/v1beta1
apiVersion: apps/v1
kind: Deployment
metadata:name: ilanni-httpd-dmnamespace: ilanni-namespace
spec:replicas: 2selector:matchLabels:app: ilanni-httpd-dmrevisionHistoryLimit: 5	# 指定保留的历史revision数量strategy:		# 应用升级时操作,选择滚动更新,具体信息见下文注释type: RollingUpdaterollingUpdate:maxSurge: 1maxUnavailable: 0template:metadata:labels:app: ilanni-httpd-dmspec:terminationGracePeriodSeconds: 60 # terminationGracePeriodSecondsrestartPolicy: Alwayscontainers:- name: ilanni-httpd-dmimage: httpd:alpineimagePullPolicy: Always
revisionHistoryLimit: 5 # 指定保留的历史revision数量
terminationGracePeriodSeconds:为kubelet配置,从失败的容器触发终止操作 到 强制容器运行时停止该容器之前等待的宽限时长。 默认值是继承 Pod 级别的 terminationGracePeriodSeconds 值(如果不设置则为 30 秒),最小值为 1
strategy: # deployment时为strategy,statusfulset时为 updateStrategytype: RollingUpdaterollingUpdate:maxSurge: 1maxUnavailable: 0
字段含义
- type:设置更新策略。有两个可选项:**recreate和RollingUpdate(默认)。**Recreate表示全部重新创建,RollingUpdate表示滚动更新。
- maxSurge:升级过程中最多可以比原先设置多出的POD数量,可以是数字,也可以是比例。例如:maxSurage=1,replicas=5,则表示升级过程中最多会有5+1个POD。
- 升级过程中最多允许有多少个POD处于不可用状态。maxUnavailable =1 表示升级过程中最多会有一个pod可以处于无法服务的状态,在这里就是至少要有5-1个pod正常。
说明:maxSurge和maxUnavaible在更新策略为RollingUpdate时才需要设置。
1.5、imagePullPolicy策略
- IfNotPresent
- Always
- Never
默认值取决于指定的镜像标签:
- 如果标签是 latest,默认的imagePullPolicy是Always。
- 如果标签不是 latest,默认的imagePullPolicy是IfNotPresent。
apiVersion: v1
kind: Pod
metadata:name: mypod
spec:containers:- name: mycontainerimage: myimage:1.0.0imagePullPolicy: IfNotPresent
1.6、restartPolicy 重启策略
- Always:这是默认的重启策略。如果容器由于任何原因停止运行,Kubernetes将始终尝试重启容器。即便容器正常退出(退出状态为0),它也会被重启。
- OnFailure:使用这个策略,只有当容器以非零状态退出时(即检测到失败),Kubernetes才会重启该容器。如果容器成功地以状态码0退出,它不会被重启。
- Never:此策略告诉Kubernetes不要重启容器。不论容器是成功完成任务还是因为错误而退出,Kubernetes都不会尝试重启它。
apiVersion: v1
kind: Pod
metadata:name: mypod
spec:containers:- name: mycontainerimage: myimagerestartPolicy: OnFailure
2、Ingress
Ingress-nginx通信原理:ingress 将访问规则注入到 nginx 里面—>然后将流量打到对应的 service—>然后通过 clusterIP 访问后端的 pod
访问:客户端–>域名:/test–>service–>pod
k8s-ingress nginx(https证书,ingress nginx常用语法,ingress设置方式
2.1、apeclass
1、ingress-controller
apiVersion: v1
kind: Namespace
metadata:name: ingress-nginxlabels:app.kubernetes.io/name: ingress-nginxapp.kubernetes.io/part-of: ingress-nginx---
apiVersion: v1
kind: ConfigMap
metadata:name: nginx-configurationnamespace: ingress-nginxlabels:app.kubernetes.io/name: ingress-nginxapp.kubernetes.io/part-of: ingress-nginx---
apiVersion: v1
kind: ConfigMap
metadata:name: tcp-servicesnamespace: ingress-nginxlabels:app.kubernetes.io/name: ingress-nginxapp.kubernetes.io/part-of: ingress-nginx---
kind: ConfigMap
apiVersion: v1
metadata:name: udp-servicesnamespace: ingress-nginxlabels:app.kubernetes.io/name: ingress-nginxapp.kubernetes.io/part-of: ingress-nginx---
apiVersion: v1
kind: ServiceAccount
metadata:name: nginx-ingress-serviceaccountnamespace: ingress-nginxlabels:app.kubernetes.io/name: ingress-nginxapp.kubernetes.io/part-of: ingress-nginx---
apiVersion: rbac.authorization.k8s.io/v1beta1
kind: ClusterRole
metadata:name: nginx-ingress-clusterrolelabels:app.kubernetes.io/name: ingress-nginxapp.kubernetes.io/part-of: ingress-nginx
rules:- apiGroups:- ""resources:- configmaps- endpoints- nodes- pods- secretsverbs:- list- watch- apiGroups:- ""resources:- nodesverbs:- get- apiGroups:- ""resources:- servicesverbs:- get- list- watch- apiGroups:- "extensions"resources:- ingressesverbs:- get- list- watch- apiGroups:- ""resources:- eventsverbs:- create- patch- apiGroups:- "extensions"resources:- ingresses/statusverbs:- update---
apiVersion: rbac.authorization.k8s.io/v1beta1
kind: Role
metadata:name: nginx-ingress-rolenamespace: ingress-nginxlabels:app.kubernetes.io/name: ingress-nginxapp.kubernetes.io/part-of: ingress-nginx
rules:- apiGroups:- ""resources:- configmaps- pods- secrets- namespacesverbs:- get- apiGroups:- ""resources:- configmapsresourceNames:# Defaults to "<election-id>-<ingress-class>"# Here: "<ingress-controller-leader>-<nginx>"# This has to be adapted if you change either parameter# when launching the nginx-ingress-controller.- "ingress-controller-leader-nginx"verbs:- get- update- apiGroups:- ""resources:- configmapsverbs:- create- apiGroups:- ""resources:- endpointsverbs:- get---
apiVersion: rbac.authorization.k8s.io/v1beta1
kind: RoleBinding
metadata:name: nginx-ingress-role-nisa-bindingnamespace: ingress-nginxlabels:app.kubernetes.io/name: ingress-nginxapp.kubernetes.io/part-of: ingress-nginx
roleRef:apiGroup: rbac.authorization.k8s.iokind: Rolename: nginx-ingress-role
subjects:- kind: ServiceAccountname: nginx-ingress-serviceaccountnamespace: ingress-nginx---
apiVersion: rbac.authorization.k8s.io/v1beta1
kind: ClusterRoleBinding
metadata:name: nginx-ingress-clusterrole-nisa-bindinglabels:app.kubernetes.io/name: ingress-nginxapp.kubernetes.io/part-of: ingress-nginx
roleRef:apiGroup: rbac.authorization.k8s.iokind: ClusterRolename: nginx-ingress-clusterrole
subjects:- kind: ServiceAccountname: nginx-ingress-serviceaccountnamespace: ingress-nginx---
apiVersion: apps/v1
kind: Deployment
metadata:name: nginx-ingress-controllernamespace: ingress-nginxlabels:app.kubernetes.io/name: ingress-nginxapp.kubernetes.io/part-of: ingress-nginx
spec:replicas: 1selector:matchLabels:app.kubernetes.io/name: ingress-nginxapp.kubernetes.io/part-of: ingress-nginxtemplate:metadata:labels:app.kubernetes.io/name: ingress-nginxapp.kubernetes.io/part-of: ingress-nginxannotations:prometheus.io/port: "10254"prometheus.io/scrape: "true"spec:hostNetwork: true #启用宿主机网络nodeSelector:nginx: "nginx" #匹配 node 标签、生成该 podserviceAccountName: nginx-ingress-serviceaccountcontainers:- name: nginx-ingress-controllerimage: registry.cn-hangzhou.aliyuncs.com/ilanni/nginx-ingress-controller:0.21.0args:- /nginx-ingress-controller- --configmap=$(POD_NAMESPACE)/nginx-configuration- --tcp-services-configmap=$(POD_NAMESPACE)/tcp-services - --udp-services-configmap=$(POD_NAMESPACE)/udp-services- --publish-service=$(POD_NAMESPACE)/ingress-nginx - --annotations-prefix=nginx.ingress.kubernetes.iosecurityContext:allowPrivilegeEscalation: truecapabilities:drop:- ALLadd:- NET_BIND_SERVICE# www-data -> 33runAsUser: 33env:- name: POD_NAMEvalueFrom:fieldRef:fieldPath: metadata.name- name: POD_NAMESPACEvalueFrom:fieldRef:fieldPath: metadata.namespaceports:- name: httpcontainerPort: 80- name: httpscontainerPort: 443livenessProbe:failureThreshold: 3httpGet:path: /healthzport: 10254 scheme: HTTPinitialDelaySeconds: 10periodSeconds: 10successThreshold: 1timeoutSeconds: 1readinessProbe:failureThreshold: 3httpGet:path: /healthzport: 10254scheme: HTTPperiodSeconds: 10successThreshold: 1timeoutSeconds: 1---
apiVersion: v1
kind: Service
metadata:name: ingress-nginxnamespace: ingress-nginx
spec:#type: NodePortports:- name: httpport: 80targetPort: 80protocol: TCP- name: httpsport: 443targetPort: 443protocol: TCPselector:# app.kubernetes.io/name: ingress-nginx# app.kubernetes.io/part-of: ingress-nginxapp: ingress-nginx
kubectl label node node02 nginx=nginx #给 node02 打标签、让 ingress-controller 在 node02 这个节点上生成
apiVersion: apps/v1
kind: Deployment
metadata:name: nginx-ingress-controller
spec:template:spec:hostNetwork: true #启用宿主机网络nodeSelector:nginx: "nginx" #匹配 node 标签、生成该 podserviceAccountName: nginx-ingress-serviceaccountcontainers:- name: nginx-ingress-controller
kubectl apply -f ingress-controller.yaml
kubectl get pod -A -owide #查看 ingress-controller 这个 pod
2、ingress-nginx-rule
apiVersion: v1
kind: List
items:- apiVersion: extensions/v1beta1 # - apiVersion: apps/v1kind: Ingressmetadata:name: ilanni-ingressnamespace: ilanni-namespaceannotations:nginx.ingress.kubernetes.io/rewrite-target: /spec:rules:- host: ingress.ilanni.com # 定义的域名http:paths:- path: /backend:serviceName: ilanni-httpd-svcservicePort: 80# - path: /tomcat# backend:# serviceName: ilanni-tomcat-svc# servicePort: 8080
kubectl apply -f ingress-rule.yaml
提示 warning 警告的时候不必理会,只要没有 error 错误就行、不影响实验测试结果、但是 生成环境中一定要改好。
kubectl get ingress -n ilanni-namespace #查看创建的 ingress 规则
NAME             CLASS    HOSTS                ADDRESS   PORTS   AGE
ilanni-ingress   <none>   ingress.ilanni.com             80      50m

备注:waring 警告提示 yaml 配置的 apiversion 在 k8s 1.14 以后已经废除掉,此处不必理会、 不影响测试效果。
将进入到 ingress-nginx-controller 这个 pod、查看到 ingress 规则已经注入到 ingress-controller 里面
执行命令:kubectl exec -it nginx-ingress-controller-* -n ingress-nginx bash
cat nginx.conf
NAME                                            READY   STATUS    RESTARTS   AGE
pod/nginx-ingress-controller-85c4fcc56b-j2zdt   1/1     Running   0          82mNAME                    TYPE       CLUSTER-IP      EXTERNAL-IP   PORT(S)                      AGE
service/ingress-nginx   NodePort   10.244.128.20   <none>        80:31761/TCP,443:30122/TCP   82mNAME                                       READY   UP-TO-DATE   AVAILABLE   AGE
deployment.apps/nginx-ingress-controller   1/1     1            1           82mNAME                                                  DESIRED   CURRENT   READY   AGE
replicaset.apps/nginx-ingress-controller-85c4fcc56b   1         1         1       82m

本地笔记本添加hosts解析
# Host Database
#
# localhost is used to configure the loopback interface
# when the system is booting.  Do not change this entry.
##
127.0.0.1	localhost
255.255.255.255	broadcasthost
::1             localhost192.168.10.159 ingress.ilanni.com
浏览器访问
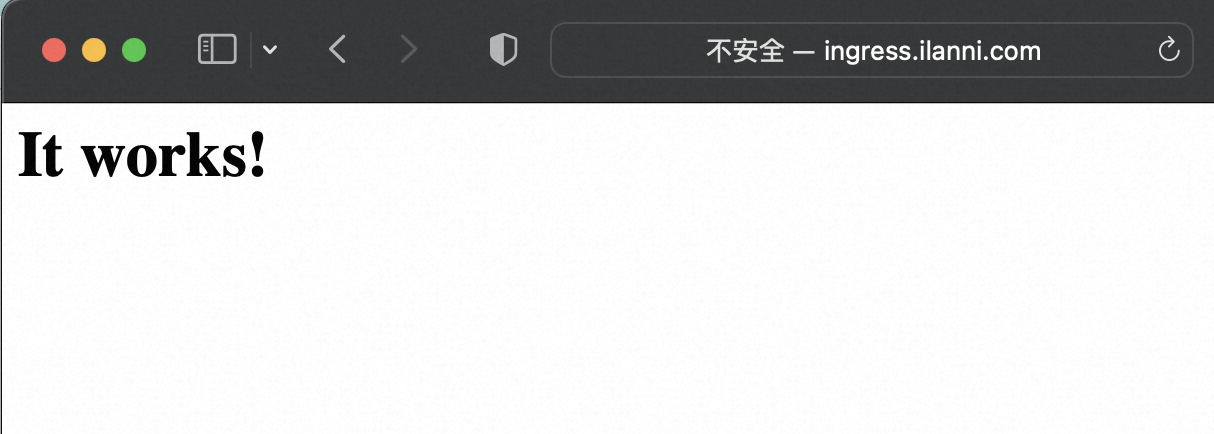
浏览器访问域名成功
Ingress-nginx 通过 ingress 规则到达 http–svc—>http-pod
Ingress Controller 的工作原理(上)
盗用别人图

2.2、官方版本
参考:
https://blog.csdn.net/qq_40208428/article/details/133947090
1、ingress解释
k8s服务对外暴露有三种方式
- NodePort
- LoadBalancer
- Ingress
Nodeport
服务暴露需要在集群每个节点都开放一个同样的端口,通过nodtIp:nodePort来访问,如果服务数量多了,开放的端口就难以管理,通常会使用节点标签选择器nodeselector
LoadBalancer
大部分情况下只适用于支持外部负载均衡器的云提供商(AWS,阿里云,华为云等)使用。每个服务都会由云服务提供一个IP作为入口,转发相应的流量,但每个LoadBlancer Service都会产生费用,成本比较高。如果想要在内网环境中使用就需要部署网络负载均衡器,比如MetalLB等组件,它主要提供两个功能:地址分配和外部通知。
如果是本地搭建LoadBalancer,一般采用metallb方案,官网地址:https://metallb.universe.tf/.
ingress
Ingress可以把进入到集群内部的请求转发到集群中的一些服务上,从而可以把服务映射到集群外部。Ingress 能把集群内Service 配置成外网能够访问的 URL,流量负载均衡,提供基于域名访问的虚拟主机等
2、ingress相关地址
k8s提供的ingress,github地址:https://github.com/kubernetes/ingress-nginx
nginx提供的ingress,github地址:https://github.com/nginxinc/kubernetes-ingress
3、配置nginx-controller
- 下载nginx-controller配置文件
wget https://raw.githubusercontent.com/kubernetes/ingress-nginx/controller-v1.8.2/deploy/static/provider/cloud/deploy.yaml
- 替换镜像源
registry.cn-hangzhou.aliyuncs.com/google_containers/nginx-ingress-controller:v1.1.0registry.cn-hangzhou.aliyuncs.com/google_containers/kube-webhook-certgen:v1.1.1
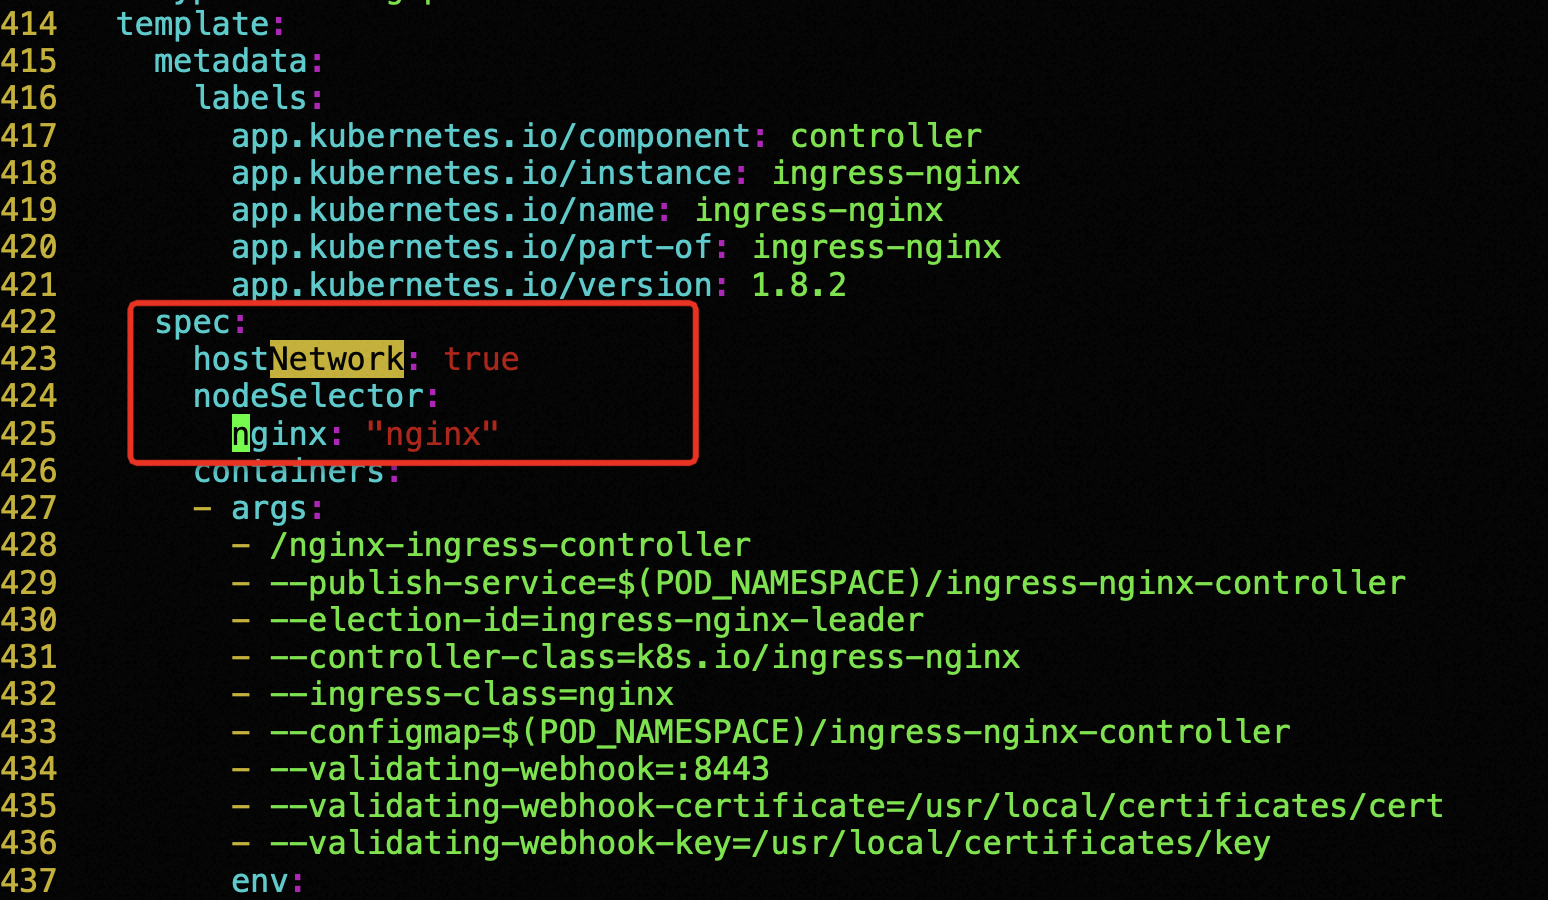
替换后状态如下

启用宿主机网络:hostNetwork: true
设置node标签:nodeSelector(可选)
---
apiVersion: apps/v1
kind: Deployment
metadata:...name: ingress-nginx-controllernamespace: ingress-nginx
spec:strategy:rollingUpdate:maxUnavailable: 1type: RollingUpdatetemplate:metadata:spec:hostNetwork: true		# 启用宿主机网络nodeSelector:nginx: "nginx"		# 启用node标签containers:
运行deploy.yaml后状态如下
添加对应的DNS解析,解析A地址为 192.168.10.18


3、配置2个 deployment+service
- 第一个deployment+servie
apiVersion: apps/v1
kind: Deployment
metadata:name: httpd-dmnamespace: dev
spec:replicas: 2selector:matchLabels:app: httpd-dmrevisionHistoryLimit: 5strategy:type: RollingUpdaterollingUpdate:maxSurge: 1maxUnavailable: 0template:metadata:labels:app: httpd-dmspec:terminationGracePeriodSeconds: 60restartPolicy: Alwayscontainers:- name: httpd-dmimage: httpd:alpineimagePullPolicy: Always---
apiVersion: v1
kind: Service
metadata:name: httpd-svcnamespace: dev
spec:type: NodePortports:- name: http-portnodePort: 30000port: 80targetPort: 80selector:app: httpd-dm
- 第二个deployment+servie
apiVersion: apps/v1
kind: Deployment
metadata:name: httpd-dm2namespace: dev
spec:replicas: 2selector:matchLabels:app: httpd-dm2revisionHistoryLimit: 5strategy:type: RollingUpdaterollingUpdate:maxSurge: 1maxUnavailable: 0template:metadata:labels:app: httpd-dm2spec:terminationGracePeriodSeconds: 60restartPolicy: Alwayscontainers:- name: httpd-dm2image: demo:latestimagePullPolicy: IfNotPresent---
apiVersion: v1
kind: Service
metadata:name: httpd-svc2namespace: dev
spec:type: NodePortports:- name: http-portnodePort: 30001port: 8181targetPort: 8181selector:app: httpd-dm2
- 第二个deployment的docker镜像制作
dockerfile内容如下
FROM python:3.7-alpine
ADD TestController.py /opt
RUN pip3 install flask
RUN pip3 install requests
WORKDIR /opt
EXPOSE 8181
ENTRYPOINT python TestController.py
代码内容如下
import requests
from flask import Flask
import os,time
app = Flask(__name__)@app.route("/test")
def index():pid = str(os.getpid())msg = time.strftime("%Y-%m-%d %H:%M:%S") + "\tMyPid: "+pid+"\n"return msg@app.route("/pid")
def pid():pid = str(os.getpid())return piddef a():pid = str(os.getpid())+"\n"print(pid)if __name__ == "__main__":app.run(host='0.0.0.0',port=8181)
生成镜像
docker build -t demo:latest .
4、ingress转发规则rule配置
访问:客户端–>域名:/test–>service–>pod
apiVersion: networking.k8s.io/v1
kind: Ingress
metadata:namespace: devname: demo-ingress
spec:ingressClassName: nginx		# 此处不要改动,改动后ingress-controller识别不了这个ingressrules:- host: ingress.rocky.comhttp:paths:- path: /pathType: Prefixbackend:service:name: httpd-svc		# service 名称port:number: 80		# nginx中server_name中指定的端口- host: ingress2.rocky.comhttp:paths:- path: /testpathType: Prefixbackend:service:name: httpd-svc2port:number: 80
运行ingress-rule-demo后查看

登陆到ingress-nginx-controller pod中查看
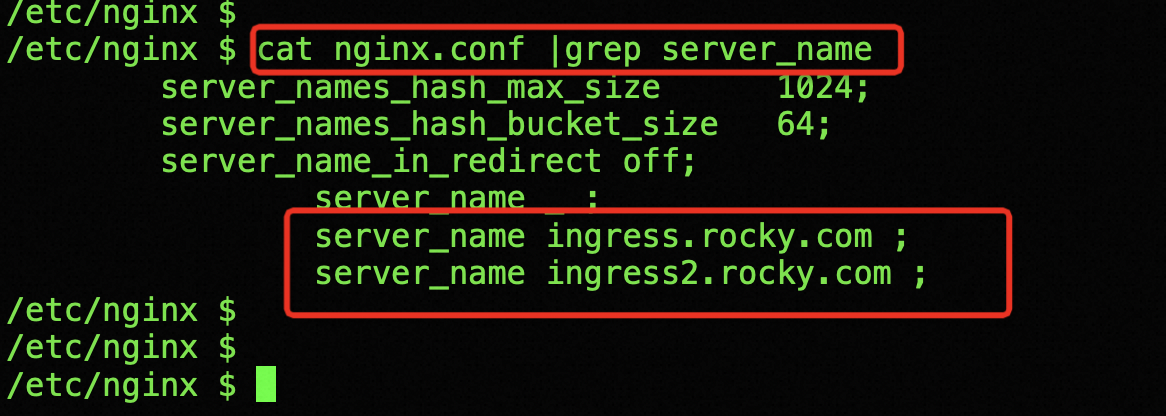

验证,访问ingress.rocky.com,ingress2.rocky.com
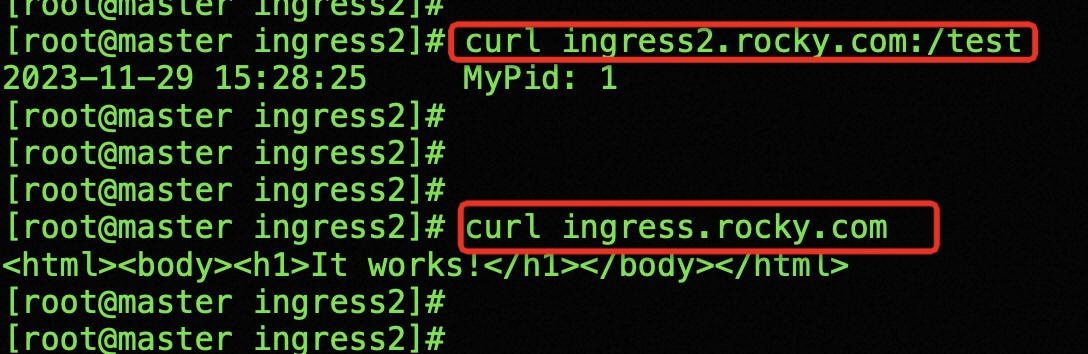
查看ingress-nginx-controller pod 日志

3、pod健康检查
三种pod探针:
- livenessProbe 存活性探针
- readinessProbe 就绪性探针
- startupProbe 启动探针
K8S 三种探针 ReadinessProbe、LivenessProbe和StartupProbe 之探索
Kubernetes 集群 Pod资源容器健康检查探针配置(十)_弓长三虎的博客-CSDN博客
3.1、LivenessProbe:存活性探针
用于判断容器是不是健康,存活探针用于确定容器是否处于运行状态。如果存活探针失败(返回失败状态码或超时),Kubernetes会认为容器不健康,并会重启容器。这可以用于检测应用程序内部错误或死锁情况。
如果不满足健康条件,那么 Kubelet 将根据 Pod 中设置的 restartPolicy (重启策略)来判断,Pod 是否要进行重启操作。LivenessProbe 按照配置去探测 ( 进程、或者端口、或者命令执行后是否成功等等),来判断容器是不是正常。如果探测不到,代表容器不健康(可以配置连续多少次失败才记为不健康),则 kubelet 会杀掉该容器,并根据容器的重启策略做相应的处理。如果未配置存活探针,则默认容器启动为通过(Success)状态。即探针返回的值永远是 Success。即 Success 后 pod 状态是RUNING
3.2、ReadinessProbe:就绪性探针
用于判断容器内的程序是否存活(或者说是否健康),就绪探针用于确定容器是否准备好接受流量。如果就绪探针失败,Kubernetes 会将容器从服务的负载均衡中剔除,直到探针成功。这可以用于确保应用程序在启动后完成必要的初始化或数据加载。
容器启动后按照 ReadinessProbe 配置进行探测,无问题后结果为成功即状态为Success,pod 的 READY 状态为 true,从 0/1 变为 1/1。如果失败继续为 0/1,状态为 false。若未配置就绪探针,则默认状态容器启动后为 Success。对于此 pod、此 pod 关联的 Service 资源、EndPoint 的关系也将基于 Pod 的 Ready 状态进行设置,如果 Pod 运行过程中 Ready 状态变为 false,则系统自动从 Service 资源 关联的 EndPoint 列表中去除此 pod,届时 service 资源接收到 GET 请求后,kube-proxy 将不会把流量引入此 pod 中,通过这种机制就能防止将流量转发到不可用的 Pod 上。如果 Pod 恢复为 Ready 状态。将再会被加回 Endpoint 列表。kube-proxy 也将有概率通过负载机制会引入流量到此 pod 中。
3.3、StartupProbe:启动探针
启动探针用于确定容器是否已经启动并且准备好接受流量。与存活探针和就绪探针不同,启动探针在容器的初始启动阶段使用,并且仅会运行一次。启动探针成功后,就绪探针和存活探针才会启动。
聊聊k8s中的启动探针startupProbe
3.4、三种探针区别
1、ReadinessProbe 与 LivenessProbe 的区别
- ReadinessProbe 当检测失败后,将 Pod 的 IP:Port 从对应的 EndPoint 列表中删除,service将不再把流量转发给该pod
- LivenessProbe 当检测失败后,将杀死容器并根据 Pod 的重启策略来决定作出对应的措施。
2、StartupProbe 与 ReadinessProbe、LivenessProbe 的区别
如果三个探针同时存在,先执行 StartupProbe 探针,其他两个探针将会被暂时禁用,直到 pod 满足 StartupProbe 探针配置的条件,其他 2 个探针启动,如果不满足按照规则重启容器。
另外两种探针在容器启动后,会按照配置,直到容器消亡才停止探测,而 StartupProbe 探针只是在容器启动后按照配置满足一次后,不在进行后续的探测。
3、LivenessProbe 和 ReadinessProbe 两种探针都支持下面三种探测方法:
- exec: 在容器内执行一个命令、如果返回值为 0、则代表容器健康。
- tcpSocket: 通过 TCP 连接检查容器内的端口是否是通的、如果是通的则认为容器健康。
- httpGet: 通过应用程序暴露的 API 地址来检查程序是否是正常的,如果状态码是 200-400,则认为容器健康。(在生产环境中用的最多)
3.5、探针检查参数配置
:::success
initialDelaySeconds: 60 # 初始化时间。
periodSeconds: 5 # 检测的频率(以秒为单位)默认为10秒,最小值为1
timeoutSeconds: 2 # 检测超时秒数,默认为1秒,最小值为1
successThreshold: 1 # 检测成功为1次表示就绪
failureThreshold: 2 # 检测失败2次表示未就绪,当pod成功启动且检查失败时,kubernetes将在放弃之前尝试 failureThreshold 次。放弃生存检查意味着重新启动 Pod。而放弃就绪检查, Pod 将被标记为未就绪。默认为 3.最小值为 1。
:::
1、验证测试
在创建pod的时候指定健康检查方式
kubectl apply -f pod_healthcheck.yaml
apiVersion: v1
kind: Pod
metadata:name: nginx-podlabels:app: nginx
spec:containers:- name: nginximage: nginx:latestports:- containerPort: 80livenessProbe:httpGet:path: /index.htmlport: 80
这里是采用了 httpGet 方式,判断服务 80 端口的 http 返回结果
首先创建容器,检查探测返回200
然后进入容器删除index.html,使探测返回404,探测失败后重新部署pod
shell> kubectl get pod
NAME        READY   STATUS    RESTARTS   AGE
nginx-pod   1/1     Running   0          72sshell> kubectl exec -it nginx-pod bash
root@nginx-pod:/# cd /usr/share/nginx/html/
root@nginx-pod:/usr/share/nginx/html# ls
50x.html  index.html
root@nginx-pod:/usr/share/nginx/html# rm -rf index.html
通过命令 **kubectl describe pod nginx-pod **可以看到健康检查配置:

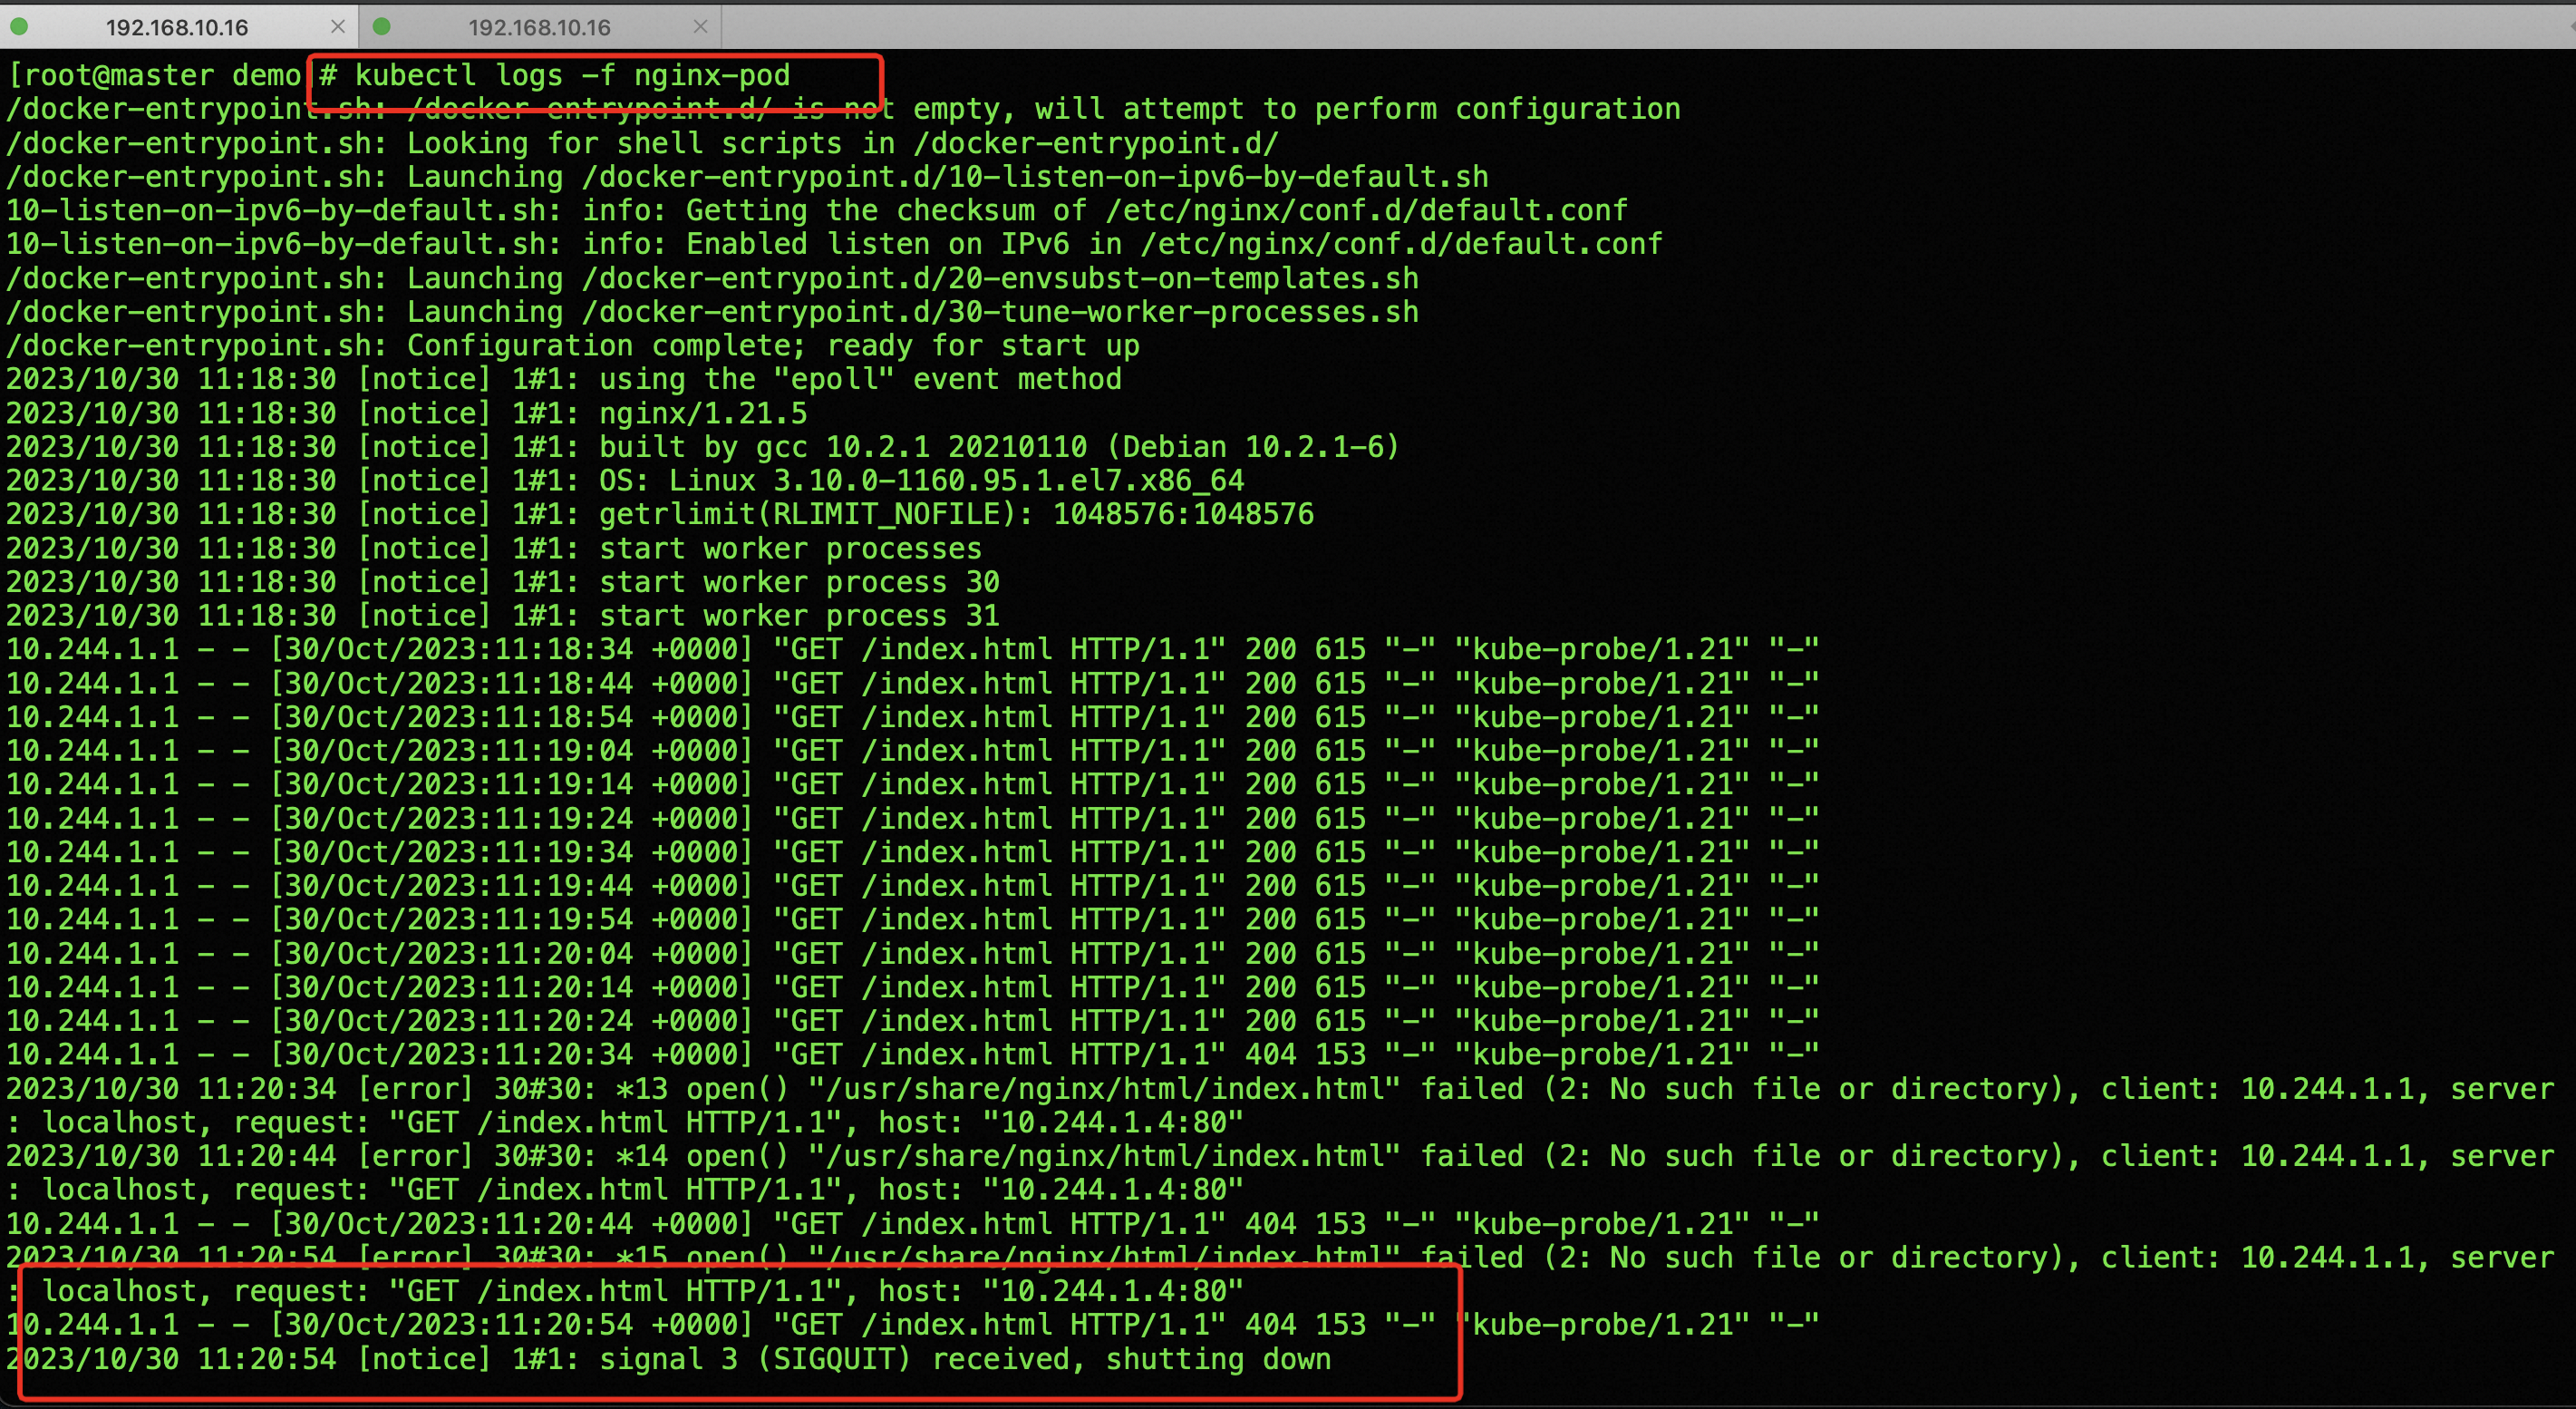
通过 kubectl logs -f nginx-pod 观察pod的日志建查看检查请求
检查返回 404 错误状态
通过 pod 的事件可以看到整个过程:检测到 404 后删除 pod 并重建:
2、查探针的各项参数说明
kubectl explain pods.spec.containers
kubectl explain pods.spec.containers.livenessProbe
3、示例> 探测端口
apiVersion: v1
kind: Pod
metadata:name: pod-livereadinessnamespace: default
spec:containers:- name: nginximage: nginx:latestports:- name: nginx-portcontainerPort: 80livenessProbe:tcpSocket:port: 80initialDelaySeconds: 30		# 容器启动后30s以后开始探测timeoutSeconds: 5					# 探测超时时间readinessProbe:httpGet:scheme: HTTPport: 80path: /
4、示例> exec
1.编写使用exec探测的yaml文件
#exec配置时,执行一个退出状态码为1的命令,观察pod的状态
[root@k8s-master ~]# vim pod-liveness-exec.yaml
apiVersion: v1
kind: Pod
metadata:name: pod-liveness-execnamespace: dev
spec:containers:- name: nginximage: nginx:1.18ports:- name: nginx-portcontainerPort: 80livenessProbe:										# 定义存活性探测exec:														# 使用exec命令方式command: ["/bin/cat","/tmp/hello.txt"]					#执行具体命令:查看下/tmp/hello.txt文件,这个文件一定是不存在的,返回的状态码一定是1
#在最后的输出里可以看到说找不到/tmp/hello.txt这个文件,命令执行失败
#根据输出的信息可以看到nginx容器在启动之后就进行了健康检查,健康检查失败之后,容器就会被kill掉,然后尝试重启pod,然而健康检查一直失败,容器就会一直重启
5、deployment实例
apiVersion: v1
kind: Namespace
metadata:name: deployment---
apiVersion: apps/v1
kind: Deployment
metadata:name: httpdnamespace: deployment
spec:replicas: 8strategy:       # rollingUpdate 滚动更新rollingUpdate:maxSurge: 1maxUnavailable: 1type: RollingUpdateselector:matchLabels:app: httpd-testtemplate:metadata:labels:app: httpd-testspec:containers:- name: httpd-testimage: nginx:alpineimagePullPolicy: AlwayslivenessProbe:tcpSocket:port: 80initialDelaySeconds: 5   # 容器启动后30s以后开始探timeoutSeconds: 5         # 探测超时时间readinessProbe:httpGet:scheme: HTTPport: 80path: /
4、deployment
4.1、Kubectl常用命令详解
https://www.xjx100.cn/news/590213.html?action=onClick
4.2、更新策略
支持两种更新,Recreate和RollingUpdate
- Recreate 重建式更新,删除一个更新一个
- RollingUpdate 滚动更新,定义滚动更新的更新方式的,也就是pod能多几个,少几个,控制更新力度的
官方文档解释
kubectl explain deploy.spec.strategy
kubectl explain deploy.spec.strategy.rollingUpdate
[root@master ~]# kubectl explain deploy.spec.strategy
KIND:     Deployment
VERSION:  apps/v1RESOURCE: strategy <Object>DESCRIPTION:The deployment strategy to use to replace existing pods with new ones.DeploymentStrategy describes how to replace existing pods with new ones.FIELDS:rollingUpdate	<Object>Rolling update config params. Present only if DeploymentStrategyType =RollingUpdate.type	<string>Type of deployment. Can be "Recreate" or "RollingUpdate". Default isRollingUpdate.
  strategy:rollingUpdate:  ##由于replicas为3,则整个升级,pod个数在2-4个之间maxSurge: 1      #滚动升级时会先启动1个pod,值可数字可百分比maxUnavailable: 1 #滚动升级时允许的最大Unavailable的pod个数,值可数字可百分比maxUnavailable: [0%, 100%] 向下取整,比如10个副本,5%的话==0.5个,但计算按照0个
maxSurge: [0%, 100%] 向上取整,比如10个副本,5%的话==0.5个,但计算按照1个
4.3、资源更新
示例代码
apiVersion: v1
kind: Namespace
metadata:name: deployment---
apiVersion: apps/v1
kind: Deployment
metadata:name: httpdnamespace: deployment
spec:replicas: 8strategy:       # rollingUpdate 滚动更新rollingUpdate:maxSurge: 1maxUnavailable: 1type: RollingUpdateselector:matchLabels:app: httpd-testtemplate:metadata:labels:app: httpd-testspec:containers:- name: httpd-testimage: nginx:alpineimagePullPolicy: AlwayslivenessProbe:tcpSocket:port: 80initialDelaySeconds: 5   # 容器启动后30s以后开始探timeoutSeconds: 5         # 探测超时时间readinessProbe:httpGet:scheme: HTTPport: 80path: /
> 修改yaml文件后,更新资源
kubectl apply -f nginx-test.yaml
kubectl replace -f nginx-test.yaml
> 扩缩容,增加副本为4个
kubectl scale --replicas=4 deployment.app nginx-test
> 升级镜像
kubectl set image deployments nginx-test nginx-test=nginx:alpine --record
nginx-test: deployment名称
nginx-test=nginx:alpine 需要更新的镜像
record 记录更新> 查看deployment滚动更新状态
kubectl rollout status deployment nginx-test
Waiting for deployment "nginx-test" rollout to finish: 3 out of 4 new replicas have been updated...Waiting for deployment "nginx-test" rollout to finish: 3 out of 4 new replicas have been updated...
Waiting for deployment "nginx-test" rollout to finish: 3 out of 4 new replicas have been updated...
Waiting for deployment "nginx-test" rollout to finish: 1 old replicas are pending termination...
Waiting for deployment "nginx-test" rollout to finish: 1 old replicas are pending termination...
Waiting for deployment "nginx-test" rollout to finish: 3 of 4 updated replicas are available...
deployment "nginx-test" successfully rolled out
> 查看滚动升级记录
kubectl rollout history deployment nginx-test deployment.apps/nginx-test
REVISION  CHANGE-CAUSE
2         kubectl set image deployments nginx-test nginx=nginx:alpine --record=true
3         kubectl set image deployments nginx-test nginx-test=nginx:alpine --record=true
4         kubectl set image deployments nginx-test nginx-test=nginx:v1.9.1 --record=true
> 查看升级后的版本
kubectl get deployments.apps -o wide
NAME         READY   UP-TO-DATE   AVAILABLE   AGE    CONTAINERS   IMAGES         SELECTOR
nginx-test   2/2     1            2           9m2s   nginx-test   nginx:v1.9.1   app=nginx-test
> 查看更新记录
kubectl rollout history deployment nginx-test
deployment.apps/nginx-test
REVISION  CHANGE-CAUSE
2         kubectl set image deployments nginx-test nginx=nginx:alpine --record=true
3         kubectl set image deployments nginx-test nginx-test=nginx:alpine --record=true
4         kubectl set image deployments nginx-test nginx-test=nginx:v1.9.1 --record=true
> 回滚到上一个版本
kubectl rollout undo deployment nginx-test
deployment.apps/nginx-test rolled back> 回滚到指定版本
kubectl rollout undo deployment nginx-test --to-revision=4 # 4为上边查到的REVISION
deployment.apps/nginx-test rolled back
> deployment 暂停和恢复pod
> deployment暂停功能
> kubectl set -h # 查看帮助命令
> kubectl rollout pause deployment nginx-test # 暂停
> kubectl set resources deployment nginx-test --limits=cpu=200m,memory=512Mi --requests=cpu=100m,memory=256Mi # 配置
> kubectl rollout resume deployment nginx-test # 恢复
> kubectl get pod nginx-test-d7c948bd7-ctllc  -o yaml # 查看cpu 内存大小
5、StatefulSet
5.1、StatefulSet介绍
注意:Statefulset 创建无头服务(headless service),即创建 service 的时候不创建 cluster ip、
通过 ip 地址访问 pod。
StatefulSet:用于管理有状态应用,比如Redis, MySQL
(三)k8s实战-资源调度_青衫落拓客的博客-CSDN博客
k8s之StatefulSet详解-CSDN博客
apiVersion: v1
kind: Namespace
metadata:name: statefulset---
apiVersion: v1
kind: Service
metadata:name: nginx-svc-stsnamespace: statefulsetlabels:app: nginx-svc-sts
spec:ports:- port: 80name: web-portclusterIP: Noneselector:app: nginx-svc-sts---
apiVersion: apps/v1
kind: StatefulSet
metadata:name: webnamespace: statefulset
spec:selector:matchLabels:app: nginx_stsserviceName: "nginx-svc-sts" #声明它属于哪个 Headless Service.replicas: 5 #副本数updateStrategy: # 升级策略rollingUpdate:partition: 2type: RollingUpdatetemplate:metadata:labels:app: nginx_sts # 必须配置 .spec.selector.matchLabelsspec:terminationGracePeriodSeconds: 10 # 删除操作最多宽限多长时间containers:- name: nginximage: nginx:alpineports:- containerPort: 80name: web-port # 暴露端口的名字
应用文件、会发现 statefulset 先创建好 web-0、然后在创建 web-1、在创建 web-2、这就是有序的
5.2、StatefulSet灰度发布
1、灰度发布简介
利用滚动更新中的 partition 属性,可以实现简易的灰度发布的效果 例如我们有 5 个 pod,如果当前
partition 设置为 3,那么此时滚动更新时,只会更新那些 序号 >= 3 的 pod 利用该机制,我们可以通过控制partition 的值,来决定只更新其中一部分 pod,确认没有问题后再主键增大更新的 pod 数量,最终实现全部 pod 更新
2、两种更新策略
- RollingUpdate 滚动更新
- OnDelete 删除更新
kubectl -n dev edit statefulsets.apps web
updateStrategy:rollingUpdate:partition: 2type: RollingUpdate# 例如这里修改成2,更新 >=2的,所以更新web-2,web-3,web-4,默认是0全部更新
updateStrategy:type: OnDelete# 删除pod时才更新
# 1)级联删除:删除 statefulset 时会同时删除 pods
kubectl delete statefulset web# 或 非级联删除:删除 statefulset 时不会删除 pods,删除 sts 后,pods 就没人管了,此时再删除 pod 不会重建的
kubectl delete sts web --cascade=false# 2)删除 service
kubectl delete service nginx# 3)StatefulSet删除后PVC还会保留着,数据不再使用的话也需要删除
kubectl delete pvc www-web-0 www-web-1
5.3、级联删除与非级联删除
- 级联删除(默认),删除sts和pod
- 非级联删除,删除sts时不删除pod,需要加参数–cascade=false
非级联删除sts后,pod变为孤儿pod,删除pod时不会被重建
kubectl delete sts name --cascade=false
6、Daemonset
6.1、daemonset简介
特点: 每个 node 节点上只运行一个容器。比如 flannel 插件、calicao、日志收集程序这些。
- 首先能保证集群内的每一个节点都运行一组相同的 pod;
- 同时还能根据节点的状态保证新加入的节点自动创建对应的 pod;
- 在移除节点的时候,能删除对应的 pod;
- 而且它会跟踪每个 pod 的状态,当这个pod出现异常、Crash 掉了,会及时地去 recovery 这个状态。
kubectl label node node01 ds=true
kubectl label node node02 ds=true
apiVersion: apps/v1
kind: DaemonSet
metadata:name: web-dsnamespace: ds
spec:selector:matchLabels:app: nginx-ds #必须匹配 .spec.template.metadata.labelstemplate:metadata:labels:app: nginx-ds # 必须配置 .spec.selector.matchLabelsspec:nodeSelector: #pod 调度策略--node 节点调度ds: "true" #调度到标签的 key=ds、value=true 的节点上terminationGracePeriodSeconds: 10containers:- name: nginximage: nginx:latestports:- containerPort: 80name: web-ds
6.2、daemonset的更新与回滚
> 以下时默认的ds策略
kubectl -n ds edit daemonsets.apps web-ds updateStrategy:rollingUpdate:maxSurge: 0maxUnavailable: 1type: RollingUpdate # 滚动更新
**Daemonset **更新注意事项:
ds 的策略我们通常使用 Ondelete 集合 nodeSelector 标签的的方式、只更新部分节点做测试, 没问题了在更新其他的节点
kubectl -n ds edit daemonsets.apps web-ds updateStrategy:rollingUpdate:maxSurge: 0maxUnavailable: 1type: OnDelete # 删除更新
7、pod生命周期管理
参考:https://www.cnblogs.com/zhanglianghhh/p/13526153.html
- postStart
- preStop
Kubernetes 支持 postStart 和 preStop 事件。
当一个主容器启动后,Kubernetes 将立即发送 postStart 事件;
在主容器被终结之前,Kubernetes 将发送一个 preStop 事件。
7.1、pod创建过程
Pod是Kubernetes的基础单元,了解其创建的过程,更有助于理解系统的运作。
1、用户通过kubectl或其他API客户端提交Pod Spec给API Server。
2、API Server尝试将Pod对象的相关信息存储到etcd中,等待写入操作完成,API Server返回确认信息到客户端。
3、API Server开始反映etcd中的状态变化。
4、所有的Kubernetes组件通过"watch"机制跟踪检查API Server上的相关信息变动。
5、kube-scheduler(调度器)通过其"watcher"检测到API Server创建了新的Pod对象但是没有绑定到任何工作节点。
6、kube-scheduler为Pod对象挑选一个工作节点并将结果信息更新到API Server。
7、调度结果新消息由API Server更新到etcd,并且API Server也开始反馈该Pod对象的调度结果。
8、Pod被调度到目标工作节点上的kubelet尝试在当前节点上调用docker engine进行启动容器,并将容器的状态结果返回到API Server。
9、API Server将Pod信息存储到etcd系统中。
10、在etcd确认写入操作完成,API Server将确认信息发送到相关的kubelet。
7.2、postStart和preStop
pod删除时先进入 Terminating 状态,同时新pod处于ContainerCreating
Terminating状态持续时间取决于参数:terminationGracePeriodSeconds: 30,默认为30秒,也可通过如下yaml文件中的prestop中的配置观察
poststart和prestop都支持如下三个参数
- exec
- httpGet
- tcpSocket
[root@master ~]# kubectl explain deployment.spec.template.spec.containers.lifecycle.postStart
[root@master ~]# kubectl explain deployment.spec.template.spec.containers.lifecycle.preStopKIND:     Deployment
VERSION:  apps/v1
FIELDS:exec	<Object>One and only one of the following should be specified. Exec specifies theaction to take.httpGet	<Object>HTTPGet specifies the http request to perform.tcpSocket	<Object>TCPSocket specifies an action involving a TCP port. TCP hooks not yetsupported
7.3、yaml文件实例
apiVersion: v1
kind: Namespace
metadata:name: lifecycle---
apiVersion: apps/v1
kind: Deployment
metadata:name: httpdnamespace: lifecycle
spec:replicas: 8strategy:       # rollingUpdate 滚动更新rollingUpdate:maxSurge: 1maxUnavailable: 1type: RollingUpdateselector:matchLabels:app: httpd-testtemplate:metadata:labels:app: httpd-testspec:containers:- name: httpd-testimage: nginx:alpineimagePullPolicy: AlwayslivenessProbe:tcpSocket:port: 80initialDelaySeconds: 5   # 容器启动后30s以后开始探timeoutSeconds: 5         # 探测超时时间readinessProbe:httpGet:scheme: HTTPport: 80path: /lifecycle:		# 启动前/删除前执行的操作postStart:exec:command: ["/bin/sh","-c","echo 'hello world' > /opt/message"]preStop:exec:command: ["/bin/sh","-c","while true;do if [ -z num ];then num = 0;fi;let num=num+1;echo sleep ${num}s >> /opt/message;sleep 1;done"]
验证一个pod创建时和删除时的操作
kubectl -n lifecycle exec httpd-6f4fcd66fb-4bnbf -- tail -f -n 20 /opt/message
hello worldsleep 1s
sleep 2s
...
8、初始化容器-initcontainer
参考:https://www.cnblogs.com/zhanglianghhh/p/13526153.html
初始化容器、在容器启动之前做一些预处理、预判断等初始化操作,比生命周期Prestart好用一些。
Prestart:在容器启动之前做的一些操作,不能保证你容器在EntryPoint (ep) 之前运行。
备注:通过 kubectl get ep 可以查看EntryPoint信息(Pod的ip和端口)
apiVersion: apps/v1
kind: Deployment
metadata:name: sidecarnginx
spec:selector:matchLabels:app: sidecarnginxtemplate:metadata:labels:app: sidecarnginxspec:initContainers: #初始化容器执行完,会下载一个demo4shl.war文件映射到emptyDir{},而主容器也是和spec.volumes里的emptyDir{}进行映射,所以nginx容器的/usr/local/nginx/webapps`目录下会映射demo4shl.war文件- name: getwarimage: nginx:latest #用shell的if语法判断,检测指定资源是否存在,以防重复拉取command: ['sh', '-c', 'if [ ! -f "/app/demo4shl.war" ]; then echo "" >> /app/demo4shl.war; fi']  volumeMounts:- mountPath: /appname: app-volumecontainers:- name: sidecarnginximage: nginx:latestvolumeMounts: #将指定的卷mount到容器指定的位置- mountPath: /opt/name: app-volumeresources:limits:memory: "128Mi"cpu: "500m"ports:- containerPort: 8080volumes: #指的是Pod中的卷- name: app-volumeemptyDir: {} #容器目录是emptyDir{},这个就相当于一个共享卷,是一个临时的目录,生命周期等同于Pod的生命周期
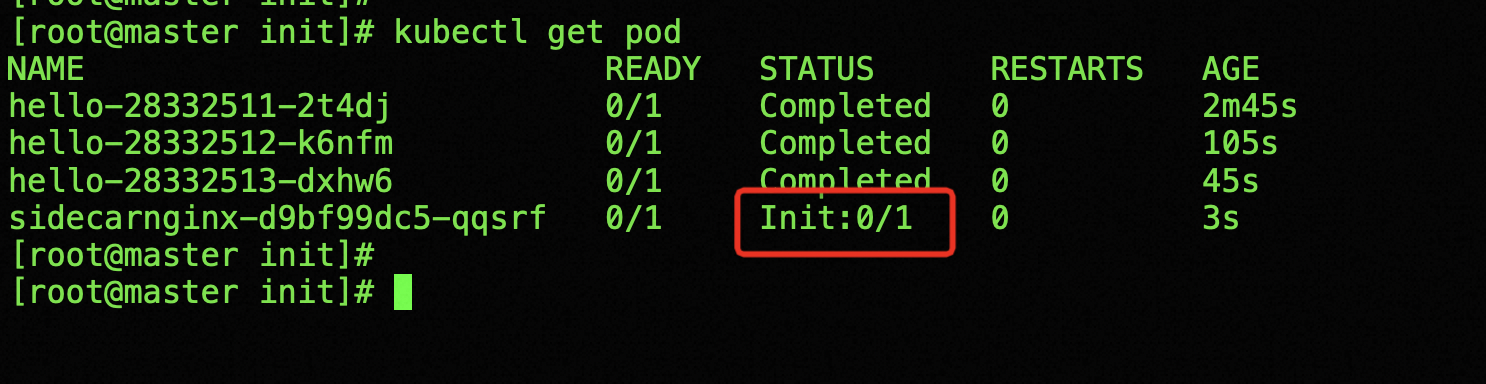
会看到只要initContainer不成功、状态就一直为 init
8、HPA
官方文档:https://kubernetes.io/zh-cn/docs/tasks/run-application/horizontal-pod-autoscale-walkthrough
HorizontalPodAutoscaler(简称HPA)自动更新工作负载资源(例如Deployment和StatefulSet),目的是自动扩缩工作负载以满足需求。
- 水平扩缩:增进/减少pod
- 垂直扩缩:分配更多资源(CPU,内存)给已经负载运行的pod
8.1、实例,运行php-apache服务器并暴露服务
为了演示 HorizontalPodAutoscaler,你将首先启动一个 Deployment 用 hpa-example 镜像运行一个容器, 然后使用以下清单文件将其暴露为一个 服务(Service)
apiVersion: v1
kind: Namespace
metadata:name: hpa---
apiVersion: apps/v1
kind: Deployment
metadata:name: php-apachenamespace: hpa
spec:selector:matchLabels:run: php-apachetemplate:metadata:labels:run: php-apachespec:containers:- name: php-apacheimage: registry.k8s.io/hpa-exampleimagePullPolicy: IfNotPresentports:- containerPort: 80resources:limits:cpu: 500mrequests:cpu: 200m
---
apiVersion: v1
kind: Service
metadata:name: php-apachenamespace: hpalabels:run: php-apache
spec:ports:- port: 80selector:run: php-apache
执行文件
kubectl apply -f php-apache.yaml
8.2、创建HorizontalPodAutoscaler
- –cpu-percent=50
- –min=1
- –max=10
pod的CPU利用率超过50%,增加pod,最小1个,最多10个pod
kubectl -n pha autoscale deployment php-apache --cpu-percent=50 --min=1 --max=10kubectl -n hpa get hpa
NAME         REFERENCE               TARGETS   MINPODS   MAXPODS   REPLICAS   AGE
php-apache   Deployment/php-apache   0%/50%    1         10        1          24m
8.3、增加负载
接下来,看看自动扩缩器如何对增加的负载做出反应。 为此,你将启动一个不同的 Pod 作为客户端。 客户端 Pod 中的容器在无限循环中运行,向 php-apache 服务发送查询。
# 在单独的终端中运行它
# 以便负载生成继续,你可以继续执行其余步骤
kubectl -n hpa run -i --tty load-generator --rm --image=busybox:1.28 --restart=Never -- /bin/sh -c "while sleep 0.01; do wget -q -O- http://php-apache; done"
观察
kubectl -n hpa get horizontalpodautoscalers.autoscaling
或者执行
kubectl -n hpa get hpa
NAME         REFERENCE               TARGETS   MINPODS   MAXPODS   REPLICAS   AGE
php-apache   Deployment/php-apache   36%/50%   1         10        5          30mkubectl -n hpa get deployments.apps --watch
NAME         READY   UP-TO-DATE   AVAILABLE   AGE
php-apache   1/1     1            1           34m
php-apache   1/4     1            1           34m
php-apache   1/4     1            1           34m
php-apache   1/4     1            1           34m
php-apache   1/4     4            1           34m
php-apache   2/4     4            2           34m
php-apache   3/4     4            3           35m
php-apache   4/4     4            4           35m
php-apache   4/5     4            4           35m
php-apache   4/5     4            4           35m
php-apache   4/5     4            4           35m
php-apache   4/5     5            4           35m
php-apache   5/5     5            5           35mkubectl -n hpa get deployments.apps php-apache
NAME         READY   UP-TO-DATE   AVAILABLE   AGE
php-apache   5/5     5            5           40m
8.4、其他指标
略
9、ConfigMap
太简单,没啥好写的
作用:把配置文件和镜像分离、便于修改配置、保持容器的可移植性。
官网:https://kubernetes.io/zh-cn/docs/tasks/configure-pod-container/configure-pod-configmap/
- 基于目录创建 --from-file
- 基于文件 --from-file,–from-env-file
- 根据字面值创建 --from-literal
9.1、示例1,基于文件创建configmap
文件内容
user  nginx;
worker_processes  1;error_log  /var/log/nginx/error.log warn;
pid        /var/run/nginx.pid;events {worker_connections  1024;
}http {include       /etc/nginx/mime.types;default_type  application/octet-stream;log_format  main  '$remote_addr - $remote_user [$time_local] "$request" ''$status $body_bytes_sent "$http_referer" ''"$http_user_agent" "$http_x_forwarded_for"';access_log  /var/log/nginx/access.log  main;sendfile        on;#tcp_nopush     on;keepalive_timeout  65;#gzip  on;#include /etc/nginx/conf.d/*.conf;server {listen                    80;server_name               localhost;root                      /home/wwwroot/test;index                     index.html;
}
}
创建configmap
kubectl create configmap confnginx --from-file=nginx.yaml
添加本地文件映射
> mkdir -p /home/wwwroot/hello
> cd /home/wwwroot/
> cat index.html
hello world
This is 192.168.10.17
> mkdir -p /home/wwwroot/hello
> cd /home/wwwroot/
> cat index.html
hello world
This is 192.168.10.18
创建pod
apiVersion: v1
kind: ReplicationController
metadata:name: nginx-controller
spec:replicas: 2selector:name: nginxtemplate:metadata:labels:name: nginxspec:containers:- name: nginximage: nginx:alpineports:- containerPort: 80volumeMounts:- mountPath: /etc/nginx/nginx.conf	# 容器内路径name: nginx-config	# 上边创建的cmsubPath: nginx.conf- mountPath: /home/wwwroot/testname: nginx-datavolumes:- name: nginx-configconfigMap:name: confnginx- name: nginx-datahostPath:path: /home/wwwroot/hello	# 本地路径
9.2、示例2,定义从文件创建ConfigMap时要用到的键值对
格式如下
kubectl create configmap game-config-3 --from-file=<我的键名>=<文件路径>
game-config-3为configmap名称
例如:
kubectl create configmap game-config-3 --from-file=game-special-key=configure-pod-container/configmap/game.properties
9.3、示例3、根据字面值创建 ConfigMap
你可以将 kubectl create configmap 与 --from-literal 参数一起使用, 通过命令行定义文字值:
kubectl create configmap special-config \--from-literal=special.how=very \--from-literal=special.type=charm
你可以传入多个键值对。命令行中提供的每对键值在 ConfigMap 的 data 部分中均表示为单独的条目。
kubectl get configmaps special-config -o yamlapiVersion: v1
kind: ConfigMap
metadata:creationTimestamp: 2022-02-18T19:14:38Zname: special-confignamespace: defaultresourceVersion: "651"uid: dadce046-d673-11e5-8cd0-68f728db1985
data:special.how: veryspecial.type: charm
9.4、基于文件生成ConfigMap
例如,要基于 configure-pod-container/configmap/game.properties 文件生成一个 ConfigMap:
# 创建包含 ConfigMapGenerator 的 kustomization.yaml 文件
cat <<EOF >./kustomization.yaml
configMapGenerator:
- name: game-config-4		# configmap名称options:labels:game-config: config-4files:- configure-pod-container/configmap/game.properties	# 文件路径
EOF
应用(Apply)kustomization 目录创建 ConfigMap 对象:
kubectl apply -k .
查看
kubectl get configmap
NAME                                DATA   AGE
game-config-4-tbg7c4gc77            1      97skubectl describe configmaps game-config-4-tbg7c4gc77
Name:         game-config-4-tbg7c4gc77
Namespace:    default
Labels:       game-config=config-4
Annotations:  <none>Data
====
game.properties:	# 默认键名为文件名
----
enemies=aliens
lives=3
enemies.cheat=true
enemies.cheat.level=noGoodRotten
secret.code.passphrase=UUDDLRLRBABAS
secret.code.allowed=true
secret.code.lives=30
Events:  <none>
定义从文件生成configmap时要使用的键
# 创建包含 ConfigMapGenerator 的 kustomization.yaml 文件
cat <<EOF >./kustomization2.yaml
configMapGenerator:
- name: game-config-5options:labels:game-config: config-5files:- game-special-key=./game.properties	# 指定键名
EOF
ubectl describe configmaps game-config-5-tfhf8f4fkf
Name:         game-config-5-tfhf8f4fkf
Namespace:    default
Labels:       game-config=config-5
Annotations:  <none>Data
====
game-special-key:
----
enemies=aliens
lives=3
enemies.cheat=true
enemies.cheat.level=noGoodRotten
secret.code.passphrase=UUDDLRLRBABAS
secret.code.allowed=true
secret.code.lives=30
Events:  <none>
9.5、基于字面值生成ConfigMap
---
# 基于字面创建 ConfigMap 的 kustomization.yaml 内容
cat <<EOF >./kustomization2.yaml
configMapGenerator:
- name: special-config-2literals:		# 基于文件,此处为files- special.how=very- special.type=charm
EOF
9.4、其他示例,挂载使用
用 busybox 镜像创建一个 pod 容器通过 volume 挂载的方式引用 cm
基于字面值创建configmap的另一种形式
apiVersion: v1
kind: ConfigMap
metadata:name: special-confignamespace: default
data:SPECIAL_LEVEL: verySPECIAL_TYPE: charm
kubectl apply -f cm.yaml
方式1、通过volume挂载的方式引用cm
apiVersion: v1
kind: Pod
metadata:name: dapi-test-pod
spec:containers:- name: test-containersimage: busybox:latestcommand: ["/bin/sh","-c","sleep 3600"]volumeMounts:- name: config-volumemountPath: /etc/configvolumes:- name: config-volumeconfigMap:name: special-configrestartPolicy: Never
kubectl apply -f busybox.yaml
进入容器内查看引入的configmap变量

方式2、使用 envFrom 将 ConfigMap 的所有数据定义为容器环境变量
apiVersion: v1
kind: Pod
metadata:name: envfrom-busybox
spec:containers:- name: test-containerimage: busybox:latestcommand: ["/bin/sh","-c","env"]envFrom:- configMapRef:name: special-configrestartPolicy: Never
kubectl apply -f envFrom.yaml
kubectl logs -f envfrom-busybox
现在,Pod 的输出包含环境变量 SPECIAL_LEVEL=very 和 SPECIAL_TYPE=charm。