-
返回:OpenCV系列文章目录(持续更新中......)
上一篇:OpenCV使用通用内部函数对代码进行矢量化
下一篇:使用OpenCV4.9的随机生成器和文本
目标
在本教程中,您将学习如何:
- 使用 OpenCV 函数 line() 画一条线
- 使用 OpenCV 函数 ellipse()绘制椭圆
- 使用 OpenCV 函数 rectangle()绘制矩形
- 使用 OpenCV 函数 circle() 画一个圆
- 使用 OpenCV 函数 fillPoly()绘制填充多边形
点
它表示一个二维点,由其图像坐标 \(x\) 和 \(y\) 指定。我们可以将其定义为:
C++:
Point pt;
pt.x = 10;
pt.y = 8;
Java:
Point pt = new Point();
pt.x = 10;
pt.y = 8;
or
C++:
Point pt = Point(10, 8);Java:
Point pt = new Point(10, 8);标量
- 表示一个 4 元素向量。Scalar 类型在 OpenCV 中广泛用于传递像素值。
- 在本教程中,我们将广泛使用它来表示 BGR 颜色值(3 个参数)。如果不打算使用最后一个参数,则无需定义它。
- 让我们看一个例子,如果我们被要求一个颜色参数,我们给出:
-
我们将定义一个 BGR 颜色,例如:蓝色 = a、绿色 = b 和红色 = cScalar( a, b, c )
代码
此代码位于 OpenCV 示例文件夹中。否则你可以从这里下载
C++:
#include <opencv2/core.hpp>
#include <opencv2/imgproc.hpp>
#include <opencv2/highgui.hpp>#define w 400using namespace cv;void MyEllipse( Mat img, double angle );
void MyFilledCircle( Mat img, Point center );
void MyPolygon( Mat img );
void MyLine( Mat img, Point start, Point end );int main( void ){char atom_window[] = "Drawing 1: Atom";char rook_window[] = "Drawing 2: Rook";Mat atom_image = Mat::zeros( w, w, CV_8UC3 );Mat rook_image = Mat::zeros( w, w, CV_8UC3 );MyEllipse( atom_image, 90 );MyEllipse( atom_image, 0 );MyEllipse( atom_image, 45 );MyEllipse( atom_image, -45 );MyFilledCircle( atom_image, Point( w/2, w/2) );MyPolygon( rook_image );rectangle( rook_image,Point( 0, 7*w/8 ),Point( w, w),Scalar( 0, 255, 255 ),FILLED,LINE_8 );MyLine( rook_image, Point( 0, 15*w/16 ), Point( w, 15*w/16 ) );MyLine( rook_image, Point( w/4, 7*w/8 ), Point( w/4, w ) );MyLine( rook_image, Point( w/2, 7*w/8 ), Point( w/2, w ) );MyLine( rook_image, Point( 3*w/4, 7*w/8 ), Point( 3*w/4, w ) );imshow( atom_window, atom_image );moveWindow( atom_window, 0, 200 );imshow( rook_window, rook_image );moveWindow( rook_window, w, 200 );waitKey( 0 );return(0);
}void MyEllipse( Mat img, double angle )
{int thickness = 2;int lineType = 8;ellipse( img,Point( w/2, w/2 ),Size( w/4, w/16 ),angle,0,360,Scalar( 255, 0, 0 ),thickness,lineType );
}void MyFilledCircle( Mat img, Point center )
{circle( img,center,w/32,Scalar( 0, 0, 255 ),FILLED,LINE_8 );
}void MyPolygon( Mat img )
{int lineType = LINE_8;Point rook_points[1][20];rook_points[0][0] = Point( w/4, 7*w/8 );rook_points[0][1] = Point( 3*w/4, 7*w/8 );rook_points[0][2] = Point( 3*w/4, 13*w/16 );rook_points[0][3] = Point( 11*w/16, 13*w/16 );rook_points[0][4] = Point( 19*w/32, 3*w/8 );rook_points[0][5] = Point( 3*w/4, 3*w/8 );rook_points[0][6] = Point( 3*w/4, w/8 );rook_points[0][7] = Point( 26*w/40, w/8 );rook_points[0][8] = Point( 26*w/40, w/4 );rook_points[0][9] = Point( 22*w/40, w/4 );rook_points[0][10] = Point( 22*w/40, w/8 );rook_points[0][11] = Point( 18*w/40, w/8 );rook_points[0][12] = Point( 18*w/40, w/4 );rook_points[0][13] = Point( 14*w/40, w/4 );rook_points[0][14] = Point( 14*w/40, w/8 );rook_points[0][15] = Point( w/4, w/8 );rook_points[0][16] = Point( w/4, 3*w/8 );rook_points[0][17] = Point( 13*w/32, 3*w/8 );rook_points[0][18] = Point( 5*w/16, 13*w/16 );rook_points[0][19] = Point( w/4, 13*w/16 );const Point* ppt[1] = { rook_points[0] };int npt[] = { 20 };fillPoly( img,ppt,npt,1,Scalar( 255, 255, 255 ),lineType );
}void MyLine( Mat img, Point start, Point end )
{int thickness = 2;int lineType = LINE_8;line( img,start,end,Scalar( 0, 0, 0 ),thickness,lineType );
}
Java:
import org.opencv.core.*;
import org.opencv.core.Point;
import org.opencv.highgui.HighGui;
import org.opencv.imgproc.Imgproc;import java.util.*;
import java.util.List;class GeometricDrawingRun{private static final int W = 400;public void run(){String atom_window = "Drawing 1: Atom";String rook_window = "Drawing 2: Rook";Mat atom_image = Mat.zeros( W, W, CvType.CV_8UC3 );Mat rook_image = Mat.zeros( W, W, CvType.CV_8UC3 );MyEllipse( atom_image, 90.0 );MyEllipse( atom_image, 0.0 );MyEllipse( atom_image, 45.0 );MyEllipse( atom_image, -45.0 );MyFilledCircle( atom_image, new Point( W/2, W/2) );MyPolygon( rook_image );Imgproc.rectangle( rook_image,new Point( 0, 7*W/8 ),new Point( W, W),new Scalar( 0, 255, 255 ),-1,8,0 );MyLine( rook_image, new Point( 0, 15*W/16 ), new Point( W, 15*W/16 ) );MyLine( rook_image, new Point( W/4, 7*W/8 ), new Point( W/4, W ) );MyLine( rook_image, new Point( W/2, 7*W/8 ), new Point( W/2, W ) );MyLine( rook_image, new Point( 3*W/4, 7*W/8 ), new Point( 3*W/4, W ) );HighGui.imshow( atom_window, atom_image );HighGui.moveWindow( atom_window, 0, 200 );HighGui.imshow( rook_window, rook_image );HighGui.moveWindow( rook_window, W, 200 );HighGui.waitKey( 0 );System.exit(0);}private void MyEllipse( Mat img, double angle ) {int thickness = 2;int lineType = 8;int shift = 0;Imgproc.ellipse( img,new Point( W/2, W/2 ),new Size( W/4, W/16 ),angle,0.0,360.0,new Scalar( 255, 0, 0 ),thickness,lineType,shift );}private void MyFilledCircle( Mat img, Point center ) {int thickness = -1;int lineType = 8;int shift = 0;Imgproc.circle( img,center,W/32,new Scalar( 0, 0, 255 ),thickness,lineType,shift );}private void MyPolygon( Mat img ) {int lineType = 8;int shift = 0;Point[] rook_points = new Point[20];rook_points[0] = new Point( W/4, 7*W/8 );rook_points[1] = new Point( 3*W/4, 7*W/8 );rook_points[2] = new Point( 3*W/4, 13*W/16 );rook_points[3] = new Point( 11*W/16, 13*W/16 );rook_points[4] = new Point( 19*W/32, 3*W/8 );rook_points[5] = new Point( 3*W/4, 3*W/8 );rook_points[6] = new Point( 3*W/4, W/8 );rook_points[7] = new Point( 26*W/40, W/8 );rook_points[8] = new Point( 26*W/40, W/4 );rook_points[9] = new Point( 22*W/40, W/4 );rook_points[10] = new Point( 22*W/40, W/8 );rook_points[11] = new Point( 18*W/40, W/8 );rook_points[12] = new Point( 18*W/40, W/4 );rook_points[13] = new Point( 14*W/40, W/4 );rook_points[14] = new Point( 14*W/40, W/8 );rook_points[15] = new Point( W/4, W/8 );rook_points[16] = new Point( W/4, 3*W/8 );rook_points[17] = new Point( 13*W/32, 3*W/8 );rook_points[18] = new Point( 5*W/16, 13*W/16 );rook_points[19] = new Point( W/4, 13*W/16 );MatOfPoint matPt = new MatOfPoint();matPt.fromArray(rook_points);List<MatOfPoint> ppt = new ArrayList<MatOfPoint>();ppt.add(matPt);Imgproc.fillPoly(img,ppt,new Scalar( 255, 255, 255 ),lineType,shift,new Point(0,0) );}private void MyLine( Mat img, Point start, Point end ) {int thickness = 2;int lineType = 8;int shift = 0;Imgproc.line( img,start,end,new Scalar( 0, 0, 0 ),thickness,lineType,shift );}
}public class BasicGeometricDrawing {public static void main(String[] args) {// Load the native library.System.loadLibrary(Core.NATIVE_LIBRARY_NAME);new GeometricDrawingRun().run();}
}
Python :
import cv2 as cv
import numpy as npW = 400def my_ellipse(img, angle):thickness = 2line_type = 8cv.ellipse(img,(W // 2, W // 2),(W // 4, W // 16),angle,0,360,(255, 0, 0),thickness,line_type)def my_filled_circle(img, center):thickness = -1line_type = 8cv.circle(img,center,W // 32,(0, 0, 255),thickness,line_type)def my_polygon(img):line_type = 8# Create some pointsppt = np.array([[W / 4, 7 * W / 8], [3 * W / 4, 7 * W / 8],[3 * W / 4, 13 * W / 16], [11 * W / 16, 13 * W / 16],[19 * W / 32, 3 * W / 8], [3 * W / 4, 3 * W / 8],[3 * W / 4, W / 8], [26 * W / 40, W / 8],[26 * W / 40, W / 4], [22 * W / 40, W / 4],[22 * W / 40, W / 8], [18 * W / 40, W / 8],[18 * W / 40, W / 4], [14 * W / 40, W / 4],[14 * W / 40, W / 8], [W / 4, W / 8],[W / 4, 3 * W / 8], [13 * W / 32, 3 * W / 8],[5 * W / 16, 13 * W / 16], [W / 4, 13 * W / 16]], np.int32)ppt = ppt.reshape((-1, 1, 2))cv.fillPoly(img, [ppt], (255, 255, 255), line_type)# Only drawind the lines would be:# cv.polylines(img, [ppt], True, (255, 0, 255), line_type)def my_line(img, start, end):thickness = 2line_type = 8cv.line(img,start,end,(0, 0, 0),thickness,line_type)atom_window = "Drawing 1: Atom"
rook_window = "Drawing 2: Rook"# Create black empty images
size = W, W, 3
atom_image = np.zeros(size, dtype=np.uint8)
rook_image = np.zeros(size, dtype=np.uint8)# 1.a. Creating ellipses
my_ellipse(atom_image, 90)
my_ellipse(atom_image, 0)
my_ellipse(atom_image, 45)
my_ellipse(atom_image, -45)# 1.b. Creating circles
my_filled_circle(atom_image, (W // 2, W // 2))# 2. Draw a rook
# ------------------
# 2.a. Create a convex polygon
my_polygon(rook_image)cv.rectangle(rook_image,(0, 7 * W // 8),(W, W),(0, 255, 255),-1,8)# 2.c. Create a few lines
my_line(rook_image, (0, 15 * W // 16), (W, 15 * W // 16))
my_line(rook_image, (W // 4, 7 * W // 8), (W // 4, W))
my_line(rook_image, (W // 2, 7 * W // 8), (W // 2, W))
my_line(rook_image, (3 * W // 4, 7 * W // 8), (3 * W // 4, W))cv.imshow(atom_window, atom_image)
cv.moveWindow(atom_window, 0, 200)
cv.imshow(rook_window, rook_image)
cv.moveWindow(rook_window, W, 200)cv.waitKey(0)
cv.destroyAllWindows()
解释
由于我们计划绘制两个示例(一个原子和一个车),我们必须创建两个图像和两个窗口来显示它们。
C++:
char atom_window[] = "Drawing 1: Atom";char rook_window[] = "Drawing 2: Rook";Mat atom_image = Mat::zeros( w, w, CV_8UC3 );Mat rook_image = Mat::zeros( w, w, CV_8UC3 );Java:
String atom_window = "Drawing 1: Atom";String rook_window = "Drawing 2: Rook"; Mat atom_image = Mat.zeros( W, W, CvType.CV_8UC3 );Mat rook_image = Mat.zeros( W, W, CvType.CV_8UC3 );Python:
# Windows names
atom_window = "Drawing 1: Atom"
rook_window = "Drawing 2: Rook"# Create black empty images
size = W, W, 3
atom_image = np.zeros(size, dtype=np.uint8)
rook_image = np.zeros(size, dtype=np.uint8)
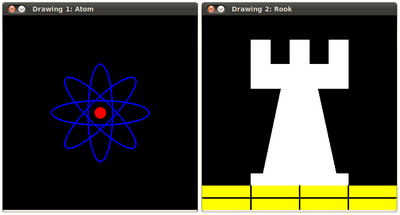
我们创建了函数来绘制不同的几何形状。例如,为了绘制原子,我们使用了 MyEllipse 和 MyFilledCircle:
MyEllipse( atom_image, 90 );MyEllipse( atom_image, 0 );MyEllipse( atom_image, 45 );MyEllipse( atom_image, -45 );MyFilledCircle( atom_image, Point( w/2, w/2) );Java:
MyEllipse( atom_image, 90.0 );MyEllipse( atom_image, 0.0 );MyEllipse( atom_image, 45.0 );MyEllipse( atom_image, -45.0 );MyFilledCircle( atom_image, new Point( W/2, W/2) );Python:
# 1. Draw a simple atom:
# -----------------------# 1.a. Creating ellipses
my_ellipse(atom_image, 90)
my_ellipse(atom_image, 0)
my_ellipse(atom_image, 45)
my_ellipse(atom_image, -45)# 1.b. Creating circles
my_filled_circle(atom_image, (W // 2, W // 2))
为了绘制车,我们使用了 MyLine、矩形和 MyPolygon:
MyPolygon( rook_image );rectangle( rook_image,Point( 0, 7*w/8 ),Point( w, w),Scalar( 0, 255, 255 ),FILLED,LINE_8 );MyLine( rook_image, Point( 0, 15*w/16 ), Point( w, 15*w/16 ) );MyLine( rook_image, Point( w/4, 7*w/8 ), Point( w/4, w ) );MyLine( rook_image, Point( w/2, 7*w/8 ), Point( w/2, w ) );MyLine( rook_image, Point( 3*w/4, 7*w/8 ), Point( 3*w/4, w ) );Java:
MyPolygon( rook_image );Imgproc.rectangle( rook_image,new Point( 0, 7*W/8 ),new Point( W, W),new Scalar( 0, 255, 255 ),-1,8,0 );MyLine( rook_image, new Point( 0, 15*W/16 ), new Point( W, 15*W/16 ) );MyLine( rook_image, new Point( W/4, 7*W/8 ), new Point( W/4, W ) );MyLine( rook_image, new Point( W/2, 7*W/8 ), new Point( W/2, W ) );MyLine( rook_image, new Point( 3*W/4, 7*W/8 ), new Point( 3*W/4, W ) );Python:
# 2. Draw a rook
# ------------------
# 2.a. Create a convex polygon
my_polygon(rook_image)cv.rectangle(rook_image,(0, 7 * W // 8),(W, W),(0, 255, 255),-1,8) # 2.c. Create a few lines
my_line(rook_image, (0, 15 * W // 16), (W, 15 * W // 16))
my_line(rook_image, (W // 4, 7 * W // 8), (W // 4, W))
my_line(rook_image, (W // 2, 7 * W // 8), (W // 2, W))
my_line(rook_image, (3 * W // 4, 7 * W // 8), (3 * W // 4, W))
让我们检查一下这些函数中的每一个都包含什么:
我的线条:
void MyLine( Mat img, Point start, Point end )
{int thickness = 2;int lineType = LINE_8;line( img,start,end,Scalar( 0, 0, 0 ),thickness,lineType );
}
Java:
private void MyLine( Mat img, Point start, Point end ) {int thickness = 2;int lineType = 8;int shift = 0;Imgproc.line( img,start,end,new Scalar( 0, 0, 0 ),thickness,lineType,shift );}
Python:
def my_line(img, start, end):thickness = 2line_type = 8cv.line(img,start,end,(0, 0, 0),thickness,line_type)- 正如我们所看到的,MyLine 只需调用函数 line() ,它执行以下操作:
- 从点起点到点终点画一条线
- 该线显示在图像 img 中
- 线条颜色由 ( 0, 0, 0 ) 定义,它是与黑色相对应的 RGB 值
- 线条粗细设置为粗细(在本例中为 2)
- 该线是 8 连接的线 (lineType = 8)
MyEllipse(椭圆)
void MyEllipse( Mat img, double angle )
{int thickness = 2;int lineType = 8;ellipse( img,Point( w/2, w/2 ),Size( w/4, w/16 ),angle,0,360,Scalar( 255, 0, 0 ),thickness,lineType );
}
Java:
private void MyEllipse( Mat img, double angle ) {int thickness = 2;int lineType = 8;int shift = 0;Imgproc.ellipse( img,new Point( W/2, W/2 ),new Size( W/4, W/16 ),angle,0.0,360.0,new Scalar( 255, 0, 0 ),thickness,lineType,shift );}Python:
def my_ellipse(img, angle):thickness = 2line_type = 8cv.ellipse(img,(W // 2, W // 2),(W // 4, W // 16),angle,0,360,(255, 0, 0),thickness,line_type)- 从上面的代码中,我们可以观察到函数 ellipse() 绘制一个椭圆,使得:
- 椭圆显示在图像 img 中
- 椭圆中心位于点 (w/2, w/2) 中,并封闭在大小为 (w/4, w/16) 的盒子中
- 椭圆是旋转角度度数
- 椭圆在 0 到 360 度之间延伸一条弧线
- 图形的颜色将是 ( 255, 0, 0 ),表示 BGR 值中的蓝色。
- 椭圆的厚度为 2。
MyFilledCircle(圆)
void MyFilledCircle( Mat img, Point center )
{circle( img,center,w/32,Scalar( 0, 0, 255 ),FILLED,LINE_8 );
}
Java:
private void MyFilledCircle( Mat img, Point center ) {int thickness = -1;int lineType = 8;int shift = 0;Imgproc.circle( img,center,W/32,new Scalar( 0, 0, 255 ),thickness,lineType,shift );}Python:
def my_filled_circle(img, center):thickness = -1line_type = 8cv.circle(img,center,W // 32,(0, 0, 255),thickness,line_type)- 与椭圆函数类似,我们可以观察到 circle 接收为参数:
- 将显示圆圈的图像(img)
- 圆的中心表示为点中心
- 圆的半径:w/32
- 圆圈的颜色:( 0, 0, 255 ) 在 BGR 中表示红色
- 由于厚度 = -1,因此圆将被绘制填充。
MyPolygon
void MyPolygon( Mat img )
{int lineType = LINE_8;Point rook_points[1][20];rook_points[0][0] = Point( w/4, 7*w/8 );rook_points[0][1] = Point( 3*w/4, 7*w/8 );rook_points[0][2] = Point( 3*w/4, 13*w/16 );rook_points[0][3] = Point( 11*w/16, 13*w/16 );rook_points[0][4] = Point( 19*w/32, 3*w/8 );rook_points[0][5] = Point( 3*w/4, 3*w/8 );rook_points[0][6] = Point( 3*w/4, w/8 );rook_points[0][7] = Point( 26*w/40, w/8 );rook_points[0][8] = Point( 26*w/40, w/4 );rook_points[0][9] = Point( 22*w/40, w/4 );rook_points[0][10] = Point( 22*w/40, w/8 );rook_points[0][11] = Point( 18*w/40, w/8 );rook_points[0][12] = Point( 18*w/40, w/4 );rook_points[0][13] = Point( 14*w/40, w/4 );rook_points[0][14] = Point( 14*w/40, w/8 );rook_points[0][15] = Point( w/4, w/8 );rook_points[0][16] = Point( w/4, 3*w/8 );rook_points[0][17] = Point( 13*w/32, 3*w/8 );rook_points[0][18] = Point( 5*w/16, 13*w/16 );rook_points[0][19] = Point( w/4, 13*w/16 );const Point* ppt[1] = { rook_points[0] };int npt[] = { 20 };fillPoly( img,ppt,npt,1,Scalar( 255, 255, 255 ),lineType );
}
Java:
private void MyPolygon( Mat img ) {int lineType = 8;int shift = 0;Point[] rook_points = new Point[20];rook_points[0] = new Point( W/4, 7*W/8 );rook_points[1] = new Point( 3*W/4, 7*W/8 );rook_points[2] = new Point( 3*W/4, 13*W/16 );rook_points[3] = new Point( 11*W/16, 13*W/16 );rook_points[4] = new Point( 19*W/32, 3*W/8 );rook_points[5] = new Point( 3*W/4, 3*W/8 );rook_points[6] = new Point( 3*W/4, W/8 );rook_points[7] = new Point( 26*W/40, W/8 );rook_points[8] = new Point( 26*W/40, W/4 );rook_points[9] = new Point( 22*W/40, W/4 );rook_points[10] = new Point( 22*W/40, W/8 );rook_points[11] = new Point( 18*W/40, W/8 );rook_points[12] = new Point( 18*W/40, W/4 );rook_points[13] = new Point( 14*W/40, W/4 );rook_points[14] = new Point( 14*W/40, W/8 );rook_points[15] = new Point( W/4, W/8 );rook_points[16] = new Point( W/4, 3*W/8 );rook_points[17] = new Point( 13*W/32, 3*W/8 );rook_points[18] = new Point( 5*W/16, 13*W/16 );rook_points[19] = new Point( W/4, 13*W/16 );MatOfPoint matPt = new MatOfPoint();matPt.fromArray(rook_points);List<MatOfPoint> ppt = new ArrayList<MatOfPoint>();ppt.add(matPt);Imgproc.fillPoly(img,ppt,new Scalar( 255, 255, 255 ),lineType,shift,new Point(0,0) );}Python:
def my_polygon(img):line_type = 8# Create some pointsppt = np.array([[W / 4, 7 * W / 8], [3 * W / 4, 7 * W / 8],[3 * W / 4, 13 * W / 16], [11 * W / 16, 13 * W / 16],[19 * W / 32, 3 * W / 8], [3 * W / 4, 3 * W / 8],[3 * W / 4, W / 8], [26 * W / 40, W / 8],[26 * W / 40, W / 4], [22 * W / 40, W / 4],[22 * W / 40, W / 8], [18 * W / 40, W / 8],[18 * W / 40, W / 4], [14 * W / 40, W / 4],[14 * W / 40, W / 8], [W / 4, W / 8],[W / 4, 3 * W / 8], [13 * W / 32, 3 * W / 8],[5 * W / 16, 13 * W / 16], [W / 4, 13 * W / 16]], np.int32)ppt = ppt.reshape((-1, 1, 2))cv.fillPoly(img, [ppt], (255, 255, 255), line_type)# Only drawind the lines would be:# cv.polylines(img, [ppt], True, (255, 0, 255), line_type)- 为了绘制一个填充的多边形,我们使用函数 fillPoly() 。我们注意到:
- 多边形将在 img 上绘制
- 多边形的顶点是 ppt 中的点集
- 多边形的颜色由 ( 255, 255, 255 ) 定义,这是白色的 BGR 值
矩形
rectangle( rook_image,Point( 0, 7*w/8 ),Point( w, w),Scalar( 0, 255, 255 ),FILLED,LINE_8 );Java:
Imgproc.rectangle( rook_image,new Point( 0, 7*W/8 ),new Point( W, W),new Scalar( 0, 255, 255 ),-1,8,0 );Python:
# 2.b. Creating rectangles
cv.rectangle(rook_image,(0, 7 * W // 8),(W, W),(0, 255, 255),-1,8)- 最后,我们有了cv::rectangle函数(我们没有为这个家伙创建一个特殊函数)。我们注意到:
- 矩形将绘制在rook_image
- 矩形的两个相对顶点由 ( 0, 7*w/8 ) 和 ( w, w ) 定义
- 矩形的颜色由 ( 0, 255, 255 ) 给出,它是黄色的 BGR 值
- 由于厚度值由 FILLED (-1) 给出,因此矩形将被填充。
结果
编译和运行程序应该会得到这样的结果:






![[BT]BUUCTF刷题第13天(4.1)](https://img-blog.csdnimg.cn/direct/ec814b81531c41e893cba457b535895c.png)
