文章目录
- 今日内容
- 1 搭建es环境
- 1.1 拉取es镜像
- 1.2 创建容器
- 1.3 配置中文分词器ik
- 1.4 测试
- 2 app文章搜索
- 2.1 需求说明
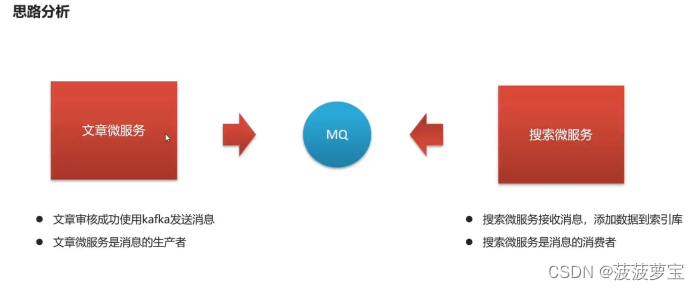
- 2.2 思路分析
- 2.3 创建索引和映射
- 2.3.1 PUT请求添加映射
- 2.3.2 其他操作
- 2.4 初始化索引库数据
- 2.4.1 导入es-init
- 2.4.2 es-init配置
- 2.4.3 导入数据
- 2.4.4 查询已导入的文档
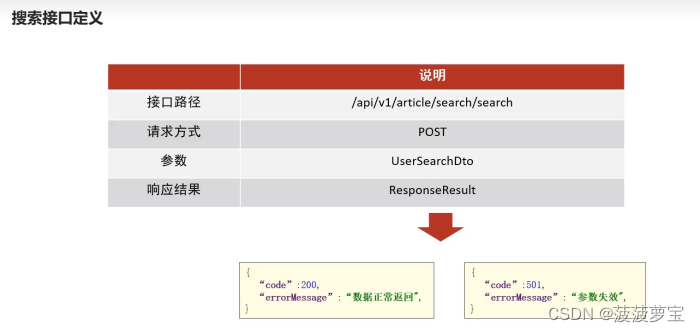
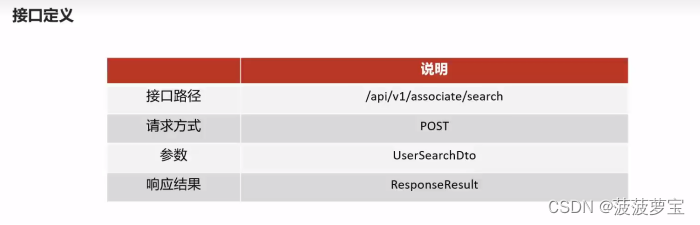
- 2.5 接口定义
- 2.5.1 UserSearchDto
- 2.6 app端文章搜索项目准备
- 2.6.1 导入heima-leadnews-search
- 2.6.2 导入依赖
- 2.6.3 导入配置
- 2.7 实现app端文章搜索
- 2.7.1 Controller接口定义
- 2.7.2 业务层
- 2.7.3 为app端文章搜索添加网关
- 2.7.3 测试
- 3 新增文章创建索引
- 3.1 思路分析
- 3.2 SearchArticleVo
- 3.3 创建kafka的topic
- 3.3 修改文章微服务配置
- 3.4 静态文件路径生成后文章生产通知
- 3.5 搜索微服务监听消息
- 3.5.1 修改搜索微服务配置
- 3.5.2 定义监听消息
- 3.6 综合测试
- 4 app端搜索-保存搜索记录
- 4.1 需求说明
- 4.2 安装mongoDB
- 4.2.1 拉取镜像
- 4.2.2 创建容器
- 4.2.3 本地连接mongodb
- 4.3 SpringBoot集成mongoDB
- 4.3.1 导入资料中的mongo-demo
- 4.3.2 导入依赖
- 4.3.3. 配置mongoDB
- 4.3.4 添加表映射
- 4.3.5 核心方法
- 4.3.5.1 保存
- 4.3.5.2 查询
- 4.3.5.3 条件查询
- 4.3.5.4 删除
- 4.4 保存搜索记录
- 4.4.1 实现思路
- 4.4.2 为搜索微服务添加mongoDB
- 4.4.3 在nacos中配置mongoDB
- 4.4.4 运行sql脚本
- 4.4.5 导入对应的表的实体类
- 4.4.6 Service
- 4.4.7 过滤器解析token获取id放入头部,拦截器将id存入线程
- 4.4.8 Search微服务也采用这样的方法
- 4.4.9 异步调用保存搜索记录
- 4.5 测试
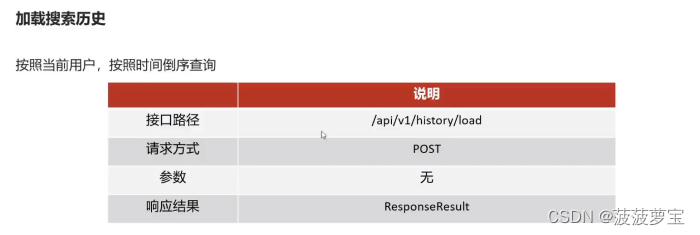
- 5 app端搜索-加载搜索历史
- 5.1 接口
- 5.2 Controller
- 5.3 Service
- 5.4 测试
- 6 app端搜索-删除搜索历史
- 6.1 接口
- 6.2 Dto
- 6.3 Controller
- 6.4 Service
- 6.5 测试
- 7 app端搜索-关键字联想功能
- 7.1 需求分析
- 7.2 接口定义
- 7.3 自动补全py插件
- 7.4 自定义分词器
今日内容

1 搭建es环境
1.1 拉取es镜像
docker pull elasticsearch:7.4.0
1.2 创建容器
docker run -id \
--name es -d --restart=always \
-p 9200:9200 \
-p 9300:9300 \
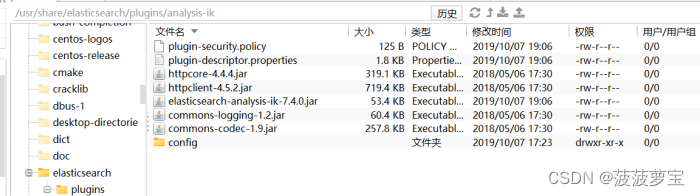
-v /usr/share/elasticsearch/plugins:/usr/share/elasticsearch/plugins \
-e "discovery.type=single-node" \
elasticsearch:7.4.0
1.3 配置中文分词器ik
把资料中的elasticsearch-analysis-ik-7.4.0.zip上传到服务器上,放到对应目录(plugins)解压
#切换目录
cd /usr/share/elasticsearch/plugins
#新建目录
mkdir analysis-ik
cd analysis-ik
#root根目录中拷贝文件
mv elasticsearch-analysis-ik-7.4.0.zip /usr/share/elasticsearch/plugins/analysis-ik
#解压文件
cd /usr/share/elasticsearch/plugins/analysis-ik
unzip elasticsearch-analysis-ik-7.4.0.zip
并且重启当前es容器
docker restart es
1.4 测试
发送post请求 192.168.204.129:9200/_analyze
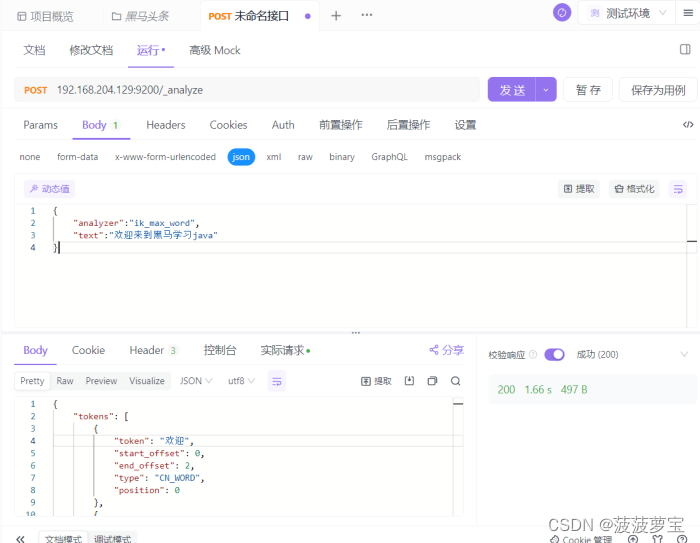
{"analyzer":"ik_max_word","text":"欢迎来到黑马学习java"
}
返回
{"tokens": [{"token": "欢迎","start_offset": 0,"end_offset": 2,"type": "CN_WORD","position": 0},{"token": "迎来","start_offset": 1,"end_offset": 3,"type": "CN_WORD","position": 1},{"token": "来到","start_offset": 2,"end_offset": 4,"type": "CN_WORD","position": 2},{"token": "黑马","start_offset": 4,"end_offset": 6,"type": "CN_WORD","position": 3},{"token": "学习","start_offset": 6,"end_offset": 8,"type": "CN_WORD","position": 4},{"token": "java","start_offset": 8,"end_offset": 12,"type": "ENGLISH","position": 5}]
}
2 app文章搜索
2.1 需求说明

2.2 思路分析


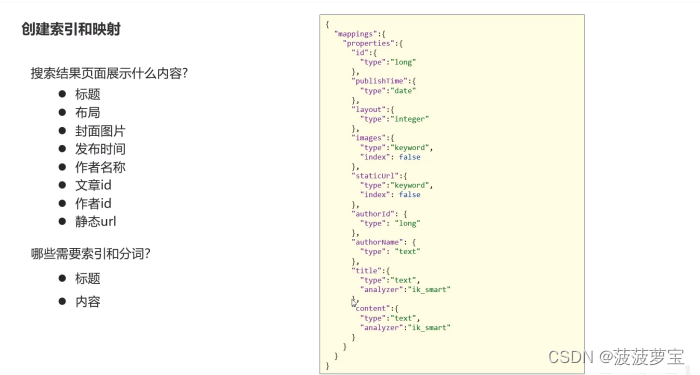
2.3 创建索引和映射
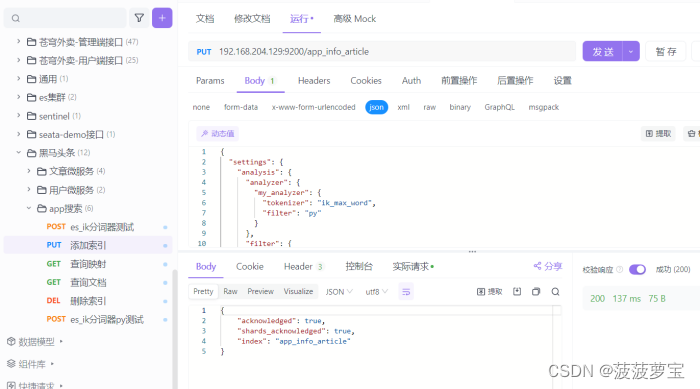
2.3.1 PUT请求添加映射
PUT请求:192.168.204.129:9200/app_info_article
请求体设置映射
{"mappings":{"properties":{"id":{"type":"long"},"publishTime":{"type":"date"},"layout":{"type":"integer"},"images":{"type":"keyword","index": false},"staticUrl":{"type":"keyword","index": false},"authorId": {"type": "long"},"authorName": {"type": "text"},"title":{"type":"text","analyzer":"ik_smart"},"content":{"type":"text","analyzer":"ik_smart"}}}
}
返回:
{"acknowledged": true,"shards_acknowledged": true,"index": "app_info_article"
}
2.3.2 其他操作
GET请求查询映射:192.168.204.129:9200/app_info_article
{"app_info_article": {"aliases": {},"mappings": {"properties": {"authorId": {"type": "long"},"authorName": {"type": "text"},"content": {"type": "text","analyzer": "ik_smart"},"id": {"type": "long"},"images": {"type": "keyword","index": false},"layout": {"type": "integer"},"publishTime": {"type": "date"},"staticUrl": {"type": "keyword","index": false},"title": {"type": "text","analyzer": "ik_smart"}}},"settings": {"index": {"creation_date": "1712574364409","number_of_shards": "1","number_of_replicas": "1","uuid": "IPlVoSqUSOm5dRBfJmaV_A","version": {"created": "7040099"},"provided_name": "app_info_article"}}}
}
DELETE请求,删除索引及映射:192.168.204.129:9200/app_info_article
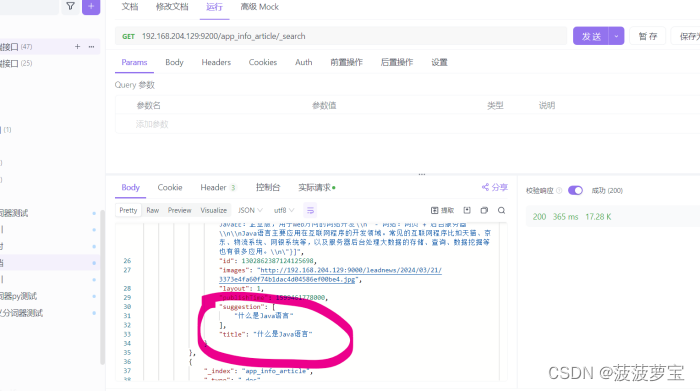
GET请求,查询所有文档:192.168.204.129:9200/app_info_article/_search
2.4 初始化索引库数据
2.4.1 导入es-init
将es-init导入heima-leadnews-testk模块中
将其引入heima-leadnews-testk模块的pom文件中
<modules><module>freemarker-demo</module><module>minio-demo</module><module>tess4j-demo</module><module>kafka-demo</module><module>es-init</module>
</modules>
2.4.2 es-init配置
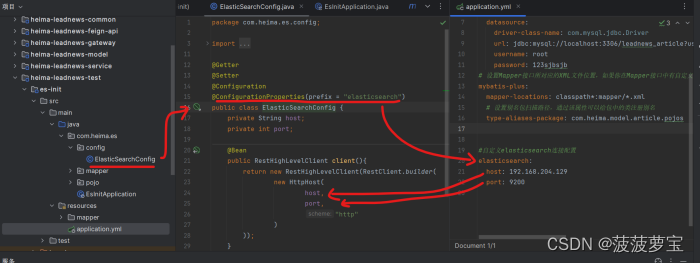
通过配置类进行RestHighLevelClient的初始化
2.4.3 导入数据
在com.heima.es.ApArticleTest中编写测试方法导入数据
先创建BulkRequest,在把一条条数据组成IndexRequest再放到BulkRequest中,在用RestHighLevelClient的bulk方法批量添加
@SpringBootTest
@RunWith(SpringRunner.class)
public class ApArticleTest {@Autowiredprivate ApArticleMapper apArticleMapper;@Autowiredprivate RestHighLevelClient restHighLevelClient;/*** 注意:数据量的导入,如果数据量过大,需要分页导入* @throws Exception*/@Testpublic void init() throws Exception {//1. 查询文章列表List<SearchArticleVo> searchArticleVos = apArticleMapper.loadArticleList();//2. 将数据导入到es中BulkRequest bulkRequest = new BulkRequest("app_info_article");for(SearchArticleVo searchArticleVo : searchArticleVos){IndexRequest indexRequest = new IndexRequest().id(searchArticleVo.getId().toString()).source(JSON.toJSONString(searchArticleVo), XContentType.JSON);//添加到批量请求中bulkRequest.add(indexRequest);}restHighLevelClient.bulk(bulkRequest, RequestOptions.DEFAULT);}
}
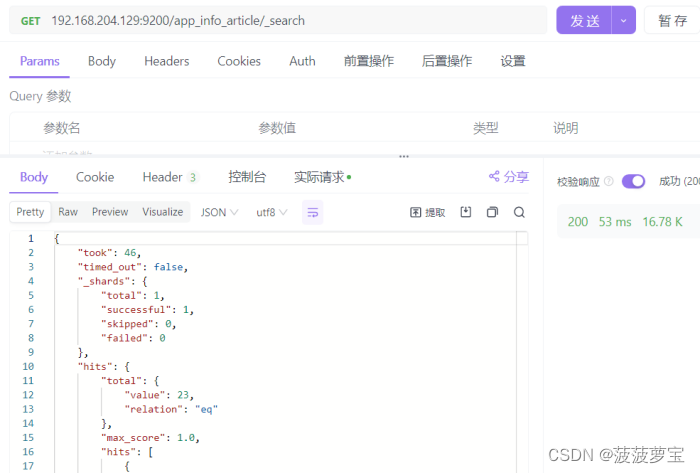
2.4.4 查询已导入的文档
GET请求,查询所有文档:192.168.204.129:9200/app_info_article/_search,有23条数据
2.5 接口定义
2.5.1 UserSearchDto
@Data
public class UserSearchDto {/*** 搜索关键字*/String searchWords;/*** 当前页*/int pageNum;/*** 分页条数*/int pageSize;/*** 最小时间*/Date minBehotTime;public int getFromIndex(){if(this.pageNum<1)return 0;if(this.pageSize<1) this.pageSize = 10;return this.pageSize * (pageNum-1);}
}
2.6 app端文章搜索项目准备
2.6.1 导入heima-leadnews-search
导入heima-leadnews-search到heima-leadnews-service中
引入heima-leadnews-search到pom文件中
2.6.2 导入依赖
在heima-leadnews-service的pom中添加依赖
<!--elasticsearch-->
<dependency><groupId>org.elasticsearch.client</groupId><artifactId>elasticsearch-rest-high-level-client</artifactId><version>7.4.0</version>
</dependency>
<dependency><groupId>org.elasticsearch.client</groupId><artifactId>elasticsearch-rest-client</artifactId><version>7.4.0</version>
</dependency>
<dependency><groupId>org.elasticsearch</groupId><artifactId>elasticsearch</artifactId><version>7.4.0</version>
</dependency>
2.6.3 导入配置
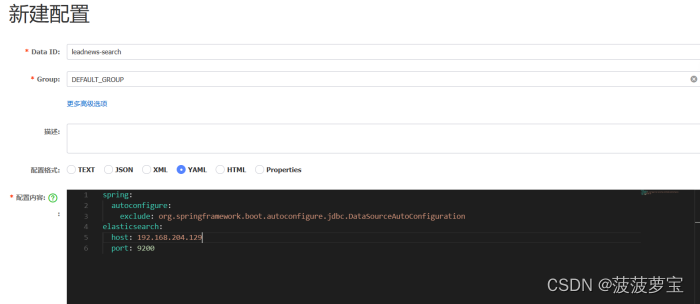
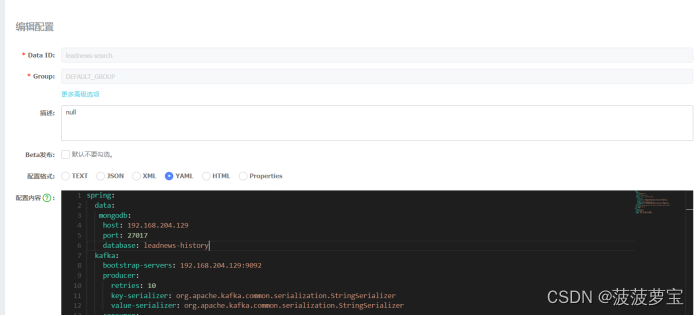
server:port: 51804
spring:application:name: leadnews-searchcloud:nacos:discovery:server-addr: 192.168.204.129:8848config:server-addr: 192.168.204.129:8848file-extension: yml
这里并没有数据库相关配置,需要在nacos配置,在nacos中创建leadnews-search
因为暂时不需要数据库,所以取消掉DataSourceAutoConfiguration自动配置类
spring:autoconfigure:exclude: org.springframework.boot.autoconfigure.jdbc.DataSourceAutoConfiguration
elasticsearch:host: 192.168.204.129port: 9200
minio:accessKey: miniosecretKey: minio123bucket: leadnewsendpoint: http://192.168.204.129:9000readPath: http://192.168.204.129:9000
2.7 实现app端文章搜索
2.7.1 Controller接口定义
创建com.heima.search.controller.v1.ArticleSearchController
@RestController
@RequestMapping("/api/v1/article/search")
public class ArticleSearchController {@Autowiredprivate ArticleSearchService articleSearchService;@PostMapping("/search")public ResponseResult search(@RequestBody UserSearchDto userSearchDto) {return articleSearchService.search(userSearchDto);}
}
2.7.2 业务层
创建com.heima.search.service.ArticleSearchService接口
public interface ArticleSearchService {ResponseResult search(UserSearchDto userSearchDto);
}
实现
@Service
@Slf4j
public class ArticleSearchServiceImpl implements ArticleSearchService  {@Autowiredprivate RestHighLevelClient restHighLevelClient;@Overridepublic ResponseResult search(UserSearchDto userSearchDto) {//1. 检查参数if(userSearchDto == null|| StringUtils.isBlank(userSearchDto.getSearchWords())){return ResponseResult.errorResult(AppHttpCodeEnum.PARAM_INVALID,"参数不合法");}//2. 设置查询条件SearchRequest searchRequest = new SearchRequest("app_info_article");SearchSourceBuilder searchSourceBuilder = new SearchSourceBuilder();//复合查询需要使用boolQueryBoolQueryBuilder boolQueryBuilder = QueryBuilders.boolQuery();//2.1 关键词的分词之查询QueryStringQueryBuilder queryStringQueryBuilder = QueryBuilders.queryStringQuery(userSearchDto.getSearchWords()).field("title").field("content").defaultOperator(Operator.OR);boolQueryBuilder.must(queryStringQueryBuilder);//2.2 查询小于mindate的数据RangeQueryBuilder publishTime = QueryBuilders.rangeQuery("publishTime").lt(userSearchDto.getMinBehotTime().getTime());boolQueryBuilder.filter(publishTime);//2.3 分页查询searchSourceBuilder.from(0).size(userSearchDto.getPageSize());//2.4 按照时间倒序排序searchSourceBuilder.sort("publishTime", SortOrder.DESC);//2.5 设置高亮显示titleHighlightBuilder highlightBuilder = new HighlightBuilder();highlightBuilder.field("title");highlightBuilder.preTags("<font style='color: red; font-size: inherit;'>");highlightBuilder.postTags("</font>");searchSourceBuilder.highlighter(highlightBuilder);//2.6 查询searchSourceBuilder.query(boolQueryBuilder);searchRequest.source(searchSourceBuilder);try {SearchResponse response = restHighLevelClient.search(searchRequest, RequestOptions.DEFAULT);//3. 结果封装List<Map> list= new ArrayList<>();SearchHits searchHits= response.getHits();SearchHit[] hits = searchHits.getHits();for (SearchHit hit : hits) {//3.1 获取sourceString json= hit.getSourceAsString();Map map = JSON.parseObject(json, Map.class);//3.2 获取高亮数据Map<String, HighlightField> highlightFields = hit.getHighlightFields();if(!CollectionUtils.isEmpty(highlightFields)){HighlightField highlightField = highlightFields.get("title");if(highlightField!=null){//3.3 拿到所有高亮数据Text[] titles = hit.getHighlightFields().get("title").getFragments();String title = StringUtils.join(titles);map.put("h_title",title);}else{map.put("h_title",map.get("title"));}}list.add(map);}//4. 返回结果return ResponseResult.okResult(list);} catch (IOException e) {throw new RuntimeException(e);}}
}
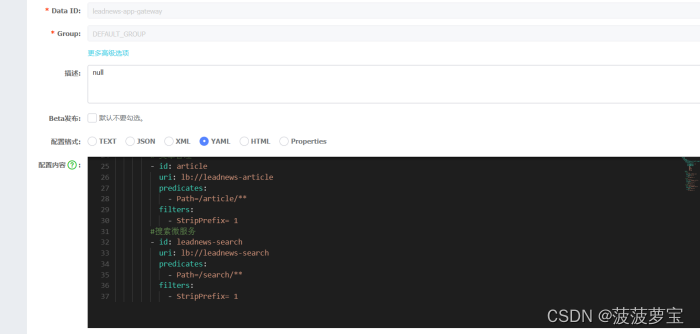
2.7.3 为app端文章搜索添加网关
需要在app的网关中添加搜索微服务的路由配置
#搜索微服务
- id: leadnews-searchuri: lb://leadnews-searchpredicates:- Path=/search/**filters:- StripPrefix= 1
spring:cloud:gateway:globalcors:add-to-simple-url-handler-mapping: truecorsConfigurations:'[/**]':allowedHeaders: "*"allowedOrigins: "*"allowedMethods:- GET- POST- DELETE- PUT- OPTIONroutes:# 用户管理- id: useruri: lb://leadnews-userpredicates:- Path=/user/**filters:- StripPrefix= 1# 文章管理- id: articleuri: lb://leadnews-articlepredicates:- Path=/article/**filters:- StripPrefix= 1#搜索微服务- id: leadnews-searchuri: lb://leadnews-searchpredicates:- Path=/search/**filters:- StripPrefix= 1
2.7.3 测试
启动对应微服务

打开 localhost:8801
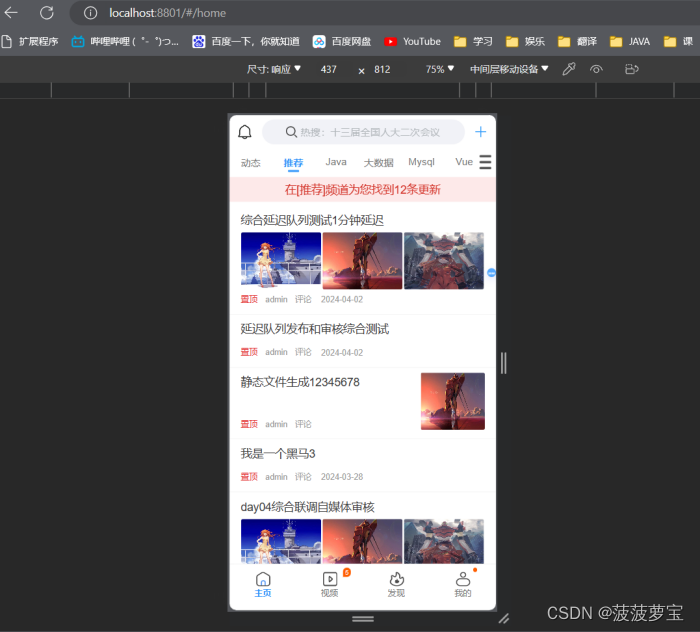
数据显示没有问题,测试成功
3 新增文章创建索引
3.1 思路分析
3.2 SearchArticleVo
文章问微服务需要组装SearchArticleVo给搜索微服务
所以需要先定义SearchArticleVo,创建com.heima.model.search.SearchArticleVo类
@Data
public class SearchArticleVo {// 文章idprivate Long id;// 文章标题private String title;// 文章发布时间private Date publishTime;// 文章布局private Integer layout;// 封面private String images;// 作者idprivate Long authorId;// 作者名词private String authorName;//静态urlprivate String staticUrl;//文章内容private String content;
}
3.3 创建kafka的topic
在com.heima.common.constants.ArticleConstants类中创建新的属性
public class ArticleConstants {public static final Short LOADTYPE_LOAD_MORE = 1;public static final Short LOADTYPE_LOAD_NEW = 2;public static final String DEFAULT_TAG = "__all__";public static final String ARTICLE_ES_INDEX_TOPIC = "article.es.syn.topic";}
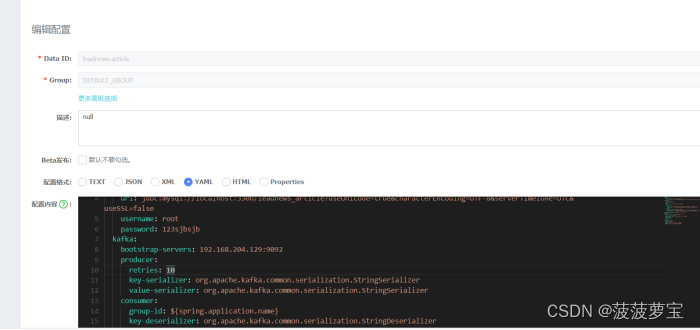
3.3 修改文章微服务配置
因为文章微服务相当于生产者,所以要更新文章微服务的nacos配置
spring:datasource:driver-class-name: com.mysql.jdbc.Driverurl: jdbc:mysql://localhost:3306/leadnews_article?useUnicode=true&characterEncoding=UTF-8&serverTimezone=UTC&useSSL=falseusername: rootpassword: 123sjbsjbkafka:bootstrap-servers: 192.168.204.129:9092producer:retries: 10key-serializer: org.apache.kafka.common.serialization.StringSerializervalue-serializer: org.apache.kafka.common.serialization.StringSerializerconsumer:group-id: ${spring.application.name}key-deserializer: org.apache.kafka.common.serialization.StringDeserializervalue-deserializer: org.apache.kafka.common.serialization.StringDeserializer# 设置Mapper接口所对应的XML文件位置,如果你在Mapper接口中有自定义方法,需要进行该配置
mybatis-plus:mapper-locations: classpath*:mapper/*.xml# 设置别名包扫描路径,通过该属性可以给包中的类注册别名type-aliases-package: com.heima.model.article.pojosglobal-config:datacenter-id: 1workerId: 1
minio:accessKey: miniosecretKey: minio123bucket: leadnewsendpoint: http://192.168.204.129:9000readPath: http://192.168.204.129:9000
3.4 静态文件路径生成后文章生产通知
在com.heima.article.service.impl.ArticleFreemarkerServiceImpl类中
最后生成
//4.把静态页面的路径保存到数据库
apArticleService.update(Wrappers.<ApArticle>lambdaUpdate().eq(ApArticle::getId,apArticle.getId()).set(ApArticle::getStaticUrl,path));//5. 发送消息到kafka,创建es索引
createArticleESIndex(apArticle,content,path);
创建es索引
@Autowired
private KafkaTemplate<String,String> kafkaTemplate;/*** 创建文章索引* @param apArticle* @param content* @param path*/
private void createArticleESIndex(ApArticle apArticle, String content, String path) {SearchArticleVo searchArticleVo = new SearchArticleVo();BeanUtils.copyProperties(apArticle,searchArticleVo);searchArticleVo.setContent(content);searchArticleVo.setStaticUrl(path);kafkaTemplate.send(ArticleConstants.ARTICLE_ES_INDEX_TOPIC, JSON.toJSONString(searchArticleVo));
}
3.5 搜索微服务监听消息
3.5.1 修改搜索微服务配置
搜索微服务作为kafka的消费者,进行nacos配置
spring:autoconfigure:exclude: org.springframework.boot.autoconfigure.jdbc.DataSourceAutoConfigurationkafka:bootstrap-servers: 192.168.204.129:9092consumer:group-id: ${spring.application.name}key-deserializer: org.apache.kafka.common.serialization.StringDeserializervalue-deserializer: org.apache.kafka.common.serialization.StringDeserializer
elasticsearch:host: 192.168.204.129port: 9200
minio:accessKey: miniosecretKey: minio123bucket: leadnewsendpoint: http://192.168.204.129:9000readPath: http://192.168.204.129:9000

3.5.2 定义监听消息
在heima-leadnews-search模块中创建com.heima.search.listen.SyncArticleListener类
@Component
@Slf4j
public class SyncArticleListener {@Autowiredprivate RestHighLevelClient restHighLevelClient;@KafkaListener(topics = ArticleConstants.ARTICLE_ES_INDEX_TOPIC)public void onMessage(String message){if(StringUtils.isNotBlank(message)){log.info("SyncArticleListener,message={}",message);SearchArticleVo searchArticleVo = JSON.parseObject(message, SearchArticleVo.class);IndexRequest indexRequest = new IndexRequest("app_info_article");indexRequest.id(searchArticleVo.getId().toString());indexRequest.source(message, XContentType.JSON);try {restHighLevelClient.index(indexRequest, RequestOptions.DEFAULT);} catch (IOException e) {e.printStackTrace();log.error("sync es error={}",e);}}}
}
3.6 综合测试
启动es、kafka、redis、rabbitmq、minio、nacos、zookeeper

再启动相应启动类

现在app端显示

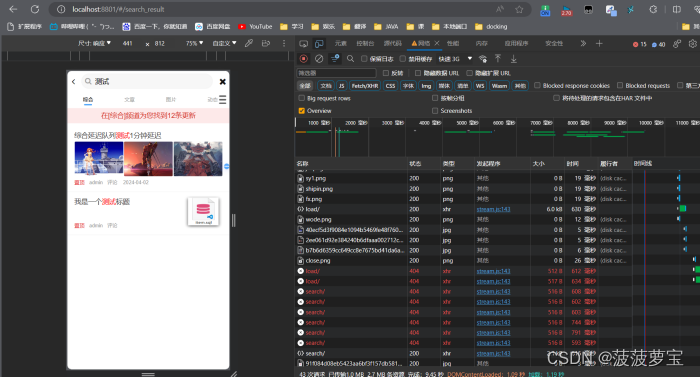
在自媒体端添加测试:黑马测试搜索123
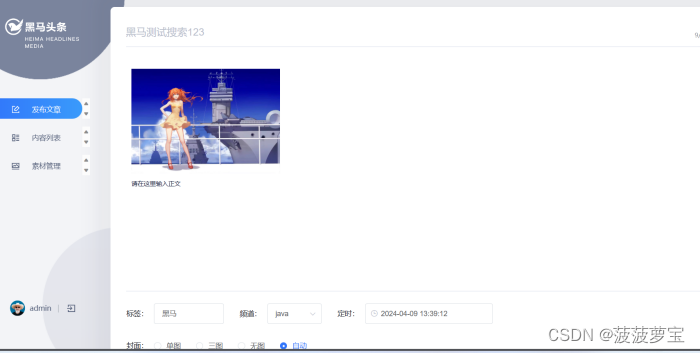
点击发布,自动审核成功
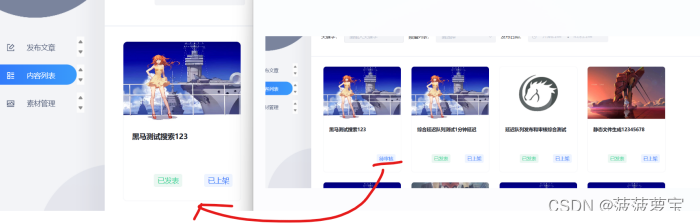
重新加载app端,此时审核已上架的文章已经显示
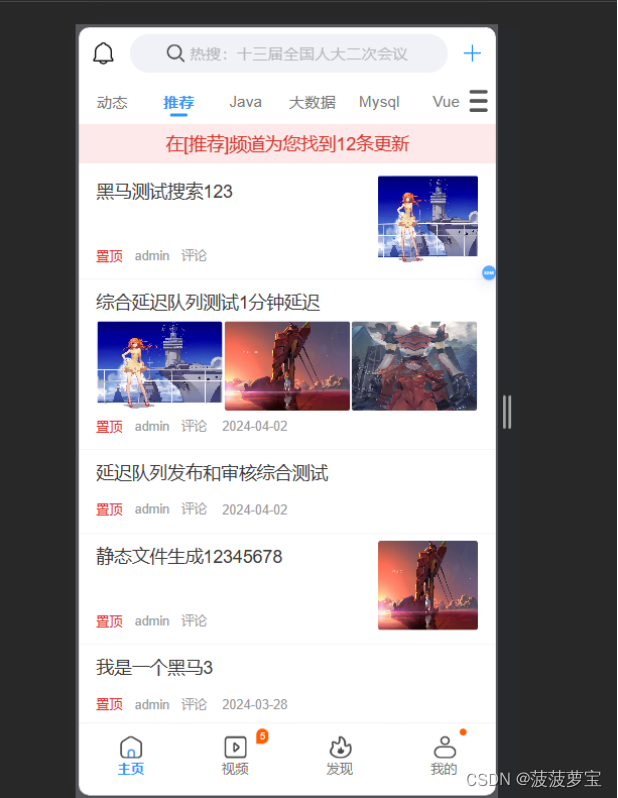
搜索栏中尝试搜搜
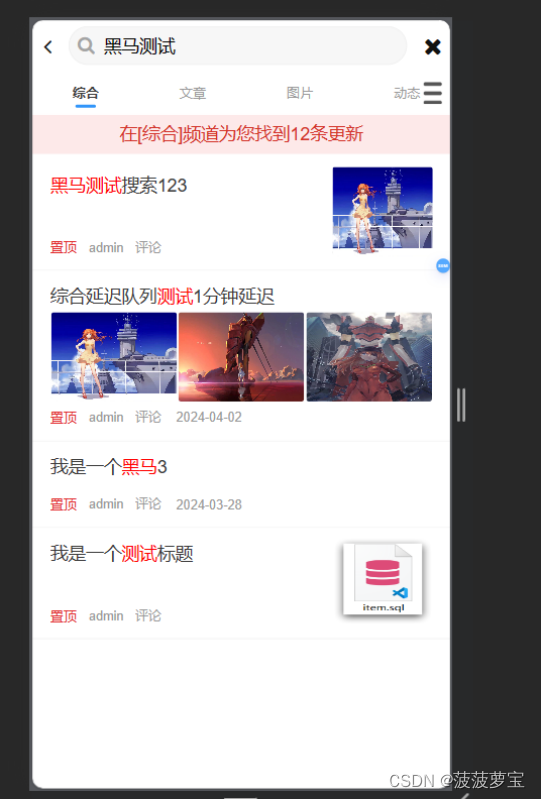
成功搜索到
查看SearchApplication的日志显示
2024-04-09 13:41:44.683 INFO 16292 --- [ntainer#0-0-C-1] c.h.search.listen.SyncArticleListener : SyncArticleListener,message={"authorId":1102,"authorName":"admin","content":"[{\"type\":\"image\",\"value\":\"http://192.168.204.129:9000/leadnews/2024/03/25/40ecf5d3f9084e1094b5469fe48f7603.jpg\"},{\"type\":\"text\",\"value\":\"请在这里输入正文\"}]","id":1777572583391236097,"images":"http://192.168.204.129:9000/leadnews/2024/03/25/40ecf5d3f9084e1094b5469fe48f7603.jpg","publishTime":1712641152000,"staticUrl":"http://192.168.204.129:9000/leadnews/2024/04/09/1777572583391236097.html","title":"黑马测试搜索123"}
说明我们的测试非常成功。
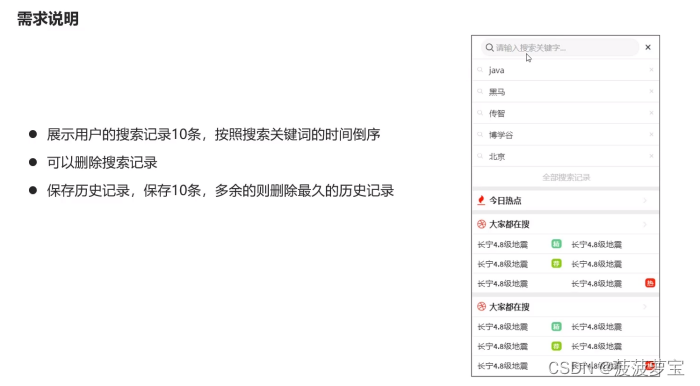
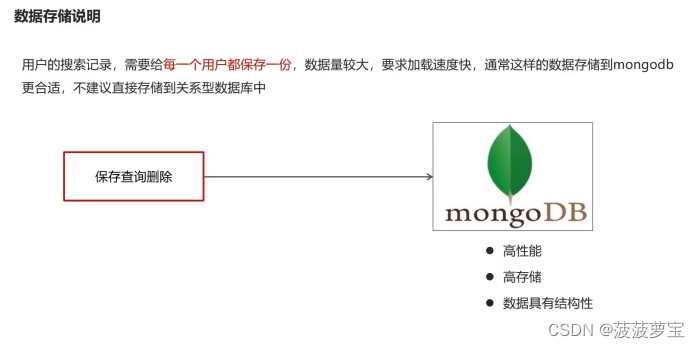
4 app端搜索-保存搜索记录
4.1 需求说明
4.2 安装mongoDB
4.2.1 拉取镜像
docker pull mongo
4.2.2 创建容器
docker run -di --name mongo \
--restart=always \
-p 27017:27017 \
-v ~/data/mongodata:/data mongo
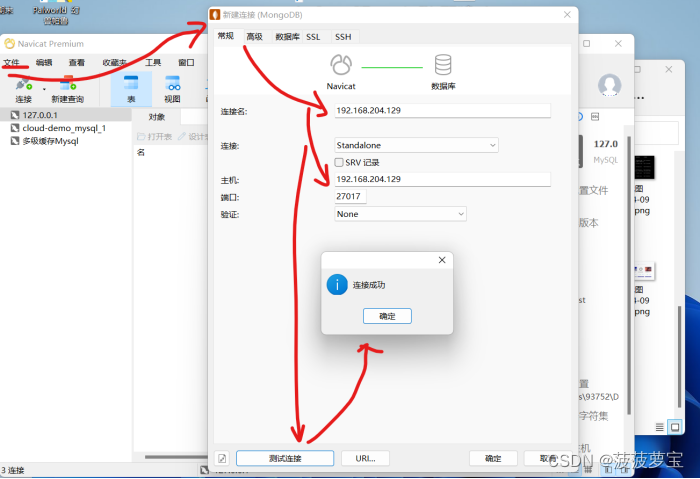
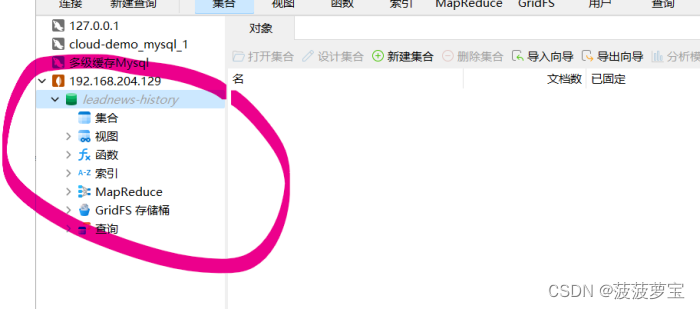
4.2.3 本地连接mongodb
使用navicat,,同时创建leadnews-history数据库
4.3 SpringBoot集成mongoDB
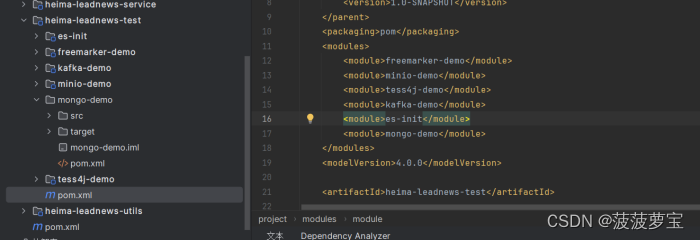
4.3.1 导入资料中的mongo-demo
导入资料中的mongo-demo并将其导入test模块中的pom文件里
4.3.2 导入依赖
<dependency><groupId>org.springframework.boot</groupId><artifactId>spring-boot-starter-data-mongodb</artifactId>
</dependency>
4.3.3. 配置mongoDB
创建application.yaml
server:port: 9998
spring:data:mongodb:host: 192.168.204.129port: 27017database: leadnews-history
4.3.4 添加表映射
@Data
@Document("ap_associate_words")
public class ApAssociateWords implements Serializable {private static final long serialVersionUID = 1L;private String id;/*** 联想词*/private String associateWords;/*** 创建时间*/private Date createdTime;}
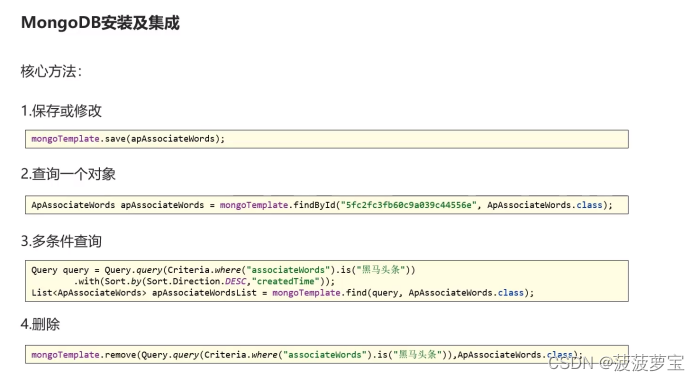
4.3.5 核心方法
com.itheima.mongo.test.MongoTest测试方法
@SpringBootTest(classes = MongoApplication.class)
@RunWith(SpringRunner.class)
public class MongoTest {@Autowiredprivate MongoTemplate mongoTemplate;//保存,会自动创建相应的表结构@Testpublic void saveTest(){ApAssociateWords apAssociateWords = new ApAssociateWords();apAssociateWords.setAssociateWords("黑马头条");apAssociateWords.setCreatedTime(new Date());mongoTemplate.save(apAssociateWords);}//查询一个@Testpublic void saveFindOne(){ApAssociateWords apAssociateWords = mongoTemplate.findById("6614e7011f52f0112ac7df19", ApAssociateWords.class);System.out.println(apAssociateWords);}//条件查询@Testpublic void testQuery(){Query query = Query.query(Criteria.where("associateWords").is("黑马头条")).with(Sort.by(Sort.Direction.DESC,"createdTime"));List<ApAssociateWords> apAssociateWordsList = mongoTemplate.find(query, ApAssociateWords.class);System.out.println(apAssociateWordsList);}//删除@Testpublic void testDel(){mongoTemplate.remove(Query.query(Criteria.where("associateWords").is("黑马头条")),ApAssociateWords.class);}
}
4.3.5.1 保存
//保存
@Test
public void saveTest(){ApAssociateWords apAssociateWords = new ApAssociateWords();apAssociateWords.setAssociateWords("黑马头条");apAssociateWords.setCreatedTime(new Date());mongoTemplate.save(apAssociateWords);
}
4.3.5.2 查询
//查询一个
@Test
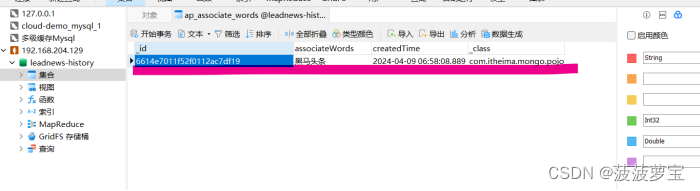
public void saveFindOne(){ApAssociateWords apAssociateWords = mongoTemplate.findById("6614e7011f52f0112ac7df19", ApAssociateWords.class);System.out.println(apAssociateWords);
}
2024-04-09 15:04:51.338  INFO 13360 --- [           main] o.m.d.connection                         : Opened connection [connectionId{localValue:2, serverValue:16}] to 192.168.204.129:27017
[ApAssociateWords(id=6614e7011f52f0112ac7df19, associateWords=黑马头条, createdTime=Tue Apr 09 14:58:08 CST 2024)]
4.3.5.3 条件查询
//条件查询
@Test
public void testQuery(){Query query = Query.query(Criteria.where("associateWords").is("黑马头条")).with(Sort.by(Sort.Direction.DESC,"createdTime"));List<ApAssociateWords> apAssociateWordsList = mongoTemplate.find(query, ApAssociateWords.class);System.out.println(apAssociateWordsList);
}
2024-04-09 15:06:09.968  INFO 13672 --- [           main] o.m.d.connection                         : Opened connection [connectionId{localValue:2, serverValue:18}] to 192.168.204.129:27017
[ApAssociateWords(id=6614e7011f52f0112ac7df19, associateWords=黑马头条, createdTime=Tue Apr 09 14:58:08 CST 2024)]
4.3.5.4 删除
//删除
@Test
public void testDel(){mongoTemplate.remove(Query.query(Criteria.where("associateWords").is("黑马头条")),ApAssociateWords.class);
}
4.4 保存搜索记录
4.4.1 实现思路
4.4.2 为搜索微服务添加mongoDB
为heima-leadnews-search搜索微服务添加mongoDB
<dependency><groupId>org.springframework.boot</groupId><artifactId>spring-boot-starter-data-mongodb</artifactId>
</dependency>
4.4.3 在nacos中配置mongoDB
spring:data:mongodb:host: 192.168.204.129port: 27017database: leadnews-historykafka:bootstrap-servers: 192.168.204.129:9092producer:retries: 10key-serializer: org.apache.kafka.common.serialization.StringSerializervalue-serializer: org.apache.kafka.common.serialization.StringSerializerconsumer:group-id: ${spring.application.name}key-deserializer: org.apache.kafka.common.serialization.StringDeserializervalue-deserializer: org.apache.kafka.common.serialization.StringDeserializerautoconfigure:exclude: org.springframework.boot.autoconfigure.jdbc.DataSourceAutoConfiguration
elasticsearch:host: 192.168.204.129port: 9200
minio:accessKey: miniosecretKey: minio123bucket: leadnewsendpoint: http://192.168.204.129:9000readPath: http://192.168.204.129:9000
4.4.4 运行sql脚本
4.4.5 导入对应的表的实体类
@Data
@Document("ap_user_search")
public class ApUserSearch implements Serializable {private static final long serialVersionUID = 1L;/*** 主键*/private String id;/*** 用户ID*/private Integer userId;/*** 搜索词*/private String keyword;/*** 创建时间*/private Date createdTime;
}
@Data
@Document("ap_associate_words")
public class ApAssociateWords implements Serializable {private static final long serialVersionUID = 1L;private String id;/*** 联想词*/private String associateWords;/*** 创建时间*/private Date createdTime;
}
4.4.6 Service
接口
public interface ApUserSearchService {/*** 保存用户搜索历史记录* @param keyword* @param userId*/void insert(String keyword,Integer userId);
}
实现
@Service
@Slf4j
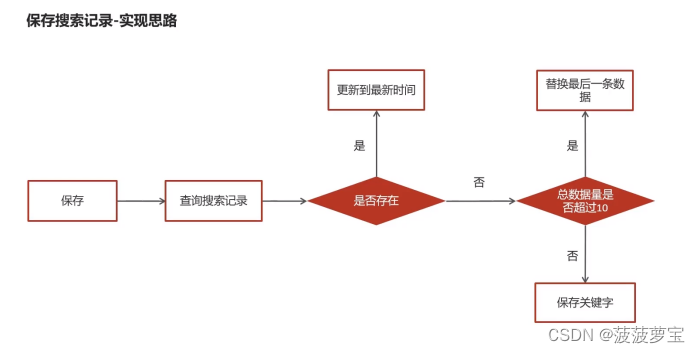
public class ApUserSearchServiceImpl implements ApUserSearchService {@Autowiredprivate MongoTemplate mongoTemplate;@Overridepublic void insert(String keyword, Integer userId) {//1. 查询用户搜索历史记录Query query = Query.query(Criteria.where("userId").is(userId).and("keyword").is(keyword));ApUserSearch apUserSearch = mongoTemplate.findOne(query, ApUserSearch.class);//2. 存在则更新时间if(apUserSearch != null) {apUserSearch.setCreatedTime(new Date());mongoTemplate.save(apUserSearch);return;}//3. 不存在则插入,判断是否超过10条,超过则删除最早的一条long count = mongoTemplate.count(Query.query(Criteria.where("userId").is(userId)), ApUserSearch.class);if(count >= 10) {Query query1 = Query.query(Criteria.where("userId").is(userId)).with(Sort.by(Sort.Order.asc("createdTime"))).limit(1);ApUserSearch apUserSearch1 = mongoTemplate.findOne(query1, ApUserSearch.class);mongoTemplate.remove(apUserSearch1);}else{ApUserSearch apUserSearch1 = new ApUserSearch();apUserSearch1.setUserId(userId);apUserSearch1.setKeyword(keyword);apUserSearch1.setCreatedTime(new Date());mongoTemplate.save(apUserSearch1);}}
}
4.4.7 过滤器解析token获取id放入头部,拦截器将id存入线程
针对每个用户的保存历史记录,需要放在对应的userid下
在gateway网关中通过过滤器fliter解析token获取的jwt令牌获取用户id
@Component
@Slf4j
public class AuthorizeFilter implements Ordered, GlobalFilter {@Overridepublic Mono<Void> filter(ServerWebExchange exchange, GatewayFilterChain chain) {//1.获取Request对象和Response对象ServerHttpRequest request = exchange.getRequest();ServerHttpResponse response = exchange.getResponse();//2.判断当前请求是否为登录请求,如果是,直接放行if (request.getURI().getPath().contains("/login")) {//放行return chain.filter(exchange);}//3.获取当前请求的token信息String token = request.getHeaders().getFirst("token");//4.判断token是否存在if(StringUtils.isBlank(token)) {response.setStatusCode(HttpStatus.UNAUTHORIZED);return response.setComplete();}//5.判断token是否有效//5.1 解析tokentry{Claims body = AppJwtUtil.getClaimsBody(token);//5.2 判断token是否有效int result = AppJwtUtil.verifyToken(body);if(result == 1||result == 2) {//5.3 token过期response.setStatusCode(HttpStatus.UNAUTHORIZED);return response.setComplete();}//获取用户信息Integer userId = (Integer) body.get("id");//将用户信息放入到header中ServerHttpRequest serverHttpRequest = request.mutate().headers(httpHeaders -> {httpHeaders.add("userId", userId + "");}).build();//重置请求exchange.mutate().request(serverHttpRequest);}catch (Exception e) {e.printStackTrace();//5.4 token无效response.setStatusCode(HttpStatus.UNAUTHORIZED);return response.setComplete();}//6.放行return chain.filter(exchange);}
解析完token后,将其发在httpheaders的头部,重置请求request
然后再通过拦截器解析request获取userid,再存入线程中
public class WmTokenInterceptor implements HandlerInterceptor {/*** 拦截器的前置方法,得到header中的用户信息,存入到当前线程中* @param request* @param response* @param handler* @return* @throws Exception*/@Overridepublic boolean preHandle(HttpServletRequest request, HttpServletResponse response, Object handler) throws Exception {String userId = request.getHeader("userId");if(userId != null){//存入当前线程WmUser wmUser = new WmUser();wmUser.setId(Integer.valueOf(userId));WmThreadLocalUtil.setUser(wmUser);}return true;}/*** 后置方法,清除当前线程中的用户信息* @param request* @param response* @param handler* @param ex* @throws Exception*/@Overridepublic void afterCompletion(HttpServletRequest request, HttpServletResponse response, Object handler, Exception ex) throws Exception {WmThreadLocalUtil.clear();}
}
4.4.8 Search微服务也采用这样的方法
在WmTokenInterceptor中存放userid的是WmThreadLocalUtil,search微服务也需要一个线程空间来存放userid,自然创建AppThreadLocalUtil,在heima-leadnews-utils模块下创建com.heima.utils.thread.AppThreadLocalUtil类
public class AppThreadLocalUtil {private static final ThreadLocal<ApUser> APP_USER_THREAD_LOCAL = new ThreadLocal<>();public static void setUser(ApUser user) {APP_USER_THREAD_LOCAL.set(user);}public static ApUser getUser() {return APP_USER_THREAD_LOCAL.get();}public static void clear() {APP_USER_THREAD_LOCAL.remove();}
}
在heima-leadnews-search模块中添加com.heima.search.interceptor.AppTokenInterceptor类
public class AppTokenInterceptor implements HandlerInterceptor {@Overridepublic boolean preHandle(HttpServletRequest request, HttpServletResponse response, Object handler) throws Exception {String userId = request.getHeader("userId");if(userId != null){//存入当前线程ApUser apUser = new ApUser();apUser.setId(Integer.valueOf(userId));AppThreadLocalUtil.setUser(apUser);}return true;}@Overridepublic void afterCompletion(HttpServletRequest request, HttpServletResponse response, Object handler, Exception ex) throws Exception {AppThreadLocalUtil.clear();}
}
要想使拦截器AppTokenInterceptor生效,需要将拦截器载入拦截器注册器里,在heima-leadnews-search模块中添加com.heima.search.config.WebMvcConfig类
@Configuration
public class WebMvcConfig implements WebMvcConfigurer {@Overridepublic void addInterceptors(InterceptorRegistry registry) {registry.addInterceptor(new AppTokenInterceptor()).addPathPatterns("/**");}
}
将拦截器AppTokenInterceptor加入到拦截器注册器里,拦截所有path
4.4.9 异步调用保存搜索记录
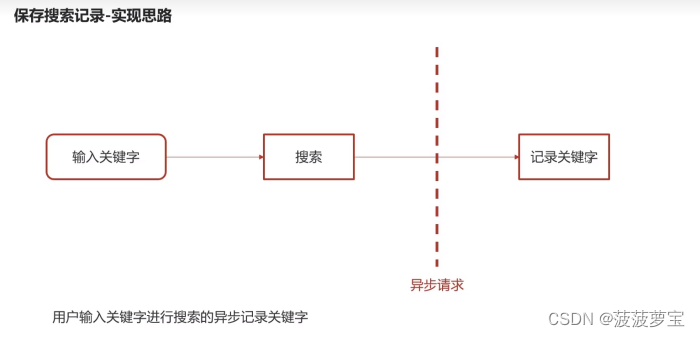
在搜索之前就可以进行保存了,所以在com.heima.search.service.impl.ArticleSearchServiceImpl检查完参数之后就可以写进mongoDB里了,并且为apUserSearchService.insert(userSearchDto.getSearchWords(), AppThreadLocalUtil.getUser().getId());添加异步调用方法@Async
userSearchDto.getFromIndex()==0是因为只有在第一页的时候才保存,你都翻到第二页了,不用再保存一次关键字了。
@Override
public ResponseResult search(UserSearchDto userSearchDto) {//1. 检查参数if(userSearchDto == null|| StringUtils.isBlank(userSearchDto.getSearchWords())){return ResponseResult.errorResult(AppHttpCodeEnum.PARAM_INVALID,"参数不合法");}ApUser user=AppThreadLocalUtil.getUser();//1.1 异步调用保存搜索记录if(user!=null&& userSearchDto.getFromIndex()==0){apUserSearchService.insert(userSearchDto.getSearchWords(), AppThreadLocalUtil.getUser().getId());}//2. 设置查询条件SearchRequest searchRequest = new SearchRequest("app_info_article");SearchSourceBuilder searchSourceBuilder = new SearchSourceBuilder();
为apUserSearchService.insert(userSearchDto.getSearchWords(), AppThreadLocalUtil.getUser().getId());添加异步调用方法@Async
@Override
@Async
public void insert(String keyword, Integer userId) {//1. 查询用户搜索历史记录Query query = Query.query(Criteria.where("userId").is(userId).and("keyword").is(keyword));ApUserSearch apUserSearch = mongoTemplate.findOne(query, ApUserSearch.class);//2. 存在则更新时间
并且在com.heima.search.SearchApplication启动类中添加启动异步方法@EnableAsync
@SpringBootApplication
@EnableDiscoveryClient
@EnableAsync
public class SearchApplication {public static void main(String[] args) {SpringApplication.run(SearchApplication.class,args);}
}
4.5 测试
启动

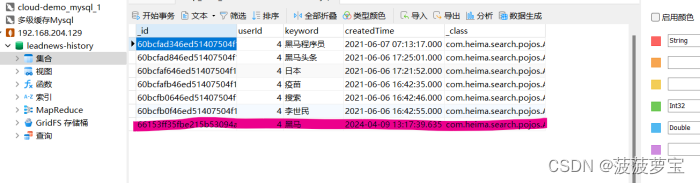
搜索黑马

查看mongoDB,说明插入成功
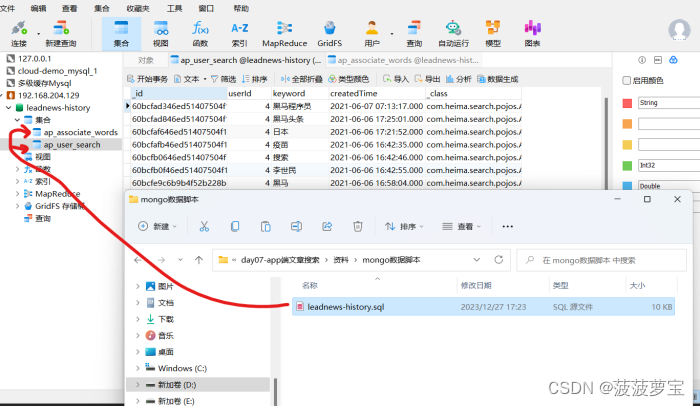
测试10个会不会删除
需求满足
5 app端搜索-加载搜索历史
5.1 接口
5.2 Controller
创建com.heima.search.controller.v1.ApUserSearchController
@RestController
@RequestMapping("/api/v1/history")
public class ApUserSearchController {@Autowiredprivate ApUserSearchService apUserSearchService;@PostMapping("/load")public ResponseResult load() {return apUserSearchService.load();}
}
5.3 Service
接口:
public interface ApUserSearchService {public void insert(String keyword, Integer userId);public ResponseResult load();}
实现
@Override
public ResponseResult load() {//1. 获取当前用户ApUser user = AppThreadLocalUtil.getUser();if(user == null) {return ResponseResult.errorResult(400, "请先登录");}//2. 查询用户搜索历史记录Query query = Query.query(Criteria.where("userId").is(user.getId())).with(Sort.by(Sort.Order.desc("createdTime")));List<ApUserSearch> apUserSearches = mongoTemplate.find(query, ApUserSearch.class);return ResponseResult.okResult(apUserSearches);}
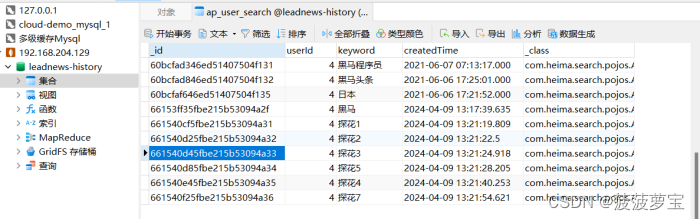
5.4 测试
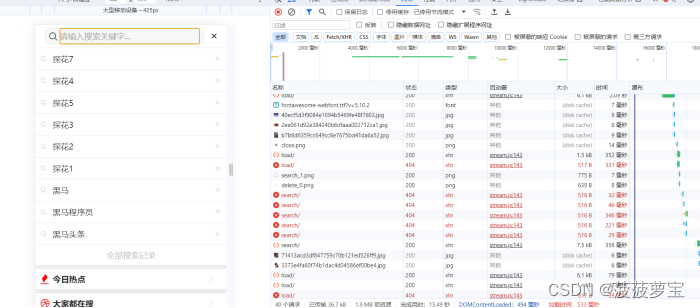
探花都在
6 app端搜索-删除搜索历史
6.1 接口
6.2 Dto
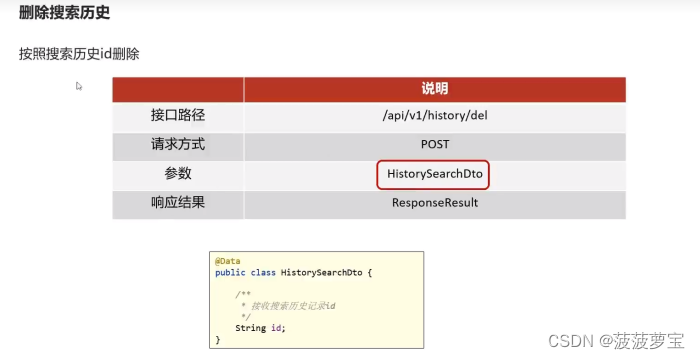
创建com.heima.model.search.dtos.HistorySearchDto类接收历史记录id
public class HistorySearchDto {/*** 接收历史记录id*/String id;
}
6.3 Controller
@PostMapping("/del")
public ResponseResult del(@RequestBody HistorySearchDto historySearchDto) {return apUserSearchService.deleteHistorySearch(historySearchDto);
}
6.4 Service
接口:
ResponseResult deleteHistorySearch(HistorySearchDto historySearchDto);
实现:
@Override
public ResponseResult deleteHistorySearch(HistorySearchDto historySearchDto) {//1. 获取当前用户ApUser user = AppThreadLocalUtil.getUser();if(user == null) {return ResponseResult.errorResult(400, "请先登录");}//2. 删除用户搜索历史记录Query query = Query.query(Criteria.where("userId").is(user.getId()).and("id").is(historySearchDto.getId()));mongoTemplate.remove(query, ApUserSearch.class);return ResponseResult.okResult(AppHttpCodeEnum.SUCCESS);
}
6.5 测试
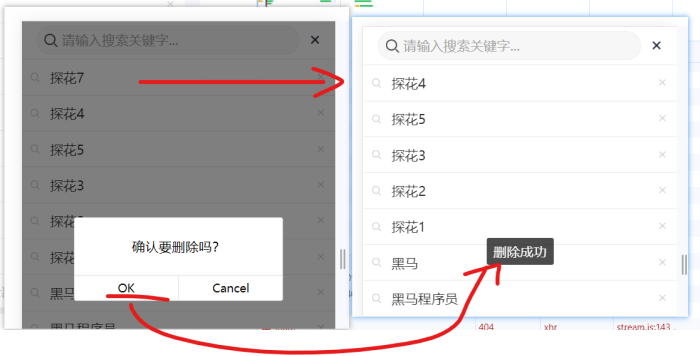
探花7已经没有了
查看数据库
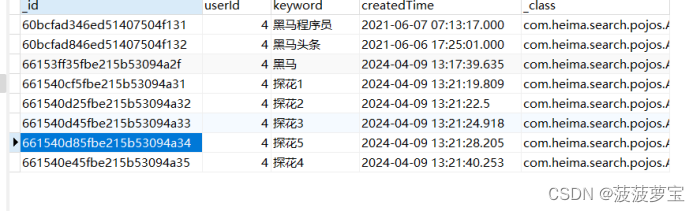
永失我探花7,测试成功
7 app端搜索-关键字联想功能
7.1 需求分析
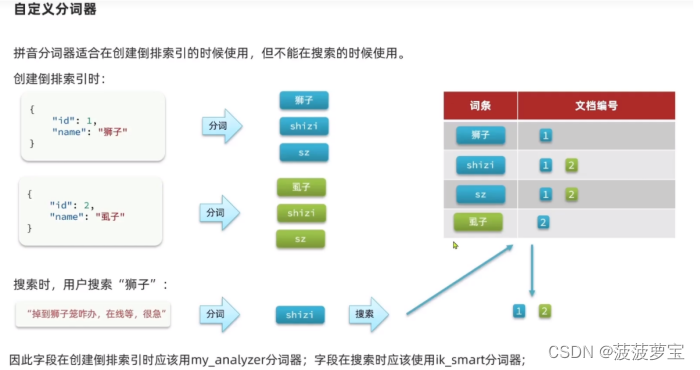
es的补全使这个数据本身在es的数据库里就有,才能补全,而这个是不管有没有都能补全。
这是与es的补全不同的地方。
我觉得老师这个不好,因为ES补全的是可以搜索到文章的,我要用ES实现。
7.2 接口定义

7.3 自动补全py插件
要实现根据字母自动补全,就必须对文章按照拼音分词。在GitHub上恰好有es的拼音分词插件,版本是7.4.0。
将py插件放到es的插件库里

重启es
docker restart es
测试
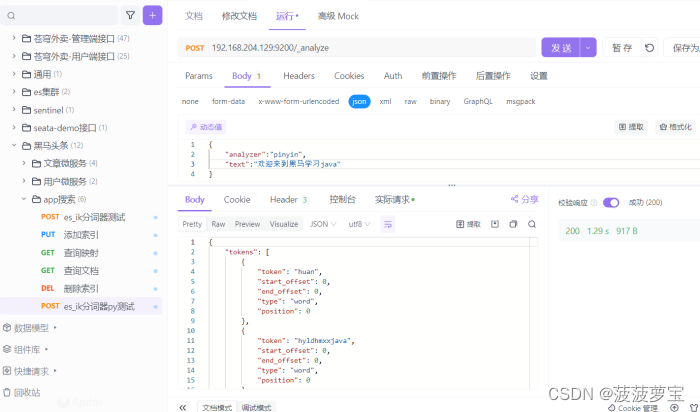
{"analyzer":"pinyin","text":"欢迎来到黑马学习java"
}
响应
{"tokens": [{"token": "huan","start_offset": 0,"end_offset": 0,"type": "word","position": 0},{"token": "hyldhmxxjava","start_offset": 0,"end_offset": 0,"type": "word","position": 0},{"token": "ying","start_offset": 0,"end_offset": 0,"type": "word","position": 1},{"token": "lai","start_offset": 0,"end_offset": 0,"type": "word","position": 2},{"token": "dao","start_offset": 0,"end_offset": 0,"type": "word","position": 3},{"token": "hei","start_offset": 0,"end_offset": 0,"type": "word","position": 4},{"token": "ma","start_offset": 0,"end_offset": 0,"type": "word","position": 5},{"token": "xue","start_offset": 0,"end_offset": 0,"type": "word","position": 6},{"token": "xi","start_offset": 0,"end_offset": 0,"type": "word","position": 7},{"token": "ja","start_offset": 0,"end_offset": 0,"type": "word","position": 8},{"token": "v","start_offset": 0,"end_offset": 0,"type": "word","position": 9},{"token": "a","start_offset": 0,"end_offset": 0,"type": "word","position": 10}]
}
7.4 自定义分词器

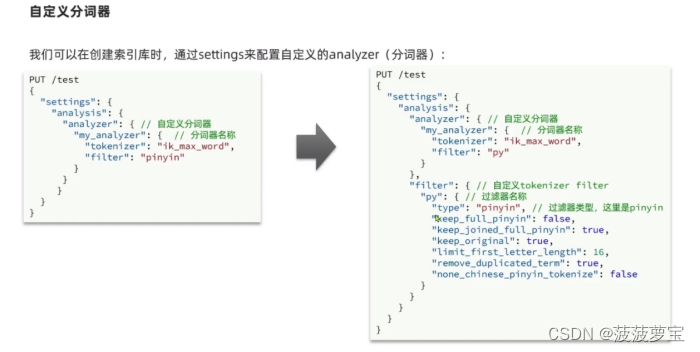
删除以前索引和文档
创建自定义分词器以及新的索引
{"settings": {"analysis": {"analyzer": { "my_analyzer": { "tokenizer": "ik_max_word","filter": "py"},"completion_analyzer": {"tokenizer": "keyword","filter": "py"}},"filter": {"py": { "type": "pinyin","keep_full_pinyin": false,"keep_joined_full_pinyin": true,"keep_original": true,"limit_first_letter_length": 16,"remove_duplicated_term": true,"none_chinese_pinyin_tokenize": false}}}},"mappings":{"properties":{"id":{"type":"long"},"publishTime":{"type":"date"},"layout":{"type":"integer"},"images":{"type":"keyword","index": false},"staticUrl":{"type":"keyword","index": false},"authorId": {"type": "long"},"authorName": {"type": "text"},"title":{"type":"text","analyzer":"my_analyzer","search_analyzer":"ik_smart","copy_to": "all"},"content":{"type":"text","analyzer":"my_analyzer"},"suggestion":{"type":"completion","analyzer":"completion_analyzer"    }}}
}
因为多了suggestion字段,因此创建一个实体类接收com.heima.model.search.vos.SearchArticlewithSuggestion
@Data
public class SearchArticlewithSuggestion {// 文章idprivate Long id;// 文章标题private String title;// 文章发布时间private Date publishTime;// 文章布局private Integer layout;// 封面private String images;// 作者idprivate Long authorId;// 作者名词private String authorName;//静态urlprivate String staticUrl;//文章内容private String content;//建议private List<String> suggestion;SearchArticlewithSuggestion(SearchArticleVo vo){BeanUtils.copyProperties(vo,this);this.suggestion= Arrays.asList(this.title);}}
响应
{"acknowledged": true,"shards_acknowledged": true,"index": "app_info_article"
}
导入数据,创建新的单元测试
@Test
void testBatchInsertIndexDocument2() throws IOException {///1. 查询文章列表List<SearchArticleVo> searchArticleVos = apArticleMapper.loadArticleList();//2. 将数据导入到es中BulkRequest bulkRequest = new BulkRequest("app_info_article");for(SearchArticleVo searchArticleVo : searchArticleVos){SearchArticlewithSuggestion searchArticleVoWithSuggestion = new SearchArticlewithSuggestion(searchArticleVo);IndexRequest indexRequest = new IndexRequest().id(searchArticleVoWithSuggestion.getId().toString()).source(JSON.toJSONString(searchArticleVoWithSuggestion), XContentType.JSON);//添加到批量请求中bulkRequest.add(indexRequest);}restHighLevelClient.bulk(bulkRequest, RequestOptions.DEFAULT);
}
导入后查看数据,成功有suggestion
测试自动补全
{"suggest": {"title_suggest": {"text": "h", "completion": {"field": "suggestion", "skip_duplicates": false, "size": 10 }}}
}

{"took": 30,"timed_out": false,"_shards": {"total": 1,"successful": 1,"skipped": 0,"failed": 0},"hits": {"total": {"value": 0,"relation": "eq"},"max_score": null,"hits": []},"suggest": {"title_suggest": [{"text": "h","offset": 0,"length": 1,"options": [{"text": "黄龄工作室发视频回应","_index": "app_info_article","_type": "_doc","_id": "1302977754114826241","_score": 1.0,"_source": {"authorId": 4,"authorName": "admin","content": "[{\"type\":\"text\",\"value\":\"3黄龄工作室发视频回应黄龄工作室发视频回应黄龄工作室发视频回应黄龄工作室发视频回应黄龄工作室发视频回应黄龄工作室发视频回应黄龄工作室发视频回应黄龄工作室发视频回应黄龄工作室发视频回应黄龄工作室发视频回应黄龄工作室发视频回应黄龄工作室发视频回应黄龄工作室发视频回应黄龄工作室发视频回应黄龄工作室发视频回应\"},{\"type\":\"image\",\"value\":\"http://192.168.200.130/group1/M00/00/00/wKjIgl892vuAXr_MAASCMYD0yzc919.jpg\"},{\"type\":\"text\",\"value\":\"请在这里输入正文黄龄工作室发视频回应黄龄工作室发视频回应黄龄工作室发视频回应黄龄工作室发视频回应黄龄工作室发视频回应黄龄工作室发视频回应黄龄工作室发视频回应黄龄工作室发视频回应黄龄工作室发视频回应黄龄工作室发视频回应黄龄工作室发视频回应黄龄工作室发视频回应\"}]","id": 1302977754114826241,"images": "http://192.168.204.129:9000/leadnews/2024/03/25/71413acd3df847759c70b121ed526ff9.jpg","layout": 1,"publishTime": 1599489079000,"suggestion": ["黄龄工作室发视频回应"],"title": "黄龄工作室发视频回应"}},{"text": "黑马测试搜索123","_index": "app_info_article","_type": "_doc","_id": "1777572583391236097","_score": 1.0,"_source": {"authorId": 1102,"authorName": "admin","content": "[{\"type\":\"image\",\"value\":\"http://192.168.204.129:9000/leadnews/2024/03/25/40ecf5d3f9084e1094b5469fe48f7603.jpg\"},{\"type\":\"text\",\"value\":\"请在这里输入正文\"}]","id": 1777572583391236097,"images": "http://192.168.204.129:9000/leadnews/2024/03/25/40ecf5d3f9084e1094b5469fe48f7603.jpg","layout": 1,"publishTime": 1712641152000,"staticUrl": "http://192.168.204.129:9000/leadnews/2024/04/09/1777572583391236097.html","suggestion": ["黑马测试搜索123"],"title": "黑马测试搜索123"}}]}]}
}
只能匹配到第一个字。
分析:如果想要句中也能匹配,就要把completion_analyzer的tokenizer变成ik_max_word,保证都能覆盖到,而不是keyword作为一个整体。

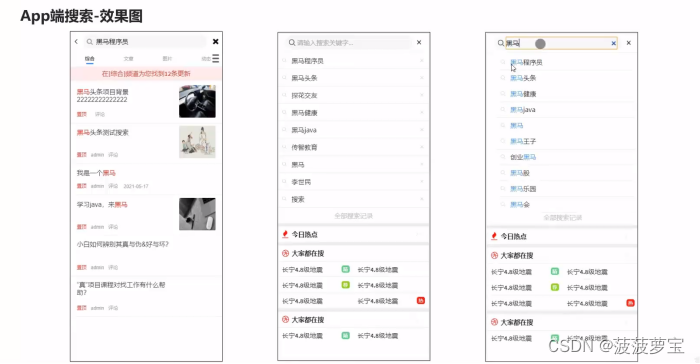
如果想要做成黑马旅游那样,就要改前端了,这不是本节课的重点,我也就不进行了。

![[网鼎杯 2020 玄武组]SSRFMe](https://img-blog.csdnimg.cn/img_convert/469e239ae679d5676a8672d61bbbf32f.png)


![天池医疗AI大赛[第一季] Rank5解决方案](https://img-blog.csdnimg.cn/direct/8e11a5b551114391a483e1a039bc5603.png)