前言:
在Unity项目中,调试和可视化是开发过程中不可或缺的部分。其中,绘制线条是一种常见的手段,可以用于在Scene场景和Game视图中进行调试和展示。本篇博客将为你介绍多种不同的绘制线条方法,帮助你轻松应对各种调试和可视化需求。
一、Debug.DrawLine
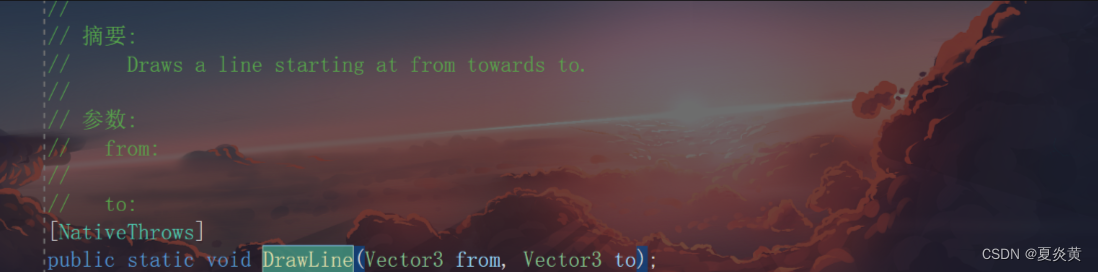
Debug.DrawLine 是 Unity 提供的一种用于在 Scene 视图中绘制调试线条的方法。

| start | 世界空间中线条起始点的位置。 |
| end | 在世界空间中指向线条的终点。 |
| color | 线条的颜色。 |
| duration | 线条的可见长度。 |
在 Update/FixedUpdate/LateUpdate 中调用:
这个方法通常用于游戏运行时进行更新,在这些方法中调用 Debug.DrawLine 来在不同帧更新时绘制线条。
只在 Scene 窗口里显示:
Debug.DrawLine 绘制的线条只能在 Scene 窗口中显示。这限制了在 Game 窗口中实时查看线条。
不能设置材质:
使用 Debug.DrawLine 绘制的线条无法更改或设置材质,因为它们主要用于调试和临时可视化,不提供材质设置的选项。
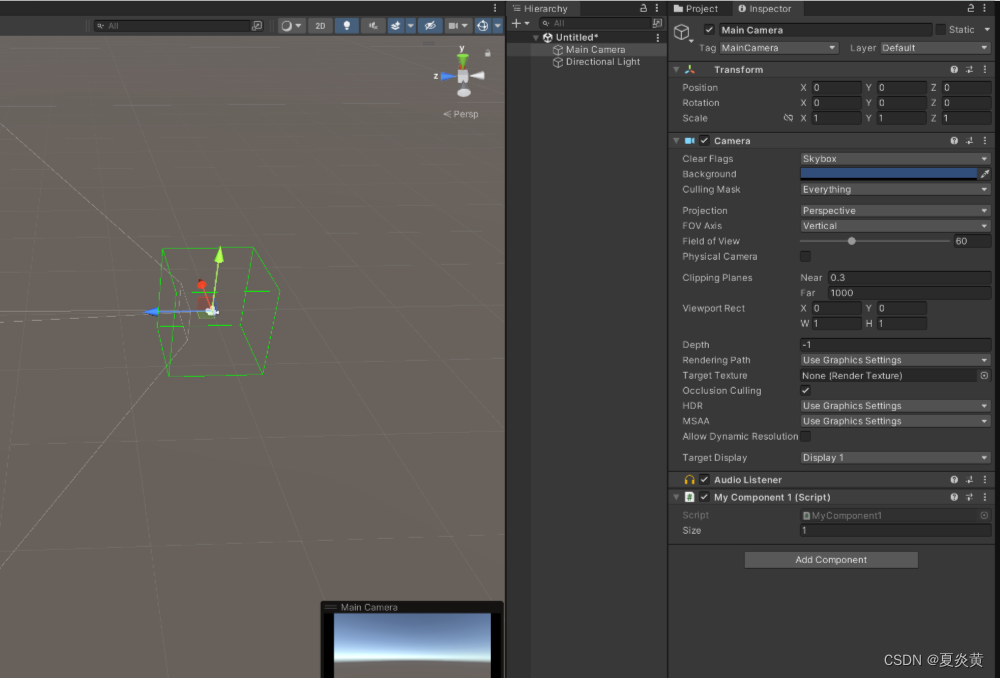
1、绘制正方体
[ExecuteInEditMode]
public class MyComponent1 : MonoBehaviour
{public float size = 1; // 正方体的大小private Vector3[] vertices = new Vector3[8]{new Vector3(-1, -1, -1),new Vector3(1, -1, -1),new Vector3(1, -1, 1),new Vector3(-1, -1, 1),new Vector3(-1, 1, -1),new Vector3(1, 1, -1),new Vector3(1, 1, 1),new Vector3(-1, 1, 1),};private void Update(){for (int i = 0; i < 4; i++){int next = (i < 3) ? (i + 1) : 0;// 底部边框线Debug.DrawLine(vertices[i] * size * 0.5f, vertices[next] * size * 0.5f, Color.green);// 顶部边框线Debug.DrawLine(vertices[i + 4] * size * 0.5f, vertices[next + 4] * size * 0.5f, Color.green);// 垂直边框线Debug.DrawLine(vertices[i] * size * 0.5f, vertices[i + 4] * size * 0.5f, Color.green); }}
}
要使用 Debug.DrawLine 绘制一个正方体,需要考虑其边界上的顶点和线条之间的关系。下面是一个示例代码,用于在场景中绘制一个简单的正方体:
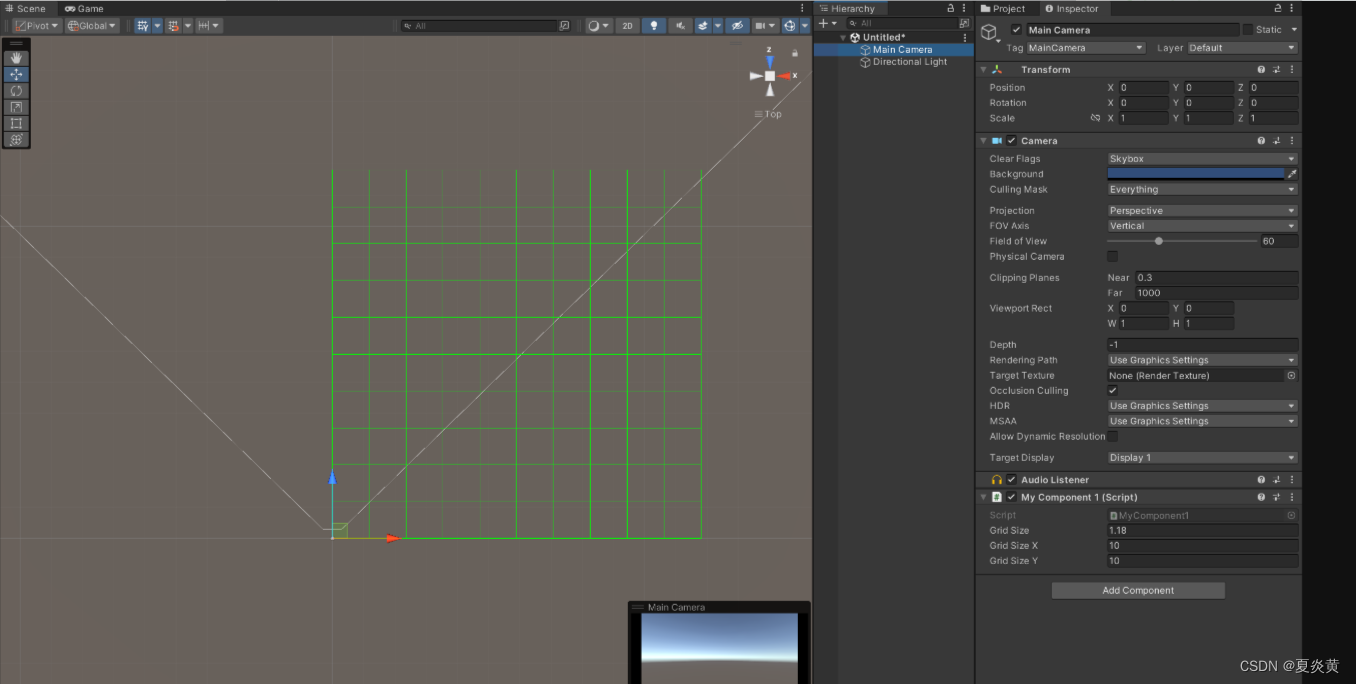
2、绘制网格
using UnityEngine;public class DrawGrid : MonoBehaviour
{public float gridSize = 1.0f; // 网格单元的大小public int gridSizeX = 10; // 网格的列数public int gridSizeY = 10; // 网格的行数void OnDrawGizmos(){// 绘制水平方向的线条for (int i = 0; i <= gridSizeX; i++){Vector3 start = Vector3.right * i * gridSize;Vector3 end = start + Vector3.forward * gridSize * gridSizeY;Debug.DrawLine(start, end, Color.white);}// 绘制垂直方向的线条for (int i = 0; i <= gridSizeY; i++){Vector3 start = Vector3.forward * i * gridSize;Vector3 end = start + Vector3.right * gridSize * gridSizeX;Debug.DrawLine(start, end, Color.white);}}
}
使用 Debug.DrawLine 绘制一个 10x10 的网格。将这个脚本附加到一个空 GameObject 上。gridSize 变量表示网格的单元大小,gridSizeX 和 gridSizeY 分别表示网格的列数和行数。在 Scene 视图中,可以看到一个由绿色线条组成的网格。这些线条只是用于调试和可视化,不会在游戏中显示。
二、Gizmos.DrawLine
Gizmos.DrawLine 是 Unity 提供的一个用于在 Scene 窗口中绘制线条的函数。它可以在 OnDrawGizmos 和 OnDrawGizmosSelected 方法中使用。
| from | 世界空间中线条起始点的位置。 |
| to | 在世界空间中指向线条的终点。 |
调用方式:
适合在 OnDrawGizmos 和 OnDrawGizmosSelected 这两个 Unity 生命周期方法中调用。这些方法是专门用于在 Scene 窗口中绘制 Gizmo 的。
显示范围:
所绘制的线条只会在 Scene 窗口中显示,而不会出现在游戏运行中。这有助于在编辑器中进行调试和可视化,但不会影响游戏性能或最终的构建。
材质设置:
Gizmos 提供的绘制方法通常不能设置材质、颜色等属性。Gizmos.DrawLine 绘制的线条颜色和材质是固定的,无法调整其粗细、透明度或使用自定义材质。
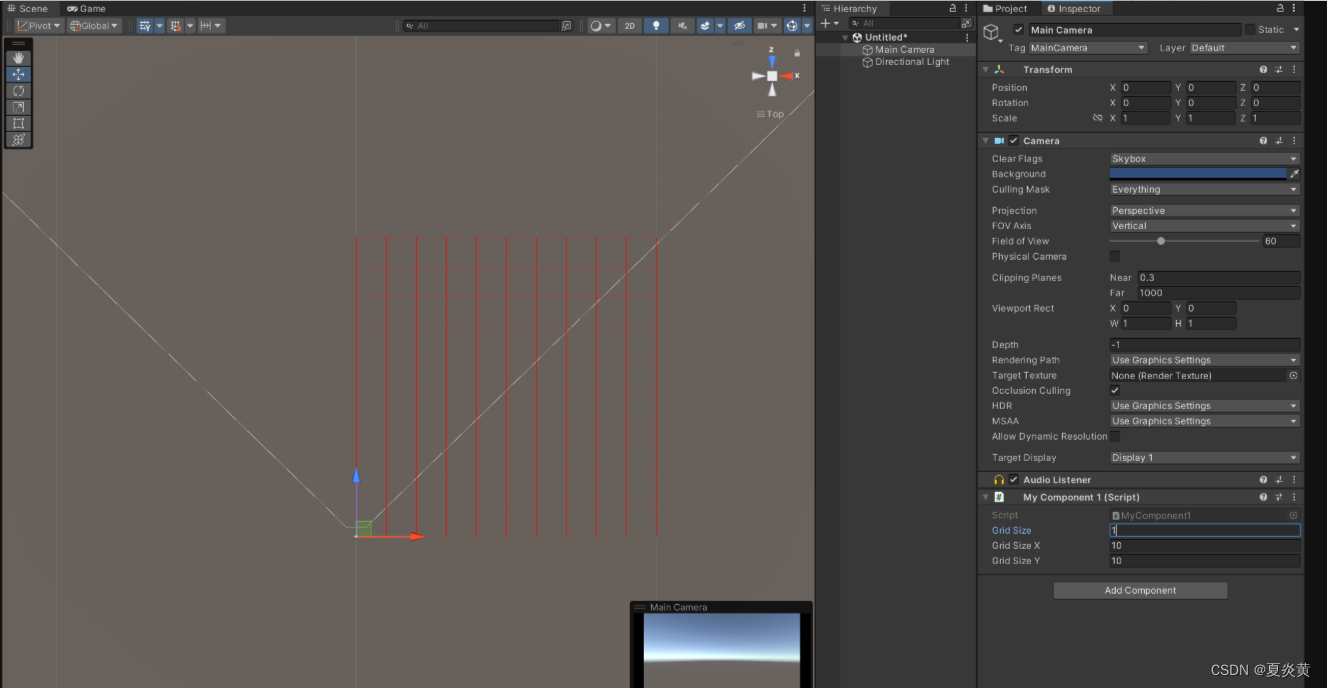
1、绘制网格
using UnityEngine;public class DrawGrid : MonoBehaviour
{public float gridSize = 1.0f; // 网格单元的大小public int gridSizeX = 10; // 网格的列数public int gridSizeY = 10; // 网格的行数void OnDrawGizmos(){Gizmos.color = Color.red;// 绘制水平方向的线条for (int i = 0; i <= gridSizeX; i++){Vector3 start = Vector3.right * i * gridSize;Vector3 end = start + Vector3.forward * gridSize * gridSizeY;Gizmos.DrawLine(start, end);}// 绘制垂直方向的线条for (int i = 0; i <= gridSizeY; i++){Vector3 start = Vector3.forward * i * gridSize;Vector3 end = start + Vector3.right * gridSize * gridSizeX;Gizmos.DrawLine(start, end);}}
}
在 OnDrawGizmos 方法中使用 Gizmos.DrawLine 绘制一个 10x10 的网格。这些线条只在 Scene 窗口中显示,并且不能设置材质。要注意的是,Gizmos 类用于在 Scene 窗口中绘制 Gizmo,但不会在游戏运行时显示。
三、Mesh
在Unity中,Mesh(网格)是一种用于表示3D模型的数据结构。它定义了一个网格模型的顶点、三角形(或其他多边形)、UV(纹理坐标)、法线(法线方向)等数据。Mesh是用于构建3D模型的基本组成部分之一。
Mesh是Unity中许多3D对象(如MeshFilter、MeshRenderer等)的基础,通过MeshFilter组件将Mesh应用到GameObject上,并使用MeshRenderer来渲染对象。通常,开发者使用Mesh来创建静态或动态的3D模型,并在游戏场景中呈现出来。

| vertices | 表示网格的顶点数组。 |
| triangles | 表示定义三角形的索引数组。 |
| normals | 表示法线数组,用于指定网格每个顶点的法线方向。 |
| uv | 表示纹理坐标数组。 |
| colors | 表示网格的顶点颜色。 |
| SetIndices | SetIndices 是 Mesh 类中用于设置网格顶点索引的方法。它允许您指定用于连接顶点以形成三角形或其他多边形的索引数组。 |
| MarkDynamic | MarkDynamic 方法用于标记网格为动态网格。它是一个性能优化方法,用于告诉引擎此网格将频繁地更新。当您有一个需要在每帧或频繁时间间隔内更新的网格时,可以使用 MarkDynamic 方法。 |
1、绘制正方体线框
using System.Collections;
using System.Collections.Generic;
using UnityEngine;
using UnityEngine.UI;[RequireComponent(typeof(MeshFilter))]
[RequireComponent(typeof(MeshRenderer))]
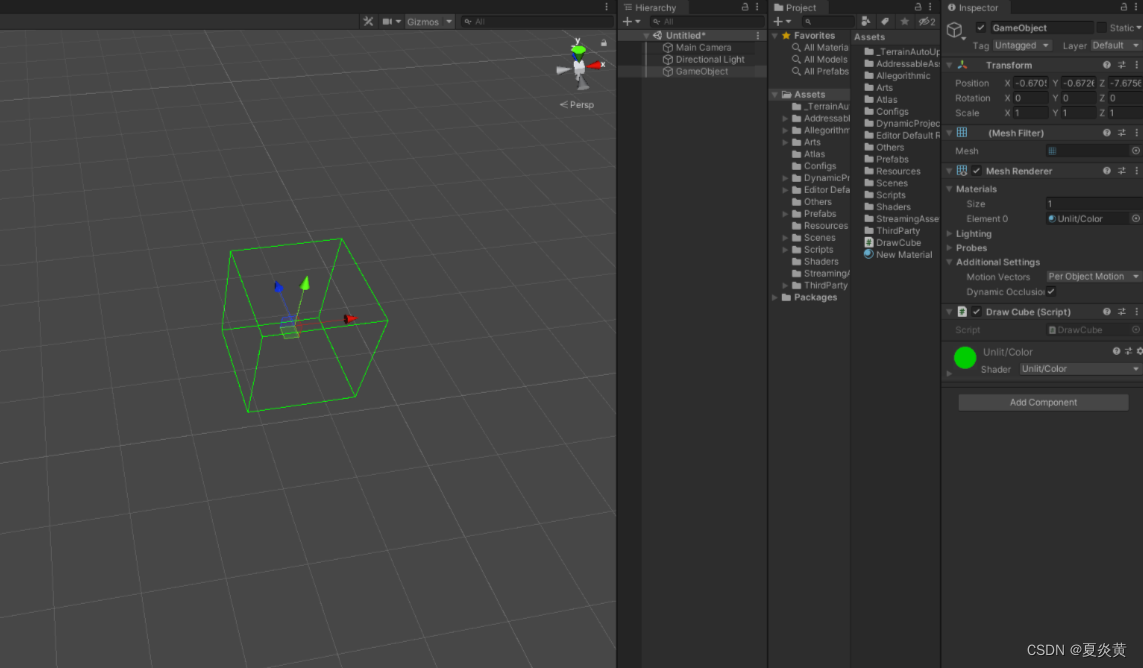
public class DrawCube : MonoBehaviour
{private Mesh mesh;private MeshFilter meshFilter;private MeshRenderer meshRenderer;// 创建一个立方体的 Meshprivate Mesh CreateCubeMesh(){Mesh mesh = new Mesh();mesh.vertices = new Vector3[]{new Vector3(-1, -1, -1), // 0new Vector3(1, -1, -1), // 1new Vector3(1, 1, -1), // 2new Vector3(-1, 1, -1), // 3new Vector3(-1, -1, 1), // 4new Vector3(1, -1, 1), // 5new Vector3(1, 1, 1), // 6new Vector3(-1, 1, 1) // 7};mesh.SetIndices(new int[]{0, 1, 1, 2, 2, 3, 3, 0, // 前面四条边4, 5, 5, 6, 6, 7, 7, 4, // 后面四条边0, 4, 1, 5, 2, 6, 3, 7 // 连接前后两个面的四条边}, MeshTopology.Lines, 0);return mesh;}private void Start(){meshFilter = GetComponent<MeshFilter>();meshRenderer = GetComponent<MeshRenderer>();mesh = CreateCubeMesh();meshFilter.mesh = mesh;var material = new Material(Shader.Find("Unlit/Color"));material.color = Color.green;meshRenderer.material = material;}
}这里是通过创建一个正方体的Mesh,然后通过MeshFilter组件将Mesh应用到GameObject上,并使用MeshRenderer来渲染该正方体线框。
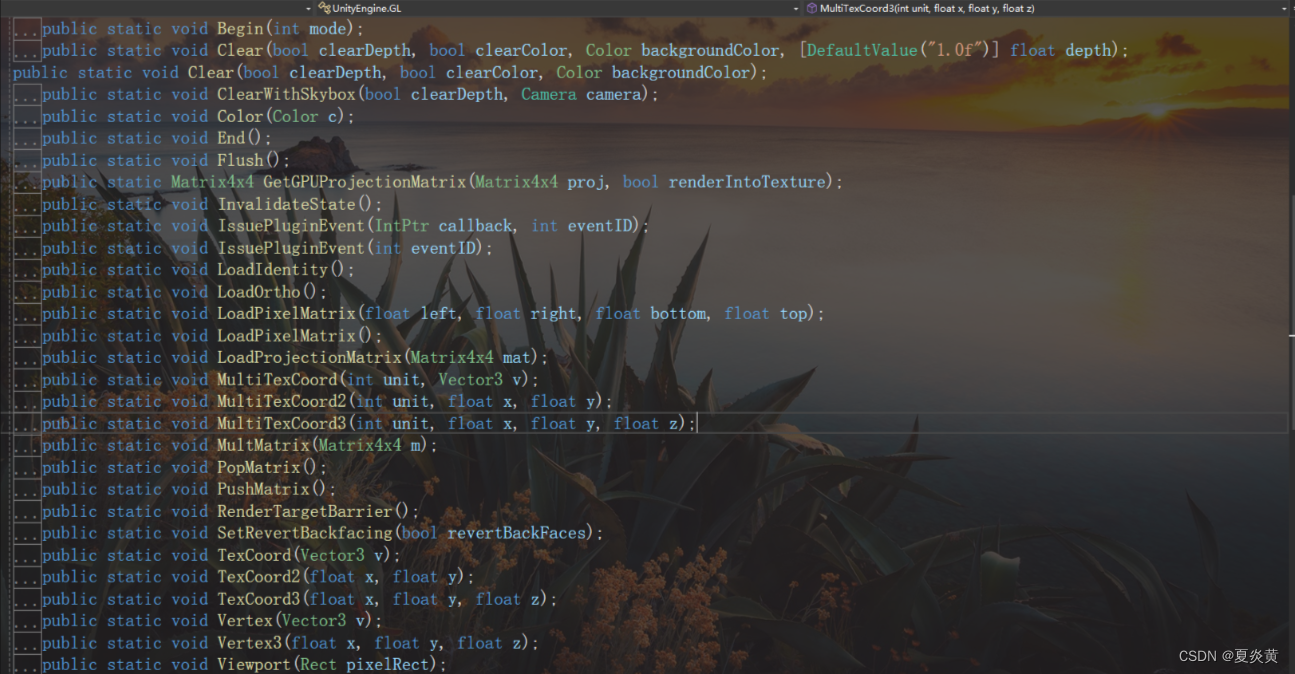
四、GL
OpenGL(Open Graphics Library)是一个用于渲染 2D 和 3D 图形的跨平台图形库。它提供了一系列函数和指令,允许开发者通过编程来操作图形硬件,实现图形渲染和交互式图形应用程序的开发。
在Unity中,GL(Graphics Library)是一个底层的图形渲染接口,用于执行低级图形绘制操作。GL允许开发者以非常灵活的方式直接控制图形渲染,使开发者可以绘制各种形状、线条、文本和纹理,实现各种自定义的绘图需求。
调用方式:
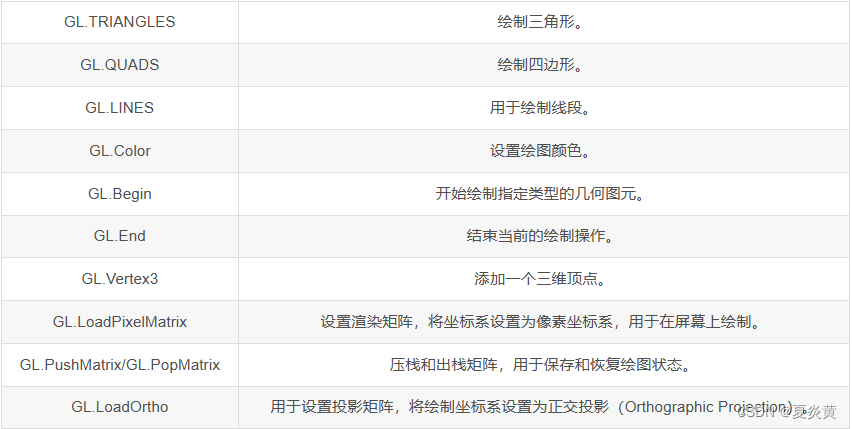
OnPostRender(): 用于在完成渲染场景之后立即调用,适合进行屏幕后处理或绘制Overlay UI。
OnRenderObject(): 在渲染对象时调用。允许手动渲染对象并覆盖其默认渲染。用于自定义渲染对象或其他特殊渲染需求。
显示范围:
LoadOrtho(): 用于设置绘制范围为屏幕坐标系,绘制在整个屏幕上。在OnPostRender()中调用,以便以屏幕为基础绘制2D图形。
材质设置:
GL允许使用材质,但与在Unity中常规渲染管道中的应用方式有所不同。
在GL中,使用材质时,需要在GL代码中直接调用SetPass()来设置所需的材质属性。这将设置着色器状态,让GL能够使用该材质来渲染几何图元。
若要控制颜色,需要使用GL.Color()方法设置颜色。
若要控制透明度,可以通过设置颜色的Alpha值来实现半透明效果。
1、绘制3D网格和屏幕网格
using UnityEngine;public class DrawGrid : MonoBehaviour
{public float gridSize = 1.0f; // 网格单元的大小public int gridSizeX = 10; // 网格的列数public int gridSizeY = 10; // 网格的行数private Material lineMaterial;void CreateLineMaterial(){if (!lineMaterial){// Unity has a built-in shader that is useful for drawing// simple colored things.Shader shader = Shader.Find("Hidden/Internal-Colored");lineMaterial = new Material(shader);lineMaterial.hideFlags = HideFlags.HideAndDontSave;// Turn on alpha blendinglineMaterial.SetInt("_SrcBlend", (int)UnityEngine.Rendering.BlendMode.SrcAlpha);lineMaterial.SetInt("_DstBlend", (int)UnityEngine.Rendering.BlendMode.OneMinusSrcAlpha);// Turn backface culling offlineMaterial.SetInt("_Cull", (int)UnityEngine.Rendering.CullMode.Off);// Turn off depth writeslineMaterial.SetInt("_ZWrite", 0);}}// Will be called after all regular rendering is donepublic void OnRenderObject(){CreateLineMaterial();lineMaterial.SetPass(0);                //刷新当前材质  //Draw3DGrid();DrawScreenGrid();}/// <summary>/// 在三维场景中绘制网格/// </summary>void Draw3DGrid(){GL.PushMatrix();GL.MultMatrix(transform.localToWorldMatrix);GL.Begin(GL.LINES);float startX = -(gridSize * gridSizeX) / 2;float startZ = -(gridSize * gridSizeY) / 2;// 绘制垂直方向的线条for (int i = 0; i <= gridSizeX; i++){GL.Color(Color.red);float xPos = startX + i * gridSize;GL.Vertex3(xPos, 0, startZ);GL.Vertex3(xPos, 0, -startZ);}// 绘制水平方向的线条for (int i = 0; i <= gridSizeY; i++){GL.Color(Color.green);float zPos = startZ + i * gridSize;GL.Vertex3(startX, 0, zPos);GL.Vertex3(-startX, 0, zPos);}GL.End();GL.PopMatrix();}/// <summary>/// 在屏幕上绘制网格/// </summary>void DrawScreenGrid(){GL.PushMatrix(); 			 			//保存当前Matirx  GL.LoadPixelMatrix();                   //设置pixelMatrix  GL.Begin(GL.LINES);// 绘制水平方向的线条for (int i = 0; i <= gridSizeX; i++){GL.Color(Color.green);float xPos = i * gridSize;GL.Vertex3(xPos, 0, 0);GL.Vertex3(xPos, gridSize * gridSizeY, 0);}// 绘制垂直方向的线条for (int i = 0; i <= gridSizeY; i++){GL.Color(Color.green);float zPos = i * gridSize;GL.Vertex3(0, zPos, 0);GL.Vertex3(gridSize * gridSizeX, zPos, 0);}GL.End();GL.PopMatrix();//读取之前的Matrix  }
}


2、实现屏幕框选
public class BoxSelection: MonoBehaviour
{public Material boxMaterial;public Material lineMaterial;private Vector3 startPoint;private bool isSelecting = false;private void Update(){if (Input.GetMouseButtonDown(0)){startPoint = Input.mousePosition;isSelecting = true;}else if (Input.GetMouseButtonUp(0)){isSelecting = false;SelectObjects();}}private void OnPostRender(){if (!boxMaterial || !lineMaterial){Debug.LogError("Please assign materials on the inspector!");return;}if (isSelecting){GL.PushMatrix();boxMaterial.SetPass(0);GL.LoadPixelMatrix();GL.Begin(GL.QUADS);boxMaterial.color = new Color(1f, 1f, 1f, 0.2f);Vector3 endPos = Input.mousePosition;GL.Vertex3(startPoint.x, startPoint.y, 0);GL.Vertex3(endPos.x, startPoint.y, 0);GL.Vertex3(endPos.x, endPos.y, 0);GL.Vertex3(startPoint.x, endPos.y, 0);GL.End();GL.PopMatrix();GL.PushMatrix();lineMaterial.SetPass(0);GL.LoadPixelMatrix();GL.Begin(GL.LINES);lineMaterial.color = Color.green;GL.Vertex3(startPoint.x, startPoint.y, 0);GL.Vertex3(endPos.x, startPoint.y, 0);GL.Vertex3(endPos.x, startPoint.y, 0);GL.Vertex3(endPos.x, endPos.y, 0);GL.Vertex3(endPos.x, endPos.y, 0);GL.Vertex3(startPoint.x, endPos.y, 0);GL.Vertex3(startPoint.x, endPos.y, 0);GL.Vertex3(startPoint.x, startPoint.y, 0);GL.End();GL.PopMatrix();}}private void SelectObjects(){Vector3 mouseStartPos = startPoint;Vector3 mouseEndPos = Input.mousePosition;Vector3 min = Vector3.Min(mouseStartPos, mouseEndPos);Vector3 max = Vector3.Max(mouseStartPos, mouseEndPos);Rect selectRect = new Rect(min.x, Screen.height - max.y, max.x - min.x, max.y - min.y);foreach (GameObject obj in FindObjectsOfType<GameObject>()){Vector3 screenPos = Camera.main.WorldToScreenPoint(obj.transform.position);if (selectRect.Contains(screenPos)){Debug.Log("Selected object: " + obj.name);// 在这里可以添加选中对象的操作逻辑}}}
}

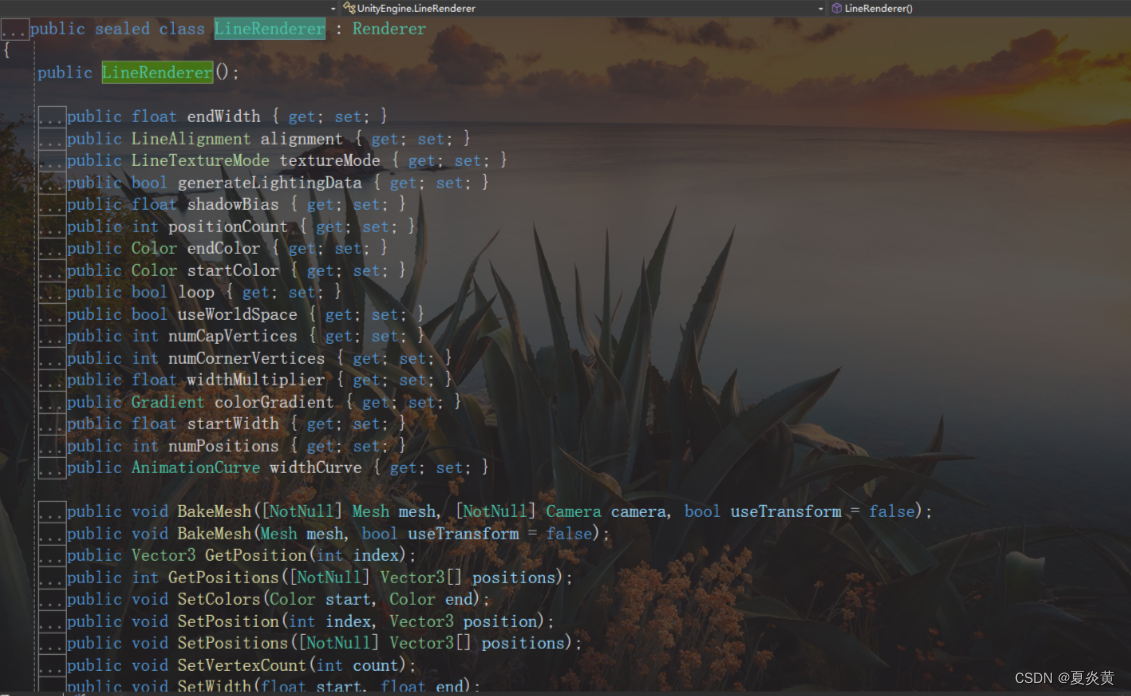
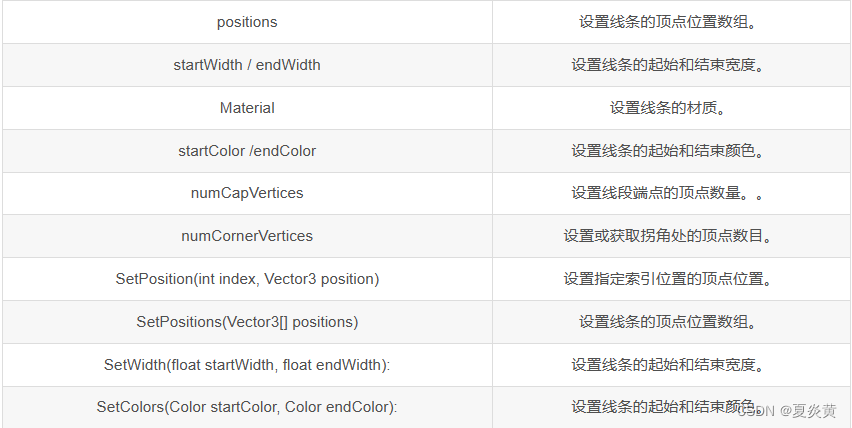
五、LineRenderer
LineRenderer 是 Unity 中用于在场景中绘制线条的组件之一。它可以用于创建简单的线段、路径、连线等效果。
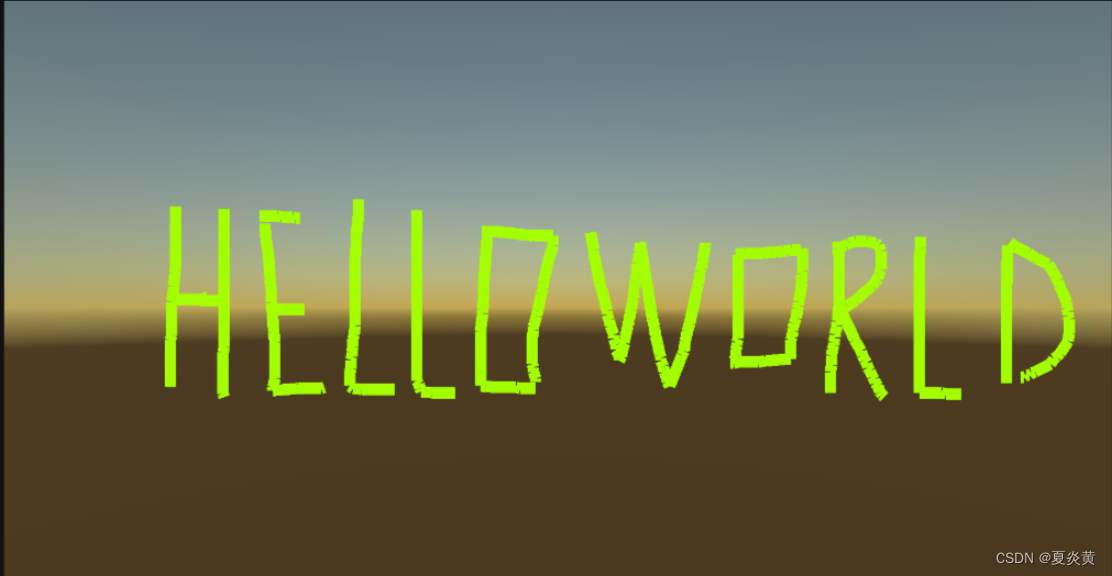
1、实现屏幕写字板
using System.Collections;
using System.Collections.Generic;
using UnityEngine;public class LineRendererDraw : MonoBehaviour
{private LineRenderer clone;public LineRenderer linePre;private int positionCount;private Material lineMaterial;private void Start(){lineMaterial = new Material(Shader.Find("Legacy Shaders/Particles/Additive"));linePre.material = lineMaterial;}/// <summary>/// 创建线条/// </summary>/// <returns></returns>private LineRenderer CreateLine(){//实例化对象LineRenderer line = Instantiate(linePre, linePre.transform.position, Quaternion.identity);//设置起始和结束的颜色line.startColor = Color.red;line.endColor = Color.blue;//设置起始和结束的宽度line.startWidth = 0.4f;line.endWidth = 0.35f;return line;}// Update is called once per framevoid Update(){if (Input.GetMouseButtonDown(0)){//实例化对象clone = CreateLine();//计数positionCount = 0;}if (Input.GetMouseButton(0)){//每一帧检测,按下鼠标的时间越长,计数越多positionCount++;//设置顶点数clone.positionCount = positionCount;//设置顶点位置(顶点的索引,将鼠标点击的屏幕坐标转换为世界坐标)clone.SetPosition(positionCount - 1, Camera.main.ScreenToWorldPoint(new Vector3(Input.mousePosition.x, Input.mousePosition.y, 15)));}}
}
六、UI画线
这里通过Unity的UGUI来进行画线,主要原理就是使用OnPopulateMesh方法来重构Mesh进行画线。
OnPopulateMesh函数:当一个UI元素生成顶点数据时会调用。
OnPopulateMesh(VertexHelper vh)函数,我们可以在这个函数中修改顶点的数据或者获取顶点的数据。
using System.Collections.Generic;
using UnityEngine;
using UnityEngine.UI;/// <summary>
/// 绘制的线段结构体
/// </summary>
public struct LineSegment
{public Vector3 startPoint;public Vector3 endPoint;public float lineWidth;public Vector3 Vector{get{return endPoint - startPoint;}}public Vector3 Normal{get{return Vector3.Cross(Vector.normalized, Vector3.forward).normalized;}}public Vector3 StartLeftPoint{get{return startPoint + Normal * lineWidth; }}public Vector3 StartRightPoint {get{return startPoint - Normal * lineWidth;}}public Vector3 EndLeftPoint{get{return endPoint + Normal * lineWidth; }}public Vector3 EndRightPoint{get{return endPoint - Normal * lineWidth;}}
}public class ImageLine : MaskableGraphic
{private List<List<UIVertex>> vertexQuadList = new List<List<UIVertex>>();private LineSegment lineSegment = new LineSegment();public float lineWidth = 4;protected override void OnPopulateMesh(VertexHelper vh){vh.Clear();for (int i = 0; i < vertexQuadList.Count; i++){vh.AddUIVertexQuad(vertexQuadList[i].ToArray());}}// Update is called once per framevoid Update(){if (Input.GetMouseButtonDown(0)){lineSegment.lineWidth = lineWidth;lineSegment.startPoint = ScreenPointToLocalPointInRectangle(Input.mousePosition);}else if (Input.GetMouseButton(0)){lineSegment.endPoint = ScreenPointToLocalPointInRectangle(Input.mousePosition);//当鼠标不动时不再绘制if (lineSegment.startPoint == lineSegment.endPoint) return;//线段过短不进行绘制if (lineSegment.Vector.magnitude < 5) return;AddVertexQuad(lineSegment);lineSegment.startPoint = lineSegment.endPoint;SetVerticesDirty();}if (Input.GetMouseButtonDown(1)){vertexQuadList.Clear();SetVerticesDirty();}}/// <summary>/// 将线段上顶点添加到UI四边形顶点/// </summary>/// <param name="lineSegment"></param>private void AddVertexQuad(LineSegment lineSegment){List<UIVertex> uIVertices = new List<UIVertex>();UIVertex uIVertex = new UIVertex();uIVertex.position = lineSegment.StartLeftPoint;uIVertex.color = color;uIVertices.Add(uIVertex);UIVertex uIVertex1 = new UIVertex();uIVertex1.position = lineSegment.StartRightPoint;uIVertex1.color = color;uIVertices.Add(uIVertex1);UIVertex uIVertex2 = new UIVertex();uIVertex2.position = lineSegment.EndRightPoint;uIVertex2.color = color;uIVertices.Add(uIVertex2);UIVertex uIVertex3 = new UIVertex();uIVertex3.position = lineSegment.EndLeftPoint;uIVertex3.color = color;uIVertices.Add(uIVertex3);vertexQuadList.Add(uIVertices);}/// <summary>/// 屏幕坐标转换为本地坐标/// </summary>/// <param name="screenPoint"></param>/// <returns></returns>private Vector2 ScreenPointToLocalPointInRectangle(Vector3 screenPoint){RectTransform rectTransform = GetComponent<RectTransform>();Vector2 localPoint = Vector2.zero;switch (canvas.renderMode){case RenderMode.ScreenSpaceOverlay:RectTransformUtility.ScreenPointToLocalPointInRectangle(rectTransform, screenPoint, null, out localPoint);break;case RenderMode.ScreenSpaceCamera:RectTransformUtility.ScreenPointToLocalPointInRectangle(rectTransform, screenPoint, canvas.worldCamera, out localPoint);break;case RenderMode.WorldSpace:RectTransformUtility.ScreenPointToLocalPointInRectangle(rectTransform, screenPoint, canvas.worldCamera, out localPoint);break;default:break;}return localPoint;}
}