1、环境准备
| 主机 | CPU数量 | 内存 | 硬盘 | IPV4 | 发行版 |
|---|---|---|---|---|---|
| controller | 4 | 8GB | 100GB | ens33: 192.168.110.27/24 esn34: 192.168.237.131/24 | CentOS 7.9 |
| compute | 4 | 8GB | 200GB、100GB | ens33: 192.168.110.26/24 esn34: 192.168.237.132/24 | CentOS 7.9 |
1.1 虚拟机安装部署
1.1.1 创建虚拟机
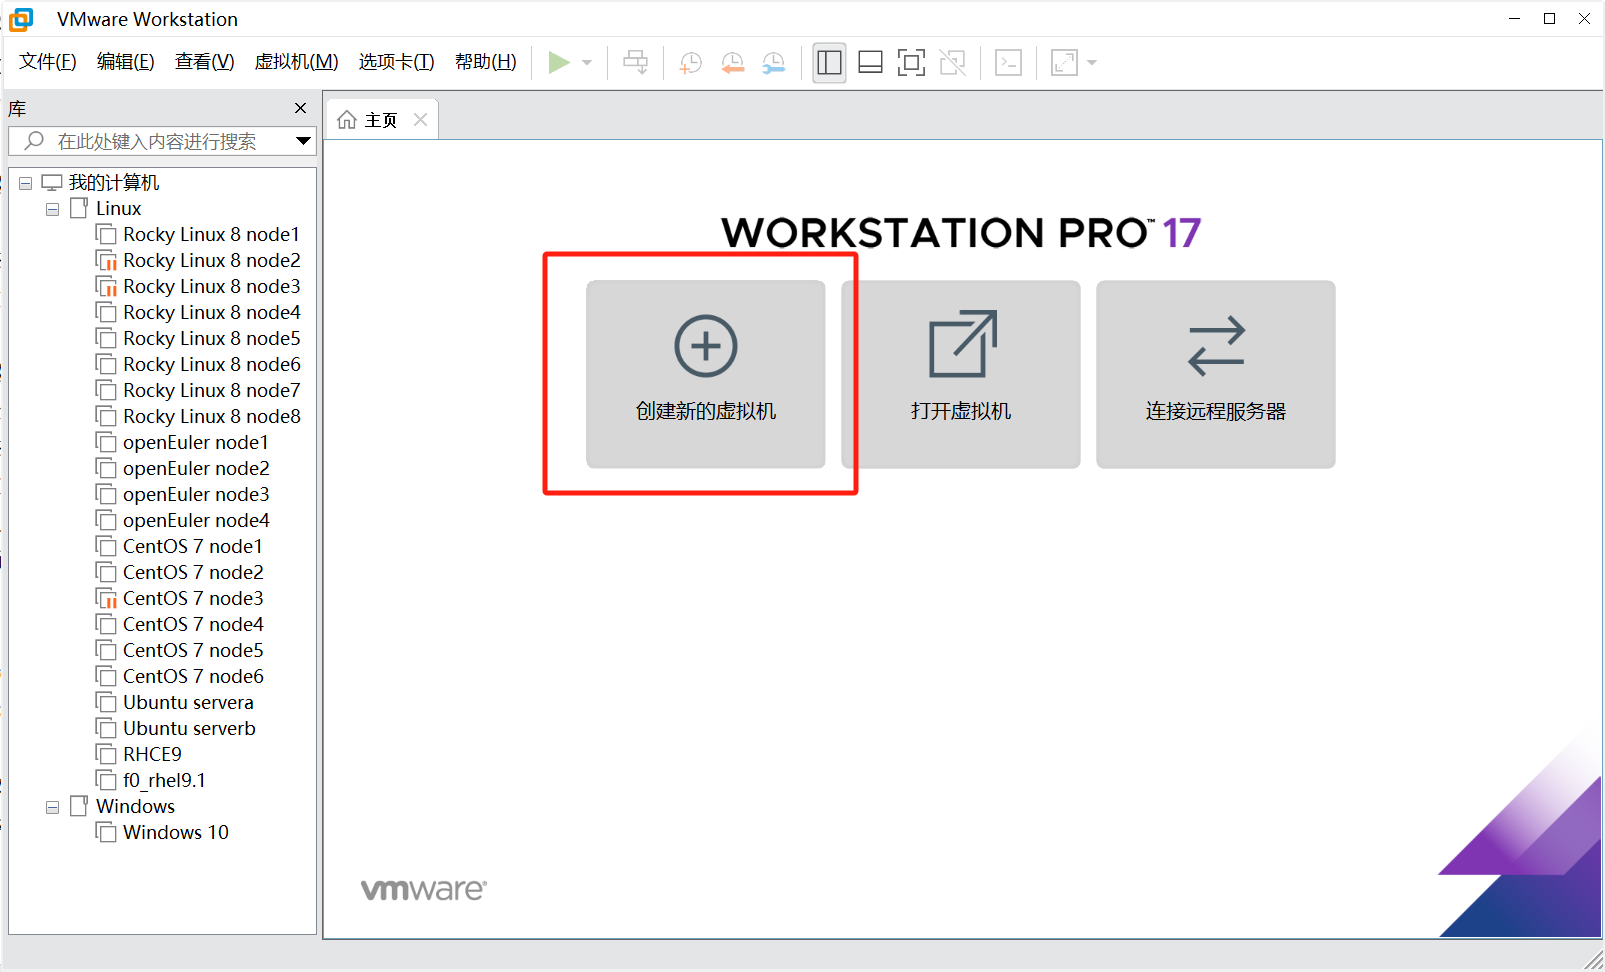
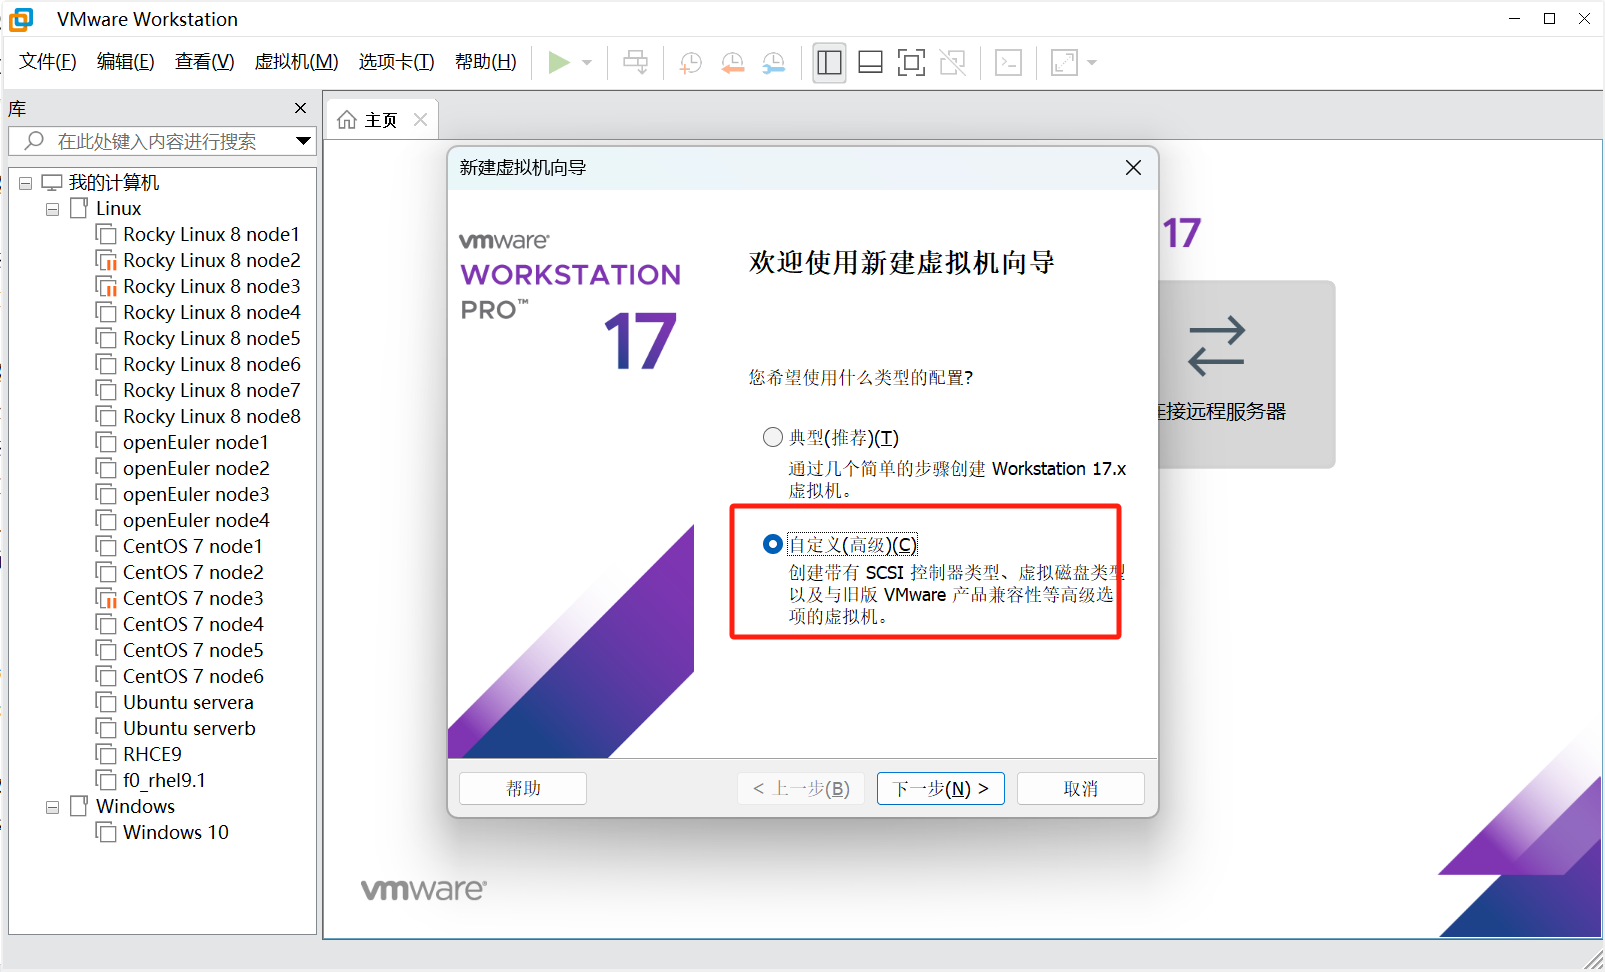
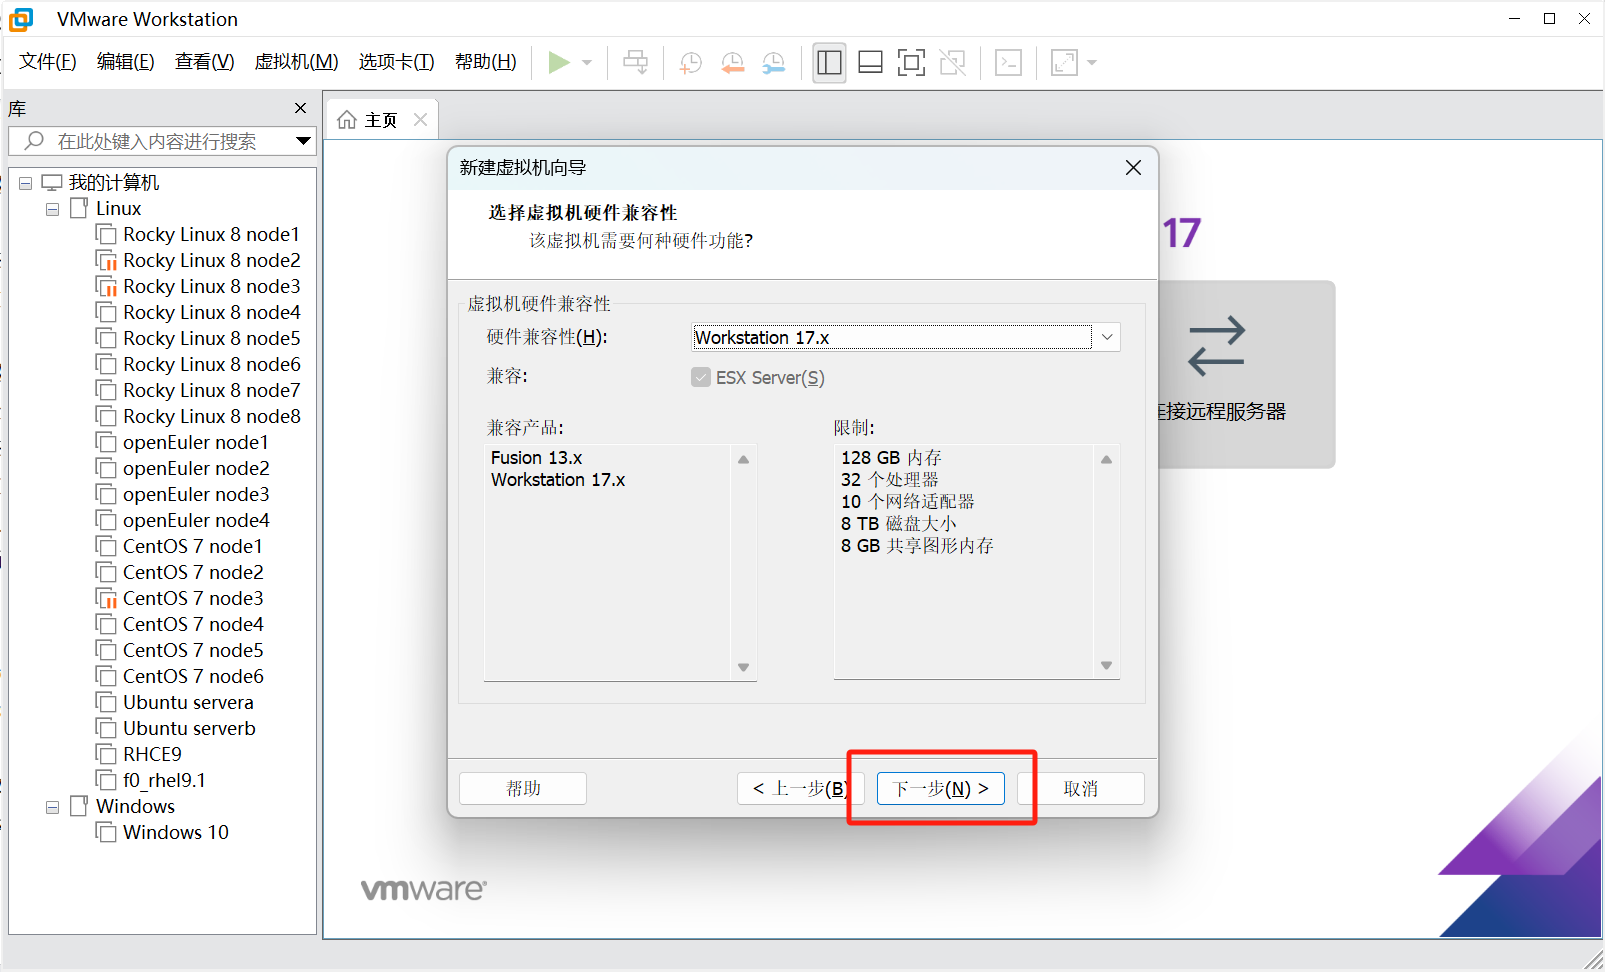
这里16或者17都行
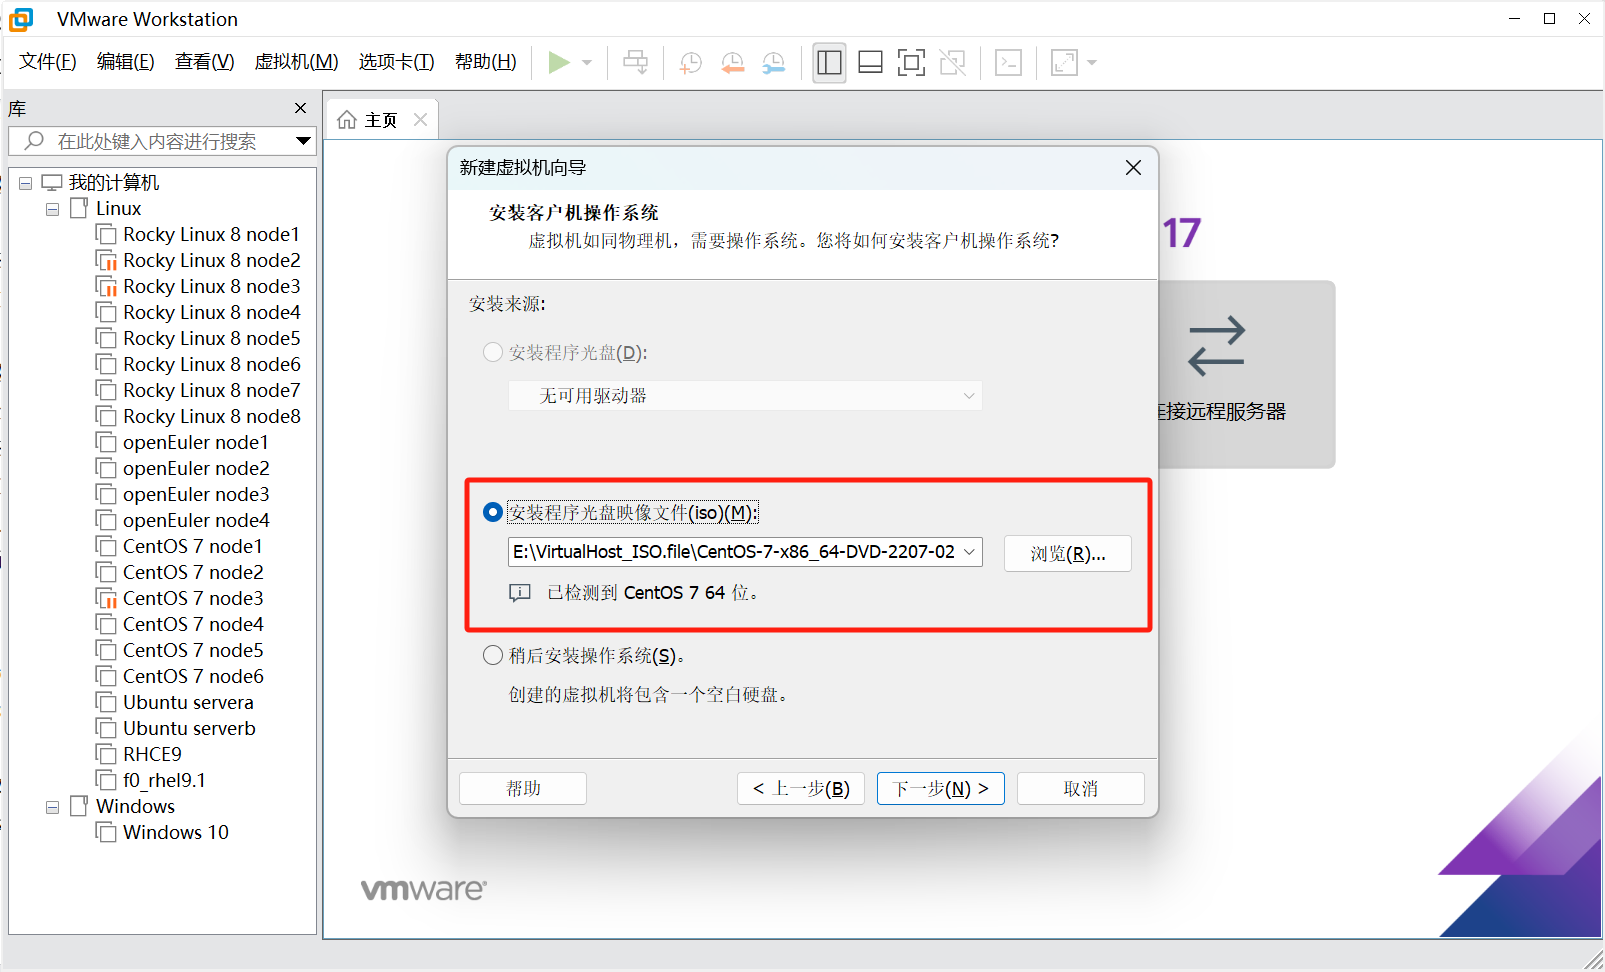
选择本地镜像文件的路径
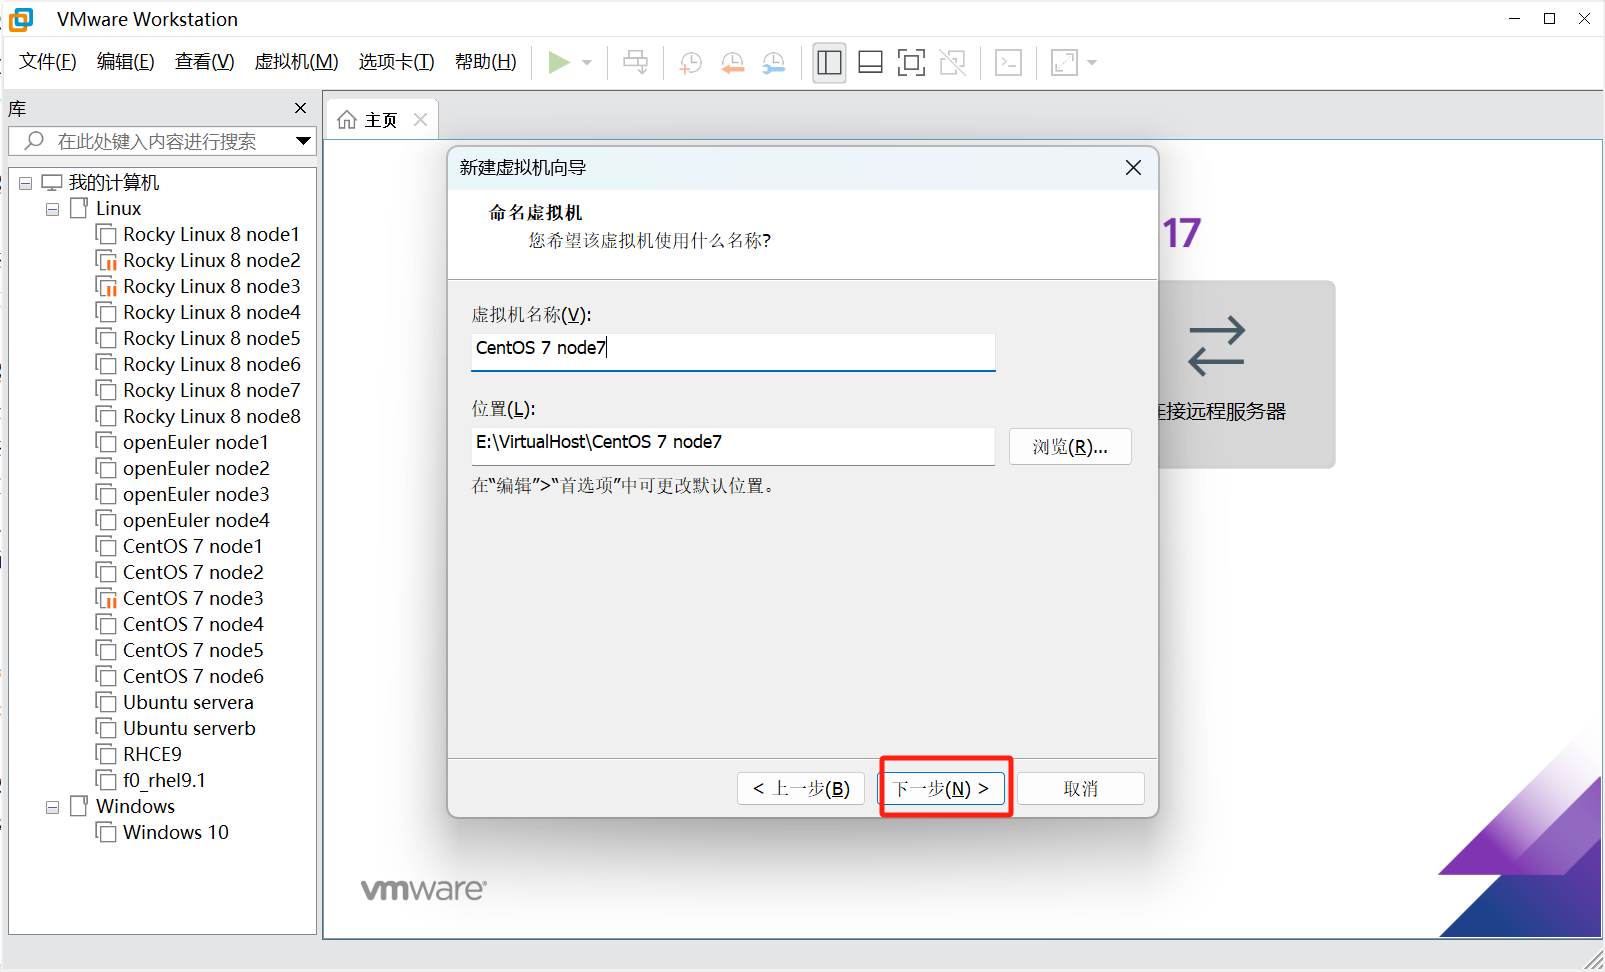
虚拟机命名,这里随意
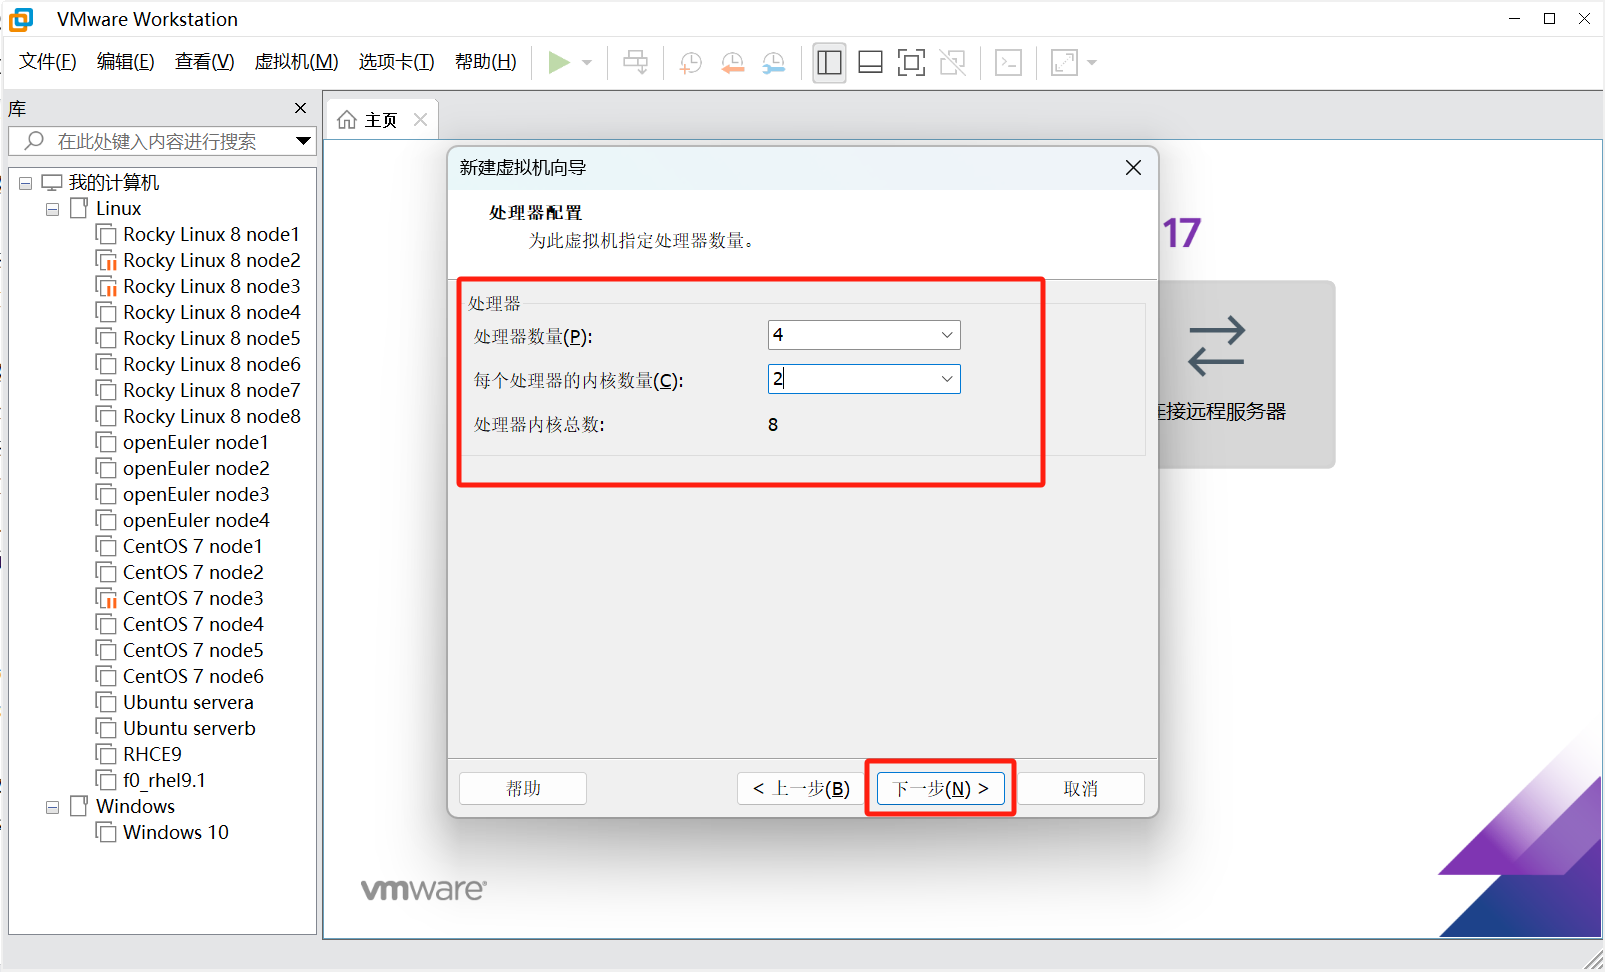
这里根据自己的轻快给,最少两核
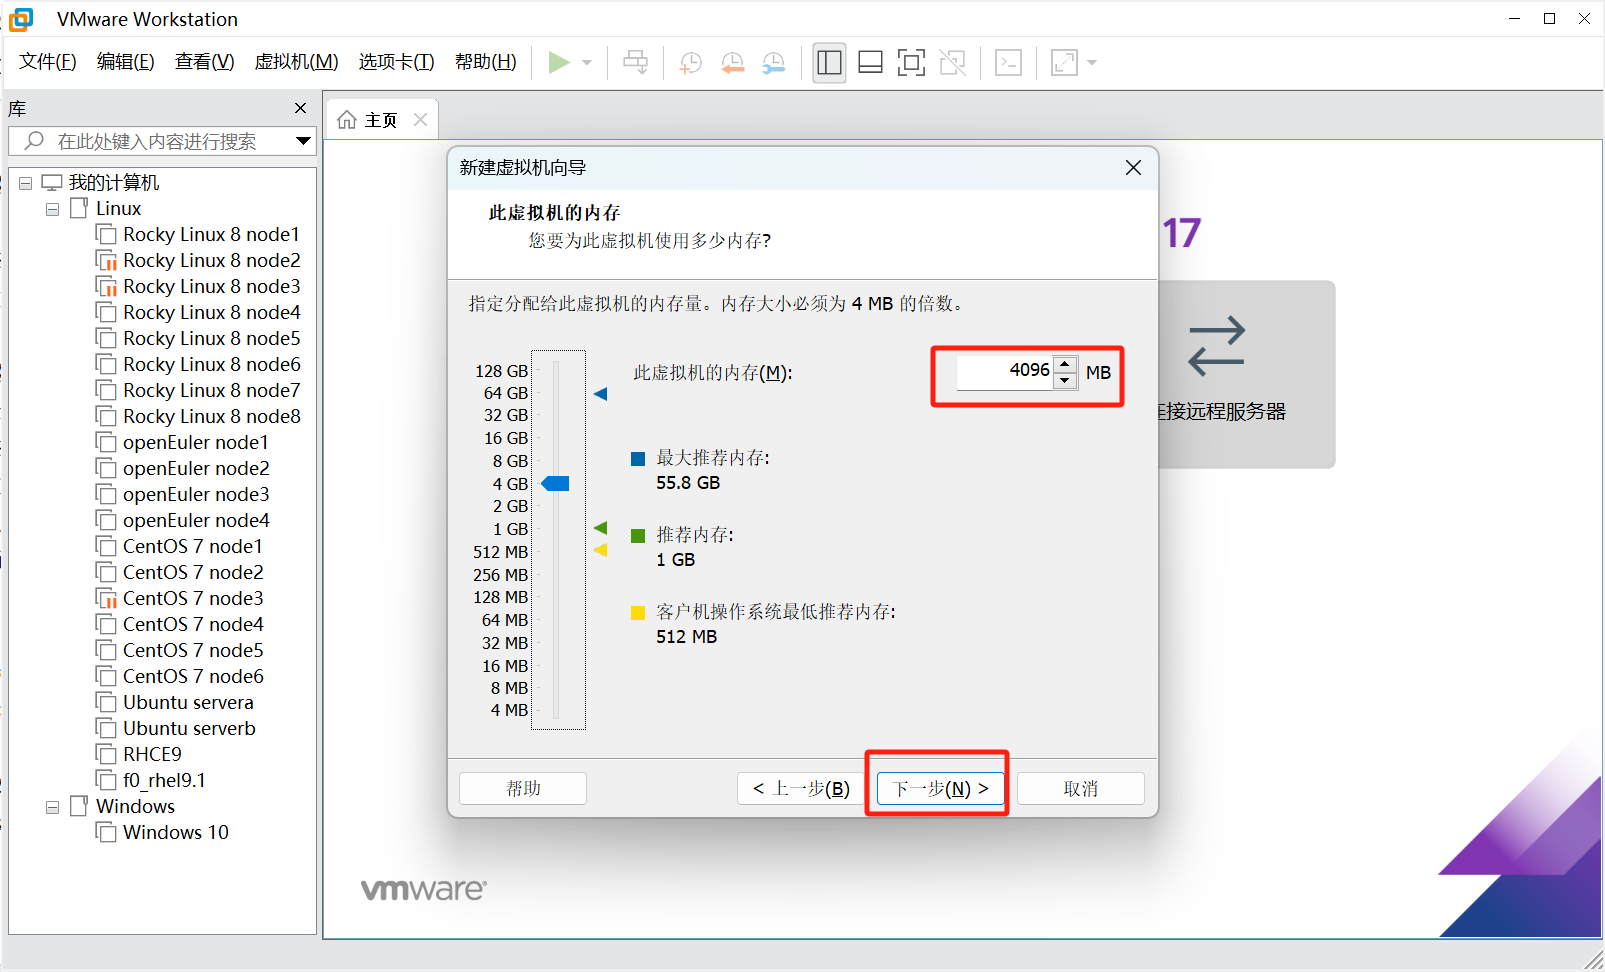
内存最少给2GB
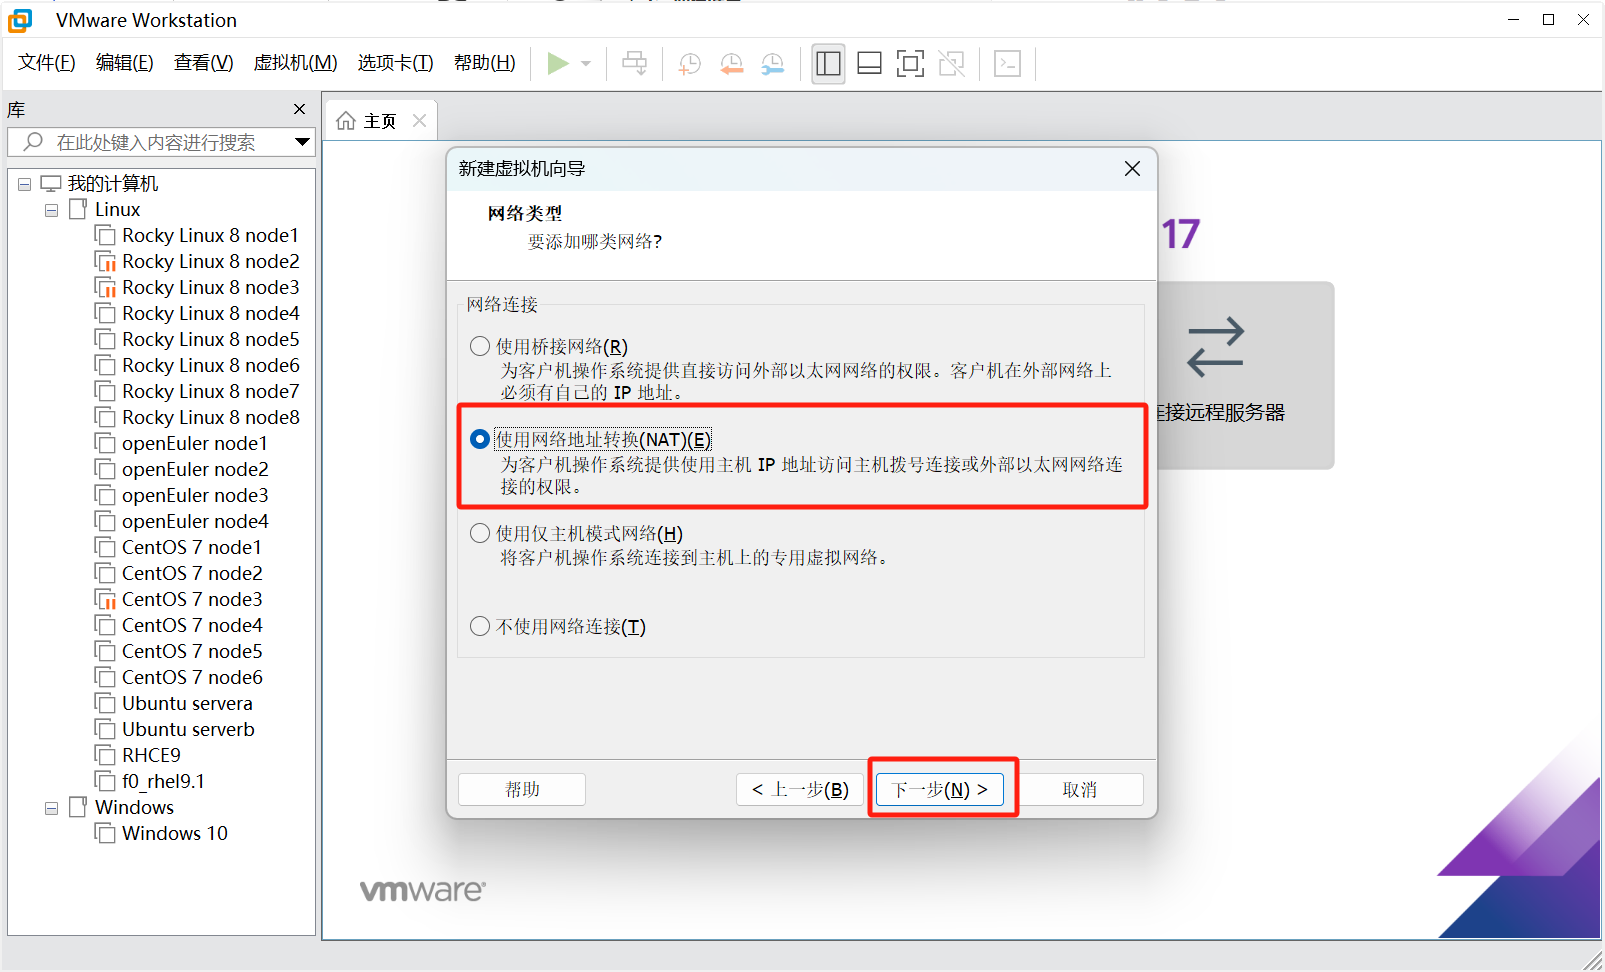
这里用桥接或者NAT都可以,只要能访问外网
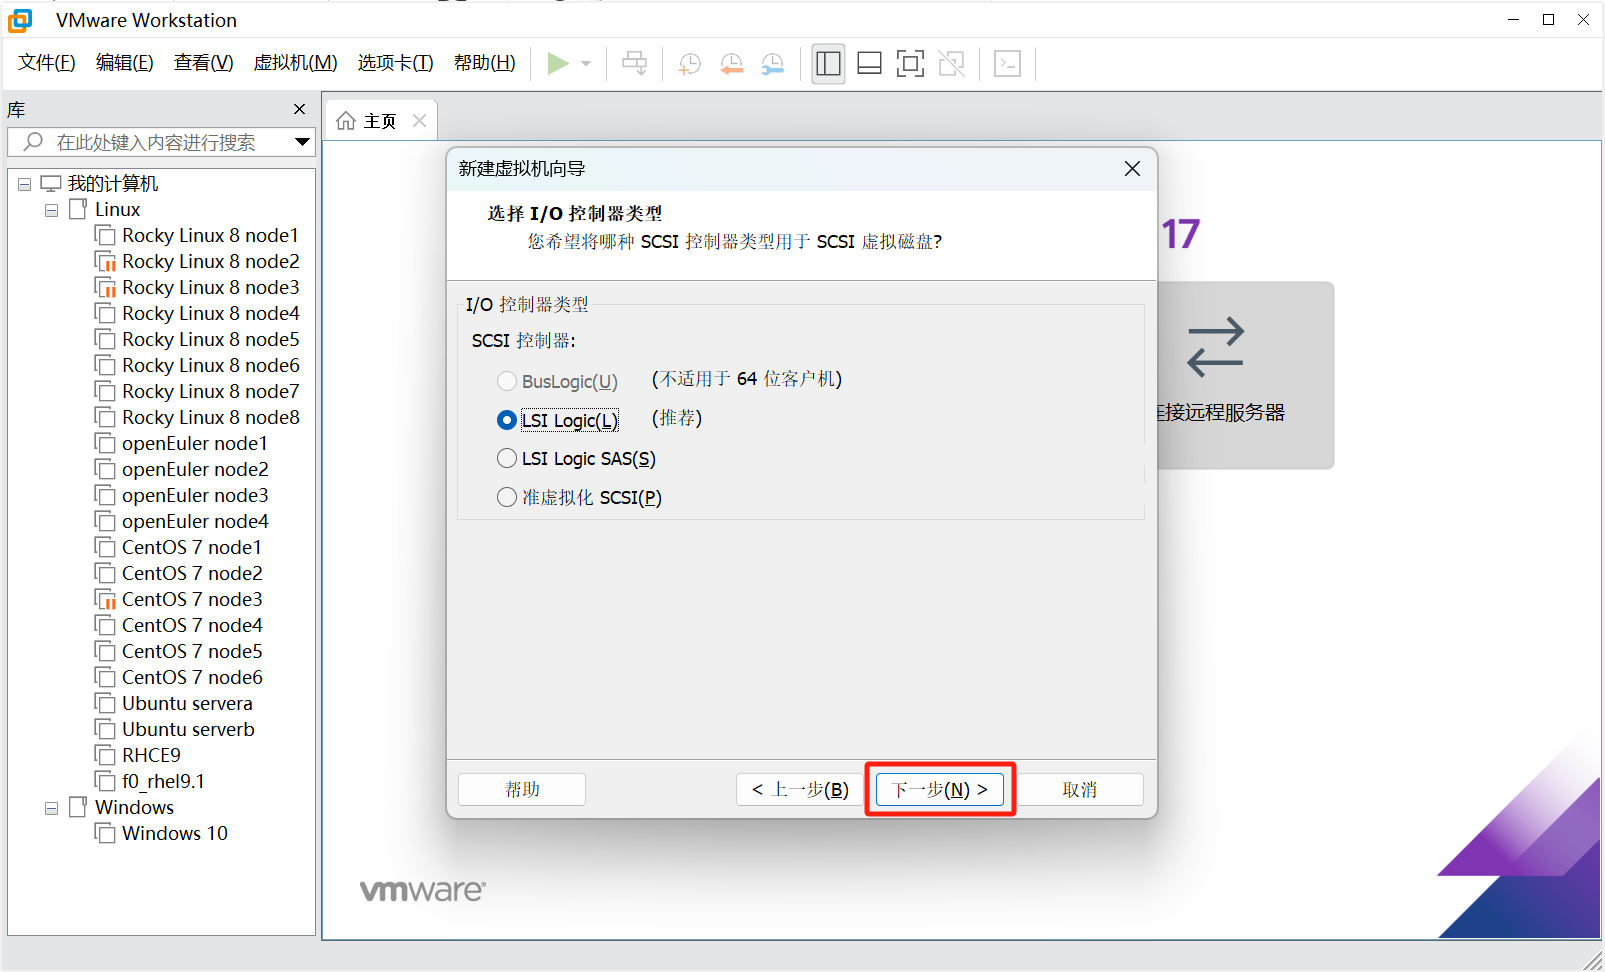
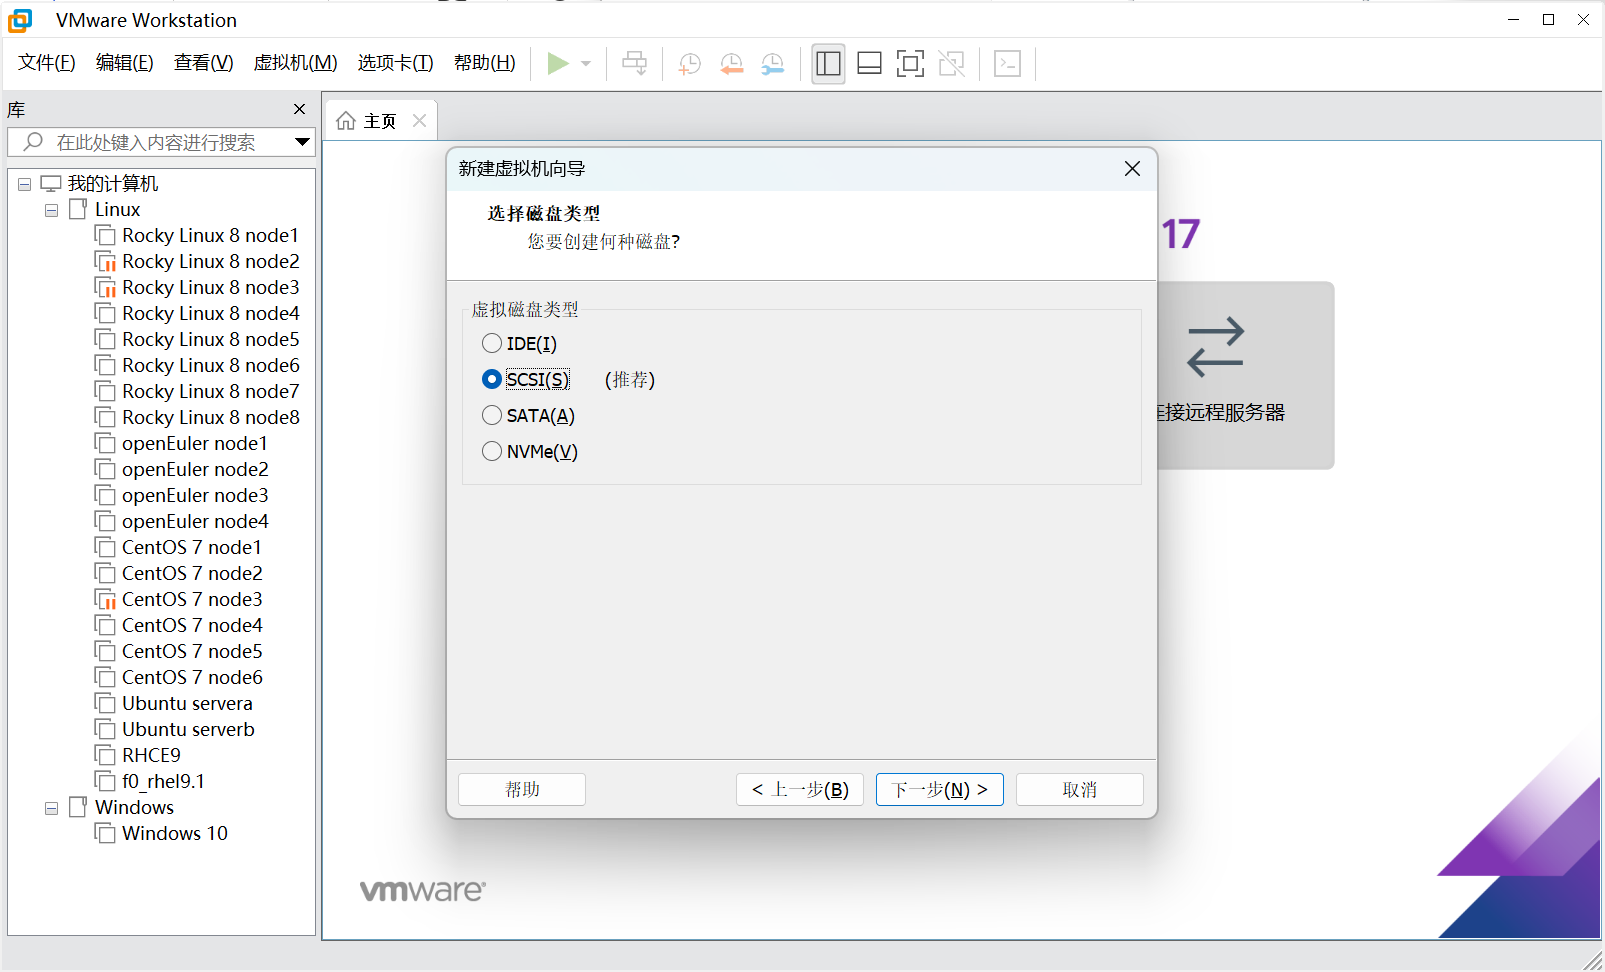
这里默认就行
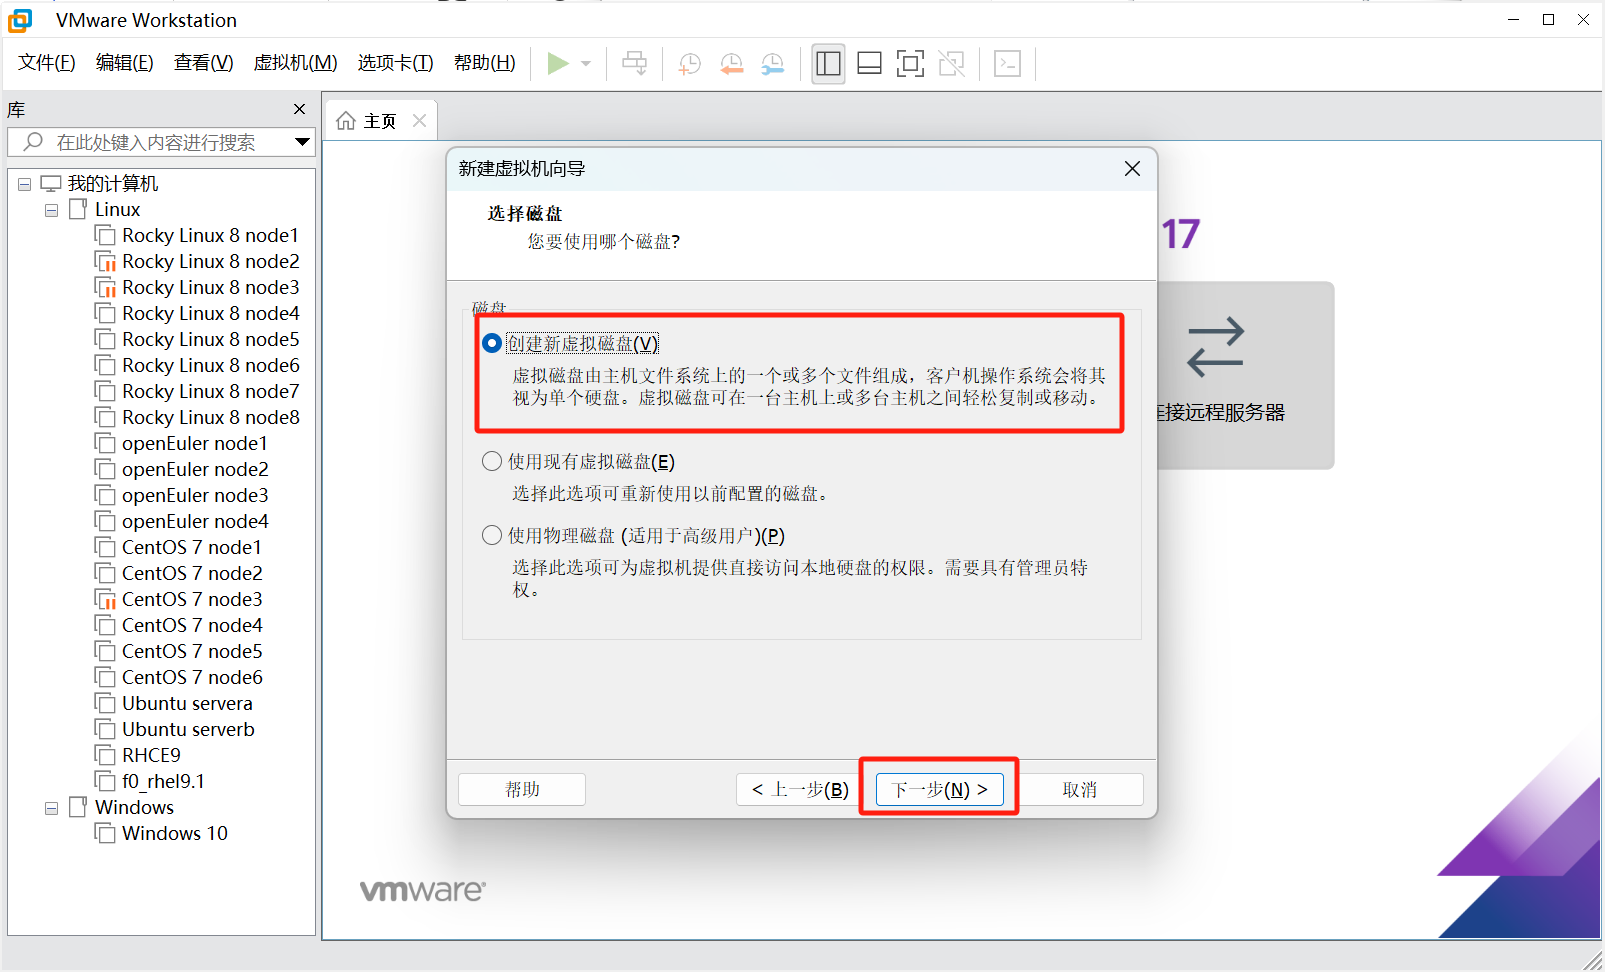
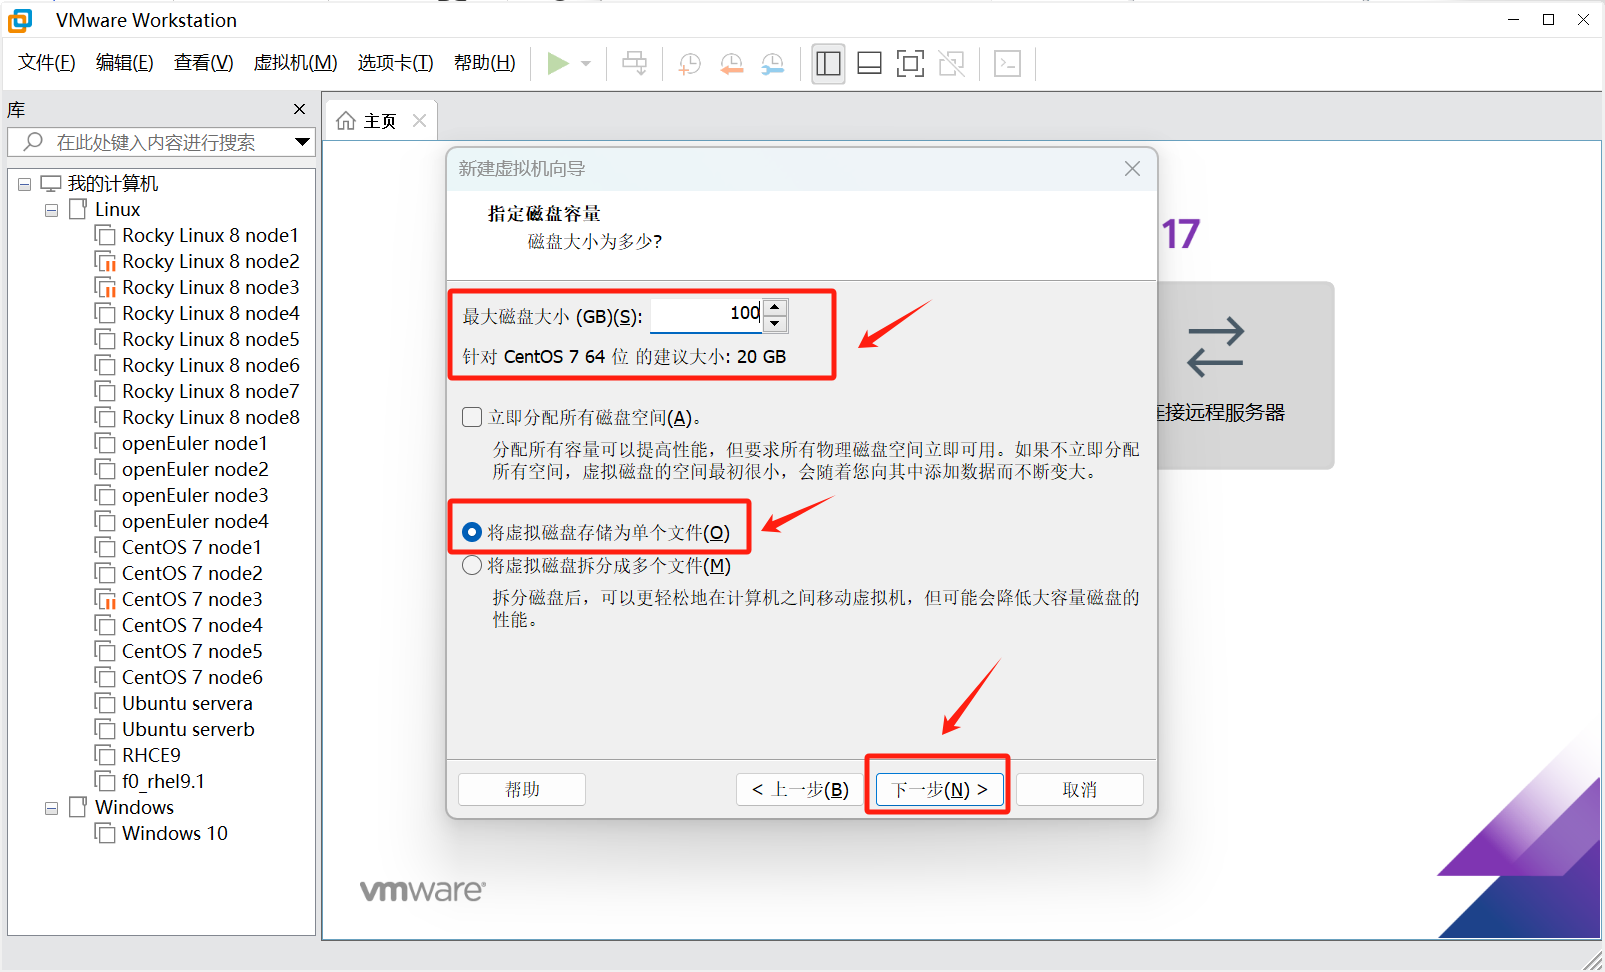
这里磁盘最少20G,不一定必须按照老师的文档来,能用就行
接下来一直下一步到完成即可

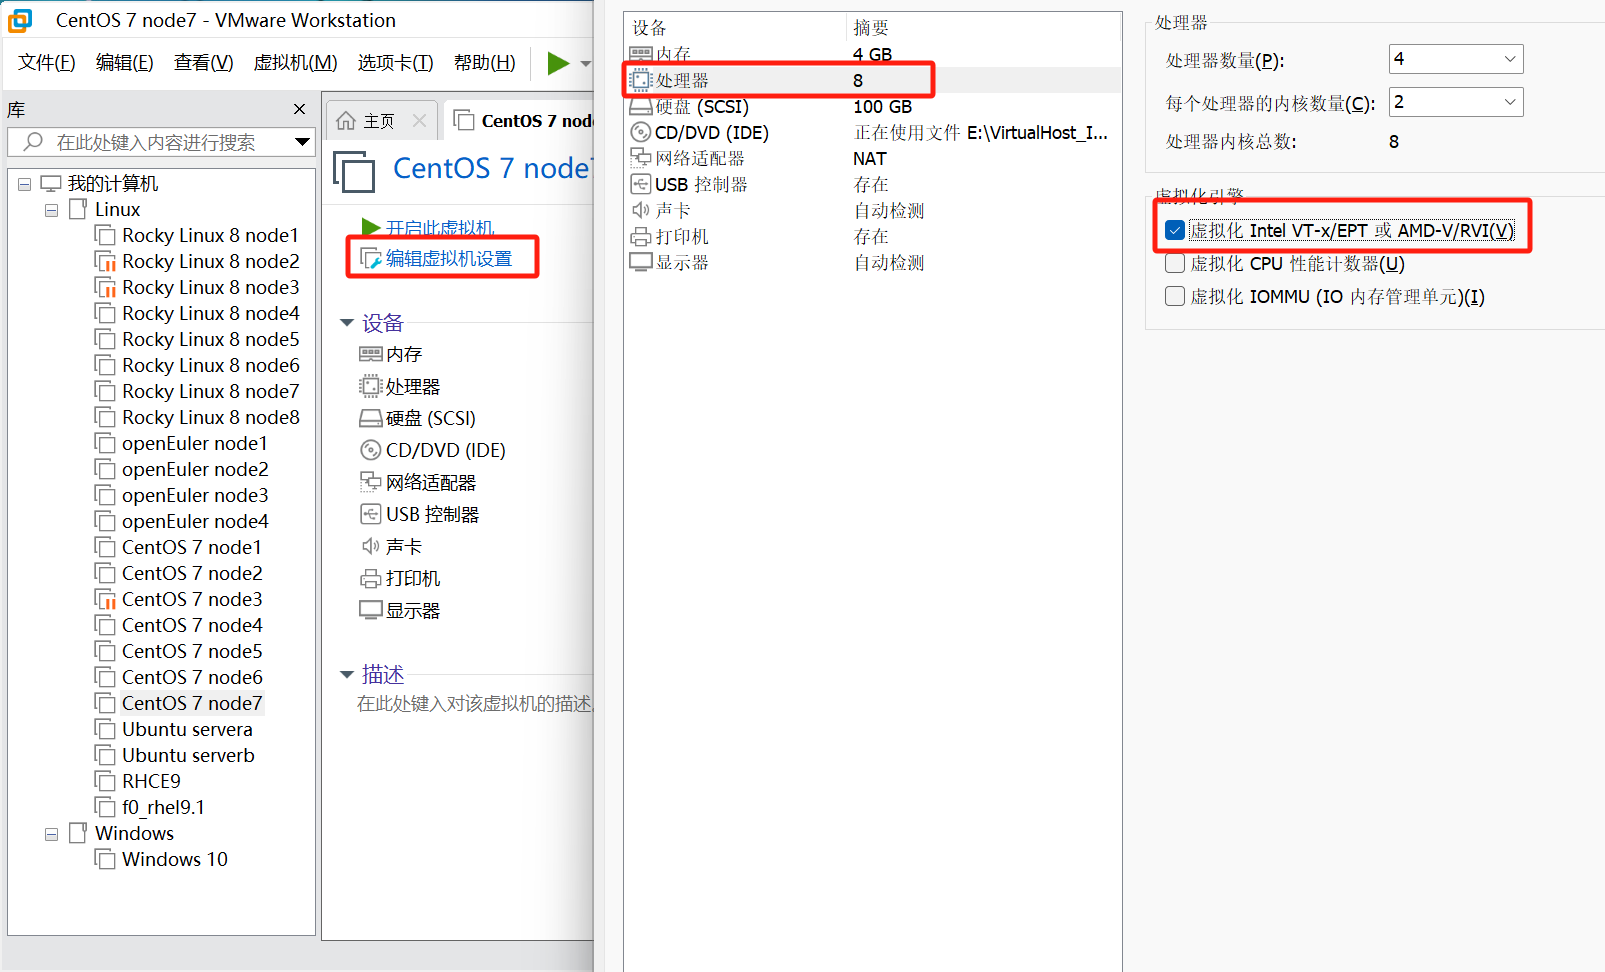
开启嵌套虚拟化
1.1.2 CentOS 7.9 系统部署
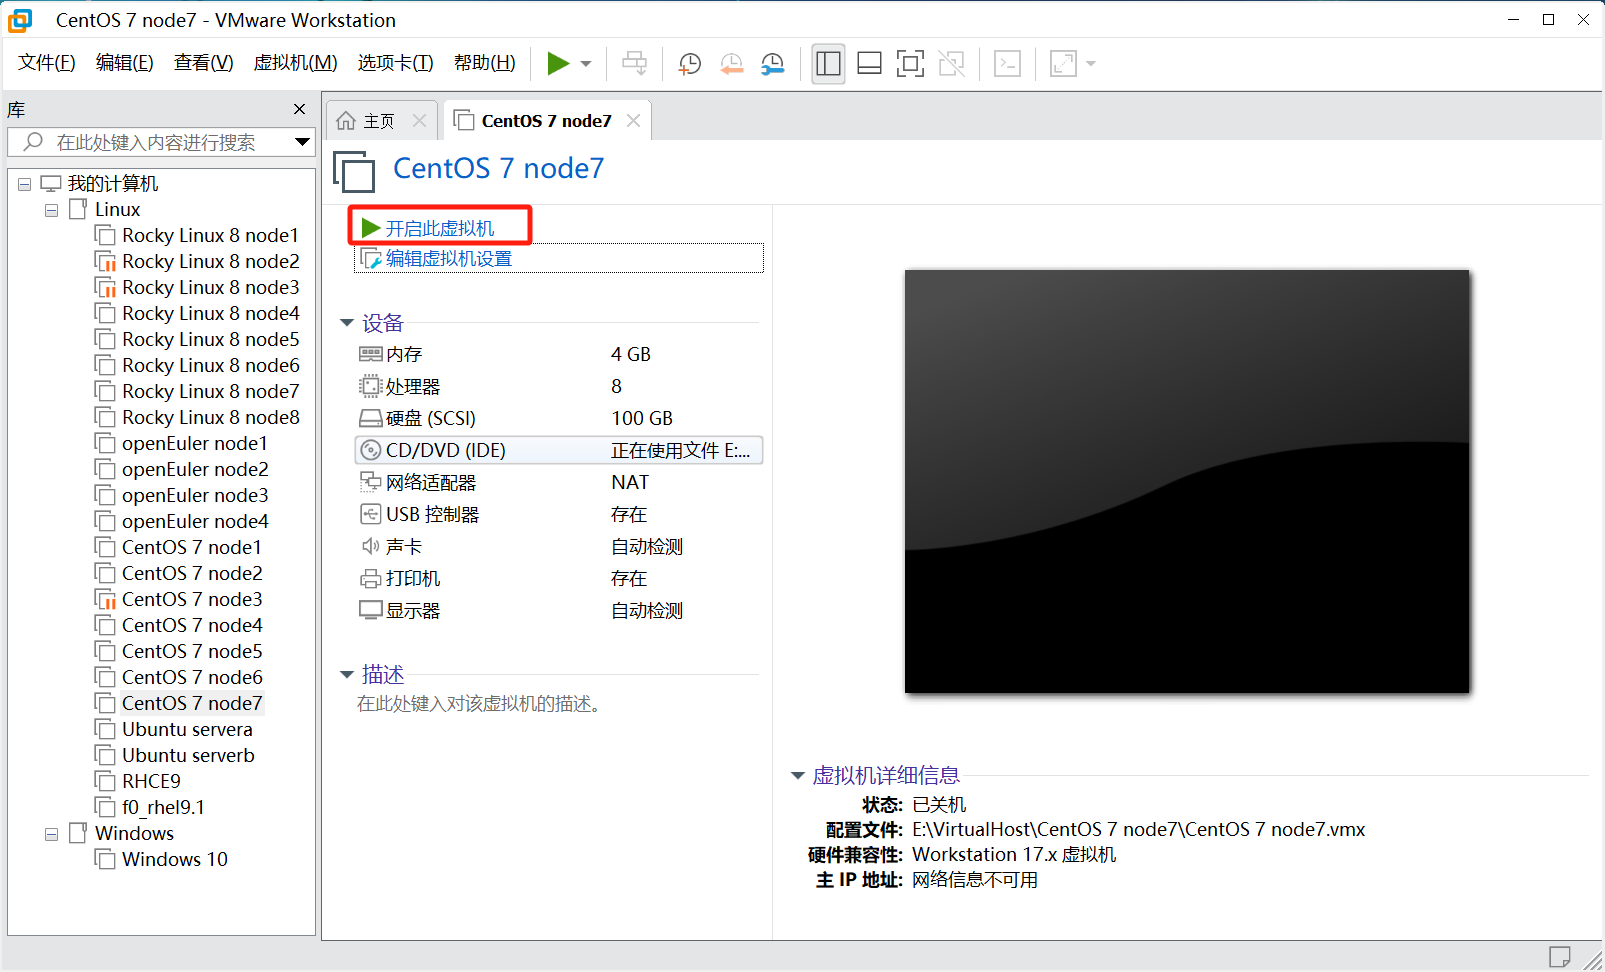
开机!!!
等待一段时间进入安装界面
1.1.2.1 语言选择
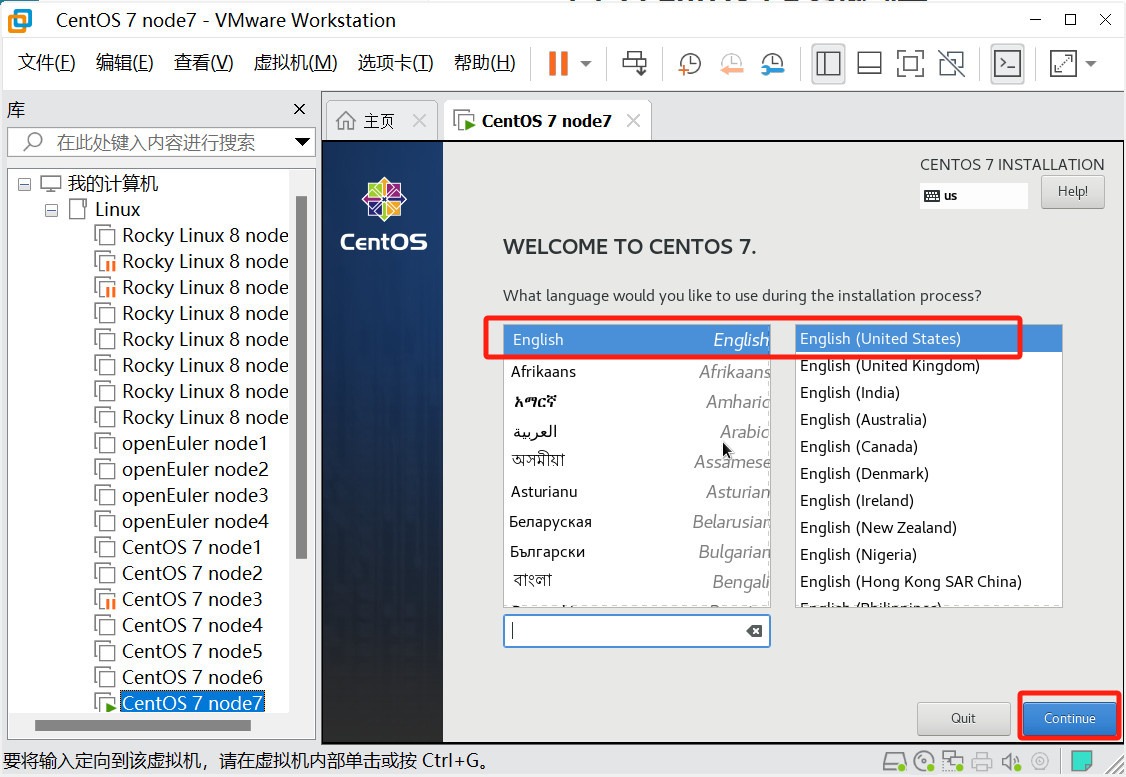
选择English,不要搞中文
1.1.2.2 设置时区
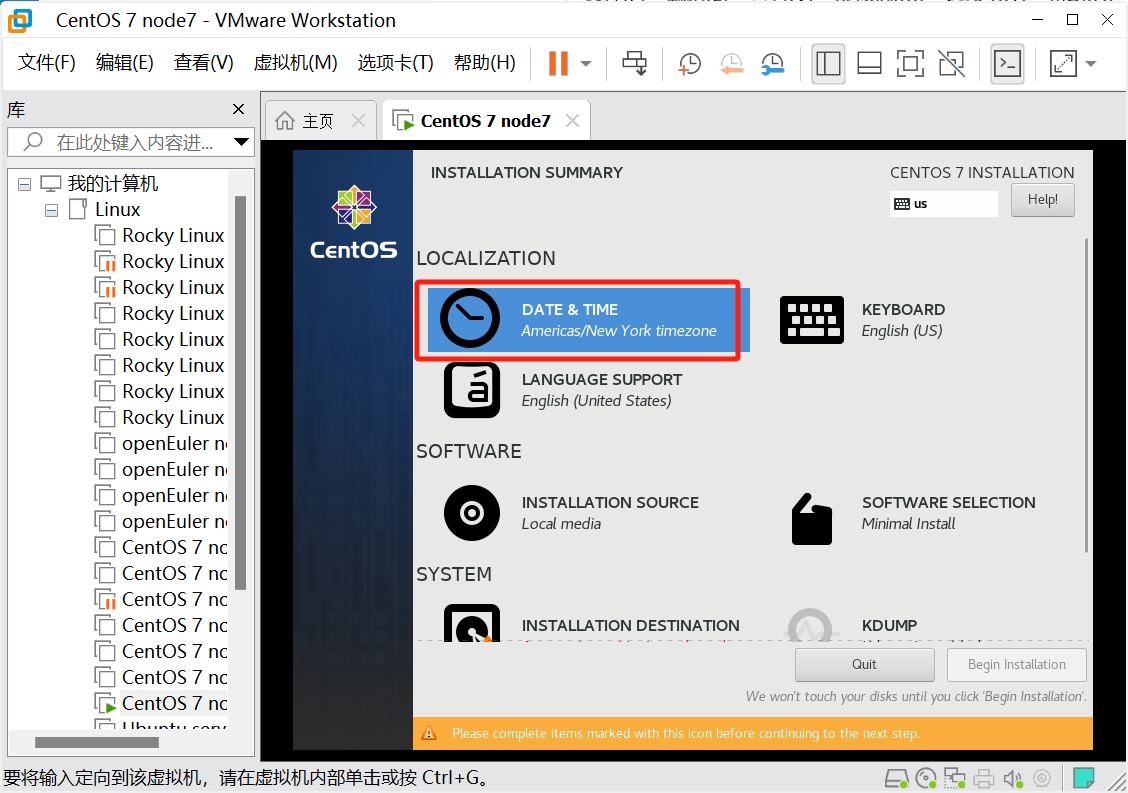
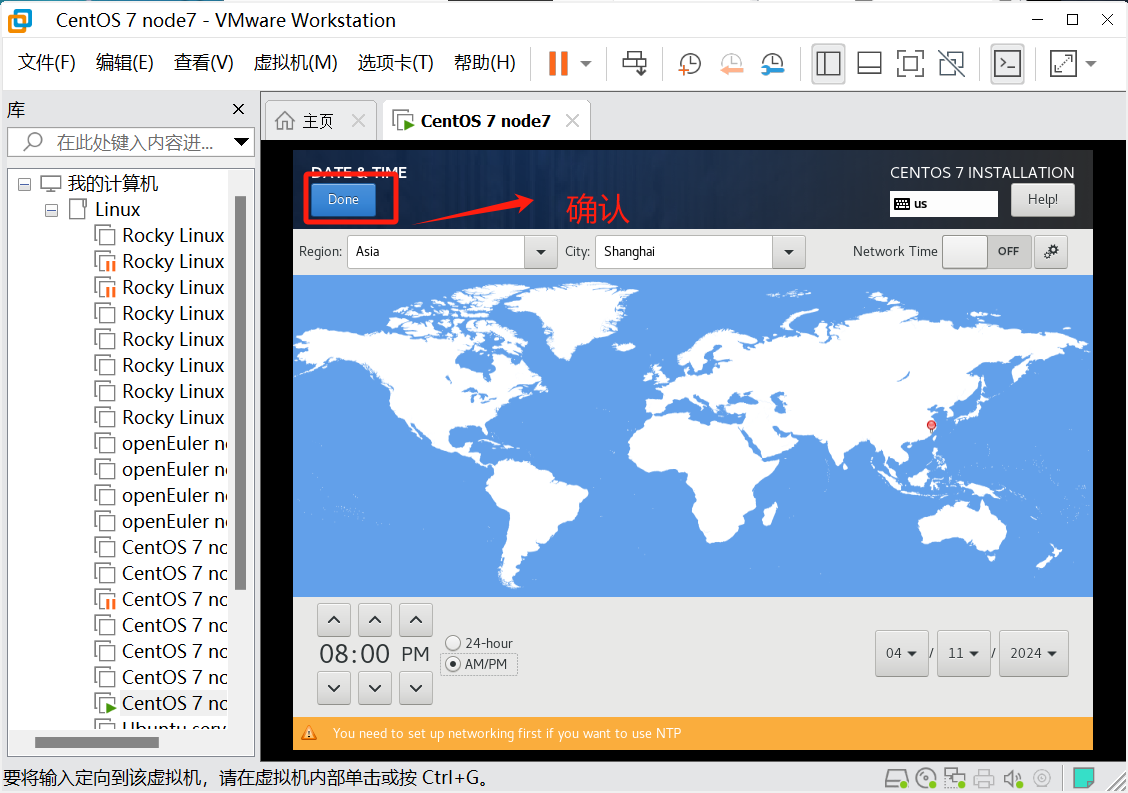
选择亚洲上海,图上点就行
1.1.2.3 选择安装方式
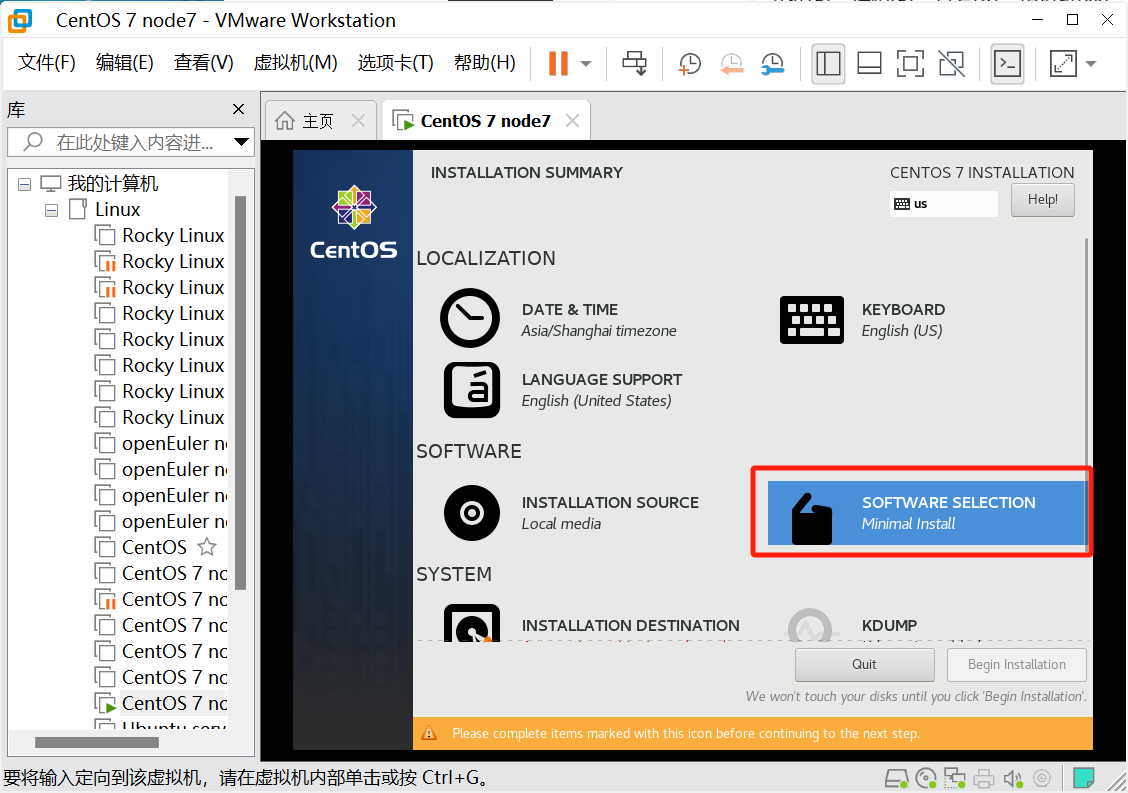
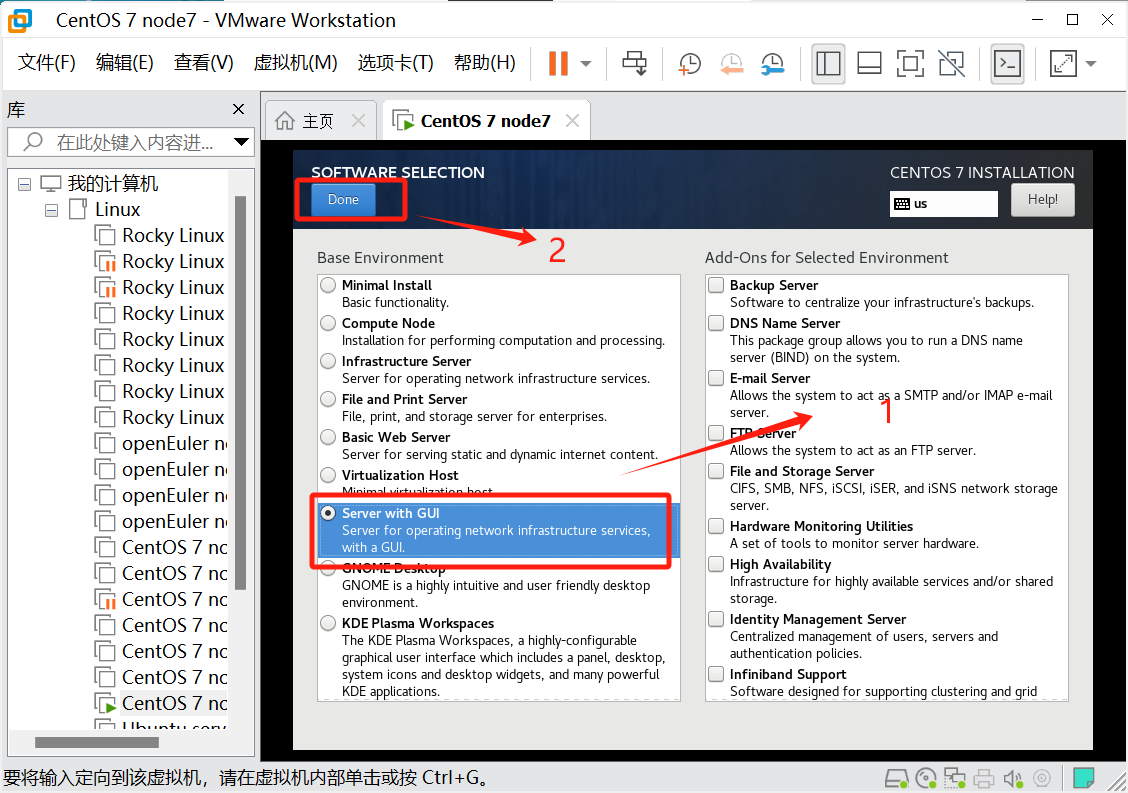
选择安装GUI图形化界面,如果熟悉Linux建议选择最小化安装省资源
1.1.2.4 磁盘分区
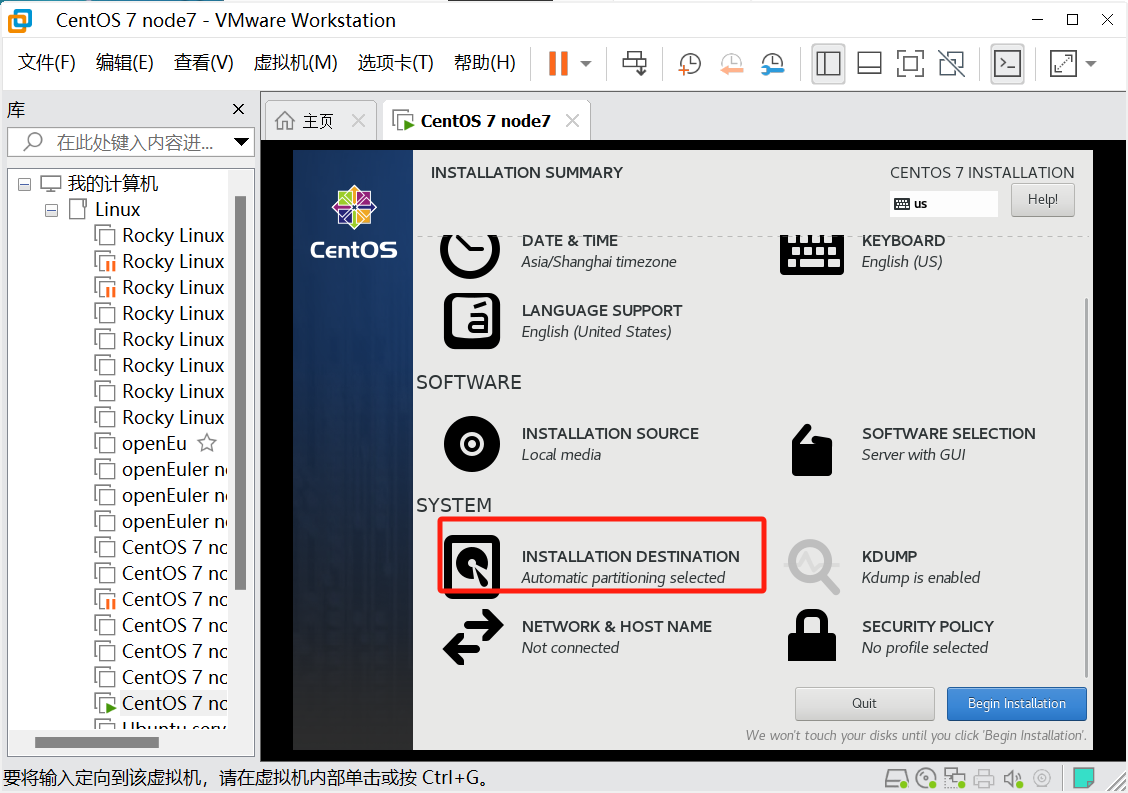
默认分区即可,进来后直接点Done

1.1.2.5 配置网卡用户名
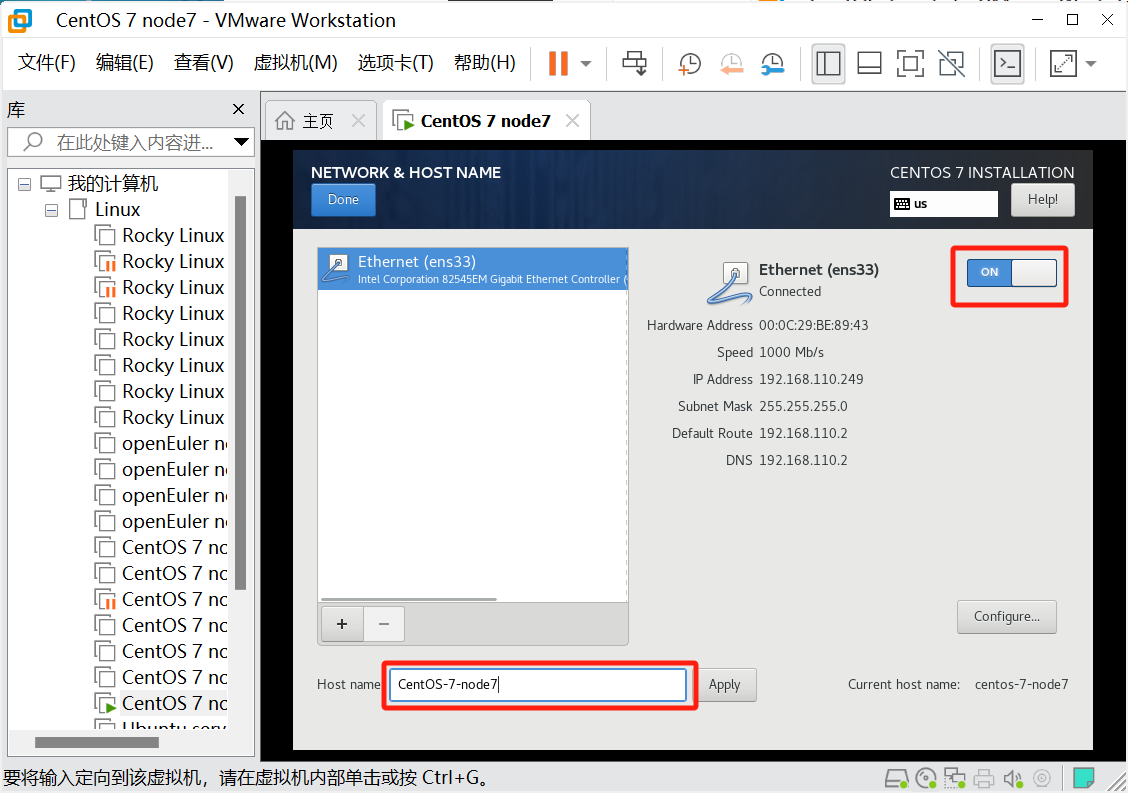
主机名随便起,然后开机自动连接网卡
1.1.2.6 配置静态IP
点击编辑---> 虚拟网络编辑器
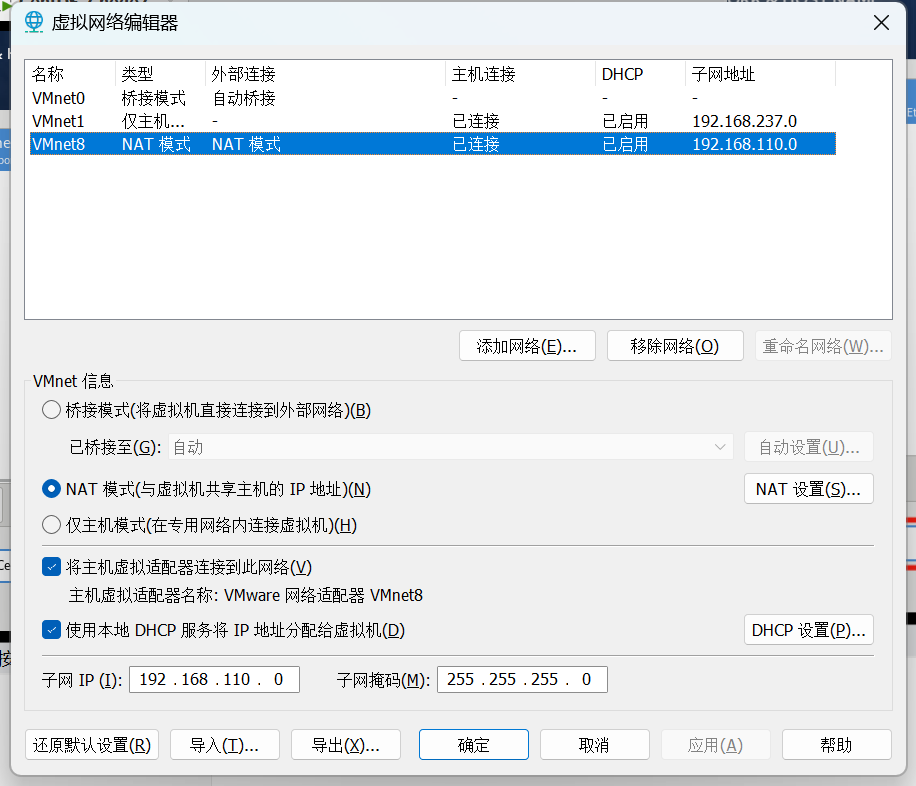
查看自己的VMnet8网卡的地址前三位,后面的机器地址前三位必须是这三位,我这里是192.168.110.X,当然这个可以改,你也可以改成和我一样IP地址的方便后续操作
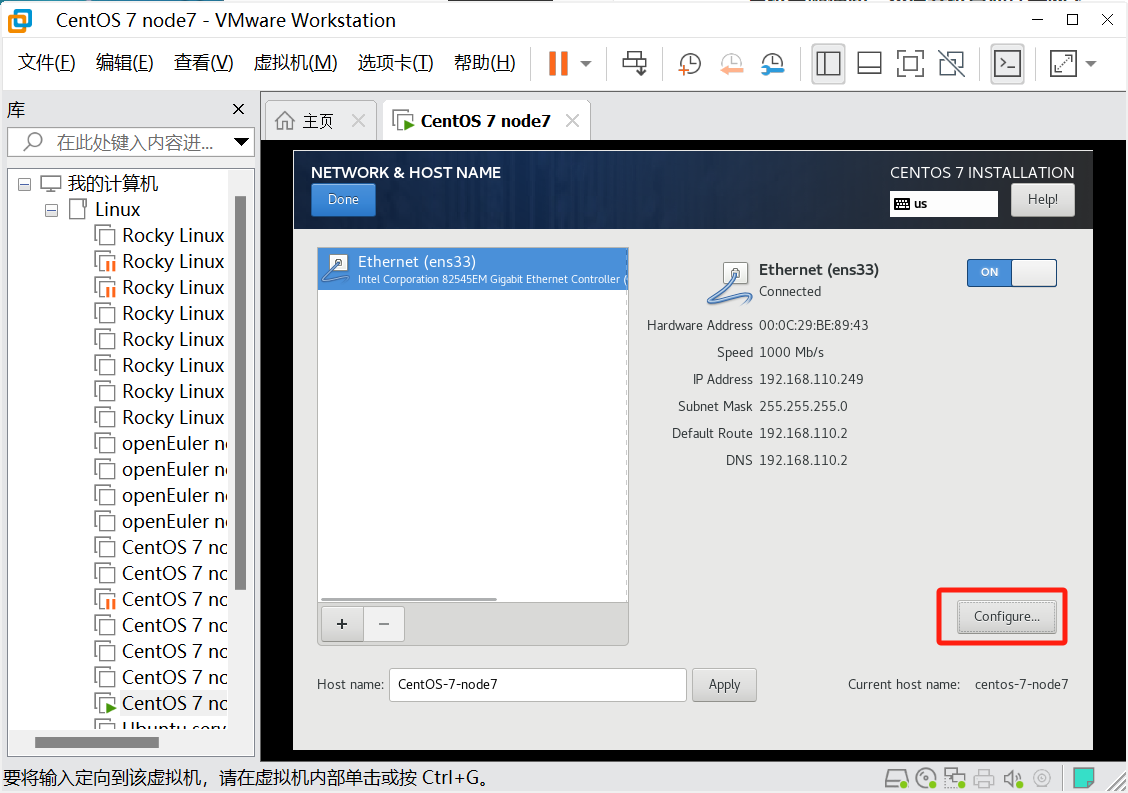
配置网络
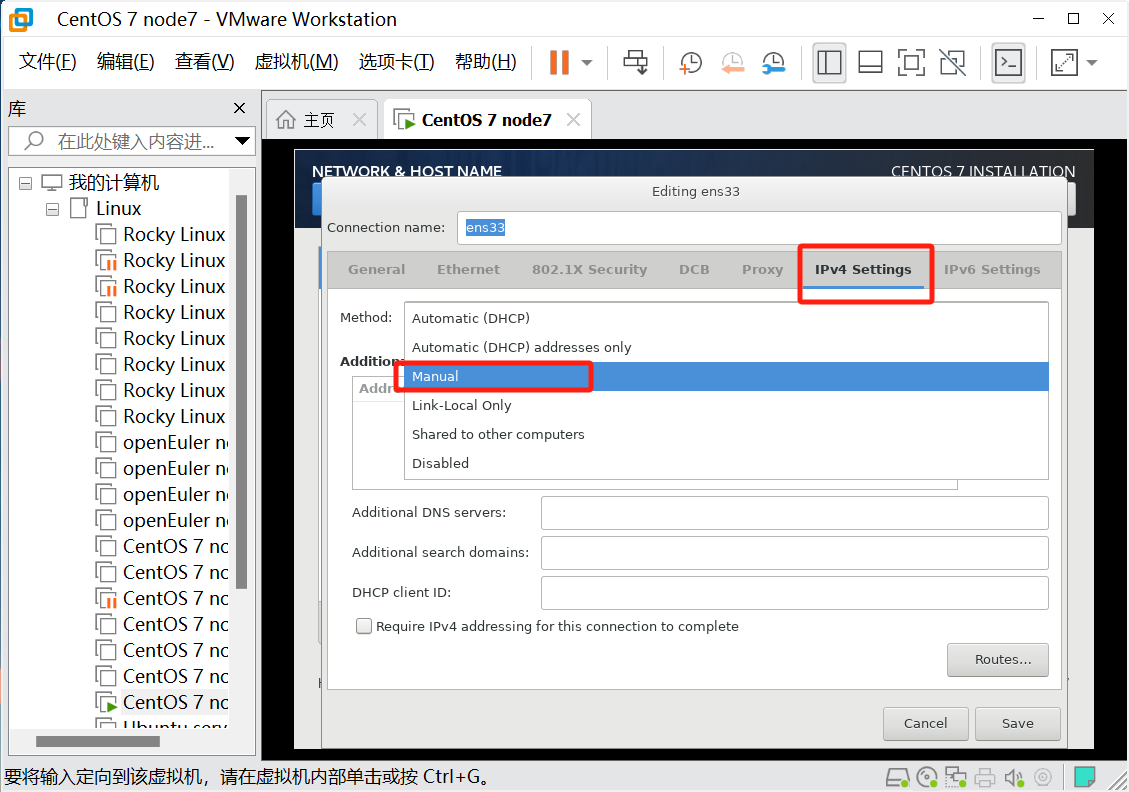
选择IPV4是设置为手动获取
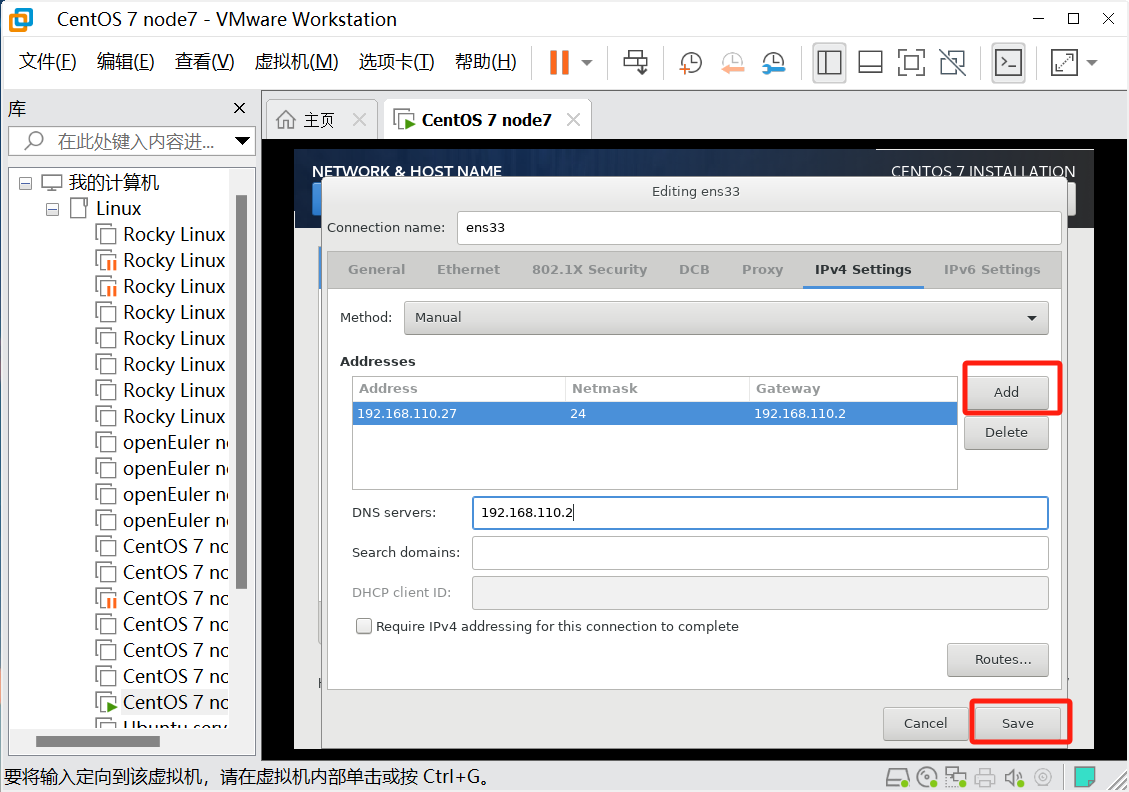
网关和DNS一样,且第四位都是2
保存后,点Done
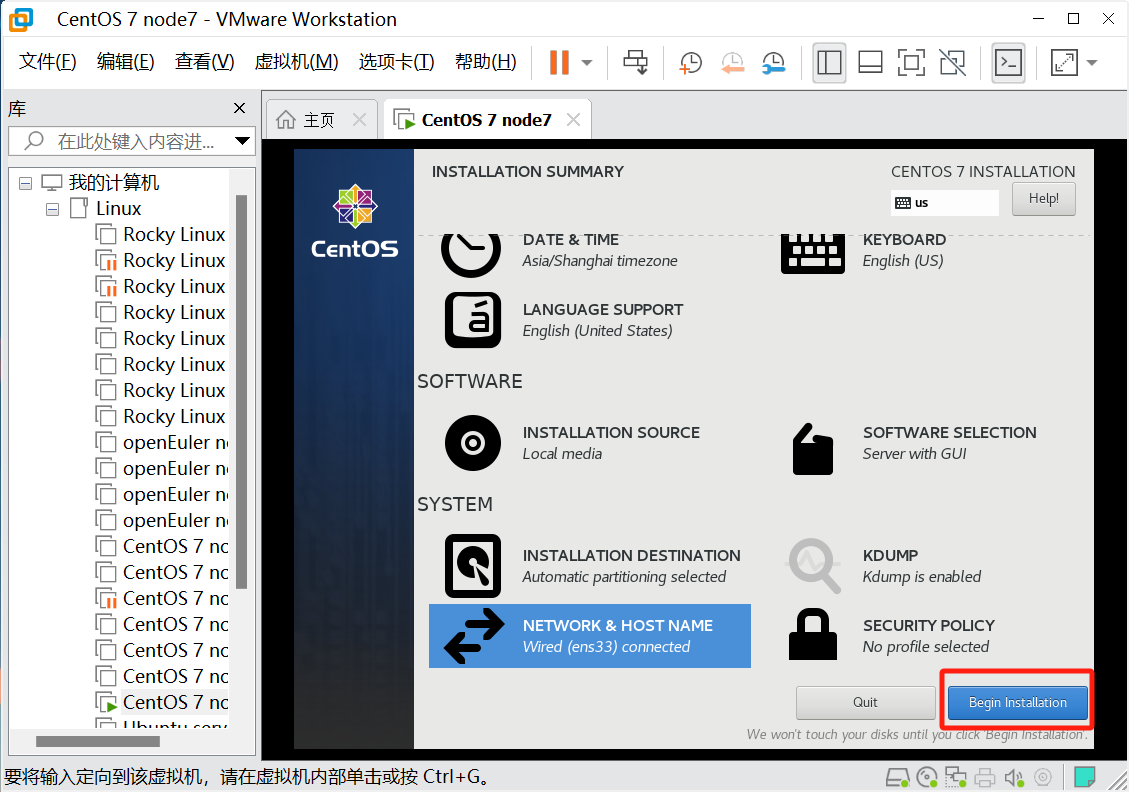
然后就可以安装了
1.1.2.7 设置ROOT密码并创建普通用户
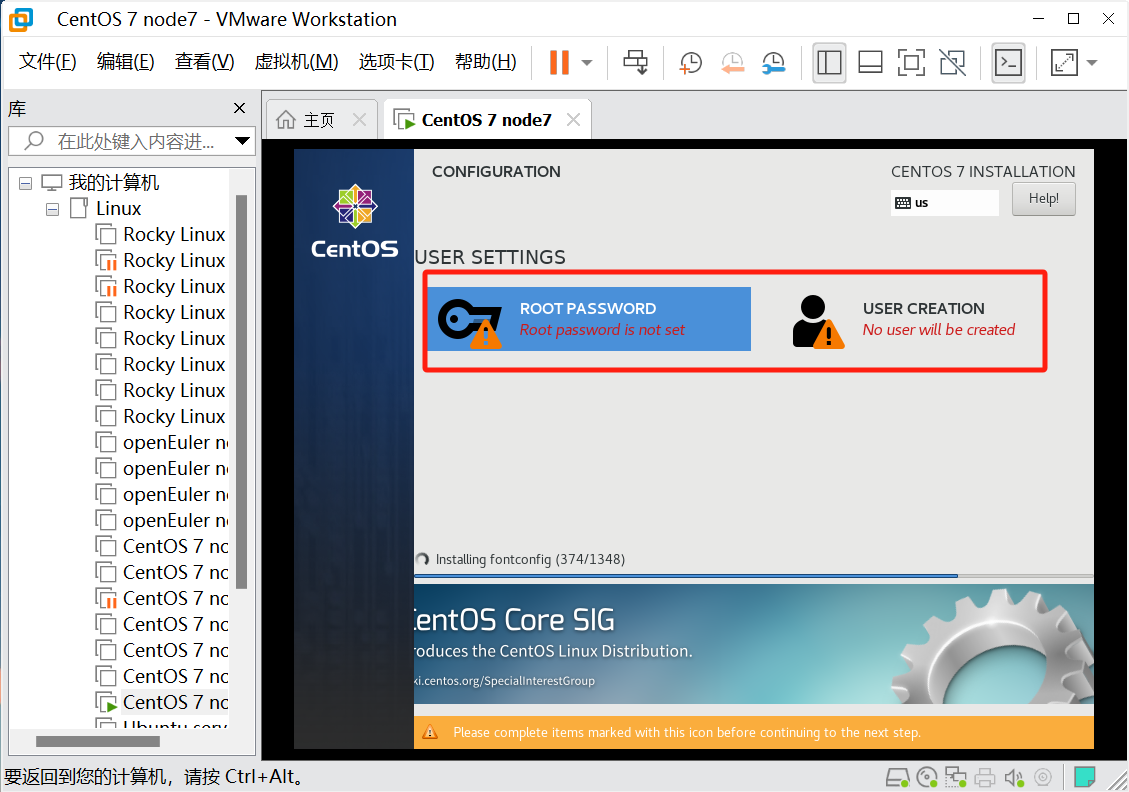
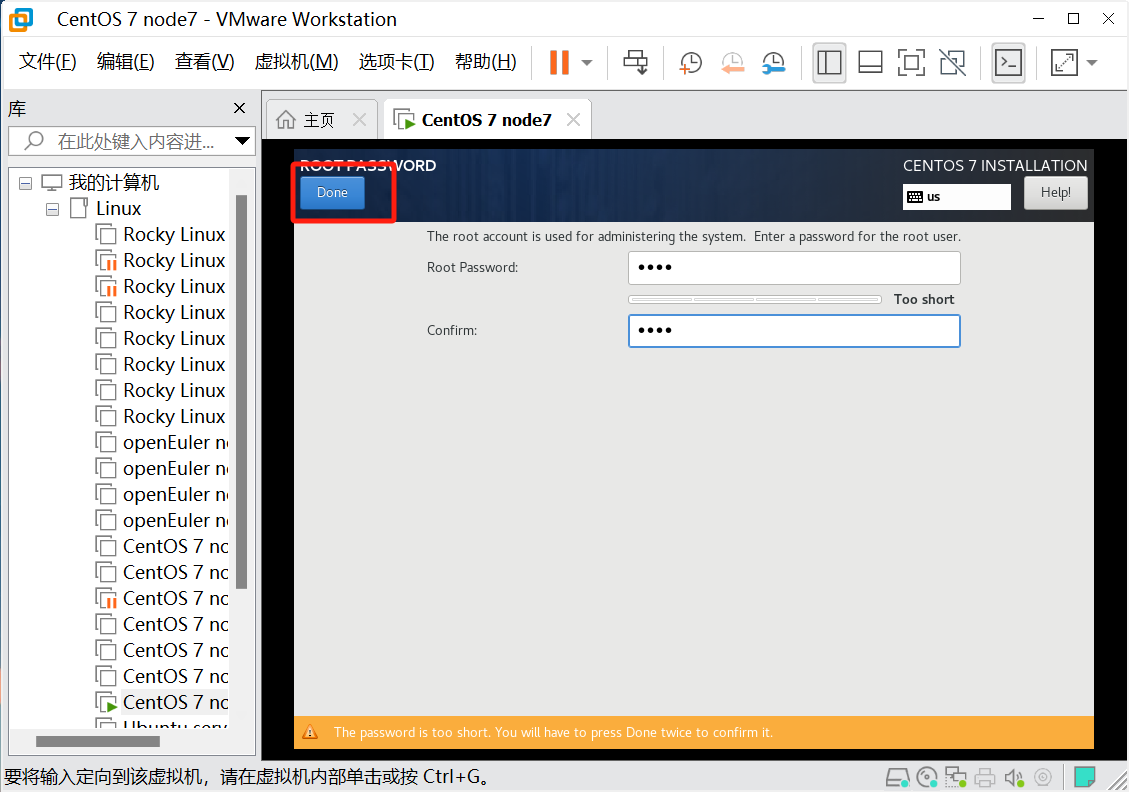
我这里为1234

有GUI界面就必须创建一个普通用户
点Done确定后等待安装即可
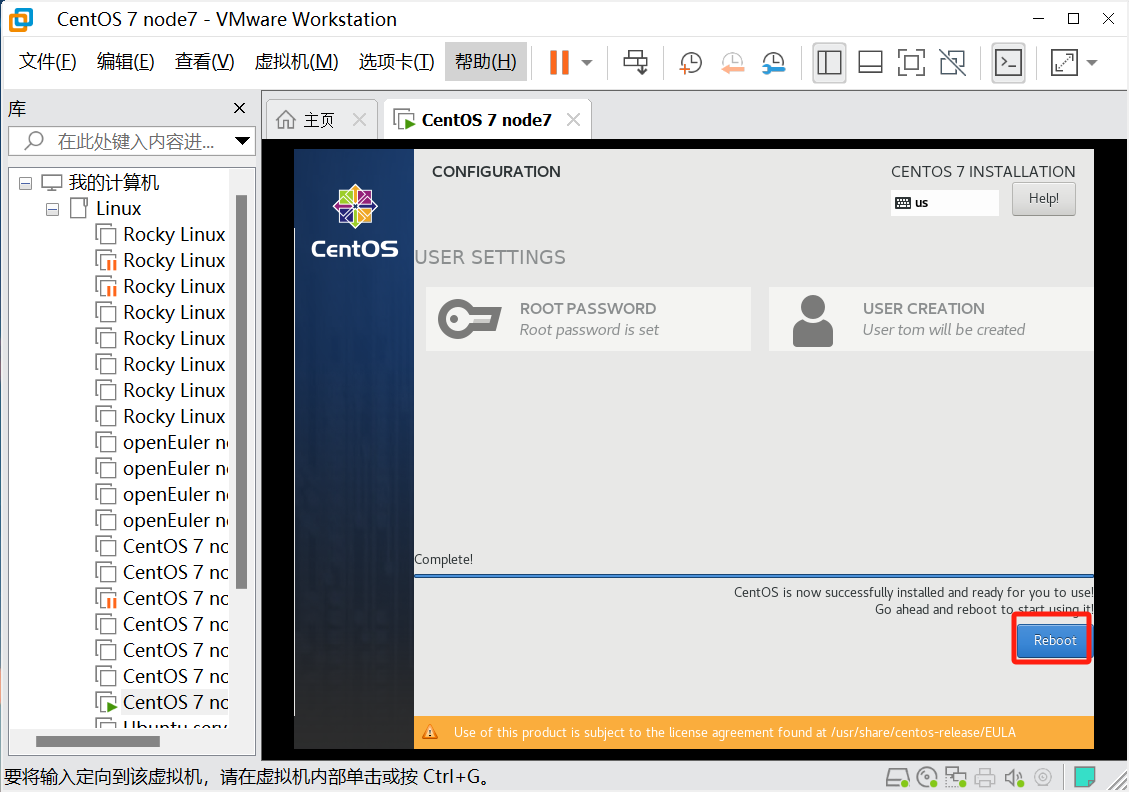
最后Reboot重启即可
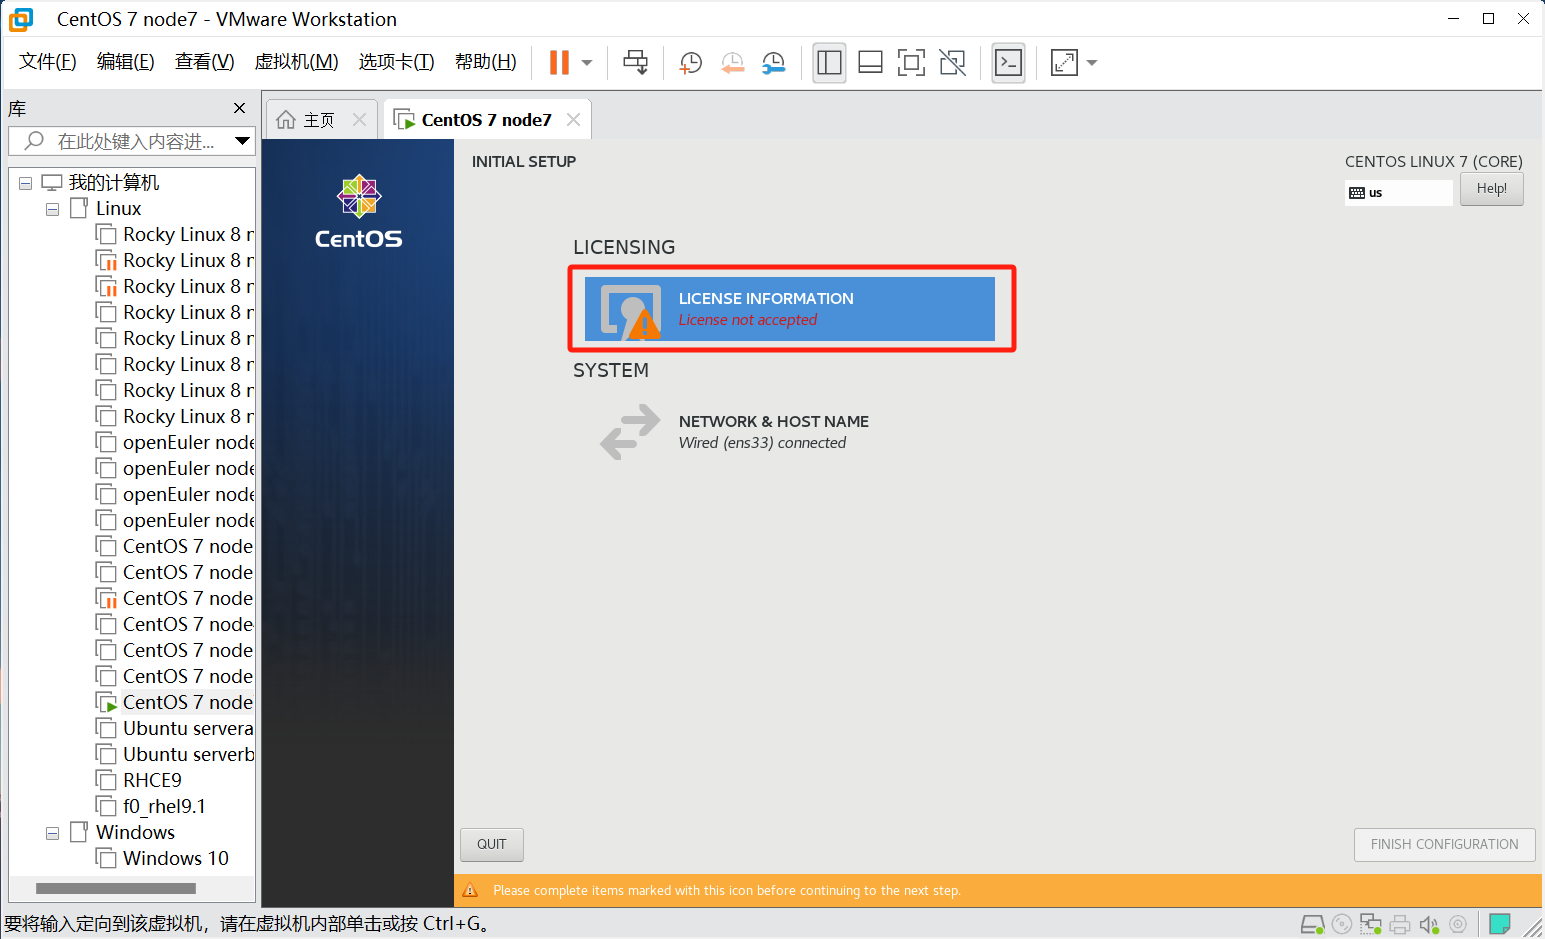
这里点开勾选一下同意即可
1.2 安装完毕后的环境部署
1.2.1 以root身份登录
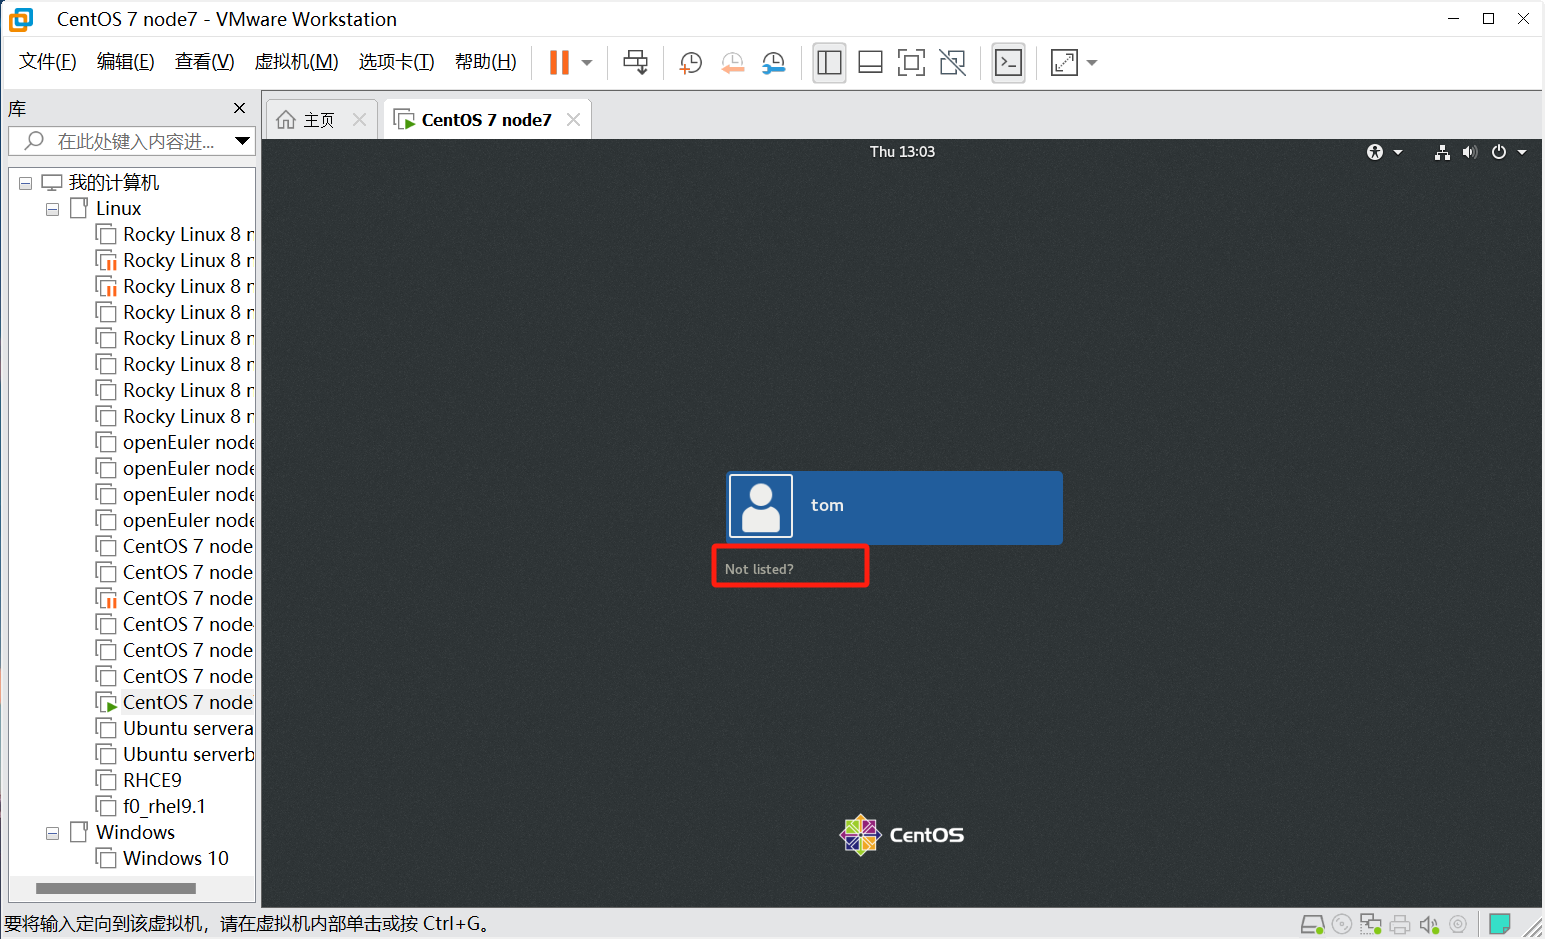
点击Not listed,输入用户名为root
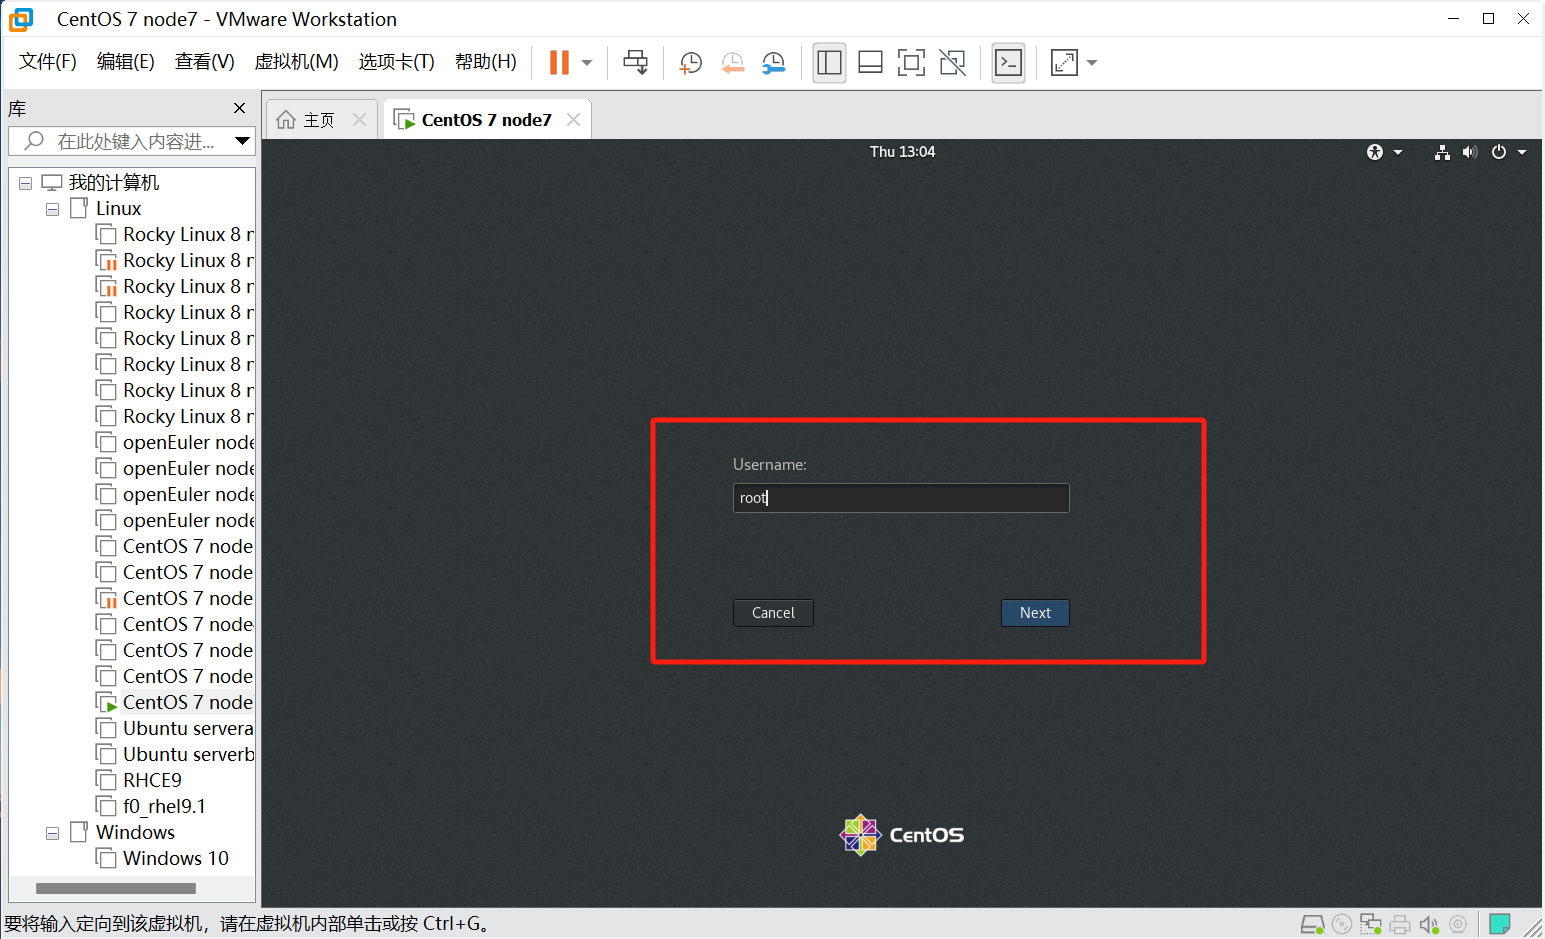

输入密码登录
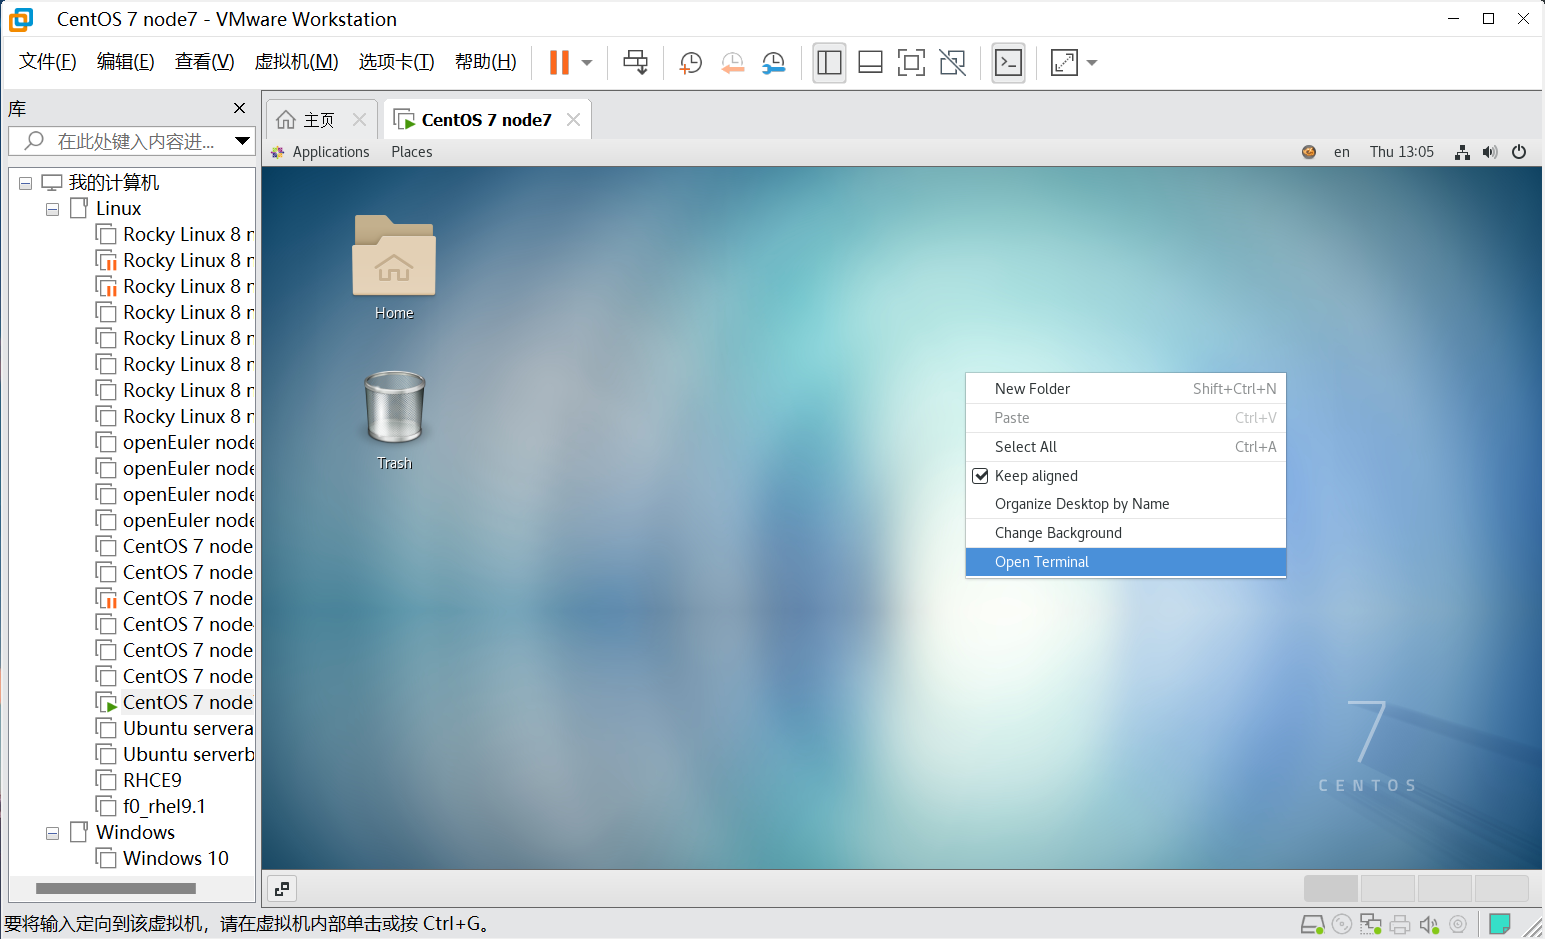
右键打开Terminal,Ctrl+Shift+加号(+)可以放大,Ctrl+减号(-)为缩小
1.2.2 按照要求更改主机名
这里可以在创建虚拟机时就改好
[root@CentOS-7-node7 ~]# hostnamectl set-hostname controller   #永久修改主机名
[root@CentOS-7-node7 ~]# bash   #刷新终端
[root@controller ~]# hostname   #查看主机名
controller
1.2.3 关闭防火墙
[root@controller ~]# systemctl disable firewalld.service --now   #永久关闭
Removed symlink /etc/systemd/system/multi-user.target.wants/firewalld.service.
Removed symlink /etc/systemd/system/dbus-org.fedoraproject.FirewallD1.service
[root@controller ~]# systemctl is-active firewalld.service   #查看
unknown
1.2.4 禁止SELinux
[root@controller ~]# sed -i '/^SELINUX=/ c SELINUX=disabled' /etc/selinux/config #使用sed替换,也可以vim编辑,重启生效
1.2.5 关机并快照
[root@controller ~]# init 0 #关机
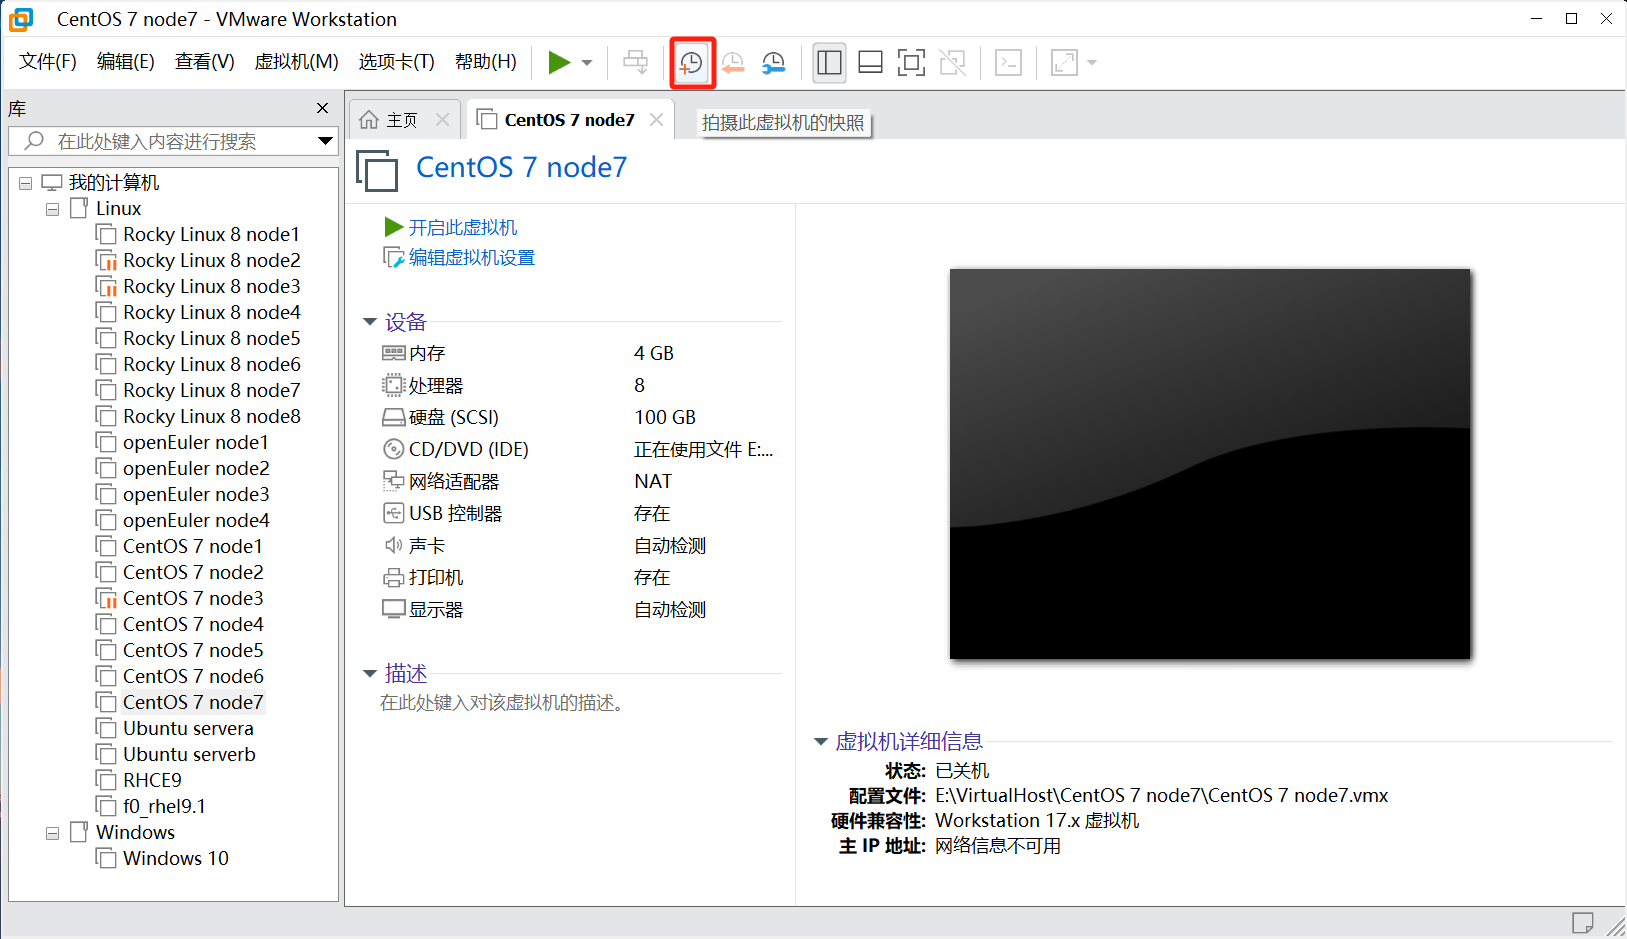
创建快照
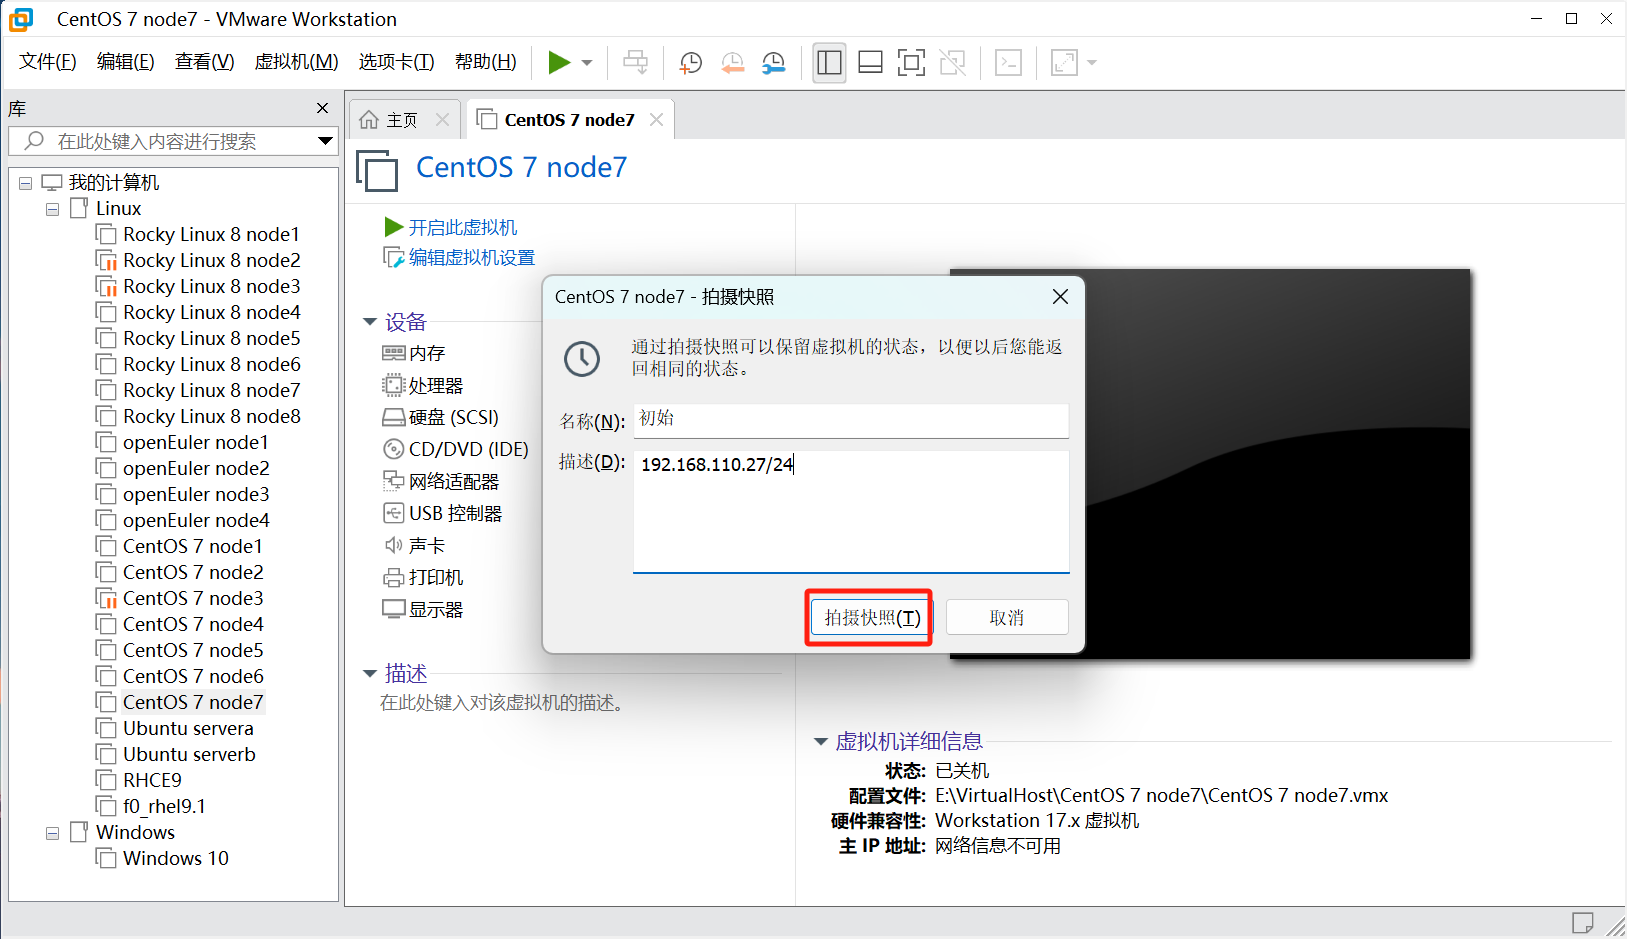
注意:本次实验需要两台机器,第二台可以克隆没必要再次创建,具体步骤这里就不描述了,你也可以重复以上操作。
1.2.6 计算节点安装部署
这里我用我已有的一台机器
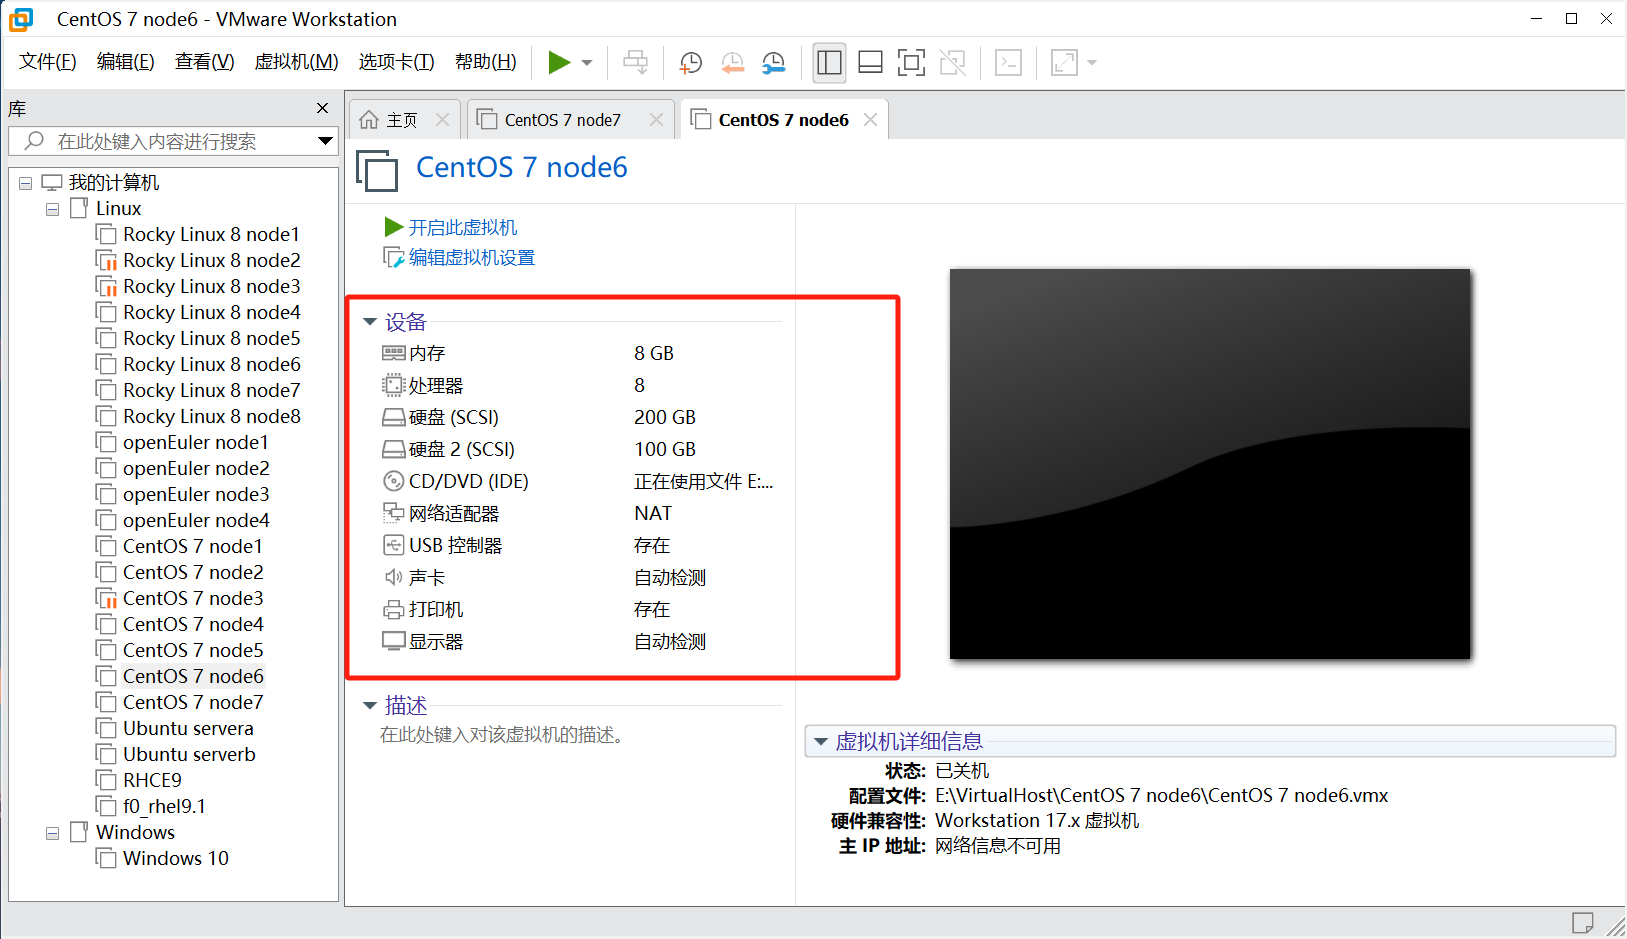
还是一样的操作
[root@CentOS-7-node6 ~]# hostnamectl set-hostname computel   #永久修改主机名
[root@CentOS-7-node6 ~]# bash   #刷新终端
[root@computel ~]# hostname   #查看主机名
computel
[root@computel ~]# systemctl disable firewalld.service --now   #永久关闭防火墙
Removed symlink /etc/systemd/system/multi-user.target.wants/firewalld.service.
Removed symlink /etc/systemd/system/dbus-org.fedoraproject.FirewallD1.service
[root@computel ~]# systemctl is-active firewalld.service   #查看
unknown
[root@computel ~]# sed -i '/^SELINUX=/ c SELINUX=disabled' /etc/selinux/config #使用sed替换,也可以vim编辑,重启生效
[root@computel ~]# init 0 #关机
1.2.7 两台机器添加网卡模式为仅主机
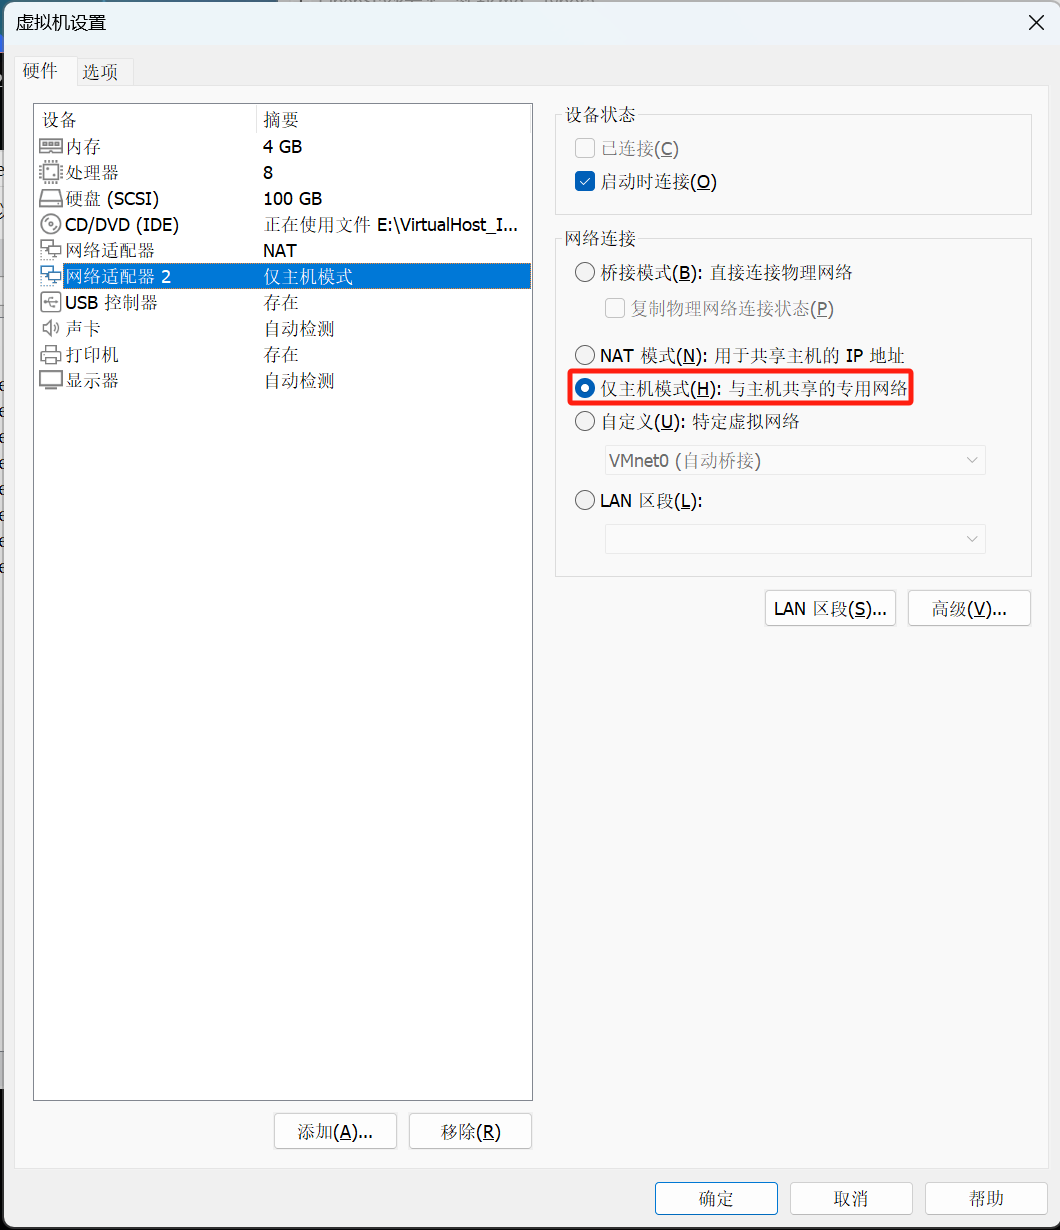
然后开机
1.2.8调整时区为亚洲上海
装机时选了就不管了
[root@controller ~]# timedatectl set-timezone "Asia/Shanghai" [root@computel ~]# timedatectl set-timezone "Asia/Shanghai"
1.2.9 配置NTP时间服务器
为了方便这里就用阿里的时间服务了
controller
[root@controller ~]# sed -i '3,6 s/^/# /' /etc/chrony.conf   #将原有的注释
[root@controller ~]# sed -i '6 a server ntp.aliyun.com iburst' /etc/chrony.conf  #添加阿里云的NTP
[root@controller ~]# systemctl restart chronyd.service  #重启生效
[root@controller ~]# chronyc sources   #查看,^*为OK
210 Number of sources = 1
MS Name/IP address         Stratum Poll Reach LastRx Last sample
===============================================================================
^* 203.107.6.88                  2   6     7     0   +361us[-1996us] +/-   25ms
computel一样的操作
[root@computel ~]# sed -i '3,6 s/^/# /' /etc/chrony.conf
[root@computel ~]# sed -i '6 a server ntp.aliyun.com iburst' /etc/chrony.conf
[root@computel ~]# systemctl restart chronyd.service
[root@computel ~]# chronyc sources
210 Number of sources = 1
MS Name/IP address         Stratum Poll Reach LastRx Last sample
===============================================================================
^* 203.107.6.88                  2   6     7     2    +48us[-1618us] +/-   22ms
1.2.10 两台机器配置hosts解析
[root@controller ~]# ip address show ens36 3: ens36: <BROADCAST,MULTICAST,UP,LOWER_UP> mtu 1500 qdisc pfifo_fast state UP group default qlen 1000link/ether 00:0c:29:be:89:4d brd ff:ff:ff:ff:ff:ffinet 192.168.237.131/24 brd 192.168.237.255 scope global noprefixroute dynamic ens36valid_lft 1797sec preferred_lft 1797secinet6 fe80::8b82:8bf1:df2e:adf6/64 scope link noprefixroute valid_lft forever preferred_lft forever [root@computel ~]# ip address show ens36 3: ens36: <BROADCAST,MULTICAST,UP,LOWER_UP> mtu 1500 qdisc pfifo_fast state UP group default qlen 1000link/ether 00:0c:29:f4:76:84 brd ff:ff:ff:ff:ff:ffinet 192.168.237.132/24 brd 192.168.237.255 scope global noprefixroute dynamic ens36valid_lft 1318sec preferred_lft 1318secinet6 fe80::95ec:7129:512c:ade9/64 scope link noprefixroute valid_lft forever preferred_lft forever 查看两台内网网卡的地址,就是两个仅主机的网卡,你的网卡名不一定是ens36 [root@controller ~]# cat >> /etc/hosts << EOF 192.168.237.131 192.168.110.27 controller 192.168.237.132 192.168.110.26 computel EOF [root@controller ~]# scp /etc/hosts computel:/etc/ #将文件直接拷到computel上 The authenticity of host 'computel (192.168.110.26)' can't be established. ECDSA key fingerprint is SHA256:7DxPV6lLUf3yYneZ1yA68t1byoPbftQkZ1mJ/E7cUpI. ECDSA key fingerprint is MD5:45:dc:c5:68:b7:a2:3a:84:57:4d:27:0c:ad:99:6e:9b. Are you sure you want to continue connecting (yes/no)? yes Warning: Permanently added 'computel,192.168.110.26' (ECDSA) to the list of known hosts. root@computel's password: hosts 100% 208 198.5KB/s 00:00
1.2.11 配置SSH免密钥
1、controller控制节点 [root@controller ~]# ssh-keygen -f ~/.ssh/id_rsa -P '' -q [root@controller ~]# ssh-copy-id computel /usr/bin/ssh-copy-id: INFO: Source of key(s) to be installed: "/root/.ssh/id_rsa.pub" /usr/bin/ssh-copy-id: INFO: attempting to log in with the new key(s), to filter out any that are already installed /usr/bin/ssh-copy-id: INFO: 1 key(s) remain to be installed -- if you are prompted now it is to install the new keys root@computel's password: Number of key(s) added: 1 Now try logging into the machine, with: "ssh 'computel'" and check to make sure that only the key(s) you wanted were added. 2、computel管理节点 [root@computel ~]# ssh-keygen -f ~/.ssh/id_rsa -P '' -q [root@computel ~]# ssh-copy-id controller /usr/bin/ssh-copy-id: INFO: Source of key(s) to be installed: "/root/.ssh/id_rsa.pub" The authenticity of host 'controller (192.168.110.27)' can't be established. ECDSA key fingerprint is SHA256:gKhiCVLcpdVrST9fXZ57uG4CXDqheLXuEIajW0f3Gyk. ECDSA key fingerprint is MD5:06:f1:d6:57:d0:47:b9:bc:c6:cd:c9:d9:a5:96:d8:e8. Are you sure you want to continue connecting (yes/no)? yes /usr/bin/ssh-copy-id: INFO: attempting to log in with the new key(s), to filter out any that are already installed /usr/bin/ssh-copy-id: INFO: 1 key(s) remain to be installed -- if you are prompted now it is to install the new keys root@controller's password: Number of key(s) added: 1 Now try logging into the machine, with: "ssh 'controller'" and check to make sure that only the key(s) you wanted were added.
2、部署OpenStack云平台
2.1 安装OpenStack软件包
2.1.1 管理节点
[root@controller ~]# yum install centos-release-openstack-train -y   #安装OpenStack软件仓库
[root@controller ~]# yum upgrade -y  #升级软件包
[root@controller ~]# yum install python-openstackclient -y   #安装OpenStack客户端
[root@controller ~]# openstack --version   #查看OpenStack版本
openstack 4.0.2
2.1.2 计算节点同样操作
[root@computel ~]# yum install centos-release-openstack-train -y   #安装OpenStack软件仓库
[root@computel ~]# yum upgrade -y  #升级软件包
[root@computel ~]# yum install python-openstackclient -y   #安装OpenStack客户端
[root@computel ~]# openstack --version   #查看OpenStack版本
openstack 4.0.2
2.2 控制节点部署MariaDB数据库
[root@controller ~]# yum install mariadb mariadb-server python2-PyMySQL -y [root@controller ~]# sed -i '20 a bind-address = 192.168.237.131' /etc/my.cnf.d/mariadb-server.cnf #添加服务器监听的IP地址 [root@controller ~]# systemctl enable --now mariadb.service #启动服务并设置为开机自启 [root@controller ~]# mysql #可以登录即可 Welcome to the MariaDB monitor. Commands end with ; or \g. Your MariaDB connection id is 23 Server version: 10.3.20-MariaDB MariaDB Server Copyright (c) 2000, 2018, Oracle, MariaDB Corporation Ab and others. Type 'help;' or '\h' for help. Type '\c' to clear the current input statement. MariaDB [(none)]>
2.3 控制节点安装消息队列
2.3.1 安装RabbitMQ消息代理服务器核心组件
[root@controller ~]# yum install rabbitmq-server -y  #安装RabbitMQ
rabbitmq-server是RabbitMQ消息代理服务器的核心组件,它实现了高级消息队列协议(AMQP)和其他消息协议。
[root@controller ~]# systemctl enable rabbitmq-server.service --now   #启动服务并设置为开机自启
2.3.2 创建openstack账户并授权
[root@controller ~]# rabbitmqctl add_user openstack RABBIT_PASS #创建名为openstack的用户密码为RABBIT_PASS
Creating user "openstack"
[root@controller ~]# rabbitmqctl set_permissions -p / openstack ".*" ".*" ".*"  #为 openstack 用户配置写入和读取访问权限
Setting permissions for user "openstack" in vhost "/"
2.4 控制节点部署Memcached服务
-
Memcached 是一个高性能的分布式内存对象缓存系统,广泛用于加速数据库驱动的网站通过减少数据库查询的次数来提升速度。
2.4.1 安装Memcached软件包
[root@controller ~]# yum install memcached python-memcached -y
2.4.2 在 OPTIONS 选项值中加入控制节点controller
[root@controller ~]# sed -i '/^OPTIONS/ c OPTIONS="-l 127.0.0.1,::1,controller"' /etc/sysconfig/memcached
[root@controller ~]# systemctl enable memcached.service --now   #启动服务并设置为开机自启
2.5 控制节点部署Etcd高可用的键值存储系统
-
Etcd 是一个高可用的键值存储系统,用于配置共享和服务发现。
2.5.1 安装软件包
[root@controller ~]# yum install etcd -y #类似yuredis做缓存用的
2.5.2 配置允许其他节点通过管理网络访问 Etcd 服务
[root@controller ~]# vim /etc/etcd/etcd.conf   #一下为需要修改的行,进来按“i”进入插入模式,ESC为退 a出插入模式
5 ETCD_LISTEN_PEER_URLS="http://192.168.237.131:2380"
6 ETCD_LISTEN_CLIENT_URLS="http://192.168.237.131:2379"
9 ETCD_NAME="controller"
20 ETCD_INITIAL_ADVERTISE_PEER_URLS="http://192.168.237.131:2380"
21 ETCD_ADVERTISE_CLIENT_URLS="http://192.168.237.131:2379"
26 ETCD_INITIAL_CLUSTER="controller=http://192.168.237.131:2380"
27 ETCD_INITIAL_CLUSTER_TOKEN="etcd-cluster-01"
28 ETCD_INITIAL_CLUSTER_STATE="new"#普通模式下,输入“:” 进入命令模式
:set nu #调出行号
:number(数字),跳到指定行
:wq  #保存并退出[root@controller ~]# systemctl enable etcd --now   #启动服务并设置为开机自启
2.6 控制节点安装和部署 Keystone
-
Keystone 是 OpenStack 的身份服务组件,负责用户认证(AuthN)和授权(AuthZ)。它是 OpenStack 云平台的关键部分,提供了服务令牌(tokens)的管理、项目(tenants)、用户(users)和角色(roles)的概念。
2.6.1 创建keystone数据库
[root@controller ~]# mysql -e 'create database keystone'
[root@controller ~]# mysql -e 'show databases'
+--------------------+
| Database           |
+--------------------+
| information_schema |
| keystone           |
| mysql              |
| performance_schema |
+--------------------+
2.6.2 创建keystone用户并授权
[root@controller ~]# mysql -e "grant all privileges on keystone.* to 'keystone'@'localhost' identified by 'keystone';"
[root@controller ~]# mysql -e "grant all privileges on keystone.* to 'keystone'@'%' identified by 'keystone';"
2.6.3 安装和配置 Keystone 及相关组件
[root@controller ~]# yum install openstack-keystone httpd mod_wsgi -y  #安装
[root@controller ~]# sed -i '600 a connection = mysql+pymysql://keystone:keystone@controller/keystone' /etc/keystone/keystone.conf     #让 Keystone 服务能知道如何连接到后端的数据库 keystone。其中pymysql 是一个可以操作 mysql 的 python 库。
[root@controller ~]# sed -i 's/^#provider/provider/' /etc/keystone/keystone.conf   #生成令牌
2.6.4 初始化 Keystone 数据库
[root@controller ~]# su -s /bin/bash -c "keystone-manage db_sync" keystone
#Python 的对象关系映射(ORM)需要初始化,以生成数据库表结构
[root@controller ~]# mysql -e 'select count(*) 表数量 from information_schema.tables where table_schema = "keystone";'   #注意48个表
+-----------+
| 表数量     |
+-----------+
|        48 |
+-----------+
2.6.5 初始化 Fernet 密钥库以生成令牌
[root@controller ~]# keystone-manage fernet_setup --keystone-user keystone --keystone-group keystone
[root@controller ~]# keystone-manage credential_setup --keystone-user keystone --keystone-group keystone
#Keystone是OpenStack的Identity服务,负责用户认证、服务目录管理和策略管理
2.6.6 初始化keystone服务
[root@controller ~]# keystone-manage bootstrap --bootstrap-password ADMIN_PASS \
--bootstrap-admin-url http://controller:5000/v3/ \
--bootstrap-internal-url http://controller:5000/v3/ \
--bootstrap-public-url http://controller:5000/v3/ \
--bootstrap-region-id RegionOne
#将账户信息添加到环境变量
[root@controller ~]# export OS_USERNAME=admin
[root@controller ~]# export OS_PASSWORD=ADMIN_PASS
[root@controller ~]# export OS_PROJECT_NAME=admin
[root@controller ~]# export OS_USER_DOMAIN_NAME=Default
[root@controller ~]# export OS_PROJECT_DOMAIN_NAME=Default
[root@controller ~]# export OS_AUTH_URL=http://controller:5000/v3
[root@controller ~]# export OS_IDENTITY_API_VERSION=3
2.6.7 配置Apache提供HTTP服务
[root@controller ~]# yum install httpd -y
[root@controller ~]# sed -i '95 a ServerName controller' /etc/httpd/conf/httpd.conf  #指定servername
[root@controller ~]# ln -s /usr/share/keystone/wsgi-keystone.conf /etc/httpd/conf.d/
#做软连接,将Keystone服务的WSGI配置文件放置在Apache HTTP服务器的配置目录中,从而使得Apache能够通过这个配置文件来管理和运行Keystone的WSGI应用程序
[root@controller ~]# systemctl enable httpd --now  #启动服务并设置为开机自启
[root@controller ~]# curl http://controller:5000/v3   #访问验证
{"version": {"status": "stable", "updated": "2019-07-19T00:00:00Z", "media-types": [{"base": "application/json", "type": "application/vnd.openstack.identity-v3+json"}], "id": "v3.13", "links": [{"href": "http://controller:5000/v3/", "rel": "self"}]}}
2.6.8 查看Keystone默认域(Domain)
[root@controller ~]# openstack domain list   #查看已有的默认域
+---------+---------+---------+--------------------+
| ID      | Name    | Enabled | Description        |
+---------+---------+---------+--------------------+
| default | Default | True    | The default domain |
+---------+---------+---------+--------------------+
该默认域的 ID 为 default,名称为 Default
2.6.9 创建项目
[root@controller ~]# openstack project list   #默认项目
+----------------------------------+-------+
| ID                               | Name  |
+----------------------------------+-------+
| 1708f0d621ec42b9803250c0a2dac89c | admin |
+----------------------------------+-------+
[root@controller ~]# openstack project create --domain default --description "Service Project" service #创建项目
+-------------+----------------------------------+
| Field       | Value                            |
+-------------+----------------------------------+
| description | Service Project                  |
| domain_id   | default                          |
| enabled     | True                             |
| id          | df9a37a505944cf89d7147c19ffe1273 |
| is_domain   | False                            |
| name        | service                          |
| options     | {}                               |
| parent_id   | default                          |
| tags        | []                               |
+-------------+----------------------------------+
[root@controller ~]# openstack project list
+----------------------------------+---------+
| ID                               | Name    |
+----------------------------------+---------+
| 1708f0d621ec42b9803250c0a2dac89c | admin   |
| df9a37a505944cf89d7147c19ffe1273 | service |
+----------------------------------+---------+
#所有的 OpenStack 服务共用一个名为 service 的项目,其中包含添加到环境中每个服务的一个唯一用户
2.6.10 创建用户
#需要创建 demo 项目和 demo 用户用于测试
[root@controller ~]# openstack project create --domain default --description "Demo Project" demo
+-------------+----------------------------------+
| Field       | Value                            |
+-------------+----------------------------------+
| description | Demo Project                     |
| domain_id   | default                          |
| enabled     | True                             |
| id          | c5fe2333105b43e8a2aad0800fcf2884 |
| is_domain   | False                            |
| name        | demo                             |
| options     | {}                               |
| parent_id   | default                          |
| tags        | []                               |
+-------------+----------------------------------+
[root@controller ~]# openstack user create --domain default --password-prompt demo  #密码为DEMO_PASS
User Password:
Repeat User Password:
+---------------------+----------------------------------+
| Field               | Value                            |
+---------------------+----------------------------------+
| domain_id           | default                          |
| enabled             | True                             |
| id                  | db94413ca2de44908019a9643422f6aa |
| name                | demo                             |
| options             | {}                               |
| password_expires_at | None                             |
+---------------------+----------------------------------+
2.6.11 创建角色
#默认 Keystone 提供 3 个角色:admin、member 和 reader
root@controller ~]# openstack role list
+----------------------------------+--------+
| ID                               | Name   |
+----------------------------------+--------+
| 443a73cafe474bd6a572defbe4ccd698 | reader |
| 6c5b595291b74d8b88395ceb78da3ff8 | member |
| e710904c3b4d411cb51fdf2a67b2b4ae | admin  |
+----------------------------------+--------+
[root@controller ~]# openstack role create demo   #再创建一个名为 demo 的角色
+-------------+----------------------------------+
| Field       | Value                            |
+-------------+----------------------------------+
| description | None                             |
| domain_id   | None                             |
| id          | 940446bc6c3a4cfcaa63f8378fe6cb37 |
| name        | demo                             |
| options     | {}                               |
+-------------+----------------------------------+
[root@controller ~]# openstack role add --project demo --user demo member  #将 member 角色添加到 demo 项目和 demo 用户
[root@controller ~]# echo $?  #确保命令执行成功
0
2.6.12 验证 Keystone 服务的安装
在安装其他OpenStack服务之前,确保Keystone身份管理服务正常工作是非常重要的
1、取消设置环境变量
[root@controller ~]# unset OS_AUTH_URL OS_PASSWORD2、在没有设置环境变量的情况下手动指定了OpenStack客户端所需的参数来请求一个认证令牌
[root@controller ~]# openstack --os-auth-url http://controller:5000/v3 --os-project-domain-name Default --os-user-domain-name Default --os-project-name admin --os-username admin token issue  ##密码为ADMIN_PASS
Password:
Password:
+------------+-----------------------------------------------------------------------------------------------------------------------------------------------------------------------------------------+
| Field      | Value                                                                                                                                                                                   |
+------------+-----------------------------------------------------------------------------------------------------------------------------------------------------------------------------------------+
| expires    | 2024-04-12T04:58:26+0000                                                                                                                                                                |
| id         | gAAAAABmGLFiqBQSRpPbWk4qisO_As9AKVZJQttsmcOl83qbDRqOo_Vg7VIRViMidUiBK7FcIe9eioyXe1cOoCpw6wjsONLWFyv9E0CtXuzSf6NFkFGdskIITh_1omFgWb_xghpGMqgZOnQJ-muJjpxJ07JvxNgTKYQKcXAaKGK34vWk2WmVIlw |
| project_id | 1708f0d621ec42b9803250c0a2dac89c                                                                                                                                                        |
| user_id    | 270edc0ccfb04e00a2ea4ef05115b939                                                                                                                                                        |
+------------+-----------------------------------------------------------------------------------------------------------------------------------------------------------------------------------------+
2.7 创建 OpenStack 客户端环境脚本
2.7.1 创建脚本并运行
[root@controller ~]# vim admin-openrc   #admin 管理员的客户端环境脚本,并加入以下内容。
export OS_PROJECT_DOMAIN_NAME=Default
export OS_USER_DOMAIN_NAME=Default
export OS_PROJECT_NAME=admin
export OS_USERNAME=admin
export OS_PASSWORD=ADMIN_PASS
export OS_AUTH_URL=http://controller:5000/v3
export OS_IDENTITY_API_VERSION=3
export OS_IMAGE_API_VERSION=2[root@controller ~]# vim demo-openrc   #demo用户的客户端环境脚本文件
export OS_USER_DOMAIN_NAME=Default
export OS_PROJECT_NAME=demo
export OS_USERNAME=demo
export OS_PASSWORD=DEMO_PASS
export OS_AUTH_URL=http://controller:5000/v3
export OS_IDENTITY_API_VERSION=3
export OS_IMAGE_API_VERSION=2
[root@controller ~]# chmod +x admin-openrc   #增加执行权限
[root@controller ~]# chmod +x demo-openrc
运行
[root@controller ~]# . admin-openrc
[root@controller ~]# openstack token issue
+------------+-----------------------------------------------------------------------------------------------------------------------------------------------------------------------------------------+
| Field      | Value                                                                                                                                                                                   |
+------------+-----------------------------------------------------------------------------------------------------------------------------------------------------------------------------------------+
| expires    | 2024-04-12T06:10:39+0000                                                                                                                                                                |
| id         | gAAAAABmGMJPmeJUFCHSvtJgilDs9_G5ScWNmY64NAyE_18ZmUA3S79URDpIteDuAdkUGNK7a1OhKuVPZINj-Nufn_Oz1lC9aaOaEDphx01QP6VRebPka8_bHJzVT_xz1cwjUXnbvD0Vj_dpOKqih9boVnXZi-eF2-gpCbSvv5_qJDjYbqSzClc |
| project_id | 1708f0d621ec42b9803250c0a2dac89c                                                                                                                                                        |
| user_id    | 270edc0ccfb04e00a2ea4ef05115b939                                                                                                                                                        |
+------------+-----------------------------------------------------------------------------------------------------------------------------------------------------------------------------------------+
2.8 安装和部署 Glance
-
Glance 是 OpenStack 的镜像服务,它负责存储和分发虚拟机镜像。Glance 提供了一个 RESTful API 接口,允许用户和开发者查询、创建、更新和删除镜像。镜像是虚拟机实例的模板,可以用来启动新的虚拟机实例。
2.8.1 创建 Glance 数据库
[root@controller ~]# mysql -e 'create database glance'
[root@controller ~]# mysql -e 'show databases'
+--------------------+
| Database           |
+--------------------+
| glance             |
| information_schema |
| keystone           |
| mysql              |
| performance_schema |
+--------------------+
2.8.2 创建用户并授权
[root@controller ~]# mysql -e "grant all privileges on glance.* to 'glance'@'localhost' identified by 'GLANCE_DBPASS'"
[root@controller ~]# mysql -e "grant all privileges on glance.* to 'glance'@'%' identified by 'GLANCE_DBPASS'"
2.8.3 获取管理员凭据
[root@controller ~]# . admin-openrc
2.8.4 创建 Glance 服务凭据
1、创建用户
oot@controller ~]# openstack user create --domain default --password-prompt glance #创建 Glance 用户这里密码设为 GLANCE_PASS
User Password:
Repeat User Password:
+---------------------+----------------------------------+
| Field               | Value                            |
+---------------------+----------------------------------+
| domain_id           | default                          |
| enabled             | True                             |
| id                  | 3a404d0247ed45beb0bd4051f7569485 |
| name                | glance                           |
| options             | {}                               |
| password_expires_at | None                             |
+---------------------+----------------------------------+
2、将 admin 角色授予 glance 用户和 service 项目
[root@controller ~]# openstack role add --project service --user glance admin
3、在服务目录中创建镜像服务的服务实体名为 glance
[root@controller ~]# openstack service create --name glance --description "OpenStack Image" image
+-------------+----------------------------------+
| Field       | Value                            |
+-------------+----------------------------------+
| description | OpenStack Image                  |
| enabled     | True                             |
| id          | d9944c6af4c440e094131a1d0900b4d1 |
| name        | glance                           |
| type        | image                            |
+-------------+----------------------------------+
4、创建镜像服务的 API 端点
[root@controller ~]# openstack endpoint create --region RegionOne image public http://controller:9292
+--------------+----------------------------------+
| Field        | Value                            |
+--------------+----------------------------------+
| enabled      | True                             |
| id           | 2db4fc80758e42d9b73bf2ff7a43c244 |
| interface    | public                           |
| region       | RegionOne                        |
| region_id    | RegionOne                        |
| service_id   | d9944c6af4c440e094131a1d0900b4d1 |
| service_name | glance                           |
| service_type | image                            |
| url          | http://controller:9292           |
+--------------+----------------------------------+
[root@controller ~]# openstack endpoint create --region RegionOne image internal http://controller:9292
+--------------+----------------------------------+
| Field        | Value                            |
+--------------+----------------------------------+
| enabled      | True                             |
| id           | 6f6ea7cbf8014aa087e8a6d2cd47670f |
| interface    | internal                         |
| region       | RegionOne                        |
| region_id    | RegionOne                        |
| service_id   | d9944c6af4c440e094131a1d0900b4d1 |
| service_name | glance                           |
| service_type | image                            |
| url          | http://controller:9292           |
+--------------+----------------------------------+
[root@controller ~]# openstack endpoint create --region RegionOne image admin http://controller:9292
+--------------+----------------------------------+
| Field        | Value                            |
+--------------+----------------------------------+
| enabled      | True                             |
| id           | 55765fdaafd640feacaef2738ba3032b |
| interface    | admin                            |
| region       | RegionOne                        |
| region_id    | RegionOne                        |
| service_id   | d9944c6af4c440e094131a1d0900b4d1 |
| service_name | glance                           |
| service_type | image                            |
| url          | http://controller:9292           |
+--------------+----------------------------------+
2.8.5 安装和配置 Glance 组件
1、安装
[root@controller ~]# yum install openstack-glance -y
2、配置
[root@controller ~]# sed -i '2089 a connection = mysql+pymysql://glance:GLANCE_DBPASS@controller/glance' /etc/glance/glance-api.conf  #编辑配置文件让 Keystone 能知道如何连接到后端的 Glance 数据库
[root@controller ~]# sed -i '5017a \
www_authenticate_uri = http://controller:5000 \
auth_url = http://controller:5000 \
memcached_servers = controller:11211 \
auth_type = password \
project_domain_name = Default \
user_domain_name = Default \
> project_name = service \
> username = glance \
> password = GLANCE_PASS' /etc/glance/glance-api.conf
#配置身份管理服务访问
[root@controller ~]# sed -i 's/^#flavor/flavor/' /etc/glance/glance-api.conf
[root@controller ~]# sed -i '3350 a stores = file,http \
default_store = file \
filesystem_store_datadir = /var/lib/glance/images/' /etc/glance/glance-api.conf  #定义本地文件系统以及存储路径
3、初始化镜像服务数据库
[root@controller ~]# su -s /bin/bash -c "glance-manage db_sync" glance
[root@controller ~]# echo $?  #0表示成功
0
[root@controller ~]# mysql -e 'select count(*) 表数量 from information_schema.tables where table_schema = "glance";'       #15张表
+-----------+
| 表数量     |
+-----------+
|        15 |
+-----------+
2.8.6 启动服务并验证
1、启动服务并设置开机自启
[root@controller ~]# systemctl enable openstack-glance-api.service --now
Created symlink from /etc/systemd/system/multi-user.target.wants/openstack-glance-api.service to /usr/lib/systemd/system/openstack-glance-api.service.
2、验证 Glance 镜像操作
[root@controller ~]# wget -c http://download.cirros-cloud.net/0.4.0/cirros-0.4.0-x86_64-disk.img #下载 CirrOS 源镜像
[root@controller ~]# . admin-openrc #加载 admin 用户的客户端环境脚本,获得只有管理员能执行命令的访问权限
[root@controller ~]# openstack image create "cirros" --file cirros-0.4.0-x86_64-disk.img --disk-format qcow2 --container-format bare --public
+------------------+--------------------------------------------------------------------------------------------------------------------------------------------------------------------------------------------+
| Field            | Value                                                                                                                                                                                      |
+------------------+--------------------------------------------------------------------------------------------------------------------------------------------------------------------------------------------+
| checksum         | 443b7623e27ecf03dc9e01ee93f67afe                                                                                                                                                           |
| container_format | bare                                                                                                                                                                                       |
| created_at       | 2024-04-12T07:09:12Z                                                                                                                                                                       |
| disk_format      | qcow2                                                                                                                                                                                      |
| file             | /v2/images/49987c60-2bfe-4095-9512-b822aee818db/file                                                                                                                                       |
| id               | 49987c60-2bfe-4095-9512-b822aee818db                                                                                                                                                       |
| min_disk         | 0                                                                                                                                                                                          |
| min_ram          | 0                                                                                                                                                                                          |
| name             | cirros                                                                                                                                                                                     |
| owner            | 1708f0d621ec42b9803250c0a2dac89c                                                                                                                                                           |
| properties       | os_hash_algo='sha512', os_hash_value='6513f21e44aa3da349f248188a44bc304a3653a04122d8fb4535423c8e1d14cd6a153f735bb0982e2161b5b5186106570c17a9e58b64dd39390617cd5a350f78', os_hidden='False' |
| protected        | False                                                                                                                                                                                      |
| schema           | /v2/schemas/image                                                                                                                                                                          |
| size             | 12716032                                                                                                                                                                                   |
| status           | active                                                                                                                                                                                     |
| tags             |                                                                                                                                                                                            |
| updated_at       | 2024-04-12T07:09:12Z                                                                                                                                                                       |
| virtual_size     | None                                                                                                                                                                                       |
| visibility       | public                                                                                                                                                                                     |
+------------------+--------------------------------------------------------------------------------------------------------------------------------------------------------------------------------------------+
#以 qcow2 磁盘格式和 bare 容器格式将镜像上传到 Glance 镜像服务,并将其设置为公共可见以让所有的项目都可以访问[root@controller ~]# openstack image list   #查看镜像
+--------------------------------------+--------+--------+
| ID                                   | Name   | Status |
+--------------------------------------+--------+--------+
| 49987c60-2bfe-4095-9512-b822aee818db | cirros | active |
+--------------------------------------+--------+--------+
2.9 安装和部署 Placement
-
Placement 是 OpenStack 中的一个服务,它是在 OpenStack Newton 版本中引入的,旨在解决资源优化和分配问题。Placement 的主要职责是跟踪和管理可用资源(如 CPU、内存、存储和网络)在 OpenStack 云环境中的分布情况。
2.9.1 创建 Placement 数据库以及placement用户并授权
[root@controller ~]# mysql -e 'create database placement'
[root@controller ~]# mysql -e "grant all privileges on placement.* to 'placement'@'localhost' identified by 'PLACEMENT_DBPASS'"
[root@controller ~]# mysql -e "grant all privileges on placement.* to 'placement'@'%' identified by 'PLACEMENT_DBPASS'"
2.9.2 创建用户和端点
[root@controller ~]# . admin-openrc  #加载 admin 用户的客户端环境脚本
[root@controller ~]# openstack user create --domain default --password-prompt placement
User Password:
Repeat User Password:
+---------------------+----------------------------------+
| Field               | Value                            |
+---------------------+----------------------------------+
| domain_id           | default                          |
| enabled             | True                             |
| id                  | c6a15876462341efb9be89a0858c1e3d |
| name                | placement                        |
| options             | {}                               |
| password_expires_at | None                             |
+---------------------+----------------------------------+
#创建名为 placement 的放置服务用户,密码使用 PLACEMENT_PASS[root@controller ~]# openstack role add --project service --user placement admin
#将 admin 角色授予 glance 用户和 service 项目[root@controller ~]# openstack service create --name placement --description "Placement API" placement
+-------------+----------------------------------+
| Field       | Value                            |
+-------------+----------------------------------+
| description | Placement API                    |
| enabled     | True                             |
| id          | eabc4726b42548de948cd7a831635bbb |
| name        | placement                        |
| type        | placement                        |
+-------------+----------------------------------+
#在服务目录中创建 Placement 服务实体[root@controller ~]# openstack endpoint create --region RegionOne placement public http://controller:8778
+--------------+----------------------------------+
| Field        | Value                            |
+--------------+----------------------------------+
| enabled      | True                             |
| id           | 2e8c9dd5705d43f29a211492f9a008e0 |
| interface    | public                           |
| region       | RegionOne                        |
| region_id    | RegionOne                        |
| service_id   | eabc4726b42548de948cd7a831635bbb |
| service_name | placement                        |
| service_type | placement                        |
| url          | http://controller:8778           |
+--------------+----------------------------------+
[root@controller ~]# openstack endpoint create --region RegionOne placement internal http://controller:8778
+--------------+----------------------------------+
| Field        | Value                            |
+--------------+----------------------------------+
| enabled      | True                             |
| id           | 2c1c5e667ed64460816cbc99bbed8e68 |
| interface    | internal                         |
| region       | RegionOne                        |
| region_id    | RegionOne                        |
| service_id   | eabc4726b42548de948cd7a831635bbb |
| service_name | placement                        |
| service_type | placement                        |
| url          | http://controller:8778           |
+--------------+----------------------------------+
[root@controller ~]# openstack endpoint create --region RegionOne placement admin http://controller:8778
+--------------+----------------------------------+
| Field        | Value                            |
+--------------+----------------------------------+
| enabled      | True                             |
| id           | 9ead80d644e64ca88bab50f70eae03c3 |
| interface    | admin                            |
| region       | RegionOne                        |
| region_id    | RegionOne                        |
| service_id   | eabc4726b42548de948cd7a831635bbb |
| service_name | placement                        |
| service_type | placement                        |
| url          | http://controller:8778           |
+--------------+----------------------------------+
#创建 Placement 服务端点
2.9.3 安装和配置放置服务组件
2.9.3.1 安装软件包
[root@controller ~]# yum install openstack-placement-api -y
2.9.3.2 配置placement
[root@controller ~]# sed -i '503 a connection = mysql+pymysql://placement:PLACEMENT_DBPASS@controller/placement' /etc/placement/placement.conf
#配置数据库访问#配置身份管理服务访问
[root@controller ~]# sed -i 's/^#auth_strategy/auth_strategy/' /etc/placement/placement.conf[root@controller ~]# sed -i '241 a auth_url = http://controller:5000/v3 \
memcached_servers = controller:11211 \
auth_type = password \
project_domain_name = Default \
user_domain_name = Default \
project_name = service \
username = placement \
password = PLACEMENT_PASS' /etc/placement/placement.conf
2.9.4 初始化placement数据库
[root@controller ~]# su -s /bin/bash -c "placement-manage db sync" placement
[root@controller ~]# mysql -e 'select count(*) 表数量 from information_schema.tables where table_schema = "placement";'
+-----------+
| 表数量     |
+-----------+
|        12 |
+-----------+
2.9.5 完成放置服务安装并进行验证
2.9.5.1 完成placement配置
[root@controller ~]# systemctl restart httpd  #重启Apache#执行状态检查以确保一切正常
[root@controller ~]# . admin-openrc
[root@controller ~]# placement-status upgrade check
+----------------------------------+
| Upgrade Check Results            |
+----------------------------------+
| Check: Missing Root Provider IDs |
| Result: Success                  |
| Details: None                    |
+----------------------------------+
| Check: Incomplete Consumers      |
| Result: Success                  |
| Details: None                    |
+----------------------------------+
2.9.5.2 针对放置服务运行一些命令进行测试
1、安装 osc-placement 插件
[root@controller ~]# wget -c https://bootstrap.pypa.io/pip/2.7/get-pip.py
[root@controller ~]# python get-pip.py
[root@controller ~]# pip install osc-placement
#这里注意pip版本
2、列出可用的资源类和特性
[root@controller ~]# . admin-openrc
[root@controller ~]# sed -i '15 a \<Directory /usr/bin> \<IfVersion >= 2.4> \Require all granted \</IfVersion> \<IfVersion < 2.4> \Order allow,deny \Allow from all \</IfVersion> \</Directory>' /etc/httpd/conf.d/00-placement-api.conf   #让 Placement API 可以被访问
[root@controller ~]# systemctl restart httpd   #重启服务
[root@controller ~]# openstack --os-placement-api-version 1.2 resource class list --sort-column name -f value | wc -l
18
[root@controller ~]# openstack --os-placement-api-version 1.6 trait list --sort-column name -f value | wc -l
270
#想看具体删除-f value | wc -l
2.10 安装和部署 Nova
-
Nova 是 OpenStack 的计算组件,负责创建和管理虚拟机实例。它处理云环境中的虚拟机生命周期,包括启动、停止、暂停、恢复、删除和迁移等操作。Nova 还负责调度新创建的实例到合适的计算节点上,并与 OpenStack 的其他组件如 Glance(镜像服务)、Neutron(网络服务)和 Keystone(身份服务)紧密协作,以提供完整的云基础设施服务。
2.10.1 创建 Nova 数据库
[root@controller ~]# mysql -e 'create database nova_api'
[root@controller ~]# mysql -e 'create database nova'
[root@controller ~]# mysql -e 'create database nova_cell0'
[root@controller ~]# mysql -e 'show databases'
+--------------------+
| Database           |
+--------------------+
| glance             |
| information_schema |
| keystone           |
| mysql              |
| nova               |
| nova_api           |
| nova_cell0         |
| performance_schema |
| placement          |
+--------------------+
2.10.2 nova 用户授予访问权限
[root@controller ~]# mysql -e "grant all privileges on nova_api.* to 'nova'@'localhost' identified by 'NOVA_DBPASS'"
[root@controller ~]# mysql -e "grant all privileges on nova_api.* to 'nova'@'%' identified by 'NOVA_DBPASS'"
[root@controller ~]# mysql -e "grant all privileges on nova.* to 'nova'@'localhost' identified by 'NOVA_DBPASS'"
[root@controller ~]# mysql -e "grant all privileges on nova.* to 'nova'@'%' identified by 'NOVA_DBPASS'"
[root@controller ~]# mysql -e "grant all privileges on nova_cell0.* to 'nova'@'localhost' identified by 'NOVA_DBPASS'"
[root@controller ~]# mysql -e "grant all privileges on nova_cell0.* to 'nova'@'%' identified by 'NOVA_DBPASS'"
2.10.3 获取管理员凭证
[root@controller ~]# . admin-openrc
2.10.4 创建计算服务凭据
1、创建 nova 用户,密码设为 NOVA_PASS
[root@controller ~]# openstack user create --domain default --password-prompt nova
User Password:
Repeat User Password:
+---------------------+----------------------------------+
| Field               | Value                            |
+---------------------+----------------------------------+
| domain_id           | default                          |
| enabled             | True                             |
| id                  | 25d9f5ec83e548c7bffe4f5200c733d1 |
| name                | nova                             |
| options             | {}                               |
| password_expires_at | None                             |
+---------------------+----------------------------------+
2、将 admin 角色授予 nova 用户和 service 项目
[root@controller ~]# openstack role add --project service --user nova admin
3、创建 Nova 的计算服务实体
[root@controller ~]# openstack service create --name nova --description "OpenStack Compute" compute
+-------------+----------------------------------+
| Field       | Value                            |
+-------------+----------------------------------+
| description | OpenStack Compute                |
| enabled     | True                             |
| id          | a52035f110044965ace8802849a686b3 |
| name        | nova                             |
| type        | compute                          |
+-------------+----------------------------------+
4、创建计算服务的 API 端点
[root@controller ~]# openstack endpoint create --region RegionOne compute public http://controller:8774/v2.1
+--------------+----------------------------------+
| Field        | Value                            |
+--------------+----------------------------------+
| enabled      | True                             |
| id           | 890cf33f7638495fb53a5dbcc85da8bd |
| interface    | public                           |
| region       | RegionOne                        |
| region_id    | RegionOne                        |
| service_id   | a52035f110044965ace8802849a686b3 |
| service_name | nova                             |
| service_type | compute                          |
| url          | http://controller:8774/v2.1      |
+--------------+----------------------------------+
[root@controller ~]# openstack endpoint create --region RegionOne compute admin http://controller:8774/v2.1
+--------------+----------------------------------+
| Field        | Value                            |
+--------------+----------------------------------+
| enabled      | True                             |
| id           | 44c2b9080f824d709dd259306faaa950 |
| interface    | admin                            |
| region       | RegionOne                        |
| region_id    | RegionOne                        |
| service_id   | a52035f110044965ace8802849a686b3 |
| service_name | nova                             |
| service_type | compute                          |
| url          | http://controller:8774/v2.1      |
+--------------+----------------------------------+
[root@controller ~]# openstack endpoint create --region RegionOne compute admin http://controller:8774/v2.1
+--------------+----------------------------------+
| Field        | Value                            |
+--------------+----------------------------------+
| enabled      | True                             |
| id           | 9a0229e5dd4a4d04a7ead1eff8ace87d |
| interface    | admin                            |
| region       | RegionOne                        |
| region_id    | RegionOne                        |
| service_id   | a52035f110044965ace8802849a686b3 |
| service_name | nova                             |
| service_type | compute                          |
| url          | http://controller:8774/v2.1      |
+--------------+----------------------------------+
2.10.5 控制节点上安装和配置 Nova 组件
[root@controller ~]# yum install openstack-nova-api openstack-nova-conductor openstack-nova-novncproxy openstack-nova-scheduler -y
2.10.6 编辑配置文件
1、在[DEFAULT]节中仅启用 compute 和 metadata API。
[root@controller ~]# sed -i 's/^#enabled_apis/enabled_apis/' /etc/nova/nova.conf
2、在[api_database]和[database]节中配置数据库访问
[root@controller ~]# sed -i '1828 a connection = mysql+pymysql://nova:NOVA_DBPASS@controller/nova_api' /etc/nova/nova.conf
[root@controller ~]# sed -i '2314 a connection = mysql+pymysql://nova:NOVA_DBPASS@controller/nova' /etc/nova/nova.conf
3、在[DEFAULT]节中配置 RabbitMQ 消息队列访问
[root@controller ~]# sed -i '2 a transport_url = rabbit://openstack:RABBIT_PASS@controller:5672/' /etc/nova//nova.conf
4、在[api]和[keystone_authtoken]节中配置身份管理服务访问
[root@controller ~]# sed -i 's/^#auth_strategy/auth_strategy/' /etc/nova/nova.conf
[root@controller ~]# sed -i '3202 a \
www_authenticate_uri = http://controller:5000/ \
auth_url = http://controller:5000/ \
memcached_servers = controller:11211 \
auth_type = password \
project_domain_name = Default \
user_domain_name = Default \
project_name = service \
username = nova \
password = NOVA_PASS' /etc/nova/nova.conf
5、在[DEFAULT]节中配置网路
[root@controller ~]# sed -i '3 a \
my_ip = 192.168.237.131 \
use_neutron = true \
firewall_driver = nova.virt.firewall.NoopFirewallDriver' /etc/nova/nova.conf
6、在[vnc]节中配置 VNC 代理使用控制节点的管理网络接口 IP 地址
[root@controller ~]# sed -i 's/^#enabled=true/enabled=true/' /etc/nova/nova.conf
[root@controller ~]# sed -i '5886 a server_listen = $my_ip \
server_proxyclient_address = $my_ip' /etc/nova/nova.conf
7、在[glance]节中配置镜像服务 API 的位置
[root@controller ~]# sed -i '2639 a api_servers = http://controller:9292' /etc/nova/nova.conf
8、在[oslo_concurrency]节中配置锁定路径
[root@controller ~]# sed -i 's/^#lock_path/lock_path/' /etc/nova/nova.conf
9、在[placement]节中配置放置服务 API
[root@controller ~]# sed -i '4755 a \
region_name = RegionOne \
project_domain_name = Default \
project_name = service \
auth_type = password \
user_domain_name = Default \
auth_url = http://controller:5000/v3 \
username = placement \
password = PLACEMENT_PASS' /etc/nova/nova.conf
2.10.7 初始化数据库
1、初始化 nova_api 数据库
[root@controller ~]# su -s /bin/bash -c "nova-manage api_db sync" nova
[root@controller ~]# mysql -e 'select count(*) 表数量 from information_schema.tables where table_schema = "nova_api";'
+-----------+
| 表数量     |
+-----------+
|        32 |
+-----------+
2、注册 cell0 数据库
[root@controller ~]# su -s /bin/bash -c "nova-manage cell_v2 map_cell0" nova
3、创建 cell1 单元
[root@controller ~]# su -s /bin/bash -c "nova-manage cell_v2 create_cell --name=cell1 --verbose" nova
115cd4bf-0696-42cc-92a3-068bb1a4f6ac
4、初始化 nova 数据库
[root@controller ~]# su -s /bin/sh -c "nova-manage db sync" nova
[root@controller ~]# mysql -e 'select count(*) 表数量 from information_schema.tables where table_schema = "nova";'
+-----------+
| 表数量     |
+-----------+
|       110 |
+-----------+
5、验证 nova 的 cell0 和 cell1 已正确注册
[root@controller ~]# su -s /bin/bash -c "nova-manage cell_v2 list_cells" nova
+-------+--------------------------------------+------------------------------------------+-------------------------------------------------+----------+
|  Name |                 UUID                 |              Transport URL               |               Database Connection               | Disabled |
+-------+--------------------------------------+------------------------------------------+-------------------------------------------------+----------+
| cell0 | 00000000-0000-0000-0000-000000000000 |                  none:/                  | mysql+pymysql://nova:****@controller/nova_cell0 |  False   |
| cell1 | 115cd4bf-0696-42cc-92a3-068bb1a4f6ac | rabbit://openstack:****@controller:5672/ |    mysql+pymysql://nova:****@controller/nova    |  False   |
+-------+--------------------------------------+------------------------------------------+-------------------------------------------------+----------+
2.10.8 控制节点完成 Nova 安装
[root@controller ~]# systemctl enable openstack-nova-api.service openstack-nova-scheduler.service openstack-nova-conductor.service openstack-nova-novncproxy.service --now   #启动
[root@controller ~]# systemctl is-active openstack-nova-api.service openstack-nova-scheduler.service openstack-nova-conductor.service openstack-nova-novncproxy.service   #确保都是active
active
active
active
active
2.11 计算节点安装和配置 Nova 组件
2.11.1 安装软件包
[root@computel ~]# yum install openstack-nova-compute -y
2.11.2 编辑配置文件
1、在[DEFAULT]节中仅启用 compute 和 metadata API
[root@computel ~]# sed -i '2 a enabled_apis = osapi_compute,metadata' /etc/nova/nova.conf
2、在[DEFAULT]节中配置 RabbitMQ 消息队列访问
[root@computel ~]# sed -i '3 a transport_url = rabbit://openstack:RABBIT_PASS@controller' /etc/nova/nova.conf
3、在[api]和[keystone_authtoken]节中配置身份认证服务访问
[root@computel ~]# sed -i 's/^#auth_strategy/auth_strategy/' /etc/nova/nova.conf
[root@computel ~]# sed -i '3205 a \
www_authenticate_uri = http://controller:5000/ \
auth_url = http://controller:5000/ \
memcached_servers = controller:11211 \
auth_type = password \
project_domain_name = Default \
user_domain_name = Default \
project_name = service \
username = nova \
password = NOVA_PASS' /etc/nova/nova.conf[root@computel ~]# sed -i '8 a my_ip = 192.168.237.132 \
use_neutron = true \
firewall_driver = nova.virt.firewall.NoopFirewallDriver' /etc/nova/nova.conf
4、在[vnc]节中启用和配置远程控制台访问
[root@computel ~]# sed -i '5886 a \
enabled = true \
server_listen = 0.0.0.0 \
server_proxyclient_address = $my_ip \
novncproxy_base_url = http://controller:6080/vnc_auto.html' /etc/nova/nova.conf
5、在[glance]节中配置镜像服务 API 的位置
[root@computel ~]# sed -i '2639 a api_servers = http://controller:9292' /etc/nova/nova.conf
6、在[oslo_concurrency]节中配置锁定路径
[root@computel ~]# sed -i 's/^#lock_path/lock_path/' /etc/nova/nova.conf
7、在[placement]节中配置放置服务 API
[root@computel ~]# sed -i '4754 a region_name = RegionOne \
project_domain_name = Default \
project_name = service \
auth_type = password \
user_domain_name = Default \
auth_url = http://controller:5000/v3 \
username = placement \
password = PLACEMENT_PASS' /etc/nova/nova.conf
2.11.3 计算节点完成 Nova 安装
[root@computel ~]# egrep -c '(vmx|svm)' /proc/cpuinfo   #0说明不支持硬件加速,需要进行其他配置
0
[root@computel ~]# sed -i '3387 a virt_type = qemu' /etc/nova/nova.conf
[root@computel ~]# systemctl enable libvirtd.service openstack-nova-compute.service --now  #启动
[root@computel ~]# systemctl is-active libvirtd.service openstack-nova-compute.service
active
active
2.11.4 将计算节点添加到 cell 数据库
1、加载 admin 凭据的环境脚本确认数据库中计算节点主机
[root@controller ~]# . admin-openrc
[root@controller ~]# openstack compute service list --service nova-compute
+----+--------------+----------+------+---------+-------+----------------------------+
| ID | Binary       | Host     | Zone | Status  | State | Updated At                 |
+----+--------------+----------+------+---------+-------+----------------------------+
|  7 | nova-compute | computel | nova | enabled | up    | 2024-04-13T06:47:02.000000 |
+----+--------------+----------+------+---------+-------+----------------------------+
2、注册计算节点主机
[root@controller ~]# su -s /bin/bash -c "nova-manage cell_v2 discover_hosts --verbose" nova
2.11.5 验证 Nova 计算服务的安装
1、加载 admin 凭据的环境脚本
[root@controller ~]# . admin-openrc
2、列出计算服务组件以验证每个进程是否成功启动和注册
[root@controller ~]# openstack compute service list
+----+----------------+------------+----------+---------+-------+----------------------------+
| ID | Binary         | Host       | Zone     | Status  | State | Updated At                 |
+----+----------------+------------+----------+---------+-------+----------------------------+
|  1 | nova-conductor | controller | internal | enabled | up    | 2024-04-13T06:49:48.000000 |
|  2 | nova-scheduler | controller | internal | enabled | up    | 2024-04-13T06:49:48.000000 |
|  7 | nova-compute   | computel   | nova     | enabled | up    | 2024-04-13T06:49:52.000000 |
+----+----------------+------------+----------+---------+-------+----------------------------+
[root@controller ~]# openstack hypervisor list   #计算节点 compute1 的虚拟机管理器类型为 QEMU
+----+---------------------+-----------------+-----------------+-------+
| ID | Hypervisor Hostname | Hypervisor Type | Host IP         | State |
+----+---------------------+-----------------+-----------------+-------+
|  1 | computel            | QEMU            | 192.168.237.132 | up    |
+----+---------------------+-----------------+-----------------+-------+
2.12 安装和部署 Neutron
-
Neutron 是 OpenStack 的网络服务组件,它提供了云环境中的网络即服务(Networking-as-a-Service)功能。Neutron 允许用户创建和管理自己的网络,包括子网、路由器、IP 地址、网络策略和负载均衡器等。它为 OpenStack 云中的虚拟机(VMs)和其他实例提供网络连接,使得它们可以相互通信,也可以与外部网络(如互联网)通信。
2.12.1 在控制节点上完成网络服务的安装准备
1、创建 Neutron 数据库
[root@controller ~]# mysql -e 'create database neutron'
2、创建neutron 账户并授权
[root@controller ~]# mysql -e "grant all privileges on neutron.* to 'neutron'@'localhost' identified by 'NEUTRON_DBPASS'"
[root@controller ~]# mysql -e "grant all privileges on neutron.* to 'neutron'@'%' identified by 'NEUTRON_DBPASS'"
3、加载 admin 用户的环境脚本
[root@controller ~]# . admin-openrc
4、创建 Neutron 服务凭据
#创建 neutron 用户(密码设为 NEUTRON_PASS)
[root@controller ~]# openstack user create --domain default --password-prompt neutron
User Password:
Repeat User Password:
+---------------------+----------------------------------+
| Field               | Value                            |
+---------------------+----------------------------------+
| domain_id           | default                          |
| enabled             | True                             |
| id                  | d0cd270faad3451782d0d9901be589f4 |
| name                | neutron                          |
| options             | {}                               |
| password_expires_at | None                             |
+---------------------+----------------------------------+#创建 Neutron 的服务实体
[root@controller ~]# openstack role add --project service --user neutron admin
[root@controller ~]# openstack service create --name neutron --description "OpenStack Networking" network
+-------------+----------------------------------+
| Field       | Value                            |
+-------------+----------------------------------+
| description | OpenStack Networking             |
| enabled     | True                             |
| id          | c9a1d8bd557c4e9dbb0d36ebd710d334 |
| name        | neutron                          |
| type        | network                          |
+-------------+----------------------------------+
5、创建 Neutron 服务的 API 端点
[root@controller ~]# openstack endpoint create --region RegionOne network public http://controller:9696
+--------------+----------------------------------+
| Field        | Value                            |
+--------------+----------------------------------+
| enabled      | True                             |
| id           | 0cd6487130af4781a32ba0ab429bf151 |
| interface    | public                           |
| region       | RegionOne                        |
| region_id    | RegionOne                        |
| service_id   | c9a1d8bd557c4e9dbb0d36ebd710d334 |
| service_name | neutron                          |
| service_type | network                          |
| url          | http://controller:9696           |
+--------------+----------------------------------+
[root@controller ~]# openstack endpoint create --region RegionOne network internal http://controller:9696
+--------------+----------------------------------+
| Field        | Value                            |
+--------------+----------------------------------+
| enabled      | True                             |
| id           | 5ea95c540bab4b7892ef4591d8d2bc5c |
| interface    | internal                         |
| region       | RegionOne                        |
| region_id    | RegionOne                        |
| service_id   | c9a1d8bd557c4e9dbb0d36ebd710d334 |
| service_name | neutron                          |
| service_type | network                          |
| url          | http://controller:9696           |
+--------------+----------------------------------+
[root@controller ~]# openstack endpoint create --region RegionOne network admin http://controller:9696
+--------------+----------------------------------+
| Field        | Value                            |
+--------------+----------------------------------+
| enabled      | True                             |
| id           | de20c32dbe764985ba6606c2f2566390 |
| interface    | admin                            |
| region       | RegionOne                        |
| region_id    | RegionOne                        |
| service_id   | c9a1d8bd557c4e9dbb0d36ebd710d334 |
| service_name | neutron                          |
| service_type | network                          |
| url          | http://controller:9696           |
+--------------+----------------------------------+
2.12.2 控制节点配置网络选项
[root@controller ~]# yum install openstack-neutron openstack-neutron-ml2 ebtables libibverbs openstack-neutron-linuxbridge ipset -y
2.12.3 配置 Neutron 服务器组件
1、在[database]节中配置数据库访问
[root@controller ~]# sed -i '255 a connection = mysql+pymysql://neutron:NEUTRON_DBPASS@controller/neutron' /etc/neutron/neutron.conf
2、在[DEFAULT]节中启用 ML2 插件
[root@controller ~]# sed -i '2 a \
core_plugin = ml2 \
service_plugins = router \
allow_overlapping_ips = true' /etc/neutron/neutron.conf
3、在[DEFAULT]节中配置 RabbitMQ 消息队列访问
[root@controller ~]# sed -i '5 a transport_url = rabbit://openstack:RABBIT_PASS@controller' /etc/neutron/neutron.conf
4、在 [DEFAULT] 和 [keystone_authtoken] 节中配置身份管理服务访问
[root@controller ~]# sed -i '6 a auth_strategy = keystone' /etc/neutron/neutron.conf
[root@controller ~]# sed -i '366 a \
www_authenticate_uri = http://controller:5000 \
auth_url = http://controller:5000 \
memcached_servers = controller:11211 \
auth_type = password \
project_domain_name = Default \
user_domain_name = Default \
project_name = service \
username = neutron \
password = NEUTRON_PASS' /etc/neutron/neutron.conf
5、在[DEFAULT]和[nova]节中配置网络拓扑的变动时,网络服务能够通知计算服务
[root@controller ~]# sed -i '7 a notify_nova_on_port_status_changes = true \
notify_nova_on_port_data_changes = true' /etc/neutron/neutron.conf
[root@controller ~]# sed -i '230 a [nova] \
auth_url = http://controller:5000 \
auth_type = password \
project_domain_name = default \
user_domain_name = default \
region_name = RegionOne \
project_name = service \
username = nova \
password = NOVA_PASS' /etc/neutron/neutron.conf
6、在[oslo_concurrency]节中配置锁定路径
[root@controller ~]# sed -i '560 a lock_path = /var/lib/neutron/tmp' /etc/neutron/neutron.conf
2.12.4 配置 ML2 插件
1、在[ml2]节中启用 flat、VLAN 和 VXLAN 网络
[root@controller ~]# sed -i '150 a [ml2] \
type_drivers = flat,vlan,vxlan \
tenant_network_types = vxlan \
mechanism_drivers = linuxbridge,l2population \
extension_drivers = port_security' /etc/neutron/plugins/ml2/ml2_conf.ini
2、在[ml2_type_flat]节中列出可以创建 Flat 类型提供者网络的物理网络名称
[root@controller ~]# sed -i '155 a [ml2_type_flat] \
flat_networks = provider' /etc/neutron/plugins/ml2/ml2_conf.ini
3、在[ml2_type_vxlan]节中配置自服务网络的 VXLAN 网络 ID 范围
[root@controller ~]# sed -i '157 a [ml2_type_vxlan] \
vni_ranges = 1:1000' /etc/neutron/plugins/ml2/ml2_conf.ini
3、在[securitygroup]节中,启用 ipset 以提高安全组规则的效率
[root@controller ~]# sed -i '159 a [securitygroup] \
enable_ipset = true' /etc/neutron/plugins/ml2/ml2_conf.ini
2.12.5 配置 Linux 网桥代理
-
Linux 桥接代理为实例构建第 2 层(桥接和交换)虚拟网络基础架构并处理安全组
1、编辑/etc/neutron/plugins/ml2/linuxbridge_agent.ini
[root@controller ~]# cat >> /etc/neutron/plugins/ml2/linuxbridge_agent.ini << EOF
[linux_bridge]
physical_interface_mappings = provider:ens33
EOF
[root@controller ~]# cat >> /etc/neutron/plugins/ml2/linuxbridge_agent.ini << EOF
[vxlan]
enable_vxlan = true
local_ip = 192.168.237.131
l2_population = true
EOF
2、确保 Linux 操作系统内核支持网桥过滤器
[root@controller ~]# cat >> /etc/sysctl.conf << EOF
net.bridge.bridge-nf-call-iptables = 1
net.bridge.bridge-nf-call-ip6tables = 1
EOF
[root@controller ~]# modprobe br_netfilter
[root@controller ~]# sysctl -p
net.bridge.bridge-nf-call-iptables = 1
net.bridge.bridge-nf-call-ip6tables = 1
3、配置 L3 代理
#第 3 层 (L3) 代理为自助服务虚拟网络提供路由和 NAT 服务。
[root@controller ~]# sed -i '2 a interface_driver = linuxbridge' /etc/neutron/l3_agent.ini
6、配置 DHCP 代理
[root@controller ~]# sed -i '2 a interface_driver = linuxbridge \
dhcp_driver = neutron.agent.linux.dhcp.Dnsmasq \
enable_isolated_metadata = true' /etc/neutron/dhcp_agent.ini
2.12.6 控制节点配置元数据代理
[root@controller ~]# sed -i '2 a nova_metadata_host = controller \
metadata_proxy_shared_secret = METADATA_SECRET' /etc/neutron/metadata_agent.ini
2.12.7 控制节点上配置计算服务使用网络服务
[root@controller ~]# sed -i '3995 aauth_url = http://controller:5000 \
auth_type = password \
project_domain_name = default \
user_domain_name = default \
region_name = RegionOne \
project_name = service \
username = neutron \
password = NEUTRON_PASS \
service_metadata_proxy = true \
metadata_proxy_shared_secret = METADATA_SECRET' /etc/nova/nova.conf
2.12.8 控制节点完成网络服务安装
1、指向 ML2插件配置 文件软连接
[root@controller ~]# ln -s /etc/neutron/plugins/ml2/ml2_conf.ini /etc/neutron/plugin.ini
2、初始化数据库
[root@controller ~]# su -s /bin/bash -c "neutron-db-manage --config-file /etc/neutron/neutron.conf --config-file /etc/neutron/plugins/ml2/ml2_conf.ini upgrade head" neutron
[root@controller ~]# mysql -e 'select count(*) 表数量 from information_schema.tables where table_schema = "neutron";'
+-----------+
| 表数量     |
+-----------+
|       172 |
+-----------+
3、重启计算 API 服务
[root@controller ~]# systemctl restart openstack-nova-api.service
4、启动网络服务并将其配置为开机自动启动
[root@controller ~]# systemctl enable neutron-server.service neutron-linuxbridge-agent.service neutron-dhcp-agent.service neutron-metadata-agent.service --now
[root@controller ~]# systemctl is-active neutron-server.service neutron-linuxbridge-agent.service neutron-dhcp-agent.service neutron-metadata-agent.service
active
active
active
active
2.13 计算节点安装 Neutron 组件
2.13.1 安装
[root@computel ~]# yum install openstack-neutron-linuxbridge ebtables ipset -y
2.13.2 计算节点配置网络通用组件
1、在[DEFAULT]节中配置 RabbitMQ 消息队列访问
[root@computel ~]# sed -i '2 a transport_url = rabbit://openstack:RABBIT_PASS@controller' /etc/neutron/neutron.conf
2、在[DEFAULT]和[keystone_authtoken]节中配置身份管理服务访问
[root@computel ~]# sed -i '3 a auth_strategy = keystone' /etc/neutron/neutron.conf
[root@computel ~]# sed -i '362 a www_authenticate_uri = http://controller:5000 \
auth_url = http://controller:5000 \
memcached_servers = controller:11211 \
auth_type = password \
project_domain_name = Default \
user_domain_name = Default \
project_name = service \
username = neutron \
password = NEUTRON_PASS' /etc/neutron/neutron.conf
3、在[oslo_concurrency]节中配置锁定路径
[root@computel ~]# sed -i '533 a lock_path = /var/lib/neutron/tmp' /etc/neutron/neutron.conf
2.13.3 计算节点配置网络选项
#编辑/etc/neutron/plugins/ml2/linuxbridge_agent.ini
[root@computel ~]# cat >> /etc/neutron/plugins/ml2/linuxbridge_agent.ini << EOF
[linux_bridge]
physical_interface_mappings = provider:ens33
EOF
[root@computel ~]# cat >> /etc/neutron/plugins/ml2/linuxbridge_agent.ini << EOF
[vxlan]
enable_vxlan = true
local_ip = 192.168.110.26
l2_population = true
EOF
[root@computel ~]# cat >> /etc/neutron/plugins/ml2/linuxbridge_agent.ini << EOF
[securitygroup]
enable_security_group = true
firewall_driver = neutron.agent.linux.iptables_firewall.IptablesFirewallDriver
EOF
2.13.4 确保Linux 操作系统内核支持网桥过滤器
[root@computel ~]# cat >> /etc/sysctl.conf << EOF
net.bridge.bridge-nf-call-iptables = 1
net.bridge.bridge-nf-call-ip6tables = 1
EOF
[root@computel ~]# modprobe br_netfilter
[root@computel ~]# sysctl -p
net.bridge.bridge-nf-call-iptables = 1
net.bridge.bridge-nf-call-ip6tables = 1
2.14 计算节点配置计算服务使用网络服务
2.14.1 配置
[root@computel ~]# sed -i '3999 a auth_url = http://controller:5000 \
auth_type = password \
project_domain_name = Default \
user_domain_name = Default \
region_name = RegionOne \
project_name = service \
username = neutron \
password = NEUTRON_PASS' /etc/nova/nova.conf
2.14.2 计算节点完成网络服务安装
[root@computel ~]# systemctl restart openstack-nova-compute.service
[root@computel ~]# systemctl enable neutron-linuxbridge-agent.service --now
2.14.3 控制节点验证网络服务运行
[root@controller ~]# . admin-openrc
[root@controller ~]# openstack network agent list
+--------------------------------------+--------------------+------------+-------------------+-------+-------+---------------------------+
| ID                                   | Agent Type         | Host       | Availability Zone | Alive | State | Binary                    |
+--------------------------------------+--------------------+------------+-------------------+-------+-------+---------------------------+
| 2b564673-50e1-4547-8999-579f759eb76f | DHCP agent         | controller | nova              | :-)   | UP    | neutron-dhcp-agent        |
| 37bc9d7f-a47f-484e-b61b-e06d3df6a2fa | Linux bridge agent | computel   | None              | :-)   | UP    | neutron-linuxbridge-agent |
| 45d04b17-8a6d-4c32-8456-945f33d13133 | Metadata agent     | controller | None              | :-)   | UP    | neutron-metadata-agent    |
| 71628d33-924a-4a3a-8b3c-c09df4bde1ec | Linux bridge agent | controller | None              | :-)   | UP    | neutron-linuxbridge-agent |
+--------------------------------------+--------------------+------------+-------------------+-------+-------+---------------------------+
2.15 Dashboard组件安装部署
-
在 OpenStack 中,Dashboard 组件通常指的是 Horizon,它是 OpenStack 的官方仪表盘,提供了一个基于Web的用户界面。Horizon 允许用户和管理员通过一个直观的界面来与 OpenStack 云进行交互,执行各种管理和操作任务。
2.15.1 软件包安装
[root@controller ~]# yum install openstack-dashboard -y
2.15.2 配置仪表板以在controller节点上使用 OpenStack 服务
[root@controller ~]# sed -i '/^OPENSTACK_HOST =/ c OPENSTACK_HOST = "controller"' /etc/openstack-dashboard/local_settings
[root@controller ~]# sed -i "119 a WEBROOT = '/dashboard'" /etc/openstack-dashboard/local_settings
[root@controller ~]# sed -i "/^ALLOWED_HOSTS =/ c ALLOWED_HOSTS = ['*']" /etc/openstack-dashboard/local_settings
2.15.3 配置memcached会话存储服务
[root@controller ~]# sed -i 's/^#SESSION_ENGINE/SESSION_ENGINE/' /etc/openstack-dashboard/local_settings
[root@controller ~]# sed -i '94,99 s/^#//' /etc/openstack-dashboard/local_settings
[root@controller ~]# sed -i 's/127.0.0.1:11211/controller:11211/' /etc/openstack-dashboard/local_settings
[root@controller ~]# sed -i '121 a OPENSTACK_KEYSTONE_MULTIDOMAIN_SUPPORT = True' /etc/openstack-dashboard/local_settings
[root@controller ~]# cat >> /etc/openstack-dashboard/local_settings << EOF
OPENSTACK_API_VERSIONS = {"identity": 3,"image": 2,"volume": 3,
}
EOF
2.15.4 配置 API 版本
[root@controller ~]# cat >> /etc/openstack-dashboard/local_settings << EOF
OPENSTACK_API_VERSIONS = {"identity": 3,"image": 2,"volume": 3,
}
EOF
2.15.5 配置Default为您通过仪表板创建的用户的默认域和角色
[root@controller ~]# echo 'OPENSTACK_KEYSTONE_DEFAULT_DOMAIN = "Default"' >> /etc/openstack-dashboard/local_settings
[root@controller ~]# echo 'OPENSTACK_KEYSTONE_DEFAULT_ROLE = "user"' >> /etc/openstack-dashboard/local_settings
[root@controller ~]# sed -i '4 a WSGIApplicationGroup %{GLOBAL}' /etc/httpd/conf.d/openstack-dashboard.conf
2.15.6 重启服务
[root@controller ~]# systemctl restart httpd.service memcached.service
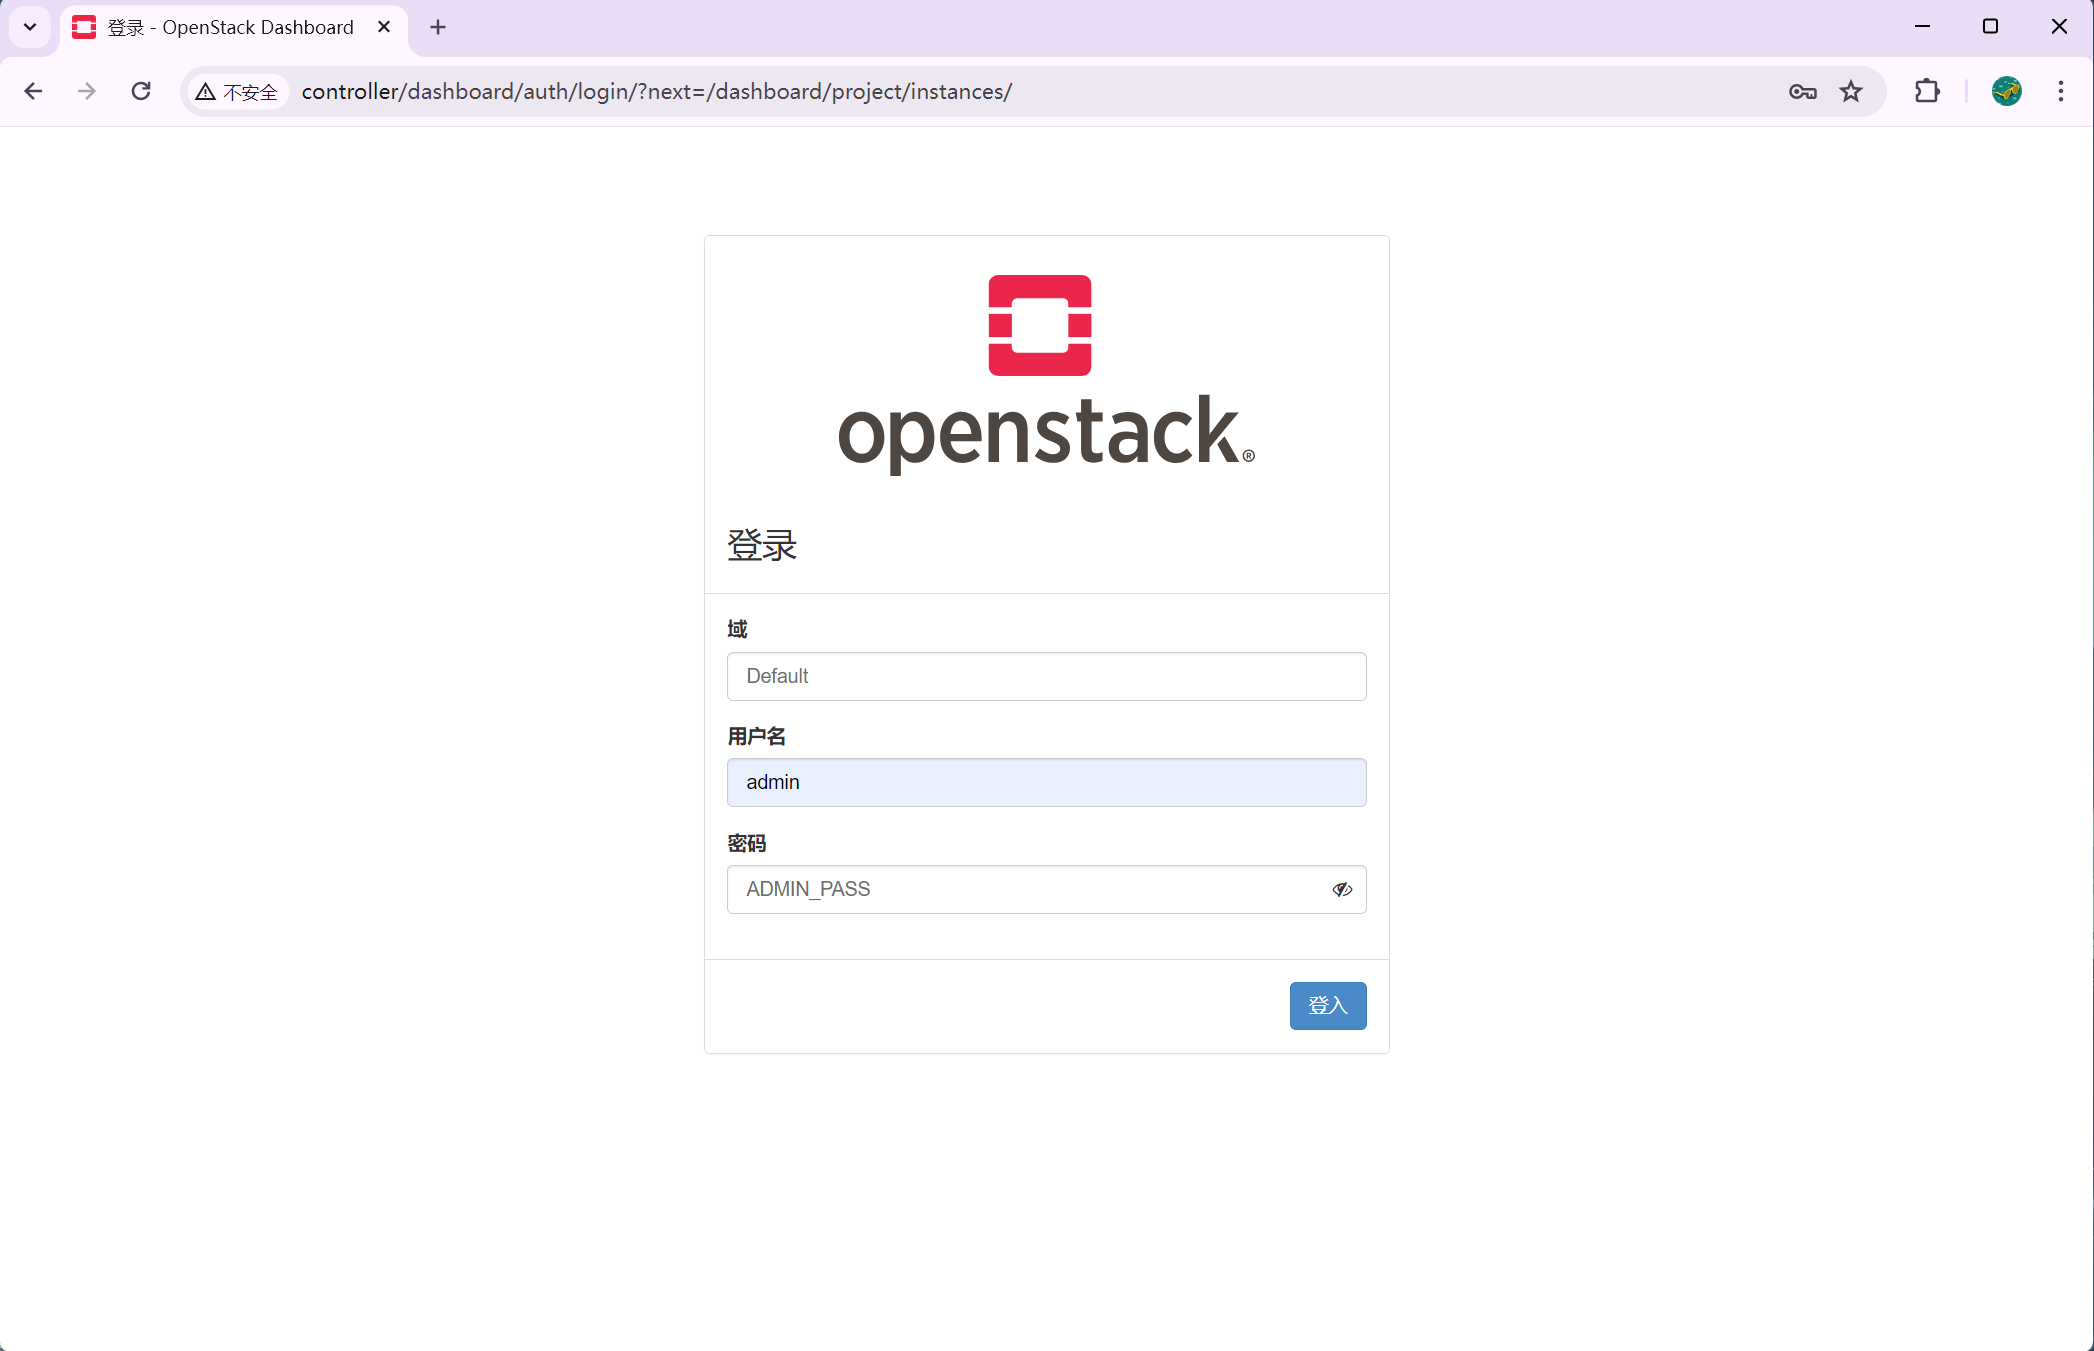
访问:http://192.168.110.27/dashboard
或者编辑Windows的hosts 文件,路径:C:\Windows\System32\drivers\etc\hosts 添加内容
192.168.110.27 controller
2.16 安装和部署 Cinder
-
Cinder 是 OpenStack 的块存储服务,也称为 OpenStack 卷服务。它提供了持久化块存储,允许用户在云环境中创建和管理磁盘卷。这些磁盘卷可以被挂载到虚拟机实例上,为它们提供额外的存储空间。Cinder 支持多种存储后端,包括本地存储、网络文件系统(NFS)、存储区域网络(SAN)、对象存储以及第三方存储解决方案。
2.16.1 数据库配置
[root@controller ~]# mysql -e 'create database cinder'
[root@controller ~]# mysql -e "grant all privileges on cinder.* to 'cinder'@'localhost' identified by 'CINDER_DBPASS'"
[root@controller ~]# mysql -e "grant all privileges on cinder.* to 'cinder'@'%' identified by 'CINDER_DBPASS'"
2.16.2 创建 cinder 服务凭据
[root@controller ~]# . admin-openrc
[root@controller ~]# openstack user create --domain default --password-prompt cinder  #密码为CINDER_PASS
User Password:
Repeat User Password:
+---------------------+----------------------------------+
| Field               | Value                            |
+---------------------+----------------------------------+
| domain_id           | default                          |
| enabled             | True                             |
| id                  | 2934c3a64f574060be7f0dc93e581bee |
| name                | cinder                           |
| options             | {}                               |
| password_expires_at | None                             |
+---------------------+----------------------------------+
[root@controller ~]# openstack role add --project service --user cinder admin
[root@controller ~]# openstack service create --name cinderv2 --description "OpenStack Block Storage" volumev2
+-------------+----------------------------------+
| Field       | Value                            |
+-------------+----------------------------------+
| description | OpenStack Block Storage          |
| enabled     | True                             |
| id          | 0a7f7bf9d12442c9904351437a3b82d9 |
| name        | cinderv2                         |
| type        | volumev2                         |
+-------------+----------------------------------+
[root@controller ~]# openstack service create --name cinderv3 --description "OpenStack Block Storage" volumev3
+-------------+----------------------------------+
| Field       | Value                            |
+-------------+----------------------------------+
| description | OpenStack Block Storage          |
| enabled     | True                             |
| id          | 89ccd6be20094be182e5dd18e413abc9 |
| name        | cinderv3                         |
| type        | volumev3                         |
+-------------+----------------------------------+
2.16.3 创建块存储服务的 API 端点
[root@controller ~]# openstack endpoint create --region RegionOne volumev2 public http://controller:8776/v2/%\(project_id\)s
+--------------+------------------------------------------+
| Field        | Value                                    |
+--------------+------------------------------------------+
| enabled      | True                                     |
| id           | 3c6eb5621a964179b5d584297c295a18         |
| interface    | public                                   |
| region       | RegionOne                                |
| region_id    | RegionOne                                |
| service_id   | 0a7f7bf9d12442c9904351437a3b82d9         |
| service_name | cinderv2                                 |
| service_type | volumev2                                 |
| url          | http://controller:8776/v2/%(project_id)s |
+--------------+------------------------------------------+
[root@controller ~]# openstack endpoint create --region RegionOne volumev2 internal http://controller:8776/v2/%\(project_id\)s
+--------------+------------------------------------------+
| Field        | Value                                    |
+--------------+------------------------------------------+
| enabled      | True                                     |
| id           | 83dc97a94ba14c529e6fcb68103b7e7a         |
| interface    | internal                                 |
| region       | RegionOne                                |
| region_id    | RegionOne                                |
| service_id   | 0a7f7bf9d12442c9904351437a3b82d9         |
| service_name | cinderv2                                 |
| service_type | volumev2                                 |
| url          | http://controller:8776/v2/%(project_id)s |
+--------------+------------------------------------------+
[root@controller ~]# openstack endpoint create --region RegionOne volumev2 admin http://controller:8776/v2/%\(project_id\)s
+--------------+------------------------------------------+
| Field        | Value                                    |
+--------------+------------------------------------------+
| enabled      | True                                     |
| id           | 13de3c5a43b54cc3ae4e52d7d7662bd6         |
| interface    | admin                                    |
| region       | RegionOne                                |
| region_id    | RegionOne                                |
| service_id   | 0a7f7bf9d12442c9904351437a3b82d9         |
| service_name | cinderv2                                 |
| service_type | volumev2                                 |
| url          | http://controller:8776/v2/%(project_id)s |
+--------------+------------------------------------------+
[root@controller ~]# openstack endpoint create --region RegionOne volumev3 public http://controller:8776/v3/%\(project_id\)s
+--------------+------------------------------------------+
| Field        | Value                                    |
+--------------+------------------------------------------+
| enabled      | True                                     |
| id           | e852f482addd4b2c9af5fd4a979ebf4a         |
| interface    | public                                   |
| region       | RegionOne                                |
| region_id    | RegionOne                                |
| service_id   | 89ccd6be20094be182e5dd18e413abc9         |
| service_name | cinderv3                                 |
| service_type | volumev3                                 |
| url          | http://controller:8776/v3/%(project_id)s |
+--------------+------------------------------------------+
[root@controller ~]# openstack endpoint create --region RegionOne volumev3 internal http://controller:8776/v3/%\(project_id\)s
+--------------+------------------------------------------+
| Field        | Value                                    |
+--------------+------------------------------------------+
| enabled      | True                                     |
| id           | 078f9bf1579442e1bd8b2053e1e9ee2b         |
| interface    | internal                                 |
| region       | RegionOne                                |
| region_id    | RegionOne                                |
| service_id   | 89ccd6be20094be182e5dd18e413abc9         |
| service_name | cinderv3                                 |
| service_type | volumev3                                 |
| url          | http://controller:8776/v3/%(project_id)s |
+--------------+------------------------------------------+
[root@controller ~]# openstack endpoint create --region RegionOne volumev3 admin http://controller:8776/v3/%\(project_id\)s
+--------------+------------------------------------------+
| Field        | Value                                    |
+--------------+------------------------------------------+
| enabled      | True                                     |
| id           | 5cec9a4185fc41ef886eec304bad2ec5         |
| interface    | admin                                    |
| region       | RegionOne                                |
| region_id    | RegionOne                                |
| service_id   | 89ccd6be20094be182e5dd18e413abc9         |
| service_name | cinderv3                                 |
| service_type | volumev3                                 |
| url          | http://controller:8776/v3/%(project_id)s |
+--------------+------------------------------------------+
2.16.4 控制节点安装和配置 Cinder 组件
1、安装软件包
[root@controller ~]# yum install openstack-cinder -y
2、编辑/etc/cinder/cinder.conf 文件以完成相关设置
[root@controller ~]# sed -i '3840 a connection = mysql+pymysql://cinder:CINDER_DBPASS@controller/cinder' /etc/cinder/cinder.conf
[root@controller ~]# sed -i '2 a transport_url = rabbit://openstack:RABBIT_PASS@controller' /etc/cinder/cinder.conf
[root@controller ~]# sed -i '3 a auth_strategy = keystone' /etc/cinder/cinder.conf
[root@controller ~]# sed -i '4097 a www_authenticate_uri = http://controller:5000 \
auth_url = http://controller:5000 \
memcached_servers = controller:11211 \
auth_type = password \
project_domain_name = default \
user_domain_name = default \
project_name = service \
username = cinder \
password = CINDER_PASS' /etc/cinder/cinder.conf
[root@controller ~]# sed -i '4 a my_ip = 192.168.237.131' /etc/cinder/cinder.conf
[root@controller ~]# sed -i '4322 a lock_path = /var/lib/cinder/tmp' /etc/cinder/cinder.conf
3、初始化数据库
[root@controller ~]# su -s /bin/bash -c "cinder-manage db sync" cinder
[root@controller ~]# mysql -e 'select count(*) 表数量 from information_schema.tables where table_schema = "cinder";'
+-----------+
| 表数量     |
+-----------+
|        35 |
+-----------+
4、控制节点配置计算服务使用块存储服务
[root@controller ~]# sed -i '2051 a os_region_name = RegionOne' /etc/nova/nova.conf
2.16.5 控制节点完成 Cinder 安装
[root@controller ~]# systemctl restart openstack-nova-api.service
[root@controller ~]# systemctl enable openstack-cinder-api.service openstack-cinder-scheduler.service --now
2.16.6 存储节/计算节点 Cinder 安装
1、安装支持工具包
[root@computel ~]# yum install lvm2 device-mapper-persistent-data -y
[root@computel ~]# systemctl enable lvm2-lvmetad.service --now
2、创建逻辑卷组
[root@computel ~]# vgcreate cinder-volumes /dev/sdb #直接VG就行,物理卷会自己创建Physical volume "/dev/sdb" successfully created.Volume group "cinder-volumes" successfully created
3、编辑/etc/lvm/lvm.conf 文件
[root@computel ~]# sed -i '56 a filter = [ "a/sda/", "a/sdb/", "r/.*/"]' /etc/lvm/lvm.conf
#过滤器来接受/dev/sdb 设备并拒绝所有其他设备
2.16.7 存储节点安装和配置 Cinder 组件
1、安装软件包
[root@computel ~]# yum install openstack-cinder targetcli python-keystone -y
2、编辑配置文件
[root@computel ~]# sed -i '3840 a connection = mysql+pymysql://cinder:CINDER_DBPASS@controller/cinder' /etc/cinder/cinder.conf
[root@computel ~]# sed -i '2 a transport_url = rabbit://openstack:RABBIT_PASS@controller' /etc/cinder/cinder.conf
[root@computel ~]# sed -i '4096 a www_authenticate_uri = http://controller:5000 \
auth_url = http://controller:5000 \
memcached_servers = controller:11211 \
auth_type = password \
project_domain_name = default \
user_domain_name = default \
project_name = service \
username = cinder \
password = CINDER_PASS' /etc/cinder/cinder.conf
[root@computel ~]# sed -i '3 a my_ip = 192.168.237.132' /etc/cinder/cinder.conf
[root@computel ~]# sed -i '4 a enabled_backends = lvm' /etc/cinder/cinder.conf
[root@computel ~]# sed -i '5 a glance_api_servers = http://controller:9292' /etc/cinder/cinder.conf
[root@computel ~]# cat >> /etc/cinder/cinder.conf << EOF
[lvm]
volume_driver = cinder.volume.drivers.lvm.LVMVolumeDriver
volume_group = cinder-volumes
target_protocol = iscsi
target_helper = lioadm
EOF
[root@computel ~]# sed -i '4323 a lock_path = /var/lib/cinder/tmp' /etc/cinder/cinder.conf
2.16.8 存储节点完成 Cinder安装
[root@computel ~]# systemctl enable openstack-cinder-volume.service target.service --now
2.16.9 验证 Cinder 服务操作
[root@controller ~]# . admin-openrc
[root@controller ~]# openstack volume service list  #命令列出 Cinder 块存储服务组件
+------------------+--------------+------+---------+-------+----------------------------+
| Binary           | Host         | Zone | Status  | State | Updated At                 |
+------------------+--------------+------+---------+-------+----------------------------+
| cinder-scheduler | controller   | nova | enabled | up    | 2024-04-14T02:35:37.000000 |
| cinder-volume    | computel@lvm | nova | enabled | up    | 2024-04-14T02:35:32.000000 |
+------------------+--------------+------+---------+-------+----------------------------+
[root@controller ~]# openstack volume create --size 5 --availability-zone nova testVol #控制节点上创建一个卷
+---------------------+--------------------------------------+
| Field               | Value                                |
+---------------------+--------------------------------------+
| attachments         | []                                   |
| availability_zone   | nova                                 |
| bootable            | false                                |
| consistencygroup_id | None                                 |
| created_at          | 2024-04-14T02:35:51.000000           |
| description         | None                                 |
| encrypted           | False                                |
| id                  | 42e7e1e1-c03d-4d45-a1f7-4c636b0727e0 |
| migration_status    | None                                 |
| multiattach         | False                                |
| name                | testVol                              |
| properties          |                                      |
| replication_status  | None                                 |
| size                | 5                                    |
| snapshot_id         | None                                 |
| source_volid        | None                                 |
| status              | creating                             |
| type                | __DEFAULT__                          |
| updated_at          | None                                 |
| user_id             | 25e74fe0f2cd4195a1b31f72c08300f1     |
+---------------------+--------------------------------------+
[root@controller ~]# openstack volume list  #查看
+--------------------------------------+---------+-----------+------+-------------+
| ID                                   | Name    | Status    | Size | Attached to |
+--------------------------------------+---------+-----------+------+-------------+
| 42e7e1e1-c03d-4d45-a1f7-4c636b0727e0 | testVol | available |    5 |             |
+--------------------------------------+---------+-----------+------+-------------+
2.17 网络配置
2.17.1 创建网络
[root@controller ~]# openstack network create --share --external --provider-physical-network provider --provider-network-type flat provider +---------------------------+---------------------------------------------------------------------------------------------------------------------------------------------------------+ | Field | Value | +---------------------------+---------------------------------------------------------------------------------------------------------------------------------------------------------+ | admin_state_up | UP | | availability_zone_hints | | | availability_zones | | | created_at | 2024-04-15T13:09:49Z | | description | | | dns_domain | None | | id | dd4d87a8-baef-4fbd-9993-f7f8868dac48 | | ipv4_address_scope | None | | ipv6_address_scope | None | | is_default | False | | is_vlan_transparent | None | | location | cloud='', project.domain_id=, project.domain_name='Default', project.id='56200d822bf548af9b192fdb2456a278', project.name='admin', region_name='', zone= | | mtu | 1500 | | name | provider | | port_security_enabled | True | | project_id | 56200d822bf548af9b192fdb2456a278 | | provider:network_type | flat | | provider:physical_network | provider | | provider:segmentation_id | None | | qos_policy_id | None | | revision_number | 1 | | router:external | External | | segments | None | | shared | True | | status | ACTIVE | | subnets | | | tags | | | updated_at | 2024-04-15T13:09:50Z | +---------------------------+---------------------------------------------------------------------------------------------------------------------------------------------------------+[root@controller ~]# openstack subnet create --network provider --allocation-pool start=192.168.110.60,end=192.168.110.254 --gateway 192.168.0.254 --subnet-range 192.168.0.0/16 provider +-------------------+---------------------------------------------------------------------------------------------------------------------------------------------------------+ | Field | Value | +-------------------+---------------------------------------------------------------------------------------------------------------------------------------------------------+ | allocation_pools | 192.168.110.60-192.168.110.254 | | cidr | 192.168.0.0/16 | | created_at | 2024-04-15T13:09:54Z | | description | | | dns_nameservers | | | enable_dhcp | True | | gateway_ip | 192.168.0.254 | | host_routes | | | id | 89e2abdc-5cae-4505-9ed5-4ead4b2c39ac | | ip_version | 4 | | ipv6_address_mode | None | | ipv6_ra_mode | None | | location | cloud='', project.domain_id=, project.domain_name='Default', project.id='56200d822bf548af9b192fdb2456a278', project.name='admin', region_name='', zone= | | name | provider | | network_id | dd4d87a8-baef-4fbd-9993-f7f8868dac48 | | prefix_length | None | | project_id | 56200d822bf548af9b192fdb2456a278 | | revision_number | 0 | | segment_id | None | | service_types | | | subnetpool_id | None | | tags | | | updated_at | 2024-04-15T13:09:54Z | +-------------------+---------------------------------------------------------------------------------------------------------------------------------------------------------+
2.17.2 创建规格
[root@controller ~]# openstack flavor create --id 0 --vcpus 1 --ram 64 --disk 1 m1.nano
+----------------------------+---------+
| Field                      | Value   |
+----------------------------+---------+
| OS-FLV-DISABLED:disabled   | False   |
| OS-FLV-EXT-DATA:ephemeral  | 0       |
| disk                       | 1       |
| id                         | 0       |
| name                       | m1.nano |
| os-flavor-access:is_public | True    |
| properties                 |         |
| ram                        | 64      |
| rxtx_factor                | 1.0     |
| swap                       |         |
| vcpus                      | 1       |
+----------------------------+---------+
2.17.3 创建密钥对
[root@controller ~]# openstack keypair create --public-key ~/.ssh/id_rsa.pub mykey
+-------------+-------------------------------------------------+
| Field       | Value                                           |
+-------------+-------------------------------------------------+
| fingerprint | bf:67:6b:22:07:13:1d:82:be:62:94:59:e1:54:0c:bc |
| name        | mykey                                           |
| user_id     | 36fa413c0a414c9e9e42f43ee05b85b6                |
+-------------+-------------------------------------------------+
2.17.4 创建安全组并允许SSH访问
[root@controller ~]# openstack security group rule create --proto icmp default +-------------------+---------------------------------------------------------------------------------------------------------------------------------------------------------+ | Field | Value | +-------------------+---------------------------------------------------------------------------------------------------------------------------------------------------------+ | created_at | 2024-04-15T13:14:06Z | | description | | | direction | ingress | | ether_type | IPv4 | | id | 527f5a54-540f-421b-a7b9-f07b4b76480a | | location | cloud='', project.domain_id=, project.domain_name='Default', project.id='56200d822bf548af9b192fdb2456a278', project.name='admin', region_name='', zone= | | name | None | | port_range_max | None | | port_range_min | None | | project_id | 56200d822bf548af9b192fdb2456a278 | | protocol | icmp | | remote_group_id | None | | remote_ip_prefix | 0.0.0.0/0 | | revision_number | 0 | | security_group_id | 534fe0af-e9df-4f32-a19b-50aa58cc1f08 | | tags | [] | | updated_at | 2024-04-15T13:14:06Z | +-------------------+---------------------------------------------------------------------------------------------------------------------------------------------------------+[root@controller ~]# openstack security group rule create --proto tcp --dst-port 22 default +-------------------+---------------------------------------------------------------------------------------------------------------------------------------------------------+ | Field | Value | +-------------------+---------------------------------------------------------------------------------------------------------------------------------------------------------+ | created_at | 2024-04-15T13:14:10Z | | description | | | direction | ingress | | ether_type | IPv4 | | id | d3771cab-c815-4ded-9e4f-2645fdddfa5c | | location | cloud='', project.domain_id=, project.domain_name='Default', project.id='56200d822bf548af9b192fdb2456a278', project.name='admin', region_name='', zone= | | name | None | | port_range_max | 22 | | port_range_min | 22 | | project_id | 56200d822bf548af9b192fdb2456a278 | | protocol | tcp | | remote_group_id | None | | remote_ip_prefix | 0.0.0.0/0 | | revision_number | 0 | | security_group_id | 534fe0af-e9df-4f32-a19b-50aa58cc1f08 | | tags | [] | | updated_at | 2024-04-15T13:14:10Z | +-------------------+---------------------------------------------------------------------------------------------------------------------------------------------------------+
2.17.5 创建个user的,不然后面创建项目创建用户会报找不到token
[root@controller ~]# openstack role create user
+-------------+----------------------------------+
| Field       | Value                            |
+-------------+----------------------------------+
| description | None                             |
| domain_id   | None                             |
| id          | c3daea61e8054a85aacd38bcbdedbf40 |
| name        | user                             |
| options     | {}                               |
+-------------+----------------------------------+
2.17.6 创建镜像
[root@controller ~]# touch cirros-0.5.2-x86_64-disk.img
[root@controller ~]# openstack image create Cirros --container-format bare --disk-format qcow2 --file cirros-0.5.2-x86_64-disk.img
+------------------+--------------------------------------------------------------------------------------------------------------------------------------------------------------------------------------------+
| Field            | Value                                                                                                                                                                                      |
+------------------+--------------------------------------------------------------------------------------------------------------------------------------------------------------------------------------------+
| checksum         | d41d8cd98f00b204e9800998ecf8427e                                                                                                                                                           |
| container_format | bare                                                                                                                                                                                       |
| created_at       | 2024-04-15T13:23:27Z                                                                                                                                                                       |
| disk_format      | qcow2                                                                                                                                                                                      |
| file             | /v2/images/fbacecf1-8dde-4ca0-8c8c-a4261af29de7/file                                                                                                                                       |
| id               | fbacecf1-8dde-4ca0-8c8c-a4261af29de7                                                                                                                                                       |
| min_disk         | 0                                                                                                                                                                                          |
| min_ram          | 0                                                                                                                                                                                          |
| name             | Cirros                                                                                                                                                                                     |
| owner            | 56200d822bf548af9b192fdb2456a278                                                                                                                                                           |
| properties       | os_hash_algo='sha512', os_hash_value='cf83e1357eefb8bdf1542850d66d8007d620e4050b5715dc83f4a921d36ce9ce47d0d13c5d85f2b0ff8318d2877eec2f63b931bd47417a81a538327af927da3e', os_hidden='False' |
| protected        | False                                                                                                                                                                                      |
| schema           | /v2/schemas/image                                                                                                                                                                          |
| size             | 0                                                                                                                                                                                          |
| status           | active                                                                                                                                                                                     |
| tags             |                                                                                                                                                                                            |
| updated_at       | 2024-04-15T13:23:27Z                                                                                                                                                                       |
| virtual_size     | None                                                                                                                                                                                       |
| visibility       | shared                                                                                                                                                                                     |
+------------------+--------------------------------------------------------------------------------------------------------------------------------------------------------------------------------------------+
[root@controller ~]#
3、完成OpenStack云平台部署
3.1 创建实例
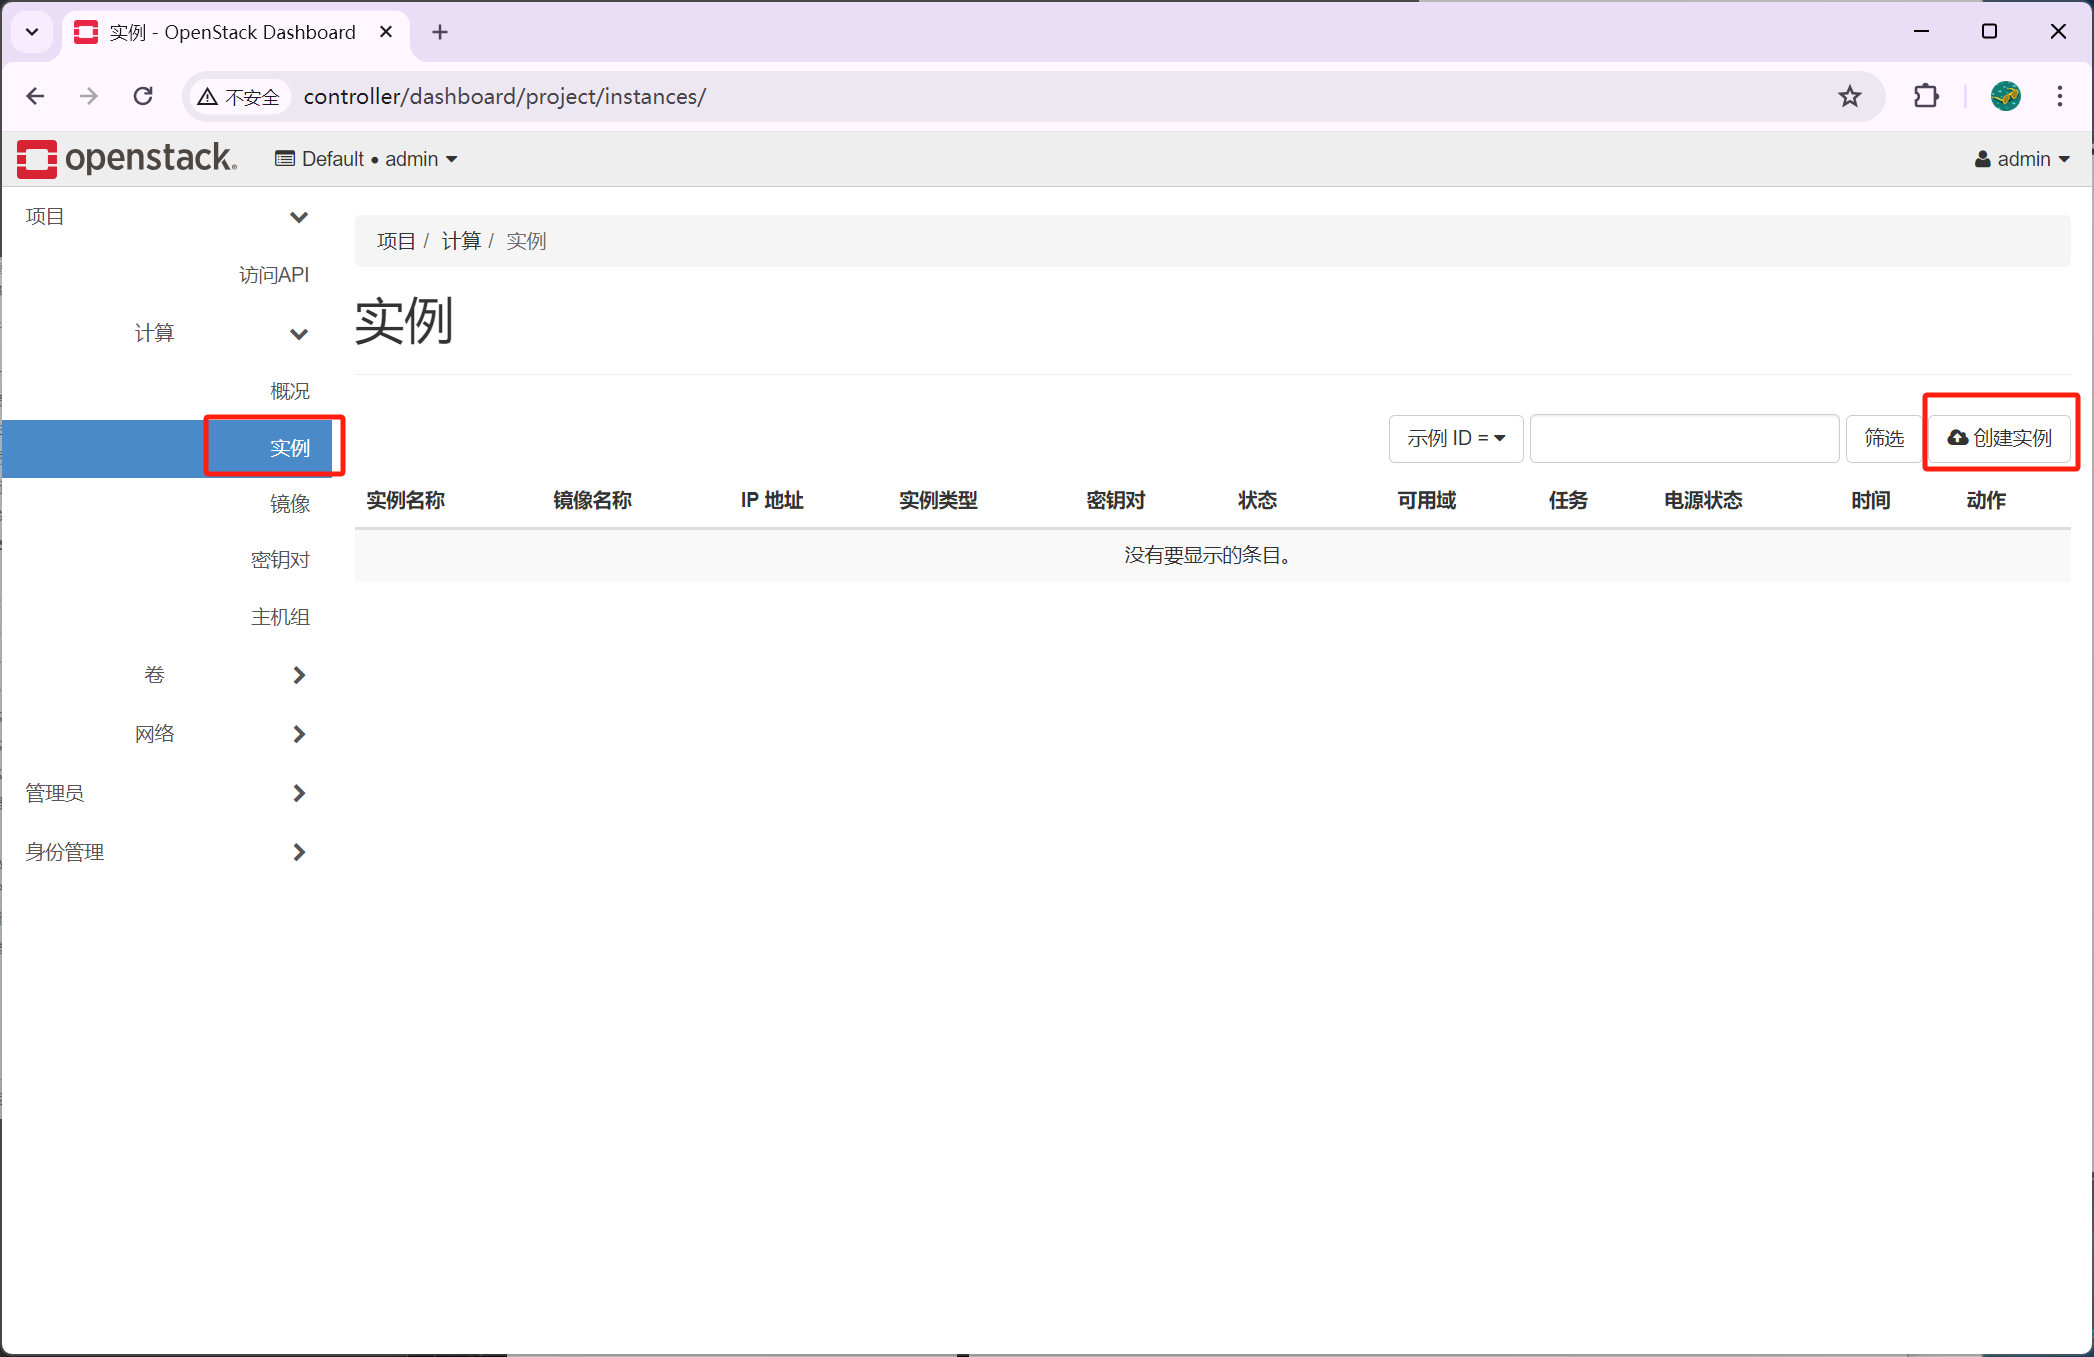
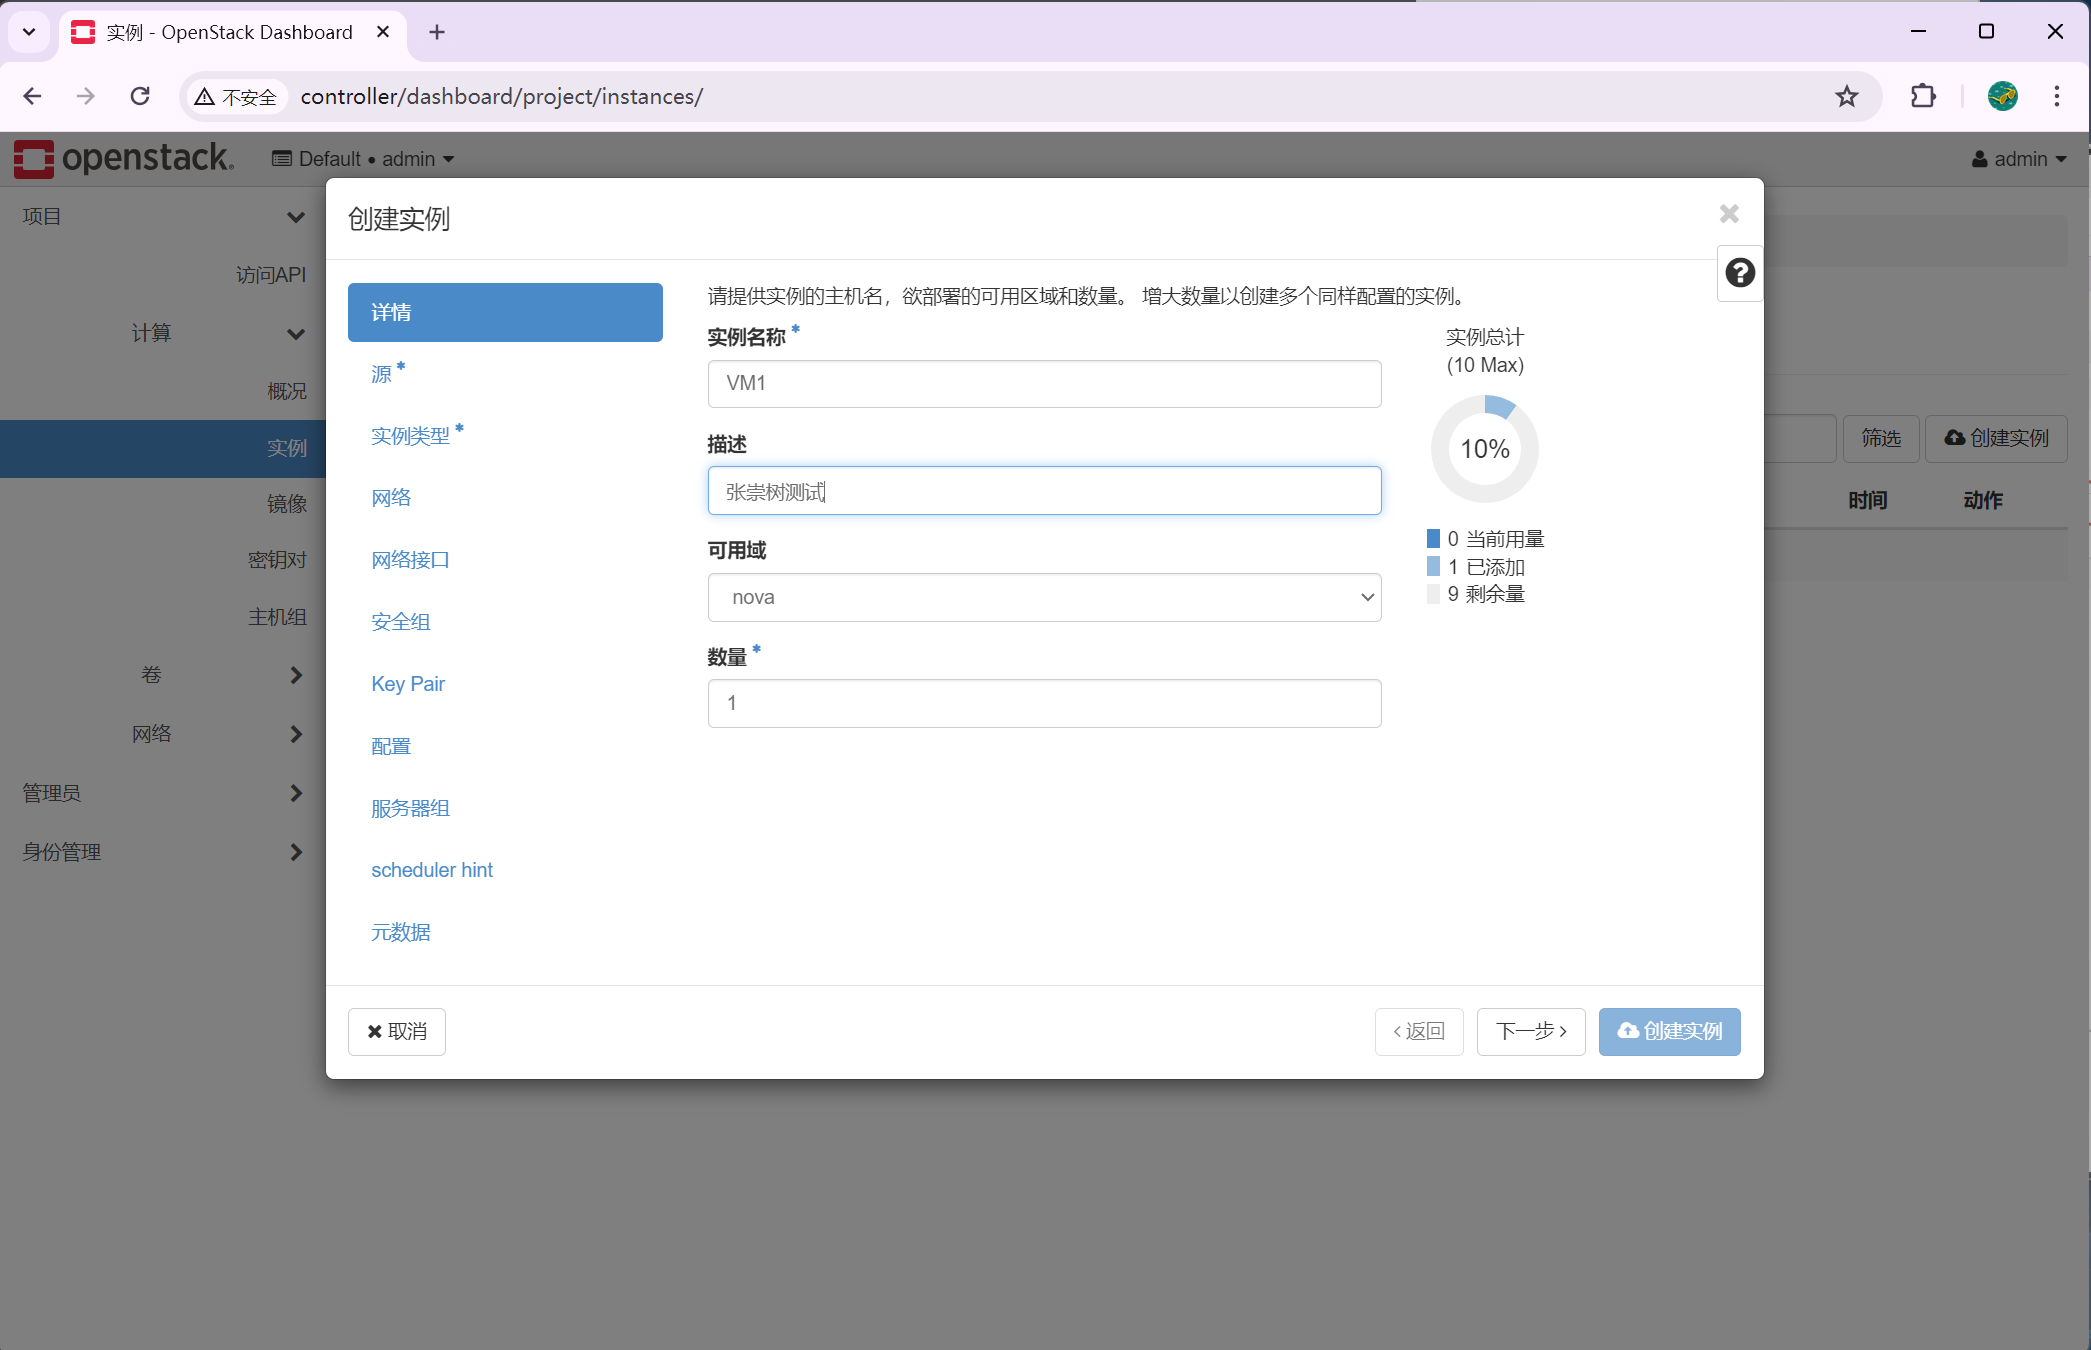

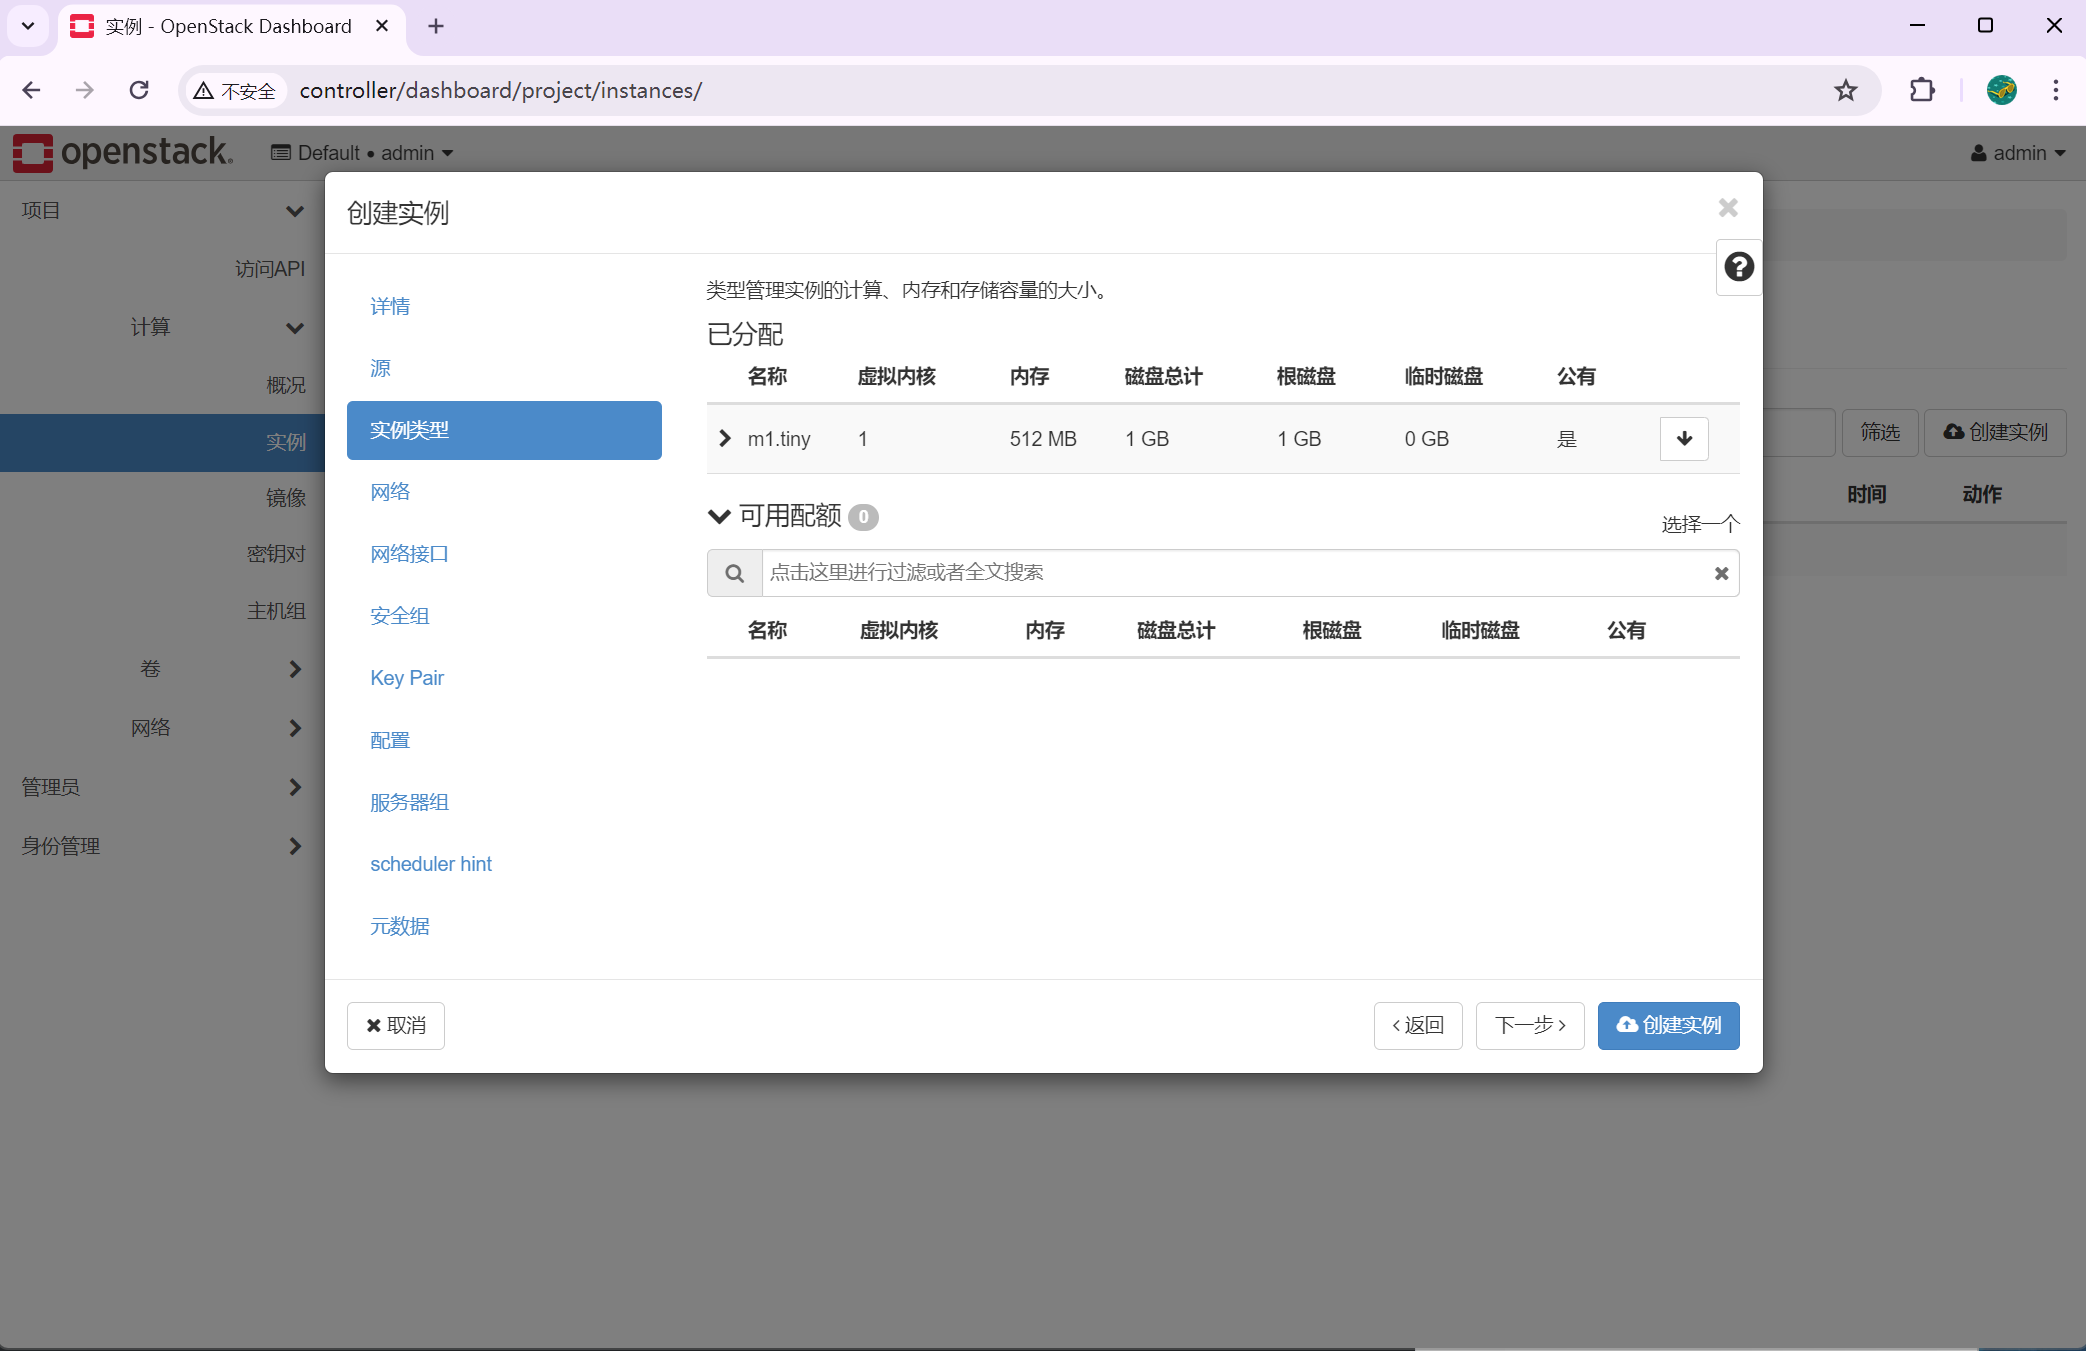
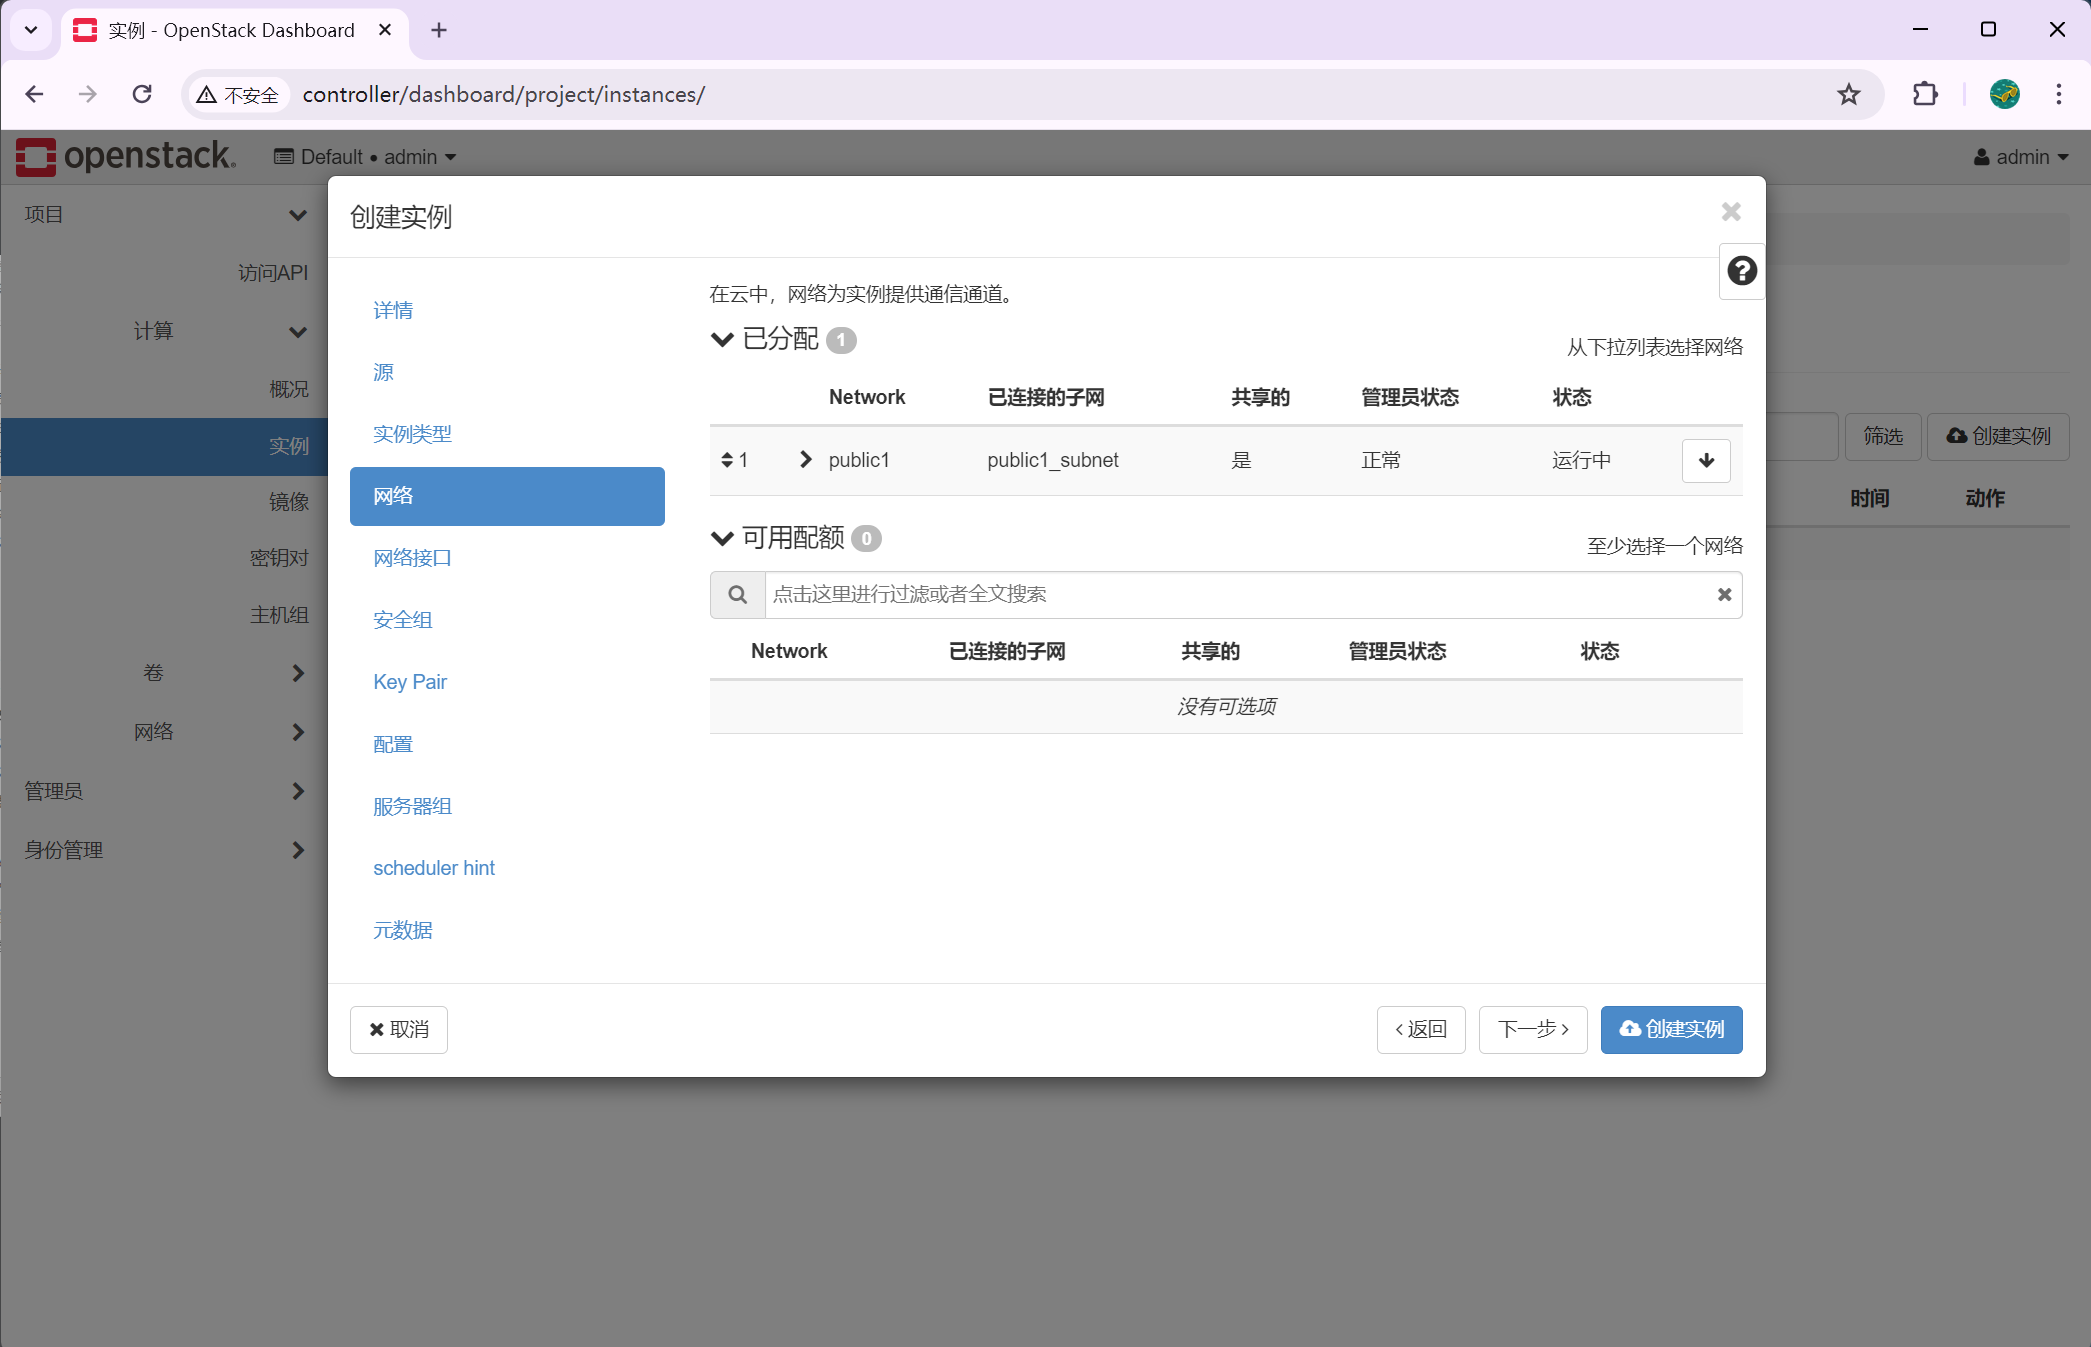
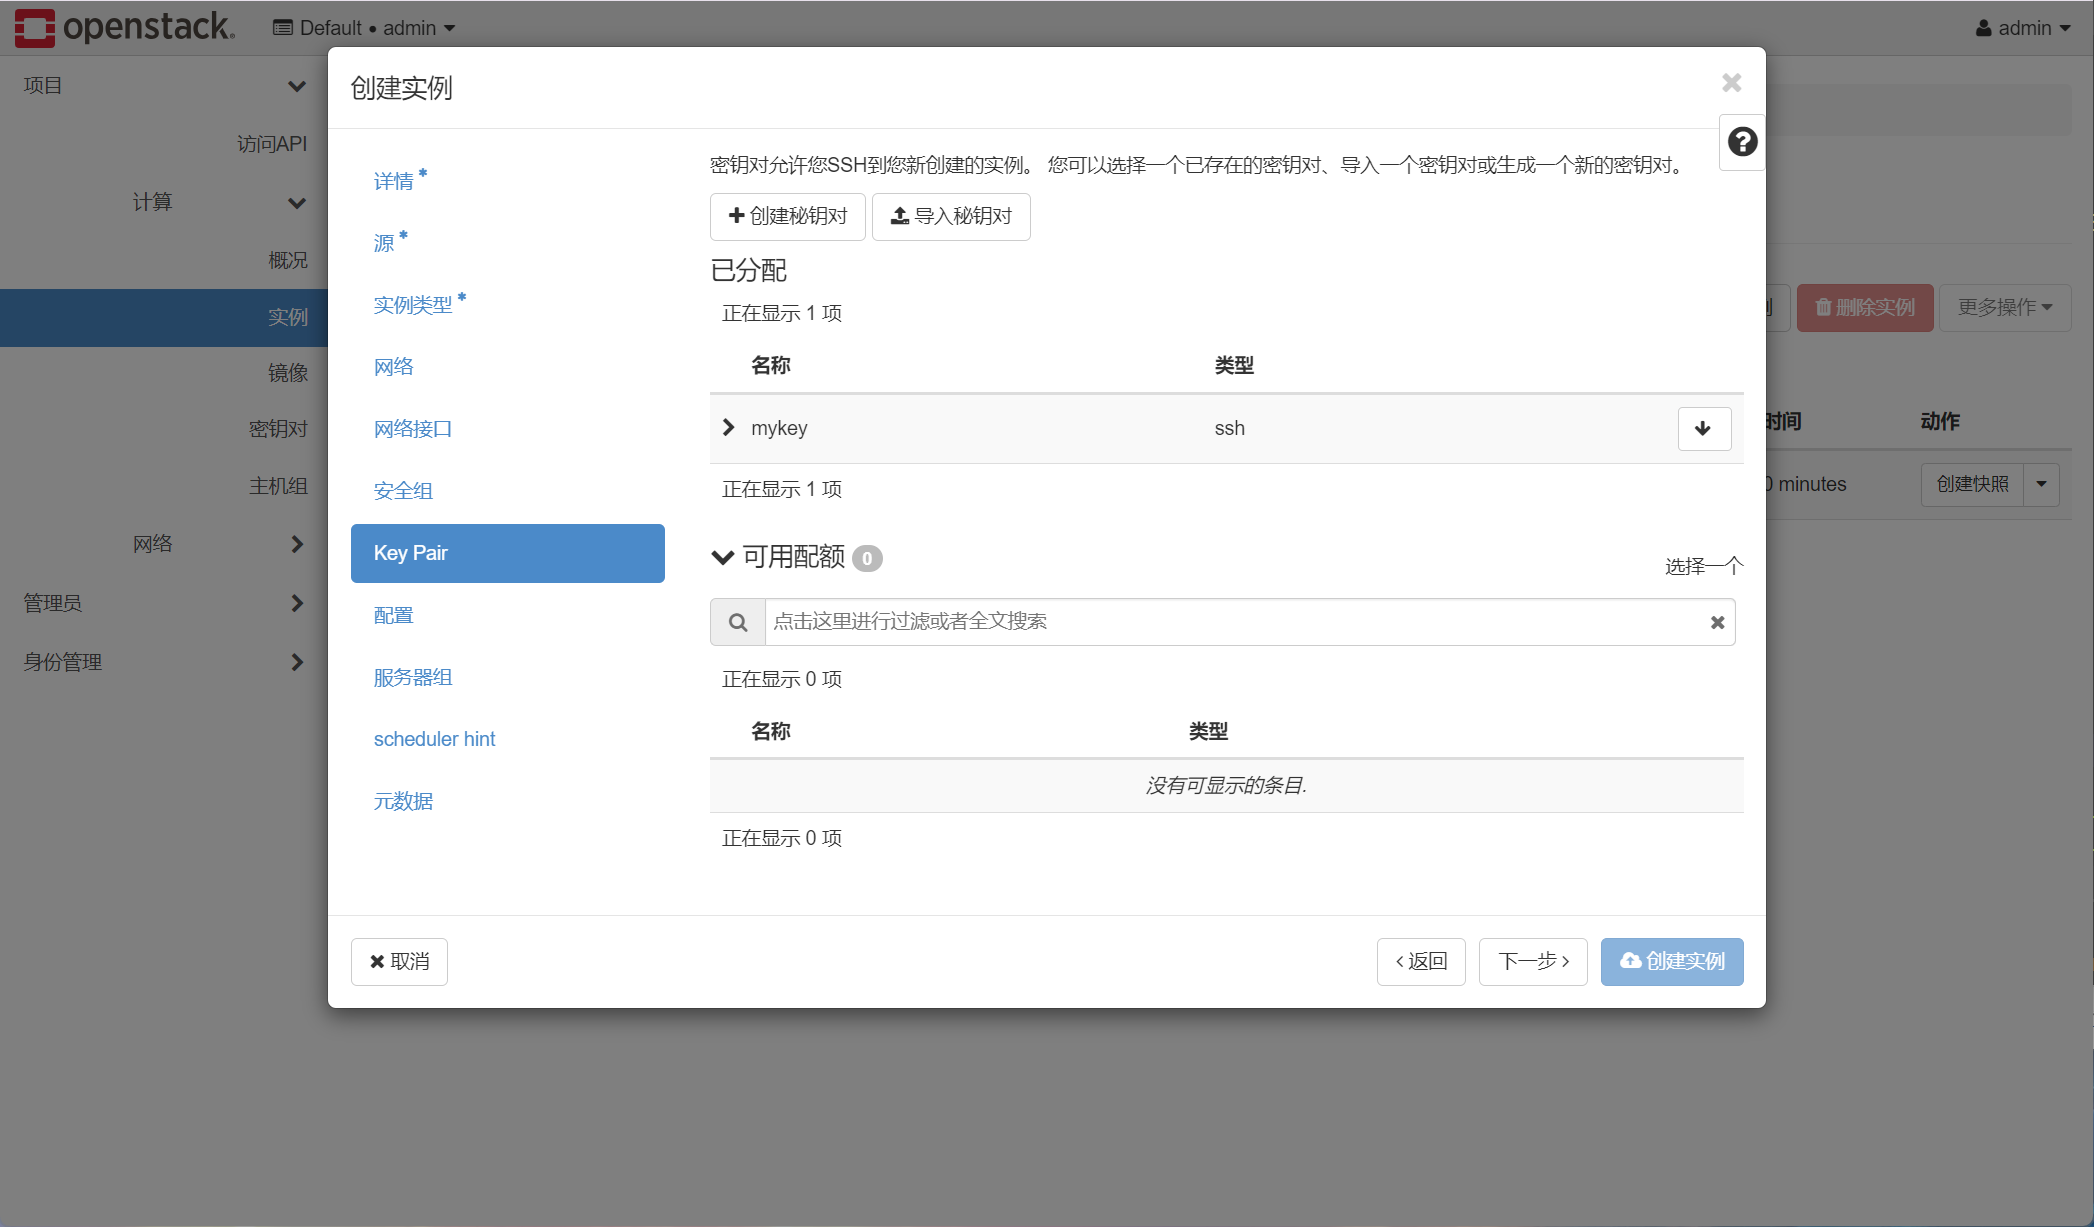
一直下一步
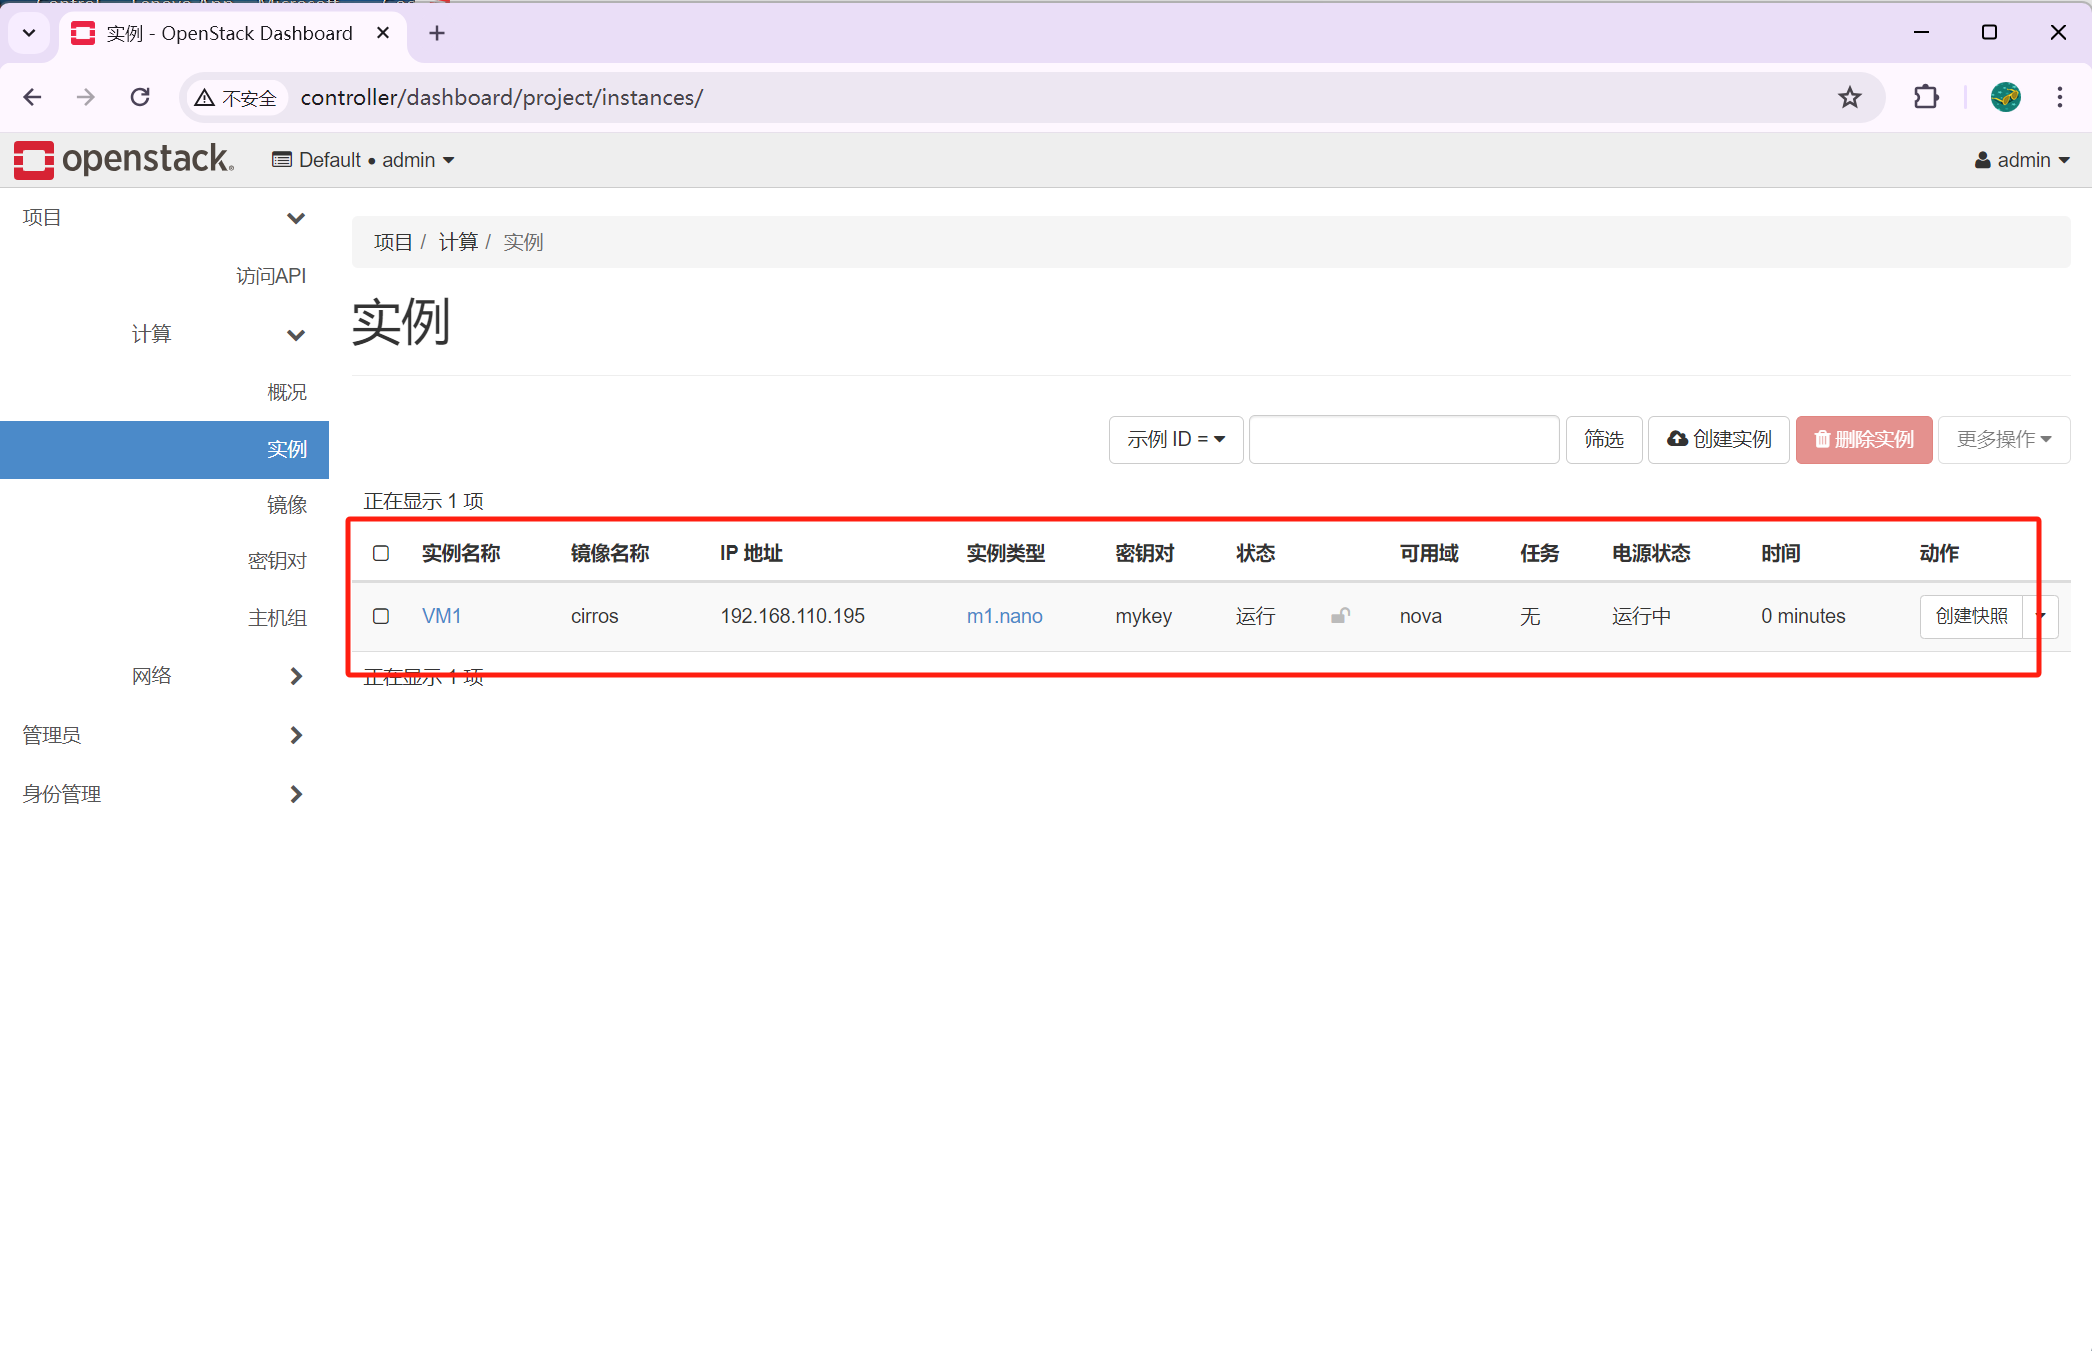
2、测试一下连通性
[root@controller ~]# ping -c 2 192.168.110.195
PING 192.168.110.195 (192.168.110.195) 56(84) bytes of data.
64 bytes from 192.168.110.195: icmp_seq=1 ttl=64 time=1.45 ms
64 bytes from 192.168.110.195: icmp_seq=2 ttl=64 time=12.1 ms--- 192.168.110.195 ping statistics ---
2 packets transmitted, 2 received, 0% packet loss, time 1008ms
rtt min/avg/max/mdev = 1.458/6.805/12.153/5.348 ms
OK结束


