QT中基于TCP的网络通信
- QTcpServer
- 公共成员函数
- 信号
- QTcpSocket
- 公共成员函数
- 信号
- 通信流程
- 服务器端
- 通信流程
- 代码
- 客户端
- 通信流程
- 代码
- 多线程网络通信
- SendFileClient
- SendFileServer
使用Qt提供的类进行基于TCP的套接字通信需要用到两个类:
QTcpServer:服务器类,用于监听客户端连接以及和客户端建立连接。
QTcpSocket:通信的套接字类,客户端、服务器端都需要使用。
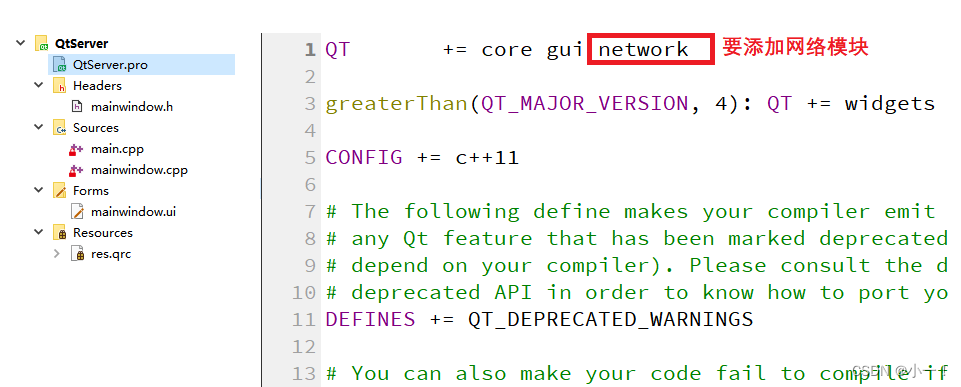
这两个套接字通信类都属于网络模块network。
QTcpServer
QTcpServer类 用于监听客户端连接以及和客户端建立连接,在使用之前先介绍一下这个类提供的一些常用API函数
公共成员函数
构造函数
QTcpServer::QTcpServer(QObject *parent = Q_NULLPTR);
给监听的套接字设置监听
bool QTcpServer::listen(const QHostAddress &address = QHostAddress::Any, quint16 port = 0);
// 判断当前对象是否在监听, 是返回true,没有监听返回false
bool QTcpServer::isListening() const;
// 如果当前对象正在监听返回监听的服务器地址信息, 否则返回 QHostAddress::Null
QHostAddress QTcpServer::serverAddress() const;
// 如果服务器正在侦听连接,则返回服务器的端口; 否则返回0
quint16 QTcpServer::serverPort() const
参数:
address:通过类QHostAddress可以封装IPv4、IPv6格式的IP地址,QHostAddress::Any表示自动绑定
port:如果指定为0表示随机绑定一个可用端口。
返回值:绑定成功返回true,失败返回false
QTcpSocket *QTcpServer::nextPendingConnection();
得到和客户端建立连接之后用于通信的QTcpSocket套接字对象,它是QTcpServer的一个子对象,当QTcpServer对象析构的时候会自动析构这个子对象,当然也可自己手动析构,建议用完之后自己手动析构这个通信的QTcpSocket对象。
bool QTcpServer::waitForNewConnection(int msec = 0, bool *timedOut = Q_NULLPTR);
阻塞等待客户端发起的连接请求,不推荐在单线程程序中使用,建议使用非阻塞方式处理新连接,即使用信号 newConnection() 。
参数:
msec:指定阻塞的最大时长,单位为毫秒(ms)
timeout:传出参数,如果操作超时timeout为true,没有超时timeout为false
信号
当接受新连接导致错误时,将发射如下信号。socketError参数描述了发生的错误相关的信息。
[signal] void QTcpServer::acceptError(QAbstractSocket::SocketError socketError);
每次有新连接可用时都会发出 newConnection() 信号。
[signal] void QTcpServer::newConnection();
QTcpSocket
QTcpSocket是一个套接字通信类,不管是客户端还是服务器端都需要使用。在Qt中发送和接收数据也属于IO操作(网络IO),先来看一下这个类的继承关系:

公共成员函数
构造函数
QTcpSocket::QTcpSocket(QObject *parent = Q_NULLPTR);
连接服务器,需要指定服务器端绑定的IP和端口信息。
[virtual] void QAbstractSocket::connectToHost(const QString &hostName, quint16 port, OpenMode openMode = ReadWrite, NetworkLayerProtocol protocol = AnyIPProtocol);[virtual] void QAbstractSocket::connectToHost(const QHostAddress &address, quint16 port, OpenMode openMode = ReadWrite);
在Qt中不管调用读操作函数接收数据,还是调用写函数发送数据,操作的对象都是本地的由Qt框架维护的一块内存。因此,调用了发送函数数据不一定会马上被发送到网络中,调用了接收函数也不是直接从网络中接收数据,关于底层的相关操作是不需要使用者来维护的。
接收数据
// 指定可接收的最大字节数 maxSize 的数据到指针 data 指向的内存中
qint64 QIODevice::read(char *data, qint64 maxSize);
// 指定可接收的最大字节数 maxSize,返回接收的字符串
QByteArray QIODevice::read(qint64 maxSize);
// 将当前可用操作数据全部读出,通过返回值返回读出的字符串
QByteArray QIODevice::readAll();
发送数据
// 发送指针 data 指向的内存中的 maxSize 个字节的数据
qint64 QIODevice::write(const char *data, qint64 maxSize);
// 发送指针 data 指向的内存中的数据,字符串以 \0 作为结束标记
qint64 QIODevice::write(const char *data);
// 发送参数指定的字符串
qint64 QIODevice::write(const QByteArray &byteArray);
信号
在使用QTcpSocket进行套接字通信的过程中,如果该类对象发射出readyRead()信号,说明对端发送的数据达到了,之后就可以调用 read 函数接收数据了。
[signal] void QIODevice::readyRead();
调用connectToHost()函数并成功建立连接之后发出connected()信号。
[signal] void QAbstractSocket::connected();
在套接字断开连接时发出disconnected()信号。
[signal] void QAbstractSocket::disconnected();
通信流程
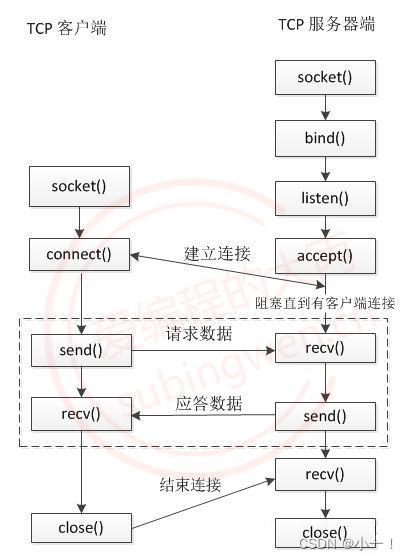
服务器端
通信流程
- 创建套接字服务器QTcpServer对象
- 通过QTcpServer对象设置监听,即:QTcpServer::listen()
- 基于QTcpServer::newConnection()信号检测是否有新的客户端连接
- 如果有新的客户端连接调用QTcpSocket
- *QTcpServer::nextPendingConnection()得到通信的套接字对象
- 使用通信的套接字对象QTcpSocket和客户端进行通信
代码
服务器端的窗口界面如下图所示:
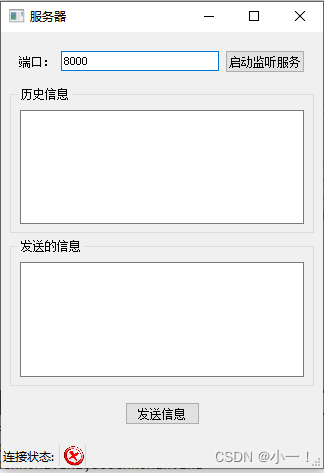
QtServer.pro文件
mainwindow.h文件
#ifndef MAINWINDOW_H
#define MAINWINDOW_H#include <QMainWindow>
#include <QTcpServer>
#include <QTcpSocket>
#include <QLabel>QT_BEGIN_NAMESPACE
namespace Ui { class MainWindow; }
QT_END_NAMESPACEclass MainWindow : public QMainWindow
{Q_OBJECTpublic:MainWindow(QWidget *parent = nullptr);~MainWindow();private slots:void on_setListen_clicked();void on_sendMsg_clicked();private:Ui::MainWindow *ui;QTcpServer* m_s;QTcpSocket* m_tcp;QLabel* m_status;
};
#endif // MAINWINDOW_Hmain.cpp文件
#include "mainwindow.h"#include <QApplication>int main(int argc, char *argv[])
{QApplication a(argc, argv);MainWindow w;w.show();return a.exec();
}mainwindow.cpp文件
#include "mainwindow.h"
#include "ui_mainwindow.h"MainWindow::MainWindow(QWidget *parent): QMainWindow(parent), ui(new Ui::MainWindow)
{ui->setupUi(this);ui->port->setText("8000"); //先设置一个端口号setWindowTitle("服务器");//创建监听的服务器对象m_s = new QTcpServer(this); //指定父对象,不需要再去管内存的释放//等待客户端链接,连接上会发送一个信号newConnectionconnect(m_s,&QTcpServer::newConnection,this,[=](){m_tcp = m_s->nextPendingConnection(); //得到可供通讯的套接字对象m_status->setPixmap(QPixmap(":/connect.png").scaled(20,20)); //更改链接状态//检测是否可以接收数据connect(m_tcp,&QTcpSocket::readyRead,this,[=](){QByteArray data = m_tcp->readAll(); //全部读出来ui->record->append("客户端say: " + data);  //显示在历史记录框中});//对端断开链接时会,TcpSocket会发送一个disconnect信号connect(m_tcp,&QTcpSocket::disconnected,this,[=](){m_tcp->close(); //关闭套接字m_tcp->deleteLater(); //释放m_tcpm_status->setPixmap(QPixmap(":/disconnect.png").scaled(20,20)); //更改链接状态});});//状态栏m_status = new QLabel;//给标签设置图片m_status->setPixmap(QPixmap(":/disconnect.png").scaled(20,20));  //scaled设置图片大小//将标签设置到状态栏中ui->statusbar->addWidget(new QLabel("连接状态: "));ui->statusbar->addWidget(m_status);
}MainWindow::~MainWindow()
{delete ui;
}void MainWindow::on_setListen_clicked()
{unsigned short port = ui->port->text().toUShort();m_s->listen(QHostAddress::Any,port); //开始监听ui->setListen->setDisabled(true);  //监听之后设置为不可用状态
}void MainWindow::on_sendMsg_clicked()
{QString msg = ui->msg->toPlainText(); //以纯文本的方式把数据读出来m_tcp->write(msg.toUtf8());ui->record->append("服务器say: " + msg);  //显示在历史记录框中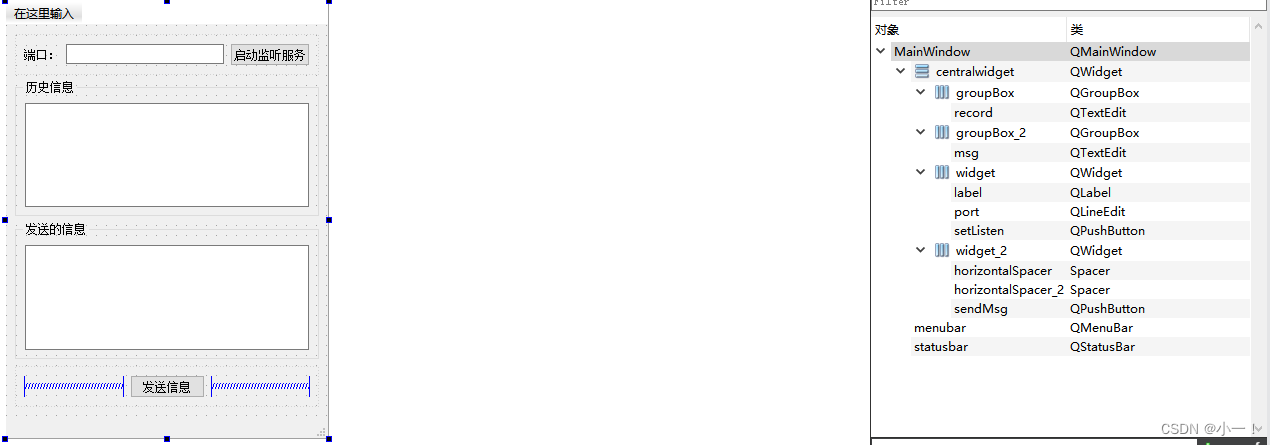
}mainwindow.ui文件
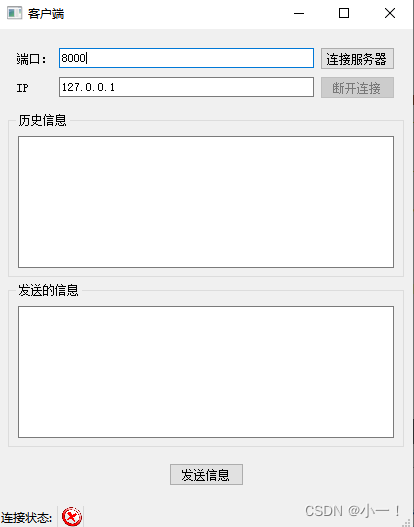
客户端
通信流程
- 创建通信的套接字类QTcpSocket对象
- 使用服务器端绑定的IP和端口连接服务器QAbstractSocket::connectToHost()
- 使用QTcpSocket对象和服务器进行通信
代码
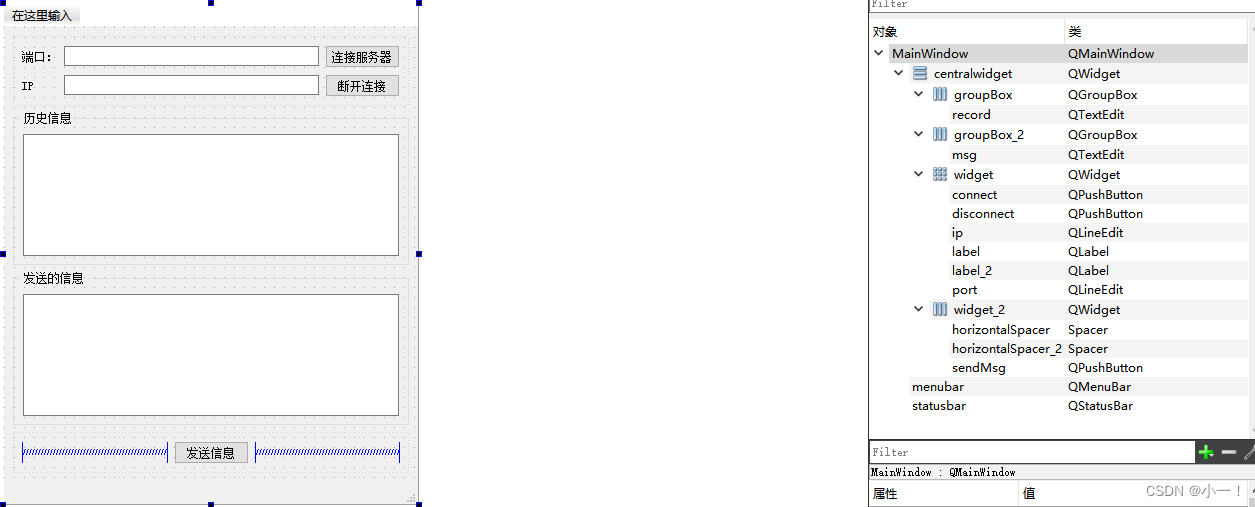
客户端的窗口界面如下图所示:
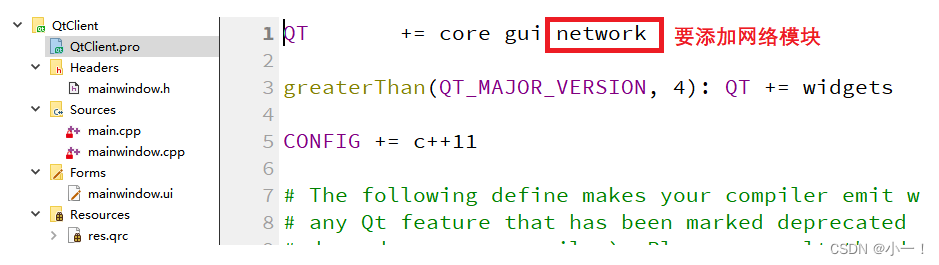
QtClient.pro文件
mainwindow.h文件
#ifndef MAINWINDOW_H
#define MAINWINDOW_H#include <QMainWindow>
#include <QTcpSocket>
#include <QLabel>QT_BEGIN_NAMESPACE
namespace Ui { class MainWindow; }
QT_END_NAMESPACEclass MainWindow : public QMainWindow
{Q_OBJECTpublic:MainWindow(QWidget *parent = nullptr);~MainWindow();private slots:void on_sendMsg_clicked();void on_connect_clicked();void on_disconnect_clicked();private:Ui::MainWindow *ui;QTcpSocket* m_tcp;QLabel* m_status;
};
#endif // MAINWINDOW_Hmain.cpp文件
#include "mainwindow.h"#include <QApplication>int main(int argc, char *argv[])
{QApplication a(argc, argv);MainWindow w;w.show();return a.exec();
}mainwindow.cpp文件
#include "mainwindow.h"
#include "ui_mainwindow.h"#include <QHostAddress>MainWindow::MainWindow(QWidget *parent): QMainWindow(parent), ui(new Ui::MainWindow)
{ui->setupUi(this);ui->port->setText("8000"); //先设置一个端口号ui->ip->setText("127.0.0.1"); //设置本地循环ipsetWindowTitle("客户端");ui->disconnect->setDisabled(true);//断开连接按钮不可用//创建监听的服务器对象m_tcp = new QTcpSocket(this); //指定父对象,不需要再去管内存的释放//检测是否可以接受数据 当 m_tcp 发送给出readyRead信号,就说明有信号到达了connect(m_tcp,&QTcpSocket::readyRead,this,[=](){QByteArray data = m_tcp->readAll(); //全部读出来ui->record->append("服务器say: " + data);  //显示在历史记录框中});//对端断开链接时会,TcpSocket会发送一个disconnect信号connect(m_tcp,&QTcpSocket::disconnected,this,[=](){m_tcp->close(); //关闭套接字//m_tcp->deleteLater(); // 指定了父对象,不需要手动释放 m_tcpm_status->setPixmap(QPixmap(":/disconnect.png").scaled(20,20)); //更改链接状态ui->record->append("服务器已经和客户端断开了连接...");ui->connect->setDisabled(false); //连接按钮可用ui->disconnect->setEnabled(false); //断开连接按钮不可用});//当 m_tcp 发送一个 connected 信号后,就说明已经连接上服务器connect(m_tcp,&QTcpSocket::connected,this,[=](){m_status->setPixmap(QPixmap(":/connect.png").scaled(20,20));  //scaled设置图片大小ui->record->append("已经成功连接到了服务器...");ui->connect->setDisabled(true); //连接按钮不可用ui->disconnect->setEnabled(true); //断开连接按钮可用});//状态栏m_status = new QLabel;//给标签设置图片m_status->setPixmap(QPixmap(":/disconnect.png").scaled(20,20));  //scaled设置图片大小//将标签设置到状态栏中ui->statusbar->addWidget(new QLabel("连接状态: "));ui->statusbar->addWidget(m_status);
}MainWindow::~MainWindow()
{delete ui;
}void MainWindow::on_sendMsg_clicked()
{QString msg = ui->msg->toPlainText(); //以纯文本的方式把数据读出来m_tcp->write(msg.toUtf8());ui->record->append("客户端say: " + msg);  //显示在历史记录框中
}void MainWindow::on_connect_clicked()
{QString ip = ui->ip->text();unsigned short port = ui->port->text().toUShort();m_tcp->connectToHost(QHostAddress(ip),port);
}void MainWindow::on_disconnect_clicked()
{m_tcp->close();ui->connect->setDisabled(false);ui->disconnect->setEnabled(false);
}mainwindow.ui文件
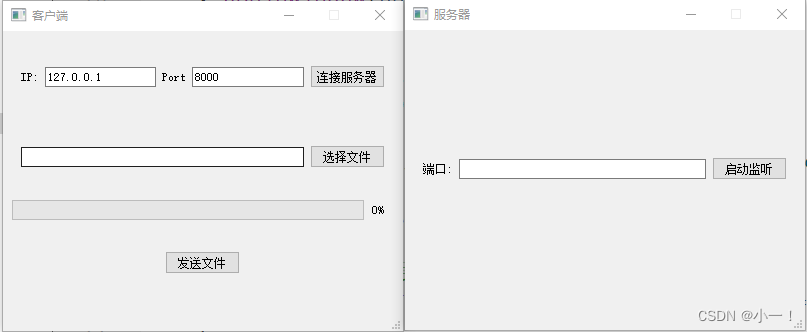
多线程网络通信
客户端通过子线程发送文件,服务器通过子线程接收文件。
通信界面
SendFileClient

mainwindow.h文件
#ifndef MAINWINDOW_H
#define MAINWINDOW_H#include <QMainWindow>QT_BEGIN_NAMESPACE
namespace Ui { class MainWindow; }
QT_END_NAMESPACEclass MainWindow : public QMainWindow
{Q_OBJECTpublic:MainWindow(QWidget *parent = nullptr);~MainWindow();signals:
void startConnect(unsigned short,QString ip);
void sendFile(QString path);private slots:void on_connectServer_clicked();void on_selFile_clicked();void on_sendFile_clicked();private:Ui::MainWindow *ui;
};
#endif // MAINWINDOW_Hsendfile.h文件
#ifndef SENDFILE_H
#define SENDFILE_H#include <QObject>
#include <QTcpSocket>class SendFile : public QObject
{Q_OBJECT
public:explicit SendFile(QObject *parent = nullptr);//连接服务器void connectServer(unsigned short port,QString ip);//发送文件void sendFile(QString path);signals:void connectOk();void gameOver();void CurPercent(int num);
private:QTcpSocket* m_tcp;};#endif // SENDFILE_Hmain.cpp文件
#include "mainwindow.h"#include <QApplication>int main(int argc, char *argv[])
{QApplication a(argc, argv);MainWindow w;w.show();return a.exec();
}
mainwindow.cpp文件
#include "mainwindow.h"
#include "ui_mainwindow.h"
#include <QMessageBox>
#include <QThread>
#include "sendfile.h"
#include <QFileDialog>
#include <QDebug>MainWindow::MainWindow(QWidget *parent): QMainWindow(parent), ui(new Ui::MainWindow)
{ui->setupUi(this);setFixedSize(400,300);setWindowTitle("客户端");qDebug() << "主线程: " << QThread::currentThread();ui->ip->setText("127.0.0.1");ui->port->setText("8000");ui->progressBar->setRange(0,100); //进度条设置范围ui->progressBar->setValue(0); //进度设置初始值//创建线程对象QThread* t = new QThread;//创建任务对象SendFile* worker = new SendFile;worker->moveToThread(t);  //worker对象就会在 线程 t 里面执行connect(this,&MainWindow::sendFile,worker,&SendFile::sendFile);connect(this,&MainWindow::startConnect,worker,&SendFile::connectServer);//处理子线程发送的信号connect(worker,&SendFile::connectOk,this,[=](){QMessageBox::information(this,"连接服务器","已经成功连接了服务器");});connect(worker,&SendFile::gameOver,this,[=](){//资源释放t->quit();t->wait();worker->deleteLater();t->deleteLater();});//接受子线程发送的数据,更新进度条connect(worker,&SendFile::CurPercent,ui->progressBar,&QProgressBar::setValue);t->start(); //启动线程}MainWindow::~MainWindow()
{delete ui;
}void MainWindow::on_connectServer_clicked()
{QString ip = ui->ip->text(); //获取ipunsigned short port = ui->port->text().toUShort();emit startConnect(port,ip); //发送连接信号
}void MainWindow::on_selFile_clicked()
{QString path = QFileDialog::getOpenFileName(); //获取文件路径if(path.isEmpty()){QMessageBox::warning(this,"打开文件","选择的文件路径不能为空!");return;}ui->filePath->setText(path);
}void MainWindow::on_sendFile_clicked()
{emit sendFile(ui->filePath->text());
}sendfile.cpp文件
#include "sendfile.h"#include <QFile>
#include <QFileInfo>
#include <QHostAddress>
#include <QDebug>
#include <QThread>SendFile::SendFile(QObject *parent) : QObject(parent)
{}void SendFile::connectServer(unsigned short port, QString ip)
{qDebug() << "连接服务器线程: " << QThread::currentThread();m_tcp = new QTcpSocket;m_tcp->connectToHost(QHostAddress(ip),port);//当m_tcp发送connected信号后,表示已经连接成功了connect(m_tcp,&QTcpSocket::connected,this,&SendFile::connectOk);//当m_tcp发送disconnected信号后,表示服务器断开连接了connect(m_tcp,&QTcpSocket::disconnected,this,[=](){m_tcp->close();m_tcp->deleteLater();//发送信号给主线程,告诉主线程服务器已经断开连接emit gameOver();});
}void SendFile::sendFile(QString path)
{qDebug() << "发送文件线程: " << QThread::currentThread();QFile file(path);QFileInfo info(path);int fileSize = info.size(); //求文件大小file.open(QFile::ReadOnly); //只读形式while(!file.atEnd()){//第一次循环的时候,要把文件大小传送过去static int num = 0;if(num==0){m_tcp->write((char*)&fileSize, 4);}QByteArray line = file.readLine(); //一行一行读num += line.size();int percent = (num*100 / fileSize);emit CurPercent(percent); //更新传送文件的百分比m_tcp->write(line); //将数据发送给服务器}
}
SendFileServer

mainwindow.h文件
#ifndef MAINWINDOW_H
#define MAINWINDOW_H#include <QMainWindow>
#include <QTcpServer>
#include "mytcpserver.h"QT_BEGIN_NAMESPACE
namespace Ui { class MainWindow; }
QT_END_NAMESPACEclass MainWindow : public QMainWindow
{Q_OBJECTpublic:MainWindow(QWidget *parent = nullptr);~MainWindow();private slots:void on_setListen_clicked();private:Ui::MainWindow *ui;MyTcpServer* m_s;
};
#endif // MAINWINDOW_Hmytcpserver.h文件
#ifndef MYTCPSERVER_H
#define MYTCPSERVER_H#include <QTcpServer>class MyTcpServer : public QTcpServer
{Q_OBJECT
public:explicit MyTcpServer(QObject *parent = nullptr);protected:virtual void incomingConnection(qintptr socketDescriptor) override;
signals:void newDescriptor(qintptr sock);};#endif // MYTCPSERVER_Hrecvfile.h文件
#ifndef RECVFILE_H
#define RECVFILE_H#include <QThread>
#include <QTcpSocket>class RecvFile : public QThread
{Q_OBJECT
public:explicit RecvFile(qintptr sock,QObject *parent = nullptr);protected:void run() override;
private:QTcpSocket* m_tcp;
signals:void over();
};#endif // RECVFILE_Hmain.cpp文件
#include "mainwindow.h"#include <QApplication>int main(int argc, char *argv[])
{QApplication a(argc, argv);MainWindow w;w.show();return a.exec();
}mainwindow.cpp文件
#include "mainwindow.h"
#include "ui_mainwindow.h"#include <QMessageBox>
#include <QTcpSocket>
#include "recvfile.h"
#include <QDebug>MainWindow::MainWindow(QWidget *parent): QMainWindow(parent), ui(new Ui::MainWindow)
{ui->setupUi(this);setFixedSize(400,300);setWindowTitle("服务器");qDebug()<<"服务器主线程: "<<QThread::currentThread();m_s = new MyTcpServer(this);//检测是否有连接信号connect(m_s,&MyTcpServer::newDescriptor,this,[=](qintptr sock){// QTcpSocket* tcp = m_s->nextPendingConnection(); //得到用于通讯的Socket对象//创建子线程RecvFile* subThread  =new RecvFile(sock);subThread->start(); //启动子线程//接收子线程信号connect(subThread,&RecvFile::over,this,[=](){subThread->exit();subThread->wait();subThread->deleteLater();QMessageBox::information(this,"文件接收","文件接收完毕!!!");});});}MainWindow::~MainWindow()
{delete ui;
}void MainWindow::on_setListen_clicked()
{unsigned short port = ui->port->text().toUShort();m_s->listen(QHostAddress::Any,port);
}mytcpserver.cpp文件
#include "mytcpserver.h"MyTcpServer::MyTcpServer(QObject *parent) : QTcpServer(parent)
{}//当客户端发起新的连接,就会被自动调用
void MyTcpServer::incomingConnection(qintptr socketDescriptor)
{//不能在子线程里面直接使用主线程定义的套接字对象,自己在子线程中定义一个emit newDescriptor(socketDescriptor);
}recvfile.cpp文件
#include "recvfile.h"
#include <QFile>
#include <QDebug>RecvFile::RecvFile(qintptr sock,QObject *parent) : QThread(parent)
{m_tcp = new QTcpSocket(this);m_tcp->setSocketDescriptor(sock);
}void RecvFile::run()
{qDebug() << "服务器子线程: " << QThread::currentThread();QFile* file = new QFile("recv.txt");file->open(QFile::WriteOnly);//接受数据connect(m_tcp,&QTcpSocket::readyRead,this,[=](){static int count = 0;static int total = 0;if(count ==0) //第一次接收,把文件大小接收过来{m_tcp->read((char*)&total,4); //接收4个字节}//读剩余的数据QByteArray all = m_tcp->readAll();count += all.size();file->write(all);//判断数据是否接收完毕if(count==total){m_tcp->close();m_tcp->deleteLater();file->close();file->deleteLater();//发送信号告诉子线程数据已经接收完emit over();}});//进入事件循环exec(); //保证子线程不退出
}