文章目录
- 0 前言
- 2 开发简介
- 3 识别原理
- 3.1 传统图像识别原理
- 3.2 深度学习水果识别
- 4 数据集
- 5 部分关键代码
- 5.1 处理训练集的数据结构
- 5.2 模型网络结构
- 5.3 训练模型
- 6 识别效果
- 7 最后
0 前言
🔥 优质竞赛项目系列,今天要分享的是
🚩 深度学习的水果识别 opencv python
该项目较为新颖,适合作为竞赛课题方向,学长非常推荐!
🥇学长这里给一个题目综合评分(每项满分5分)
- 难度系数:3分
- 工作量:3分
- 创新点:4分
🧿 更多资料, 项目分享:
https://gitee.com/dancheng-senior/postgraduate
2 开发简介
深度学习作为机器学习领域内新兴并且蓬勃发展的一门学科, 它不仅改变着传统的机器学习方法, 也影响着我们对人类感知的理解,
已经在图像识别和语音识别等领域取得广泛的应用。 因此, 本文在深入研究深度学习理论的基础上, 将深度学习应用到水果图像识别中,
以此来提高了水果图像的识别性能。
3 识别原理
3.1 传统图像识别原理
传统的水果图像识别系统的一般过程如下图所示,主要工作集中在图像预处理和特征提取阶段。
在大多数的识别任务中, 实验所用图像往往是在严格限定的环境中采集的, 消除了外界环境对图像的影响。 但是实际环境中图像易受到光照变化、 水果反光、
遮挡等因素的影响, 这在不同程度上影响着水果图像的识别准确率。
在传统的水果图像识别系统中, 通常是对水果的纹理、 颜色、 形状等特征进行提取和识别。

3.2 深度学习水果识别
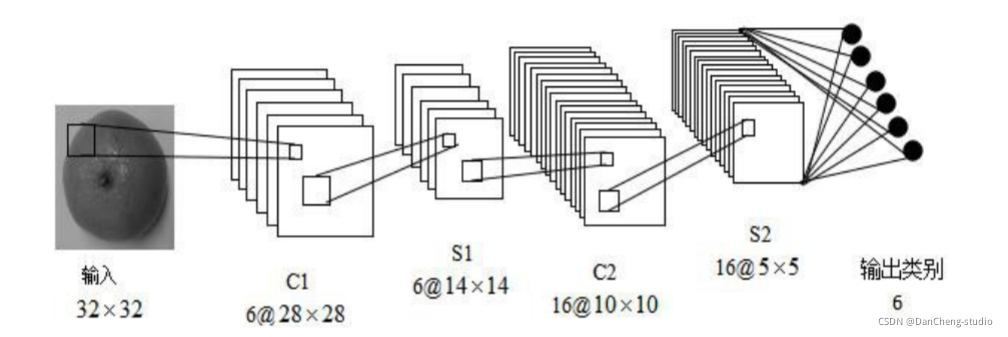
CNN 是一种专门为识别二维特征而设计的多层神经网络, 它的结构如下图所示,这种结构对平移、 缩放、 旋转等变形具有高度的不变性。
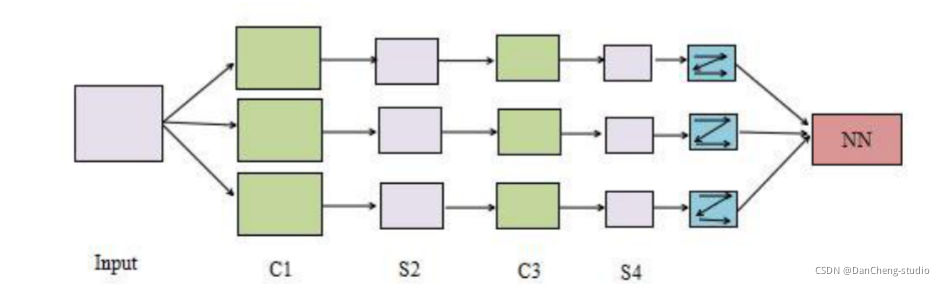
学长本次采用的 CNN 架构如图:
4 数据集
-
数据库分为训练集(train)和测试集(test)两部分
-
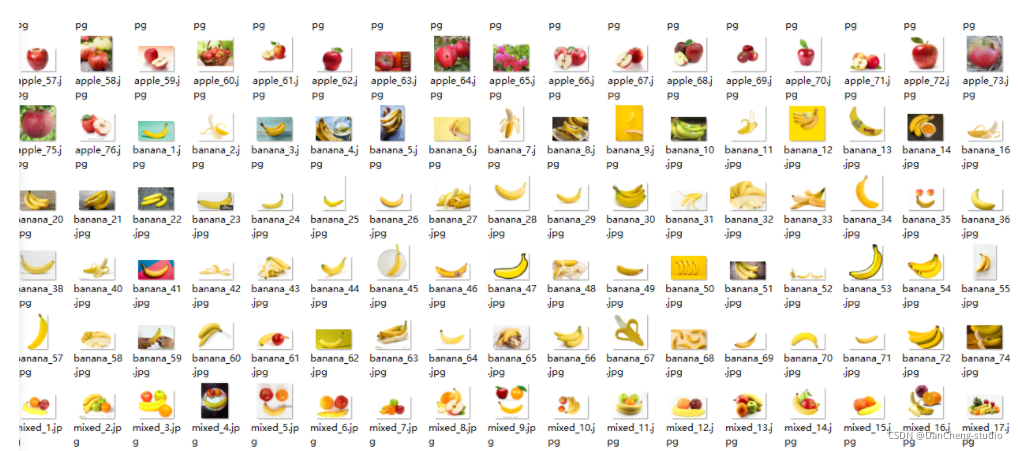
训练集包含四类apple,orange,banana,mixed(多种水果混合)四类237张图片;测试集包含每类图片各两张。图片集如下图所示。
-
图片类别可由图片名称中提取。
训练集图片预览
测试集预览

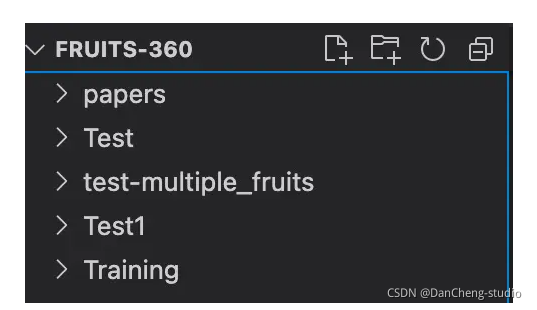
数据集目录结构
5 部分关键代码
5.1 处理训练集的数据结构
import os
import pandas as pdtrain_dir = './Training/'
test_dir = './Test/'
fruits = []
fruits_image = []for i in os.listdir(train_dir):for image_filename in os.listdir(train_dir + i):fruits.append(i) # name of the fruitfruits_image.append(i + '/' + image_filename)
train_fruits = pd.DataFrame(fruits, columns=["Fruits"])
train_fruits["Fruits Image"] = fruits_imageprint(train_fruits)
5.2 模型网络结构
import matplotlib.pyplot as plt
import seaborn as sns
from keras.preprocessing.image import ImageDataGenerator, img_to_array, load_img
from glob import glob
from keras.models import Sequential
from keras.layers import Conv2D, MaxPooling2D, Activation, Dropout, Flatten, Dense
img = load_img(train_dir + "Cantaloupe 1/r_234_100.jpg")
plt.imshow(img)
plt.axis("off")
plt.show()array_image = img_to_array(img)# shape (100,100)
print("Image Shape --> ", array_image.shape)# 131个类目
fruitCountUnique = glob(train_dir + '/*' )
numberOfClass = len(fruitCountUnique)
print("How many different fruits are there --> ",numberOfClass)# 构建模型
model = Sequential()
model.add(Conv2D(32,(3,3),input_shape = array_image.shape))
model.add(Activation("relu"))
model.add(MaxPooling2D())
model.add(Conv2D(32,(3,3)))
model.add(Activation("relu"))
model.add(MaxPooling2D())
model.add(Conv2D(64,(3,3)))
model.add(Activation("relu"))
model.add(MaxPooling2D())
model.add(Flatten())
model.add(Dense(1024))
model.add(Activation("relu"))
model.add(Dropout(0.5))# 区分131类
model.add(Dense(numberOfClass)) # output
model.add(Activation("softmax"))
model.compile(loss = "categorical_crossentropy",optimizer = "rmsprop",metrics = ["accuracy"])print("Target Size --> ", array_image.shape[:2])
5.3 训练模型
train_datagen = ImageDataGenerator(rescale= 1./255,shear_range = 0.3,horizontal_flip=True,zoom_range = 0.3)test_datagen = ImageDataGenerator(rescale= 1./255)
epochs = 100
batch_size = 32
train_generator = train_datagen.flow_from_directory(train_dir,target_size= array_image.shape[:2],batch_size = batch_size,color_mode= "rgb",class_mode= "categorical")test_generator = test_datagen.flow_from_directory(test_dir,target_size= array_image.shape[:2],batch_size = batch_size,color_mode= "rgb",class_mode= "categorical")for data_batch, labels_batch in train_generator:print("data_batch shape --> ",data_batch.shape)print("labels_batch shape --> ",labels_batch.shape)breakhist = model.fit_generator(generator = train_generator,steps_per_epoch = 1600 // batch_size,epochs=epochs,validation_data = test_generator,validation_steps = 800 // batch_size)#保存模型 model_fruits.h5
model.save('model_fruits.h5')
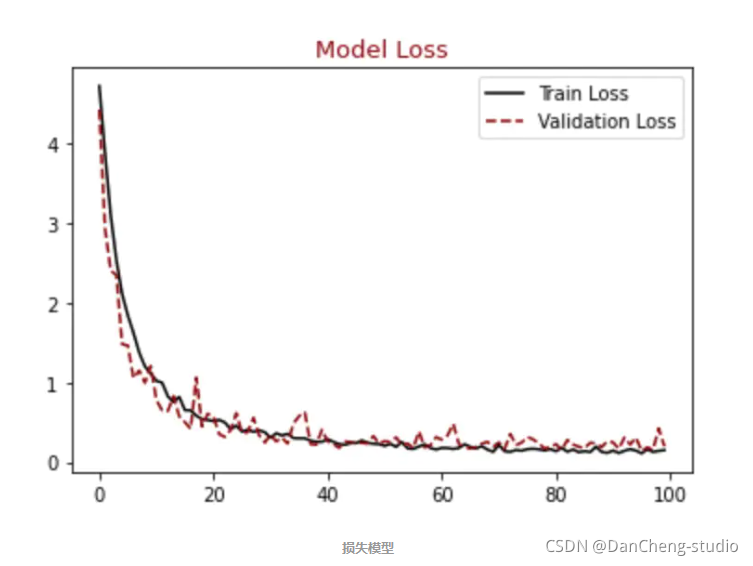
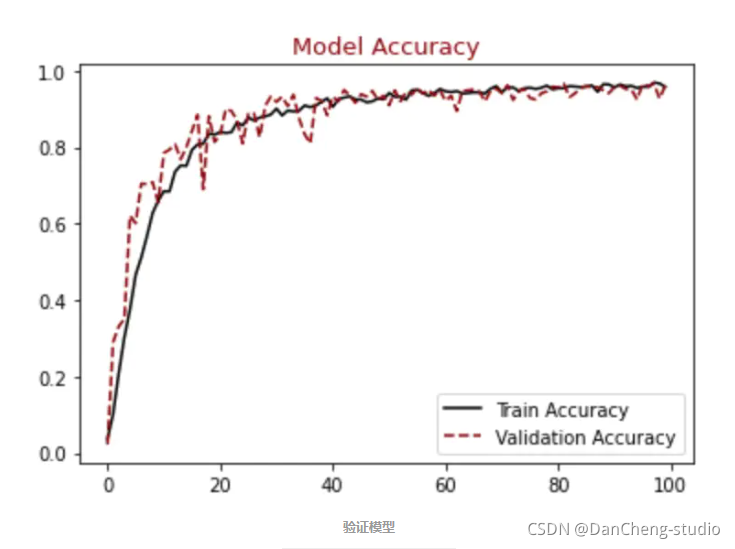
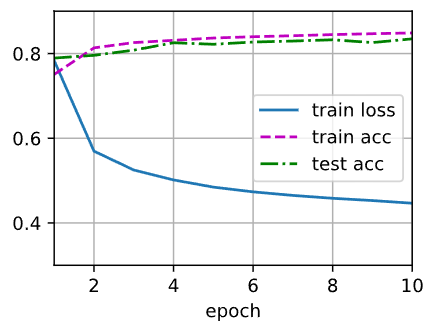
顺便输出训练曲线
#展示损失模型结果
plt.figure()
plt.plot(hist.history["loss"],label = "Train Loss", color = "black")
plt.plot(hist.history["val_loss"],label = "Validation Loss", color = "darkred", linestyle="dashed",markeredgecolor = "purple", markeredgewidth = 2)
plt.title("Model Loss", color = "darkred", size = 13)
plt.legend()
plt.show()#展示精确模型结果
plt.figure()
plt.plot(hist.history["accuracy"],label = "Train Accuracy", color = "black")
plt.plot(hist.history["val_accuracy"],label = "Validation Accuracy", color = "darkred", linestyle="dashed",markeredgecolor = "purple", markeredgewidth = 2)
plt.title("Model Accuracy", color = "darkred", size = 13)
plt.legend()
plt.show()
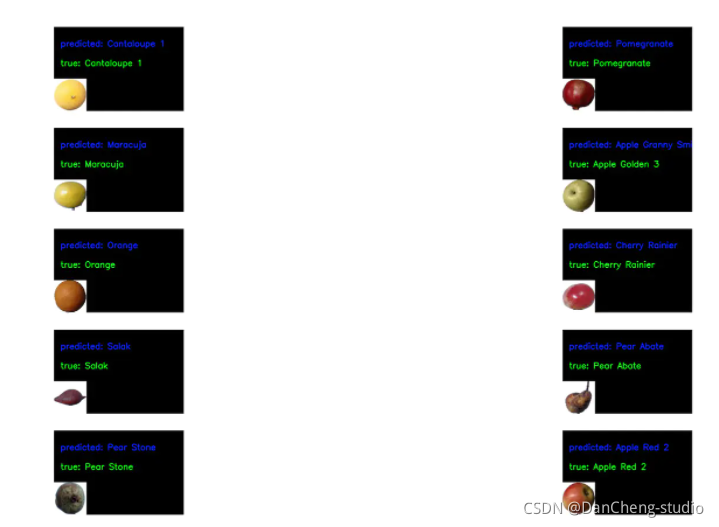
6 识别效果
from tensorflow.keras.models import load_model
import os
import pandas as pdfrom keras.preprocessing.image import ImageDataGenerator,img_to_array, load_img
import cv2,matplotlib.pyplot as plt,numpy as np
from keras.preprocessing import imagetrain_datagen = ImageDataGenerator(rescale= 1./255,shear_range = 0.3,horizontal_flip=True,zoom_range = 0.3)model = load_model('model_fruits.h5')
batch_size = 32
img = load_img("./Test/Apricot/3_100.jpg",target_size=(100,100))
plt.imshow(img)
plt.show()array_image = img_to_array(img)
array_image = array_image * 1./255
x = np.expand_dims(array_image, axis=0)
images = np.vstack([x])
classes = model.predict_classes(images, batch_size=10)
print(classes)
train_dir = './Training/'train_generator = train_datagen.flow_from_directory(train_dir,target_size= array_image.shape[:2],batch_size = batch_size,color_mode= "rgb",class_mode= "categorical”)
print(train_generator.class_indices)
fig = plt.figure(figsize=(16, 16))
axes = []
files = []
predictions = []
true_labels = []
rows = 5
cols = 2# 随机选择几个图片
def getRandomImage(path, img_width, img_height):"""function loads a random image from a random folder in our test path"""folders = list(filter(lambda x: os.path.isdir(os.path.join(path, x)), os.listdir(path)))random_directory = np.random.randint(0, len(folders))path_class = folders[random_directory]file_path = os.path.join(path, path_class)file_names = [f for f in os.listdir(file_path) if os.path.isfile(os.path.join(file_path, f))]random_file_index = np.random.randint(0, len(file_names))image_name = file_names[random_file_index]final_path = os.path.join(file_path, image_name)return image.load_img(final_path, target_size = (img_width, img_height)), final_path, path_classdef draw_test(name, pred, im, true_label):BLACK = [0, 0, 0]expanded_image = cv2.copyMakeBorder(im, 160, 0, 0, 300, cv2.BORDER_CONSTANT, value=BLACK)cv2.putText(expanded_image, "predicted: " + pred, (20, 60), cv2.FONT_HERSHEY_SIMPLEX,0.85, (255, 0, 0), 2)cv2.putText(expanded_image, "true: " + true_label, (20, 120), cv2.FONT_HERSHEY_SIMPLEX,0.85, (0, 255, 0), 2)return expanded_image
IMG_ROWS, IMG_COLS = 100, 100# predicting images
for i in range(0, 10):path = "./Test"img, final_path, true_label = getRandomImage(path, IMG_ROWS, IMG_COLS)files.append(final_path)true_labels.append(true_label)x = image.img_to_array(img)x = x * 1./255x = np.expand_dims(x, axis=0)images = np.vstack([x])classes = model.predict_classes(images, batch_size=10)predictions.append(classes)class_labels = train_generator.class_indices
class_labels = {v: k for k, v in class_labels.items()}
class_list = list(class_labels.values())for i in range(0, len(files)):image = cv2.imread(files[i])image = draw_test("Prediction", class_labels[predictions[i][0]], image, true_labels[i])axes.append(fig.add_subplot(rows, cols, i+1))plt.imshow(cv2.cvtColor(image, cv2.COLOR_BGR2RGB))plt.grid(False)plt.axis('off')
plt.show()
7 最后
🧿 更多资料, 项目分享:
https://gitee.com/dancheng-senior/postgraduate


![[论文笔记]Longformer: The Long-Document Transformer](https://img-blog.csdnimg.cn/img_convert/2b28caa341b99dde661698030daaec48.png)