一、简介
Crypto++(也称为CryptoPP、libcrypto++或cryptlib)是一个免费的开源C++库,提供了多种加密方案。它由Wei Dai开发和维护,广泛应用于需要强大加密安全的各种应用程序中。该库提供了广泛的加密算法和协议的实现,包括:
-
对称加密算法:AES、DES、3DES、RC2、RC4、RC5、RC6、Blowfish、Twofish等。
-
非对称加密算法:RSA、DSA、ElGamal、ECC(椭圆曲线加密)等。
-
哈希函数:SHA-1、SHA-2(SHA-224、SHA-256、SHA-384、SHA-512)、MD2、MD4、MD5、RIPEMD-160等。
-
消息认证码(MAC):HMAC、CMAC等。
-
数字签名算法:DSA、ECDSA、EdDSA等。
-
随机数生成器:各种伪随机数生成器和真随机数生成器。
-
密码协议:SSL/TLS、SRP(安全远程密码协议)等。
Crypto++的设计目标是提供高性能、高质量的加密算法实现,并且易于集成到C++应用程序中。它是一个跨平台的库,支持多种操作系统,包括Windows、Linux、macOS等。
二、下载
Crypto++下载:
Crypto++ Library 8.9 | Free C++ Class Library of Cryptographic Schemes
或者Tags · weidai11/cryptopp · GitHub
cryptopp-pem下载:
PEM Pack - Crypto++ Wiki ,滚动到页面最下方下载
PEM Pack 是一个消息加密的部分实现,它允许你读取和写入 PEM 编码的密钥和参数,包括加密的私钥。该包额外提供了对 RSA、DSA、EC、ECDSA 密钥以及 Diffie-Hellman 参数的支持。该包包含五个额外的源文件,一个使用 OpenSSL 创建测试密钥的脚本,一个用于测试读取和写入密钥的 C++ 程序,以及一个用于验证由 Crypto++ 写入的密钥的脚本。
最终下载文件如下:
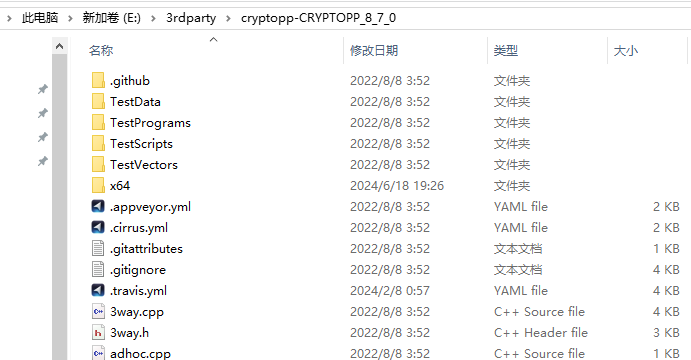
cryptopp-CRYPTOPP_8_7_0.zip
cryptopp-pem-master.zip
三、编译静态库
1、解压cryptopp-CRYPTOPP_8_7_0.zip
再解压cryptopp-pem-master.zip,内容全部拷贝到cryptopp-CRYPTOPP_8_7_0中
2、VS打开cryptest.sln工程
3、往子工程cryptlib中加入pem包
选中cryptlib,右击“Header Files”->添加->现有项:
-
pem.h
-
pem_common.h
右击“Source Files”->添加->现有项:
-
pem_common.cpp
-
pem_read.cpp
-
pem_write.cpp
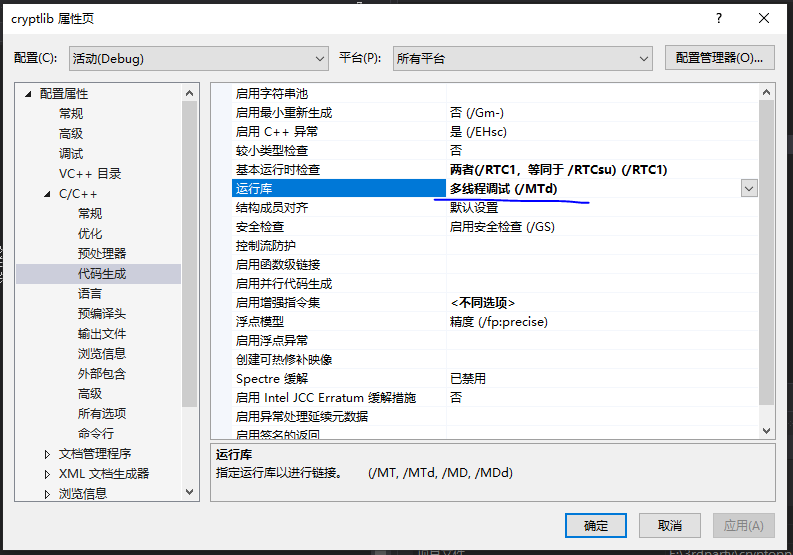
4、修改属性页-》配置属性-》C/C++ -》代码生成-》运行库 。debug模式选"多线程调试DLL(/MDd) 或者"多线程调试(/MTd)"",release模式选择“多线程DLL(/MD)” 或者"多线程(/MT)"
5、编译生成,右击子工程cryptlib点击“生成”
6、作为SDK发布
创建文件夹cryptopp870,内部创建include文件夹(存放.h文件),创建lib文件(夹存放.lib文件)
cryptopp-CRYPTOPP_8_7_0中所有头文件复制到include中
xxx/cryptopp-CRYPTOPP_8_7_0\x64\Output中的Debug和Release文件夹复制到lib中
运行库说明:
在 Visual C++ 中,运行库(Runtime Library)有四个主要的选项,它们在编译和链接时使用不同的设置。这些选项主要影响程序的内存管理、异常处理和调试支持等方面。以下是这四个选项的区别:
-
多线程 (/MT)
-
描述:使用静态链接的多线程运行库。
-
特点:
-
程序在运行时不需要额外的 DLL 支持,因为所有的运行库代码都被静态链接到可执行文件中。
-
可执行文件较大,因为包含了运行库的所有代码。
-
适用于发布版本,因为不需要依赖外部 DLL。
-
-
适用场景:不需要依赖外部 DLL 的独立应用程序。
-
-
多线程调试 (/MTd)
-
描述:使用静态链接的多线程调试运行库。
-
特点:
-
与
/MT类似,但包含了调试信息,适用于调试版本。 -
可执行文件较大,因为包含了运行库的所有代码和调试信息。
-
适用于调试版本,因为可以提供更详细的调试信息。
-
-
适用场景:需要详细调试信息的调试版本。
-
-
多线程 DLL (/MD)
-
描述:使用动态链接的多线程运行库。
-
特点:
-
程序在运行时需要依赖
msvcrt.dll(Microsoft Visual C++ 运行库 DLL)。 -
可执行文件较小,因为只包含了程序自身的代码,运行库代码在
msvcrt.dll中。 -
适用于发布版本,因为可以减小可执行文件的大小。
-
-
适用场景:需要减小可执行文件大小的发布版本。
-
-
多线程调试 DLL (/MDd)
-
描述:使用动态链接的多线程调试运行库。
-
特点:
-
与
/MD类似,但包含了调试信息,适用于调试版本。 -
程序在运行时需要依赖
msvcrtd.dll(Microsoft Visual C++ 调试运行库 DLL)。 -
适用于调试版本,因为可以提供更详细的调试信息。
-
-
适用场景:需要详细调试信息的调试版本。
-
总结:
-
/MT和/MTd使用静态链接,适用于不需要依赖外部 DLL 的独立应用程序。 -
/MD和/MDd使用动态链接,适用于需要减小可执行文件大小或依赖外部 DLL 的应用程序。 -
调试版本通常使用
/MTd或/MDd,因为它们包含了调试信息,有助于调试。
在选择运行库选项时,需要根据具体的需求和项目配置来决定使用哪个选项。确保所有相关的库和模块都使用相同的运行库选项,以避免链接错误。
例如,如果你有一个静态库 mylib.lib 是用 /MD 选项编译的,那么任何使用 mylib.lib 的可执行文件或 DLL 也必须使用 /MD 选项进行编译。
四、使用示例
VS配置:
新建一个测试工程,添加依赖库
属性页-》配置属性-》C/C++ -》常规-》附加包含目录,输入头文件路径E:\3rdparty\dist\cryptopp870\include
属性页-》配置属性-》链接器-》常规-》附加库目录,输入lib文件路径E:\3rdparty\dist\cryptopp870\lib\Debug
属性页-》配置属性-》链接器-》输入-》附加依赖项,添加cryptlib.lib
QT配置:
CONFIG(debug, debug|release) {
QMAKE_CXXFLAGS_DEBUG += /MTd # 或/MDd
}CONFIG(release, debug|release) {
QMAKE_CXXFLAGS_RELEASE += /MT # 或/MD
}win32:CONFIG(release, debug|release): LIBS += -L$$PWD/cryptopp870/lib/Release/ -lcryptlib
else:win32:CONFIG(debug, debug|release): LIBS += -L$$PWD/cryptopp870/lib/Debug/ -lcryptlibINCLUDEPATH += $$PWD/cryptopp870/include
DEPENDPATH += $$PWD/cryptopp870/includewin32-g++:CONFIG(release, debug|release): PRE_TARGETDEPS += $$PWD/cryptopp870/lib/Release/libcryptlib.a
else:win32-g++:CONFIG(debug, debug|release): PRE_TARGETDEPS += $$PWD/cryptopp870/lib/Debug/libcryptlib.a
else:win32:!win32-g++:CONFIG(release, debug|release): PRE_TARGETDEPS += $$PWD/cryptopp870/lib/Release/cryptlib.lib
else:win32:!win32-g++:CONFIG(debug, debug|release): PRE_TARGETDEPS += $$PWD/cryptopp870/lib/Debug/cryptlib.lib
4.1、RSA非对称加密
#include <iostream>
#include <string>
#include <rsa.h>
#include <osrng.h>
#include <base64.h>
#include <files.h>
#include <pem.h>using namespace std;
using namespace CryptoPP;class RSAKeyManager {
public:RSAKeyManager() {}void GenerateKeys(int keySize = 2048) {AutoSeededRandomPool rng;privateKey.GenerateRandomWithKeySize(rng, keySize);publicKey = RSA::PublicKey(privateKey);}std::string GetPrivateKeyPEM() const {std::string privateKeyPEM;StringSink privateKeySink(privateKeyPEM);PEM_Save(privateKeySink, privateKey);return privateKeyPEM;}std::string GetPublicKeyPEM() const {std::string publicKeyPEM;StringSink publicKeySink(publicKeyPEM);PEM_Save(publicKeySink, publicKey);return publicKeyPEM;}void SavePrivateKey(const char* filename) const {FileSink file(filename);PEM_Save(file, privateKey);}void SavePublicKey(const char* filename) const {FileSink file(filename);PEM_Save(file, publicKey);}void LoadPrivateKey(const char* filename) {FileSource file(filename, true);PEM_Load(file, privateKey);}void LoadPublicKey(const char* filename) {FileSource file(filename, true);PEM_Load(file, publicKey);}void LoadPrivateKeyFromString(const std::string& privateKeyPEM) {StringSource source(privateKeyPEM, true);PEM_Load(source, privateKey);}void LoadPublicKeyFromString(const std::string& publicKeyPEM) {StringSource source(publicKeyPEM, true);PEM_Load(source, publicKey);}std::string Encrypt(const std::string& message) const {AutoSeededRandomPool rng;std::string encrypted;RSAES_OAEP_SHA_Encryptor encryptor(publicKey);StringSource(message, true,new PK_EncryptorFilter(rng, encryptor,new StringSink(encrypted)));return encrypted;}std::string Decrypt(const std::string& encrypted) const {AutoSeededRandomPool rng;std::string decrypted;RSAES_OAEP_SHA_Decryptor decryptor(privateKey);StringSource(encrypted, true,new PK_DecryptorFilter(rng, decryptor,new StringSink(decrypted)));return decrypted;}private:RSA::PrivateKey privateKey;RSA::PublicKey publicKey;
};int main() {try {RSAKeyManager keyManager;// 生成密钥对keyManager.GenerateKeys();// 将私钥和公钥转换为PEM格式std::string privateKeyPEM = keyManager.GetPrivateKeyPEM();std::cout << "RSA Private Key:" << std::endl;std::cout << privateKeyPEM << std::endl;std::string publicKeyPEM = keyManager.GetPublicKeyPEM();std::cout << "RSA Public Key:" << std::endl;std::cout << publicKeyPEM << std::endl;// 从字符串加载密钥对RSAKeyManager loadedKeyManager;loadedKeyManager.LoadPrivateKeyFromString(privateKeyPEM);loadedKeyManager.LoadPublicKeyFromString(publicKeyPEM);// 加密string message = "Hello, World!";string encrypted = loadedKeyManager.Encrypt(message);// 解密string decrypted = loadedKeyManager.Decrypt(encrypted);// 输出结果cout << "Original message: " << message << endl;cout << "Encrypted message: " << encrypted << endl;cout << "Decrypted message: " << decrypted << endl;}catch (const Exception& e) {cout << "Crypto++ exception: " << e.what() << endl;}catch (const std::exception& e) {cout << "Standard exception: " << e.what() << endl;}catch (...) {cout << "Unknown exception" << endl;}return 0;
}
4.2、RSA签名
生成密钥对、签名数据以及验证签名
#include <iostream>
#include <string>
#include <rsa.h>
#include <osrng.h>
#include <base64.h>
#include <files.h>
#include <pem.h>
#include <sha.h>
#include <hex.h>
#include <pssr.h>using namespace std;
using namespace CryptoPP;void GenerateKeyPair(RSA::PrivateKey& privateKey, RSA::PublicKey& publicKey) {AutoSeededRandomPool rng;privateKey.GenerateRandomWithKeySize(rng, 2048);publicKey = RSA::PublicKey(privateKey);
}bool SignMessage(const string& message, const RSA::PrivateKey& privateKey, string &signature) {try{AutoSeededRandomPool rng;RSASS<PSS, SHA256>::Signer signer(privateKey);StringSource(message, true,new SignerFilter(rng, signer,new StringSink(signature)));}catch (const Exception& e){cout << "Sign exception: " << e.what() << endl;return false;}return true;
}bool VerifyMessage(const string& message, const string& signature, const RSA::PublicKey& publicKey) {try {RSASS<PSS, SHA256>::Verifier verifier(publicKey);/* 解签使用内容+签名 */StringSource ss(message + signature , true,new SignatureVerificationFilter(verifier,NULL,SignatureVerificationFilter::THROW_EXCEPTION | SignatureVerificationFilter::PUT_MESSAGE));}catch (const Exception& e) {cout << "Verifier exception: " << e.what() << endl;return false;}return true;
}struct LicenseData {string message = "2024/6/19, 2024/7/19";string signature;   /* 数字签名,验证数据是否被修改 */string publicKey;   /* 公钥 */
};int main() {try {RSA::PrivateKey privateKey;RSA::PublicKey publicKey;// 生成密钥对GenerateKeyPair(privateKey, publicKey);// 要签名的消息string message = "Hello, World!";// 签名消息string signature;bool b = SignMessage(message, privateKey, signature);cout << "signature:" << b << endl << signature << endl;// 验证签名b= VerifyMessage(message, signature, publicKey);if (b) {cout << "Signature is valid." << endl;}else {cout << "Signature is invalid." << endl;}}catch (const Exception& e) {cout << "Crypto++ exception: " << e.what() << endl;}catch (const std::exception& e) {cout << "Standard exception: " << e.what() << endl;}catch (...) {cout << "Unknown exception" << endl;}return 0;
}
4.3、 Base64 编码和解码
#include <iostream>
#include <string>#include <rsa.h>
#include <osrng.h>
#include <base64.h>
#include <files.h>
#include <pem.h>using namespace std;
using namespace CryptoPP;class Base64 {
public:static std::string encode(const std::string& data) {std::string encoded;CryptoPP::Base64Encoder encoder;encoder.Attach(new CryptoPP::StringSink(encoded));encoder.Put((const byte*)data.data(), data.size());encoder.MessageEnd();return encoded;}static std::string decode(const std::string& encoded) {std::string decoded;CryptoPP::Base64Decoder decoder;decoder.Attach(new CryptoPP::StringSink(decoded));decoder.Put((const byte*)encoded.data(), encoded.size());decoder.MessageEnd();return decoded;}
};int main()
{try {// 原始数据std::string data = "Hello, World!";// Base64 编码std::string encoded = Base64::encode(data);std::cout << "Encoded data: " << encoded << std::endl;// Base64 解码std::string decoded = Base64::decode(encoded);std::cout << "Decoded data: " << decoded << std::endl;}catch (const Exception& e) {cout << "Crypto++ exception: " << e.what() << endl;}catch (const std::exception& e) {cout << "Standard exception: " << e.what() << endl;}catch (...) {cout << "Unknown exception" << endl;}return 0;
}
4.4、AES对称加密
#include <iostream>
#include <string>
#include <aes.h>
#include <modes.h>
#include <filters.h>
#include <hex.h>
#include <osrng.h>using namespace std;
using namespace CryptoPP;class AESCipher {
public:AESCipher(const string& key, const string& iv) : key(key), iv(iv) {}string Encrypt(const string& plainText) {string cipherText;try {CBC_Mode<AES>::Encryption encryptor;encryptor.SetKeyWithIV((byte*)key.data(), key.size(), (byte*)iv.data());StringSource(plainText, true,new StreamTransformationFilter(encryptor,new StringSink(cipherText)));}catch (const Exception& e) {cerr << "Encryption error: " << e.what() << endl;}return cipherText;}string Decrypt(const string& cipherText) {string plainText;try {CBC_Mode<AES>::Decryption decryptor;decryptor.SetKeyWithIV((byte*)key.data(), key.size(), (byte*)iv.data());StringSource(cipherText, true,new StreamTransformationFilter(decryptor,new StringSink(plainText)));}catch (const Exception& e) {cerr << "Decryption error: " << e.what() << endl;}return plainText;}private:string key;string iv;
};int main() {// 生成随机的密钥和初始化向量(IV)AutoSeededRandomPool rng;byte key[AES::DEFAULT_KEYLENGTH];byte iv[AES::BLOCKSIZE];rng.GenerateBlock(key, sizeof(key));rng.GenerateBlock(iv, sizeof(iv));string keyStr(reinterpret_cast<char*>(key), sizeof(key));string ivStr(reinterpret_cast<char*>(iv), sizeof(iv));AESCipher aes(keyStr, ivStr);string plainText = "Hello, World!";string encryptedText = aes.Encrypt(plainText);string decryptedText = aes.Decrypt(encryptedText);cout << "Original Text: " << plainText << endl;cout << "Encrypted Text: " << encryptedText << endl;cout << "Decrypted Text: " << decryptedText << endl;return 0;
}