paper:Pay Attention to MLPs
third-party implementation:https://github.com/huggingface/pytorch-image-models/blob/main/timm/models/mlp_mixer.py
方法介绍
gMLP和MLP-Mixer以及ResMLP都是基于MLP的网络结构,非常简单,关于MLP-Mixer和ResMLP的介绍见MLP-Mixer(NeurIPS 2021, Google)论文与源码解读-CSDN博客、ResMLP(NeurIPS 2021,Meta)论文与代码解析-CSDN博客。

在MLP-Mixer中每个block包含两个MLP,每个MLP包含两个线性层(即全连接层),一个MLP用于token间的信息交互,另一个MLP用于通道间的信息交互,每个MLP都用了residual connection,标准化采用LayerNorm。而在ResMLP中,第一个包含两个线性层的token MLP换成了单个线性层,此外在线性层前后包含两个标准化层pre-normalization和post-normalization,pre-normalization采用了简单的仿射变换,post-normalization采用了CaiT中的LayerScale。
gMLP的结构和伪代码如图1所示。可以看到gMLP将token_mlp(即这里的spatial gating unit)和channel_mlp放到了一起,只包含一个skip-connection,而不是像MLP-Mixer和ResMLP中每个mlp都采用一个skip-connection。此外block内的结构和MLP-Mixer以及ResMLP中的先token_mlp后channel_mlp不同,这里采用了channel+token+channel的形式。最后作者专门为token_mlp设计了一个门控机制,将输入split开一分为二,一半经过spatial proj得到的输出再和另一半相乘得到最终输出。
以上就是gMLP和MLP-Mixer以及ResMLP不同之处,总共包括三点,整体结构也非常简单。下面就直接用代码来解释具体的实现细节。
代码解析
一个完整的block的代码如下,forward函数中可以看到只包含一个skip-connection,self.mlp_channels包含了图1中第一个Channel Proj到最后的Channel Proj。
class SpatialGatingBlock(nn.Module):""" Residual Block w/ Spatial GatingBased on: `Pay Attention to MLPs` - https://arxiv.org/abs/2105.08050"""def __init__(self,dim,seq_len,mlp_ratio=4,mlp_layer=GatedMlp,norm_layer=partial(nn.LayerNorm, eps=1e-6),act_layer=nn.GELU,drop=0.,drop_path=0.,):super().__init__()channel_dim = int(dim * mlp_ratio) # 512x6=3072self.norm = norm_layer(dim)sgu = partial(SpatialGatingUnit, seq_len=seq_len) # 196self.mlp_channels = mlp_layer(dim, channel_dim, act_layer=act_layer, gate_layer=sgu, drop=drop)self.drop_path = DropPath(drop_path) if drop_path > 0. else nn.Identity()def forward(self, x): # (1,196,512)x = x + self.drop_path(self.mlp_channels(self.norm(x)))return x上面的mlp_layer的代码如下,self.fc1和self.fc2对应两个Channel Proj。
class GatedMlp(nn.Module):""" MLP as used in gMLP"""def __init__(self,in_features,hidden_features=None,out_features=None,act_layer=nn.GELU,norm_layer=None,gate_layer=None,bias=True,drop=0.,):super().__init__()out_features = out_features or in_featureshidden_features = hidden_features or in_featuresbias = to_2tuple(bias)drop_probs = to_2tuple(drop)self.fc1 = nn.Linear(in_features, hidden_features, bias=bias[0])self.act = act_layer()self.drop1 = nn.Dropout(drop_probs[0])if gate_layer is not None:assert hidden_features % 2 == 0self.gate = gate_layer(hidden_features)hidden_features = hidden_features // 2 # FIXME base reduction on gate property?else:self.gate = nn.Identity()self.norm = norm_layer(hidden_features) if norm_layer is not None else nn.Identity()self.fc2 = nn.Linear(hidden_features, out_features, bias=bias[1])self.drop2 = nn.Dropout(drop_probs[1])def forward(self, x): # (1,196,512)# Linear(in_features=512, out_features=3072, bias=True)x = self.fc1(x) # (1,196,3072)x = self.act(x)x = self.drop1(x)x = self.gate(x) # (1,196,1536)x = self.norm(x)# Linear(in_features=1536, out_features=512, bias=True)x = self.fc2(x) # (1,196,512)x = self.drop2(x)return xgate_layer的代码如下,其中x.chunk(2, dim=-1)表示将x沿最后一个维度均分为2份。
class SpatialGatingUnit(nn.Module):""" Spatial Gating UnitBased on: `Pay Attention to MLPs` - https://arxiv.org/abs/2105.08050"""def __init__(self, dim, seq_len, norm_layer=nn.LayerNorm):super().__init__()gate_dim = dim // 2self.norm = norm_layer(gate_dim)self.proj = nn.Linear(seq_len, seq_len) # 196,196def init_weights(self):# special init for the projection gate, called as override by base model initnn.init.normal_(self.proj.weight, std=1e-6)nn.init.ones_(self.proj.bias)def forward(self, x): # (1,196,3072)u, v = x.chunk(2, dim=-1) # (1,196,1536),(1,196,1536)v = self.norm(v)v = self.proj(v.transpose(-1, -2)) # (1,1536,196)return u * v.transpose(-1, -2) # (1,196,1536) * (1,196,1536)实验结果
作者设计了三个不同大小的gMLP,具体参数配置如下

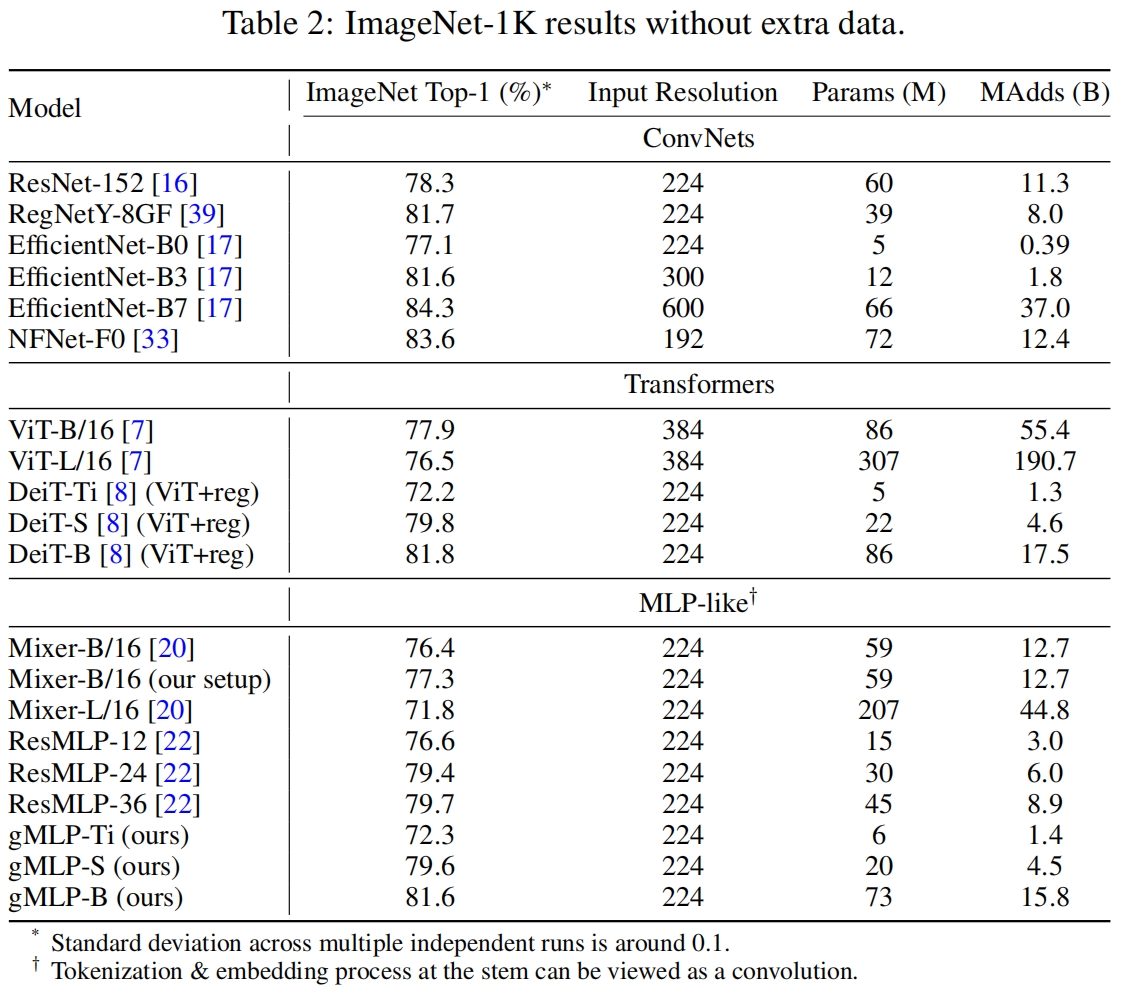
和其它模型在ImageNet上的分类性能对比如下,可以看到和类似大小的MLP-Mixer与ResMLP相比,gMLP用更少的参数得到了更好的性能。






![SpringBoot学习04-[定制SpringMVC]](https://img-blog.csdnimg.cn/direct/7cdd801ca04e452c86d6c26b990511aa.png)

