1、函数式组件
在vite脚手架中执行:
app.jsx:
import { useState } from 'react'
import reactLogo from './assets/react.svg'
import viteLogo from '/vite.svg'
import './App.css'function App() {console.log(this)return <h2>我是函数式组件</h2>
}export default App
main.tsx:
import React from 'react'
import ReactDOM from 'react-dom/client'
import App from './App.tsx'
import './index.css'ReactDOM.createRoot(document.getElementById('root')!).render(<React.StrictMode><App /></React.StrictMode>,
)
注意:
1、这里没有this,因为babel编译后开启了模式
2、渲染的组件必须要大写开头(虚拟dom转为真实的dom)
2、类式组件
1、类式组件必须通过react的Component继承
2、组件必须在类中的render方法中返回
import { Component } from "react"
//使用类组件的时候必须要继承react中的Component
//类组件不写构造器,必须要render
//render放在组件的原型对象上
//this是指向组件实例对象,
class MyClassCom extends Component
{render(){return(<div><h1>This is Class Component</h1></div>)}
}
export {MyClassCom}
3、组件三大核心(都是在类组件中使用,props可以在函数组件中使用)
3.1、state
import { Component } from "react";
//使用类组件的时候必须要继承react中的Component
//类组件可以不写构造器,必须要render
//render放在组件的原型对象上
//this是指向组件实例对象,
class MyClassCom extends Component {//构造器调用一次constructor(props) {super(props);//初始化状态this.state = {name: "张三",isHot: false,};//绑定this,这里其实是重写的,可以用其他名字,但是下面调用也要改名字this.b = this.b.bind(this);}//调用1+n次,n次是响应式状态更新的次数render() {return (<div><h1>今天{this.state.isHot ? "炎热" : "凉快"}</h1><button onClick={this.a}>点击</button><button onClick={this.b}>点击</button></div>);}a = () => {//这里能拿到this,是因为箭头函数绑定了thisconsole.log(this);//修改状态,必须通过setState修改状态this.setState({isHot: !this.state.isHot,});};b() {//因为是直接调用的类方法,不是实例对象调用的,所以拿不到this//类中的方法默认开启了局部严格模式,所以this指向undefinedconsole.log(this);this.setState({isHot: !this.state.isHot,});}
}
export { MyClassCom };
简写方式:
import { Component } from "react";class MyClassCom extends Component {//类中可以直接定义属性state = {name: "张三",isHot: false,};render() {return (<div><h1>今天{this.state.isHot ? "炎热" : "凉快"}</h1><button onClick={this.a}>点击</button></div>);}//直接使用箭头函数(箭头函数可以修改this指向),避免了this指向修改,也就不用构造器了a = () => {this.setState({isHot: !this.state.isHot,});};
}
export { MyClassCom };
总结:
1、state是组件对象的重要属性,值是对象
2、组件被称为”状态机”,通过更新组件的state来更新对应页面显示(重新渲染页面-可以理解为响应式)
3、组件中的render方法中的this为组件实例对象
4、组件自定义方法中的this为undefined(通过强制绑定this,通过对象的build(),如果是类组件但是要使用构造器,也可以直接使用箭头函数(推荐直接使用箭头函数))
5、状态数据不能直接修改或者更新,要通过setState修改更新
3.2、props
3.2.1、基本使用
封装组件:
import { Component } from "react";
class Person extends Component<{ name: string,age:string,sex:string }> {render() {const {name, age , sex} = this.props;return (<ul><li>{name}</li><li>{age}</li><li>{sex}</li></ul>)}
}export { Person }
调用组件(通过props传值)
import { Person } from './components/propsReact'function App() {//return <h2>我是函数式组件<MyClassCom></MyClassCom></h2> return (<div><Person name="张三" age="18" sex="男"></Person><Person name="李四" age="19" sex="女"></Person></div>)
}export default App
其实这里就是一个父传子的操作,跟vue思想差不多
3.2.2、props限制
类型限制:
import { Component } from "react";
import PropTypes from "prop-types";//需要安装库
class Person extends Component<{ name: string,age:string,sex:string }> {render() {const {name, age , sex} = this.props;return (<ul><li>{name}</li><li>{age}</li><li>{sex}</li></ul>)}
}Person.propTypes = {name: PropTypes.string.isRequired,//isRequired是必填项age: PropTypes.string.isRequired,sex: PropTypes.string.isRequired,
};export { Person }
import { Person } from './components/propsReact'function App() {//return <h2>我是函数式组件<MyClassCom></MyClassCom></h2> return (<div><Person name="asd" age="18" sex="男"></Person><Person name="李四" age="19" sex="女"></Person></div>)
}export default App简写方式:
import { Component } from "react";
import PropTypes from "prop-types";
class Person extends Component<{ name: string; age: string; sex: string }> {static propTypes = {name: PropTypes.string.isRequired,age: PropTypes.string.isRequired,sex: PropTypes.string.isRequired,};static defaultProps = {name: "张三",age: "18",sex: "男",};render() {const { name, age, sex } = this.props;return (<ul><li>{name}</li><li>{age}</li><li>{sex}</li></ul>);}
}export { Person };
3.2.3、函数组件使用props
函数式组件只能使用props,其他两个属性没法用
import { Component } from "react";
import PropTypes from "prop-types";
class Person extends Component<{ name: string; age: string; sex: string }> {static propTypes = {name: PropTypes.string.isRequired,age: PropTypes.string.isRequired,sex: PropTypes.string.isRequired,};static defaultProps = {name: "张三",age: "18",sex: "男",};render() {const { name, age, sex } = this.props;return (<ul><li>{name}</li><li>{age}</li><li>{sex}</li></ul>);}
}function Person1(props: { name: string; age: string; sex: string }) {const { name, age, sex } = props;return (<ul><li>{name}</li><li>{age}</li><li>{sex}</li></ul>);
}
Person1.prototype = {name: PropTypes.string.isRequired,age: PropTypes.string.isRequired,sex: PropTypes.string.isRequired,
}
export { Person, Person1};
import { Person,Person1 } from './components/propsReact'function App() {//return <h2>我是函数式组件<MyClassCom></MyClassCom></h2> return (<div><Person name="张三" age="18" sex="男"></Person><Person name="李四" age="19" sex="女"></Person><Person></Person><Person1 name="张三" age="108" sex="男"></Person1></div>)
}export default App
总结:
1、每个组件都有props属性
2、组件所有的标签属性都会存在props中
3、组件内部不要修改props
4、通过标签属性从组件外部传递到内部的变化的数据
3.3、refs
3.3.1、字符串类型写法:
存在效率问题(不推荐使用)
import React from "react";
class RefsDemo extends React.Component{showData  = () => {console.log(this)const {input1} = this.refsalert(input1.value)}showData2 = () => {const {input2} = this.refsalert(input2.value)}render(): React.ReactNode {return (<div><input ref="input1" type="text" /><button onClick={this.showData}></button><input ref="input2" onBlur={this.showData2} type="text" /></div>)}
}export default RefsDemo
3.3.2、回调函数形式
import React from "react";
class RefsDemo extends React.Component{showData  = () => {console.log(this)const {input1} = thisalert(input1.value)}showData2 = () => {const {input2} = thisalert(input2.value)}render(): React.ReactNode {return (<div><input ref={c=>this.input1=c} type="text" /><button onClick={this.showData}></button><input ref={c=>this.input2=c} onBlur={this.showData2} type="text" /></div>)}
}export default RefsDemo
注意:
1、这样写会有 副作用
2、可以把方法抽出来放在render里面作为方法调用
3.3.3、React.createRef()钩子的使用
import React from "react";
class RefsDemo extends React.Component{/**每一个createRef都是单独的,用来获取组件中的元素 */myRef = React.createRef()myRef1 = React.createRef()showData = () => {console.log(this.myRef.current.value)}showData2 = () => {console.log(this.myRef1.current.value)}render(): React.ReactNode {return (<div><input ref={this.myRef} type="text" /><button onClick={this.showData}></button><input ref = {this.myRef1} onBlur={this.showData2}type="text" /></div>)}
}export default RefsDemo
总结ref:
1、尽可能避免字符串方法的使用
2、内联用的最多,第三个比较繁琐,要使用钩子
4、事件处理
4.1、非受控组件
import React from "react";
class Login extends React.Component {handleSubmit = (e) => {e.preventDefault()//阻止默认行为const { username, password } = thisconsole.log(username, password)alert(`用户名:${username.value} 密码:${password.value}`)}render(): React.ReactNode {return (<div><form action="https://www.baidu.com" onSubmit={this.handleSubmit}>用户名:<input ref={c=>this.username = c} type="text" name="username" />密码:<input ref = {c=>this.password = c} type="password" name="password" /><button type="submit">登录</button></form></div>)}
}export default Login;
4.2、受控组件
import React from "react";
class Login extends React.Component {state: Readonly<{}> = {username: "",password: ""}saveUsername = (e) =>{this.setState({username: e.target.value})}savePassword = (e) =>{this.setState({password: e.target.value})}handleSubmit = (e) => {e.preventDefault()//阻止默认行为const { username, password } = this.stateconsole.log(username, password)alert(`用户名:${username} 密码:${password}`)}render(): React.ReactNode {return (<div><form action="https://www.baidu.com" onSubmit={this.handleSubmit}>用户名:<input onChange={this.saveUsername} type="text" name="username" />密码:<input onChange={this.savePassword} type="password" name="password" /><button type="submit">登录</button></form></div>)}
}export default Login;
注意:
1、受控组件能够避免ref的使用
2、现用现取是非受控,维护状态的是受控组件
5、高阶函数+函数柯里化
高级函数:
1、若A函数,按接的参数是一个函数,那么A就是高阶函数
2、若A函数,调用的返回值依然是一个函数,那么A就可以称为高阶函数
常见的高阶函数:Promise、setTimeout、arr.map()等
函数的柯里化:通过函数调用继续返回函数的方式,实现多次接收参数最后统一处理的函数
eg:
import React from "react";
class Login extends React.Component {saveFromData = (typename) =>{return (event) => {this.setState({[typename]: event.target.value})}}render(): React.ReactNode {return (<div>用户名:<input onChange={this.saveFromData('username')} type="text" name="username" />密码:<input onChange={this.saveFromData('password')} type="password" name="password" /><button type="submit">登录</button></div>)}
}export default Login;
6、生命周期
组件挂载完毕和将要卸载的调用:
import React from "react";
class Login extends React.Component {// 组件挂载的时候调用componentDidMount(): void {this.timer =   setTimeout(() => {console.log(11111)}, 1000)}// 挂载的组件卸载前 的调用componentWillUnmount(): void {clearTimeout(this.timer)}render(): React.ReactNode {return (<div></div>)}
}export default Login;
6.1、组件挂载流程
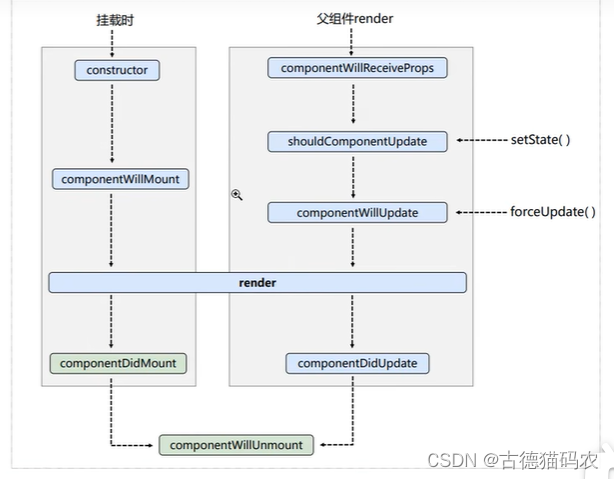
6.1.1、生命周期(旧)
eg:
import { Component } from "react";
class Count extends Component {constructor(props) {super(props);this.state = {count: 0,};this.name = "count";console.log("count-constructor");}add = () => {this.setState({count: this.state.count + 1,});};foce = () => {this.forceUpdate();};//   组件将要挂载的钩子componentWillMount() {console.log("componentWillMount");}//   组件挂载完成的钩子componentDidMount() {console.log("componentDidMount");}// 组件将要卸载componentWillUnmount() {console.log("componentWillUnmount");}// 组件是否需要更新--阀门showldComponentUpdate() {console.log("showldComponentUpdate");return true;}// 组件将要更新componentWillUpdate() {console.log("componentWillUpdate");}// 组件更新完成componentDidUpdate() {console.log("componentDidUpdate");}render() {return (<div><h2>当前求和为:{this.state.count}</h2><button onClick={this.add}>点我+1</button><button onClick={this.foce}>强制更新组件</button><A name={this.name} content={this.state.count} /></div>);}
}
class A extends Component {//这个钩子比较奇特,只有操作更新的时候才会调用,第一次传的时候不调用,此处就是操作+1的时候才调用--将要废弃componentWillReceiveProps(props) {console.log("componentWillReceiveProps",props);}render() {return (<div>我是子组件{this.props.name}<p>{this.props.content}</p></div>);}
}export default Count;
总结:(标红的是常用的)
1.初始化阶段:由ReactDoM.render()触发---初次渲染
A、constructor()
B、componentWillMount() //将要废弃
C、render()
D、componentDidMount() ---常用于做初始化数据(一般用于网络请求、订阅消息、开启定时器)
2.更新阶段:由组件内部this.setsate()或父组件render触发
A、shouldComponentUpdate()
B、componentWillUpdate() //将要废弃
C、render()
D、componentDidUpdate()
3.卸线组件:由ReactD0M.unmountComponentAtNode()触发
A、componentWillUnmount() --常用于收尾(关闭定时器、取消订阅等)
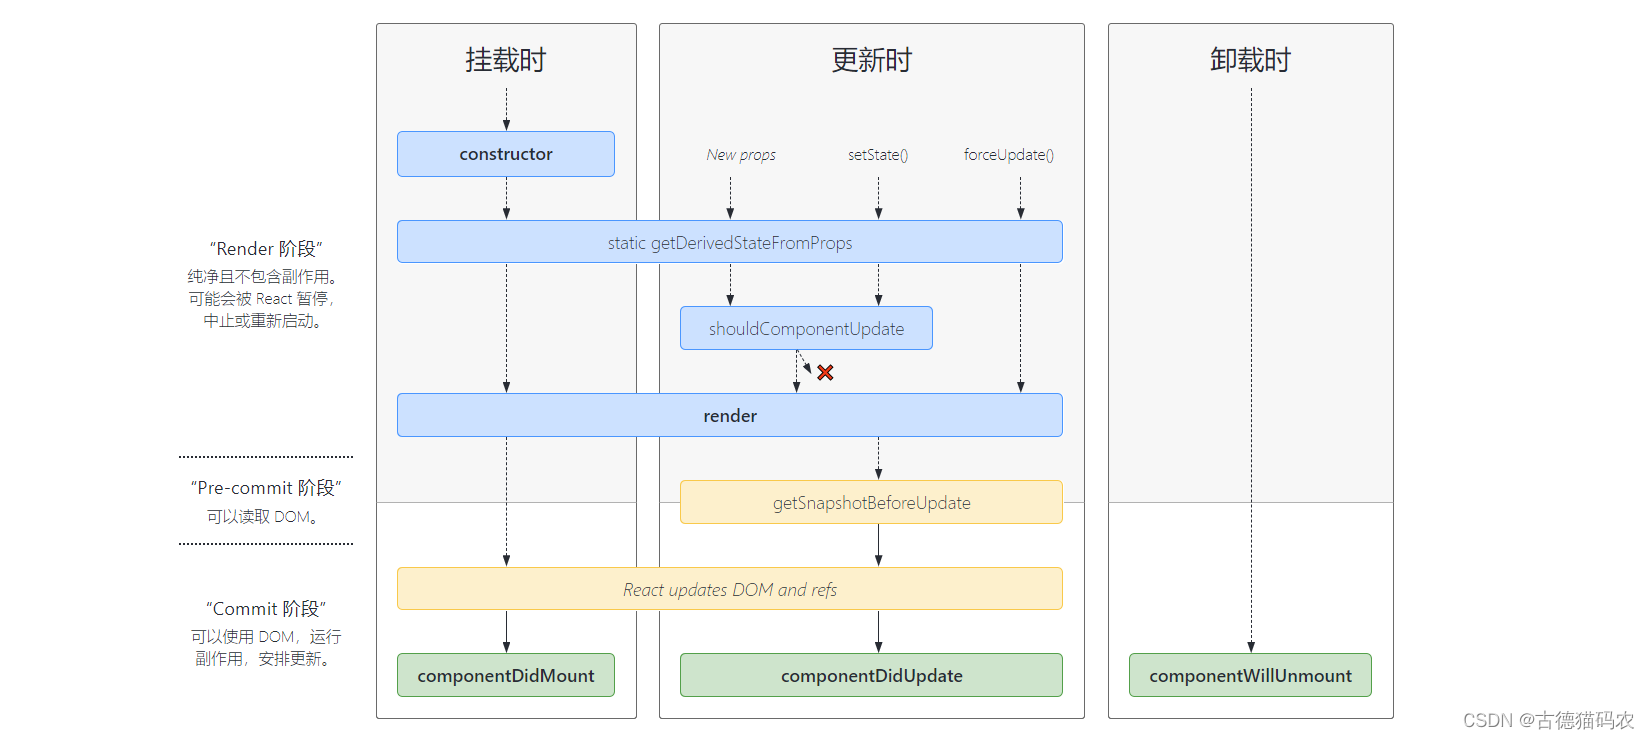
6.1.2、生命周期(新>=16.4)
官网的周期图:
eg:
import { Component, createRef } from "react";
class Count extends Component {constructor(props) {super(props);this.state = {count: 0,};this.name = "count";console.log("count-constructor");}add = () => {this.setState({count: this.state.count + 1,});};foce = () => {this.forceUpdate();};//若state的值在任何时候取决于props的值,则使用getDerivedStateFromProps ---使用场景及其罕见// static getDerivedStateFromProps(props,state) {//   console.log("getDeruvedStateFromProps");//   // return console.log(props,state);// }//   组件挂载完成的钩子componentDidMount() {console.log("componentDidMount");}// 组件将要卸载componentWillUnmount() {console.log("componentWillUnmount");}// 组件是否需要更新--阀门showldComponentUpdate() {console.log("showldComponentUpdate");return true;}// 组件更新前获取快照getSnapshotBeforeUpdate() {console.log("getSnapshotBeforeUpdate");return null}// 组件更新完成componentDidUpdate(preProps, preState,Shouwkong) {console.log("componentDidUpdate",preProps,preState,Shouwkong);}render() {return (<div><h2>当前求和为:{this.state.count}</h2><button onClick={this.add}>点我+1</button><DomList /></div>);}
}export default Count;/*** 列表滚动渲染案例*/
class DomList extends Component {constructor(props) {super(props);this.listRef = createRef();this.state = {newsArr: [],};}componentDidMount() {setInterval(() => {const { newsArr } = this.state;const news = '商品' + (newsArr.length + 1);this.setState({newsArr: [news, ...newsArr],});}, 1000);}getSnapshotBeforeUpdate(prevProps, prevState) {return this.listRef.current ? this.listRef.current.scrollHeight : null;}componentDidUpdate(prevProps, prevState, snapshot) {if (this.listRef.current) {this.listRef.current.scrollTop += this.listRef.current.scrollHeight - snapshot;}}render() {return (<div className="list" ref={this.listRef} style={{ height: '300px', overflow: 'auto' }}>{this.state.newsArr.map((item, index) => (<p key={index} className="news">{item}</p>))}</div>);}
}
总结:
(标红的是常用的)
1.初始化阶段:由ReactDoM.render()触发---初次渲染
A、constructor()
B、getDerivedStateFromProps
C、render()
D、componentDidMount() ---常用于做初始化数据(一般用于网络请求、订阅消息、开启定时器)
2.更新阶段:由组件内部this.setsate()或父组件render触发
A、getDerivedStateFromProps
B、showldComponentUpdate
C、render()
D、getSnapshotBeforeUpdate
E、componentDidUpdate
3.卸线组件:由ReactD0M.unmountComponentAtNode()触发
A、componentWillUnmount() --常用于收尾(关闭定时器、取消订阅等)
7、diffing算法


8、脚手架配置
8.1、代理配置
方法1:
在package.json追加如下配置:
"proxy":"http://localhost:5000"说明:
1、优点:配置简单,前端请求资源时可以不加任何前缀
2、缺点:不能配置多个代理
3、工作方式:当请求3000不存在的时候,资源请求转发给5000
方法2:
1、第一步:创建代理配置文件
在src下创建配置配置文件:src/setupProxy.js
2、编写setupProxy.js配置具体代理规则:
const proxy = require('http-proxy-middleware');
module.exports = function (app) {app.use(proxy('/api', { //api是需要转发的请求(所有带有/api标识的请求都会转发给后台-5000)target: 'http://localhost:3000' , //配置转发目标地址(能返回苏剧的服务器地址)changeOrigin: true,//控制服务器接收请求头中Host字段的值,/*** 重写请求路径* 例如:*  请求地址:http://localhost:3000/api/user/list*  重写之后:http://localhost:5000/user/list*/pathRewrite: {'^/api': ''//去除请求地址中的/api,保证能正常请求到接口},  }
));
};
说明:
1、优点:可以配置多个代理,可以灵活的控制请求是否走代理
2、配置繁琐,前端请求资源时必须加前缀
9、消息订阅-发布机制
1、工具库:PubSubJS
2、npm install pubsub-js
3、使用:
3.1、improt PubSub from 'pubsub-js'
3.2、PubSub.subscribe("del"mfunction(data){})//订阅
3.3、PubSub.publish(‘del’,data)//发布消息
eg:
父组件:
import React, { Component } from 'react'
import A from "../components/A"
import B from "../components/B"
export default class test extends Component {render() {return (<div><A/><B/></div>)}
}A子组件--发布
import React, { Component } from 'react'
import pubsub from 'pubsub-js'
export default class A extends Component {componentDidMount(){pubsub.publish('test', 'test')}render() {return (<div>A</div>)}
}B子组件--订阅
import React, { Component } from 'react'
import pubsub from 'pubsub-js'
export default class B extends Component {componentDidMount() {pubsub.subscribe('test',(msg,data)=>{console.log(msg,data)})}componentWillUnmount() {pubsub.unsubscribe('test')}render() {return (<div>B</div>)}
}
10、路由(参考另外一个18+的教程)
参考链接:Home v6.24.0 | React Router
对比:

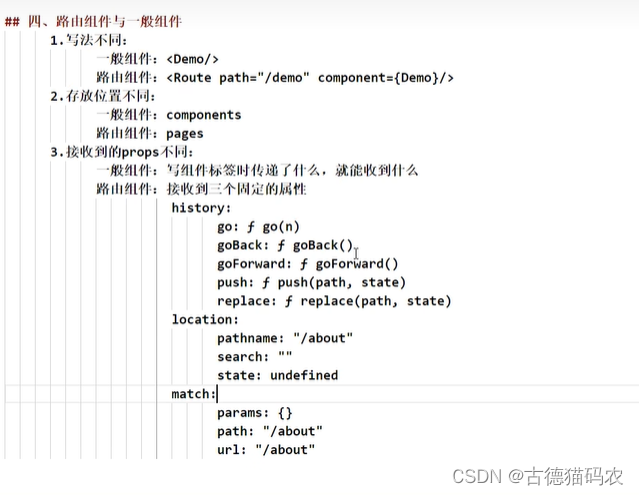
基本使用的三种方式:(16)
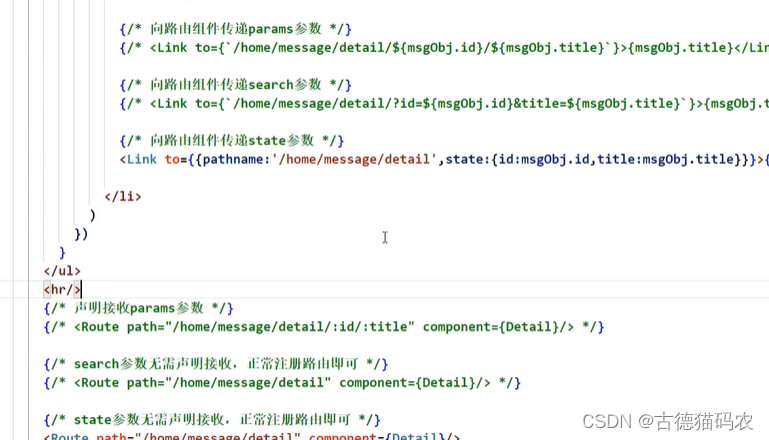
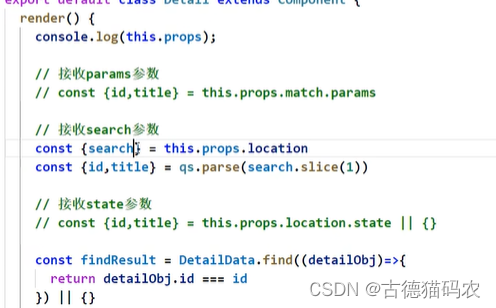
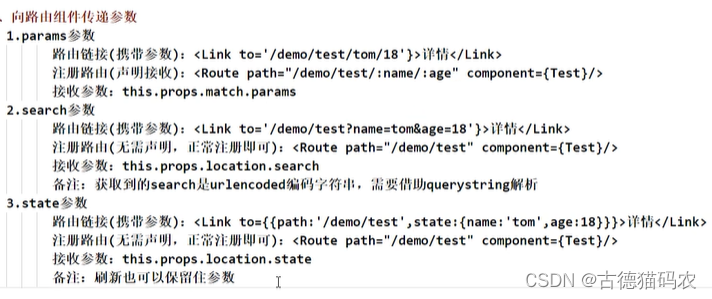
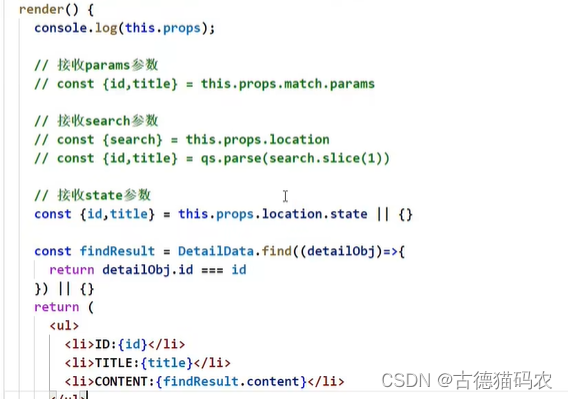
11、编程式导航
方法调用:

通过onclick调用:

detail组件接收:
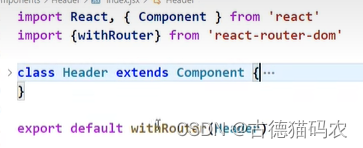
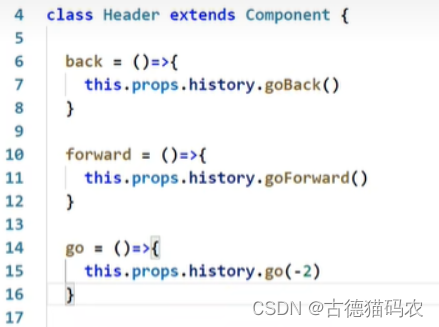
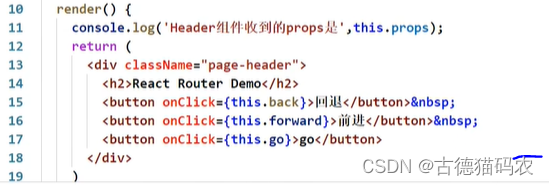
12、withRouter的使用

13、BrowserRouter与HashRouter区别