声明
本文章为个人学习使用,版面观感若有不适请谅解,文中知识仅代表个人观点,若出现错误,欢迎各位批评指正。
三十四、锚框
import torch
import matplotlib.pyplot as plt
from matplotlib_inline import backend_inlinetorch.set_printoptions(2)  # 精简输出精度def show_images(imgs, titles=None):plt.imshow(imgs)backend_inline.set_matplotlib_formats('svg')plt.rcParams['figure.figsize'] = (10.5, 8.5)plt.rcParams['font.sans-serif'] = ['Microsoft YaHei']plt.title(titles)plt.show()def box_corner_to_center(boxes):"""从(左上,右下)转换到(中间,宽度,高度)"""x1, y1, x2, y2 = boxes[:, 0], boxes[:, 1], boxes[:, 2], boxes[:, 3]cx = (x1 + x2) / 2cy = (y1 + y2) / 2w = x2 - x1h = y2 - y1boxes = torch.stack((cx, cy, w, h), axis=-1)return boxesdef box_center_to_corner(boxes):"""从(中间,宽度,高度)转换到(左上,右下)"""cx, cy, w, h = boxes[:, 0], boxes[:, 1], boxes[:, 2], boxes[:, 3]x1 = cx - 0.5 * wy1 = cy - 0.5 * hx2 = cx + 0.5 * wy2 = cy + 0.5 * hboxes = torch.stack((x1, y1, x2, y2), axis=-1)return boxesdef multibox_prior(data, sizes, ratios):"""生成以每个像素为中心具有不同形状的锚框"""in_height, in_width = data.shape[-2:]device, num_sizes, num_ratios = data.device, len(sizes), len(ratios)boxes_per_pixel = (num_sizes + num_ratios - 1)size_tensor = torch.tensor(sizes, device=device)ratio_tensor = torch.tensor(ratios, device=device)# 为了将锚点移动到像素的中心,需要设置偏移量。# 因为一个像素的高为1且宽为1,我们选择偏移我们的中心0.5offset_h, offset_w = 0.5, 0.5steps_h = 1.0 / in_height  # 在y轴上缩放步长steps_w = 1.0 / in_width  # 在x轴上缩放步长# 生成锚框的所有中心点center_h = (torch.arange(in_height, device=device) + offset_h) * steps_hcenter_w = (torch.arange(in_width, device=device) + offset_w) * steps_wshift_y, shift_x = torch.meshgrid(center_h, center_w, indexing='ij')shift_y, shift_x = shift_y.reshape(-1), shift_x.reshape(-1)# 生成“boxes_per_pixel”个高和宽,# 之后用于创建锚框的四角坐标(xmin,xmax,ymin,ymax)w = torch.cat((size_tensor * torch.sqrt(ratio_tensor[0]),sizes[0] * torch.sqrt(ratio_tensor[1:])))\* in_height / in_width  # 处理矩形输入h = torch.cat((size_tensor / torch.sqrt(ratio_tensor[0]),sizes[0] / torch.sqrt(ratio_tensor[1:])))# 除以2来获得半高和半宽anchor_manipulations = torch.stack((-w, -h, w, h)).T.repeat(in_height * in_width, 1) / 2# 每个中心点都将有“boxes_per_pixel”个锚框,# 所以生成含所有锚框中心的网格,重复了“boxes_per_pixel”次out_grid = torch.stack([shift_x, shift_y, shift_x, shift_y],dim=1).repeat_interleave(boxes_per_pixel, dim=0)output = out_grid + anchor_manipulationsreturn output.unsqueeze(0)img = plt.imread('E:\\cat\\catdog.jpg')
h, w = img.shape[:2]
show_images(img, titles='原图')print(f'图像的高为 {h} px,图像的宽为 {w} px')
X = torch.rand(size=(1, 3, h, w))
Y = multibox_prior(X, sizes=[0.60, 0.5, 0.25], ratios=[1, 2, 0.5])
print(f'锚框变量 Y 的形状是 : {Y.shape}')boxes = Y.reshape(h, w, 5, 4)        # ( 图像高度, 图像宽度, 以同一像素为中心的锚框的数量, 4 )
print("第一个锚框左上角和右下角坐标分别为: ", boxes[425, 350, 0, :] * torch.tensor([w, h, w, h]))def bbox_to_rect(bbox, color):# Convert the bounding box (upper-left x, upper-left y, lower-right x,# lower-right y) format to the matplotlib format: ((upper-left x,# upper-left y), width, height)return plt.Rectangle(xy=(bbox[0], bbox[1]), width=bbox[2]-bbox[0], height=bbox[3]-bbox[1],fill=False, edgecolor=color, linewidth=2)def show_bboxes(axes, bboxes, labels=None, colors=None):"""显示所有边界框"""def _make_list(obj, default_values=None):if obj is None:obj = default_valueselif not isinstance(obj, (list, tuple)):obj = [obj]return objlabels = _make_list(labels)colors = _make_list(colors, ['b', 'g', 'r', 'm', 'c'])for i, bbox in enumerate(bboxes):color = colors[i % len(colors)]rect = bbox_to_rect(bbox.detach().numpy(), color)axes.add_patch(rect)if labels and len(labels) > i:text_color = 'k' if color == 'w' else 'w'axes.text(rect.xy[0], rect.xy[1], labels[i],va='center', ha='center', fontsize=9, color=text_color,bbox=dict(facecolor=color, lw=0))def set_figsize(figsize=(6.5, 3.5)):backend_inline.set_matplotlib_formats('svg')plt.rcParams['figure.figsize'] = figsizeset_figsize()
bbox_scale = torch.tensor((w, h, w, h))
fig = plt.imshow(img)
show_bboxes(fig.axes, boxes[425, 350, :, :] * bbox_scale,['s=0.60, r=1', 's=0.5, r=1', 's=0.25, r=1', 's=0.60, r=2','s=0.60, r=0.5'])
plt.title('绘制出图像中以 (425, 350) 为中心的锚框')
plt.show()def box_iou(boxes1, boxes2):"""计算两个锚框或边界框列表中成对的交并比"""box_area = lambda boxes: ((boxes[:, 2] - boxes[:, 0]) *(boxes[:, 3] - boxes[:, 1]))# boxes1,boxes2,areas1,areas2的形状:# boxes1:(boxes1的数量,4),# boxes2:(boxes2的数量,4),# areas1:(boxes1的数量,),# areas2:(boxes2的数量,)areas1 = box_area(boxes1)areas2 = box_area(boxes2)# inter_upperlefts,inter_lowerrights,inters的形状:# (boxes1的数量,boxes2的数量,2)inter_upperlefts = torch.max(boxes1[:, None, :2], boxes2[:, :2])inter_lowerrights = torch.min(boxes1[:, None, 2:], boxes2[:, 2:])inters = (inter_lowerrights - inter_upperlefts).clamp(min=0)# inter_areasandunion_areas的形状:(boxes1的数量,boxes2的数量)inter_areas = inters[:, :, 0] * inters[:, :, 1]union_areas = areas1[:, None] + areas2 - inter_areasreturn inter_areas / union_areasdef assign_anchor_to_bbox(ground_truth, anchors, device, iou_threshold=0.5):"""将最接近的真实边界框分配给锚框"""num_anchors, num_gt_boxes = anchors.shape[0], ground_truth.shape[0]# 位于第i行和第j列的元素x_ij是锚框i和真实边界框j的IoUjaccard = box_iou(anchors, ground_truth)# 对于每个锚框,分配的真实边界框的张量anchors_bbox_map = torch.full((num_anchors,), -1, dtype=torch.long,device=device)# 根据阈值,决定是否分配真实边界框max_ious, indices = torch.max(jaccard, dim=1)anc_i = torch.nonzero(max_ious >= iou_threshold).reshape(-1)box_j = indices[max_ious >= iou_threshold]anchors_bbox_map[anc_i] = box_jcol_discard = torch.full((num_anchors,), -1)row_discard = torch.full((num_gt_boxes,), -1)for _ in range(num_gt_boxes):max_idx = torch.argmax(jaccard)box_idx = (max_idx % num_gt_boxes).long()anc_idx = (max_idx / num_gt_boxes).long()anchors_bbox_map[anc_idx] = box_idxjaccard[:, box_idx] = col_discardjaccard[anc_idx, :] = row_discardreturn anchors_bbox_mapdef offset_boxes(anchors, assigned_bb, eps=1e-6):"""对锚框偏移量的转换"""c_anc = box_corner_to_center(anchors)c_assigned_bb = box_corner_to_center(assigned_bb)offset_xy = 10 * (c_assigned_bb[:, :2] - c_anc[:, :2]) / c_anc[:, 2:]offset_wh = 5 * torch.log(eps + c_assigned_bb[:, 2:] / c_anc[:, 2:])offset = torch.cat([offset_xy, offset_wh], axis=1)return offsetdef multibox_target(anchors, labels):"""使用真实边界框标记锚框"""batch_size, anchors = labels.shape[0], anchors.squeeze(0)batch_offset, batch_mask, batch_class_labels = [], [], []device, num_anchors = anchors.device, anchors.shape[0]for i in range(batch_size):label = labels[i, :, :]anchors_bbox_map = assign_anchor_to_bbox(label[:, 1:], anchors, device)bbox_mask = ((anchors_bbox_map >= 0).float().unsqueeze(-1)).repeat(1, 4)# 将类标签和分配的边界框坐标初始化为零class_labels = torch.zeros(num_anchors, dtype=torch.long,device=device)assigned_bb = torch.zeros((num_anchors, 4), dtype=torch.float32,device=device)# 使用真实边界框来标记锚框的类别。# 如果一个锚框没有被分配,标记其为背景(值为零)indices_true = torch.nonzero(anchors_bbox_map >= 0)bb_idx = anchors_bbox_map[indices_true]class_labels[indices_true] = label[bb_idx, 0].long() + 1assigned_bb[indices_true] = label[bb_idx, 1:]# 偏移量转换offset = offset_boxes(anchors, assigned_bb) * bbox_maskbatch_offset.append(offset.reshape(-1))batch_mask.append(bbox_mask.reshape(-1))batch_class_labels.append(class_labels)bbox_offset = torch.stack(batch_offset)bbox_mask = torch.stack(batch_mask)class_labels = torch.stack(batch_class_labels)return (bbox_offset, bbox_mask, class_labels)ground_truth = torch.tensor([[0, 0.06, 0.44, 0.27, 0.98], [1, 0.24, 0.31, 0.47, 0.99],[0, 0.42, 0.03, 0.68, 0.98], [1, 0.68, 0.38, 0.95, 0.98]])
anchors = torch.tensor([[0.08, 0.28, 0.22, 0.92], [0.32, 0.28, 0.52, 0.89],[0.43, 0.15, 0.67, 0.68], [0.66, 0.23, 0.89, 0.88]])fig = plt.imshow(img)
show_bboxes(fig.axes, ground_truth[:, 1:] * bbox_scale, ['dog', 'cat', 'dog', 'cat'], 'k')
show_bboxes(fig.axes, anchors * bbox_scale, ['0', '1', '2', '3'])
plt.title('另外构建了四个锚框')
plt.show()labels = multibox_target(anchors.unsqueeze(dim=0), ground_truth.unsqueeze(dim=0))print(f'标记的输入锚框的类别 : {labels[2]}\n'f'掩码(mask)变量 : {labels[1]}\n'         #  形状为(批量大小,锚框数的四倍)f'为每个锚框标记的四个偏移值 : {labels[0]}')     # 负类锚框的偏移量被标记为零def offset_inverse(anchors, offset_preds):"""根据带有预测偏移量的锚框来预测边界框"""anc = box_corner_to_center(anchors)pred_bbox_xy = (offset_preds[:, :2] * anc[:, 2:] / 10) + anc[:, :2]pred_bbox_wh = torch.exp(offset_preds[:, 2:] / 5) * anc[:, 2:]pred_bbox = torch.cat((pred_bbox_xy, pred_bbox_wh), axis=1)predicted_bbox = box_center_to_corner(pred_bbox)return predicted_bboxdef nms(boxes, scores, iou_threshold):"""对预测边界框的置信度进行排序"""B = torch.argsort(scores, dim=-1, descending=True)keep = []  # 保留预测边界框的指标while B.numel() > 0:i = B[0]keep.append(i)if B.numel() == 1: breakiou = box_iou(boxes[i, :].reshape(-1, 4),boxes[B[1:], :].reshape(-1, 4)).reshape(-1)inds = torch.nonzero(iou <= iou_threshold).reshape(-1)B = B[inds + 1]return torch.tensor(keep, device=boxes.device)def multibox_detection(cls_probs, offset_preds, anchors, nms_threshold=0.5,pos_threshold=0.009999999):"""使用非极大值抑制来预测边界框"""device, batch_size = cls_probs.device, cls_probs.shape[0]anchors = anchors.squeeze(0)num_classes, num_anchors = cls_probs.shape[1], cls_probs.shape[2]out = []for i in range(batch_size):cls_prob, offset_pred = cls_probs[i], offset_preds[i].reshape(-1, 4)conf, class_id = torch.max(cls_prob[1:], 0)predicted_bb = offset_inverse(anchors, offset_pred)keep = nms(predicted_bb, conf, nms_threshold)# 找到所有的non_keep索引,并将类设置为背景all_idx = torch.arange(num_anchors, dtype=torch.long, device=device)combined = torch.cat((keep, all_idx))uniques, counts = combined.unique(return_counts=True)non_keep = uniques[counts == 1]all_id_sorted = torch.cat((keep, non_keep))class_id[non_keep] = -1class_id = class_id[all_id_sorted]conf, predicted_bb = conf[all_id_sorted], predicted_bb[all_id_sorted]# pos_threshold是一个用于非背景预测的阈值below_min_idx = (conf < pos_threshold)class_id[below_min_idx] = -1conf[below_min_idx] = 1 - conf[below_min_idx]pred_info = torch.cat((class_id.unsqueeze(1),conf.unsqueeze(1),predicted_bb), dim=1)out.append(pred_info)return torch.stack(out)anchors = torch.tensor([[0.06, 0.44, 0.27, 0.98], [0.24, 0.31, 0.47, 0.99],[0.42, 0.03, 0.68, 0.98], [0.68, 0.38, 0.95, 0.98],[0.08, 0.28, 0.22, 0.92], [0.32, 0.28, 0.52, 0.89],[0.43, 0.15, 0.67, 0.68], [0.66, 0.23, 0.89, 0.88]])
offset_preds = torch.tensor([0] * anchors.numel())
cls_probs = torch.tensor([[0] * 8,                                        # 背景的预测概率[0.9, 0.1, 0.9, 0.1, 0.4, 0.2, 0.6, 0.3],       # 狗的预测概率[0.1, 0.9, 0.1, 0.9, 0.6, 0.8, 0.4, 0.7]])      # 猫的预测概率fig = plt.imshow(img)
show_bboxes(fig.axes, anchors * bbox_scale,['dog=0.9', 'cat=0.9', 'dog=0.9', 'cat=0.9', 'dog=0.6', 'cat=0.8', 'dog=0.6', 'cat=0.7'])
plt.title('在图像上绘制这些预测边界框和置信度')
plt.show()output = multibox_detection(cls_probs.unsqueeze(dim=0),offset_preds.unsqueeze(dim=0),anchors.unsqueeze(dim=0),nms_threshold=0.45)"""  第一个元素是预测的类索引,从0开始(0代表狗,1代表猫),值 -1 表示背景或在非极大值抑制中被移除了。 第二个元素是预测的边界框的置信度。 其余四个元素分别是预测边界框左上角和右下角的轴坐标 """
print(f'[ 预测的类索引, 预测的边界框的置信度, left_x, left_y, right_x, right_y ] :\n{output}')fig = plt.imshow(img)
for i in output[0].detach().numpy():if i[0] == -1:continuelabel = ('dog=', 'cat=')[int(i[0])] + str(i[1])show_bboxes(fig.axes, [torch.tensor(i[2:]) * bbox_scale], label)plt.title('输出由非极大值抑制保存的最终预测边界框')
plt.show()

三十五、多尺度锚框
import torch
import matplotlib.pyplot as plt
from matplotlib_inline import backend_inlinedef bbox_to_rect(bbox, color):return plt.Rectangle(xy=(bbox[0], bbox[1]), width=bbox[2]-bbox[0], height=bbox[3]-bbox[1],fill=False, edgecolor=color, linewidth=2)def show_bboxes(axes, bboxes, labels=None, colors=None):def make_list(obj, default_values=None):if obj is None:obj = default_valueselif not isinstance(obj, (list, tuple)):obj = [obj]return objnumpy = lambda x, *args, **kwargs: x.detach().numpy(*args, **kwargs)labels = make_list(labels)colors = make_list(colors, ['b', 'g', 'r', 'm', 'c'])for i, bbox in enumerate(bboxes):color = colors[i % len(colors)]rect = bbox_to_rect(numpy(bbox), color)axes.add_patch(rect)if labels and len(labels) > i:text_color = 'k' if color == 'w' else 'w'axes.text(rect.xy[0], rect.xy[1], labels[i],va='center', ha='center', fontsize=9, color=text_color,bbox=dict(facecolor=color, lw=0))def multibox_prior(data, sizes, ratios):in_height, in_width = data.shape[-2:]device, num_sizes, num_ratios = data.device, len(sizes), len(ratios)boxes_per_pixel = (num_sizes + num_ratios - 1)size_tensor = torch.tensor(sizes, device=device)ratio_tensor = torch.tensor(ratios, device=device)# Offsets are required to move the anchor to the center of a pixel. Since# a pixel has height=1 and width=1, we choose to offset our centers by 0.5offset_h, offset_w = 0.5, 0.5steps_h = 1.0 / in_height # Scaled steps in y axissteps_w = 1.0 / in_width # Scaled steps in x axis# Generate all center points for the anchor boxescenter_h = (torch.arange(in_height, device=device) + offset_h) * steps_hcenter_w = (torch.arange(in_width, device=device) + offset_w) * steps_wshift_y, shift_x = torch.meshgrid(center_h, center_w, indexing='ij')shift_y, shift_x = shift_y.reshape(-1), shift_x.reshape(-1)# Generate `boxes_per_pixel` number of heights and widths that are later# used to create anchor box corner coordinates (xmin, xmax, ymin, ymax)w = torch.cat((size_tensor * torch.sqrt(ratio_tensor[0]),sizes[0] * torch.sqrt(ratio_tensor[1:])))\* in_height / in_width # Handle rectangular inputsh = torch.cat((size_tensor / torch.sqrt(ratio_tensor[0]),sizes[0] / torch.sqrt(ratio_tensor[1:])))# Divide by 2 to get half height and half widthanchor_manipulations = torch.stack((-w, -h, w, h)).T.repeat(in_height * in_width, 1) / 2out_grid = torch.stack([shift_x, shift_y, shift_x, shift_y],dim=1).repeat_interleave(boxes_per_pixel, dim=0)output = out_grid + anchor_manipulationsreturn output.unsqueeze(0)img = plt.imread('E:\\cat\\catdog.jpg')
h, w = img.shape[:2]
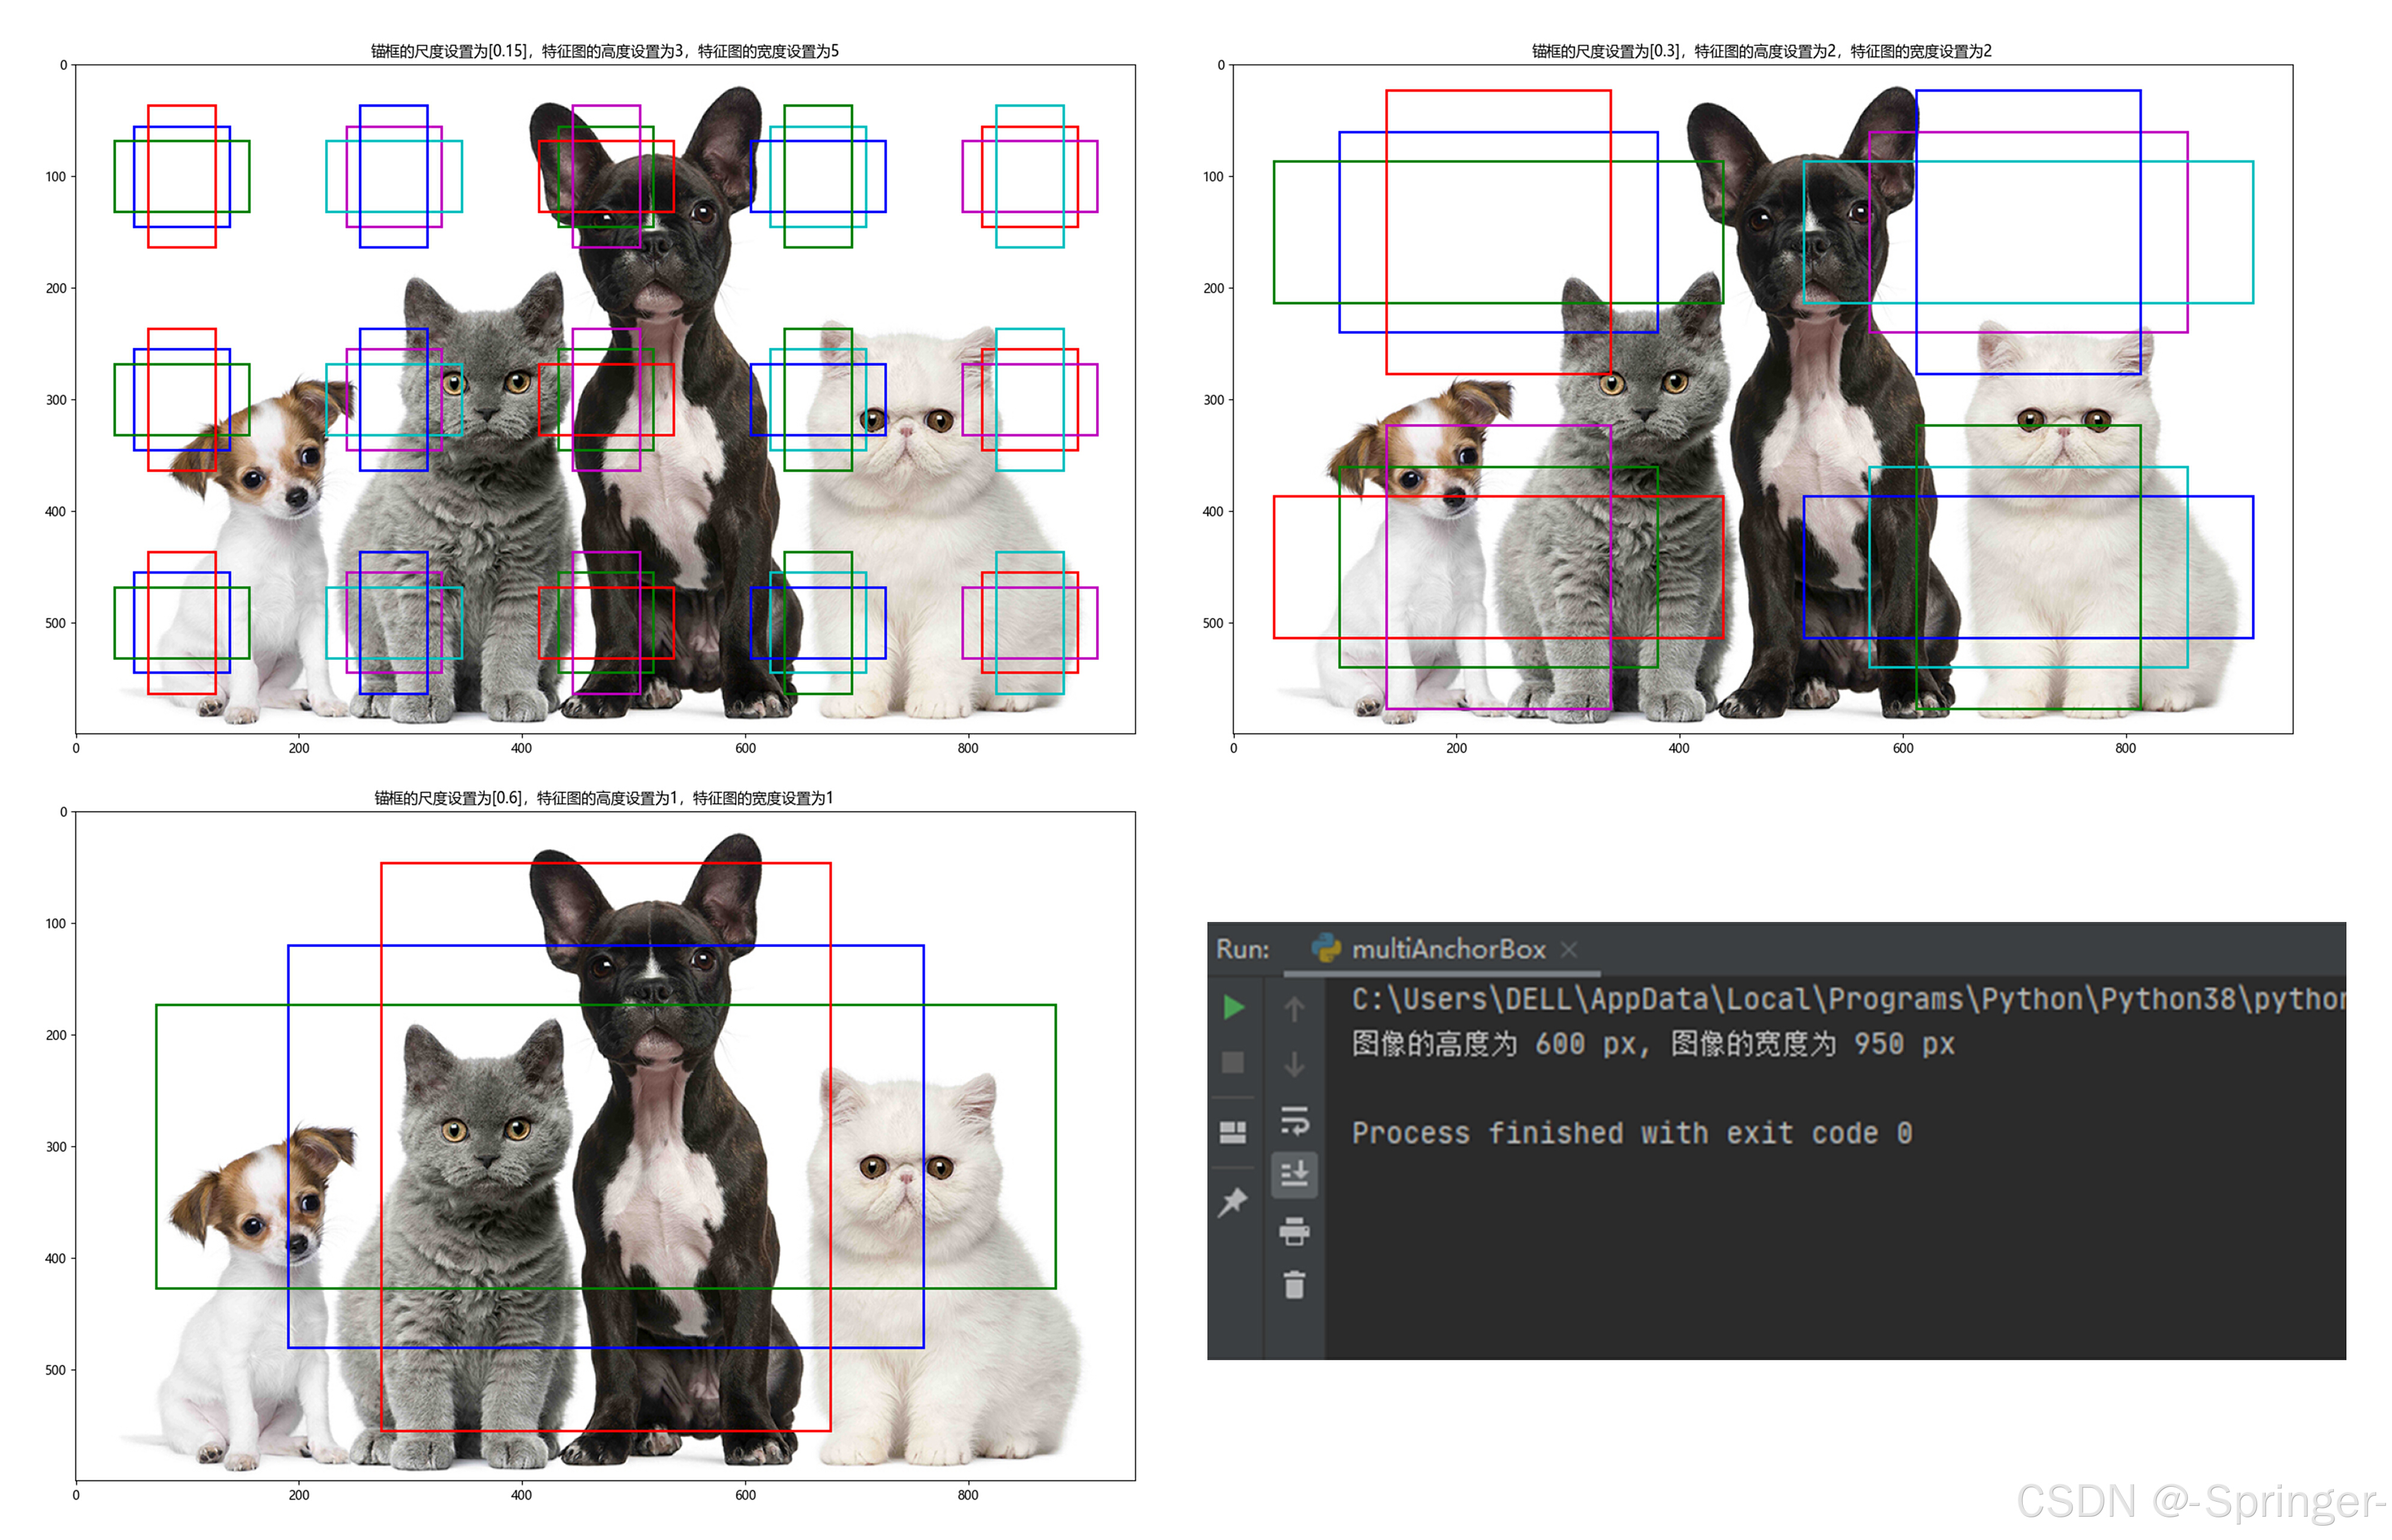
print(f'图像的高度为 {h} px, 图像的宽度为 {w} px')def display_anchors(fmap_w, fmap_h, s):backend_inline.set_matplotlib_formats('svg')plt.rcParams['figure.figsize'] = (8.5, 5.5)# 前两个维度上的值不影响输出fmap = torch.zeros((1, 10, fmap_h, fmap_w))anchors = multibox_prior(fmap, sizes=s, ratios=[1, 2, 0.5])bbox_scale = torch.tensor((w, h, w, h))show_bboxes(plt.imshow(img).axes, anchors[0] * bbox_scale)plt.rcParams['font.sans-serif'] = ['Microsoft YaHei']plt.title(f'锚框的尺度设置为{s},特征图的高度设置为{fmap_h},特征图的宽度设置为{fmap_w}')plt.show()display_anchors(fmap_w=5, fmap_h=3, s=[0.15])display_anchors(fmap_w=2, fmap_h=2, s=[0.3])display_anchors(fmap_w=1, fmap_h=1, s=[0.6])
文中部分知识参考:B 站 —— 跟李沐学AI;百度百科