kubeadm是官方社区推出的一个用于快速部署kubernetes集群的工具。
calico.yaml
kubernertes-dashboard.yaml
1. 安装要求
在开始之前,部署Kubernetes集群机器需要满足以下几个条件:
- 10台机器,操作系统Openeuler22.03 LTS SP4
- 硬件配置:2GB或更多RAM,2个CPU或更多CPU,硬盘30GB或更多,docker 数据卷单独挂载
- 集群中所有机器之间网络互通
- 可以访问外网,需要拉取镜像,【镜像代理自行解决】
- 禁止swap分区
2. 准备环境
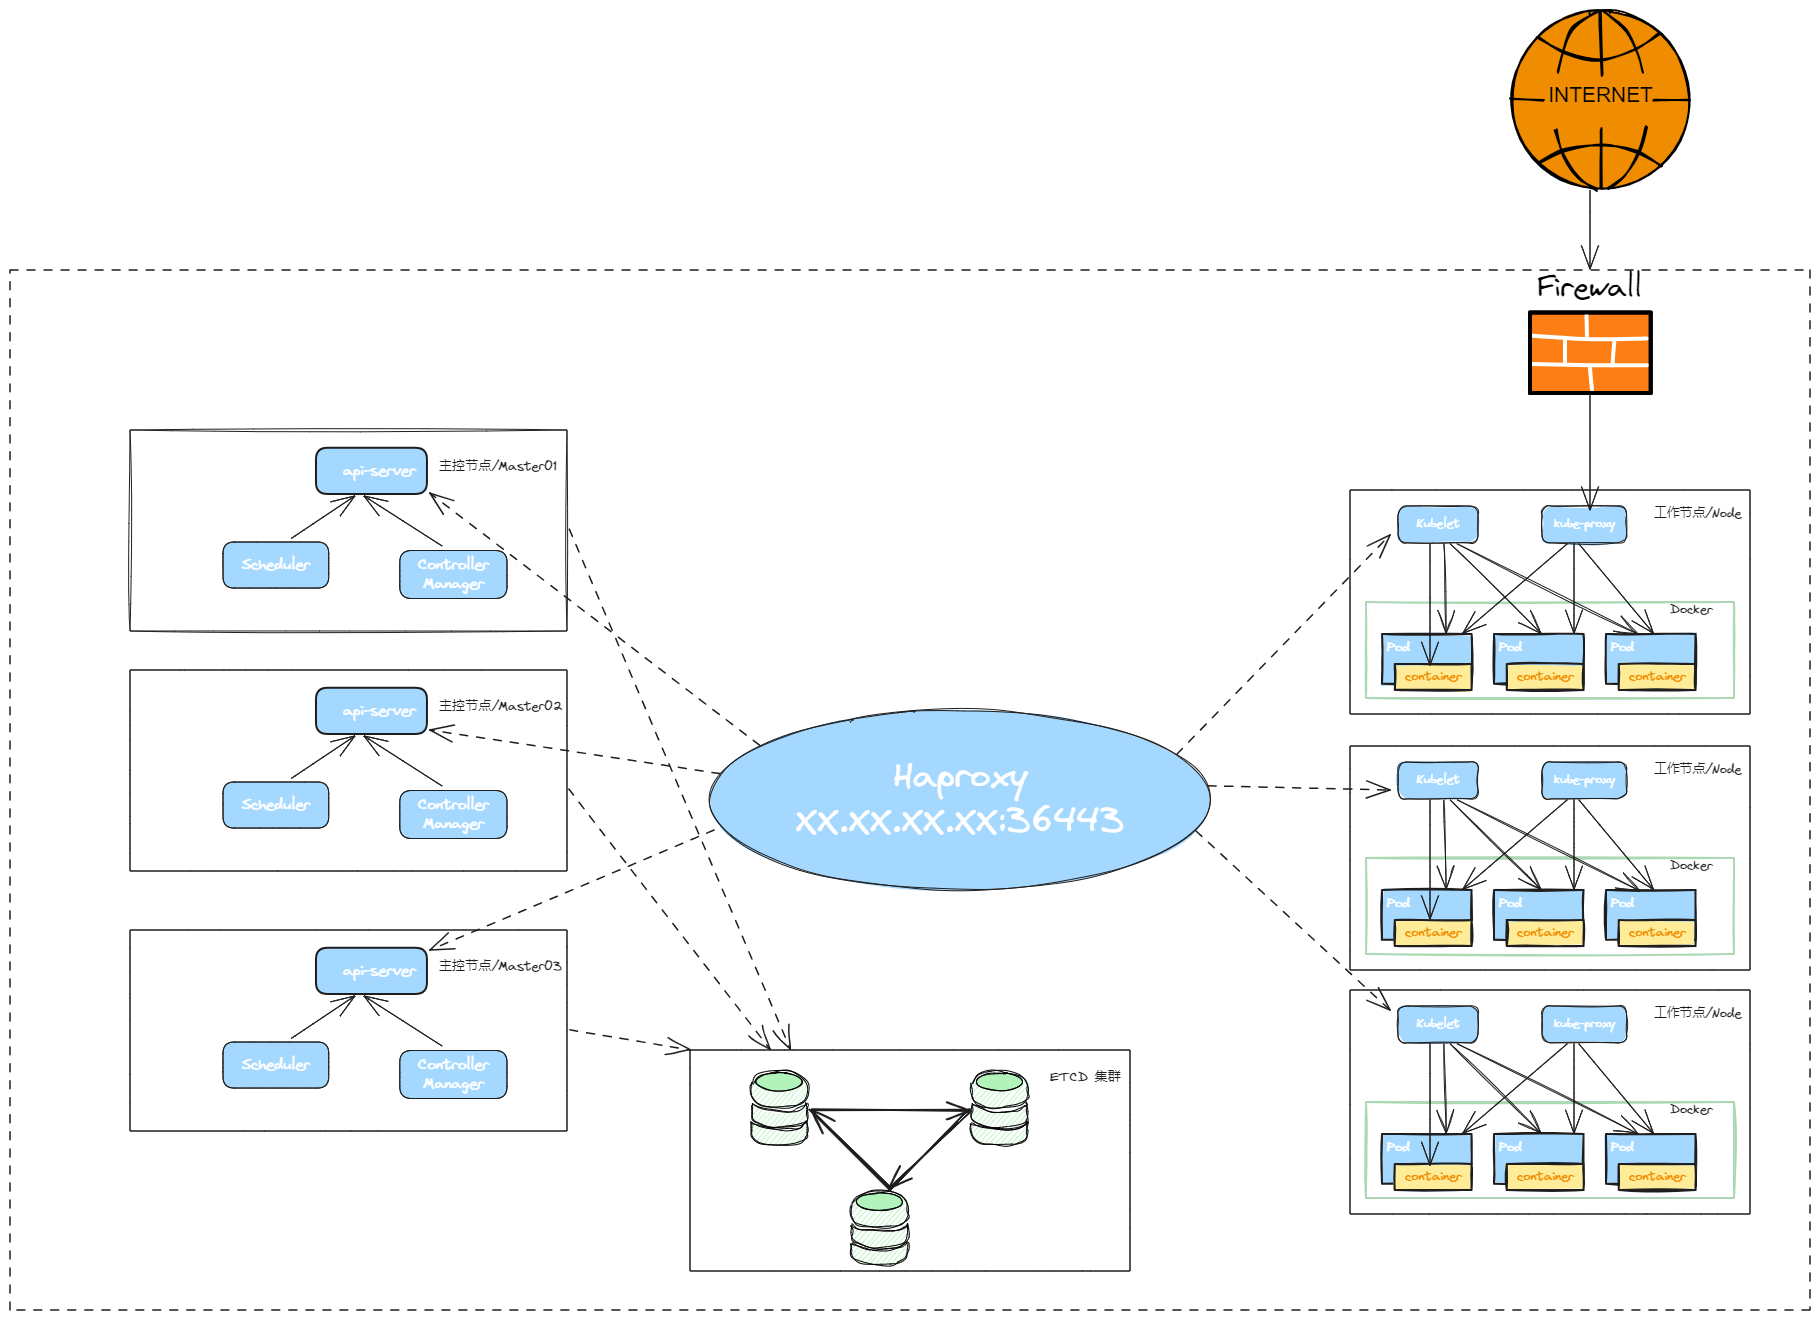
| 角色 | IP | 组件 | 功能描述 |
|---|---|---|---|
| Haproxy | 172.22.33.210 | haproxy | K8S入口,负载均衡 |
| k8s-master01 | 172.22.33.215 | docker,cri-dockerd,kube-apiserver,kube-scheduler,kube-controller-manager,kubelet,kube-proxy,coredns,calico | k8s master01节点 |
| k8s-master02 | 172.22.33.216 | docker,cri-dockerd,kube-apiserver,kube-scheduler,kube-controller-manager,kubelet,kube-proxy,calico | k8s master02节点 |
| k8s-master03 | 172.22.33.217 | docker,cri-dockerd,kube-apiserver,kube-scheduler,kube-controller-manager,kubelet,kube-proxy,calico | k8s master03节点 |
| k8s-node01 | 172.22.33.218 | docker,cri-dockerd,kubelet,kube-proxy,coredns,calico | k8s-node01 工作节点 |
| k8s-node02 | 172.22.33.219 | docker,cri-dockerd,kubelet,kube-proxy,coredns,calico | k8s-node02 工作节点 |
| k8s-node03 | 172.22.33.220 | docker,cri-dockerd,kubelet,kube-proxy,coredns,calico | k8s-node03 工作节点 |
| etcd-01 | 172.22.33.223 | etcd | etcd-01服务器 |
| etcd-02 | 172.22.33.224 | etcd | etcd-02服务器 |
| etcd-03 | 72.22.33.225 | etcd | etcd-03服务器 |
2.1 环境初始化
K8S 集群服务器 都需要配置
关闭防火墙:
$ systemctl stop firewalld
$ systemctl disable firewalld关闭selinux:
$ sed -i 's/enforcing/disabled/' /etc/selinux/config  # 永久
$ setenforce 0  # 临时关闭swap:[临时和永久关闭]
#临时关闭
$ swapoff -a#永久关闭
$ sed -ri 's/.*swap.*/#&/' /etc/fstab设置主机名:
$ hostnamectl set-hostname k8s-master01
$ hostnamectl set-hostname k8s-master02
$ hostnamectl set-hostname k8s-master03
$ hostnamectl set-hostname k8s-node01
$ hostnamectl set-hostname k8s-node02
$ hostnamectl set-hostname k8s-node03#在K8S上所有节点添加hosts:
$ cat >> /etc/hosts << EOF
172.22.33.215 k8s-master01
172.22.33.216 k8s-master02
172.22.33.217 k8s-master03
172.22.33.218 k8s-node01
172.22.33.219 k8s-node02
172.22.33.220 k8s-node03
EOF#开启内核路由转发
sed -i 's/net.ipv4.ip_forward=0/net.ipv4.ip_forward=1/g' /etc/sysctl.conf#将桥接的IPv4,IPV6流量传递到iptables的链:
$ cat > /etc/sysctl.d/k8s.conf << EOF
net.bridge.bridge-nf-call-ip6tables = 1
net.bridge.bridge-nf-call-iptables = 1
vm.swappiness = 0
EOF# 生效
$ sysctl --system#每个节点都需要安装 IPVS 的相关工具和加载ipvs内核模块
$ yum install ipvsadm#在所有节点执行以下命令
$ cat > /etc/sysconfig/modules/ipvs.modules <<EOF
#!/bin/bash
modprobe -- ip_vs
modprobe -- ip_vs_rr
modprobe -- ip_vs_wrr
modprobe -- ip_vs_sh
modprobe -- nf_conntrack_ipv4
EOF$ chmod 755 /etc/sysconfig/modules/ipvs.modules
$ bash /etc/sysconfig/modules/ipvs.modules#查看IPVS模块加载情况
$ lsmod | grep -e ip_vs -e nf_conntrack_ipv4
#能看到ip_vs ip_vs_rr ip_vs_wrr  ip_vs_sh nf_conntrack_ipv4  加载成功时间同步:
$ yum install ntpdate -y
$ ntpdate ntp.ntsc.ac.cn
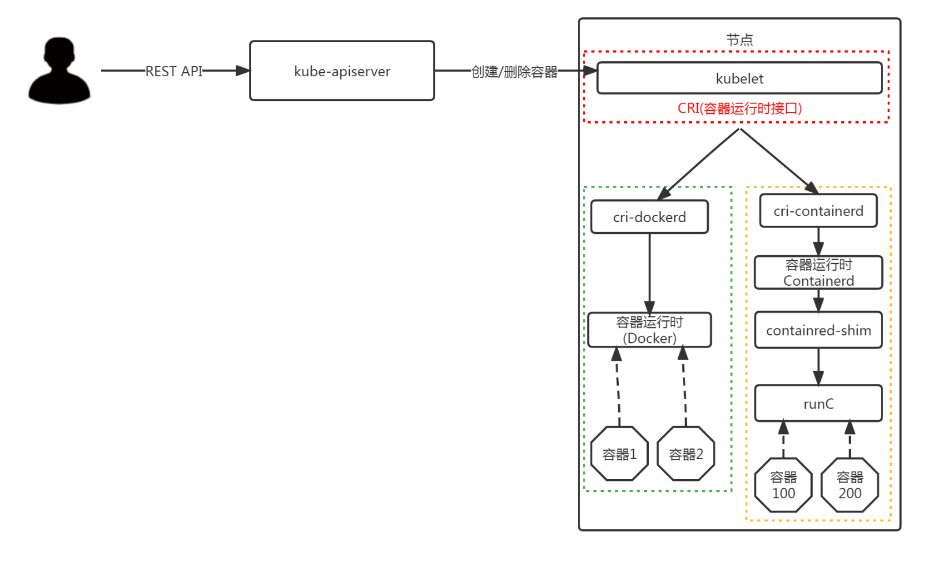
3. 安装Docker/cri-dockerd/kubeadm/kubelet/kubectl
在所有K8S 集群的节点上,执行
**Kubernetes1.24 之后, ** 在k8s中使用docker,除了安装docker 以外,还需要=安装cri-dockerd 组件; 不然就使用Containerd
3.1.1 docker二进制包下载
docker-ce 社区下载地址:
$ wget https://mirrors.nju.edu.cn/docker-ce/linux/static/stable/x86_64/docker-20.10.24.tgz
3.1.2 解压,拷贝至/usr/bin 下
$ tar -xf docker-20.10.24.tgz
$ cp docker/* /usr/bin
$ which docker
3.1.3 编写docker.service文件
$ cat > /etc/systemd/system/docker.service <<EOF[Unit]
Description=Docker Application Container Engine
Documentation=https://docs.docker.com
After=network-online.target firewalld.service
Wants=network-online.target[Service]
Type=notify
ExecStart=/usr/bin/dockerd
ExecReload=/bin/kill -s HUP $MAINPID
LimitNOFILE=65535
LimitNPROC=65535
LimitCORE=65535
TimeoutStartSec=0
Delegate=yes
KillMode=process
Restart=on-failure
StartLimitBurst=3
StartLimitInterval=60s[Install]
WantedBy=multi-user.targetEOF
3.1.4 挂载docker默认存储路径[可选]
docker的默认工作路径在/var/lib/docker ,最好不修改默认存储路径,可以做软链接
#建立工作目录
$ mkdir /home/application/#格式化磁盘
$ mkfs.ext4 /dev/sdb#磁盘永久挂载
$ vim /etc/fstab
/dev/sdb  /home/application  ext4 defaults 0 0#使挂载生效
$ mount -a# 创建docker 工作目录
$ mkdir /home/application/docker#创建软链接
$ ln -s /home/application/docker /var/lib/
3.1.5 添加可执行权限
$ chmod +x /etc/systemd/system/docker.service
3.1.6 启动,加载,开机自启动
$ systemctl daemon-reload
$ systemctl start docker.service
$ systemctl enable docker.service
3.1.7 配置镜像加速器
$ mkdir -p /etc/docker
$ tee /etc/docker/daemon.json <<-'EOF'
{"registry-mirrors": ["https://docker.srebro.cn"],"exec-opts": ["native.cgroupdriver=systemd"]
}
EOF$ systemctl daemon-reload
$ systemctl restart docker
⚠️tips:
如果仓库不是https 的,需要在 /etc/docker/daemon.json 中 添加忽略;比如下方的示例
"insecure-registries": ["https://harbor.srebro.cn","https://it-docker.pkg.devops.com"]
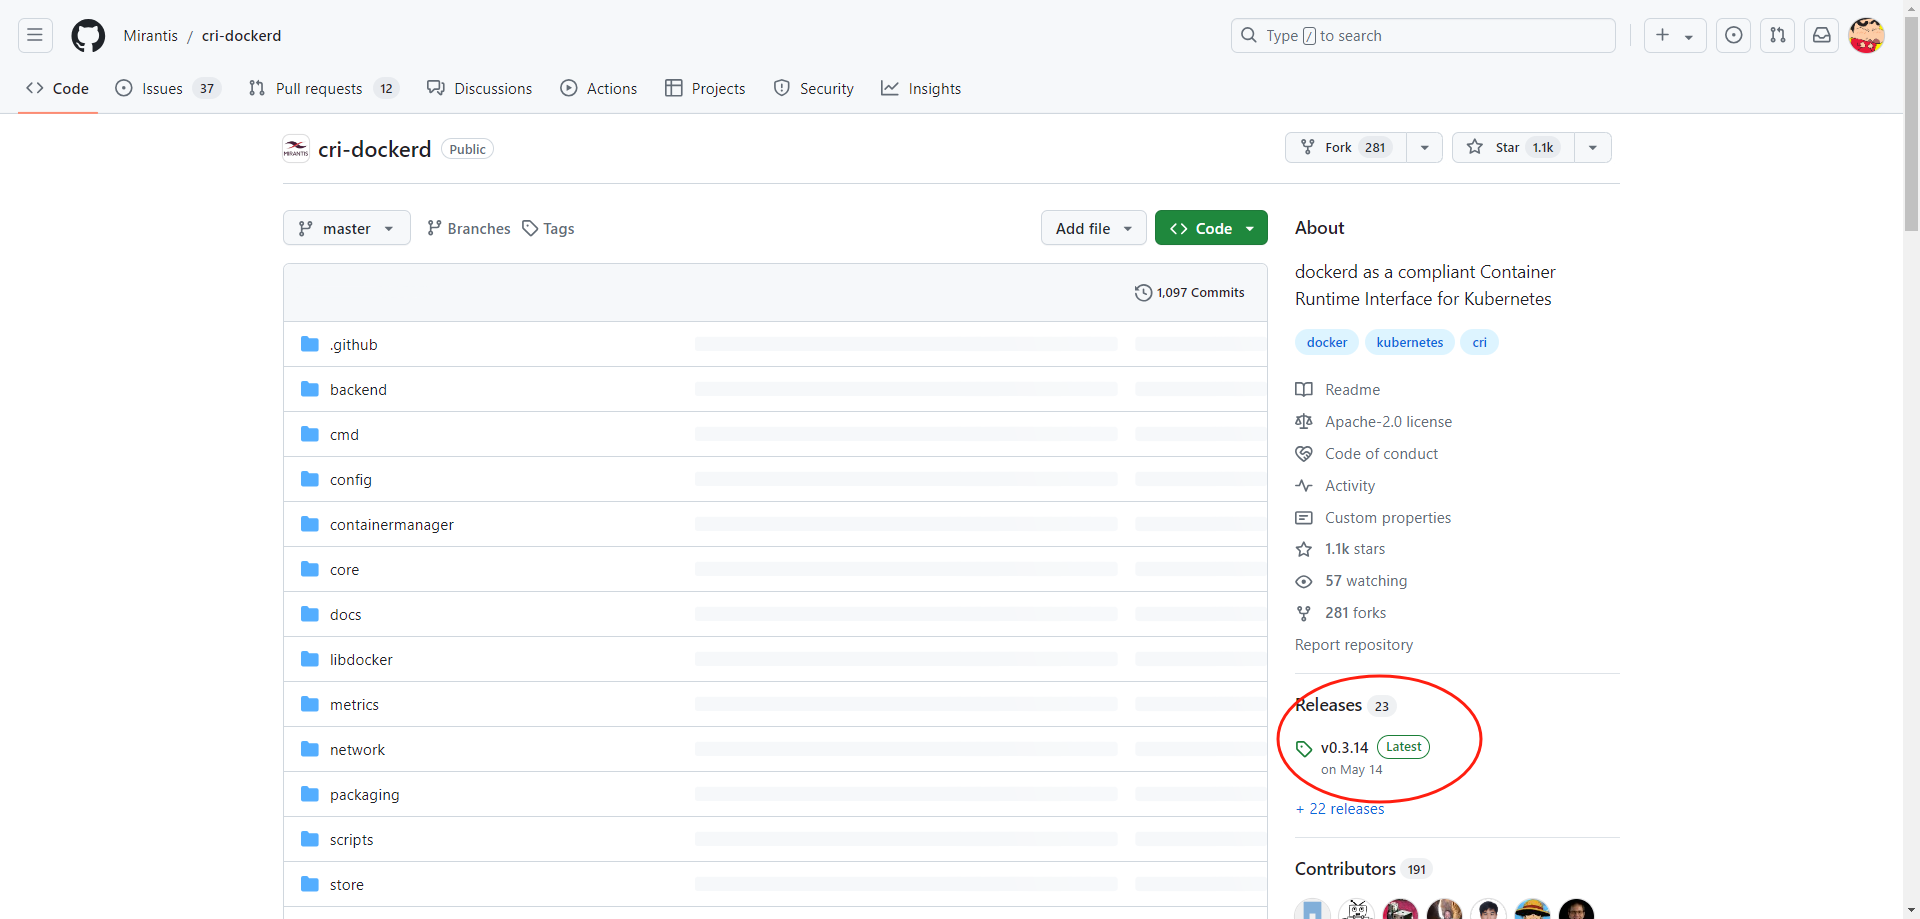
3.2.1 二进制部署cri-dockerd
- 项目地址: https://github.com/Mirantis/cri-dockerd
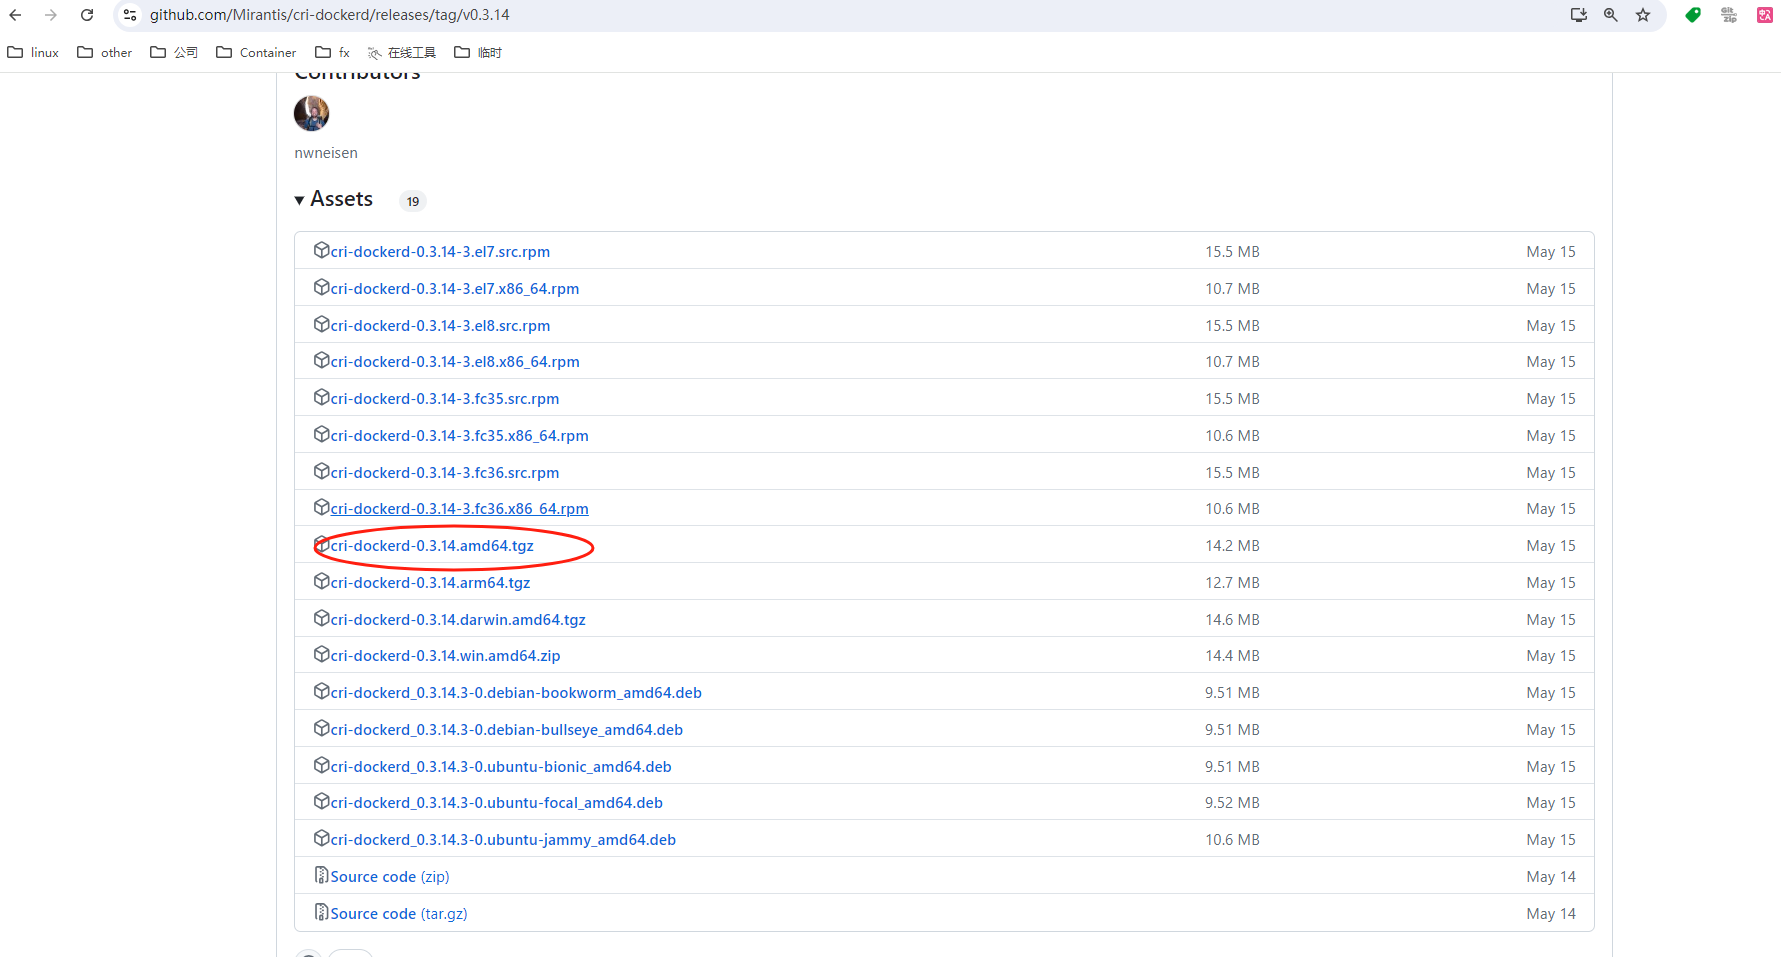
# 下载
wget https://github.com/Mirantis/cri-dockerd/releases/download/v0.3.14/cri-dockerd-0.3.14.amd64.tgz
tar -xf cri-dockerd-0.3.14.amd64.tgz
cp cri-dockerd/cri-dockerd /usr/bin/
chmod +x /usr/bin/cri-dockerd# 配置启动文件
cat <<"EOF" > /usr/lib/systemd/system/cri-docker.service
[Unit]
Description=CRI Interface for Docker Application Container Engine
Documentation=https://docs.mirantis.com
After=network-online.target firewalld.service docker.service
Wants=network-online.target
Requires=cri-docker.socket[Service]
Type=notifyExecStart=/usr/bin/cri-dockerd --network-plugin=cni --pod-infra-container-image=registry.aliyuncs.com/google_containers/pause:3.9ExecReload=/bin/kill -s HUP $MAINPID
TimeoutSec=0
RestartSec=2
Restart=alwaysStartLimitBurst=3StartLimitInterval=60sLimitNOFILE=infinity
LimitNPROC=infinity
LimitCORE=infinityTasksMax=infinity
Delegate=yes
KillMode=process[Install]
WantedBy=multi-user.target
EOF# 生成socket 文件cat <<"EOF" > /usr/lib/systemd/system/cri-docker.socket
[Unit]
Description=CRI Docker Socket for the API
PartOf=cri-docker.service[Socket]
ListenStream=%t/cri-dockerd.sock
SocketMode=0660
SocketUser=root
SocketGroup=root[Install]
WantedBy=sockets.targetEOF# 启动CRI-DOCKER
systemctl daemon-reload
systemctl start cri-docker
systemctl enable cri-docker
systemctl is-active cri-docker
3.2.2 添加阿里云YUM软件源
$ cat > /etc/yum.repos.d/kubernetes.repo << EOF
[kubernetes]
name=Kubernetes
baseurl=https://mirrors.aliyun.com/kubernetes/yum/repos/kubernetes-el7-x86_64
enabled=1
gpgcheck=0
repo_gpgcheck=0
gpgkey=https://mirrors.aliyun.com/kubernetes/yum/doc/yum-key.gpg https://mirrors.aliyun.com/kubernetes/yum/doc/rpm-package-key.gpg
EOF
3.2.3 安装kubeadm,kubelet和kubectl
由于版本更新频繁,这里指定版本号部署:
# 查看所有的可用版本
$ yum list  kubeadm  kubelet kubectl --showduplicates | sort -r#在所有节点安装
$ yum install -y kubelet-1.28.2-0 kubeadm-1.28.2-0 kubectl-1.28.2-0$ systemctl enable kubelet
4. 部署Haproxy负载均衡
4.1 yum安装haproxy
在172.22.33.210 服务器上部署
yum -y install haproxy
4.2 修改配置文件
$ cat > /etc/haproxy/haproxy.cfg << EOF
globallog /dev/log  local0 warningchroot      /var/lib/haproxypidfile     /var/run/haproxy.pidmaxconn     4000user        haproxygroup       haproxydaemonstats socket /var/lib/haproxy/stats
defaultslog globaloption  httplogoption  dontlognulltimeout connect 5000timeout client 50000timeout server 50000#frontend monitor-in#bind *:33305#mode http#option httplog#monitor-uri /monitorfrontend kube-apiserverbind *:36443mode tcpoption tcplogdefault_backend kube-apiserverbackend kube-apiservermode tcpoption tcplogoption tcp-checkbalance roundrobindefault-server inter 10s downinter 5s rise 2 fall 2 slowstart 60s maxconn 250 maxqueue 256 weight 100server kube-apiserver-1 172.22.33.215:6443 check # Replace the IP address with your own.server kube-apiserver-2 172.22.33.216:6443 check # Replace the IP address with your own.server kube-apiserver-3 172.22.33.217:6443 check # Replace the IP address with your own.
EOF
4.3 启动Haproxy
$ systemctl enable haproxy
$ systemctl start haproxy
5.部署etcd 集群
5.1 ETCD集群环境
| 机器IP | 主机名 | etcd版本 |
|---|---|---|
| 172.22.33.223 | etcd-01 | v3.3.8 |
| 172.22.33.224 | etcd-02 | v3.3.8 |
| 172.22.33.225 | etcd-03 | v3.3.8 |
5.2 修改主机名,添加hosts解析
在每台主机上执行
设置主机名:
$ hostnamectl set-hostname etcd-01
$ hostnamectl set-hostname etcd-02
$ hostnamectl set-hostname etcd-03#在所有节点添加hosts:
$ cat >> /etc/hosts << EOF
172.22.33.223 etcd-01
172.22.33.224 etcd-02
172.22.33.225 etcd-03
EOF
5.3 下载软件包,创建etcd工作目录
在每台主机上执行
- etcd 软件包下载地址: https://github.com/etcd-io/etcd/releases/download/v3.5.15/etcd-v3.5.15-linux-amd64.tar.gz
#创建etcd工作目录
$ mkdir -p /home/application/etcd/{bin,cfg,data,ssl}# 下载软件包并解压
$ wget https://github.com/etcd-io/etcd/releases/download/v3.5.15/etcd-v3.5.15-linux-amd64.tar.gz
$ tar -xf etcd-v3.5.15-linux-amd64.tar.gz
$ mv etcd-v3.5.15-linux-amd64/{etcdctl,etcd} /home/application/etcd/bin/#验证etcd版本
$ /home/application/etcd/bin/etcd --version
etcd Version: 3.5.15
Git SHA: 9a5533382
Go Version: go1.21.12
Go OS/Arch: linux/amd64
5.4 使用cfssl 工具签发etcd 证书
在172.22.33.223 主机上执行
签发证书的动作只需要在一台服务器上完成,签发之后,拷贝证书即可
#下载cfssl 签发工具【可能背墙,自行备源】
[root@master1 ~]# curl -L https://pkg.cfssl.org/R1.2/cfssl_linux-amd64 -o /usr/local/bin/cfssl
[root@master1 ~]# curl -L https://pkg.cfssl.org/R1.2/cfssljson_linux-amd64 -o /usr/local/bin/cfssljson
[root@master1 ~]# curl -L https://pkg.cfssl.org/R1.2/cfssl-certinfo_linux-amd64 -o /usr/local/bin/cfssl-certinfo
[root@master1 ~]# chmod +x /usr/local/bin/cfssl*
- 签发证书-配置 CA 并创建 TLS 证书
创建 Certificate Authority(CA), 并为 etcd创建 TLS 证书。
# 切换到证书工作目录下
$ cd /home/application/etcd/ssl# 配置 CA 的操作参数和策略。这些参数决定了 CA 的行为,如证书的有效期、证书链的深度、使用的加密算法等
$ cat << EOF | tee ca-config.json
{"signing": {"default": {"expiry": "87600h"},"profiles": {"etcd": {"expiry": "87600h","usages": ["signing","key encipherment","server auth","client auth"]}}}
}
EOF# 配置CA 生成证书签名请求(CSR)
$ cat << EOF | tee ca-csr.json
{"CN": "etcd CA","key": {"algo": "rsa","size": 2048},"names": [{"C": "CN","L": "Nanjing","ST": "Nanjing"}]
}
EOF#生成 CA 凭证和私钥:
$ cfssl gencert -initca ca-csr.json | cfssljson -bare ca#结果将生成以下两个文件:
$ ls -l ca*.pem
-rw------- 1 root root 1679  8月 26 14:19 ca-key.pem
-rw-r--r-- 1 root root 1265  8月 26 14:19 ca.pem

- 签发etcd server证书
修改请求文件中hosts字段包含所有etcd节点IP,172.22.33.223,172.22.33.224 ,172.22.33.225
# 创建etcd 证书请求文件
$ cat << EOF | tee server-csr.json
{"CN": "etcd","hosts": ["172.22.33.223","172.22.33.224","172.22.33.225"],"key": {"algo": "rsa","size": 2048},"names": [{"C": "CN","L": "Nanjing","ST": "Nanjing"}]
}
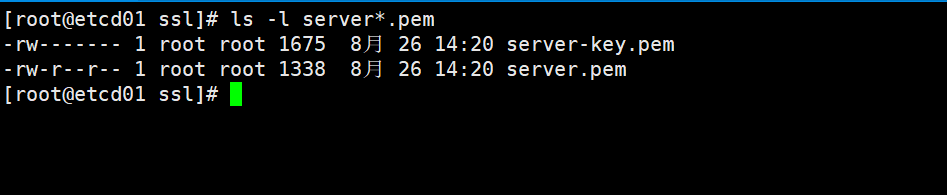
EOF# 生成etcd server证书:
$ cfssl gencert -ca=ca.pem -ca-key=ca-key.pem -config=ca-config.json -profile=etcd server-csr.json | cfssljson -bare server#结果将生成以下两个文件:
$ ls -l server*.pem
-rw------- 1 root root 1675 8月 26 14:20 server-key.pem
-rw-r--r-- 1 root root 1338 8月 26 14:20 server.pem
- 同步etcd 证书到其他节点
scp -rp /home/application/etcd/ssl/* 172.22.33.224:/home/application/etcd/ssl/*
scp -rp /home/application/etcd/ssl/* 172.22.33.225:/home/application/etcd/ssl/*
5.5 创建配置文件
172.22.33.223 etcd-01 节点
$ cd /home/application/etcd/cfg
$ cat >>  /home/application/etcd/cfg/etcd.conf << EOF
#[Member]
ETCD_NAME="etcd01"
ETCD_DATA_DIR="/home/application/etcd/data/default.etcd"
ETCD_LISTEN_PEER_URLS="https://172.22.33.223:2380"
ETCD_LISTEN_CLIENT_URLS="https://172.22.33.223:2379,http://127.0.0.1:2379"#[Clustering]
ETCD_INITIAL_ADVERTISE_PEER_URLS="https://172.22.33.223:2380"
ETCD_ADVERTISE_CLIENT_URLS="https://172.22.33.223:2379"
ETCD_INITIAL_CLUSTER="etcd01=https://172.22.33.223:2380,etcd02=https://172.22.33.224:2380,etcd03=https://172.22.33.225:2380"
ETCD_INITIAL_CLUSTER_TOKEN="etcd-cluster"
ETCD_INITIAL_CLUSTER_STATE="new"
ETCD_ENABLE_V2="true"#[Security]
ETCD_CERT_FILE="/home/application/etcd/ssl/server.pem"
ETCD_KEY_FILE="/home/application/etcd/ssl/server-key.pem"
ETCD_TRUSTED_CA_FILE="/home/application/etcd/ssl/ca.pem"
ETCD_CLIENT_CERT_AUTH="true"
ETCD_PEER_CERT_FILE="/home/application/etcd/ssl/server.pem"
ETCD_PEER_KEY_FILE="/home/application/etcd/ssl/server-key.pem"
ETCD_PEER_TRUSTED_CA_FILE="/home/application/etcd/ssl/ca.pem"
ETCD_PEER_CLIENT_CERT_AUTH="true"
EOF
172.22.33.224 etcd-02 节点
#[Member]
ETCD_NAME="etcd02"
ETCD_DATA_DIR="/home/application/etcd/data/default.etcd"
ETCD_LISTEN_PEER_URLS="https://172.22.33.224:2380"
ETCD_LISTEN_CLIENT_URLS="https://172.22.33.224:2379,http://127.0.0.1:2379"#[Clustering]
ETCD_INITIAL_ADVERTISE_PEER_URLS="https://172.22.33.224:2380"
ETCD_ADVERTISE_CLIENT_URLS="https://172.22.33.224:2379"
ETCD_INITIAL_CLUSTER="etcd01=https://172.22.33.223:2380,etcd02=https://172.22.33.224:2380,etcd03=https://172.22.33.225:2380"
ETCD_INITIAL_CLUSTER_TOKEN="etcd-cluster"
ETCD_INITIAL_CLUSTER_STATE="new"
ETCD_ENABLE_V2="true"#[Security]
ETCD_CERT_FILE="/home/application/etcd/ssl/server.pem"
ETCD_KEY_FILE="/home/application/etcd/ssl/server-key.pem"
ETCD_TRUSTED_CA_FILE="/home/application/etcd/ssl/ca.pem"
ETCD_CLIENT_CERT_AUTH="true"
ETCD_PEER_CERT_FILE="/home/application/etcd/ssl/server.pem"
ETCD_PEER_KEY_FILE="/home/application/etcd/ssl/server-key.pem"
ETCD_PEER_TRUSTED_CA_FILE="/home/application/etcd/ssl/ca.pem"
ETCD_PEER_CLIENT_CERT_AUTH="true"
EOF
172.22.33.225 etcd-03 节点
#[Member]
ETCD_NAME="etcd03"
ETCD_DATA_DIR="/home/application/etcd/data/default.etcd"
ETCD_LISTEN_PEER_URLS="https://172.22.33.225:2380"
ETCD_LISTEN_CLIENT_URLS="https://172.22.33.225:2379,http://127.0.0.1:2379"#[Clustering]
ETCD_INITIAL_ADVERTISE_PEER_URLS="https://172.22.33.225:2380"
ETCD_ADVERTISE_CLIENT_URLS="https://172.22.33.225:2379"
ETCD_INITIAL_CLUSTER="etcd01=https://172.22.33.223:2380,etcd02=https://172.22.33.224:2380,etcd03=https://172.22.33.225:2380"
ETCD_INITIAL_CLUSTER_TOKEN="etcd-cluster"
ETCD_INITIAL_CLUSTER_STATE="new"
ETCD_ENABLE_V2="true"#[Security]
ETCD_CERT_FILE="/home/application/etcd/ssl/server.pem"
ETCD_KEY_FILE="/home/application/etcd/ssl/server-key.pem"
ETCD_TRUSTED_CA_FILE="/home/application/etcd/ssl/ca.pem"
ETCD_CLIENT_CERT_AUTH="true"
ETCD_PEER_CERT_FILE="/home/application/etcd/ssl/server.pem"
ETCD_PEER_KEY_FILE="/home/application/etcd/ssl/server-key.pem"
ETCD_PEER_TRUSTED_CA_FILE="/home/application/etcd/ssl/ca.pem"
ETCD_PEER_CLIENT_CERT_AUTH="true"
EOF
5.6 创建etcd.service 文件
在每台主机上执行
$ cat >> /usr/lib/systemd/system/etcd.service << EOF
[Unit]
Description=Etcd Server
After=network.target
After=network-online.target
Wants=network-online.target[Service]
Type=notify
EnvironmentFile=/home/application/etcd/cfg/etcd.conf
ExecStart=/home/application/etcd/bin/etcd
Restart=on-failure
LimitNOFILE=65536[Install]
WantedBy=multi-user.target
EOF
5.7 启动etcd
在每台主机上执行
$ systemctl daemon-reload
$ systemctl enable etcd
$ systemctl start etcd# 检查etcd 服务是否正常
$ ps -ef | grep etcd | grep -v grep
root        7885       1  0 15:23 ?        00:00:00 /home/application/etcd/bin/etcd
5.8 etcd 集群服务可用性测试
使用etcdctl 工具测试,模拟写入数据,验证数据; etcdctl 工具,在安装包里有提供
#使用 etcdctl 工具快速检查指定的 etcd 节点(或节点集)的健康状态$  /home/application/etcd/bin/etcdctl --endpoints=https://172.22.33.223:2379,https://172.22.33.224:2379,https://172.22.33.225:2379 \
--cacert=/home/application/etcd/ssl/ca.pem \
--cert=/home/application/etcd/ssl/server.pem \
--key=/home/application/etcd/ssl/server-key.pem \
--write-out=table endpoint health
+----------------------------+--------+-------------+-------+
|          ENDPOINT          | HEALTH |    TOOK     | ERROR |
+----------------------------+--------+-------------+-------+
| https://172.22.33.224:2379 |   true | 16.120369ms |       |
| https://172.22.33.223:2379 |   true | 16.605784ms |       |
| https://172.22.33.225:2379 |   true | 19.851873ms |       |
+----------------------------+--------+-------------+-------+#使用 etcdctl 工具查看指定 etcd 节点(或节点集)当前的详细状态信息$ /home/application/etcd/bin/etcdctl --endpoints=https://172.22.33.223:2379,https://172.22.33.224:2379,https://172.22.33.225:2379 \
--cacert=/home/application/etcd/ssl/ca.pem \
--cert=/home/application/etcd/ssl/server.pem \
--key=/home/application/etcd/ssl/server-key.pem \
--write-out=table endpoint status
+----------------------------+------------------+---------+---------+-----------+------------+-----------+------------+--------------------+--------+
|          ENDPOINT          |        ID        | VERSION | DB SIZE | IS LEADER | IS LEARNER | RAFT TERM | RAFT INDEX | RAFT APPLIED INDEX | ERRORS |
+----------------------------+------------------+---------+---------+-----------+------------+-----------+------------+--------------------+--------+
| https://172.22.33.223:2379 |  b905915d4c303d2 |  3.5.15 |   20 kB |     false |      false |         2 |         11 |                 11 |        |
| https://172.22.33.224:2379 | 912027a2ec294592 |  3.5.15 |   20 kB |      true |      false |         2 |         11 |                 11 |        |
| https://172.22.33.225:2379 | 81330706eb2302ba |  3.5.15 |   20 kB |     false |      false |         2 |         11 |                 11 |        |
+----------------------------+------------------+---------+---------+-----------+------------+-----------+------------+--------------------+--------+#使用 etcdctl 工具验证测试 member$   /home/application/etcd/bin/etcdctl --endpoints=https://172.22.33.223:2379,https://172.22.33.224:2379,https://172.22.33.225:2379 \
--cacert=/home/application/etcd/ssl/ca.pem \
--cert=/home/application/etcd/ssl/server.pem \
--key=/home/application/etcd/ssl/server-key.pem \
--write-out=table member list
+------------------+---------+--------+----------------------------+----------------------------+------------+
|        ID        | STATUS  |  NAME  |         PEER ADDRS         |        CLIENT ADDRS        | IS LEARNER |
+------------------+---------+--------+----------------------------+----------------------------+------------+
|  b905915d4c303d2 | started | etcd01 | https://172.22.33.223:2380 | https://172.22.33.223:2379 |      false |
| 81330706eb2302ba | started | etcd03 | https://172.22.33.225:2380 | https://172.22.33.225:2379 |      false |
| 912027a2ec294592 | started | etcd02 | https://172.22.33.224:2380 | https://172.22.33.224:2379 |      false |
+------------------+---------+--------+----------------------------+----------------------------+------------+# etcdctl 工具验证测试数据读写
$  /home/application/etcd/bin/etcdctl --endpoints=https://172.22.33.223:2379,https://172.22.33.224:2379,https://172.22.33.225:2379 \
--cacert=/home/application/etcd/ssl/ca.pem \
--cert=/home/application/etcd/ssl/server.pem \
--key=/home/application/etcd/ssl/server-key.pem \
put srebro.cn hi
OK$ /home/application/etcd/bin/etcdctl --endpoints=https://172.22.33.223:2379,https://172.22.33.224:2379,https://172.22.33.225:2379 \
--cacert=/home/application/etcd/ssl/ca.pem \
--cert=/home/application/etcd/ssl/server.pem \
--key=/home/application/etcd/ssl/server-key.pem \
get srebro.cn
srebro.cn
OK
5.9 拷贝etcd 集群证书到K8S-master 节点上
在所有master 节点上执行
#创建etcd证书工作目录
$ mkdir -p /etc/kubernetes/pki/etcd#只需要拿etcd 集群中的任意一个节点上的证书,拷贝过去即可
$ scp -rp 172.22.33.223:/home/application/etcd/ssl/* /etc/kubernetes/pki/etcd/*
6. 部署Kubernetes Master
官方kubeadm 初始化说明:
-
https://kubernetes.io/zh/docs/reference/setup-tools/kubeadm/kubeadm-init/#config-file
-
https://kubernetes.io/docs/setup/production-environment/tools/kubeadm/create-cluster-kubeadm/#initializing-your-control-plane-node
6.1 准备好kubeadm-init.yaml初始化文件
6.1.1 使用外置ETCD 集群, 完成 kubeadm 初始化
⚠️ 包含etcd 证书
#在每个master 节点创建K8S,init 的工作目录
$ mkdir -p /etc/kubernetes/initcat >> /etc/kubernetes/init/kubeadm-init.yaml << EOF
---
apiVersion: kubeadm.k8s.io/v1beta3
bootstrapTokens:
- groups:- system:bootstrappers:kubeadm:default-node-tokentoken: 35sesk.5tm3tqc66tzlse8cttl: 24h0m0susages:- signing- authentication
kind: InitConfiguration
localAPIEndpoint:advertiseAddress: 172.22.33.223bindPort: 6443
nodeRegistration:criSocket: unix:///var/run/cri-dockerd.sockimagePullPolicy: IfNotPresentname: k8s-master01taints:- effect: NoSchedulekey: node-role.kubernetes.io/master
---
apiServer:certSANs:- kubernetes- kubernetes.default- kubernetes.default.svc- kubernetes.default.svc.cluster.local- 172.22.33.210- 172.22.33.215- 172.22.33.216- 172.22.33.217- 112.94.71.21- k8s.srebro.cntimeoutForControlPlane: 4m0s
apiVersion: kubeadm.k8s.io/v1beta3
certificatesDir: /etc/kubernetes/pki
clusterName: kubernetes
controlPlaneEndpoint: 172.22.33.210:36443
controllerManager: {}
dns: {}
etcd:external:endpoints:- "https://172.22.33.223:2379"- "https://172.22.33.224:2379"- "https://172.22.33.225:2379"caFile: /etc/kubernetes/pki/etcd/ca.pemcertFile: /etc/kubernetes/pki/etcd/server.pemkeyFile: /etc/kubernetes/pki/etcd/server-key.pem
imageRepository: registry.aliyuncs.com/google_containers
kind: ClusterConfiguration
kubernetesVersion: v1.28.2
networking:dnsDomain: cluster.localpodSubnet: 10.244.0.0/16serviceSubnet: 10.96.0.0/12
scheduler: {}
EOF
6.2 在所有master 节点上,pull 镜像到本地
init 之前,先下载镜像到master 机器上
#k8s-master01 节点上
$ kubeadm config images pull --config kubeadm-init.yaml[config/images] Pulled registry.aliyuncs.com/google_containers/kube-apiserver:v1.28.2
[config/images] Pulled registry.aliyuncs.com/google_containers/kube-controller-manager:v1.28.2
[config/images] Pulled registry.aliyuncs.com/google_containers/kube-scheduler:v1.28.2
[config/images] Pulled registry.aliyuncs.com/google_containers/kube-proxy:v1.28.2
[config/images] Pulled registry.aliyuncs.com/google_containers/pause:3.9
[config/images] Pulled registry.aliyuncs.com/google_containers/coredns:v1.10.1#k8s-master02 节点上
$ kubeadm config images pull --config kubeadm-init.yaml[config/images] Pulled registry.aliyuncs.com/google_containers/kube-apiserver:v1.28.2
[config/images] Pulled registry.aliyuncs.com/google_containers/kube-controller-manager:v1.28.2
[config/images] Pulled registry.aliyuncs.com/google_containers/kube-scheduler:v1.28.2
[config/images] Pulled registry.aliyuncs.com/google_containers/kube-proxy:v1.28.2
[config/images] Pulled registry.aliyuncs.com/google_containers/pause:3.9
[config/images] Pulled registry.aliyuncs.com/google_containers/coredns:v1.10.1#k8s-master03 节点上
$ kubeadm config images pull --config kubeadm-init.yaml[config/images] Pulled registry.aliyuncs.com/google_containers/kube-apiserver:v1.28.2
[config/images] Pulled registry.aliyuncs.com/google_containers/kube-controller-manager:v1.28.2
[config/images] Pulled registry.aliyuncs.com/google_containers/kube-scheduler:v1.28.2
[config/images] Pulled registry.aliyuncs.com/google_containers/kube-proxy:v1.28.2
[config/images] Pulled registry.aliyuncs.com/google_containers/pause:3.9
[config/images] Pulled registry.aliyuncs.com/google_containers/coredns:v1.10.1
6.3 在master01 节点上,完成kubeadm 初始化
$ cd /etc/kubernetes/init
$ kubeadm init --config kubeadm-init.yaml[init] Using Kubernetes version: v1.28.2
[preflight] Running pre-flight checks[WARNING Service-Kubelet]: kubelet service is not enabled, please run 'systemctl enable kubelet.service'
[preflight] Pulling images required for setting up a Kubernetes cluster
[preflight] This might take a minute or two, depending on the speed of your internet connection
[preflight] You can also perform this action in beforehand using 'kubeadm config images pull'
W0828 15:30:08.273727   10698 checks.go:835] detected that the sandbox image "registry.aliyuncs.com/google_containers/pause:3.7" of the container runtime is inconsistent with that used by kubeadm. It is recommended that using "registry.aliyuncs.com/google_containers/pause:3.9" as the CRI sandbox image.
[certs] Using certificateDir folder "/etc/kubernetes/pki"
[certs] Generating "ca" certificate and key
[certs] Generating "apiserver" certificate and key
[certs] apiserver serving cert is signed for DNS names [k8s-master01 k8s.srebro.cn kubernetes kubernetes.default kubernetes.default.svc kubernetes.default.svc.cluster.local] and IPs [10.96.0.1 172.22.33.223 172.22.33.226 172.22.33.224 112.94.71.21]
[certs] Generating "apiserver-kubelet-client" certificate and key
[certs] Generating "front-proxy-ca" certificate and key
[certs] Generating "front-proxy-client" certificate and key
[certs] External etcd mode: Skipping etcd/ca certificate authority generation
[certs] External etcd mode: Skipping etcd/server certificate generation
[certs] External etcd mode: Skipping etcd/peer certificate generation
[certs] External etcd mode: Skipping etcd/healthcheck-client certificate generation
[certs] External etcd mode: Skipping apiserver-etcd-client certificate generation
[certs] Generating "sa" key and public key
[kubeconfig] Using kubeconfig folder "/etc/kubernetes"
W0828 15:30:09.375139   10698 endpoint.go:57] [endpoint] WARNING: port specified in controlPlaneEndpoint overrides bindPort in the controlplane address
[kubeconfig] Writing "admin.conf" kubeconfig file
W0828 15:30:09.562271   10698 endpoint.go:57] [endpoint] WARNING: port specified in controlPlaneEndpoint overrides bindPort in the controlplane address
[kubeconfig] Writing "kubelet.conf" kubeconfig file
W0828 15:30:09.703979   10698 endpoint.go:57] [endpoint] WARNING: port specified in controlPlaneEndpoint overrides bindPort in the controlplane address
[kubeconfig] Writing "controller-manager.conf" kubeconfig file
W0828 15:30:09.998820   10698 endpoint.go:57] [endpoint] WARNING: port specified in controlPlaneEndpoint overrides bindPort in the controlplane address
[kubeconfig] Writing "scheduler.conf" kubeconfig file
[control-plane] Using manifest folder "/etc/kubernetes/manifests"
[control-plane] Creating static Pod manifest for "kube-apiserver"
[control-plane] Creating static Pod manifest for "kube-controller-manager"
[control-plane] Creating static Pod manifest for "kube-scheduler"
[kubelet-start] Writing kubelet environment file with flags to file "/var/lib/kubelet/kubeadm-flags.env"
[kubelet-start] Writing kubelet configuration to file "/var/lib/kubelet/config.yaml"
[kubelet-start] Starting the kubelet
[wait-control-plane] Waiting for the kubelet to boot up the control plane as static Pods from directory "/etc/kubernetes/manifests". This can take up to 4m0s
[apiclient] All control plane components are healthy after 18.596178 seconds
[upload-config] Storing the configuration used in ConfigMap "kubeadm-config" in the "kube-system" Namespace
[kubelet] Creating a ConfigMap "kubelet-config" in namespace kube-system with the configuration for the kubelets in the cluster
[upload-certs] Skipping phase. Please see --upload-certs
[mark-control-plane] Marking the node k8s-master01 as control-plane by adding the labels: [node-role.kubernetes.io/control-plane node.kubernetes.io/exclude-from-external-load-balancers]
[mark-control-plane] Marking the node k8s-master01 as control-plane by adding the taints [node-role.kubernetes.io/master:NoSchedule]
[bootstrap-token] Using token: 35sesk.5tm3tqc66tzlse8c
[bootstrap-token] Configuring bootstrap tokens, cluster-info ConfigMap, RBAC Roles
[bootstrap-token] Configured RBAC rules to allow Node Bootstrap tokens to get nodes
[bootstrap-token] Configured RBAC rules to allow Node Bootstrap tokens to post CSRs in order for nodes to get long term certificate credentials
[bootstrap-token] Configured RBAC rules to allow the csrapprover controller automatically approve CSRs from a Node Bootstrap Token
[bootstrap-token] Configured RBAC rules to allow certificate rotation for all node client certificates in the cluster
[bootstrap-token] Creating the "cluster-info" ConfigMap in the "kube-public" namespace
[kubelet-finalize] Updating "/etc/kubernetes/kubelet.conf" to point to a rotatable kubelet client certificate and key
[addons] Applied essential addon: CoreDNS
W0828 15:30:31.282450   10698 endpoint.go:57] [endpoint] WARNING: port specified in controlPlaneEndpoint overrides bindPort in the controlplane address
[addons] Applied essential addon: kube-proxyYour Kubernetes control-plane has initialized successfully!To start using your cluster, you need to run the following as a regular user:mkdir -p $HOME/.kubesudo cp -i /etc/kubernetes/admin.conf $HOME/.kube/configsudo chown $(id -u):$(id -g) $HOME/.kube/configAlternatively, if you are the root user, you can run:export KUBECONFIG=/etc/kubernetes/admin.confYou should now deploy a pod network to the cluster.
Run "kubectl apply -f [podnetwork].yaml" with one of the options listed at:https://kubernetes.io/docs/concepts/cluster-administration/addons/You can now join any number of control-plane nodes by copying certificate authorities
and service account keys on each node and then running the following as root:kubeadm join 172.22.33.210:36443 --token 35sesk.5tm3tqc66tzlse8c \--discovery-token-ca-cert-hash sha256:5a4476ac560c2c5c577abea0f1310c040385e4c12cfd9038734a68952c9fe815 \--control-plane Then you can join any number of worker nodes by running the following on each as root:kubeadm join 172.22.33.210:36443 --token 35sesk.5tm3tqc66tzlse8c \--discovery-token-ca-cert-hash sha256:5a4476ac560c2c5c577abea0f1310c040385e4c12cfd9038734a68952c9fe815
拷贝kubectl使用的连接k8s认证文件到默认路径
$ mkdir -p $HOME/.kube
$ sudo cp -i /etc/kubernetes/admin.conf $HOME/.kube/config
$ sudo chown $(id -u):$(id -g) $HOME/.kube/config
6.4 加入 Kubernetes Master 节点
因为我们的K8S集群已经初始化过了,再添加其他master 节点到集群中,首要添加是把已经初始化过的证书拷贝到其他master 节点上
6.4.1 在master02和master03节点复制相关证书
#创建K8S证书工作目录
$ mkdir -p /etc/kubernetes/pki/$ scp -r 172.22.33.215:/etc/kubernetes/pki/ca.* /etc/kubernetes/pki/
$ scp -r 172.22.33.215:/etc/kubernetes/pki/sa.* /etc/kubernetes/pki/
$ scp -r 172.22.33.215:/etc/kubernetes/pki/front-proxy-ca.* /etc/kubernetes/pki/#拷贝k8s-admin 文件
$ scp -r 172.22.33.215:/etc/kubernetes/admin.conf /etc/kubernetes/
6.4.2 把 master02和master03节点 添加到Kubernetes 集群中
使用刚刚 master01 在kubeadm init输出的kubeadm join命令:
#加入控制平面
$ kubeadm join 172.22.33.210:36443 --token 35sesk.5tm3tqc66tzlse8c \--discovery-token-ca-cert-hash sha256:5a4476ac560c2c5c577abea0f1310c040385e4c12cfd9038734a68952c9fe815 \--control-plane
6.4.3 在master01节点上查看master节点个数
$ kubectl get node
NAME           STATUS     ROLES                  AGE     VERSION
k8s-master01   NotReady   control-plane,master   8m26s   v1.28.2
k8s-master02   NotReady   control-plane,master   2m54s   v1.28.2
k8s-master03   NotReady   control-plane,master   59s     v1.28.2
可以看到,所有的master 节点都已经加入到集群中了;NotReady是需要等待CNI网络插件安装好
7. 加入Kubernetes Node 节点
- 官方文档: https://kubernetes.io/docs/reference/setup-tools/kubeadm/kubeadm-join/
在K8S node 节点上操作
| k8s-node01 | 172.22.33.218 |
|---|---|
| k8s-node02 | 172.22.33.219 |
| k8s-node03 | 172.22.33.220 |
使用刚刚master01 在kubeadm init输出的kubeadm join命令:
$ kubeadm join 172.22.33.210:36443 --token 35sesk.5tm3tqc66tzlse8c \--discovery-token-ca-cert-hash sha256:5a4476ac560c2c5c577abea0f1310c040385e4c12cfd9038734a68952c9fe815
默认token有效期为24小时,当过期之后,该token就不可用了。这时就需要重新创建token,可以直接在master 节点上,使用命令快捷生成:
$ kubeadm token create --print-join-command
8. 部署容器网络(CNI)
https://kubernetes.io/docs/setup/production-environment/tools/kubeadm/create-cluster-kubeadm/#pod-network
:::danger
注意:只需要部署下面其中一个,推荐Calico。
Calico是一个纯三层的数据中心网络方案,Calico支持广泛的平台,包括Kubernetes、OpenStack等。
Calico 在每一个计算节点利用 Linux Kernel 实现了一个高效的虚拟路由器( vRouter) 来负责数据转发,而每个 vRouter 通过 BGP 协议负责把自己上运行的 workload 的路由信息向整个 Calico 网络内传播。
此外,Calico 项目还实现了 Kubernetes 网络策略,提供ACL功能。
https://docs.projectcalico.org/getting-started/kubernetes/quickstart
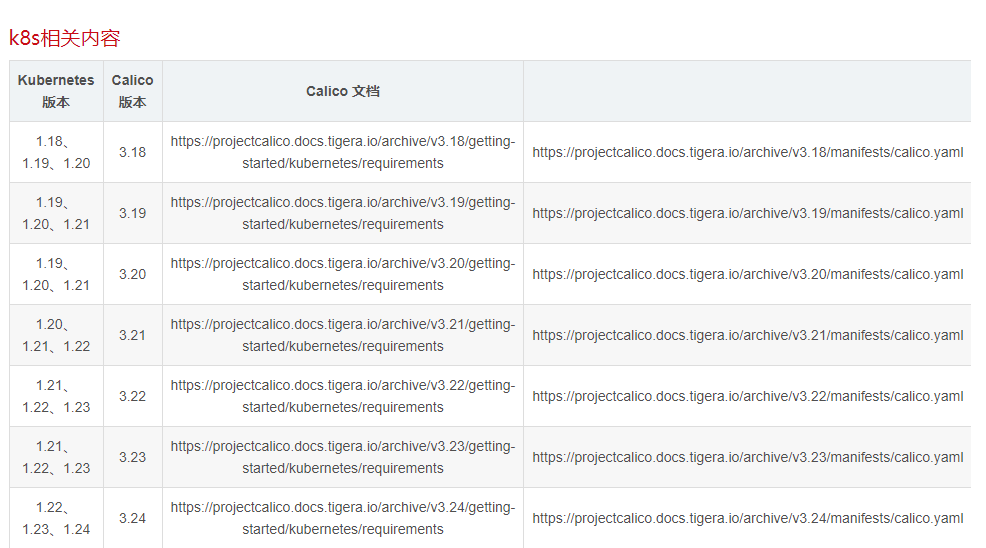
K8S版本和calico 版本的对应关系
参考链接:https://blog.csdn.net/qq_32596527/article/details/127692734
:::
$ wget https://projectcalico.docs.tigera.io/archive/v3.21/manifests/calico.yaml
下载完后还需要修改里面定义Pod网络(CALICO_IPV4POOL_CIDR),与前面kubeadm init指定的
--pod-network-cidr=10.244.0.0/16 保持一致; 默认是 192.168.0.0/16
- name: CALICO_IPV4POOL_CIDRvalue: "10.244.0.0/16"

修改完后应用清单:
$ kubectl apply -f calico.yaml
$ kubectl get pods -n kube-system
查看所有节点,以及pod,svc情况
$ kubectl get nodes
NAME           STATUS   ROLES                  AGE   VERSION
k8s-master01   Ready    control-plane,master   70m   v1.28.2
k8s-master02   Ready    control-plane,master   64m   v1.28.2
k8s-master03   Ready    control-plane,master   62m   v1.28.2
k8s-node01     Ready    <none>                 46m   v1.28.2
k8s-node02     Ready    <none>                 46m   v1.28.2
k8s-node03     Ready    <none>                 46m   v1.28.2
[root@openeuler ~]# kubectl get all -A
NAMESPACE     NAME                                           READY   STATUS    RESTARTS   AGE
default       pod/my-web-6b6c9df775-2p67z                    1/1     Running   0          45m
default       pod/my-web-6b6c9df775-76f8w                    1/1     Running   0          45m
default       pod/my-web-6b6c9df775-t2zrm                    1/1     Running   0          45m
default       pod/my-web-6b6c9df775-zs6db                    1/1     Running   0          45m
kube-system   pod/calico-kube-controllers-5bb48c55fd-vvktf   1/1     Running   0          52m
kube-system   pod/calico-node-7ng4l                          1/1     Running   0          52m
kube-system   pod/calico-node-lrf24                          1/1     Running   0          47m
kube-system   pod/calico-node-qxnxg                          1/1     Running   0          52m
kube-system   pod/calico-node-vwjt4                          1/1     Running   0          52m
kube-system   pod/coredns-7f89b7bc75-cc6gn                   1/1     Running   0          70m
kube-system   pod/coredns-7f89b7bc75-wsg29                   1/1     Running   0          70m
kube-system   pod/etcd-k8s-master01                          1/1     Running   0          70m
kube-system   pod/etcd-k8s-master02                          1/1     Running   0          65m
kube-system   pod/etcd-k8s-master03                          1/1     Running   0          62m
kube-system   pod/kube-apiserver-k8s-master01                1/1     Running   0          70m
kube-system   pod/kube-apiserver-k8s-master02                1/1     Running   0          65m
kube-system   pod/kube-apiserver-k8s-master03                1/1     Running   0          62m
kube-system   pod/kube-controller-manager-k8s-master01       1/1     Running   1          70m
kube-system   pod/kube-controller-manager-k8s-master02       1/1     Running   0          65m
kube-system   pod/kube-controller-manager-k8s-master03       1/1     Running   0          62m
kube-system   pod/kube-proxy-ck9lr                           1/1     Running   0          63m
kube-system   pod/kube-proxy-vzrs8                           1/1     Running   0          65m
kube-system   pod/kube-proxy-wxb78                           1/1     Running   0          70m
kube-system   pod/kube-proxy-z5chd                           1/1     Running   0          47m
kube-system   pod/kube-scheduler-k8s-master01                1/1     Running   1          70m
kube-system   pod/kube-scheduler-k8s-master02                1/1     Running   0          65m
kube-system   pod/kube-scheduler-k8s-master03                1/1     Running   0          62mNAMESPACE     NAME                 TYPE        CLUSTER-IP   EXTERNAL-IP   PORT(S)                  AGE
default       service/kubernetes   ClusterIP   10.96.0.1    <none>        443/TCP                  70m
kube-system   service/kube-dns     ClusterIP   10.96.0.10   <none>        53/UDP,53/TCP,9153/TCP   70mNAMESPACE     NAME                         DESIRED   CURRENT   READY   UP-TO-DATE   AVAILABLE   NODE SELECTOR            AGE
kube-system   daemonset.apps/calico-node   4         4         4       4            4           kubernetes.io/os=linux   52m
kube-system   daemonset.apps/kube-proxy    4         4         4       4            4           kubernetes.io/os=linux   70mNAMESPACE     NAME                                      READY   UP-TO-DATE   AVAILABLE   AGE
default       deployment.apps/my-web                    4/4     4            4           45m
kube-system   deployment.apps/calico-kube-controllers   1/1     1            1           52m
kube-system   deployment.apps/coredns                   2/2     2            2           70mNAMESPACE     NAME                                                 DESIRED   CURRENT   READY   AGE
default       replicaset.apps/my-web-6b6c9df775                    4         4         4       45m
kube-system   replicaset.apps/calico-kube-controllers-5bb48c55fd   1         1         1       52m
kube-system   replicaset.apps/coredns-7f89b7bc75                   2         2         2       70m
9. 测试kubernetes集群
- 验证Pod工作
- 验证Pod网络通信
- 验证DNS解析
在Kubernetes集群中创建一个pod,验证是否正常运行:
$ kubectl create deployment nginx --image=nginx
$ kubectl expose deployment nginx --port=80 --type=NodePort
$ kubectl get pod,svc
访问地址:http://NodeIP:Port
10. 部署 Dashboard[可选]
$ wget https://raw.githubusercontent.com/kubernetes/dashboard/v2.0.3/aio/deploy/recommended.yaml
默认Dashboard只能集群内部访问,修改Service为NodePort类型,暴露到外部:
$ vi recommended.yaml
...
kind: Service
apiVersion: v1
metadata:labels:k8s-app: kubernetes-dashboardname: kubernetes-dashboardnamespace: kubernetes-dashboard
spec:ports:- port: 443targetPort: 8443nodePort: 30001selector:k8s-app: kubernetes-dashboardtype: NodePort
...$ kubectl apply -f recommended.yaml
$ kubectl get pods -n kubernetes-dashboard
NAME                                         READY   STATUS    RESTARTS   AGE
dashboard-metrics-scraper-6b4884c9d5-gl8nr   1/1     Running   0          13m
kubernetes-dashboard-7f99b75bf4-89cds        1/1     Running   0          13m
访问地址:https://NodeIP:30001
创建service account并绑定默认cluster-admin管理员集群角色:
# 创建用户
$ kubectl create serviceaccount dashboard-admin -n kube-system
# 用户授权
$ kubectl create clusterrolebinding dashboard-admin --clusterrole=cluster-admin --serviceaccount=kube-system:dashboard-admin
# 获取用户Token
$ kubectl describe secrets -n kube-system $(kubectl -n kube-system get secret | awk '/dashboard-admin/{print $1}')
使用输出的token登录Dashboard。
11. 补充
11.1 将节点上的容器运行时从 Docker Engine 改为 containerd
官网参考:https://kubernetes.io/zh-cn/docs/tasks/administer-cluster/migrating-from-dockershim/change-runtime-containerd/
1、配置先决条件【上面环境初始化的时候如果做过了,直接忽略】
$ cat <<EOF | sudo tee /etc/modules-load.d/containerd.conf
overlay
br_netfilter
EOF$ sudo modprobe overlay
$ sudo modprobe br_netfilter# 设置必需的 sysctl 参数,这些参数在重新启动后仍然存在。
cat <<EOF | sudo tee /etc/sysctl.d/99-kubernetes-cri.conf
net.bridge.bridge-nf-call-iptables  = 1
net.ipv4.ip_forward                 = 1
net.bridge.bridge-nf-call-ip6tables = 1
EOF# Apply sysctl params without reboot
$ sudo sysctl --system
2、下线节点
将
<node-to-drain>替换为你所要下线的节点的名称
kubectl drain <node-to-drain> --ignore-daemonsets
3、停止 Docker 守护进程
systemctl stop kubelet
systemctl disable docker.service --now
4、二进制安装containerd
$ wget https://github.com/containerd/containerd/releases/download/v1.7.20/containerd-1.7.20-linux-amd64.tar.gz
$ tar -xf containerd-1.7.20-linux-amd64.tar.gz#复制bin下所有二进制文件到/usr/bin 目录下,并覆盖之前的文件
$ cp bin/* /usr/bin/
cp:是否覆盖'/usr/bin/containerd'? y
cp:是否覆盖'/usr/bin/containerd-shim'? y
cp:是否覆盖'/usr/bin/containerd-shim-runc-v2'? y
cp:是否覆盖'/usr/bin/ctr'? y#验证containerd的版本
$ containerd --version
containerd github.com/containerd/containerd v1.7.20 8fc6bcff51318944179630522a095cc9dbf9f353#创建containerd 配置文件
$ mkdir -p /etc/containerd#也可以使用生成的默认配置
$ containerd config default | sudo tee /etc/containerd/config.toml
修改containerd配置文件
$ cat > /etc/containerd/config.toml << EOF
disabled_plugins = []
imports = []
oom_score = 0
plugin_dir = ""
required_plugins = []
root = "/var/lib/containerd"
state = "/run/containerd"
temp = ""
version = 2[cgroup]path = ""[debug]address = ""format = ""gid = 0level = ""uid = 0[grpc]address = "/run/containerd/containerd.sock"gid = 0max_recv_message_size = 16777216max_send_message_size = 16777216tcp_address = ""tcp_tls_ca = ""tcp_tls_cert = ""tcp_tls_key = ""uid = 0[metrics]address = ""grpc_histogram = false[plugins][plugins."io.containerd.gc.v1.scheduler"]deletion_threshold = 0mutation_threshold = 100pause_threshold = 0.02schedule_delay = "0s"startup_delay = "100ms"[plugins."io.containerd.grpc.v1.cri"]device_ownership_from_security_context = falsedisable_apparmor = falsedisable_cgroup = falsedisable_hugetlb_controller = truedisable_proc_mount = falsedisable_tcp_service = trueenable_selinux = falseenable_tls_streaming = falseenable_unprivileged_icmp = falseenable_unprivileged_ports = falseignore_image_defined_volumes = falsemax_concurrent_downloads = 3max_container_log_line_size = 16384netns_mounts_under_state_dir = falserestrict_oom_score_adj = falsesandbox_image = "registry.aliyuncs.com/google_containers/pause:3.6"selinux_category_range = 1024stats_collect_period = 10stream_idle_timeout = "4h0m0s"stream_server_address = "127.0.0.1"stream_server_port = "0"systemd_cgroup = falsetolerate_missing_hugetlb_controller = trueunset_seccomp_profile = ""[plugins."io.containerd.grpc.v1.cri".cni]bin_dir = "/opt/cni/bin"conf_dir = "/etc/cni/net.d"conf_template = ""ip_pref = ""max_conf_num = 1[plugins."io.containerd.grpc.v1.cri".containerd]default_runtime_name = "runc"disable_snapshot_annotations = truediscard_unpacked_layers = falseignore_rdt_not_enabled_errors = falseno_pivot = falsesnapshotter = "overlayfs"[plugins."io.containerd.grpc.v1.cri".containerd.default_runtime]base_runtime_spec = ""cni_conf_dir = ""cni_max_conf_num = 0container_annotations = []pod_annotations = []privileged_without_host_devices = falseruntime_engine = ""runtime_path = ""runtime_root = ""runtime_type = ""[plugins."io.containerd.grpc.v1.cri".containerd.default_runtime.options][plugins."io.containerd.grpc.v1.cri".containerd.runtimes][plugins."io.containerd.grpc.v1.cri".containerd.runtimes.runc]base_runtime_spec = ""cni_conf_dir = ""cni_max_conf_num = 0container_annotations = []pod_annotations = []privileged_without_host_devices = falseruntime_engine = ""runtime_path = ""runtime_root = ""runtime_type = "io.containerd.runc.v2"[plugins."io.containerd.grpc.v1.cri".containerd.runtimes.runc.options]BinaryName = ""CriuImagePath = ""CriuPath = ""CriuWorkPath = ""IoGid = 0IoUid = 0NoNewKeyring = falseNoPivotRoot = falseRoot = ""ShimCgroup = ""SystemdCgroup = true[plugins."io.containerd.grpc.v1.cri".containerd.untrusted_workload_runtime]base_runtime_spec = ""cni_conf_dir = ""cni_max_conf_num = 0container_annotations = []pod_annotations = []privileged_without_host_devices = falseruntime_engine = ""runtime_path = ""runtime_root = ""runtime_type = ""[plugins."io.containerd.grpc.v1.cri".containerd.untrusted_workload_runtime.options][plugins."io.containerd.grpc.v1.cri".image_decryption]key_model = "node"[plugins."io.containerd.grpc.v1.cri".registry]config_path = ""[plugins."io.containerd.grpc.v1.cri".registry.auths][plugins."io.containerd.grpc.v1.cri".registry.configs][plugins."io.containerd.grpc.v1.cri".registry.headers][plugins."io.containerd.grpc.v1.cri".registry.mirrors][plugins."io.containerd.grpc.v1.cri".registry.mirrors."docker.io"]endpoint = ["https://docker.srebro.site"][plugins."io.containerd.grpc.v1.cri".registry.mirrors."gcr.io"]endpoint = ["https://gcr.srebro.site"][plugins."io.containerd.grpc.v1.cri".registry.mirrors."k8s.gcr.io"]endpoint = ["https://k8s-gcr.srebro.site"][plugins."io.containerd.grpc.v1.cri".registry.mirrors."quay.io"]endpoint = ["https://quay.srebro.site"][plugins."io.containerd.grpc.v1.cri".x509_key_pair_streaming]tls_cert_file = ""tls_key_file = ""[plugins."io.containerd.internal.v1.opt"]path = "/opt/containerd"[plugins."io.containerd.internal.v1.restart"]interval = "10s"[plugins."io.containerd.internal.v1.tracing"]sampling_ratio = 1.0service_name = "containerd"[plugins."io.containerd.metadata.v1.bolt"]content_sharing_policy = "shared"[plugins."io.containerd.monitor.v1.cgroups"]no_prometheus = false[plugins."io.containerd.runtime.v1.linux"]no_shim = falseruntime = "runc"runtime_root = ""shim = "containerd-shim"shim_debug = false[plugins."io.containerd.runtime.v2.task"]platforms = ["linux/amd64"]sched_core = false[plugins."io.containerd.service.v1.diff-service"]default = ["walking"][plugins."io.containerd.service.v1.tasks-service"]rdt_config_file = ""[plugins."io.containerd.snapshotter.v1.aufs"]root_path = ""[plugins."io.containerd.snapshotter.v1.btrfs"]root_path = ""[plugins."io.containerd.snapshotter.v1.devmapper"]async_remove = falsebase_image_size = ""discard_blocks = falsefs_options = ""fs_type = ""pool_name = ""root_path = ""[plugins."io.containerd.snapshotter.v1.native"]root_path = ""[plugins."io.containerd.snapshotter.v1.overlayfs"]root_path = ""upperdir_label = false[plugins."io.containerd.snapshotter.v1.zfs"]root_path = ""[plugins."io.containerd.tracing.processor.v1.otlp"]endpoint = ""insecure = falseprotocol = ""[proxy_plugins][stream_processors][stream_processors."io.containerd.ocicrypt.decoder.v1.tar"]accepts = ["application/vnd.oci.image.layer.v1.tar+encrypted"]args = ["--decryption-keys-path", "/etc/containerd/ocicrypt/keys"]env = ["OCICRYPT_KEYPROVIDER_CONFIG=/etc/containerd/ocicrypt/ocicrypt_keyprovider.conf"]path = "ctd-decoder"returns = "application/vnd.oci.image.layer.v1.tar"[stream_processors."io.containerd.ocicrypt.decoder.v1.tar.gzip"]accepts = ["application/vnd.oci.image.layer.v1.tar+gzip+encrypted"]args = ["--decryption-keys-path", "/etc/containerd/ocicrypt/keys"]env = ["OCICRYPT_KEYPROVIDER_CONFIG=/etc/containerd/ocicrypt/ocicrypt_keyprovider.conf"]path = "ctd-decoder"returns = "application/vnd.oci.image.layer.v1.tar+gzip"[timeouts]"io.containerd.timeout.bolt.open" = "0s""io.containerd.timeout.shim.cleanup" = "5s""io.containerd.timeout.shim.load" = "5s""io.containerd.timeout.shim.shutdown" = "3s""io.containerd.timeout.task.state" = "2s"[ttrpc]address = ""gid = 0uid = 0
EOF
使用systemd管理containerd ,并启动
$ cat > /etc/systemd/system/containerd.service << EOF[Unit]
Description=containerd container runtime
Documentation=https://containerd.io
After=network.target[Service]
ExecStart=/usr/bin/containerd
Restart=always
RestartSec=5
Delegate=yes
KillMode=process
OOMScoreAdjust=-999[Install]
WantedBy=multi-user.target
EOF$ systemctl daemon-reload
$ systemctl enable containerd
$ systemctl restart containerd
5、配置kubelet使用containerd并重启kubelet
$ vim /etc/sysconfig/kubelet
KUBELET_EXTRA_ARGS=--container-runtime=remote --container-runtime-endpoint=unix:///run/containerd/containerd.sock --cgroup-driver=systemd$ systemctl restart kubelet
6、验证节点处于健康状态
# 会显示出containerd版本,健康状态
$ kubectl get nodes -o wide
NAME         STATUS   ROLES                  AGE     VERSION    INTERNAL-IP     EXTERNAL-IP   OS-IMAGE                    KERNEL-VERSION                        CONTAINER-RUNTIME
k8s-master   Ready    control-plane,master   7d21h   v1.20.15   172.22.33.210   <none>        openEuler 22.03 (LTS-SP4)   5.10.0-221.0.0.124.oe2203sp3.x86_64   containerd://1.7.20
k8s-node1    Ready,SchedulingDisabled    <none>                 7d21h   v1.20.15   172.22.33.211   <none>        openEuler 22.03 (LTS-SP4)   5.10.0-221.0.0.124.oe2203sp3.x86_64   containerd://1.7.20
k8s-node2    Ready    <none>                 7d21h   v1.20.15   172.22.33.212   <none>        openEuler 22.03 (LTS-SP4)   5.10.0-221.0.0.124.oe2203sp3.x86_64   containerd://1.7.20
k8s-node3    Ready    <none>                 6d22h   v1.20.15   172.22.33.213   <none>        openEuler 22.03 (LTS-SP4)   5.10.0-221.0.0.124.oe2203sp3.x86_64   containerd://1.7.20
7、uncordon 节点
将
<node-to-uncordon>替换为你之前下线的节点的名称。
$ kubectl uncordon <node-to-uncordon>
8、再次验证
[root@k8s-master bin]# kubectl get nodes -o wide
NAME         STATUS   ROLES                  AGE     VERSION    INTERNAL-IP     EXTERNAL-IP   OS-IMAGE                    KERNEL-VERSION                        CONTAINER-RUNTIME
k8s-master   Ready    control-plane,master   7d21h   v1.20.15   172.22.33.210   <none>        openEuler 22.03 (LTS-SP4)   5.10.0-221.0.0.124.oe2203sp3.x86_64   containerd://1.7.20
k8s-node1    Ready    <none>                 7d21h   v1.20.15   172.22.33.211   <none>        openEuler 22.03 (LTS-SP4)   5.10.0-221.0.0.124.oe2203sp3.x86_64   containerd://1.7.20
k8s-node2    Ready    <none>                 7d21h   v1.20.15   172.22.33.212   <none>        openEuler 22.03 (LTS-SP4)   5.10.0-221.0.0.124.oe2203sp3.x86_64   containerd://1.7.20
k8s-node3    Ready    <none>                 6d22h   v1.20.15   172.22.33.213   <none>        openEuler 22.03 (LTS-SP4)   5.10.0-221.0.0.124.oe2203sp3.x86_64   docker://20.10.18
11.2 kubectl 命令补齐
$ yum install bash-completion -y
$ source /usr/share/bash-completion/bash_completion
$ source <(kubectl completion bash)
$ kubectl completion bash >/etc/bash_completion.d/kubectl
本文是原创文章,采用 CC BY-NC-ND 4.0 协议,完整转载请注明来自 运维小弟