⼀、安装环境
1. 安装说明
本次以⼆进制⽅式安装⾼可⽤ k8s 1.28.0 版本,但在⽣产环境中,建议使⽤⼩版本⼤于 5 的 Kubernetes 版本,⽐如 1.19.5 以后。
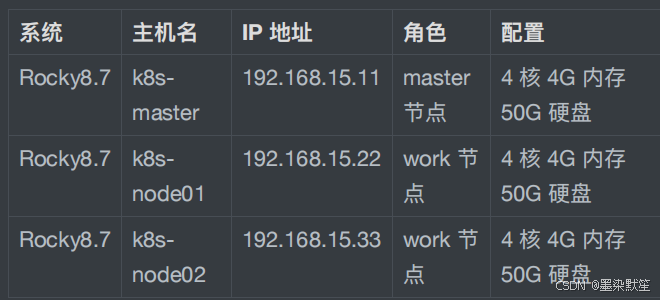
2. 系统环境
3. ⽹络及版本环境
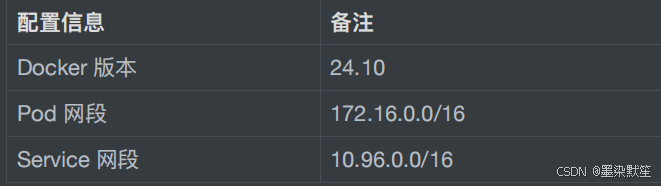
注:宿主机⽹段、Pod ⽹段、Service ⽹段不能重复,服务器 IP 地址不能设置为 DHCP,需配置为静态 IP。
⼆、前期准备
1. 配置主机映射
[root@k8s-master ~]# vim /etc/hosts
127.0.0.1 localhost localhost.localdomain
localhost4 localhost4.localdomain4
::1 localhost localhost.localdomain
localhost6 localhost6.localdomain6
192.168.15.11 k8s-master
192.168.15.11 k8s-master-lb # 若有⾼可⽤主机,这⾥为
另⼀个master的IP
192.168.15.22 k8s-node01
192.168.15.33 k8s-node02
2. 配置 yum 源
[root@k8s-master ~]# cd /etc/yum.repos.d/
[root@k8s-master yum.repos.d]# mkdir bak
[root@k8s-master yum.repos.d]# mv Rocky* bak
[root@k8s-master yum.repos.d]# mv local.repo bak
[root@k8s-master yum.repos.d]# ls
aliyunbak bak
[root@k8s-master yum.repos.d]# vim docker-ce.repo
# docker软件源
[docker-ce-stable]
name=Docker CE Stable - $basearch
baseurl=https://mirrors.aliyun.com/dockerce/linux/centos/$releasever/$basearch/stable
enabled=1
gpgcheck=1
gpgkey=https://mirrors.aliyun.com/dockerce/linux/centos/gpg
[docker-ce-stable-debuginfo]
name=Docker CE Stable - Debuginfo $basearch
baseurl=https://mirrors.aliyun.com/dockerce/linux/centos/$releasever/debug-$basearch/stable
enabled=0
gpgcheck=1
gpgkey=https://mirrors.aliyun.com/dockerce/linux/centos/gpg
[docker-ce-stable-source]
name=Docker CE Stable - Sources
baseurl=https://mirrors.aliyun.com/dockerce/linux/centos/$releasever/source/stable
enabled=0
gpgcheck=1
gpgkey=https://mirrors.aliyun.com/dockerce/linux/centos/gpg
[docker-ce-test]
name=Docker CE Test - $basearch
baseurl=https://mirrors.aliyun.com/dockerce/linux/centos/$releasever/$basearch/test
enabled=0
gpgcheck=1
gpgkey=https://mirrors.aliyun.com/dockerce/linux/centos/gpg
[docker-ce-test-debuginfo]
name=Docker CE Test - Debuginfo $basearch
baseurl=https://mirrors.aliyun.com/dockerce/linux/centos/$releasever/debug-$basearch/test
enabled=0
gpgcheck=1
gpgkey=https://mirrors.aliyun.com/dockerce/linux/centos/gpg
[docker-ce-test-source]
name=Docker CE Test - Sources
baseurl=https://mirrors.aliyun.com/dockerce/linux/centos/$releasever/source/test
enabled=0
gpgcheck=1
gpgkey=https://mirrors.aliyun.com/dockerce/linux/centos/gpg
[docker-ce-nightly]
name=Docker CE Nightly - $basearch
baseurl=https://mirrors.aliyun.com/dockerce/linux/centos/$releasever/$basearch/nightly
enabled=0
gpgcheck=1
gpgkey=https://mirrors.aliyun.com/dockerce/linux/centos/gpg
[docker-ce-nightly-debuginfo]
name=Docker CE Nightly - Debuginfo $basearch
baseurl=https://mirrors.aliyun.com/dockerce/linux/centos/$releasever/debug-
$basearch/nightly
enabled=0
gpgcheck=1
gpgkey=https://mirrors.aliyun.com/dockerce/linux/centos/gpg
[docker-ce-nightly-source]
name=Docker CE Nightly - Sources
baseurl=https://mirrors.aliyun.com/dockerce/linux/centos/$releasever/source/nightly
enabled=0
gpgcheck=1
gpgkey=https://mirrors.aliyun.com/dockerce/linux/centos/gpg
[root@k8s-master yum.repos.d]# vim RockyBaseOS.repo # 阿⾥云软件源
[baseos]
name=Rocky Linux $releasever - BaseOS
#mirrorlist=https://mirrors.rockylinux.org/mirrorl
ist?arch=$basearch&repo=BaseOS-$releasever
baseurl=https://mirrors.aliyun.com/rockylinux/$rel
easever/BaseOS/$basearch/os/
gpgcheck=1
enabled=1
gpgkey=file:///etc/pki/rpm-gpg/RPM-GPG-KEYrockyofficial
[root@k8s-master yum.repos.d]# vim RockyAppStream.repo # 阿⾥云软件源
[appstream]
name=Rocky Linux $releasever - AppStream
#mirrorlist=https://mirrors.rockylinux.org/mirrorl
ist?arch=$basearch&repo=AppStream-$releasever
baseurl=https://mirrors.aliyun.com/rockylinux/$rel
easever/AppStream/$basearch/os/
gpgcheck=1
enabled=1
gpgkey=file:///etc/pki/rpm-gpg/RPM-GPG-KEYrockyofficial
[root@k8s-master yum.repos.d]# vim kubernetes.repo
# K8S软件源
[kubernetes]
name=Kubernetes
baseurl=https://mirrors.aliyun.com/kubernetes/yum/
repos/kubernetes-el7-x86_64/
enabled=1
gpgcheck=0
repo_gpgcheck=0
gpgkey=https://mirrors.aliyun.com/kubernetes/yum/d
oc/yum-key.gpg
https://mirrors.aliyun.com/kubernetes/yum/doc/rpmpackage-key.gpg
[root@k8s-master yum.repos.d]# ls
aliyunbak docker-ce.repo Rocky-AppStream.repo
bak kubernetes.repo Rocky-BaseOS.repo
[root@k8s-master yum.repos.d]# yum clean all #
清除yum缓存
35 ⽂件已删除
[root@k8s-master yum.repos.d]# yum makecache #
建⽴yum元数据缓存
Rocky Linux 8 - AppStream
5.2 MB/s | 9.6 MB 00:01
Rocky Linux 8 - BaseOS
2.6 MB/s | 3.9 MB 00:01
Docker CE Stable - x86_64
54 kB/s | 52 kB 00:00
Kubernetes
193 kB/s | 182 kB 00:00
元数据缓存已建⽴。
3. 安装必备⼯具
[root@k8s-master yum.repos.d]# cd
[root@k8s-master ~]# yum install wget jq psmisc
vim net-tools telnet yum-utils device-mapperpersistent-data lvm2 git -y
......省略部分内容......
已安装:git-2.39.3-1.el8_8.x86_64 gitcore-2.39.3-1.el8_8.x86_64 git-core-doc-2.39.3-1.el8_8.noarch perlError-1:0.17025-2.el8.noarch perl-Git-2.39.3-1.el8_8.noarch perlTermReadKey-2.37-7.el8.x86_64 telnet-1:0.17-76.el8.x86_64 yumutils-4.0.21-23.el8.noarch
完毕!
4. 关闭安全及 swap 分区
[root@k8s-master ~]# systemctl disable --now
firewalld
[root@k8s-master ~]# systemctl disable --now
dnsmasq
[root@k8s-master ~]# setenforce 0
[root@k8s-master ~]# sed -i
's#SELINUX=enforcing#SELINUX=disabled#g'
/etc/sysconfig/selinux
[root@k8s-master ~]# sed -i
's#SELINUX=enforcing#SELINUX=disabled#g'
/etc/selinux/config
[root@k8s-master ~]# swapoff -a && sysctl -w
vm.swappiness=0
vm.swappiness = 0
[root@k8s-master ~]# sed -ri '/^[^#]*swap/s@^@#@'
/etc/fstab
5. 同步时间
[root@k8s-master ~]# rpm -ivh
https://mirrors.wlnmp.com/rockylinux/wlnmprelease-rocky-8.noarch.rpm
获取https://mirrors.wlnmp.com/rockylinux/wlnmprelease-rocky-8.noarch.rpm
Verifying...
################################# [100%]
准备中...
################################# [100%]
正在升级/安装...
1:wlnmp-release-rocky-1-1
################################# [100%]
[root@k8s-master ~]# yum -y install wntp
[root@k8s-master ~]# ntpdate time2.aliyun.com
19 Dec 21:02:09 ntpdate[33790]: adjust time server
203.107.6.88 offset -0.001396 sec
[root@k8s-master ~]# crontab -e
*/5 * * * * /usr/sbin/ntpdate time2.aliyun.com
6. 配置 limit
[root@k8s-master ~]# ulimit -SHn 65535 # 单个进程
可以打开的⽂件数量将被限制为 65535
[root@k8s-master ~]# vim /etc/security/limits.conf
# 末尾添加如下内容
* soft nofile 65536
* hard nofile 131072
* soft nproc 65535
* hard nproc 655350
* soft memlock unlimited
* hard memlock unlimited
7. 配置免密登录
[root@k8s-master ~]# ssh-keygen -t rsa
# 遵循默认配置,⼀路回⻋即可
[root@k8s-master ~]# for i in k8s-node01 k8snode02;do ssh-copy-id -i .ssh/id_rsa.pub $i;done
# 按照提示输⼊yes和密码
8. 安装 k8s ⾼可⽤性 Git 仓库
[root@k8s-master ~]# cd /root/ ; git clone
https://gitee.com/dukuan/k8s-ha-install.git
# 在 /root/ ⽬录下克隆⼀个名为 k8s-ha-install.git 的
Git 仓库
正克隆到 'k8s-ha-install'...
remote: Enumerating objects: 882, done.
remote: Counting objects: 100% (208/208), done.
remote: Compressing objects: 100% (130/130), done.
remote: Total 882 (delta 92), reused 145 (delta
52), pack-reused 674
接收对象中: 100% (882/882), 19.71 MiB | 2.82 MiB/s,
完成.
处理 delta 中: 100% (356/356), 完成.
9. 升级系统并重启
更新系统但不包括内核
[root@k8s-master ~]# yum update -y --
exclude=kernel* --nobest && reboot
三、配置内核模块
1. 配置 ipvs 模块
[root@k8s-master ~]# yum install ipvsadm ipset
sysstat conntrack libseccomp -y
[root@k8s-master ~]# modprobe -- ip_vs #
使⽤ modprobe 命令加载内核模块,核⼼ IPVS 模块。
[root@k8s-master ~]# modprobe -- ip_vs_rr #
IPVS 负载均衡算法 rr
[root@k8s-master ~]# modprobe -- ip_vs_wrr #
IPVS 负载均衡算法 wrr
[root@k8s-master ~]# modprobe -- ip_vs_sh #
⽤于源端负载均衡的模块
[root@k8s-master ~]# modprobe -- nf_conntrack #
⽤于⽹络流量过滤和跟踪的模块
[root@k8s-master ~]# vim /etc/modulesload.d/ipvs.conf
# 在系统启动时加载下列 IPVS 和相关功能所需的模块
ip_vs # 负载均衡模块
ip_vs_lc # ⽤于实现基于连接数量的负载均衡算法
ip_vs_wlc # ⽤于实现带权重的最少连接算法的模块
ip_vs_rr # 负载均衡rr算法模块
ip_vs_wrr # 负载均衡wrr算法模块
ip_vs_lblc # 负载均衡算法,它结合了最少连接(LC)算法
和基于偏置的轮询(Round Robin with Bias)算法
ip_vs_lblcr # ⽤于实现基于链路层拥塞状况的最少连接负载
调度算法的模块
ip_vs_dh # ⽤于实现基于散列(Hashing)的负载均衡算
法的模块
ip_vs_sh # ⽤于源端负载均衡的模块
ip_vs_fo # ⽤于实现基于本地服务的负载均衡算法的模块
ip_vs_nq # ⽤于实现NQ算法的模块
ip_vs_sed # ⽤于实现随机早期检测(Random Early
Detection)算法的模块
ip_vs_ftp # ⽤于实现FTP服务的负载均衡模块
ip_vs_sh
nf_conntrack # ⽤于跟踪⽹络连接的状态的模块
ip_tables # ⽤于管理防护墙的机制
ip_set # ⽤于创建和管理IP集合的模块
xt_set # ⽤于处理IP数据包集合的模块,提供了与
iptables等⽹络⼯具的接⼝
ipt_set # ⽤于处理iptables规则集合的模块
ipt_rpfilter # ⽤于实现路由反向路径过滤的模块
ipt_REJECT # iptables模块之⼀,⽤于将不符合规则的数据
包拒绝,并返回特定的错误码
ipip # ⽤于实现IP隧道功能的模块,使得数据可以在
两个⽹络之间进⾏传输
[root@k8s-master ~]# systemctl enable --now
systemd-modules-load.service # 开机⾃启systemd默
认提供的⽹络管理服务
The unit files have no installation config
(WantedBy, RequiredBy, Also, Alias
settings in the [Install] section, and
DefaultInstance for template units).
This means they are not meant to be enabled using
systemctl.
Possible reasons for having this kind of units
are:
1) A unit may be statically enabled by being
symlinked from another unit's.wants/ or .requires/ directory.
2) A unit's purpose may be to act as a helper for
some other unit which hasa requirement dependency on it.
3) A unit may be started when needed via
activation (socket, path, timer,D-Bus, udev, scripted systemctl call, ...).
4) In case of template units, the unit is meant to
be enabled with someinstance name specified.
[root@k8s-master ~]# lsmod | grep -e ip_vs -e
nf_conntrack # 查看已写⼊加载的模块
ip_vs_sh 16384 0
ip_vs_wrr 16384 0
ip_vs_rr 16384 0
ip_vs 172032 6
ip_vs_rr,ip_vs_sh,ip_vs_wrr
nf_conntrack 172032 4
xt_conntrack,nf_nat,ipt_MASQUERADE,ip_vs
nf_defrag_ipv6 20480 2 nf_conntrack,ip_vs
nf_defrag_ipv4 16384 1 nf_conntrack
libcrc32c 16384 5
nf_conntrack,nf_nat,nf_tables,xfs,ip_vs
2. 配置 k8s 内核
[root@k8s-master ~]# vim /etc/sysctl.d/k8s.conf
# 写⼊k8s所需内核模块
net.bridge.bridge-nf-call-iptables = 1 # 控制⽹络
桥接与iptables之间的⽹络转发⾏为
net.bridge.bridge-nf-call-ip6tables = 1 # ⽤于控制
⽹络桥接(bridge)的IP6tables过滤规则。当该参数设置为1
时,表示启⽤对⽹络桥接的IP6tables过滤规则
fs.may_detach_mounts = 1 # ⽤于控制⽂件系统是否允许
分离挂载,1表示允许
net.ipv4.conf.all.route_localnet = 1 # 允许本地⽹
络上的路由。设置为1表示允许,设置为0表示禁⽌。
vm.overcommit_memory=1 # 控制内存分配策略。设置为1表
示允许内存过量分配,设置为0表示不允许。
vm.panic_on_oom=0 # 决定当系统遇到内存不⾜(OOM)时是
否产⽣panic。设置为0表示不产⽣panic,设置为1表示产⽣
panic。
fs.inotify.max_user_watches=89100 # inotify可以监
视的⽂件和⽬录的最⼤数量。
fs.file-max=52706963 # 系统级别的⽂件描述符的最⼤数
量。
fs.nr_open=52706963 # 单个进程可以打开的⽂件描述符
的最⼤数量。
net.netfilter.nf_conntrack_max=2310720 # ⽹络连接
跟踪表的最⼤⼤⼩。
net.ipv4.tcp_keepalive_time = 600 # TCP保活机制发
送探测包的间隔时间(秒)。
net.ipv4.tcp_keepalive_probes = 3 # TCP保活机制发
送探测包的最⼤次数。
net.ipv4.tcp_keepalive_intvl =15 # TCP保活机制在
发送下⼀个探测包之前等待响应的时间(秒)。
net.ipv4.tcp_max_tw_buckets = 36000 # TCP
TIME_WAIT状态的bucket数量。
net.ipv4.tcp_tw_reuse = 1 # 允许重⽤TIME_WAIT套接
字。设置为1表示允许,设置为0表示不允许。
net.ipv4.tcp_max_orphans = 327680 # 系统中最⼤的孤
套接字数量。
net.ipv4.tcp_orphan_retries = 3 # 系统尝试重新分
配孤套接字的次数。
net.ipv4.tcp_syncookies = 1 # ⽤于防⽌SYN洪⽔攻击。
设置为1表示启⽤SYN cookies,设置为0表示禁⽤。
net.ipv4.tcp_max_syn_backlog = 16384 # SYN连接请
求队列的最⼤⻓度。
net.ipv4.ip_conntrack_max = 65536 # IP连接跟踪表的
最⼤⼤⼩。
net.ipv4.tcp_max_syn_backlog = 16384 # 系统中最⼤
的监听队列的⻓度。
net.ipv4.tcp_timestamps = 0 # ⽤于关闭TCP时间戳选
项。
net.core.somaxconn = 16384 # ⽤于设置系统中最⼤的监
听队列的⻓度
[root@k8s-master ~]# reboot
# 保存后,所有节点重启,保证重启后内核依然加载
[root@k8s-master ~]# lsmod | grep --color=auto -e
ip_vs -e nf_conntrack
ip_vs_ftp 16384 0
nf_nat 45056 3
ipt_MASQUERADE,nft_chain_nat,ip_vs_ftp
ip_vs_sed 16384 0
ip_vs_nq 16384 0
ip_vs_fo 16384 0
ip_vs_sh 16384 0
ip_vs_dh 16384 0
ip_vs_lblcr 16384 0
ip_vs_lblc 16384 0
ip_vs_wrr 16384 0
ip_vs_rr 16384 0
ip_vs_wlc 16384 0
ip_vs_lc 16384 0
ip_vs 172032 25
ip_vs_wlc,ip_vs_rr,ip_vs_dh,ip_vs_lblcr,ip_vs_sh,i
p_vs_fo,ip_vs_nq,ip_vs_lblc,ip_vs_wrr,ip_vs_lc,ip_
vs_sed,ip_vs_ftp
nf_conntrack 172032 4
xt_conntrack,nf_nat,ipt_MASQUERADE,ip_vs
nf_defrag_ipv6 20480 2 nf_conntrack,ip_vs
nf_defrag_ipv4 16384 1 nf_conntrack
libcrc32c 16384 5
nf_conntrack,nf_nat,nf_tables,xfs,ip_vs
四、基本组件安装
1. 安装 Containerd
(1)安装 Docker
[root@k8s-master ~]# yum remove -y podman runc
containerd # 卸载之前的containerd
[root@k8s-master ~]# yum install docker-ce dockerce-cli containerd.io -y # 安装Docker和containerd
(2)配置 Containerd 所需模块
y # ⽤于⽀持Overlay⽹络⽂件系统的模块,它可以
在现有的⽂件系统之上创建叠加层,以实现虚拟化、隔离和管理等功
能。
> br_netfilter # ⽤于containerd的⽹络过滤模块,它可
以对进出容器的⽹络流量进⾏过滤和管理。
> EOF
overlay
br_netfilter
[root@k8s-master ~]# modprobe -- overlay
[root@k8s-master ~]# modprobe -- br_netfilter
(3)配置 Containerd 所需内核
[root@k8s-master ~]# cat <<EOF | sudo tee
/etc/sysctl.d/99-kubernetes-cri.conf # tee:读取
的数据写⼊到⼀个或多个⽂件中,同时还将其复制到标准输出
> net.bridge.bridge-nf-call-iptables = 1 # ⽤于
控制⽹络桥接是否调⽤iptables进⾏包过滤和转发。
> net.ipv4.ip_forward = 1 # 路由
转发,1为开启
> net.bridge.bridge-nf-call-ip6tables = 1 # 控制
是否在桥接接⼝上调⽤IPv6的iptables进⾏数据包过滤和转发。
> EOF
net.bridge.bridge-nf-call-iptables = 1
net.ipv4.ip_forward = 1
net.bridge.bridge-nf-call-ip6tables = 1
[root@k8s-master ~]# sysctl --system
(4)Containerd 配置⽂件
[root@k8s-master ~]# mkdir -p /etc/containerd
[root@k8s-master ~]# containerd config default |
tee /etc/containerd/config.toml # 读取containerd
的配置并保存到/etc/containerd/config.toml
[root@k8s-master ~]# vim
/etc/containerd/config.toml
# 找到containerd.runtimes.runc.options模块,添加
SystemdCgroup = true,如果已经存在则直接修改[plugins."io.containerd.grpc.v1.cri".containerd.ru
ntimes.runc.options]BinaryName = ""CriuImagePath = ""CriuPath = ""CriuWorkPath = ""IoGid = 0IoUid = 0NoNewKeyring = falseNoPivotRoot = falseRoot = ""ShimCgroup = ""SystemdCgroup = false # 没有就添加,有
的话就修改
# 找到sandbox_image修改为如下参数sandbox_image = "registry.cnhangzhou.aliyuncs.com/google_containers/pause:3.9"
[root@k8s-master ~]# systemctl daemon-reload #
加载systemctl控制脚本
[root@k8s-master ~]# systemctl enable --now
containerd # 启动containerd并设置开机启动
Created symlink /etc/systemd/system/multiuser.target.wants/containerd.service "
/usr/lib/systemd/system/containerd.service.
(5)配置 crictl 客户端连接的运⾏位置
[root@k8s-master ~]# cat > /etc/crictl.yaml <<EOF
# 配置容器运⾏环境的crictl.yml⽂件
> runtime-endpoint:
unix:///run/containerd/containerd.sock # 指定了容
器运⾏时的地址为:unix://...
> image-endpoint:
unix:///run/containerd/containerd.sock # 指定
了镜像运⾏时的地址为:unix://...
> timeout: 10 # 设置了超时时间为10秒
> debug: false # 关闭调试模式
> EOF
2. 安装 Kubernetes 组件
安装 Kubeadm、Kubelet 和 Kubect
[root@k8s-master ~]# yum list kubeadm.x86_64 --
showduplicates | sort -r
# 查询最新的Kubernetes版本号
[root@k8s-master ~]# yum install kubeadm-1.28*
kubelet-1.28* kubectl-1.28* -y
# 安装1.28最新版本kubeadm、kubelet和kubectl
[root@k8s-master ~]# systemctl daemon-reload
[root@k8s-master ~]# systemctl enable --now
kubelet # 允许开机⾃启kubelet
Created symlink /etc/systemd/system/multiuser.target.wants/kubelet.service "
/usr/lib/systemd/system/kubelet.service.
[root@k8s-master ~]# kubeadm version # 查看当前安
装的kubeadm版本号
kubeadm version: &version.Info{Major:"1",
Minor:"28", GitVersion:"v1.28.2",
GitCommit:"89a4ea3e1e4ddd7f7572286090359983e0387b2
f", GitTreeState:"clean", BuildDate:"2023-09-
13T09:34:32Z", GoVersion:"go1.20.8",
Compiler:"gc", Platform:"linux/amd64"}
3. Kubernetes 集群初始化
(1)Kubeadm 配置⽂件
[root@k8s-master ~]# vim kubeadm-config.yaml #
修改kubeadm配置⽂件
apiVersion: kubeadm.k8s.io/v1beta3 # 指定
Kubernetes配置⽂件的版本,使⽤的是kubeadm API的v1beta3
版本
bootstrapTokens: # 定义bootstrap tokens的信息。这
些tokens⽤于在Kubernetes集群初始化过程中进⾏身份验证
- groups: # 定义了与此token关联的组
- system:bootstrappers:kubeadm:default-nodetokentoken: 7t2weq.bjbawausm0jaxury # bootstrap
token的值ttl: 24h0m0s # token的⽣存时间,这⾥设置为24⼩时usages: # 定义token的⽤途
- signing # 数字签名
- authentication # 身份验证
kind: InitConfiguration # 指定配置对象的类型,
InitConfiguration:表示这是⼀个初始化配置
localAPIEndpoint: # 定义本地API端点的地址和端⼝advertiseAddress: 192.168.15.11bindPort: 6443
nodeRegistration: # 定义节点注册时的配置criSocket:
unix:///var/run/containerd/containerd.sock # 容器
运⾏时(CRI)的套接字路径name: k8s-master # 节点的名称taints: # 标记
- effect: NoSchedule # 免调度节点key: node-role.kubernetes.io/control-plane
# 该节点为控制节点
---
apiServer: # 定义了API服务器的配置certSANs: # 为API服务器指定了附加的证书主体名称
(SAN),指定IP即可
- 192.168.15.11timeoutForControlPlane: 4m0s # 控制平⾯的超时时
间,这⾥设置为4分钟
apiVersion: kubeadm.k8s.io/v1beta3 # 指定API
Server版本
certificatesDir: /etc/kubernetes/pki # 指定了证书的
存储⽬录
clusterName: kubernetes # 定义了集群的名称
为"kubernetes"
controlPlaneEndpoint: 192.168.15.11:6443 # 定义
了控制节点的地址和端⼝
controllerManager: {} # 控制器管理器的配置,为空表示
使⽤默认配置
etcd: # 定义了etcd的配置local: # 本地etcd实例dataDir: /var/lib/etcd # 数据⽬录
imageRepository: registry.cnhangzhou.aliyuncs.com/google_containers # 指定了
Kubernetes使⽤的镜像仓库的地址,阿⾥云的镜像仓库。
kind: ClusterConfiguration # 指定了配置对象的类型,
ClusterConfiguration:表示这是⼀个集群配置
kubernetesVersion: v1.28.2 # 指定了kubernetes的版
本
networking: # 定义了kubernetes集群⽹络设置dnsDomain: cluster.local # 定义了集群的DNS域为:
cluster.localpodSubnet: 172.16.0.0/16 # 定义了Pod的⼦⽹serviceSubnet: 10.96.0.0/16 # 定义了服务的⼦⽹
scheduler: {} # 使⽤默认的调度器⾏为
[root@k8s-master ~]# kubeadm config migrate --oldconfig kubeadm-config.yaml --new-config new.yaml
# 将旧的kubeadm配置⽂件转换为新的格式
(2)下载组件镜像
[root@k8s-master ~]# kubeadm config images pull --
config /root/new.yaml # 通过新的配置⽂件new.yaml从指
定的阿⾥云仓库拉取kubernetes组件镜像
[config/images] Pulled registry.cnhangzhou.aliyuncs.com/google_containers/kubeapiserver:v1.28.2
[config/images] Pulled registry.cnhangzhou.aliyuncs.com/google_containers/kubecontroller-manager:v1.28.2
[config/images] Pulled registry.cnhangzhou.aliyuncs.com/google_containers/kubescheduler:v1.28.2
[config/images] Pulled registry.cnhangzhou.aliyuncs.com/google_containers/kubeproxy:v1.28.2
[config/images] Pulled registry.cnhangzhou.aliyuncs.com/google_containers/pause:3.9
[config/images] Pulled registry.cnhangzhou.aliyuncs.com/google_containers/etcd:3.5.9
-0
[config/images] Pulled registry.cnhangzhou.aliyuncs.com/google_containers/coredns:v1
.10.1
(3)集群初始化
[root@k8s-master ~]# kubeadm init --config
/root/new.yaml --upload-certs
You can now join any number of the control-plane
node running the following command on each as
root:kubeadm join 192.168.15.11:6443 --token
7t2weq.bjbawausm0jaxury \--discovery-token-ca-cert-hash
sha256:73dc6f8d973fc70818e309386c1bfc5d330c19d52b4
94c6f88f634a6b1250a2f \--control-plane --certificate-key
80fcc505867ccbc6550c18ed11f40e64ecf486d626403823f5
48dda65c19953d
# 等待初始化后保存这些命令
[root@k8s-master ~]# vim token.txt
kubeadm join 192.168.15.11:6443 --token
7t2weq.bjbawausm0jaxury \
--discovery-token-ca-cert-hash
sha256:73dc6f8d973fc70818e309386c1bfc5d330c19d52b4
94c6f88f634a6b1250a2f \ # 当需要加⼊新node节点时,
只复制到这即可
--control-plane --certificate-key
80fcc505867ccbc6550c18ed11f40e64ecf486d626403823f5
48dda65c19953d # 当需要⾼可⽤master集群时,将整个
token复制下来
(4)加载环境变量
[root@k8s-master ~]# cat <<EOF >> /root/.bashrc
> export KUBECONFIG=/etc/kubernetes/admin.conf
> EOF
[root@k8s-master ~]# source /root/.bashrc
(5)查看组件容器状态
之前采⽤初始化安装⽅式,所有的系统组件均以容器的⽅式运⾏ 并且在 kube-system 命名空间内,此时可以查看 Pod(容组)状态
[root@k8s-master ~]# kubectl get po -n kube-system
NAME READY
STATUS RESTARTS AGE
coredns-6554b8b87f-77brw 0/1
Pending 0 6m1s
coredns-6554b8b87f-8hwr4 0/1
Pending 0 6m1s
etcd-k8s-master 1/1
Running 0 6m16s
kube-apiserver-k8s-master 1/1
Running 0 6m16s
kube-controller-manager-k8s-master 1/1
Running 0 6m16s
kube-proxy-j778p 1/1
Running 0 6m2s
kube-scheduler-k8s-master 1/1
Running 0 6m16s
# kubectl:k8s控制命令
# get:获取参数
# po:pod缩写
# -n:指定命名空间
# kube-system:命名空间
(6)初始化失败排查
Ⅰ. 初始化重置
如果初始化失败,重置后再次初始化,命令如下(没有失败不要执⾏!!!)
kubeadm reset -f ; ipvsadm --clear ; rm -rf
~/.kube
Ⅱ. 多次初始化失败
⾸先排查系统⽇志
CentOS⽇志路径:/var/log/messages
Ubuntu⽇志路径:/var/log/syslog
通过⽇志找到错误原因
最后再检查之前所有的配置⽂件是否有编写错误,有的配置⽂件在修改后需要重新载⼊,可以根据刚才的步骤进⾏修改及载⼊,最终确认⽆误后输⼊重置命令,再进⾏初始化。
经常出错的原因:
Containerd 的配置⽂件修改的不对,⾃⾏参考《安装containerd》⼩节核对。
new.yaml 配置问题,⽐如⾮⾼可⽤集群忘记修改 6443 端⼝为 6443。
new.yaml 配置问题,三个⽹段有交叉,出现 IP 地址冲突。
VIP 不通导致⽆法初始化成功,此时 messages ⽇志会有VIP 超时的报错。
Ⅲ.连接 API 服务器超时
当获取集群状态出现以下信息时:
tail -f /var/log/messages | grep -v "not found"
[root@master ~]# kubectl get po
E1221 14:39:38.091729 2782 memcache.go:265]
couldn't get current server API group list: Get
"https://192.168.15.11:6443/api?timeout=32s": dial
tcp 192.168.15.11:6443: connect: connection
refused
E1221 14:39:38.092239 2782 memcache.go:265]
couldn't get current server API group list: Get
"https://192.168.15.11:6443/api?timeout=32s": dial
tcp 192.168.15.11:6443: connect: connection
refused
E1221 14:39:38.094041 2782 memcache.go:265]
couldn't get current server API group list: Get
"https://192.168.15.11:6443/api?timeout=32s": dial
tcp 192.168.15.11:6443: connect: connection
refused
E1221 14:39:38.095440 2782 memcache.go:265]
couldn't get current server API group list: Get
"https://192.168.15.11:6443/api?timeout=32s": dial
tcp 192.168.15.11:6443: connect: connection
refused
E1221 14:39:38.097007 2782 memcache.go:265]
couldn't get current server API group list: Get
"https://192.168.15.11:6443/api?timeout=32s": dial
tcp 192.168.15.11:6443: connect: connection
refused
The connection to the server 192.168.15.11:6443
was refused - did you specify the right host or
port?
此时可以修改系统环境变量
临时修改:
export KUBECONFIG=/etc/kubernetes/admin.conf
⻓期修改:
mkdir ~/.kube
cp /etc/kubernetes/admin.conf ~/.kube/config
如果修改环境变量后也不⾏时,需要重新进⾏初始化(依次执⾏下
⾯两条命令)
kubeadm reset -f ; ipvsadm --clear ; rm -rf
~/.kube
kubeadm init --config /root/new.yaml --upload
certs