Vue基础
Vue基本概念
Vue是什么
Vue是一个渐进式的JavaScript框架,它基于标准 HTML、CSS 和 JavaScript 构建,并提供了一套声明式的、组件化的编程模型,帮助你高效地开发用户界面。
- 渐进式:各个特性可以根据项目需要逐渐引入和应用,如Vue Router、Vuex
- 框架:高度封装,拥有自己的规则和元素
- 声明式:Vue基于标准HTML拓展了一套模板语法,使得我们可以声明式地描述最终输出的HTML和JavaScript状态之间的关系
- 组件化:将应用划分为多个独立、可复用的模块
- 响应性:Vue 会自动跟踪JavaScript状态并在其发生变化时响应式地更新DOM
@vue/cli脚手架
@vue/cli脚手架是什么
@vue/cli是Vue官方提供的一个全局模块包,用于创建脚手架项目,它是一个自动化构建项目的工具,帮助开发者快速搭建Vue.js项目的开发环境,其具有开箱即用、无需配置webpack(如babel支持、css和less支持、开发服务器支持)等有点
@vue/cli生成的文件夹目录结构及其作用
-
node_modules:项目依赖的三方包
-
public:静态资源文件
- favicon.io:浏览器小图标
- index.html:单页面的HTML文件
-
src:业务文件夹
- assets:静态资源
- components:组件目录
- App.vue:应用根组件
- main.js:入口js文件
-
.gitignore:git提交忽略配置
-
babel.config.js:babel配置
-
package.js:项目依赖包列表
-
vue.config.js:webpack配置
-
yarn.lock:项目包版本锁定和缓存地址
index.html、main.js 、App.vue的引用关系
引用关系:index.html => main.js => App.vue
Vue指令基础
插值表达式
插值表达式 {{表达式}},也叫声明式渲染、文本插值。变量写在data里,写在data的变量会被vue自动绑定this到当前组件
bind绑定
基础语法
bind绑定可以给标签绑定属性,其写法为:v-bind:属性名="vue变量名",简写为::属性名="变量名"
动态class
语法::class="{ 类名: 布尔变量 }
<template><div :class="{ redStr: bool }">动态class,值为true时可以作为类名生效{{ bool }}</div>
</template><script>
export default {data() {return {bool: false,}},
}
</script><style scoped>
.redStr {color: red;
}
</style>
动态style
语法::style="css属性名:值"
<template><div :style="{ color: colorStr }">动态style,对style的值进行赋值</div>
</template><script>
export default {data() {return {colorStr: 'red',}},
}
</script>
v-on事件绑定
vue通过v-on给标签绑定事件,其写法为v-on:事件名="短代码/函数",简写为:@事件名=短代码/函数,绑定的函数写在methods里或使用箭头函数
获取事件对象
- 无实参:直接在事件处理函数中通过形参接收
- 有实参:通过
$event实参指代事件对象传给事件处理函数
<template><div><!-- 阻止默认事件-无实参 --><a:href="url"@click="vuePreventDefault">baidu</a><br /><!-- 阻止默认事件-有实参 --><a:href="url"@click="vuePreventDefault2(1, $event)">baidu2</a></div>
</template><script>
export default {data() {return {url: 'https:\\www.baidu.com',}},methods: {// 阻止默认事件-无实参vuePreventDefault(e) {e.preventDefault()},// 阻止默认事件-有实参vuePreventDefault2(num, e) {console.log(num)e.preventDefault()},},
}
</script>
v-on修饰符
给事件添加常用的功能,语法:@事件名.修饰符=函数名,常用修饰符有:
.stop阻止冒泡.prevent阻止默认行为.once程序运行期间只触发一次事件处理函数- 按键修饰符:
@keyup.enter监测回车键@keyup.esc监测返回键- 更多修饰符参考开发文档events介绍
<template><!-- 事件修饰符 --><a:href="url"@click.prevent="vuePreventTest">baidu</a>
</template><script>
export default {data() {return {url: 'https:\\www.baidu.com',}},methods: {vuePreventTest() {console.log('超链接跳转失效了')},},
}
</script>
v-model双向绑定
通过v-model可以实现数据变量与表单数据的双向绑定,其内部实现也是通过v-bind数据绑定和v-on事件绑定实现的,相对于一个语法糖
<template><inputtype="text"v-model="vueModel"@change="print"/>
</template><script>
export default {data() {return {vueModel: '哈哈哈',}},methods: {print() {console.log(this.vueModel)},},
}
</script>
复选框的情况
遇到复选款,若v-model的值为非数组类型,则关联的是复选框的checked属性,为数组时关联的才是value值。
<template><div><inputtype="checkbox"v-model="hobby"value="吃饭"/>吃饭<inputtype="checkbox"v-model="hobby"value="睡觉"/>睡觉<inputtype="checkbox"v-model="hobby"value="打豆豆"/>打豆豆</div>
</template><script>
export default {data() {return {hobby: [], //必须是数组,否则关联的是选中状态true/false}},
}
</script>
v-model修饰符
给v-model添加常用功能,如类型转换、去除空白等
.number以parseFloat转换成数字类型.trim去除收费空白字符.lazy在change时(失去焦点)触发而非input时触发
v-text和v-html
通过变量控制innerText和innerHtml
<template><div><!-- 按innerText --><p v-text="str"></p><!-- 按innerHtml --><p v-html="str"></p></div>
</template><script>
export default {data() {return {str: '<span>我是一个span标签<span/>',}},
}
</script>
v-if和v-show
通过变量控制标签的显示和隐藏,区别:v-show采用display:none的方式控制隐藏和显示,适合频繁切换,而v-if直接将元素从DOM树添加和移除的方式控制显示和隐藏,在频繁切换时效率低下。v-if可以搭配v-else-if和v-else使用
<template><div><!-- v-show --><div v-show="age >= 18">Enter</div><!-- v-if --><div v-if="age >= 60">Ban</div><div v-else-if="age >= 18">Enter</div><div v-else>Ban</div></div>
</template><script>
export default {data() {return {age: 25,}},
}
</script>
v-for
基本用法
v-for可以实现列表渲染,所在标签结构会按照数据数量循环生成,语法为v-for="(值变量,索引变量) in 目录结构" :key="唯一值"
<template><div><!-- v-for列表渲染 --><ul><liv-for="(item, index) in arr":key="item">{{ `item:${item}; index${index}` }}</li></ul></div>
</template><script>
export default {data() {return {arr: [1, 2, 3, 4, 5, 6, 7],}},
}
</script>
数组更新检测
数组便跟方法改变数组,导致v-for更新,页面刷新,非数组便跟方法返回新数组,可以使用覆盖数组或this.$set()更新
<template><div><!-- v-for列表渲染 --><ul><liv-for="(item, index) in arr":key="item">{{ `item:${item}; index${index}` }}</li></ul><button @click="arr.push(1)">push</button></div>
</template><script>
export default {data() {return {arr: [1, 2, 3, 4, 5, 6, 7],}},
}
</script>
v-for就地更新
虚拟DOM本质上时JS和DOM之间的应该映射,在形态上表现为应该能够描述DOM结构及其属性信息的JS对象,帮助我们在更爽更高效的研发模式下保证还有良好的性能。
当数据发生改变后,会先在内存中创建新的虚拟DOM,并与旧的虚拟DOM按一定规则进行比较,然后决定是否复用真实DOM。
传统算法对树形结构的比较通过递归对树节点进行一一对比,时间复杂度为O(n³),效率过于低下,而diff算法时间复杂度为O(n),其关键是:
- 分层对比:因为DOM 节点之间的跨层级操作并不多,同层级操作才是主流,Diff 过程直接放弃了跨层级的节点比较,它只针对相同层级的节点作对比,只需要从上到下的一次遍历,就可以完成对整棵树的对比,以此降低复杂度量级。
- 类型一致的节点才有进行Diff的必要性,只有同类型的组件,才有进一步对比的必要性
- 通过key属性的设置尽可能复用同一层级内的节点,通过识别key可能知道只是顺序发生了变化,就可以只进行插入或删除操作,大量降低成本
<template><div><!-- v-for列表渲染 --><ul><liv-for="item in arr":key="item">{{ `item:${item}` }}</li></ul><!-- 更新 --><button @click="arr.splice(2, 0, arr.length + 1)">insert</button></div>
</template><script>
export default {data() {return {arr: [1, 2, 3, 4, 5, 6, 7],}},
}
</script>
这里可以看到控制台中只有插入的元素闪动了,即只更新了插入部分
过滤器filter
过滤器是用来格式化数据的,其就是一个函数,传入值后返回处理过的值,只能用在插值表达式和v-bind动态属性里
全局过滤器
定义过滤器
// main.js
import Vue from 'vue'
import App from './App.vue'Vue.config.productionTip = false// 定义全局过滤器
Vue.filter('reverse', val => val.split('').reverse().join(''))new Vue({render: h => h(App),
}).$mount('#app')
使用过滤器
<!-- xx.vue -->
<template><div><div>{{ '过滤器的使用' + msg }}</div><!-- 使用翻转过滤器 --><div>{{ msg | reverse }}</div></div>
</template><script>
export default {data() {return {msg: 'Hello World',}},
}
</script>
局部过滤器
<!-- xx.vue -->
<template><div><div>{{ '过滤器的使用' + msg }}</div><!-- 使用翻转过滤器 --><div>{{ msg | reverseLocal }}</div></div>
</template><script>
export default {data() {return {msg: 'Hello World',}},// 定义局部过滤器filters: {reverseLocal: val => val.split('').reverse().join(''),},
}
</script>
过滤器可以同时使用多个,增加|隔开即可,也可传递参数,使用方法同函数
<!-- xx.vue -->
<template><div><div>{{ '过滤器的使用' + msg }}</div><!-- 使用多个过滤器,并带有参数 --><div>{{ msg | toUp | reverseLocal('|') }}</div></div>
</template><script>
export default {data() {return {msg: 'Hello World',}},// 定义多个过滤器,并带有参数filters: {reverseLocal: (val, s) => val.split('').reverse().join(s),toUp: val => val.toUpperCase(),},
}
</script>
计算属性computed
基本用法
一个变量的值依赖另外一些变量计算而来就是计算属性,计算属性函数内的变量改变,会重新返回新的计算结果并渲染页面
<!-- xx.vue -->
<template><div><div>{{ '计算属性a+b:' + a + '+' + b }}</div><!-- 使用计算属性 -->{{ addAB }}</div>
</template><script>
export default {data() {return {a: 1,b: 2,}},// 定义计算属性computed: {addAB() {return this.a + this.b},},
}
</script>
特性
计算属性带有缓存机制,计算数学定义函数执行后会把return值缓存起来,依赖项不点,多次调用也是从缓存中取值,当依赖项改变时才会自动重新执行并返回新的值
完整写法
在将计算属性直接通过v-model关联到input输入后发现,会报错,原因是无法直接通过v-model双向绑定修改计算属性的值,这个时候时需要用到setter的完整写法
<script>
export default {computed: {computedName: {set(val) {// 设置值时触发的代码},get() {// 获取值时触发的代码},},},
}
</script>
侦听器watch
基本语法
侦听器可以侦听data/computed属性值的改变
<script>
export default {data() {return {// 被侦听的变量name: '',}},// 侦听器watch: {name(oldValue, newValue) {console.log(newValue, oldValue)},},
}
</script>
完整写法
基本语法通过函数实现,但无法对复杂类型进行侦听,也无法设置执行时机,这个时候就要用到完整写法
<!-- xx.vue -->
<template><div>姓:<inputtype="text"v-model="name.lastName"/>名:<inputtype="text"v-model="name.firstName"/></div>
</template><script>
export default {data() {return {// 被侦听的变量name: {lastName: '',firstName: '',},}},// 侦听器watch: {name: {immediate: true, // 页面一打开就执行一次侦听deep: true, // 深度侦听handler(newValue, oldValue) {console.log(newValue)console.log(oldValue)},},},
}
</script>
Vue组件
组件是可复用的Vue实例,封装了标签、样式和JS代码,把页面上可复用的部分封装为组件,可以便捷的开发和维护项目。组件使用如下:
- 创建组件
xxx.vue,封装标签、样式、js代码 - 注册组件:
- 全局注册:在
main.js中Vue.component('组件名', 组件对象) - 局部注册:在某
xx.vue文件中,export default{components: {"组件名": 组件对象 }}
- 全局注册:在
- 引入并使用组件
组件样式scoped作用及其原理
scoped可以让CSS样式只在当前组件生效,其作用原理是为组件添加机的哈希值data-v-hash值属性,在获取标签时也会添加[data-v-hash]的属性选择器,从而保证CSS类名只针对当前的组件生效
组件之间的通信
父传子——props
子组件内定义props接收数据,父组件传递props到子组件实现
儿子:
<!-- MyProduct.vue -->
<template><div class="my-product"><!-- 使用变量 --><h3>标题: {{ title }}</h3><p>价格: {{ price }}元</p><p>{{ intro }}</p></div>
</template><script>
export default {// 定义变量准备接收props: ['title', 'price', 'intro'],
}
</script>
父亲:
<!-- app.vue -->
<template><div id="app"><!-- 3.使用子组件 --><Productv-for="(product, index) in productList":key="product.id":title="product.name":price="product.price":intro="product.intro":index="index"/></div>
</template><script>
// 1.引入子组件
import Product from './components/MyProduct'export default {data() {return {productList: [{id: 1,name: '钵钵鸡',price: 1,intro: '一元一串的钵钵鸡',},{id: 2,name: '肯德基',price: 50,intro: 'Crazy星期四,V我50',},{id: 3,name: '椰子鸡',price: 100,intro: '深圳特产海南椰子鸡',},],}},components: {// 2.注册子组件Product,},
}
</script>
**单向数据流:**指的是数据从父组件流向子组件的过程,这种单向数据流能保证数据易于追踪、减少组件之间的耦合度、提高性能。父传子的props是只读的,不允许修改的。(注意Vue可以不是单向数据流,如eventBus,兄弟之间通信通过中介实现,所以Vue中的单向数据流特指的是直接的通信)
子传父$emit
父组件定义自定义事件,子组件提高$emit主动触发事件实现
父亲:
<!-- app.vue -->
<template><div id="app"><!-- 父组件中给子组件绑定自定义事件——砍价函数 --><Productv-for="(product, index) in productList":key="product.id":title="product.name":price="product.price":intro="product.intro":index="index"@subPrice="subPrice"/></div>
</template><script>
import Product from './components/MyProduct_sub'export default {data() {return {productList: [{id: 1,name: '钵钵鸡',price: 1,intro: '一元一串的钵钵鸡',},{id: 2,name: '肯德基',price: 50,intro: 'Crazy星期四,V我50',},{id: 3,name: '椰子鸡',price: 100,intro: '深圳特产海南椰子鸡',},],}},methods: {// 定义砍价函数subPrice(index) {this.productList[index].price *= 0.9},},components: {Product,},
}
</script>
儿子:
<!-- MyProduct.vue -->
<template><div class="my-product"><h3>标题: {{ title }}</h3><p>价格: {{ price }}元</p><p>{{ intro }}</p><!-- 子组件触发父组件绑定的自定义事件,父组件绑定的函数执行 --><button @click="subFn">PDD大宝刀,一刀999</button></div>
</template><script>
export default {props: ['index', 'title', 'price', 'intro'],methods: {subFn() {this.$emit('subPrice', this.index)},},
}
</script>
跨组件通信eventBus
父组件管理数据
兄弟组件之间的通信实际上通过上面的学习已经可以实现了,其实很简单,把全部数据都丢给父组件管理,通过父子之间的通信转化为兄弟之间的通信,但是这种方法依赖于父组件的介入,可能会使得组件之间的耦合度增加。、
evebntBus
当需要在两个兄弟组件之间进行通信时,可以创建一个eventBus实例,并在两个组件中都通过$on来监听事件,通过$emit来触发事件。这样,当一个组件触发事件时,另一个组件就可以接收到这个事件并进行相应的处理。
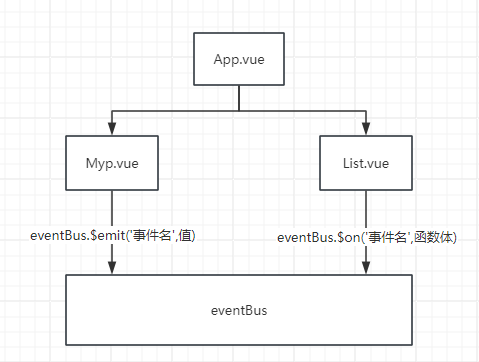
首先:先要创建一个空白的Vue对象并导出:src/EventBus/index.js
import Vue from 'vue'
export default new Vue()
接收方要引入空白Vue对象eventBus并通过$on监听事件
<!-- List.vue -->
<template><ul class="my-product"><liv-for="(item, index) in arr":key="index"><span>{{ item.name }}</span><span>{{ item.price }}</span></li></ul>
</template><script>
// 引入eventBus
import eventBus from '../eventBus'export default {props: ['arr'],// 组件创建完毕时,监听send事件created() {eventBus.$on('send', index => {this.arr[index].price *=0.5})}
}
</script>
发送方也要引入eventBus,然后通过eventBus触发事件
<!-- MyProduct.vue -->
<template><div class="my-product"><h3>标题: {{ title }}</h3><p>价格: {{ price }}元</p><p>{{ intro }}</p><button @click="subFn2">PDD大宝刀,一刀打骨折</button></div>
</template><script>
// 引入eventBus
import eventBus from '../eventBus'export default {props: ['index', 'title', 'price', 'intro'],methods: {subFn() {this.$emit('subPrice', this.index)},subFn2() {eventBus.$emit('send', this.index)}},
}
</script>
Vue组件的生命周期
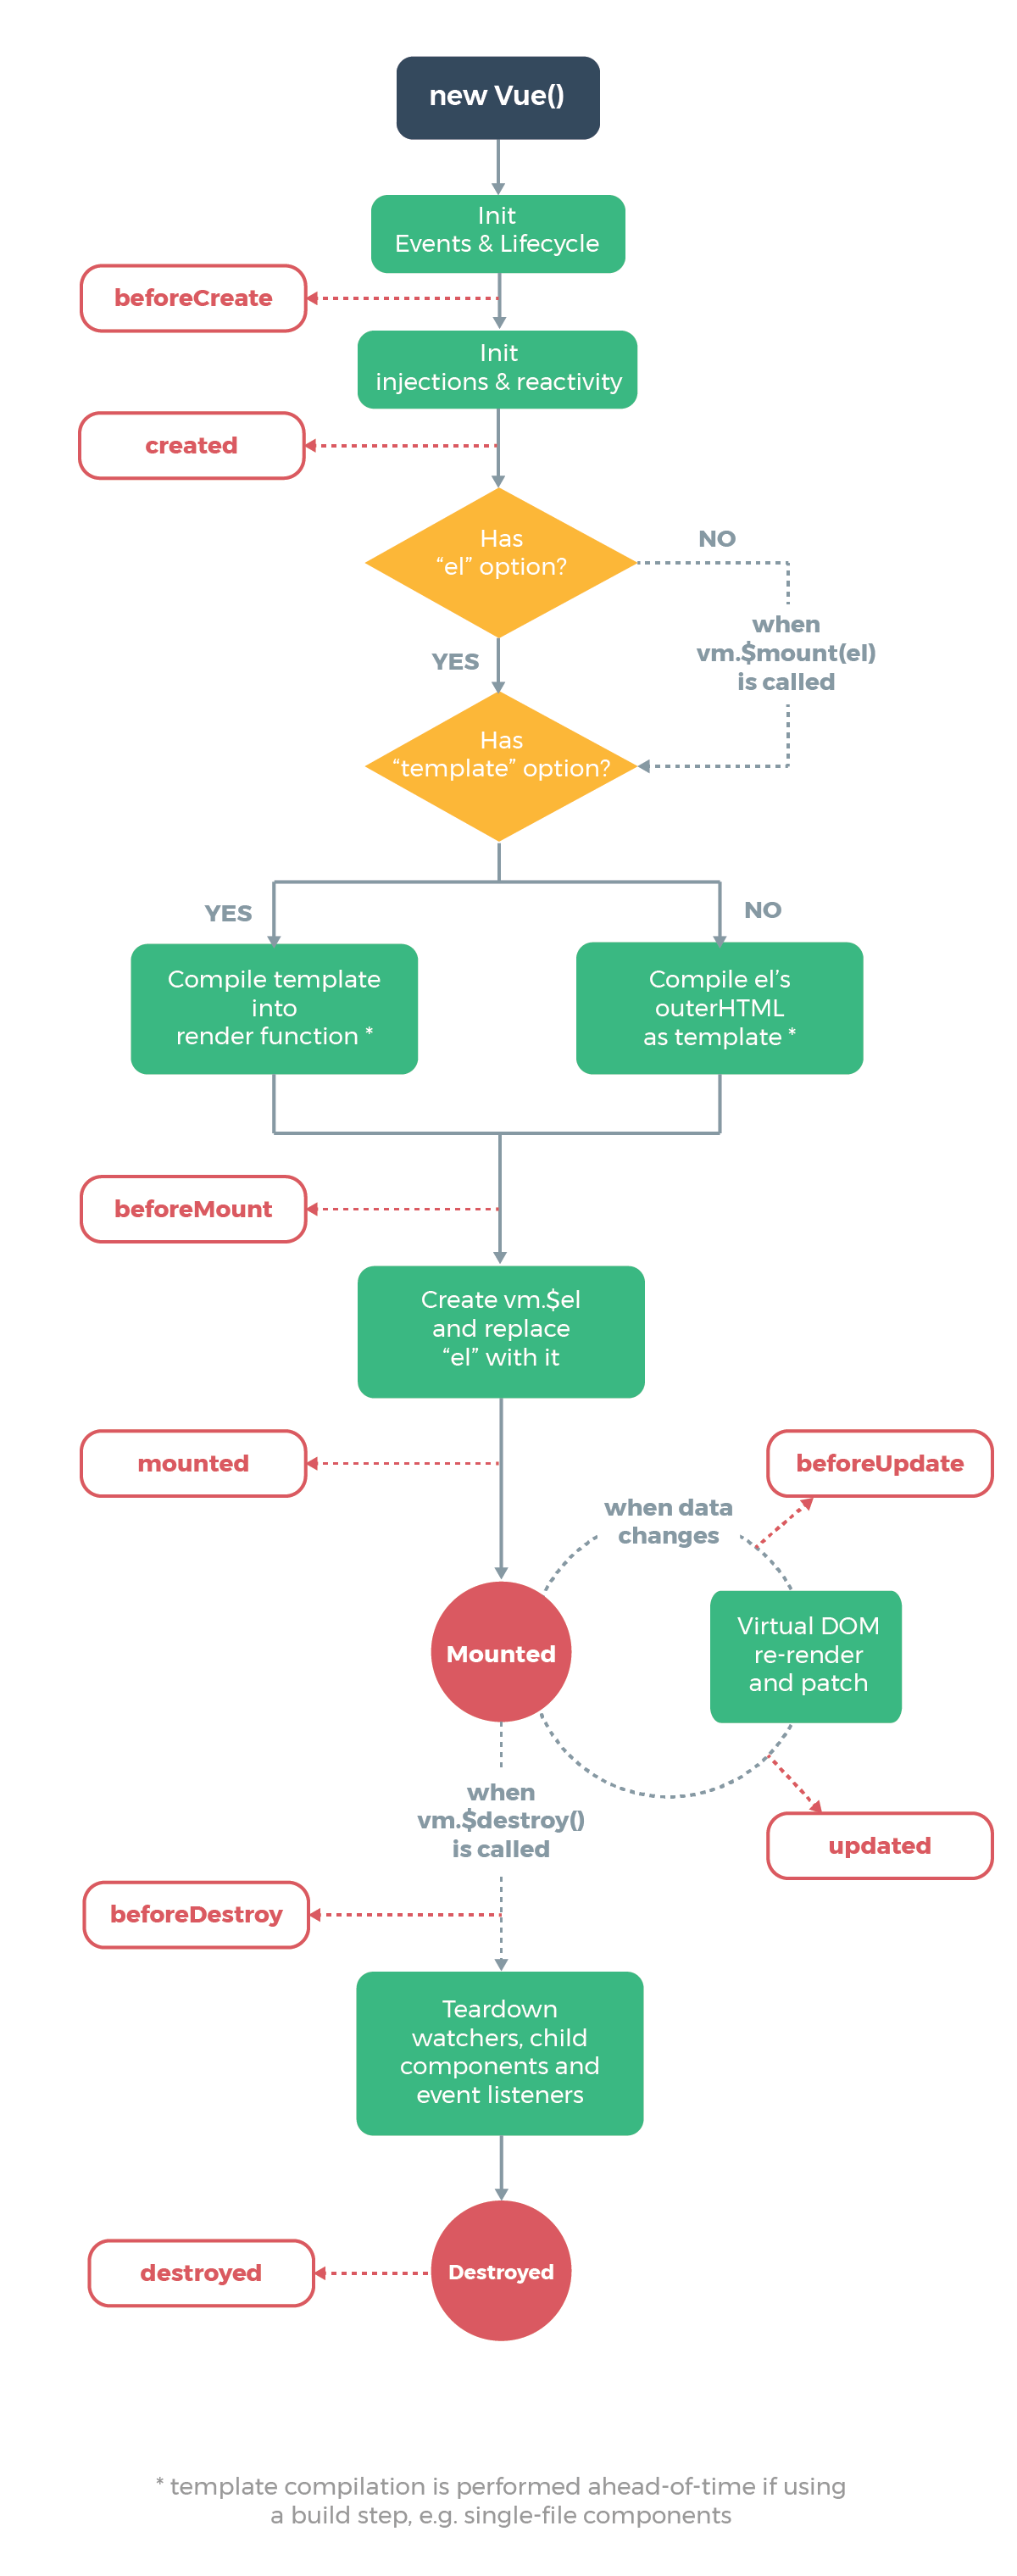
Vue的生命周期指的是Vue组件从创建到销毁的过程,Vue框架内置了钩子函数,随着组件生命周期阶段自动执行。Vue中生命周期共4个阶段,8个方法
| 生命周期 | 钩子函数 | 钩子函数 |
|---|---|---|
| 初始化 | beforeCreate | created |
| 挂载 | beforeMount | mounted |
| 更新 | beforeUpdate | updated |
| 销毁 | beforeDestory | destoryed |
生命周期如下图:
初始化阶段
- new Vue():Vue组件实例化
- Init Events & Lifecycle:初始化事件和生命周期函数
- beforeCreate:生命周期钩子函数被执行,此时是访问不到data和method的
- Init injections & reactivity:Vue内部添加data和methods等
- created:生命周期钩子函数被执行,实例创建
挂载阶段
- 编译模板阶段:开始分析Has "el"option:检查是否有el选项(如
#App):- 没有:调用$mount方法
- 有:继续检查有无template选项
- 有:编译template返回render函数
- 无:找到并编译
el选项对应的标签作为要渲染的模板template
- beforeMount:生命周期钩子函数被执行,此时虚拟DOM还没有被挂载成为真实DOM
- Create vm.$el and replace “el” with it:把虚拟DOM挂载成为真实的DOM
- mounted:生命周期钩子函数被执行,真实DOM挂载完毕,此时可以访问到真实DOM
更新阶段
- 修改数据进入更新阶段
- beforeUpdate:生命周期钩子函数被执行,此时DOM还没被更新(这里不能访问DOM,因为Vue的响应式是异步的,可能还是取到更新后的DOM)
- Virtual DOM re-render and patch:虚拟DOM重新渲染,对真实DOM进行打补丁
- updated:生命周期钩子函数被执行,此时虚拟DOM已更新
销毁阶段
此时要移除一些组件占用的全局资源,如定时器、计时器、全局事件等
- vm.$destory()被调用,比如组件被移除(view-if)
- beforeDestroy:生命周期钩子函数被执行
- 拆卸数据监视器、子组件、事件侦听器
- destroyed:生命周期钩子函数被执行
ref 和nextTick
ref
通过ref获取元素:
<template><!-- 设置ref --><divid="h"ref="myRef">ref</div>
</template><script>
export default {mounted() {// 获取DOM的两种方法console.log(document.getElementById('h'))console.log(this.$refs.ref)},// 后面通过ref获取组件可以methods: {sonFn() {console.log('son的方法执行了')},},
}
</script>
通过ref获取组件:
<template><div id="app">// 给组件添加ref<Ref ref="myComRef" /></div>
</template><script>
import Ref from './components/Ref.vue'
export default {components: {Ref,},mounted() {// 获取组件console.log(this.$refs.myComRef)// 获取的组件可以调用组件内的方法了this.$refs.myComRef.sonFn()},
}
</script>
$nextTick
DOM更新后挨个触发$nextTick中的函数体执行,而直接调用this.$nextTrick()返回的是一个Promise对象
<template><div id="app"><button@click="btnFn"ref="btnRef">{{ count }}</button></div>
</template><script>
export default {data() {return {count: 0,}},methods: {btnFn() {this.count++console.log(this.$refs.btnRef.innerHTML) // 这里点击按钮还是0this.$nextTick(() => {console.log(this.$refs.btnRef.innerHTML) // 这里可以拿到数字1了})},},
}
</script>
动态组件和组件缓存
<component :is="componentName">和<keep-alive>
component+is可以实现组件的动态切换,会根据is后面的字符串匹配组件名展示组件,配合keep-alive标签包裹的组件可以缓存到内存中,不会被立即销毁,实现动态组件切换
<template><div id="app"><div>动态组件</div><!-- keep-alive标签包裹实现组件缓存 --> <keep-alive><!-- component+is 实现动态组件 --> <component :is="comName"></component></keep-alive><button @click="comName = 'Life'">切换组件Life</button><button @click="comName = 'Ref'">切换组件Ref</button></div>
</template><script>
import Life from './components/Life.vue'
import Ref from './components/Ref.vue'
export default {data() {return {comName: 'Life',}},components: {Life,Ref,},
}
</script>
activated和deactivated钩子函数
activated在组件激活时触发,deactivated在组件失去激活状态时触发,注意组件的created和mounted钩子函数只会执行一次,而当组件再次被激活时,会触发activated钩子函数,而不是再次执行created或mounted。
<script>
export default {data() {return {msg: 'hello world',arr: [1, 1, 1, 1, 1],}},activated() {console.log('被激活了')},deactivated() {console.log('失活了')},
}
</script>
组件插槽
基本语法
通过slot标签,让组件内可以接受不同的标签结构显示,组件插入什么标签就显示什么标签
<template><div id="container"><div id="app"><h3>案例:折叠面板</h3><!-- 组件插入内容 --> <PannelSlot><p>寒雨连江夜入吴,</p><p>平明送客楚山孤。</p><p>洛阳亲友如相问,</p><p>一片冰心在玉壶。</p></PannelSlot></div></div>
</template>
<template><div><div class="title"><h4>芙蓉楼送辛渐</h4><spanclass="btn"@click="isShow = !isShow">{{ isShow ? '收起' : '展开' }}</span></div><divclass="container"v-show="isShow"><!-- 插槽 --><slot></slot></div></div>
</template>
设置默认内容
不给slot标签放置内容,slot标签内的内容作为默认内容显示
<!-- 插槽 --><slot><p>寒雨连江夜入吴,</p><p>平明送客楚山孤。</p><p>洛阳亲友如相问,</p><p>一片冰心在玉壶。</p></slot>
具名插槽
一个组件内有多出需要外部传入标签的地方,使用多个插槽时就需要用到具名插槽,通过name区分slot名字,并通过template配合v-slot:name区分插入的地方
<template><div id="container"><div id="app"><h3>案例:折叠面板</h3><!-- 具名插槽 --><PannelSlot><template v-slot:title><h4>芙蓉楼送辛渐</h4></template><template v-slot:content><p>寒雨连江夜入吴,</p><p>平明送客楚山孤。</p><p>洛阳亲友如相问,</p><p>一片冰心在玉壶。</p></template></PannelSlot></div></div>
</template>
<template><div><div class="title"><!-- 具名插槽 --><slot name="title"></slot><spanclass="btn"@click="isShow = !isShow">{{ isShow ? '收起' : '展开' }}</span></div><divclass="container"v-show="isShow"><!-- 具名插槽 --><slot name="content"> </slot></div></div>
</template>
作用域插槽
使用插槽时需要使用到子组件内的变量就要用到作用域插槽。在子组件中的slot标签上绑定属性和子组件内的之,然后再使用组件时传入自定义标签,通过template标签和v-slot="自定义变量名"获取变量.
<template><div><!-- 作用域插槽:下拉内容 --><slotname="scopedSlot":row="defaultObj">{{ defaultObj.one }}</slot></div>
</template><script>
export default {data() {return {isShow: false,defaultObj: {one: '1',two: 2,},}},
}
</script>
<template><div id="container"></PannelSlot><!-- 使用作用域插槽 --><!-- 这里我们任意取名scope,它会绑定slot上所有属性和值 --><template v-slot:scopedSlot="scope"> {{ scope.row.two }}</template></PannelSlot></div>
</template>
自定义指令
自定义指令可以给组件拓展额外功能,如自动获取焦点
全局注册
Vue.directive('gfocus', {inserted(el) { // inserted:标签被插入网页时才触发,还有update// 可以对el标签扩展额外功能el.focus() // 触发标签事件方法}
})
局部注册
<script>
export default {directives: { // 自定义组件focus: {inserted(el) {// 对el进行操作el.focus()}}}
}
</script>
使用自定义指令
<template><input type="text" v-focus>
</template>
自定义指令传值
Vue.directive('color', {inserted(el, bindingColor) { // inserted:标签被插入网页时才触发// 可以对el标签扩展额外功能el.style.color = bindingColor.value // 触发标签事件方法}
})
自定义指令触发方法
inserted:标签被插入网页时才触发
update:自定义指令所在标签刷新时执行
路由Router
基本使用
vue-router基本使用
- 下载vue_router模块到当前工程
- 在main.js中引入VueRouter函数
- 添加到Vue.use()身上:注册全局RouterLink和RouterView组件
- 创建路由规则数组:路径和组件名的对应关系
- 用规则生成路由对象
- 把路由对象注入到new Vue实例中
- 用router-view作为挂载点切换不同路由页面
// main.js
import Vue from 'vue'
import App from './App.vue'
import Find from './views/Find/Find.vue'
import Mine from './views/Mine/Mine.vue'
import Friends from './views/Friends/Friends.vue'// 在main.js中引入VueRouter函数
import VueRouter from 'vue-router'// 2. 注册全局组件
Vue.use(VueRouter)// 3. 定义规则数组
const routes = [{path: '/find',component: Find,},{path: '/mine',component: Mine,},{path: '/friends',component: Friends,},
]
// 4. 生成路由对象
const router = new VueRouter({routes: routes, //routes是固定key,传入规则数组,同名可以简写直接写routes
})Vue.config.productionTip = false// 5. 将路由对象注入到vue实例中,this可以访问$route和$router
new Vue({router,render: h => h(App),
}).$mount('#app')
<!-- App.vue -->
<template><div><a href="#/find">发现音乐</a><br /><a href="#/mine">我的音乐</a><br /><a href="#/friends">我的朋友</a><!-- 6.设置挂载点,当url的hash值路径切换,显示规则里对应的组件到这里 --><router-view></router-view></div>
</template>
声明式导航
router-link基本使用
vue-router提供了一个全局组件router-link来代替a标签,其实质上最终会渲染成a链接,其to属性等价于href,但to使用时无需用到#(自动添加),它还通过自带类名router-link-active、router-link-exact-active提供了声明式导航高亮的功能。router-link-active 会在当前路由匹配到的路由及其子路由上添加,而 router-link-exact-active 仅在当前路由完全匹配时添加
<!-- App.vue -->
<template><div><!-- 这里改成了router-link和to --><router-link to="/find">发现音乐</router-link><br /><router-link to="/mine">我的音乐</router-link><br /><router-link to="/friends">我的朋友</router-link><router-view></router-view></div>
</template>
router-link跳转传参
- 通过
/path?参数名=值,通过$route.query.参数名获取值
<router-link to="/find?name=哈哈">发现音乐</router-link>
<template><div><div>发现音乐</div><div>发现传入值:{{ $route.query.name }}</div></div>
</template>
- 通过路由设置
path/:参数名,再经path/值传递参数,在组件中使用$route.params.参数名接收参数
const routes = [{path: '/friends/:name', // 通过冒号接收具体值component: Friends,},
]
<router-link to="/friends/小vue">我的朋友</router-link>
<div>发现传入值:{{ $route.params.name }}</div>
路由重定向
通过redirect实现路由重定向
const routes = [{path: '/',redirect: '/find',},
]
404
const routes = [// 404一定要在规则数组的最后{path: '*',component: NotFound,},
]
hash路由和history路由切换
hash路由是带#的,如http://localhost:3000/#/friends,切换为history模式为http://localhost:3000/friends,但这在上线时需要服务器端支持,否则寻找到的是文件夹
const router = new VueRouter({routes,mode:"history"
})
编程式导航基本使用
编程式导航即通过js实现路由的跳转,以下path、name二者选一即可。这里vue-router要么安装3.0以下版本,要么再传递两个回调函数,作为成功和失败的回调,否则重复push到同一个路由报错Avoided redundant navigation to current location,因为3.0以上版本返回的是Promise,需要增加两个回调
this.$router.push({// path: '路由路径',name: '路由名' // 使用路由名字在规则数组中需要添加name属性
})
query和params的区别:
query:通过URL的查询字符串传递参数,它会显示在URL中,且不会影响路由的匹配。params:通过name的路由参数传递,它不会显示在URL中,且必须与name的路由规则匹配。
编程式导航传参
this.$router.push({// path: '路由路径',name: '路由名',query: {'参数'},params: { // 使用params只能用name'参数'}
})
二级路由
二级路由通过配置规则数组路由的``children`实现
const routes = [{path: '/find',name: 'find',component: Find,// 配置children  children: [{path: 'second', // 这里不需要/component: Second,},],},
]
<template><div><div>发现音乐</div><!-- 这里还是要加上/find/ --><router-link to="/find/second">链接到Second</router-link><!-- 用来展示组件 --><router-view></router-view></div>
</template>
<script>
export default {}
</script>
路由守卫
路由守卫可以让路由跳转前先触发一个函数,进行守护,主要用于路由权限判断
router.beforeEach((to, from, next) => {// to: Object 要跳转到的路由对象信息// from: Object 从哪里跳转的路由对象信息// next: Function next()路由正常切换 next(false)原地停留 next("路径")强制修改到另一个路由上 不调用next也停留在原地
})
riends`,但这在上线时需要服务器端支持,否则寻找到的是文件夹
const router = new VueRouter({routes,mode:"history"
})
编程式导航基本使用
编程式导航即通过js实现路由的跳转,以下path、name二者选一即可。这里vue-router要么安装3.0以下版本,要么再传递两个回调函数,作为成功和失败的回调,否则重复push到同一个路由报错Avoided redundant navigation to current location,因为3.0以上版本返回的是Promise,需要增加两个回调
this.$router.push({// path: '路由路径',name: '路由名' // 使用路由名字在规则数组中需要添加name属性
})
query和params的区别:
query:通过URL的查询字符串传递参数,它会显示在URL中,且不会影响路由的匹配。params:通过name的路由参数传递,它不会显示在URL中,且必须与name的路由规则匹配。
编程式导航传参
this.$router.push({// path: '路由路径',name: '路由名',query: {'参数'},params: { // 使用params只能用name'参数'}
})
二级路由
二级路由通过配置规则数组路由的``children`实现
const routes = [{path: '/find',name: 'find',component: Find,// 配置children  children: [{path: 'second', // 这里不需要/component: Second,},],},
]
<template><div><div>发现音乐</div><!-- 这里还是要加上/find/ --><router-link to="/find/second">链接到Second</router-link><!-- 用来展示组件 --><router-view></router-view></div>
</template>
<script>
export default {}
</script>
路由守卫
路由守卫可以让路由跳转前先触发一个函数,进行守护,主要用于路由权限判断
router.beforeEach((to, from, next) => {// to: Object 要跳转到的路由对象信息// from: Object 从哪里跳转的路由对象信息// next: Function next()路由正常切换 next(false)原地停留 next("路径")强制修改到另一个路由上 不调用next也停留在原地
})


