手撕高频结构
前言,以下内容,都是博主在秋招面试中,遇到的面试手撕代码题目,包含常见的数据结构、多线程以及数据库连接池等。
ArrayList
-
实现了
ArrayList的基本功能,包括随机访问和自动扩容。 -
添加元素时,如果数组容量不足,会自动扩容,避免频繁的手动扩展操作。
-
能够处理常见的越界检查、扩容和元素添加。
public class MyArrayList<T> {private T[] elements; // 用于存储元素的数组private int size;     // 当前ArrayList中实际元素的个数// 默认初始容量private static final int DEFAULT_CAPACITY = 10;// 无参构造函数,使用默认初始容量public MyArrayList() {elements = (T[]) new Object[DEFAULT_CAPACITY];size = 0;}// 带初始容量的构造函数public MyArrayList(int initialCapacity) {if (initialCapacity <= 0) {throw new IllegalArgumentException("初始容量必须大于0");}elements = (T[]) new Object[initialCapacity];size = 0;}// 添加元素方法(自动扩容)public void add(T element) {ensureCapacity(); // 检查是否需要扩容elements[size++] = element; // 将元素添加到数组中,并更新size}// 获取元素方法,根据索引随机访问元素public T get(int index) {checkIndex(index); // 检查索引是否越界return elements[index];}// 返回当前ArrayList的大小public int size() {return size;}// 扩容方法,将数组容量增加1.5倍private void ensureCapacity() {if (size == elements.length) {int newCapacity = elements.length * 1.5;elements = Arrays.copyOf(elements, newCapacity); // 扩容}}// 检查索引是否越界的方法private void checkIndex(int index) {if (index < 0 || index >= size) {throw new IndexOutOfBoundsException("索引超出范围: " + index);}}// 重写toString方法,方便输出查看@Overridepublic String toString() {return Arrays.toString(Arrays.copyOf(elements, size));}// 测试MyArrayList的功能public static void main(String[] args) {MyArrayList<Integer> list = new MyArrayList<>();// 添加元素list.add(10);list.add(20);list.add(30);list.add(40);// 打印列表System.out.println("ArrayList内容: " + list);// 随机访问元素System.out.println("索引1的元素: " + list.get(1));// 添加更多元素,测试扩容for (int i = 0; i < 10; i++) {list.add(i * 10);}// 打印扩容后的列表System.out.println("扩容后的ArrayList内容: " + list);System.out.println("ArrayList大小: " + list.size());}
}
LinkedList
底层是链表
public class MyLinkedList {// 链表节点类static class Node {int data;  // 节点的数据Node next; // 指向下一个节点的指针// 构造函数public Node(int data) {this.data = data;this.next = null;}}private Node head; // 链表的头节点// 构造函数,初始化空链表public MyLinkedList() {this.head = null;}// 1. 在链表的头部插入节点public void addFirst(int data) {Node newNode = new Node(data);newNode.next = head; // 新节点指向当前头节点head = newNode;      // 头节点更新为新节点}// 2. 在链表的尾部插入节点public void addLast(int data) {Node newNode = new Node(data);if (head == null) {head = newNode; // 如果链表为空,则新节点为头节点} else {Node cur = head;while (cur.next != null) {cur = cur.next; // 找到最后一个节点}cur.next = newNode; // 将新节点插入到最后}}// 3. 查找链表中是否存在某个数据public boolean contains(int key) {Node cur = head;while (cur != null) {if (cur.data == key) {return true; // 找到返回 true}cur = cur.next;}return false; // 未找到返回 false}// 4. 删除链表中首次出现的指定数据public void remove(int key) {if (head == null) {return; // 链表为空,直接返回}// 如果删除的是头节点if (head.data == key) {head = head.next; // 头节点指向下一个节点return;}// 遍历链表,找到要删除的节点Node prev = null;Node cur = head;while (cur != null && cur.data != key) {prev = cur;cur = cur.next;}// 如果找到要删除的节点if (cur != null) {prev.next = cur.next; // 前一个节点的 next 指向当前节点的下一个节点}}// 5. 获取链表的长度public int size() {int count = 0;Node cur = head;while (cur != null) {count++;cur = cur.next;}return count;}// 6. 打印链表public void printList() {Node cur = head;while (cur != null) {System.out.print(cur.data + " -> ");cur = cur.next;}System.out.println("null");}// 7. 清空链表public void clear() {head = null;}// 测试代码public static void main(String[] args) {MyLinkedList list = new MyLinkedList();list.addFirst(1);list.addFirst(2);list.addLast(3);list.addLast(4);list.printList();   // 打印链表: 2 -> 1 -> 3 -> 4 -> nullSystem.out.println("List size: " + list.size());  // 输出链表长度: 4System.out.println("Contains 3? " + list.contains(3));  // 输出 trueSystem.out.println("Contains 5? " + list.contains(5));  // 输出 falselist.remove(1); // 删除 1list.printList();   // 打印链表: 2 -> 3 -> 4 -> nulllist.clear();  // 清空链表list.printList();   // 打印链表: null}
}
Stack栈
先进后出
public class MyStack {public int[] elem;public int usedSize;public static final int DEFAULT_CAPACITY=10;public MyStack() {elem=new int[DEFAULT_CAPACITY];}/*** 入栈* @param val*/public void push(int val) {//先判断栈是否满了if(isFull()) {elem= Arrays.copyOf(elem,2*elem.length);}elem[usedSize++]=val;}/*** 判断当前栈是否满了* @return*/public boolean isFull() {if(usedSize==elem.length) {return true;}return false;}/*** 删除栈顶元素*/public int pop() {if(isEmpty()) {throw new RuntimeException("栈空了");}int val= elem[usedSize-1];usedSize--;return val;}/*** 是否为空* @return*/public boolean isEmpty() {return usedSize==0;}/*** 获取栈顶元素但不删除* @return*/public int peek() {if(isEmpty()) {throw new RuntimeException("栈为空了!");}return elem[usedSize-1];}
}
Queue队列
先进先出
public class MyQueue {static class Node {public int val;public Node next;public Node(int val) {this.val = val;}}public Node head;//队列的头public Node tail;//队列的尾/*** 入队操作* @param val*/public void offer(int val) {Node node=new Node(val);if(head==null) {head=node;tail=node;}else {tail.next=node;tail=tail.next;}}/*** 出队操作*/public int poll() {if(head==null)throw new RuntimeException("队列为空!");int val= head.val;;if(head.next==null)head=tail=null;elsehead=head.next;return val;}/*** 查看队头元素*/public int peek() {if(head==null) {throw new RuntimeException("队列为空!");}return head.val;}
}
优先级队列(大根堆)
队列是一种先入先出的数据结构,但是如果队列中的元素带有优先级,就可能需要让优先级高的元素先出队列
这种情况下就有了优先级队列这种数据结构,这种结构提供了两个基本操作,一是返回最高优先级对象,二是添加新的对象
PriorityQueue的底层使用了堆的数据结构,堆其实就是一棵完全二叉树,若该完全二叉树的每棵子树都是根结点最大,叫做大根堆(否则叫小根堆)
public class Heap {public int[] elem;public int usedSize;// 当前堆中有效元素个数public Heap() {this.elem=new int[10];}public void initArray(int[] array) {elem= Arrays.copyOf(array,array.length);usedSize=elem.length;}/*** 建堆* 时间复杂度:O(n)*/public void createHeap() {for (int parent = (usedSize-1-1)/2; parent >=0 ; parent--) {shiftDown(parent,usedSize);// usedSize保证所有子树的下标都不会比它大,可比较用于所有子树的结束}}/*** 向下调整 让每棵子树都成为大根堆* @param parent  每棵子树的根结点下标* @param len  所有子树的结束位置(usedSize)*/private void shiftDown(int parent,int len) {int child=2*parent+1;while (child<len) {// 存在右孩子的情况下,比较左右孩子的大小,child记录较大值的下标if(child+1<len&&elem[child]<elem[child+1]) {child++;}// 此时child记录的是孩子中的较大值,再去与父节点进行比较if(elem[child]>elem[parent]) {swap(elem,child,parent);// 向下调整,让parent到child的位置,继续往下做比较parent=child;child=2*parent+1;}else {// 如果走到else,说明此时该子树符合大根堆结构,不需要再做向下调整,直接跳出循环即可break;}}}private void swap(int[] array,int i,int j) {int tmp=array[i];array[i]=array[j];array[j]=tmp;}/*** 入队(插入元素)* 【插入末尾位置,然后向上调整结构】* @param x*/public void offer(int x) {if(isFull()) {elem=Arrays.copyOf(elem,elem.length*2);}this.elem[usedSize]=x;shiftUp(usedSize);usedSize++;}private boolean isFull() {return usedSize== elem.length;}/*** 向上调整* @param child 子节点下标*/private void shiftUp(int child) {// 找到其父节点int parent=(child-1)/2;// 向上调整一直到根节点结束while (child>0) {// 判断子节点与父节点大小if(elem[child]>elem[parent]) {swap(elem,child,parent);child=parent;parent=(child-1)/2;}else {// 若不需要调整,则直接跳出循环break;}}}/*** 出队(删除元素)* 【交换堆顶与队尾元素,删除队尾元素,再让堆顶做向下调整】* @return*/public int poll() {if(isEmpty()) {return -1;}int old=elem[0];// 交换堆顶与堆尾元素swap(elem,0,usedSize-1);// 删除堆尾元素usedSize--;// 将堆顶元素向下调整shiftDown(0,usedSize);return old;}/*** 返回堆顶最大元素* @return*/public int peek() {if(isEmpty()) {return -1;}int val=elem[0];return val;}public boolean isEmpty() {return usedSize==0;}/*** 堆排序* 1、将堆顶元素【最大值】放到末尾,剩余部分做向下调整* 2、持续遍历所有操作,完成堆排序,大顶堆通过堆排序后得到升序数组* 时间复杂度 O(n logn) ;* 空间复杂度 O(1)*/public void heapSort() {int end=usedSize-1;while (end>0) {swap(elem,0,end);shiftDown(0,end);end--;}}public static void main(String[] args) {Heap heap=new Heap();// 初始化数组并创建堆int[] array={10,20,15,30,40,25,50};System.out.println("初始化堆");heap.initArray(array); // 初始化数据heap.createHeap();  // 建堆System.out.println("初始最大堆:"+Arrays.toString(Arrays.copyOfRange(heap.elem,0,heap.usedSize)));heap.offer(35);System.out.println("插入后最大堆:"+Arrays.toString(Arrays.copyOfRange(heap.elem,0,heap.usedSize)));heap.poll();System.out.println("弹出最大元素后最大堆:"+Arrays.toString(Arrays.copyOfRange(heap.elem,0,heap.usedSize)));heap.heapSort();System.out.println("堆排序结果:"+Arrays.toString(Arrays.copyOfRange(heap.elem,0,heap.usedSize)));}
}
//
初始化堆
初始最大堆:[50, 40, 25, 30, 20, 10, 15]
插入后最大堆:[50, 40, 25, 35, 20, 10, 15, 30]
弹出最大元素后最大堆:[40, 35, 25, 30, 20, 10, 15]
堆排序结果:[10, 15, 20, 25, 30, 35, 40]Process finished with exit code 0
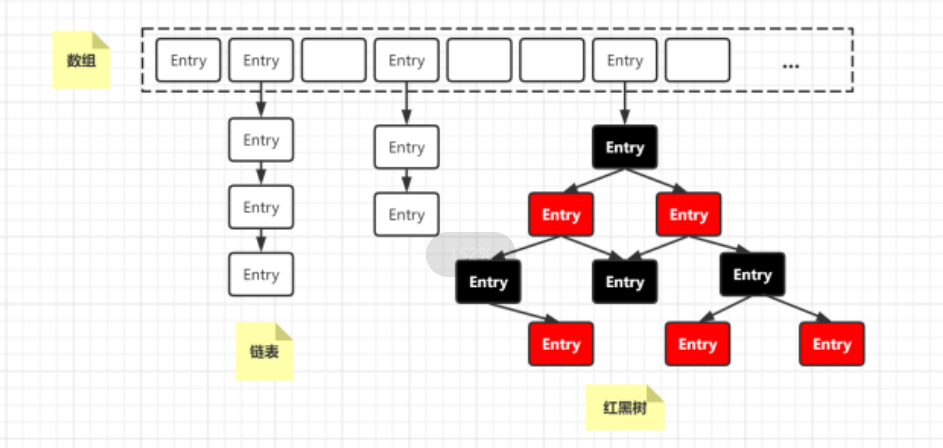
HashMap
用拉链法解决冲突,实现了常见的方法
public class MyQueue {static class Node {public int val;public Node next;public Node(int val) {this.val = val;}}public Node head;//队列的头public Node tail;//队列的尾/*** 入队操作* @param val*/public void offer(int val) {Node node=new Node(val);if(head==null) {head=node;tail=node;}else {tail.next=node;tail=tail.next;}}/*** 出队操作*/public int poll() {if(head==null)throw new RuntimeException("队列为空!");int val= head.val;;if(head.next==null)head=tail=null;elsehead=head.next;return val;}/*** 查看队头元素*/public int peek() {if(head==null) {throw new RuntimeException("队列为空!");}return head.val;}
}
生产者消费者模型
生产者和消费者彼此之间不直接通讯,而通过阻塞队列来进行通讯,所以生产者生产完数据之后不用等待消费者处理,直接扔给阻塞队列,消费者不找生产者要数据,而是直接从阻塞队列里取。
该模型有以下两个用途:
1)削峰填谷
阻塞队列就相当于一个缓冲区,平衡了生产者和消费者的处理能力。
三峡大坝,汛期控制水量,防止水灾;旱期释放积攒的水,防止旱灾。
2)解耦合
阻塞队列也能使生产者和消费者之间解耦(减少两者之间的关联关系)
过年一家子一起包饺子,一般有明确的分工,一个人负责擀饺子皮,其他人负责包,擀饺子皮的人就是“生产者”,包饺子的人就是“消费者”,擀饺子皮的人不关心包饺子的人是谁,包饺子的人也不关心擀饺子皮的人是谁。
代码关键点总结
- 生产者-消费者模型:生产者生成数据并放入队列,消费者从队列中取数据进行处理。
BlockingQueue自动处理了队列为空或满时的阻塞问题,简化了多线程编程中的同步控制。 - 线程安全:
LinkedBlockingQueue是线程安全的,它内部使用了锁机制来保证线程之间对队列的安全访问。 - 无限循环的消费者线程:消费者线程在
while(true)中不断取数据,因此只要有生产者继续生产,消费者就会不断消费。 Thread.sleep(1000)模拟生产过程的延迟:生产者每次生产一个元素后会等待1秒,模拟一个耗时的生产过程。
public static void main(String[] args) {BlockingQueue<Integer> queue=new LinkedBlockingQueue<>();Thread consumer=new Thread() {@Overridepublic void run() {while (true) {try {Integer value=queue.take();System.out.println("消费元素:"+value);} catch (InterruptedException e) {e.printStackTrace();}}}};consumer.start();Thread producer=new Thread() {@Overridepublic void run() {for (int i = 0; i < 10000; i++) {System.out.println("生产了元素:"+i);try {queue.put(i);Thread.sleep(1000);} catch (InterruptedException e) {e.printStackTrace();}}}};producer.start();try {consumer.join(); // join()方法的作用是等待线程终止producer.join(); // 由于消费者线程是一个无限循环,实际运行中,主线程将会永远阻塞在consumer.join()上。} catch (InterruptedException e) {e.printStackTrace();}
}
BlockingQueue
阻塞队列是一种特殊的队列. 也遵守 “先进先出” 的原则.
阻塞队列是一种线程安全的数据结构, 并且具有以下特性:
当队列满的时候, 继续入队列就会阻塞, 直到有其他线程从队列中取走元素.
当队列空的时候, 继续出队列也会阻塞, 直到有其他线程往队列中插入元素.
public class Main {static class BlockingQueue {//1000就相当于队列的最大容量,此处暂不考虑扩容问题private int[] items=new int[1000];private volatile int head=0;private volatile int tail=0;private volatile int size=0;private Object locker=new Object();//put用来入队列public void put(int item) throws InterruptedException {//因为队列中涉及修改操作,所以通过加锁来解决线程不安全问题(原子性)。synchronized (locker) {//使用while就是为了让wait被唤醒之后,再次确认条件是否成立while (size==items.length) {//队列已经满了,对于阻塞队列来说就要阻塞locker.wait();}items[tail]=item;tail++;//如果到达末尾,就回到起始位置if(tail>=items.length) {tail=0;}size++;locker.notify();}}public int take() throws InterruptedException {int ret=0;synchronized (locker) {while (size==0) {//对于阻塞队列来说,如果队列为空,在尝试获取元素,就要阻塞locker.wait();}ret=items[head];head++;if(head>=items.length) {head=0;}size--;//此处的notify用来唤醒put中的waitlocker.notify();}return ret;}}public static void main(String[] args) throws InterruptedException {BlockingQueue queue=new BlockingQueue();//消费者模型Thread consumer=new Thread() {@Overridepublic void run() {while (true) {try {int elem= queue.take();System.out.println("消费者元素:"+elem);} catch (InterruptedException e) {e.printStackTrace();}}}};consumer.start();//生产者线程Thread producer=new Thread() {@Overridepublic void run() {for (int i = 0; i < 10000; i++) {System.out.println("生产元素:"+i);try {queue.put(i);Thread.sleep(1000);} catch (InterruptedException e) {e.printStackTrace();}}}};producer.start();consumer.join();producer.join();}
}
多线程顺序打印ABC
-
锁与条件变量:我们使用一个
lock对象来保证线程间的同步,所有线程共享这个锁。 -
状态控制:通过一个
state变量控制当前该哪个线程执行。state的取值为0、1、2,分别代表线程A、B、C。 -
同步块与等待机制:
-
使用
synchronized来保证同一时间只有一个线程能访问共享资源。 -
使用
wait()和notifyAll()来使得线程在不符合条件时等待,并在条件满足时通知其他线程。
-
-
执行结果:
每次运行该程序,三个线程会顺序打印 "ABCABCABC...",直到打印10次结束。
public class PrintABC {private static final Object lock = new Object();private static int state = 0;  // 0: A, 1: B, 2: Cpublic static void main(String[] args) {Thread threadA = new Thread(new PrintTask("A", 0));Thread threadB = new Thread(new PrintTask("B", 1));Thread threadC = new Thread(new PrintTask("C", 2));threadA.start();threadB.start();threadC.start();}static class PrintTask implements Runnable {private String name;private int flag; // 用于标识当前线程的顺序public PrintTask(String name, int flag) {this.name = name;this.flag = flag;}@Overridepublic void run() {try {for (int i = 0; i < 10; i++) {  // 打印10次ABCsynchronized (lock) {while (state != flag) {lock.wait();  // 如果不是当前线程的轮次,则等待}System.out.print(name);  // 打印当前线程对应的字符state = (state + 1) % 3;  // 更新状态,确保下一个线程打印lock.notifyAll();  // 唤醒其他线程}}} catch (InterruptedException e) {e.printStackTrace();}}}
}
线程池
步骤:
- 使用一个
BlockingQueue组织所有任务 - 核心操作为
submit,将任务加入线程池阻塞队列中,并创建线程 - 一个线程池可用同时提交N个任务,对应线程池中有M个线程来负责完成这N个任务,利用生产者消费者模型,把N个任务分配给M个线程
public class MyThreadPool {private BlockingQueue<Runnable> queue=new LinkedBlockingQueue<>();public MyThreadPool(int m) {// 在构造方法中,创建出m个线程,负责完成工作for (int i = 0; i < m; i++) {Thread t=new Thread(()->{while (true) {try {Runnable runnable=queue.take();runnable.run();} catch (InterruptedException e) {e.printStackTrace();}}});t.start();}}// 将任务加入线程池阻塞队列中public void submit(Runnable runnable) throws InterruptedException {queue.put(runnable);}public static void main(String[] args) throws InterruptedException {MyThreadPool pool=new MyThreadPool(10);for (int i = 0; i < 1000; i++) {int taskId=i;pool.submit(new Runnable() {@Overridepublic void run() {System.out.println("执行当前任务:"+taskId+"当前线程:"+Thread.currentThread().getName());}});}}
}
数据库连接池
步骤:
1、创建固定数量的数据库连接并保存到一个集合中
2、提供getConnection()方法从池中获取连接
3、提供releaseConnection()方法将使用完的连接返回到池中
4、实现线程安全的连接获取和释放
public class ConnectionPool {private List<Connection> connectionPool;private int poolSize=10; // 池中连接数量private String url="jdbc:mysql://localhost:3306/test"; // 数据库URLprivate String username="root"; // 数据库用户名private String password="password"; // 数据库密码// 构造函数,初始化连接池public ConnectionPool() {connectionPool=new ArrayList<>();try {// 加载数据库驱动Class.forName("com.mysql.cj.jdbc.Driver");// 初始连接池for (int i = 0; i < poolSize; i++) {connectionPool.add(DriverManager.getConnection(url,username,password));}} catch (ClassNotFoundException | SQLException e) {e.printStackTrace();}}// 从池中获取连接public synchronized Connection getConnection() {// 如果池中有可用连接,返回第一个连接if(!connectionPool.isEmpty()) {return connectionPool.remove(0);}else {// 如果池中没有可用连接,返回 null或抛出异常System.out.println("连接池已用完,无法提供连接");return null;}}// 释放连接,将连接返回到池中public synchronized void releaseConnection(Connection connection) {if(connection!=null) {connectionPool.add(connection); // 归还连接到池中}}// 关闭连接池中的所有连接public synchronized void closeAllConnections() {for (Connection connection:connectionPool) {try {connection.close();}catch (SQLException e) {e.printStackTrace();}}}// 获取连接池的当前大小public int getCurrentPoolSize() {return connectionPool.size();}public static void main(String[] args) {ConnectionPool pool=new ConnectionPool();// 获取一个连接Connection  connection=pool.getConnection();// 假设进行了一些数据库操作// 使用完后将连接返回到池中pool.releaseConnection(connection);// 打印连接池剩余连接数System.out.println("当前连接池大小:"+pool.getCurrentPoolSize());// 关闭连接池pool.closeAllConnections();}
}
改进空间:
- 连接池动态扩展:目前连接池的大小是固定的,实际生产环境中可以根据需求动态扩展或缩减连接池的大小。
- 连接池维护:可以添加心跳检测,自动关闭不可用的连接并替换。
- 最大等待时间:如果连接池耗尽,可以设置最大等待时间,并且在超时后抛出异常。