一,闭包
1,什么是闭包
闭包是指一个函数和其周围的词法环境(lexical environment)的组合。
换句话说,闭包允许一个函数访问并操作函数外部的变量。
闭包的核心特性:
- 函数内部可以访问外部函数的变量
- 即使外部函数已经返回,内部函数仍然可以访问这些变量
- 闭包可以保护变量不被垃圾回收机制回收
一个简单的例子:
function outerFunction(x) {let y = 10function innerFunction() {// 内部函数innerFunction可以访问外部函数outerFunction的变量yconsole.log(x + y)}// 外部函数outerFunction返回内部函数innerFunctionreturn innerFunction
}const closure = outerFunction(5)closure()   // 输出: 15
// 即使outerFunction已经执行完毕,但是closure仍然可以访问 x 和 y 的值
closure()   // 输出: 15
在这个例子中:
- outerFunction 返回了 innerFunction
- innerFunction 形成了一个闭包,它可以访问 outerFunction 的参数 x 和局部变量 y
- 即使 outerFunction 已经执行完毕,closure 仍然可以访问 x 和 y
2,闭包的应用场景
1,数据隐私:闭包可以用来创建私有变量和方法
function createCounter() {let count = 0;return {increment: function() { count++; },getCount: function() { return count; }};
}const counter = createCounter();
counter.increment();
console.log(counter.getCount()); // 输出: 1
console.log(counter.count); // 输出: undefined
2,函数工厂:闭包可以用来创建定制的函数
function multiplyBy(factor) {return function(number) {return number * factor;};
}const double = multiplyBy(2);
console.log(double(5)); // 输出: 10
3,模块化代码:闭包可以用于实现模块模式,封装私有状态和行为
const module = (function() {let privateVariable = 0;function privateFunction() {console.log('私有函数');}return {publicMethod: function() {privateVariable++;privateFunction();},getPrivateVariable: function() {return privateVariable;}};
})();module.publicMethod();
console.log(module.getPrivateVariable()); // 输出: 1
3,注意事项
1,内存管理:闭包会保持对其外部作用域的引用,这可能导致内存泄漏。
// 潜在的内存泄漏
function createLargeArray() {let largeArray = new Array(1000000).fill('some data');return function() {console.log(largeArray[0]);};
}let printArrayItem = createLargeArray(); // largeArray 会一直存在于内存中// 解决方式1:在不需要时解除引用
printArrayItem = null; // 现在 largeArray 可以被垃圾回收// 解决方式2:立即执行函数表达式(IIFE)来限制闭包的生命周期
(function() {let largeArray = new Array(1000000).fill('some data');console.log(largeArray[0]);
})(); // largeArray 在函数执行后立即可以被回收
2,循环中创建闭包:闭包会捕获循环变量的最终值,而不是每次迭代的值。
// 闭包会捕获循环变量的最终值,而不是每次迭代的值
for (var i = 1; i <= 5; i++) {setTimeout(function() {console.log(i);}, i * 1000);
}// 解决方法:
// 1. 使用 let 替换 var
// 2:使用立即执行函数创建新的作用域
for (var i = 1; i <= 5; i++) {(function(j) {setTimeout(function() {console.log(j);}, j * 1000);})(i);
}
3,性能考虑:过度使用可能会影响性能,每个闭包都会占用内存,并且可能影响垃圾回收。在性能敏感的应用中应谨慎使用闭包。
4,this 绑定问题:在闭包中,this 的值可能会出人意料。
const obj = {value: 'Hello',sayHello: function() {setTimeout(function() {console.log(this.value);}, 1000);}
};obj.sayHello(); // 输出: undefined
sayHello 方法内部的 setTimeout 使用了一个普通的函数( function() { … } ),而不是箭头函数。普通函数的 this 关键字在运行时是根据调用上下文来确定的,而不是根据定义时的上下文。
在 setTimeout 的回调函数中, this 不再指向 obj ,而是指向全局对象(在浏览器中是 window ),或者在严格模式下是 undefined 。因此,当你尝试访问 this.value 时,它实际上是在访问全局对象的 value 属性,而全局对象并没有 value 属性,所以输出为 undefined 。
只需要改用箭头函数,因为箭头函数不会创建自己的 this ,它会捕获外部上下文的 this 值:
const obj = {value: 'Hello',sayHello: function() {setTimeout(() => {console.log(this.value);}, 1000);}
};
obj.sayHello(); // 输出: Hello
二,防抖
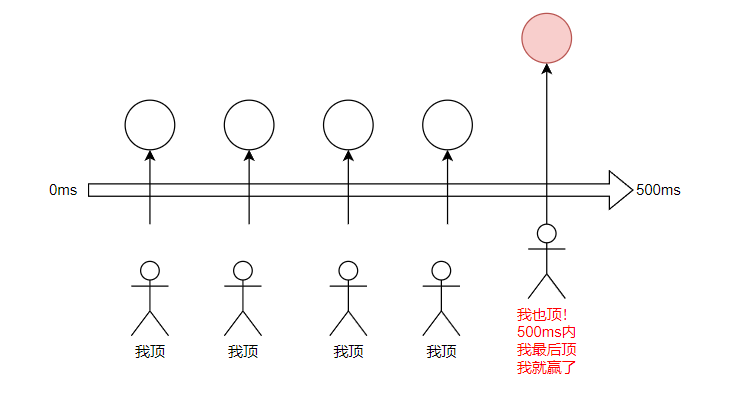
防抖的核心思想是,在事件被触发n秒后再执行回调,如果在这n秒内事件又被触发,则重新计时。这可以使得连续的函数调用变为一次。

举个例子:
function debounce(func, delay) {let timer = null;return function(...args) {clearTimeout(timer);timer = setTimeout(() => {func.apply(this, args);}, delay);}
}// Usage
const expensiveOperation = debounce(() => {console.log('Expensive operation')
}, 500)expensiveOperation()
- 在 debounce 函数中, timer 变量是在 debounce 函数的作用域内定义的。返回的函数(即 function (…args) )可以访问 timer 变量,因此每次调用返回的函数时,它都可以使用和修改 timer ,从而实现防抖的效果。
在搜索框输入查询、表单验证、按钮提交事件、浏览器窗口缩放resize事件中的应用:
<!DOCTYPE html>
<html lang="en">
<head><meta charset="UTF-8"><meta name="viewport" content="width=device-width, initial-scale=1.0"><title>Debounce Demo</title><style>body {font-family: Arial, sans-serif;max-width: 600px;margin: 0 auto;padding: 20px;}.section {margin-bottom: 20px;padding: 10px;border: 1px solid #ddd;border-radius: 5px;}input, button {margin: 5px 0;padding: 5px;}#email-error {color: red;}</style>
</head>
<body><h1>Debounce Demo</h1><div class="section"><h2>1. Search Input</h2><input type="text" id="search-input" placeholder="Search..."><div id="search-results"></div></div><div class="section"><h2>2. Email Validation</h2><input type="email" id="email-input" placeholder="Enter email"><div id="email-error"></div></div><div class="section"><h2>3. Submit Button</h2><button id="submit-button">Submit</button><div id="submit-result"></div></div><div class="section"><h2>4. Window Resize</h2><div id="window-size"></div></div><script>// Debounce functionfunction debounce(func, delay) {let timer = null;return function(...args) {clearTimeout(timer);timer = setTimeout(() => {func.apply(this, args);}, delay);}}// 1. Search Inputconst searchInput = document.getElementById('search-input');const searchResults = document.getElementById('search-results');const debouncedSearch = debounce(function(query) {console.log(`Searching for: ${query}`);searchResults.textContent = `Results for: ${query}`;}, 300);searchInput.addEventListener('input', function(e) {debouncedSearch(e.target.value);});// 2. Email Validationconst emailInput = document.getElementById('email-input');const emailError = document.getElementById('email-error');const debouncedValidateEmail = debounce(function(email) {const isValid = /^[^\s@]+@[^\s@]+\.[^\s@]+$/.test(email);emailError.textContent = isValid ? '' : 'Invalid email format';}, 500);emailInput.addEventListener('input', function(e) {debouncedValidateEmail(e.target.value);});// 3. Submit Buttonconst submitButton = document.getElementById('submit-button');const submitResult = document.getElementById('submit-result');const debouncedSubmit = debounce(function() {console.log('Form submitted');submitResult.textContent = 'Form submitted at ' + new Date().toLocaleTimeString();}, 1000);submitButton.addEventListener('click', debouncedSubmit);// 4. Window Resizeconst windowSize = document.getElementById('window-size');const debouncedResize = debounce(function() {const size = `${window.innerWidth}x${window.innerHeight}`;console.log(`Window resized to: ${size}`);windowSize.textContent = `Window size: ${size}`;}, 250);window.addEventListener('resize', debouncedResize);// Initial call to set the initial window sizedebouncedResize();</script>
</body>
</html>
三,节流
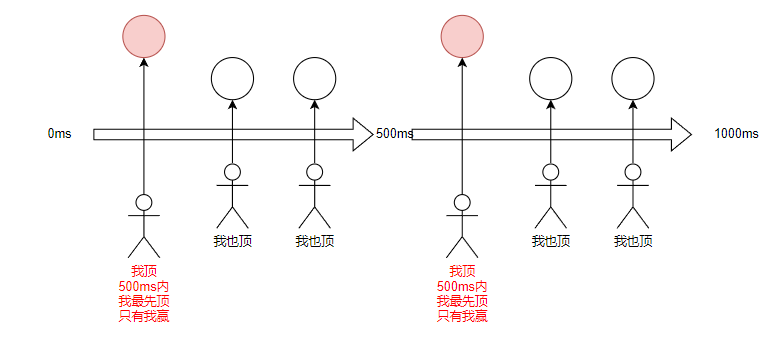
节流的核心思想是,在一个单位时间内,只能触发一次函数。如果在单位时间内触发多次函数,只有一次生效。

防抖和节流的主要区别:
- 防抖是在最后一次事件触发后才执行函数,而节流是在一定时间内只执行一次。
- 防抖适合用于用户输入验证等需要等待用户操作完成的场景,而节流适合用于限制持续触发事件的频率。
举个例子:
function throttle(func, delay) {let lastTime = 0;return function(...args) {const now = Date.now();if (now - lastTime >= delay) {func.apply(this, args);lastTime = now;}}
}// Usage
const expensiveOperation = throttle(() => {console.log('Expensive operation')
}, 1000)expensiveOperation()
在滚动加载更多、按钮点击事件、DOM元素拖拽、Canvas画笔中的应用:
<!DOCTYPE html>
<html lang="en">
<head><meta charset="UTF-8"><meta name="viewport" content="width=device-width, initial-scale=1.0"><title>Throttle Demo</title><style>body {font-family: Arial, sans-serif;max-width: 800px;margin: 0 auto;padding: 20px;}.section {margin-bottom: 20px;padding: 10px;border: 1px solid #ddd;border-radius: 5px;}#scroll-container {height: 200px;overflow-y: scroll;border: 1px solid #ccc;padding: 10px;}#drag-container {width: 300px;height: 100px;background-color: #f0f0f0;position: relative;}#draggable {width: 50px;height: 50px;background-color: #3498db;position: absolute;cursor: move;}#canvas {border: 1px solid #000;}</style>
</head>
<body><h1>Throttle Demo</h1><div class="section"><h2>1. Scroll Loading</h2><div id="scroll-container"><div id="scroll-content"></div></div></div><div class="section"><h2>2. Button Click</h2><button id="click-button">Click Me Rapidly</button><div id="click-result"></div></div><div class="section"><h2>3. Drag Element</h2><div id="drag-container"><div id="draggable"></div></div><div id="drag-result"></div></div><div class="section"><h2>4. Canvas Drawing</h2><canvas id="canvas" width="300" height="200"></canvas></div><script>// Throttle functionfunction throttle(func, limit) {let inThrottle;return function(...args) {if (!inThrottle) {func.apply(this, args);inThrottle = true;setTimeout(() => inThrottle = false, limit);}}}// 1. Scroll Loadingconst scrollContainer = document.getElementById('scroll-container');const scrollContent = document.getElementById('scroll-content');let itemCount = 20;function addItems(count) {for (let i = 0; i < count; i++) {const item = document.createElement('p');item.textContent = `Item ${itemCount++}`;scrollContent.appendChild(item);}}const throttledScroll = throttle(function() {if (scrollContainer.scrollTop + scrollContainer.clientHeight >= scrollContainer.scrollHeight - 50) {console.log('Loading more items...');addItems(10);}}, 500);scrollContainer.addEventListener('scroll', throttledScroll);addItems(20); // Initial items// 2. Button Clickconst clickButton = document.getElementById('click-button');const clickResult = document.getElementById('click-result');let clickCount = 0;const throttledClick = throttle(function() {clickCount++;clickResult.textContent = `Button clicked ${clickCount} times`;}, 1000);clickButton.addEventListener('click', throttledClick);// 3. Drag Elementconst draggable = document.getElementById('draggable');const dragResult = document.getElementById('drag-result');let isDragging = false;draggable.addEventListener('mousedown', () => isDragging = true);document.addEventListener('mouseup', () => isDragging = false);const throttledDrag = throttle(function(e) {if (isDragging) {const containerRect = draggable.parentElement.getBoundingClientRect();let x = e.clientX - containerRect.left - draggable.offsetWidth / 2;let y = e.clientY - containerRect.top - draggable.offsetHeight / 2;x = Math.max(0, Math.min(x, containerRect.width - draggable.offsetWidth));y = Math.max(0, Math.min(y, containerRect.height - draggable.offsetHeight));draggable.style.left = `${x}px`;draggable.style.top = `${y}px`;dragResult.textContent = `Position: (${x.toFixed(0)}, ${y.toFixed(0)})`;}}, 50);document.addEventListener('mousemove', throttledDrag);// 4. Canvas Drawingconst canvas = document.getElementById('canvas');const ctx = canvas.getContext('2d');let isDrawing = false;let lastX = 0;let lastY = 0;canvas.addEventListener('mousedown', (e) => {isDrawing = true;[lastX, lastY] = [e.offsetX, e.offsetY];});canvas.addEventListener('mouseup', () => isDrawing = false);canvas.addEventListener('mouseout', () => isDrawing = false);const throttledDraw = throttle(function(e) {if (!isDrawing) return;ctx.beginPath();ctx.moveTo(lastX, lastY);ctx.lineTo(e.offsetX, e.offsetY);ctx.stroke();[lastX, lastY] = [e.offsetX, e.offsetY];}, 20);canvas.addEventListener('mousemove', throttledDraw);</script>
</body>
</html>


![[论文阅读]RGB-Depth Fusion GAN for Indoor Depth Completion](https://i-blog.csdnimg.cn/direct/ca88f95ba3514f8a99f3dda52758512b.png)
