文章目录
- 1、项目准备
- 1、创建文件
- 2、用户控件库
- 2、功能实现
- 1、用户控件库
- 1、控件样式实现
- 2、数据模型实现
- 2、应用程序代码实现
- 1.UI层代码实现
- 2、数据后台代码实现
- 3、主界面菜单添加
- 1、后台按钮方法改造:
- 2、按钮添加:
- 3、依赖注入
- 3、运行效果
- 4、源代码获取
1、项目准备
1、创建文件
打开项目 Wpf_Examples,新建 RadarWindow.xaml 界面、RadarViewModel.cs 和 用户控件库 UserControlLib 。如下所示:

2、用户控件库
创建用户控件库,创建 数据模型 RadarModel.cs 和 用户控件 RadarUC.xaml,文档目录结构如下:


2、功能实现
1、用户控件库
1、控件样式实现
RadarUC.xaml 代码如下:
<UserControl x:Class="UserControlLib.RadarUC"xmlns="http://schemas.microsoft.com/winfx/2006/xaml/presentation"xmlns:x="http://schemas.microsoft.com/winfx/2006/xaml"xmlns:mc="http://schemas.openxmlformats.org/markup-compatibility/2006" xmlns:d="http://schemas.microsoft.com/expression/blend/2008" xmlns:local="clr-namespace:UserControlLib"mc:Ignorable="d" d:DesignHeight="450" d:DesignWidth="800"><Grid x:Name="LayGrid"><!--画布--><Canvas x:Name="mainCanvas"></Canvas><!--4规则多边形--><Polygon x:Name="P1" Stroke="#22ffffff" StrokeThickness="1"></Polygon><Polygon x:Name="P2" Stroke="#22ffffff" StrokeThickness="1"></Polygon><Polygon x:Name="P3" Stroke="#22ffffff" StrokeThickness="1"></Polygon><Polygon x:Name="P4" Stroke="#22ffffff" StrokeThickness="1"></Polygon><!--数据多边形--><Polygon x:Name="P5" Stroke="Orange" Fill="#550091F0" StrokeThickness="1" ></Polygon></Grid>
</UserControl>
RadarUC.cs 后端代码如下:
using System;
using System.Collections.Generic;
using System.Collections.ObjectModel;
using System.Linq;
using System.Text;
using System.Threading.Tasks;
using System.Windows;
using System.Windows.Controls;
using System.Windows.Data;
using System.Windows.Documents;
using System.Windows.Input;
using System.Windows.Media;
using System.Windows.Media.Imaging;
using System.Windows.Navigation;
using System.Windows.Shapes;
using UserControlLib.Models;namespace UserControlLib
{/// <summary>/// RadarUC.xaml 的交互逻辑/// </summary>public partial class RadarUC : UserControl{public RadarUC(){InitializeComponent();SizeChanged += OnSizeChanged;//Alt+Enter}/// <summary>/// 窗体大小发生变化 重新画图/// </summary>/// <param name="sender"></param>/// <param name="e"></param>private void OnSizeChanged(object sender, SizeChangedEventArgs e){Drag();}/// <summary>/// 数据源。支持数据绑定 依赖属性/// </summary>public ObservableCollection<RadarModel> ItemSource{get { return (ObservableCollection<RadarModel>)GetValue(ItemSourceProperty); }set { SetValue(ItemSourceProperty, value); }}// Using a DependencyProperty as the backing store for MyProperty.  This enables animation, styling, binding, etc...public static readonly DependencyProperty ItemSourceProperty =DependencyProperty.Register("ItemSource", typeof(ObservableCollection<RadarModel>), typeof(RadarUC));/// <summary>/// 画图方法/// </summary>public void Drag(){//判断是否有数据if (ItemSource == null || ItemSource.Count == 0){return;}//清楚之前画的mainCanvas.Children.Clear();P1.Points.Clear();P2.Points.Clear();P3.Points.Clear();P4.Points.Clear();P5.Points.Clear();//调整大小(正方形)double size = Math.Min(RenderSize.Width, RenderSize.Height);LayGrid.Height = size;LayGrid.Width = size;//半径double raduis = size / 2;//步子跨度double step = 360.0 / ItemSource.Count;for (int i = 0; i < ItemSource.Count; i++){double x = (raduis - 20) * Math.Cos((step * i - 90) * Math.PI / 180);//x偏移量double y = (raduis - 20) * Math.Sin((step * i - 90) * Math.PI / 180);//y偏移量//X Y坐标P1.Points.Add(new Point(raduis + x, raduis + y));P2.Points.Add(new Point(raduis + x * 0.75, raduis + y * 0.75));P3.Points.Add(new Point(raduis + x * 0.5, raduis + y * 0.5));P4.Points.Add(new Point(raduis + x * 0.25, raduis + y * 0.25));//数据多边形P5.Points.Add(new Point(raduis + x * ItemSource[i].Value * 0.01, raduis + y * ItemSource[i].Value * 0.01));//文字处理TextBlock txt = new TextBlock();txt.Width = 60;txt.FontSize = 10;txt.TextAlignment = TextAlignment.Center;txt.Text = ItemSource[i].ItemName;txt.Foreground = new SolidColorBrush(Color.FromArgb(100, 255, 255, 255));txt.SetValue(Canvas.LeftProperty, raduis + (raduis - 10) * Math.Cos((step * i - 90) * Math.PI / 180) - 30);//设置左边间距txt.SetValue(Canvas.TopProperty, raduis + (raduis - 10) * Math.Sin((step * i - 90) * Math.PI / 180) - 7);//设置上边间距mainCanvas.Children.Add(txt);}}}
}
2、数据模型实现
RadarModel.cs 代码实现:
public class RadarModel : INotifyPropertyChanged
{public event PropertyChangedEventHandler PropertyChanged;protected virtual void OnPropertyChanged([CallerMemberName] string propertyName = null){PropertyChanged?.Invoke(this, new PropertyChangedEventArgs(propertyName));}/// <summary>/// 项名称/// </summary>private string _ItemName;public string ItemName{get => _ItemName;set{if (_ItemName != value){_ItemName = value;OnPropertyChanged();}}}/// <summary>/// 项数值/// </summary>private double _Value;public double Value{get => _Value;set{if (_Value != value){_Value = value;OnPropertyChanged();}}}
}
2、应用程序代码实现
1.UI层代码实现
RadarWindow.xmal 代码如下(示例):
<Window x:Class="Wpf_Examples.Views.RadarWindow"xmlns="http://schemas.microsoft.com/winfx/2006/xaml/presentation"xmlns:x="http://schemas.microsoft.com/winfx/2006/xaml"xmlns:d="http://schemas.microsoft.com/expression/blend/2008"xmlns:mc="http://schemas.openxmlformats.org/markup-compatibility/2006"xmlns:radar="clr-namespace:UserControlLib;assembly=UserControlLib"xmlns:local="clr-namespace:Wpf_Examples.Views"DataContext="{Binding Source={StaticResource Locator},Path=Radar}"mc:Ignorable="d"Title="RadarWindow" Height="450" Width="800" Background="#2B2B2B"><Grid><GroupBox Header="战斗属性" Margin="20" Foreground="White"><radar:RadarUC ItemSource="{Binding RadarList}"></radar:RadarUC></GroupBox></Grid>
</Window>
2、数据后台代码实现
项目控件库引用,如下所示:

项目页面控件引用

RadarViewModel.cs 代码如下:
using CommunityToolkit.Mvvm.ComponentModel;
using System;
using System.Collections.Generic;
using System.Collections.ObjectModel;
using System.Linq;
using System.Text;
using System.Threading.Tasks;
using System.Windows.Threading;
using UserControlLib.Models;namespace Wpf_Examples.ViewModels
{public class RadarViewModel:ObservableObject{#region 雷达数据属性/// <summary>/// 雷达/// </summary>private ObservableCollection<RadarModel> radarList;public ObservableCollection<RadarModel> RadarList{get { return radarList; }set { SetProperty(ref radarList, value); }}#endregionpublic RadarViewModel() {#region 初始化雷达数据 RadarList = new ObservableCollection<RadarModel>();RadarList.Add(new RadarModel { ItemName = "闪避", Value = 90 });RadarList.Add(new RadarModel { ItemName = "防御", Value = 30.00 });RadarList.Add(new RadarModel { ItemName = "暴击", Value = 34.89 });RadarList.Add(new RadarModel { ItemName = "攻击", Value = 69.59 });RadarList.Add(new RadarModel { ItemName = "速度", Value = 20 });CreateTimer(); //创建定时器动态改变数据#endregion}private void CreateTimer(){#region 每秒定时器服务DispatcherTimer cpuTimer = new DispatcherTimer{Interval = new TimeSpan(0, 0, 0, 3, 0)};cpuTimer.Tick += DispatcherTimer_Tick;cpuTimer.Start();#endregion}private void DispatcherTimer_Tick(object sender, EventArgs e){Random random = new Random();foreach (var item in RadarList){item.Value = random.Next(10, 100);}}}
}
3、主界面菜单添加
1、后台按钮方法改造:
private void FunMenu(string obj){switch (obj){case "图片按钮":PopWindow(new ImageButtonWindow());break;case "LED效果灯":PopWindow(new LEDStatusWindow());break;case "动态数字卡":PopWindow(new DataCardWindow());break;case "自定义GroupBox边框":PopWindow(new GroubBoxWindow());break;case "自定义雷达图":PopWindow(new RadarWindow());break;}}
2、按钮添加:
<WrapPanel><Button Width="120" Height="30" FontSize="18" Content="图片按钮" Command="{Binding ButtonClickCmd}" CommandParameter="{Binding RelativeSource={RelativeSource Mode=Self},Path=Content}" Margin="8"/><Button Width="120" Height="30" FontSize="18" Content="LED效果灯" Command="{Binding ButtonClickCmd}" CommandParameter="{Binding RelativeSource={RelativeSource Mode=Self},Path=Content}" Margin="8"/><Button Width="120" Height="30" FontSize="18" Content="动态数字卡" Command="{Binding ButtonClickCmd}" CommandParameter="{Binding RelativeSource={RelativeSource Mode=Self},Path=Content}" Margin="8"/><Button Width="190" Height="30" FontSize="18" Content="自定义GroupBox边框" Command="{Binding ButtonClickCmd}" CommandParameter="{Binding RelativeSource={RelativeSource Mode=Self},Path=Content}" Margin="8"/><Button Width="140" Height="30" FontSize="18" Content="自定义雷达图" Command="{Binding ButtonClickCmd}" CommandParameter="{Binding RelativeSource={RelativeSource Mode=Self},Path=Content}" Margin="8"/></WrapPanel>
3、依赖注入
public class ViewModelLocator{public IServiceProvider Services { get; }public ViewModelLocator(){Services = ConfigureServices();}private static IServiceProvider ConfigureServices(){var services = new ServiceCollection();//这里实现所有viewModel的容器注入services.AddSingleton<MainViewModel>();services.AddScoped<LEDStatusViewModel>();services.AddScoped<ImageButtonViewModel>();services.AddScoped<DataCardViewModel>();services.AddScoped<GroubBoxViewModel>();services.AddScoped<RadarViewModel>();//添加其他 viewModelreturn services.BuildServiceProvider();}public MainViewModel Main => Services.GetService<MainViewModel>();public LEDStatusViewModel LedStatus => Services.GetService<LEDStatusViewModel>();public ImageButtonViewModel ImageButton => Services.GetService<ImageButtonViewModel>();public DataCardViewModel DataCard => Services.GetService<DataCardViewModel>();public GroubBoxViewModel GroupBox => Services.GetService<GroubBoxViewModel>();public RadarViewModel Radar => Services.GetService<RadarViewModel>();}3、运行效果
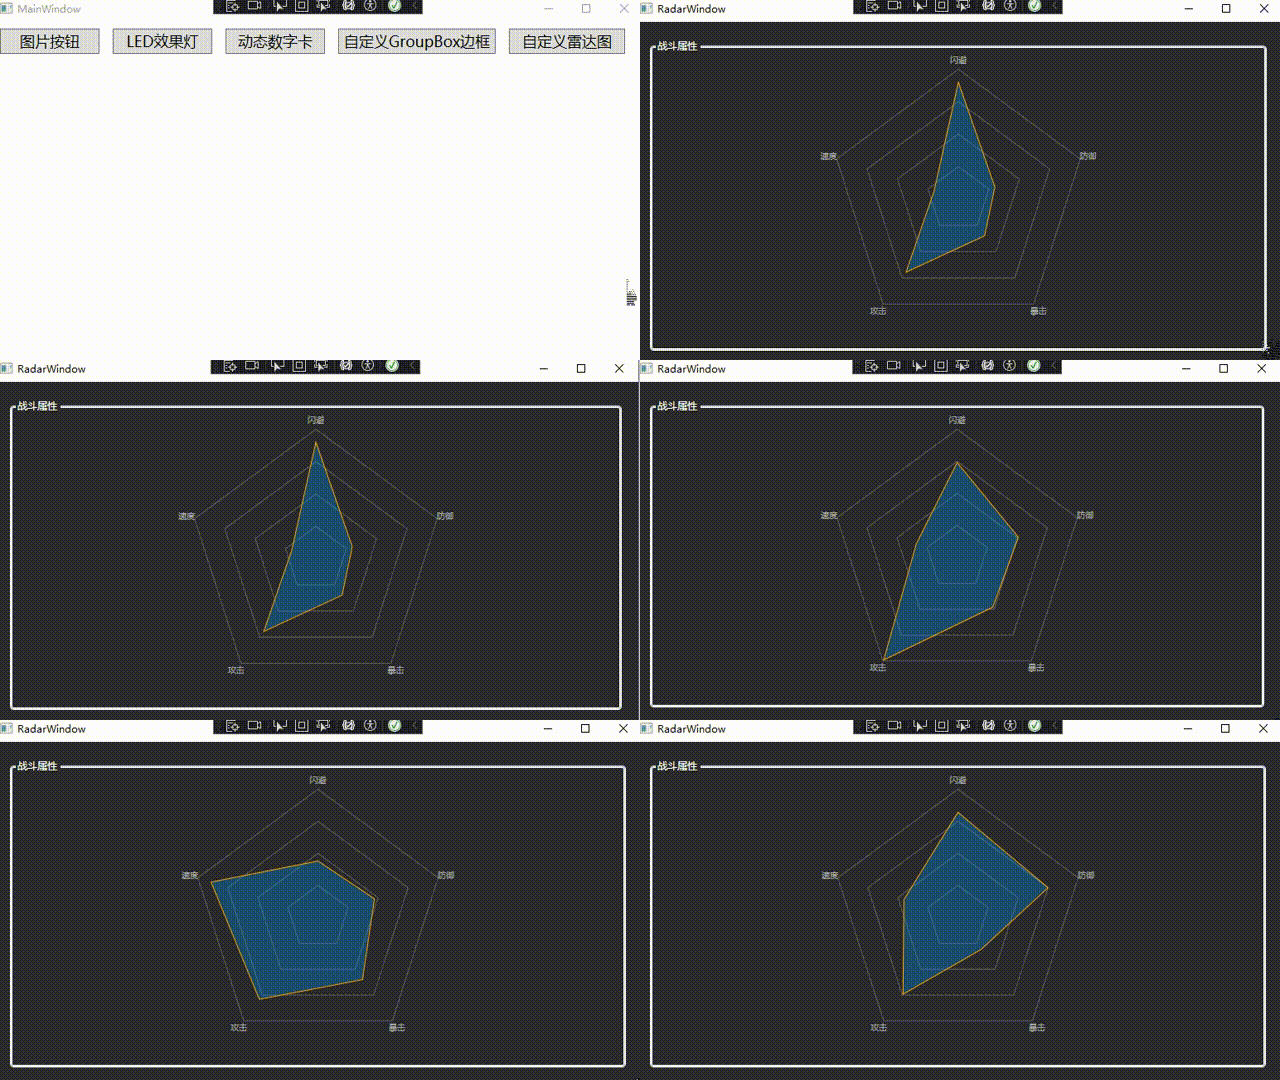
4、源代码获取
CSDN:下载链接WPF+Mvvm案例实战- 自定义雷达图实现


![C语言[求x的y次方]](https://img-blog.csdnimg.cn/8370269965df4d349ceafda5fd39b945.png)


