WPF的基础控件详解
在WPF学习中 基本控件是最简单也是最基础的东西。也是很初学者容易忽略的 本此笔记教程主要针对WPF中基础控件使用和应用进行手把手教学,如果学习了此笔记对你有帮助记得一键三连哦~~~~
TextBlock
基本用法
长字串处理
- LineBreak标籤在指定的地方手动换行。
- TextTrimming属性并设为**CharacterEllipsis**,让TextBlock在没有足够空间的时候显示…。在没有足够空间显示这麽多文字时,这是一种常见的方法。这也很适合用在当空间不足而且你不想使用多行的时候。你也可以使用**CharacterEllipsis**的另一种**WordEllipsis**,当空间不足的时候,以最后一个单字为单位显示,就不会有单字只显示一部分的问题发生。
- TextWrapping 属性并设为**Wrap**,让TextBlock在没有足够空间显示时自动换行。
TextBlock内联格式
粗体(Bold), 斜体(Italic), 下划线(Underline)
超连接 (Hyperlink)
Span块的使用
C# 或逻辑代码格式化文本
TextBlock tb = new TextBlock();
tb.TextWrapping = TextWrapping.Wrap;
tb.Margin = new Thickness(10);
tb.Inlines.Add("An example on ");
tb.Inlines.Add(new Run("the TextBlock control ") { FontWeight = FontWeights.Bold });
tb.Inlines.Add("using ");
tb.Inlines.Add(new Run("inline ") { FontStyle = FontStyles.Italic });
tb.Inlines.Add(new Run("text formatting ") { Foreground = Brushes.Blue });
tb.Inlines.Add("from ");
tb.Inlines.Add(new Run("Code-Behind") { TextDecorations = TextDecorations.Underline });
tb.Inlines.Add(".");
this.Content = tb;
Label
Label和访问键(助记符)
<StackPanel Margin="10"><Label Content="_Name:" Target="{Binding ElementName=txtName}" /><TextBox Name="txtName" /><Label Content="_Mail:" Target="{Binding ElementName=txtMail}" /><TextBox Name="txtMail" />
</StackPanel>
使用控件作为Label的内容
<Label Target="{Binding ElementName=txtName}"><StackPanel Orientation="Horizontal"><Image Source="http://cdn1.iconfinder.com/data/icons/fatcow/16/bullet_green.png" /><AccessText Text="_Name:" /></StackPanel>
</Label>
<TextBox Name="txtName" />
<Label Target="{Binding ElementName=txtMail}"><StackPanel Orientation="Horizontal"><Image Source="http://cdn1.iconfinder.com/data/icons/fatcow/16/bullet_blue.png" /><AccessText Text="_Mail:" /></StackPanel>
</Label>
<TextBox Name="txtMail" />
Label控件和TextBlock控件的对比
那为什么要使用Label呢? 好吧,Label和TextBlock之间有一些重要的区别。 TextBlock仅允许您呈现文本字串,而Label还允许您做下列的事情:
- 设定边界(border)
- 渲染其他控件,例如一张图片
- 通过ContentTemplate属性使用模板化的内容
- 使用访问键聚焦到相关的控件上
最后一个点是使用Label取代TextBlock控件的其中一个主要原因.当你只是需要渲染简单的文本内容时,你应该使用TextBlock控件,因为它更轻量并且在大多数场景下性能比Label好.
TextBox
单行TextBox
多行文本框
有拼写检查的TextBox
- SpellCheck类中名为IsEnabled的附加属性,该属性仅支持对父控件进行拼写检查,以及Language属性,该属性指示拼写检查器使用的语言。
使用TextBox的选择属性
<DockPanel Margin="10"><TextBox SelectionChanged="TextBox_SelectionChanged" DockPanel.Dock="Top" /><TextBox Name="txtStatus" AcceptsReturn="True" TextWrapping="Wrap" IsReadOnly="True" />
</DockPanel>
选择事件
private void TextBox_SelectionChanged(object sender, RoutedEventArgs e)
{TextBox textBox = sender as TextBox;txtStatus.Text = "Selection starts at character #" + textBox.SelectionStart + Environment.NewLine;txtStatus.Text += "Selection is " + textBox.SelectionLength + " character(s) long" + Environment.NewLine;txtStatus.Text += "Selected text: '" + textBox.SelectedText + "'";
}
我们使用三个相关的属性来实现:
SelectionStart,它给出了当前光标位置或是否有选择:它从什么位置开始。
SelectionLength,它给出了当前选择的长度,如果有的话。 否则它将返回0。
SelectedText,如果有选择,它会给我们当前选择的字符串。 否则返回一个空字符串。
Button
简单的按钮
格式化内容
具有高级内容的按钮
<Button><StackPanel Orientation="Horizontal"><TextBlock>Formatted </TextBlock><TextBlock Foreground="Blue" FontWeight="Bold" Margin="2,0">Button</TextBlock><TextBlock Foreground="Gray" FontStyle="Italic">[Various]</TextBlock></StackPanel>
</Button>
带图片的按钮(ImageButton)
<Button Padding="5">  <StackPanel Orientation="Horizontal">  <Image Source="/WpfTutorialSamples;component/Images/help.png" />  <TextBlock Margin="5,0">Help</TextBlock>  </StackPanel>
</Button>
按钮填充
<Button Padding="5,2">Hello, World!</Button>
- 基于通用样式编写
<Window.Resources><Style TargetType="{x:Type Button}"><Setter Property="Padding" Value="5,2"/></Style>
</Window.Resources>
CheckBox
基本内容
自定义内容
IsThreeState 属性
IsThreeState 的一般用法是创建一个“全部启用”的 CheckBox,让它控制一系列的子 CheckBox,并显示它们作为一个整体的状态。我们下面的例子展示了如何创建几个可开关的功能,并在窗口最上面有一个“全部启用”的 CheckBox:
<StackPanel Margin="10"><Label FontWeight="Bold">Application Options</Label><StackPanel Margin="10,5"><CheckBox IsThreeState="True" Name="cbAllFeatures" Checked="cbAllFeatures_CheckedChanged" Unchecked="cbAllFeatures_CheckedChanged">Enable all</CheckBox><StackPanel Margin="20,5"><CheckBox Name="cbFeatureAbc" Checked="cbFeature_CheckedChanged" Unchecked="cbFeature_CheckedChanged">Enable feature ABC</CheckBox><CheckBox Name="cbFeatureXyz" IsChecked="True" Checked="cbFeature_CheckedChanged" Unchecked="cbFeature_CheckedChanged">Enable feature XYZ</CheckBox><CheckBox Name="cbFeatureWww" Checked="cbFeature_CheckedChanged" Unchecked="cbFeature_CheckedChanged">Enable feature WWW</CheckBox></StackPanel></StackPanel>
</StackPanel>
private void cbAllFeatures_CheckedChanged(object sender, RoutedEventArgs e)
{bool newVal = (cbAllFeatures.IsChecked == true);cbFeatureAbc.IsChecked = newVal;cbFeatureXyz.IsChecked = newVal;cbFeatureWww.IsChecked = newVal;
}
private void cbFeature_CheckedChanged(object sender, RoutedEventArgs e)
{cbAllFeatures.IsChecked = null;if((cbFeatureAbc.IsChecked == true) && (cbFeatureXyz.IsChecked == true) && (cbFeatureWww.IsChecked == true))cbAllFeatures.IsChecked = true;if((cbFeatureAbc.IsChecked == false) && (cbFeatureXyz.IsChecked == false) && (cbFeatureWww.IsChecked == false))cbAllFeatures.IsChecked = false;
}RadioButton
基本用法
RadioButton 组 GroupName="ready"
自定义内容
<StackPanel Margin="10"><Label FontWeight="Bold">Are you ready?</Label><RadioButton><WrapPanel><Image Source="/WpfTutorialSamples;component/Images/accept.png" Width="16" Height="16" Margin="0,0,5,0" /><TextBlock Text="Yes" Foreground="Green" /></WrapPanel></RadioButton><RadioButton Margin="0,5"><WrapPanel><Image Source="/WpfTutorialSamples;component/Images/cancel.png" Width="16" Height="16" Margin="0,0,5,0" /><TextBlock Text="No" Foreground="Red" /></WrapPanel></RadioButton><RadioButton IsChecked="True"><WrapPanel><Image Source="/WpfTutorialSamples;component/Images/question.png" Width="16" Height="16" Margin="0,0,5,0" /><TextBlock Text="Maybe" Foreground="Gray" /></WrapPanel></RadioButton>
</StackPanel>
PasswordBox
基本用法
PasswordChar
Image
Source属性
动态加载图片(后置代码)
<StackPanel><WrapPanel Margin="10" HorizontalAlignment="Center"><Button Name="btnLoadFromFile" Margin="0,0,20,0" Click="BtnLoadFromFile_Click">Load from File...</Button><Button Name="btnLoadFromResource" Click="BtnLoadFromResource_Click">Load from Resource</Button></WrapPanel><Image Name="imgDynamic" Margin="10"  />
</StackPanel>
private void BtnLoadFromFile_Click(object sender, RoutedEventArgs e)
{OpenFileDialog openFileDialog = new OpenFileDialog();if(openFileDialog.ShowDialog() == true){Uri fileUri = new Uri(openFileDialog.FileName);imgDynamic.Source = new BitmapImage(fileUri);}
}private void BtnLoadFromResource_Click(object sender, RoutedEventArgs e)
{Uri resourceUri = new Uri("/Images/white_bengal_tiger.jpg", UriKind.Relative);imgDynamic.Source = new BitmapImage(resourceUri);
}Stretch属性
- Uniform: 这是默认模式。 图片将自动缩放,以便它适合图片区域。 将保留图片的宽高比。
- UniformToFill: 图片将被缩放,以便完全填充图片区域。 将保留图片的宽高比。
- Fill: 图片将缩放以适合图片控件的区域。 可能无法保留宽高比,因为图片的高度和宽度是独立缩放的。
- None: 如果图片小于图片控件,则不执行任何操作。 如果它比图片控件大,则会裁剪图片以适合图片控件,这意味着只有部分图片可见。
<Grid><Grid.ColumnDefinitions><ColumnDefinition Width="*" /><ColumnDefinition Width="*" /><ColumnDefinition Width="*" /><ColumnDefinition Width="*" /></Grid.ColumnDefinitions><Grid.RowDefinitions><RowDefinition Height="Auto" /><RowDefinition Height="*" /></Grid.RowDefinitions><Label Grid.Column="0" HorizontalAlignment="Center" FontWeight="Bold">Uniform</Label><Label Grid.Column="1" HorizontalAlignment="Center" FontWeight="Bold">UniformToFill</Label><Label Grid.Column="2" HorizontalAlignment="Center" FontWeight="Bold">Fill</Label><Label Grid.Column="3" HorizontalAlignment="Center" FontWeight="Bold">None</Label><Image Source="/Images/white_bengal_tiger.jpg" Stretch="Uniform" Grid.Column="0" Grid.Row="1" Margin="5" /><Image Source="/Images/white_bengal_tiger.jpg" Stretch="UniformToFill" Grid.Column="1" Grid.Row="1" Margin="5" /><Image Source="/Images/white_bengal_tiger.jpg" Stretch="Fill" Grid.Column="2" Grid.Row="1" Margin="5" /><Image Source="/Images/white_bengal_tiger.jpg" Stretch="None" Grid.Column="3" Grid.Row="1" Margin="5" />
</Grid>
ToolTip
基础用法
<Grid VerticalAlignment="Center" HorizontalAlignment="Center"><Button ToolTip="Click here and something will happen!">Click here!</Button>
</Grid>
应用
<DockPanel><ToolBar DockPanel.Dock="Top"><Button ToolTip="Create a new file"><Button.Content><Image Source="/WpfTutorialSamples;component/Images/page_white.png" Width="16" Height="16" /></Button.Content></Button><Button><Button.Content><Image Source="/WpfTutorialSamples;component/Images/folder.png" Width="16" Height="16" /></Button.Content><Button.ToolTip><StackPanel><TextBlock FontWeight="Bold" FontSize="14" Margin="0,0,0,5">Open file</TextBlock><TextBlock>Search your computer or local network<LineBreak />for a file and open it for editing.</TextBlock><Border BorderBrush="Silver" BorderThickness="0,1,0,0" Margin="0,8" /><WrapPanel><Image Source="/WpfTutorialSamples;component/Images/help.png" Margin="0,0,5,0" /><TextBlock FontStyle="Italic">Press F1 for more help</TextBlock></WrapPanel></StackPanel></Button.ToolTip></Button></ToolBar><TextBox>Editor area...</TextBox>
</DockPanel>
高级选项
ShowDuration
ShowDuration 属性扩展工具提示的时间(我们将其设置为5.000毫秒或5秒)
WPF文本渲染
控制文本渲染
TextFormattingMode
<StackPanel Margin="10"><Label TextOptions.TextFormattingMode="Ideal" FontSize="9">TextFormattingMode.Ideal, small text</Label><Label TextOptions.TextFormattingMode="Display" FontSize="9">TextFormattingMode.Display, small text</Label><Label TextOptions.TextFormattingMode="Ideal" FontSize="20">TextFormattingMode.Ideal, large text</Label><Label TextOptions.TextFormattingMode="Display" FontSize="20">TextFormattingMode.Display, large text</Label>
</StackPanel>
TextRenderingMode
<StackPanel Margin="10" TextOptions.TextFormattingMode="Display"><Label TextOptions.TextRenderingMode="Auto" FontSize="9">TextRenderingMode.Auto, small text</Label><Label TextOptions.TextRenderingMode="Aliased" FontSize="9">TextRenderingMode.Aliased, small text</Label><Label TextOptions.TextRenderingMode="ClearType" FontSize="9">TextRenderingMode.ClearType, small text</Label><Label TextOptions.TextRenderingMode="Grayscale" FontSize="9">TextRenderingMode.Grayscale, small text</Label><Label TextOptions.TextRenderingMode="Auto" FontSize="18">TextRenderingMode.Auto, large text</Label><Label TextOptions.TextRenderingMode="Aliased" FontSize="18">TextRenderingMode.Aliased, large text</Label><Label TextOptions.TextRenderingMode="ClearType" FontSize="18">TextRenderingMode.ClearType, large text</Label><Label TextOptions.TextRenderingMode="Grayscale" FontSize="18">TextRenderingMode.Grayscale, large text</Label>
</StackPanel>
Tab顺序
TabIndex和**IsTabStop**。 TabIndex用于定义顺序,而IsTabStop将强制WPF在窗口按Tab时跳过这个控件。
<Grid Margin="20"><Grid.ColumnDefinitions><ColumnDefinition Width="*" /><ColumnDefinition Width="20" /><ColumnDefinition Width="*" /></Grid.ColumnDefinitions><Grid.RowDefinitions><RowDefinition Height="*" /><RowDefinition Height="Auto" /></Grid.RowDefinitions><StackPanel><Label>First name:</Label><TextBox  /><Label>Street name:</Label><TextBox /><Label>City:</Label><TextBox IsReadOnly="True" IsTabStop="False" Background="LightYellow" /></StackPanel><StackPanel Grid.Column="2"><Label>Last name:</Label><TextBox  /><Label>Zip Code:</Label><TextBox  /></StackPanel><Button Grid.Row="1" HorizontalAlignment="Right" Width="80">Add</Button><Button Grid.Row="1" Grid.Column="2" HorizontalAlignment="Left" Width="80">Cancel</Button>
</Grid>
Border
基础用法
圆角边界
<Grid Margin="10"><Border Background="GhostWhite" BorderBrush="Silver" BorderThickness="1" CornerRadius="8,8,3,3"><StackPanel Margin="10"><Button>Button 1</Button><Button Margin="0,10">Button 2</Button><Button>Button 3</Button></StackPanel></Border>
</Grid>
边界颜色/宽度
<Grid Margin="10"><Border Background="GhostWhite" BorderBrush="DodgerBlue" BorderThickness="1,3,1,5"><StackPanel Margin="10"><Button>Button 1</Button><Button Margin="0,10">Button 2</Button><Button>Button 3</Button></StackPanel></Border>
</Grid>
边界背景
<Grid Margin="10"><Border BorderBrush="Navy" BorderThickness="1,3,1,5"><Border.Background><LinearGradientBrush StartPoint="0.5,0" EndPoint="0.5,1"><GradientStop Color="LightCyan" Offset="0.0" /><GradientStop Color="LightBlue" Offset="0.5" /><GradientStop Color="DarkTurquoise" Offset="1.0" /></LinearGradientBrush></Border.Background><StackPanel Margin="10"><Button>Button 1</Button><Button Margin="0,10">Button 2</Button><Button>Button 3</Button></StackPanel></Border>
</Grid>
Slider
基本用法
刻度
<StackPanel VerticalAlignment="Center" Margin="10"><Slider Maximum="100" TickPlacement="BottomRight" TickFrequency="5" />
</StackPanel>
捕获标记
<StackPanel VerticalAlignment="Center" Margin="10"><Slider Maximum="100" TickPlacement="BottomRight" TickFrequency="10" IsSnapToTickEnabled="True" />
</StackPanel>
Slider值
<DockPanel VerticalAlignment="Center" Margin="10"><TextBox Text="{Binding ElementName=slValue, Path=Value, UpdateSourceTrigger=PropertyChanged}" DockPanel.Dock="Right" TextAlignment="Right" Width="40" /><Slider Maximum="255" TickPlacement="BottomRight" TickFrequency="5" IsSnapToTickEnabled="True" Name="slValue" />
</DockPanel>
响应变化的值
<StackPanel Margin="10" VerticalAlignment="Center"><DockPanel VerticalAlignment="Center" Margin="10"><Label DockPanel.Dock="Left" FontWeight="Bold">R:</Label><TextBox Text="{Binding ElementName=slColorR, Path=Value, UpdateSourceTrigger=PropertyChanged}" DockPanel.Dock="Right" TextAlignment="Right" Width="40" /><Slider Maximum="255" TickPlacement="BottomRight" TickFrequency="5" IsSnapToTickEnabled="True" Name="slColorR" ValueChanged="ColorSlider_ValueChanged" /></DockPanel><DockPanel VerticalAlignment="Center" Margin="10"><Label DockPanel.Dock="Left" FontWeight="Bold">G:</Label><TextBox Text="{Binding ElementName=slColorG, Path=Value, UpdateSourceTrigger=PropertyChanged}" DockPanel.Dock="Right" TextAlignment="Right" Width="40" /><Slider Maximum="255" TickPlacement="BottomRight" TickFrequency="5" IsSnapToTickEnabled="True" Name="slColorG" ValueChanged="ColorSlider_ValueChanged" /></DockPanel><DockPanel VerticalAlignment="Center" Margin="10"><Label DockPanel.Dock="Left" FontWeight="Bold">B:</Label><TextBox Text="{Binding ElementName=slColorB, Path=Value, UpdateSourceTrigger=PropertyChanged}" DockPanel.Dock="Right" TextAlignment="Right" Width="40" /><Slider Maximum="255" TickPlacement="BottomRight" TickFrequency="5" IsSnapToTickEnabled="True" Name="slColorB" ValueChanged="ColorSlider_ValueChanged" /></DockPanel>
</StackPanel>
private void ColorSlider_ValueChanged(object sender, RoutedPropertyChangedEventArgs<double> e)
{Color color = Color.FromRgb((byte)slColorR.Value, (byte)slColorG.Value, (byte)slColorB.Value);this.Background = new SolidColorBrush(color);
}ProgressBar
基本操作
在执行漫长的任务时显示进度
<Grid Margin="20"><ProgressBar Minimum="0" Maximum="100" Name="pbStatus" />
</Grid>
private void Window_ContentRendered(object sender, EventArgs e)
{for(int i = 0; i < 100; i++){pbStatus.Value++;Thread.Sleep(100);}
}BackgroundWorker
private void Window_ContentRendered(object sender, EventArgs e)
{BackgroundWorker worker = new BackgroundWorker();worker.WorkerReportsProgress = true;worker.DoWork += worker_DoWork;worker.ProgressChanged += worker_ProgressChanged;worker.RunWorkerAsync();
}
void worker_DoWork(object sender, DoWorkEventArgs e)
{for(int i = 0; i < 100; i++){(sender as BackgroundWorker).ReportProgress(i);Thread.Sleep(100);}
}
void worker_ProgressChanged(object sender, ProgressChangedEventArgs e)
{pbStatus.Value = e.ProgressPercentage;
}
不确定
<Grid Margin="20"><ProgressBar Minimum="0" Maximum="100" Name="pbStatus" IsIndeterminate="True" />
</Grid>
ProgressBar显示文本
<Grid Margin="20"><ProgressBar Minimum="0" Maximum="100" Value="75" Name="pbStatus" /><TextBlock Text="{Binding ElementName=pbStatus, Path=Value, StringFormat={}{0:0}%}" HorizontalAlignment="Center" VerticalAlignment="Center" />
</Grid>
WebBrowser
<Window.CommandBindings><CommandBinding Command="NavigationCommands.BrowseBack" CanExecute="BrowseBack_CanExecute" Executed="BrowseBack_Executed" /><CommandBinding Command="NavigationCommands.BrowseForward" CanExecute="BrowseForward_CanExecute" Executed="BrowseForward_Executed" /><CommandBinding Command="NavigationCommands.GoToPage" CanExecute="GoToPage_CanExecute" Executed="GoToPage_Executed" />
</Window.CommandBindings>
<DockPanel><ToolBar DockPanel.Dock="Top"><Button Command="NavigationCommands.BrowseBack"><Image Source="/WpfTutorialSamples;component/Images/arrow_left.png" Width="16" Height="16" /></Button><Button Command="NavigationCommands.BrowseForward"><Image Source="/WpfTutorialSamples;component/Images/arrow_right.png" Width="16" Height="16" /></Button><Separator /><TextBox Name="txtUrl" Width="300" KeyUp="txtUrl_KeyUp" /><Button Command="NavigationCommands.GoToPage"><Image Source="/WpfTutorialSamples;component/Images/world_go.png" Width="16" Height="16" /></Button></ToolBar><WebBrowser Name="wbSample" Navigating="wbSample_Navigating"></WebBrowser>
</DockPanel>
public partial class WebBrowserControlSample : Window
{public WebBrowserControlSample(){InitializeComponent();wbSample.Navigate("http://www.wpf-tutorial.com");}private void txtUrl_KeyUp(object sender, KeyEventArgs e){if(e.Key == Key.Enter)wbSample.Navigate(txtUrl.Text);}private void wbSample_Navigating(object sender, System.Windows.Navigation.NavigatingCancelEventArgs e){txtUrl.Text = e.Uri.OriginalString;}private void BrowseBack_CanExecute(object sender, CanExecuteRoutedEventArgs e){e.CanExecute = ((wbSample != null) && (wbSample.CanGoBack));}private void BrowseBack_Executed(object sender, ExecutedRoutedEventArgs e){wbSample.GoBack();}private void BrowseForward_CanExecute(object sender, CanExecuteRoutedEventArgs e){e.CanExecute = ((wbSample != null) && (wbSample.CanGoForward));}private void BrowseForward_Executed(object sender, ExecutedRoutedEventArgs e){wbSample.GoForward();}private void GoToPage_CanExecute(object sender, CanExecuteRoutedEventArgs e){e.CanExecute = true;}private void GoToPage_Executed(object sender, ExecutedRoutedEventArgs e){wbSample.Navigate(txtUrl.Text);}
}WindowsFromsHost
使用WinForms WebBrowser控件
<Grid><WindowsFormsHost Name="wfhSample"><WindowsFormsHost.Child><wf:WebBrowser DocumentTitleChanged="wbWinForms_DocumentTitleChanged" /></WindowsFormsHost.Child></WindowsFormsHost>
</Grid>
public partial class WindowsFormsHostSample : Window
{public WindowsFormsHostSample(){InitializeComponent();(wfhSample.Child as System.Windows.Forms.WebBrowser).Navigate("http://www.wpf-tutorial.com");}private void wbWinForms_DocumentTitleChanged(object sender, EventArgs e){this.Title = (sender as System.Windows.Forms.WebBrowser).DocumentTitle;}
}组合框
基本用法
<Grid><GroupBox Header="GroupBox Sample" Margin="10" Padding="10"><StackPanel><TextBlock>First name:</TextBlock><TextBox /><TextBlock>Last name:</TextBlock><TextBox /><Button Margin="0,20">Add User</Button></StackPanel></GroupBox>
</Grid>
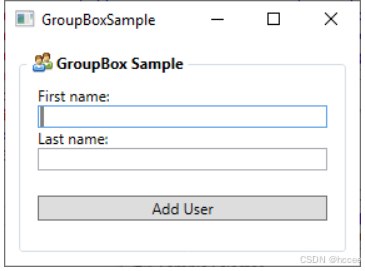
自定义标题组合框
<Grid><GroupBox Margin="10" Padding="10"><GroupBox.Header><StackPanel Orientation="Horizontal"><Image Source="/WpfTutorialSamples;component/Images/group.png" Margin="3,0" /><TextBlock FontWeight="Bold">GroupBox Sample</TextBlock></StackPanel></GroupBox.Header><StackPanel><TextBlock>First name:</TextBlock><TextBox /><TextBlock>Last name:</TextBlock><TextBox /><Button Margin="0,20">Add User</Button></StackPanel></GroupBox>
</Grid>
注意,我这里用**GroupBox.Header**标记简单替换了Header属性,随后添加了一个StackPanel 以便包含一个 Image 和一个 TextBlock —— 这样一来,你就能对 Header 完全自定义了!
日历控件
基本用法
<Grid><Calendar />
</Grid>
日历大小
<Viewbox><Calendar />
</Viewbox><Viewbox Stretch="Fill" StretchDirection="UpOnly"><Calendar />
</Viewbox>
DisplayDate设置初始化视图
<Viewbox><Calendar DisplayDate="01.01.2014" />
</Viewbox>
Calendar 选中模式
<Viewbox><Calendar SelectionMode="SingleRange" /><Calendar SelectionMode="MultipleRange" />
</Viewbox>
选中日期
<StackPanel Margin="10"><Calendar Name="cldSample" SelectionMode="MultipleRange" SelectedDate="10.10.2013" /><Label>Selected date:</Label><TextBox Text="{Binding ElementName=cldSample, Path=SelectedDate, StringFormat=d, UpdateSourceTrigger=PropertyChanged}" />
</StackPanel>
public CalendarSelectionSample()
{InitializeComponent();cldSample.SelectedDate = DateTime.Now.AddDays(1);
}多选日期
<StackPanel Margin="10"><Calendar Name="cldSample" SelectionMode="MultipleRange" /><Label>Selected dates:</Label><ListBox ItemsSource="{Binding ElementName=cldSample, Path=SelectedDates}" MinHeight="150" />
</StackPanel>
删除日期
<Viewbox><Calendar Name="cldSample" SelectionMode="MultipleRange"><Calendar.BlackoutDates><CalendarDateRange Start="10.13.2013" End="10.19.2013" /><CalendarDateRange Start="10.27.2013" End="10.31.2013" /></Calendar.BlackoutDates></Calendar>
</Viewbox>
public CalendarBlockedoutDatesSample()
{InitializeComponent();cldSample.BlackoutDates.AddDatesInPast();cldSample.BlackoutDates.Add(new CalendarDateRange(DateTime.Today, DateTime.Today.AddDays(1)));
}显示模式-显示月份或者年份
DisplayMode属性能够将Calendar 控件从一个你能选中一个日期的位置更改为到你能够选中一个月甚至一年的位置,这是能通过DisplayMode 做到,该属性默认为月份,我们已经在之前的例子中都使用到了
<Viewbox><Calendar DisplayMode="Year" />
</Viewbox>- DisplayMode [Year, Decade]
日历选择器
基本用法
添加一个DatePicker 控件
<StackPanel Margin="20"><Label>Name:</Label><TextBox /><Label>Birthday:</Label><DatePicker></DatePicker><Label>Gender:</Label><ComboBox><ComboBoxItem>Female</ComboBoxItem><ComboBoxItem>Male</ComboBoxItem></ComboBox><Button Margin="20">Signup</Button>
</StackPanel>
显示日期和选择日期
<DatePicker SelectedDate="2000-12-31"></DatePicker>
<DatePicker Name="dp1" DisplayDate="2019-01-01" />
选择日期格式
<DatePicker SelectedDate="2000-12-31" SelectedDateFormat="Long"></DatePicker>
排除日期
<DatePicker Name="dp1"><DatePicker.BlackoutDates><CalendarDateRange Start="2019-04-01" End="2019-04-07" /><CalendarDateRange Start="2019-04-22" End="2019-04-28" /></DatePicker.BlackoutDates>
</DatePicker>
扩展控件
它的代码当然非常简单:
<Expander>  <TextBlock TextWrapping="Wrap" FontSize="18">  Here we can have text which can be hidden/shown using the built-in functionality of the Expander control.  </TextBlock>
</Expander>
Expander 默认是不会扩展开来的,所以就想第一张截图所看到那样。用户可以通过点击它扩展或者你能让它通过**IsExpanded** 属性初始时扩展:
<Expander IsExpanded="True">
你当然也能在运行时读到这个属性,如果你需要知道关于Expander 的当前状态。
高级内容
<Expander Margin="10"><StackPanel Margin="10"><DockPanel><Image Source="/WpfTutorialSamples;component/Images/question32.png" Width="32" Height="32" DockPanel.Dock="Right" Margin="10"></Image><TextBlock TextWrapping="Wrap" FontSize="18">Did you know that WPF is really awesome? Just enter your e-mail address below and we'll send you updates:</TextBlock></DockPanel><TextBox Margin="10">john@doe.org</TextBox></StackPanel>
</Expander>
扩展方向
<Expander Margin="10" ExpandDirection="Right"><TextBlock TextWrapping="Wrap" FontSize="18">Here we can have text which can be hidden/shown using the built-in functionality of the Expander control.</TextBlock>
</Expander>
自定义标题
<Expander Margin="10" Header="Click to show/hide content..."><TextBlock TextWrapping="Wrap" FontSize="18">Here we can have text which can be hidden/shown using the built-in functionality of the Expander control.</TextBlock>
</Expander>Header属性允许你去添加控件进去,去创建一个更加定制的外观:
<Expander Margin="10"><Expander.Header><DockPanel VerticalAlignment="Stretch"><Image Source="/WpfTutorialSamples;component/Images/bullet_green.png" Height="16" DockPanel.Dock="Left" /><TextBlock FontStyle="Italic" Foreground="Green">Click to show/hide content...</TextBlock></DockPanel></Expander.Header><TextBlock TextWrapping="Wrap" FontSize="18">Here we can have text which can be hidden/shown using the built-in functionality of the Expander control.</TextBlock>
</Expander>
ItemsControl
一个简单的ItemsControl范例
<Grid Margin="10"><ItemsControl><system:String>ItemsControl Item #1</system:String><system:String>ItemsControl Item #2</system:String><system:String>ItemsControl Item #3</system:String><system:String>ItemsControl Item #4</system:String><system:String>ItemsControl Item #5</system:String></ItemsControl>
</Grid>
有数据绑定的ItemsControl
<Grid Margin="10"><ItemsControl Name="icTodoList"><ItemsControl.ItemTemplate><DataTemplate><Grid Margin="0,0,0,5"><Grid.ColumnDefinitions><ColumnDefinition Width="*" /><ColumnDefinition Width="100" /></Grid.ColumnDefinitions><TextBlock Text="{Binding Title}" /><ProgressBar Grid.Column="1" Minimum="0" Maximum="100" Value="{Binding Completion}" /></Grid></DataTemplate></ItemsControl.ItemTemplate></ItemsControl>
</Grid>
public partial class ItemsControlDataBindingSample : Window
{public ItemsControlDataBindingSample(){InitializeComponent();List<TodoItem> items = new List<TodoItem>();items.Add(new TodoItem() { Title = "Complete this WPF tutorial", Completion = 45 });items.Add(new TodoItem() { Title = "Learn C#", Completion = 80 });items.Add(new TodoItem() { Title = "Wash the car", Completion = 0 });icTodoList.ItemsSource = items;}
}public class TodoItem
{public string Title { get; set; }public int Completion { get; set; }
}ItemsPanelTemplate属性
<Grid Margin="10"><ItemsControl><ItemsControl.ItemsPanel><ItemsPanelTemplate><WrapPanel /></ItemsPanelTemplate></ItemsControl.ItemsPanel><ItemsControl.ItemTemplate><DataTemplate><Button Content="{Binding}" Margin="0,0,5,5" /></DataTemplate></ItemsControl.ItemTemplate><system:String>Item #1</system:String><system:String>Item #2</system:String><system:String>Item #3</system:String><system:String>Item #4</system:String><system:String>Item #5</system:String></ItemsControl>
</Grid>
UniformGrid面板,我们可以在其中定义多个列,然后将我们的项目整齐地显示在同样宽
<Grid Margin="10"><ScrollViewer VerticalScrollBarVisibility="Auto" HorizontalScrollBarVisibility="Auto"><ItemsControl><system:String>ItemsControl Item #1</system:String><system:String>ItemsControl Item #2</system:String><system:String>ItemsControl Item #3</system:String><system:String>ItemsControl Item #4</system:String><system:String>ItemsControl Item #5</system:String></ItemsControl></ScrollViewer>
</Grid>
ListBox
基本用法
<Grid Margin="10"><ListBox><ListBoxItem>ListBox Item #1</ListBoxItem><ListBoxItem>ListBox Item #2</ListBoxItem><ListBoxItem>ListBox Item #3</ListBoxItem></ListBox>
</Grid>
ListBox数据绑定
<Grid Margin="10"><ListBox Name="lbTodoList" HorizontalContentAlignment="Stretch"><ListBox.ItemTemplate><DataTemplate><Grid Margin="0,2"><Grid.ColumnDefinitions><ColumnDefinition Width="*" /><ColumnDefinition Width="100" /></Grid.ColumnDefinitions><TextBlock Text="{Binding Title}" /><ProgressBar Grid.Column="1" Minimum="0" Maximum="100" Value="{Binding Completion}" /></Grid></DataTemplate></ListBox.ItemTemplate></ListBox>
</Grid>
public partial class ListBoxDataBindingSample : Window
{public ListBoxDataBindingSample(){InitializeComponent();List<TodoItem> items = new List<TodoItem>();items.Add(new TodoItem() { Title = "Complete this WPF tutorial", Completion = 45 });items.Add(new TodoItem() { Title = "Learn C#", Completion = 80 });items.Add(new TodoItem() { Title = "Wash the car", Completion = 0 });lbTodoList.ItemsSource = items;}
}
public class TodoItem
{public string Title { get; set; }public int Completion { get; set; }
}ListBox选择
<DockPanel Margin="10"><StackPanel DockPanel.Dock="Right" Margin="10,0"><StackPanel.Resources><Style TargetType="Button"><Setter Property="Margin" Value="0,0,0,5" /></Style></StackPanel.Resources><TextBlock FontWeight="Bold" Margin="0,0,0,10">ListBox selection</TextBlock><Button Name="btnShowSelectedItem" Click="btnShowSelectedItem_Click">Show selected</Button><Button Name="btnSelectLast" Click="btnSelectLast_Click">Select last</Button><Button Name="btnSelectNext" Click="btnSelectNext_Click">Select next</Button><Button Name="btnSelectCSharp" Click="btnSelectCSharp_Click">Select C#</Button><Button Name="btnSelectAll" Click="btnSelectAll_Click">Select all</Button></StackPanel><ListBox Name="lbTodoList" HorizontalContentAlignment="Stretch" SelectionMode="Extended" SelectionChanged="lbTodoList_SelectionChanged"><ListBox.ItemTemplate><DataTemplate><Grid Margin="0,2"><Grid.ColumnDefinitions><ColumnDefinition Width="*" /><ColumnDefinition Width="100" /></Grid.ColumnDefinitions><TextBlock Text="{Binding Title}" /><ProgressBar Grid.Column="1" Minimum="0" Maximum="100" Value="{Binding Completion}" /></Grid></DataTemplate></ListBox.ItemTemplate></ListBox>
</DockPanel>
public partial class ListBoxSelectionSample : Window
{public ListBoxSelectionSample(){InitializeComponent();List<TodoItem> items = new List<TodoItem>();items.Add(new TodoItem() { Title = "Complete this WPF tutorial", Completion = 45 });items.Add(new TodoItem() { Title = "Learn C#", Completion = 80 });items.Add(new TodoItem() { Title = "Wash the car", Completion = 0 });lbTodoList.ItemsSource = items;}private void lbTodoList_SelectionChanged(object sender, System.Windows.Controls.SelectionChangedEventArgs e){if(lbTodoList.SelectedItem != null)this.Title = (lbTodoList.SelectedItem as TodoItem).Title;}private void btnShowSelectedItem_Click(object sender, RoutedEventArgs e){foreach(object o in lbTodoList.SelectedItems)MessageBox.Show((o as TodoItem).Title);}private void btnSelectLast_Click(object sender, RoutedEventArgs e){lbTodoList.SelectedIndex = lbTodoList.Items.Count - 1;}private void btnSelectNext_Click(object sender, RoutedEventArgs e){int nextIndex = 0;if((lbTodoList.SelectedIndex >= 0) && (lbTodoList.SelectedIndex < (lbTodoList.Items.Count - 1)))nextIndex = lbTodoList.SelectedIndex + 1;lbTodoList.SelectedIndex = nextIndex;}private void btnSelectCSharp_Click(object sender, RoutedEventArgs e){foreach(object o in lbTodoList.Items){if((o is TodoItem) && ((o as TodoItem).Title.Contains("C#"))){lbTodoList.SelectedItem = o;break;}}}private void btnSelectAll_Click(object sender, RoutedEventArgs e){foreach(object o in lbTodoList.Items)lbTodoList.SelectedItems.Add(o);}
}
public class TodoItem
{public string Title { get; set; }public int Completion { get; set; }
}ComboBox
基本用法
<StackPanel Margin="10"><ComboBox><ComboBoxItem>ComboBox Item #1</ComboBoxItem><ComboBoxItem IsSelected="True">ComboBox Item #2</ComboBoxItem><ComboBoxItem>ComboBox Item #3</ComboBoxItem></ComboBox>
</StackPanel>
自定义内容
<StackPanel Margin="10"><ComboBox><ComboBoxItem><StackPanel Orientation="Horizontal"><Image Source="/WpfTutorialSamples;component/Images/bullet_red.png" /><TextBlock Foreground="Red">Red</TextBlock></StackPanel></ComboBoxItem><ComboBoxItem><StackPanel Orientation="Horizontal"><Image Source="/WpfTutorialSamples;component/Images/bullet_green.png" /><TextBlock Foreground="Green">Green</TextBlock></StackPanel></ComboBoxItem><ComboBoxItem><StackPanel Orientation="Horizontal"><Image Source="/WpfTutorialSamples;component/Images/bullet_blue.png" /><TextBlock Foreground="Blue">Blue</TextBlock></StackPanel></ComboBoxItem></ComboBox>
</StackPanel>
数据绑定ComboBox
<StackPanel Margin="10"><ComboBox Name="cmbColors"><ComboBox.ItemTemplate><DataTemplate><StackPanel Orientation="Horizontal"><Rectangle Fill="{Binding Name}" Width="16" Height="16" Margin="0,2,5,2" /><TextBlock Text="{Binding Name}" /></StackPanel></DataTemplate></ComboBox.ItemTemplate></ComboBox>
</StackPanel>
public partial class ComboBoxDataBindingSample : Window
{public ComboBoxDataBindingSample(){InitializeComponent();cmbColors.ItemsSource = typeof(Colors).GetProperties();}
}IsEditable
<StackPanel Margin="10"><ComboBox IsEditable="True"><ComboBoxItem>ComboBox Item #1</ComboBoxItem><ComboBoxItem>ComboBox Item #2</ComboBoxItem><ComboBoxItem>ComboBox Item #3</ComboBoxItem></ComboBox>
</StackPanel>
使用ComboBox选择
<StackPanel Margin="10"><ComboBox Name="cmbColors" SelectionChanged="cmbColors_SelectionChanged"><ComboBox.ItemTemplate><DataTemplate><StackPanel Orientation="Horizontal"><Rectangle Fill="{Binding Name}" Width="16" Height="16" Margin="0,2,5,2" /><TextBlock Text="{Binding Name}" /></StackPanel></DataTemplate></ComboBox.ItemTemplate></ComboBox><WrapPanel Margin="15" HorizontalAlignment="Center"><Button Name="btnPrevious" Click="btnPrevious_Click" Width="55">Previous</Button><Button Name="btnNext" Click="btnNext_Click" Margin="5,0" Width="55">Next</Button><Button Name="btnBlue" Click="btnBlue_Click" Width="55">Blue</Button></WrapPanel>
</StackPanel>
public partial class ComboBoxSelectionSample : Window
{public ComboBoxSelectionSample(){InitializeComponent();cmbColors.ItemsSource = typeof(Colors).GetProperties();}private void btnPrevious_Click(object sender, RoutedEventArgs e){if(cmbColors.SelectedIndex > 0)cmbColors.SelectedIndex = cmbColors.SelectedIndex - 1;}private void btnNext_Click(object sender, RoutedEventArgs e){if(cmbColors.SelectedIndex < cmbColors.Items.Count-1)cmbColors.SelectedIndex = cmbColors.SelectedIndex + 1;}private void btnBlue_Click(object sender, RoutedEventArgs e){cmbColors.SelectedItem = typeof(Colors).GetProperty("Blue");}private void cmbColors_SelectionChanged(object sender, System.Windows.Controls.SelectionChangedEventArgs e){Color selectedColor = (Color)(cmbColors.SelectedItem as PropertyInfo).GetValue(null, null);this.Background = new SolidColorBrush(selectedColor);}
}


