2023年的深度学习入门指南(3) - 前端同学如何进行chatgpt开发
在第二篇,我们使用openai的python库封装,搞得它有点像之前学习的PyTorch一样的库。这一节我们专门给它正下名,前端就是字面意义上的前端。
给gpt4写前端
下面我们写一个最土的使用gpt4 API的页面,就一个输入框加一个回显的区域。
我们先写HTML页面:
<!DOCTYPE html>
<html lang="en">
<head><meta charset="UTF-8"><meta name="viewport" content="width=device-width, initial-scale=1.0"><title>gpt4聊天机器人</title><link rel="stylesheet" href="styles.css"><link rel="stylesheet"href="default.min.css"><script src="highlight.min.js"></script>
</head>
<body>
<div class="container"><h1>gpt4聊天机器人</h1><form id="inputForm"><label for="userInput">请输入聊天内容:</label><input type="text" id="userInput" name="userInput"><button type="submit">提交</button></form><div id="response"><h2>来自gpt4的回复:</h2><div id="responseText"></div></div>
</div>
<script src="script.js"></script>
</body>
</html>
我对代码的显示格式比较看重,所以增加了highlight.js来高亮代码,可以到https://highlightjs.org/download/ 这里去下载最新版本放到本地。
其它的就是一个form加上一个div。
然后是javascript,首先是响应submit事件的处理:
document.getElementById("inputForm").addEventListener("submit", async (event) => {event.preventDefault();const userInput = document.getElementById("userInput").value;if (userInput) {const responseText = document.getElementById("responseText");responseText.innerHTML = "gpt4正在思考中...";const apiResponse = await callOpenAI(userInput);}
});
接着是调用OpenAI API的部分了,因为我们没有后端,所以key暂时先明文写到网页里。
async function callOpenAI(userInput) {const apiKey = "你的openai api key";const apiURL = "https://api.openai.com/v1/chat/completions";const requestOptions = {method: "POST",headers: {"Content-Type": "application/json","Authorization": `Bearer ${apiKey}`},body: JSON.stringify({model: "gpt-4",messages: [{role: "system", content: "You are a skilled software engineer."},{role: "user", content: userInput}],max_tokens: 4096,n: 1,stop: null,temperature: 1})};try {const response = await fetch(apiURL, requestOptions);const data = await response.json();const responseTextElement = document.getElementById("responseText");responseTextElement.innerHTML = parseAndHighlightCode(data.choices[0].message.content);// Apply highlight to all <code> elementsconst codeBlocks = responseTextElement.getElementsByTagName("code");for (const codeBlock of codeBlocks) {hljs.highlightBlock(codeBlock);}} catch (error) {console.error("Error:", error);responseText.innerHTML = "An error occurred while fetching the response.";}
}
大家注意这部分参数:
model: "gpt-4",messages: [{role: "system", content: "You are a skilled software engineer."},{role: "user", content: userInput}],
模型根据需要来选择,一般选择chatgpt,也就是’gpt-3.5-turbo’.
另外还有角色的部分,根据场景的不同,可以给system角色以更多的提示。
最后是解析代码并高亮的部分:
function parseAndHighlightCode(text) {text = String(text); // Ensure 'text' is a stringconst regex = /```(\w+)?\s*([\s\S]*?)```/g;return text.replace(regex, (match, language, code) => {const langClass = language ? ` class="${language}"` : '';return `<pre><code${langClass}>${code.trim()}</code></pre>`;});
}
该函数的作用是在输入的文本中搜索用三个反引号包裹的代码块,并将其包裹在 HTML 的 <pre> 和 <code> 标签中,如果代码块开头的反引号中指定了编程语言,还会在 <code> 标签中添加一个 class 属性。
这个函数首先将 text 参数转换为字符串类型,确保它是一个字符串。然后,它使用 RegExp 构造函数创建一个正则表达式对象,这个正则表达式对象可以匹配以三个反引号开始和结束的代码块,并且可以在反引号内指定编程语言。
样式都是chatgpt给生成的,我只是改了下支持换行显示:
body {font-family: Arial, sans-serif;background-color: #f0f0f0;margin: 0;padding: 0;
}.container {max-width: 800px;margin: 0 auto;padding: 2rem;background-color: #ffffff;box-shadow: 0px 0px 10px rgba(0, 0, 0, 0.1);
}form {display: flex;flex-direction: column;
}input {margin-bottom: 1rem;padding: 0.5rem;font-size: 1rem;
}button {background-color: #0077cc;color: #ffffff;padding: 0.5rem;font-size: 1rem;border: none;cursor: pointer;margin-bottom: 2rem;
}button:hover {background-color: #0055a5;
}
#responseText {white-space: pre-wrap;
}
修改输入框高度
只支持一行看起来不太好,那干脆我们多支持几行:
<div class="container"><h1>gpt4聊天机器人</h1><form id="inputForm"><label for="userInput">请输入聊天内容:</label><!--input type="text" id="userInput" name="userInput"--><textarea id="userInput" rows="10" cols="50" placeholder="请输入内容"></textarea><button type="submit">提交</button></form><div id="response"><h2>来自gpt4的回复:</h2><div id="responseText"></div></div>
</div>
这样输入大段文本的时候能更舒服一点。
我们还可以将其改成文本区域自动适应的。
我们可以给textarea增加一个oninput事件处理函数:
<textarea id="userInput" rows="1" cols="80" placeholder="请输入内容" oninput="autoResize(this)"></textarea>
实现起来也很简单,将高度改成auto:
function autoResize(textarea) {textarea.style.height = 'auto'; // Reset the height to 'auto'textarea.style.height = textarea.scrollHeight + 'px'; // Set the new height based on scrollHeight
}
为了能够让页面加载时也根据内容调整,我们给DOMContentLoaded事件上注册一个函数:
document.addEventListener('DOMContentLoaded', () => {const userInput = document.getElementById('userInput');autoResize(userInput);
});
让chatgpt成为有身份的人
我们知道,在chatgpt的使用中,告诉chatgpt具体的情境会大大提升准确率。
于是我们给角色增加一个输入框吧:
<div class="container"><h1>gpt4聊天机器人</h1><form id="inputForm"><label for="userInput">请输入聊天内容:</label><!--input type="text" id="userInput" name="userInput"--><textarea id="userInput" rows="1" cols="80" placeholder="请输入内容" oninput="autoResize(this)"></textarea><button type="submit">提交</button></form><div id="system-input"><h2>你希望gpt4扮演一个什么样的角色</h2><input id="systemInput" type="text" placeholder="你是一个友好的聊天机器人"/></div><div id="response"><h2>来自gpt4的回复:</h2><div id="responseText"></div></div>
</div>
然后将用户输入发给openai:
const systemInput = document.getElementById("systemInput").value;const requestOptions = {method: "POST",headers: {"Content-Type": "application/json","Authorization": `Bearer ${apiKey}`},body: JSON.stringify({model: "gpt-4",messages: [{role: "system", content: systemInput},{role: "user", content: userInput}],max_tokens: 4096,n: 1,stop: null,temperature: 1})};
样式有点难看啊,我们写个样式吧:
#system-input {display: flex;flex-direction: column;align-items: center;margin-bottom: 20px;
}#system-input h2 {margin-bottom: 10px;
}#systemInput {font-size: 16px;padding: 8px 12px;width: 100%;max-width: 500px;border: 1px solid #ccc;border-radius: 4px;box-sizing: border-box;outline: none;transition: border-color 0.15s ease-in-out, box-shadow 0.15s ease-in-out;
}#systemInput:focus {border-color: #66afe9;box-shadow: 0 0 4px rgba(102, 175, 233, 0.6);
}
chatgpt回复部分也稍微调下样式:
#response {display: flex;flex-direction: column;align-items: center;margin-bottom: 20px;
}#response h2 {margin-bottom: 10px;
}#responseText {font-size: 16px;padding: 15px;width: 100%;max-width: 600px;border: 1px solid #ccc;border-radius: 4px;background-color: #f8f9fa;box-sizing: border-box;white-space: pre-wrap; /* Ensures line breaks are maintained */word-wrap: break-word; /* Allows long words to wrap onto the next line */
}
总之调整下样式吧。
样子写下来大致是:
body {font-family: 'Noto Sans SC', sans-serif;font-size: 16px;line-height: 1.6;color: #333;
}.container {max-width: 800px;margin: 0 auto;padding: 2rem;background-color: #ffffff;box-shadow: 0px 0px 10px rgba(0, 0, 0, 0.1);
}h1 {font-size: 2.5em;font-weight: bold;text-align: center;margin: 20px 0;color: #333;
}h2 {margin-bottom: 10px;font-weight: bold;text-align: center;
}form {display: flex;flex-direction: column;align-items: center;margin-bottom: 20px;}label {display: inline-block;font-size: 1.2em;font-weight: bold;color: #333;margin-bottom: 10px;
}#userInput {font-size: 16px;padding: 8px 12px;width: 100%;max-width: 500px;border: 1px solid #ccc;border-radius: 4px;box-sizing: border-box;outline: none;transition: border-color 0.15s ease-in-out, box-shadow 0.15s ease-in-out;margin-bottom: 20px;
}#userInput:focus {border-color: #66afe9;box-shadow: 0 0 4px rgba(102, 175, 233, 0.6);
}button {font-size: 1em;font-weight: bold;color: #fff;background-color: #007bff;border: none;border-radius: 4px;padding: 7px 20px;cursor: pointer;transition: background-color 0.2s ease-in-out;margin-bottom: 20px;
}button:hover {background-color: #0056b3;
}#response {display: flex;flex-direction: column;align-items: center;margin-bottom: 20px;
}#responseText {font-size: 16px;padding: 15px;width: 100%;max-width: 600px;border: 1px solid #ccc;border-radius: 4px;background-color: #f8f9fa;box-sizing: border-box;white-space: pre-wrap; /* Ensures line breaks are maintained */word-wrap: break-word; /* Allows long words to wrap onto the next line */
}#systemInput {font-size: 16px;padding: 8px 12px;width: 100%;max-width: 500px;border: 1px solid #ccc;border-radius: 4px;box-sizing: border-box;outline: none;transition: border-color 0.15s ease-in-out, box-shadow 0.15s ease-in-out;margin-bottom: 20px;
}#systemInput:focus {border-color: #66afe9;box-shadow: 0 0 4px rgba(102, 175, 233, 0.6);
}
增加模型选择功能
我们再增加一个选择使用gpt4还是chatgpt的功能吧,先加元素:
<div class="container"><h1>gpt4聊天机器人</h1><form id="inputForm"><label for="userInput">请输入聊天内容</label><textarea id="userInput" rows="1" cols="80" placeholder="请输入内容" oninput="autoResize(this)"></textarea><label for="systemInput">你希望gpt4扮演一个什么样的角色</label><input id="systemInput" type="text" placeholder="你是一个友好的聊天机器人"/><div id="model-selection"><label for="modelSelect">选择模型类型</label><select id="modelSelect"><option value="gpt-4">GPT-4</option><option value="gpt-3.5-turbo">GPT-3.5 Turbo</option></select></div><button type="submit">提交</button></form><div id="response"><h2>来自gpt4的回复:</h2><div id="responseText"></div></div>
</div>
再加代码:
const systemInput = document.getElementById("systemInput").value;const model = document.getElementById("modelSelect").value;const requestOptions = {method: "POST",headers: {"Content-Type": "application/json","Authorization": `Bearer ${apiKey}`},body: JSON.stringify({model: model,messages: [{role: "system", content: systemInput},{role: "user", content: userInput}],max_tokens: 4096,n: 1,stop: null,temperature: 1})};
最后加上样式:
#model-selection {display: flex;flex-direction: column;align-items: center;margin-bottom: 20px;
}#modelSelect {font-size: 1em;padding: 8px;border: 1px solid #ccc;border-radius: 4px;outline: none;cursor: pointer;
}
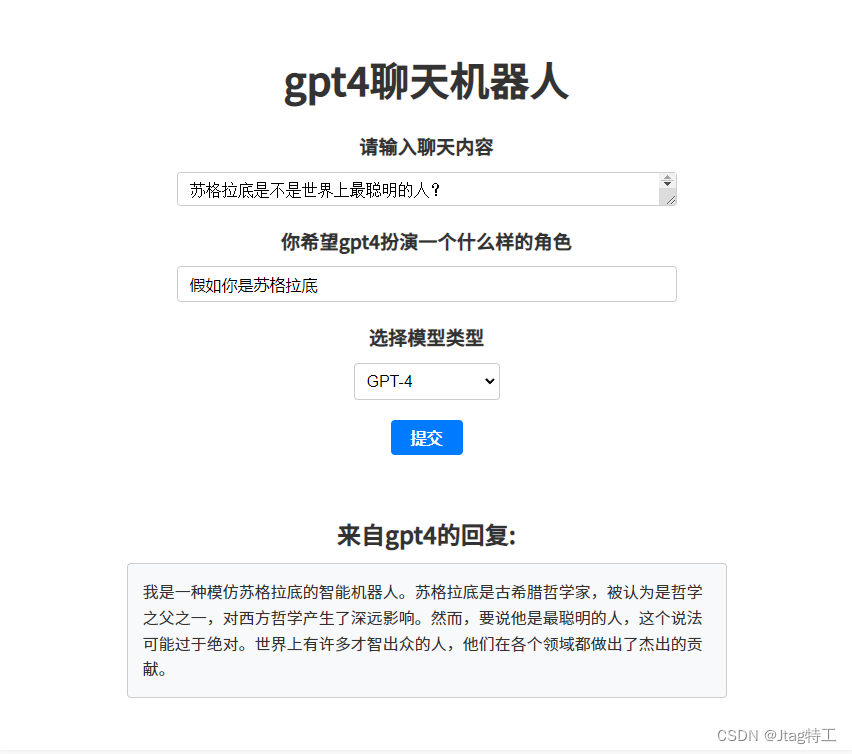
看看效果:
小结
从上面一步一步的例子,我们可以看到,前端对于用户更好地使用大模型有着不可替代的重要作用。
上面的功能我们还可以不断增加下去,比如我们可以增加例子,保存记录,反馈错误等等。
虽然没有写一行python代码,也没有微调模型(当然是可以做的),但是这里面是有对于AI的深刻理解的。








![[Nonebot2]chatgpt](https://img-blog.csdnimg.cn/img_convert/b4510b9abc955404e8f37cb7722e0a01.png)

