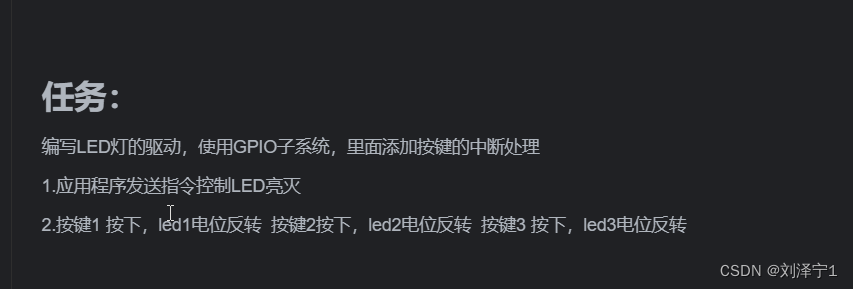
作业1:
应用层代码
#include <stdlib.h>
#include <stdio.h>
#include <sys/types.h>
#include <sys/stat.h>
#include <fcntl.h>
#include <unistd.h>
#include <string.h>
#include <sys/ioctl.h>int main(int argc, char const *argv[])
{char buf[128] = {0};int a, b;int fd;while (1){// 从终端读取fd = open("/dev/mycdev0", O_RDWR);if (fd < 0){printf("打开设备文件失败\n");exit(-1);}printf("请输入按键>");printf("0:LED1 1:LED2 2:LED3\n");printf("请输入>");scanf("%d", &b);printf("请输入指令\n");printf("0(关灯) 1(开灯)\n");printf("请输入>");scanf("%d", &a);switch (a){case 1:ioctl(fd, 1, b); // 开灯break;case 0:ioctl(fd, 0, b);break;}close(fd);}return 0;
}
驱动代码
#include <linux/init.h>
#include <linux/module.h>
#include <linux/of.h>
#include <linux/of_irq.h>
#include <linux/interrupt.h>
#include <linux/gpio.h>
#include <linux/of_gpio.h>
#include <linux/fs.h>
#include <linux/io.h>
#include <linux/device.h>
#include <linux/uaccess.h>
#include <linux/slab.h>
#include <linux/cdev.h>struct device_node *dev_led;struct gpio_desc *gpiono1;
struct gpio_desc *gpiono2;
struct gpio_desc *gpiono3;dev_t devid;
struct cdev *cdev;
unsigned int major = 500;
unsigned int minor = 0;
struct class *cls;
struct device *dev;
int mycdev_open(struct inode *inode, struct file *file)
{printk("%s:%s:%d\n", __FILE__, __func__, __LINE__);return 0;
}
long mycdev_ioctl(struct file *file, unsigned int cmd, unsigned long arg)
{switch (arg){case 0:if (cmd == 1){// 亮灯gpiod_set_value(gpiono1, 1);}else{// 灭灯gpiod_set_value(gpiono1, 0);}break;case 1:if (cmd == 1){// 亮灯gpiod_set_value(gpiono2, 1);}else{// 灭灯gpiod_set_value(gpiono2, 0);}break;case 2:if (cmd == 1){// 亮灯gpiod_set_value(gpiono3, 1);}else{// 灭灯gpiod_set_value(gpiono3, 0);}break;}return 0;
}
int mycdev_close(struct inode *inode, struct file *file)
{printk("%s:%s:%d\n", __FILE__, __func__, __LINE__);return 0;
}// 定义操作方法灯结构体变量并赋值
struct file_operations fops = {.open = mycdev_open,.unlocked_ioctl = mycdev_ioctl,.release = mycdev_close,
};static int __init mycdev_init(void)
{int ret;// 1.申请对象空间 cdev_alloccdev = cdev_alloc();if (cdev == NULL){printk("申请驱动对象空间失败\n");ret = -EFAULT;goto OUT1;}printk("申请驱动对象空间成功\n");// 2.初始化对象  cdev_initcdev_init(cdev, &fops);// 3.申请设备号  register_chrdev_region()/alloc_chrdev_region()// 动态申请if (major == 0){ret = alloc_chrdev_region(&devid, minor, 3, "mycdev");if (ret != 0){printk("动态申请设备号失败\n");goto OUT2;}// 统一后面的操作major = MAJOR(devid); // 根据设备号获取主设备号minor = MINOR(devid);}// 静态指定申请else{ret = register_chrdev_region(MKDEV(major, minor), 3, "mycdev");if (ret != 0){printk("静态指定设备号失败\n");goto OUT2;}}printk("申请设备号成功\n");// 4.注册驱动对象 cdev_add()ret = cdev_add(cdev, MKDEV(major, minor), 3);if (ret != 0){printk("注册设备驱动对象失败\n");goto OUT3;}printk("注册设备驱动对象成功\n");// 5.向上提交目录  class_create()cls = class_create(THIS_MODULE, "mycdev");if (IS_ERR(cls)){printk("向上提交目录失败\n");goto OUT4;}printk("向上提交目录成功\n");// 6.向上提交设备信息 device_create()int i;for (i = 0; i < 3; i++){dev = device_create(cls, NULL, MKDEV(major, i), NULL, "mycdev%d", i);}if (IS_ERR(dev)){printk("向上提交设备节点信息失败\n");goto OUT5;}printk("向上提交设备节点信息成功\n");//*******************************************************************//// 根据灯设备树节点的路径解析设备树信息dev_led = of_find_node_by_path("/leds");if (dev_led == NULL){printk("解析灯设备树节点失败\n");return -EFAULT;}printk("解析灯设备树节点成功\n");// led1申请gpio_desc对象并设置输出为低电平gpiono1 = gpiod_get_from_of_node(dev_led, "led1-gpios", 0, GPIOD_OUT_LOW, NULL);if (IS_ERR(gpiono1)){printk("申请gpio1对象失败\n");return -PTR_ERR(gpiono1);}printk("申请gpio1对象成功\n");// led2申请gpio_desc对象并设置输出为低电平gpiono2 = gpiod_get_from_of_node(dev_led, "led2-gpios", 0, GPIOD_OUT_LOW, NULL);if (IS_ERR(gpiono2)){printk("申请gpio2对象失败\n");return -PTR_ERR(gpiono2);}printk("申请gpio2对象成功\n");// led3申请gpio_desc对象并设置输出为低电平gpiono3 = gpiod_get_from_of_node(dev_led, "led3-gpios", 0, GPIOD_OUT_LOW, NULL);if (IS_ERR(gpiono3)){printk("申请gpio3对象失败\n");return -PTR_ERR(gpiono3);}printk("申请gpio3对象成功\n");return 0;OUT5:// 将提交成功的设备信息销毁for (--i; i >= 0; i--){device_destroy(cls, MKDEV(major, i));}
OUT4:class_destroy(cls);
OUT3:unregister_chrdev_region(MKDEV(major, minor), 3);
OUT2:kfree(cdev);
OUT1:return ret;
}
static void __exit mycdev_exit(void)
{// 1.销毁设备信息  device_destroyint i;for (i = 0; i < 3; i++){device_destroy(cls, MKDEV(major, i));}// 2.销毁目录    class_destroyclass_destroy(cls);// 3.注销驱动对象  cdev_delcdev_del(cdev);// 4.释放设备号   unregister_chrdev_region()unregister_chrdev_region(MKDEV(major, minor), 3);// 5.释放对象空间   kfree()kfree(cdev);// 灭灯gpiod_set_value(gpiono1, 0);// 释放gpio编号gpiod_put(gpiono1);// 灭灯gpiod_set_value(gpiono2, 0);// 释放gpio编号gpiod_put(gpiono2);// 灭灯gpiod_set_value(gpiono3, 0);// 释放gpio编号gpiod_put(gpiono3);
}
module_init(mycdev_init);
module_exit(mycdev_exit);
MODULE_LICENSE("GPL");
作业2
驱动代码
#include <linux/init.h>
#include <linux/module.h>
#include <linux/of.h>
#include <linux/of_irq.h>
#include <linux/interrupt.h>
#include <linux/gpio.h>
#include <linux/of_gpio.h>
/*myirq{interrupt-parent=<&gpiof>;//引用中断父节点interrupts=<9 0>,<7 0>,<8 0>;//声明和中断父节点的关系 9表示索引号,0表示默认设置
};
*/
struct device_node *dev_irq;
struct device_node *dev_led;
unsigned int irqno1;
unsigned int irqno2;
unsigned int irqno3;
struct gpio_desc *gpiono1;
struct gpio_desc *gpiono2;
struct gpio_desc *gpiono3;
//中断处理函数
irqreturn_t myirq_handler1(int irq, void *dev)
{//led1gpiod_set_value(gpiono1,!gpiod_get_value(gpiono1));printk("KEY1_INTERRUPT\n");return IRQ_HANDLED;
}
irqreturn_t myirq_handler2(int irq, void *dev)
{//led2gpiod_set_value(gpiono2,!gpiod_get_value(gpiono2));printk("KEY2_INTERRUPT\n");return IRQ_HANDLED;
}
irqreturn_t myirq_handler3(int irq, void *dev)
{//led3gpiod_set_value(gpiono3,!gpiod_get_value(gpiono3));printk("KEY3_INTERRUPT\n");return IRQ_HANDLED;
}
static int __init mycdev_init(void)
{int ret;//解析按键的设备树节点dev_irq=of_find_node_by_path("/myirq");if(dev_irq==NULL){printk("解析中断设备树节点失败\n");return -EFAULT;}printk("解析中断设备树节点成功\n");//根据设备树节点解析KEY1出软中断号irqno1=irq_of_parse_and_map(dev_irq,0);//按键1索引号为0if(!irqno1){printk("解析软中断号失败\n");return -ENXIO;}printk("解析key1软中断号成功 irqno1=%d\n",irqno1);//根据设备树节点解析KEY2出软中断号irqno2=irq_of_parse_and_map(dev_irq,1);//按键1索引号为1if(!irqno2){printk("解析软中断号失败\n");return -ENXIO;}printk("解析key2软中断号成功 irqno2=%d\n",irqno2);//根据设备树节点解析KEY3出软中断号irqno3=irq_of_parse_and_map(dev_irq,2);//按键1索引号为2if(!irqno3){printk("解析软中断号失败\n");return -ENXIO;}printk("解析key3软中断号成功 irqno3=%d\n",irqno3);//注册key1中断ret=request_irq(irqno1,myirq_handler1,IRQF_TRIGGER_FALLING,"key1",NULL);if(ret){printk("注册中断key1失败\n");return ret;}printk("注册key1中断成功\n");//注册key2中断ret=request_irq(irqno2,myirq_handler2,IRQF_TRIGGER_FALLING,"key2",NULL);if(ret){printk("注册key2中断失败\n");return ret;}printk("注册key2中断成功\n");//注册key3中断ret=request_irq(irqno3,myirq_handler3,IRQF_TRIGGER_FALLING,"key3",NULL);if(ret){printk("注册key3中断失败\n");return ret;}printk("注册key3中断成功\n");//*******************************************************************//// 根据灯设备树节点的路径解析设备树信息dev_led = of_find_node_by_path("/leds");if (dev_led == NULL){printk("解析灯设备树节点失败\n");return -EFAULT;}printk("解析灯设备树节点成功\n");// led1申请gpio_desc对象并设置输出为低电平gpiono1 = gpiod_get_from_of_node(dev_led, "led1-gpios", 0, GPIOD_OUT_LOW, NULL);if (IS_ERR(gpiono1)){printk("申请gpio1对象失败\n");return -PTR_ERR(gpiono1);}printk("申请gpio1对象成功\n");// led2申请gpio_desc对象并设置输出为低电平gpiono2 = gpiod_get_from_of_node(dev_led, "led2-gpios", 0, GPIOD_OUT_LOW, NULL);if (IS_ERR(gpiono2)){printk("申请gpio2对象失败\n");return -PTR_ERR(gpiono2);}printk("申请gpio2对象成功\n");// led3申请gpio_desc对象并设置输出为低电平gpiono3 = gpiod_get_from_of_node(dev_led, "led3-gpios", 0, GPIOD_OUT_LOW, NULL);if (IS_ERR(gpiono3)){printk("申请gpio3对象失败\n");return -PTR_ERR(gpiono3);}printk("申请gpio3对象成功\n");return 0;
}
static void __exit mycdev_exit(void)
{//注销key1中断free_irq(irqno1,NULL);//注销key2中断free_irq(irqno2,NULL);//注销key3中断free_irq(irqno3,NULL);// 灭灯gpiod_set_value(gpiono1, 0);// 释放gpio编号gpiod_put(gpiono1);// 灭灯gpiod_set_value(gpiono2, 0);// 释放gpio编号gpiod_put(gpiono2);// 灭灯gpiod_set_value(gpiono3, 0);// 释放gpio编号gpiod_put(gpiono3);}
module_init(mycdev_init);
module_exit(mycdev_exit);
MODULE_LICENSE("GPL");

