目录
一、概述
二、卷的类型
三、emptyDir
四、hostPath
五、NFS
5.1、master服务器上搭建nfs服务器
5.2、各个slave节点上安装nfs客户端
5.3、创建Pod
六、PV和PVC
6.1、PV
6.1.1、PV资源清单文件示例
6.1.2、PV属性说明
6.1.3、PV的状态
6.2、PVC
6.2.1、PVC资源清单文件示例
6.3、PV/PVC的使用
6.4、hostPath的PV与PVC案例演示
6.4.1、创建PV
6.4.2、创建PVC
6.4.3、创建Pod
6.4.4、节点添加内容
6.4.5、pod查看内容
6.5、NFS的PV与PVC案例演示
6.5.1、master服务器上搭建nfs服务器
6.5.2、各个slave节点上安装nfs客户端
6.5.3、创建PV
6.5.4、创建PVC
6.5.5、创建Pod
6.5.6、进入pod中,添加相关内容
6.5.7、进入nfs服务器中查看对应内容
一、概述
Kubernetes中的volume抽象主要用来解决两个问题:
- 1、容器中的文件在磁盘上是临时存放的,当容器崩溃时,kubelet 将重新启动容器,容器中的文件将会丢失,因为容器会以干净的状态(镜像最初的状态)重新启动【持久化存储】;
- 2、当在一个 Pod 中同时运行多个容器时,常常需要在这些容器之间共享文件【多容器数据共享】;
Kubernetes 支持很多类型的卷。 Pod 可以同时使用任意数目的卷类型。 临时卷类型的生命周期与 Pod 相同,但持久卷可以比 Pod 的存活期长。 当 Pod 不再存在时,Kubernetes 也会销毁临时卷;不过 Kubernetes 不会销毁持久卷。 对于给定 Pod 中任何类型的卷,在容器重启期间数据都不会丢失。
二、卷的类型
k8s 可以支持许多类型的卷,Pod 也能同时使用任意数量的卷。卷的核心是包含一些数据的目录,Pod 中的容器可以访问该目录。
查看k8s支持哪些类型的卷:
$ kubectl explain pods.spec.volumes
KIND:     Pod
VERSION:  v1RESOURCE: volumes <[]Object>DESCRIPTION:
List of volumes that can be mounted by containers belonging to the pod.
More info: https://kubernetes.io/docs/concepts/storage/volumesVolume represents a named volume in a pod that may be accessed by any
container in the pod.FIELDS:
awsElasticBlockStore <Object>
awsElasticBlockStore represents an AWS Disk resource that is attached to a
kubelet's host machine and then exposed to the pod. More info:
https://kubernetes.io/docs/concepts/storage/volumes#awselasticblockstoreazureDisk    <Object>
azureDisk represents an Azure Data Disk mount on the host and bind mount to
the pod.azureFile    <Object>
azureFile represents an Azure File Service mount on the host and bind mount
to the pod.cephfs       <Object>
cephFS represents a Ceph FS mount on the host that shares a pod's lifetimecinder       <Object>
cinder represents a cinder volume attached and mounted on kubelets host
machine. More info: https://examples.k8s.io/mysql-cinder-pd/README.mdconfigMap    <Object>
configMap represents a configMap that should populate this volumecsi  <Object>
csi (Container Storage Interface) represents ephemeral storage that is
handled by certain external CSI drivers (Beta feature).downwardAPI  <Object>
downwardAPI represents downward API about the pod that should populate this
volumeemptyDir     <Object>
emptyDir represents a temporary directory that shares a pod's lifetime.
More info: https://kubernetes.io/docs/concepts/storage/volumes#emptydirephemeral    <Object>
ephemeral represents a volume that is handled by a cluster storage driver.
The volume's lifecycle is tied to the pod that defines it - it will be
created before the pod starts, and deleted when the pod is removed.Use this if: a) the volume is only needed while the pod runs, b) features
of normal volumes like restoring from snapshot or capacity tracking are
needed, c) the storage driver is specified through a storage class, and d)
the storage driver supports dynamic volume provisioning through a
PersistentVolumeClaim (see EphemeralVolumeSource for more information on
the connection between this volume type and PersistentVolumeClaim).Use PersistentVolumeClaim or one of the vendor-specific APIs for volumes
that persist for longer than the lifecycle of an individual pod.Use CSI for light-weight local ephemeral volumes if the CSI driver is meant
to be used that way - see the documentation of the driver for more
information.A pod can use both types of ephemeral volumes and persistent volumes at the
same time.fc   <Object>
fc represents a Fibre Channel resource that is attached to a kubelet's host
machine and then exposed to the pod.flexVolume   <Object>
flexVolume represents a generic volume resource that is
provisioned/attached using an exec based plugin.flocker      <Object>
flocker represents a Flocker volume attached to a kubelet's host machine.
This depends on the Flocker control service being runninggcePersistentDisk    <Object>
gcePersistentDisk represents a GCE Disk resource that is attached to a
kubelet's host machine and then exposed to the pod. More info:
https://kubernetes.io/docs/concepts/storage/volumes#gcepersistentdiskgitRepo      <Object>
gitRepo represents a git repository at a particular revision. DEPRECATED:
GitRepo is deprecated. To provision a container with a git repo, mount an
EmptyDir into an InitContainer that clones the repo using git, then mount
the EmptyDir into the Pod's container.glusterfs    <Object>
glusterfs represents a Glusterfs mount on the host that shares a pod's
lifetime. More info: https://examples.k8s.io/volumes/glusterfs/README.mdhostPath     <Object>
hostPath represents a pre-existing file or directory on the host machine
that is directly exposed to the container. This is generally used for
system agents or other privileged things that are allowed to see the host
machine. Most containers will NOT need this. More info:
https://kubernetes.io/docs/concepts/storage/volumes#hostpathiscsi        <Object>
iscsi represents an ISCSI Disk resource that is attached to a kubelet's
host machine and then exposed to the pod. More info:
https://examples.k8s.io/volumes/iscsi/README.mdname <string> -required-
name of the volume. Must be a DNS_LABEL and unique within the pod. More
info:
https://kubernetes.io/docs/concepts/overview/working-with-objects/names/#namesnfs  <Object>
nfs represents an NFS mount on the host that shares a pod's lifetime More
info: https://kubernetes.io/docs/concepts/storage/volumes#nfspersistentVolumeClaim        <Object>
persistentVolumeClaimVolumeSource represents a reference to a
PersistentVolumeClaim in the same namespace. More info:
https://kubernetes.io/docs/concepts/storage/persistent-volumes#persistentvolumeclaimsphotonPersistentDisk <Object>
photonPersistentDisk represents a PhotonController persistent disk attached
and mounted on kubelets host machineportworxVolume       <Object>
portworxVolume represents a portworx volume attached and mounted on
kubelets host machineprojected    <Object>
projected items for all in one resources secrets, configmaps, and downward
APIquobyte      <Object>
quobyte represents a Quobyte mount on the host that shares a pod's lifetimerbd  <Object>
rbd represents a Rados Block Device mount on the host that shares a pod's
lifetime. More info: https://examples.k8s.io/volumes/rbd/README.mdscaleIO      <Object>
scaleIO represents a ScaleIO persistent volume attached and mounted on
Kubernetes nodes.secret       <Object>
secret represents a secret that should populate this volume. More info:
https://kubernetes.io/docs/concepts/storage/volumes#secretstorageos    <Object>
storageOS represents a StorageOS volume attached and mounted on Kubernetes
nodes.vsphereVolume        <Object>
vsphereVolume represents a vSphere volume attached and mounted on kubelets
host machine
从上面的帮助信息,可以看到支持大多数的存储系统,包括云存储、节点本地存储、分布式存储、网络存储、临时存储等,比如awsElasticBlockStore、azureDisk、azureFile划分为云存储,glusterfs、rbd这些划分为分布式存储;nfs、iscsi、fc这些划分为网络存储;emptyDir划分为临时存储;hostPath、local划分为本地存储;自定义存储csi;特殊存储configMap、secret、downwardAPId;持久卷申请persistentVolumeClaim等等。
使用卷时, Pod 声明中需要提供卷的类型 (.spec.volumes 字段)和卷挂载的位置 (.spec.containers.volumeMounts 字段)。
三、emptyDir
当 Pod 指定到某个节点上时,首先创建的是一个 emptyDir 卷,并且只要 Pod 在该节点上运行,卷就一直存在,卷最初是空的。 尽管 Pod 中的容器挂载 emptyDir 卷的路径可能相同也可能不同,但是这些容器都可以读写 emptyDir 卷中相同的文件。 当 Pod 因为某些原因被从节点上删除时,emptyDir 卷中的数据也会永久删除。emptyDir 主要用于某些应用程序无需永久保存的临时目录,多个容器的共享目录等。
注意:容器崩溃并不会导致 Pod 被从节点上移除,因此容器崩溃期间 emptyDir 卷中的数据是安全的。
下面我们演示emptyDir。创建资源清单:vim pod-emptydir-test.yaml
apiVersion: v1
kind: Pod
metadata:name: pod-emptydir-test
spec:containers:- image: nginximagePullPolicy: IfNotPresentname: nginxvolumeMounts:- mountPath: /dataname: emptydir-test-volume- image: busyboxname: busyboximagePullPolicy: IfNotPresentcommand:- /bin/sh- -c- sleep 3600volumeMounts:- mountPath: /data		#指定Volume在容器中的挂载路径name: emptydir-test-volume   	#指定使用哪个Volumevolumes:- name: emptydir-test-volume			#volume名称emptyDir: {}
这里创建了两个容器,将数据挂载到同一个目录/data下。创建pod:
[root@localhost /]# kubectl create -f pod-emptydir-test.yaml
pod/pod-emptydir-test created[root@localhost /]# kubectl get pod
NAME                READY   STATUS    RESTARTS   AGE
pod-emptydir-test   2/2     Running   0          23s
接下来,我们进入nginx容器中,在/data文件夹下写入创建一个文件a.txt并写入数据:"hello emptydir"
[root@localhost /]# kubectl exec -it pod-emptydir-test -c nginx bin/bash
kubectl exec [POD] [COMMAND] is DEPRECATED and will be removed in a future version. Use kubectl exec [POD] -- [COMMAND] instead.
root@pod-emptydir-test:/# cd /data/
root@pod-emptydir-test:/data# touch a.txt
root@pod-emptydir-test:/data# echo "hello emptydir" >> a.txt
root@pod-emptydir-test:/data# cat a.txt
hello emptydir
然后,我们查看busybox的/data是否存在数据a.txt文件:
[root@localhost /]# kubectl exec -it pod-emptydir-test -c busybox sh
kubectl exec [POD] [COMMAND] is DEPRECATED and will be removed in a future version. Use kubectl exec [POD] -- [COMMAND] instead.
/ # cd /data/
/data # ls
a.txt
/data # cat a.txt
hello emptydir
以上,就是一个通过emptyDir实现多个容器之间共享数据的例子。
四、hostPath
hostPath 卷能将主机节点文件系统上的文件或目录挂载到pod中,使容器可以使用宿主机上的目录或文件,在pod被删除,这个目录还是存在的,不会被删除。但是需要注意的是,pod删除之后重新创建后,必须调度到同一个node节点上,数据才不会丢失,因为如果调度到其它节点,其它节点可能压根没有这个目录,所以数据就丢了。
注意:HostPath 卷存在许多安全风险,最佳做法是尽可能避免使用 HostPath。 当必须使用 HostPath 卷时,它的范围应仅限于所需的文件或目录,并以只读方式挂载。
下面我们演示hostPath。创建资源清单:vim pod-hostpath-test.yaml
# 使用hostPath,将主机的/data1目录,挂载到pod的/data目录
apiVersion: v1
kind: Pod
metadata:name: pod-hostpath-test
spec:containers:- image: nginximagePullPolicy: IfNotPresentname: nginxvolumeMounts:- mountPath: /data    # 容器内的目录name: hostpath-test-volumeavolumes:- name: hostpath-test-volumehostPath: 	 # 存储类型path: /data1			# Pod被调度到的主机节点上的目录type: DirectoryOrCreate  # 指定如果该路径不存在,将如何处理
创建pod,可以看到pod被调度到node02节点:
[root@localhost /]# kubectl create -f pod-hostpath-test.yaml
pod/pod-hostpath-test created
[root@localhost /]# kubectl get pod -o wide
NAME                READY   STATUS    RESTARTS   AGE   IP              NODE     NOMINATED NODE   READINESS GATES
pod-hostpath-test   1/1     Running   0          9s    10.244.140.68   node02   <none>           <none>
接下来,我们需要在node02节点上/data1目录创建一个a.txt:
[root@localhost /]# ls
bin  boot  data1  dev  etc  home  java  lib  lib64  media  mnt  opt  proc  root  run  sbin  srv  sys  tmp  usr  var
[root@localhost /]# cd /data1/
[root@localhost data1]# touch a.txt
[root@localhost data1]# echo "hello hostPath" >> a.txt
[root@localhost data1]# cat a.txt
hello hostPath
然后,我们进入pod-hostpath-test这个pod的挂载的路径下是否存在a.txt:
[root@localhost /]# kubectl exec pod-hostpath-test cat /data/a.txt
kubectl exec [POD] [COMMAND] is DEPRECATED and will be removed in a future version. Use kubectl exec [POD] -- [COMMAND] instead.
hello hostPath
可以看到,pod调度之后所在的主机node02上/data1目录就跟pod里面的/data目录对应起来了,只要我们修改了主机目录上的a.txt,在pod里面就能看到a.txt为更新后的内容。如下图:

hostPath的type属性用来指定当宿主机上的指定的路径不存在时该怎么办,支持的 type 值如下:
- 空字符串(默认)
默认选项,意味着在挂载hostPath 卷之前不会执行任何检查。
- DirectoryOrCreate
如果在给定路径上什么都不存在,那么将根据需要创建空目录,权限设置为 0755,具有与 Kubelet 相同的组和所有权。
- Directory
在给定路径上必须存在的目录。
- FileOrCreate
如果在给定路径上什么都不存在,那么将在那里根据需要创建空文件,权限设置为 0644,具有与 Kubelet 相同的组和所有权。
- File
在给定路径上必须存在的文件。
- Socket
在给定路径上必须存在的 UNIX 套接字。
- CharDevice
在给定路径上必须存在的字符设备。
- BlockDevice
在给定路径上必须存在的块设备。
五、NFS
nfs 卷能将 NFS (网络文件系统) 挂载到你的 Pod 中。 不像 emptyDir 那样会在删除 Pod 的同时也会被删除,nfs 卷的内容在删除 Pod 时会被保存,卷只是被卸载。 这意味着 nfs 卷可以被预先填充数据,并且这些数据可以在 Pod 之间共享。
5.1、master服务器上搭建nfs服务器
[root@localhost /]# yum -y install nfs-utils rpcbind
# 共享目录
[root@localhost /]# mkdir -p /data/volumes && chmod 755 /data/volumes
# 授予所有连接访问/data/volumes目录的权限
[root@localhost /]# echo '/data/volumes  *(insecure,rw,sync,no_root_squash)'>> /etc/exports
# 启动服务与设置开机启动
[root@localhost /]# systemctl enable rpcbind && systemctl start rpcbind
[root@localhost /]# systemctl enable nfs && systemctl start nfs
Created symlink from /etc/systemd/system/multi-user.target.wants/nfs-server.service to /usr/lib/systemd/system/nfs-server.service.
5.2、各个slave节点上安装nfs客户端
这里是node01、node02节点需要执行。
# 安装nfs客户端
[root@localhost /]# yum -y install nfs-utils rpcbind
[root@localhost /]# mkdir /mntdata
[root@localhost /]# mount -t nfs 10.0.88.133:/data/volumes /mntdata# 能够正常看到nfs服务器共享出来的目录,并且也能正常挂载使用
[root@localhost ~]# mount | grep /data/volumes
10.0.88.133:/data/volumes on /mntdata type nfs4 (rw,relatime,vers=4.1,rsize=1048576,wsize=1048576,namlen=255,hard,proto=tcp,port=0,timeo=600,retrans=2,sec=sys,clientaddr=10.0.89.1,local_lock=none,addr=10.0.88.133)
5.3、创建Pod
资源清单文件:vim nfs-volume-pod.yaml
apiVersion: v1
kind: Pod
metadata:name: nfs-volume-pod
spec:containers:- name: nginximage: nginxports:- containerPort: 80protocol: TCPvolumeMounts:- name: nfs-volumemountPath: /usr/share/nginx/htmlvolumes:- name: nfs-volumenfs:path: /data/volumes	# 指定nfs文件系统的导出文件路径server: 10.0.88.133		# 指定nfs服务器地址
创建Pod:
[root@localhost /]# kubectl apply -f nfs-volume-pod.yaml
pod/nfs-volume-pod created[root@localhost /]# kubectl get pods -o wide
NAME                      READY   STATUS    RESTARTS   AGE    IP              NODE     NOMINATED NODE   READINESS GATES
nfs-volume-pod            1/1     Running   0          22s    10.244.140.72   node02   <none>           <none>[root@localhost /]# curl 10.244.140.72
<html>
<head><title>403 Forbidden</title></head>
<body>
<center><h1>403 Forbidden</h1></center>
<hr><center>nginx/1.21.5</center>
</body>
</html># 在nfs服务器的/data/volumes/目录下创建一个index.html文件
[root@localhost /]# cd /data/volumes/
[root@localhost volumes]# echo "hello nfs volume..." > index.html# nfs服务器的/data/volumes目录已经挂载到Pod的/usr/share/nginx/html目录,pod能够访问到对应文件内容
[root@localhost volumes]# curl 10.244.140.72
hello nfs volume...# 可以看到对应pod里以读写方式挂载了nfs-volume存储卷,对应nfs-volume存储卷类型为NFS,对应的nfs服务器的挂载目录是/data/volumes,pod里挂载目录是/usr/share/nginx/html
[root@localhost /]# kubectl describe pod/nfs-volume-pod
Name:         nfs-volume-pod
Namespace:    default
Priority:     0
Node:         node02/10.0.89.2
Start Time:   Wed, 04 Jan 2023 15:09:40 +0800
Labels:       <none>
Annotations:  cni.projectcalico.org/podIP: 10.244.140.72/32cni.projectcalico.org/podIPs: 10.244.140.72/32
Status:       Running
IP:           10.244.140.72
IPs:IP:  10.244.140.72
Containers:nginx:Container ID:   docker://b73887bd7c41c29b0f269fd97b6f32197d467da2e4c498fe3b3e97f568561a98Image:          nginxImage ID:       docker-pullable://nginx@sha256:0d17b565c37bcbd895e9d92315a05c1c3c9a29f762b011a10c54a66cd53c9b31Port:           80/TCPHost Port:      0/TCPState:          RunningStarted:      Wed, 04 Jan 2023 15:09:59 +0800Ready:          TrueRestart Count:  0Environment:    <none>Mounts:/usr/share/nginx/html from nfs-volume (rw)/var/run/secrets/kubernetes.io/serviceaccount from kube-api-access-b6tdl (ro)
Conditions:Type              StatusInitialized       True Ready             True ContainersReady   True PodScheduled      True
Volumes:nfs-volume:Type:      NFS (an NFS mount that lasts the lifetime of a pod)Server:    10.0.88.133Path:      /data/volumesReadOnly:  falsekube-api-access-b6tdl:Type:                    Projected (a volume that contains injected data from multiple sources)TokenExpirationSeconds:  3607ConfigMapName:           kube-root-ca.crtConfigMapOptional:       <nil>DownwardAPI:             true
QoS Class:                   BestEffort
Node-Selectors:              <none>
Tolerations:                 node.kubernetes.io/not-ready:NoExecute op=Exists for 300snode.kubernetes.io/unreachable:NoExecute op=Exists for 300s
Events:                      <none>
六、PV和PVC
6.1、PV
PV全称是PersistentVolume(持久化卷)。PV是由管理员设置的存储,是集群层面可用的资源,没有namespace这一说,集群内所有资源都可以用。
我们知道,Pod中声明的Volume,生命周期与Pod相同,这样一来,当Pod被删除之后,Volume也就被删除了。
于是,k8s引入了PV,它可以将存储和计算分离,通过不同的组件来管理存储资源和计算资源,解耦Pod和Volume之间生命周期的关联,使得PV的生命周期独立于使用它的任何Pod。
6.1.1、PV资源清单文件示例
apiVersion: v1
kind: PersistentVolume  #	PV固定为PersistentVolume
metadata:		# PV建立不要加名称空间,因为PV属于集群级别的name: pv-demo 	# PV名称
spec:storageClassName: manual	# 存储类capacity: storage: 1Gi  # 存储空间大小accessModes:			# 访问模式- ReadWriteOnce  persistentVolumeReclaimPolicy: Retain		# PV回收策略hostPath:		# 卷类型path: "/mnt/data"		# 挂载路径
6.1.2、PV属性说明
- capacity
存储能力, 目前只支持存储空间的设置, 就是我们这里的 storage=1Gi,不过未来可能会加入 IOPS、吞吐量等指标的配置。
- accessModes
访问模式, 是用来对 PV 进行访问模式的设置,用于描述用户应用对存储资源的访问权限,访问权限包括下面几种方式:
1)、ReadWriteOnce(RWO):可以被单节点以读写模式挂载;
2)、ReadOnlyMany(ROX):可以被多个节点以只读模式挂载;
3)、ReadWriteMany(RWX):可以被多个节点以读写模式挂载;
- persistentVolumeReclaimPolicy
PV的回收策略, 目前只有 NFS 和 HostPath 两种类型支持回收策略。当用户使用完卷时,可以从api中删除PVC对象,从而允许回收资源,回收资源会告诉PV如何处理该卷,目前卷可以保留,回收或删除:
1)、Retain(保留)- 允许手动回收资源,当删除PVC时,PV仍然存在,volume被视为已释放,管理员可以手动回收卷;
2)、Recycle(回收)- 清除 PV 中的数据,效果相当于执行rm -rf删除PV;
3)、Delete(删除)- 删除PVC时会同时删除PV,常见于云服务商的存储服务,比如 ASW EBS;
- storageClassName
PV的类,一个特定类型的PV只能绑定特定类型的PVC;
因为PV是直接对接底层存储的,就像集群中的Node可以为Pod提供计算资源(CPU和内存)一样,PV可以为Pod提供存储资源。因此PV不是namespaced的资源,属于集群层面可用的资源。Pod如果想使用该PV,需要通过创建PVC挂载到Pod中。
6.1.3、PV的状态
- 创建的pv会有一下几种状态:
- Available(可用):没有被PVC绑定的空间资源
- Bound (已绑定):已经被PVC绑定
- Released (已释放):PVC被删除,但是资源还未被重新使用
- Failed (失败):自动回收失败
6.2、PVC
PVC全写是PersistentVolumeClaim(持久化卷声明),PVC 是用户对存储的请求,创建完成后,可以和PV实现一对一绑定。对于真正使用存储的用户不需要关心底层的存储实现细节,只需要直接使用 PVC 即可。
6.2.1、PVC资源清单文件示例
apiVersion: v1
kind: PersistentVolumeClaim		# PVC固定为PersistentVolumeClaim
metadata:name: pvc-demo	# PVC名称namespace: default		# PVC需要定义所属空间,与所挂载的POD属于同一个空间
spec:accessModes:- ReadWriteOnce    # PVC也需要定义访问模式,不过它的模式一定是和现有PV相同或者是它的子集,否则匹配不到PVresources:	# 定义资源要求PV满足这个PVC的要求,PV才会被匹配到requests:storage: 1Gi   # 与所需挂载的PV大小,不可超过
需要注意的是,各个方面都符合要求PVC才能和PV进行绑定,比如accessModes、storageClassName、volumeMode都需要相同才能进行绑定。
6.3、PV/PVC的使用
a)、需要找一个存储服务器,把它划分成多个存储空间;
b)、k8s管理员可以把这些存储空间定义成多个pv;
c)、在pod中使用pvc类型的存储卷之前需要先创建pvc,通过定义需要使用的pv的大小和对应的访问模式,找到合适的pv;
d)、pvc被创建之后,就可以当成存储卷来使用了,我们在定义pod时就可以使用这个pvc的存储卷;
e)、pvc和pv它们是一 一对应的关系,pv如果被被pvc绑定了,就不能被其他pvc使用了;
f)、我们在创建pvc的时候,应该确保和底下的pv能匹配绑定,否则pvc就会处于pending状态;
6.4、hostPath的PV与PVC案例演示
6.4.1、创建PV
创建资源清单文件:vim pv.yaml
apiVersion: v1
kind: PersistentVolume
metadata:   	# PV建立不要加名称空间,因为PV属于集群级别的,集群内所有资源可用name: my-pv				# PV名称labels:			# 这些labels可以不定义type: local
spec:storageClassName: manualcapacity: 	 # 设置存储空间大小storage: 100MipersistentVolumeReclaimPolicy: Retain 		# PV回收策略  accessModes:		# 设置访问模式- ReadWriteOnce		#单路读写,卷只能被单一集群节点挂载读写hostPath:path: "/pvctest/data"		# 挂载路径
[root@localhost /]# kubectl apply -f pv.yaml
persistentvolume/my-pv created[root@localhost /]# kubectl get pv
NAME CAPACITY ACCESS MODES RECLAIM POLICY STATUS CLAIM STORAGECLASS REASON AGE
my-pv 100Mi RWO Retain Available manual 5s创建完PV后,可以看到初始状态为Available(可用)。
6.4.2、创建PVC
创建资源清单文件:vim pvc.yaml
apiVersion: v1
kind: PersistentVolumeClaim
metadata:name: my-pvc		# PVC的名称
spec:storageClassName: manualaccessModes:		# PVC也需要定义访问模式,不过它的模式一定是和现有PV相同或者是它的子集,否则匹配不到PV- ReadWriteOnceresources:	# 定义资源要求,只有PV满足这个PVC的要求才会被匹配到requests:storage: 100Mi		# 定义要求有多大空间
[root@localhost /]# kubectl apply -f pvc.yaml
persistentvolumeclaim/my-pvc created[root@localhost /]# kubectl get pvc
NAME STATUS VOLUME CAPACITY ACCESS MODES STORAGECLASS AGE
my-pvc Bound my-pv 100Mi RWO manual 5s创建完PVC后,可以看到PVC的状态已经变成Bound(绑定)状态,并且根据访问模式、申请资源的大小,自动绑定了my-pv这个PV。
6.4.3、创建Pod
创建资源清单文件:vim pod.yaml
apiVersion: v1
kind: Pod
metadata:name: my-pod
spec:volumes:- name: pv-storage-volume    # volume的名称persistentVolumeClaim:   	# 定义volume的时候,指定了前面我们定义的PVC:my-pvcclaimName: my-pvc		# 需跟前面定义的PVC名称保持一致containers:- name: nginximage: nginxports:- containerPort: 80name: "http-server"volumeMounts:- mountPath: "/usr/share/nginx/html"		# 容器内挂载路径name: pv-storage-volume   # 引用前面定义的volume的名称
[root@localhost /]# kubectl apply -f pod.yaml
pod/my-pod created[root@localhost /]# kubectl get pod -o wide
NAME READY STATUS RESTARTS AGE IP NODE NOMINATED NODE READINESS GATES
my-pod 1/1 Running 0 25s 10.244.140.70 node02 <none> <none>可以看到,当前pod被调度到node02节点,然后我们从pv的资源清单文件中可以看到,pv的挂载路径是主机节点的/pvctest/data目录。
6.4.4、节点添加内容
接下来我们在node02主机节点的/pvctest/data目录创建一个index.html文件:
[root@localhost /]# cd /pvctest/data/
[root@localhost data]# pwd
/pvctest/data
[root@localhost data]# echo "hello nginx, this is from pv/pvc" > index.html
[root@localhost data]# cat index.html
hello nginx, this is from pv/pvc
6.4.5、pod查看内容
从pod的资源清单文件中,挂载路径是/usr/share/nginx/html,所以我们查看pod中这个目录:
[root@localhost /]# kubectl get pod
NAME READY STATUS RESTARTS AGE
my-pod 1/1 Running 0 4m8s
[root@localhost /]# kubectl exec my-pod -it bin/bash
kubectl exec [POD] [COMMAND] is DEPRECATED and will be removed in a future version. Use kubectl exec [POD] -- [COMMAND] instead.
root@my-pod:/# cd /usr/share/nginx/html
root@my-pod:/usr/share/nginx/html# ls
index.html
root@my-pod:/usr/share/nginx/html# cat index.html
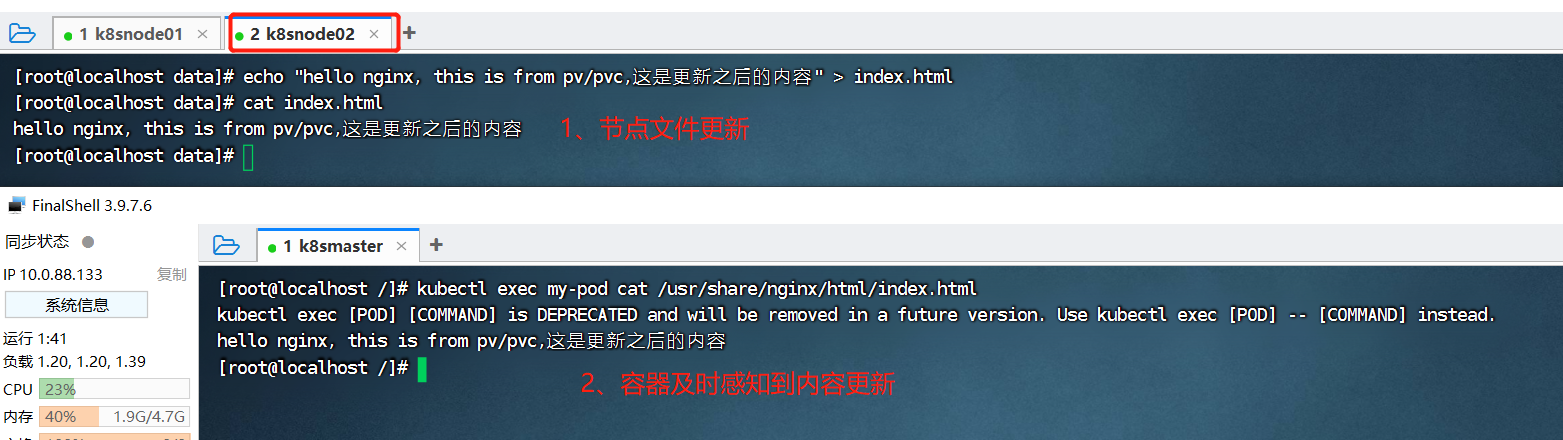
hello nginx, this is from pv/pvc如上,容器中的/usr/share/nginx/html目录已经跟主机节点上的/pvc/data目录对应起来了,主要我们修改其中一个地方的文件内容,在另外一边都能及时查看到更新后的内容。如下图:
当然,因为nginx的静态文件目录就是/usr/share/nginx/html,我们也可以通过curl查看nginx:
[root@localhost /]# kubectl get pod -o wide
NAME     READY   STATUS    RESTARTS   AGE     IP              NODE     NOMINATED NODE   READINESS GATES
my-pod   1/1     Running   0          6m54s   10.244.140.70   node02   <none>           <none>
[root@localhost /]# curl 10.244.140.70
hello nginx, this is from pv/pvc
可以看到,已经能够读取到主机节点/pvctest/data/index.html的内容。
6.5、NFS的PV与PVC案例演示
6.5.1、master服务器上搭建nfs服务器
[root@localhost /]# yum -y install nfs-utils rpcbind
# 共享目录
[root@localhost /]# mkdir -p /data/k8s && chmod 755 /data/k8s
# 授予所有连接访问权限
[root@localhost /]# echo '/data/k8s  *(insecure,rw,sync,no_root_squash)'>>/etc/exports
# 启动服务与设置开机启动
[root@localhost /]# systemctl enable rpcbind && systemctl start rpcbind
[root@localhost /]# systemctl enable nfs && systemctl start nfs
Created symlink from /etc/systemd/system/multi-user.target.wants/nfs-server.service to /usr/lib/systemd/system/nfs-server.service.
6.5.2、各个slave节点上安装nfs客户端
这里是node01、node02节点需要执行。
# 安装nfs客户端
[root@localhost /]# yum -y install nfs-utils rpcbind
[root@localhost /]# mkdir /nfsdata
[root@localhost /]# mount -t nfs 10.0.88.133:/data/k8s /nfsdata
6.5.3、创建PV
资源清单文件如下: vim nfs-pv.yaml
apiVersion: v1
kind: PersistentVolume
metadata:name: nfs-pv
spec:storageClassName: manualcapacity:storage: 100MiaccessModes:- ReadWriteOncepersistentVolumeReclaimPolicy: Retainnfs:path: /data/k8sserver: 10.0.88.133  #nfs服务器节点的IP地址,这里是master的IP地址:10.0.88.133
[root@localhost /]# kubectl apply -f nfs-pv.yaml
persistentvolume/nfs-pv created
[root@localhost /]# kubectl get pv
NAME CAPACITY ACCESS MODES RECLAIM POLICY STATUS CLAIM STORAGECLASS REASON AGE
nfs-pv 100Mi RWO Retain Available manual 7s6.5.4、创建PVC
资源清单文件如下: vim nfs-pvc.yaml
apiVersion: v1
kind: PersistentVolumeClaim
metadata:name: nfs-pvcnamespace: default
spec:storageClassName: manualaccessModes:- ReadWriteOnce      resources:requests:storage: 100Mi
[root@localhost /]# kubectl apply -f nfs-pvc.yaml
persistentvolumeclaim/nfs-pvc created# pvc已自动绑定到nfs-pv上,状态为Bound
[root@localhost /]# kubectl get pvc
NAME STATUS VOLUME CAPACITY ACCESS MODES STORAGECLASS AGE
nfs-pvc Bound nfs-pv 100Mi RWO manual 6s# 再次查看pv, 状态也变为Bound,并且可以看到绑定的pvc就是default命名空间下的nfs-pvc
[root@localhost /]# kubectl get pv
NAME CAPACITY ACCESS MODES RECLAIM POLICY STATUS CLAIM STORAGECLASS REASON AGE
nfs-pv 100Mi RWO Retain Bound default/nfs-pvc manual 90s6.5.5、创建Pod
资源清单文件如下: vim nfs-pod.yaml
apiVersion: apps/v1
kind: Deployment
metadata:name: nfs-podnamespace: default   #必须与所挂载的pvc相同的命名空间
spec:replicas: 1selector:     #指定Pod的选择器matchLabels:app: nginxtemplate:metadata:labels:app: nginxspec:containers:- name: nginximage: nginx:alpineimagePullPolicy: IfNotPresentports:- containerPort: 80name: webvolumeMounts:   #挂载容器中的目录到pvc nfs中的目录- name: nfs-volumemountPath: /usr/share/nginx/htmlvolumes:- name: nfs-volumepersistentVolumeClaim: #指定pvcclaimName: nfs-pvc
[root@localhost /]# kubectl apply -f nfs-pod.yaml
deployment.apps/nfs-pod created
[root@localhost /]# kubectl get pods -o wide
NAME READY STATUS RESTARTS AGE IP NODE NOMINATED NODE READINESS GATES
nfs-pod-dc97b99d6-bhwck 1/1 Running 0 36s 10.244.140.71 node02 <none> <none>6.5.6、进入pod中,添加相关内容
[root@localhost /]# kubectl exec -it nfs-pod-dc97b99d6-bhwck sh
kubectl exec [POD] [COMMAND] is DEPRECATED and will be removed in a future version. Use kubectl exec [POD] -- [COMMAND] instead.
/ # cd /usr/share/nginx/html
/usr/share/nginx/html # echo "hello, this is fron nfs pv/pvc" > index.html
/usr/share/nginx/html # cat index.html
hello, this is fron nfs pv/pvc
6.5.7、进入nfs服务器中查看对应内容
本例中,我们的nfs服务器就是master节点,我们nfs服务器的共享目录/data/k8s中:
[root@localhost /]# cd /data/k8s/
[root@localhost k8s]# ls
index.html
[root@localhost k8s]# cat index.html
hello, this is fron nfs pv/pvc
可以看到,容器中的相关内容,在nfs服务器上也可以看到了,如果我们需要将容器的日志自定义输出到某个地方,不妨可以试试nfs这种方式。


![ParallelCollectionRDD [0] isEmpty at KyuubiSparkUtil.scala:48问题解决](https://img-blog.csdnimg.cn/09dcfa699ce941da918f243e63ffcbe0.jpeg)