目录
一、基础概念
二、安装mongod
三、命令交互数据库
(1)数据库命令
(2)集合命令
(3)文档命令
四、Mongoose
(1)增加一条数据
(2)插入多个数据
(3)删除一条数据
(4)删除多个数据
(5)更新数据
(6)更新多条数据
(7)读取条件某一条数据
(8)根据id读取某一条数据
(9)读取多个数据
(10)根据查询条件读取
(11)个性化读取
(12)开发常见的操作
五、图形化管理
一、基础概念
Mongodb 是一个基于分布式文件存储的数据库,官方地址 https://www.mongodb.com/
数据库的主要作用就是用来管理数据,能够达到增删改查的作用,语法也和JavaScript相似。
在使用数据库之前要了解三个概念
(1)数据库:是一个数据仓库,例如一个数据库下有很多个集合(也可以理解成多个表)(2)集合:表,在JavaScript的提现形式 可以理解为 数组 [ { id:2 ,name:ultraman } ](3)文档:就可以理解成一条数据了 在JavaScript的提现形式 可以理解为 { id:2 ,name:ultraman }
用js代码举个例子:
{"users": [{"id": 1,"name": "张三","age": 18,},{"id": 2,"name": "李四","age": 20,},],"articles": [{"id": 1,"title": "标题1","content": "内容1",},{"id": 2,"title": "标题2","content": "内容2",},],}在代码中 整个对象就是一个数据库(JSON文件) 里面包含着两个集合(表) 一个用户表和一个文章表 文档就可以理解成某条表中的数据。
当然也可以有多个数据库,一般情况下一个项目使用一个数据库
二、安装mongod
下载地址: https://www.mongodb.com/try/download/community
建议选择 zip 类型, 通用性更强
配置步骤如下:
- 将压缩包移动到 C:\Program Files 下,然后解压
- 创建 C:\data\db 目录,mongodb 会将数据默认保存在这个文件夹
- 以 mongodb 中 bin 目录作为工作目录,启动命令行
- 运行命令 mongod
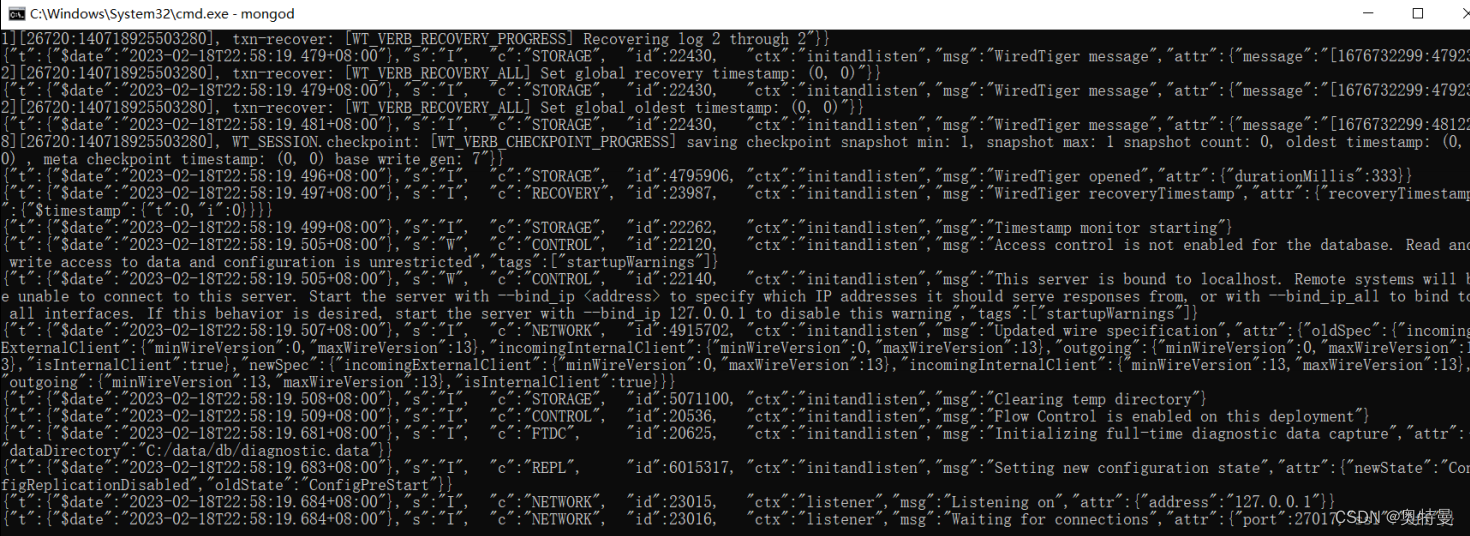
由于每次都需要在 bin目录下才能运行mongod,我们可以通过环境变量的形式进行配置
- 复制一下 目录名称 例如 :C:\Program Files\mongodb-win32-x86_64-windows-5.0.19\bin
- 打开编辑变量 找到path 把路径进行追加就好了

- 下次可以在cmd命令窗口测试
三、命令交互数据库
命令交互也就是通过cmd命令行的形式进行交互
(1)数据库命令
显示所有的数据库
show dbs 切换到指定的数据库,如果数据库不存在会自动创建数据库
use 数据库名显示当前所在的数据库
db删除当前数据库
use 库名
db.dropDatabase()(2)集合命令
创建集合
db.createCollection('集合名称')显示当前数据库中的所有集合
show collections 删除某个集合
db.集合名.drop() 重命名集合
db.集合名.renameCollection('newName')(3)文档命令
插入文档
db.集合名.insert(文档对象);查询文档 _id 是 mongodb 自动生成的唯一编号,用来唯一标识文档
db.集合名.find(查询条件)更新文档
db.集合名.update(查询条件,新的文档)
db.集合名.update({name:'张三'},{$set:{age:19}})
删除文档
db.集合名.remove(查询条件)四、Mongoose
Mongoose 是一个对象文档模型库,官网 http://www.mongoosejs.net/
//1. 安装 mongoose
//2. 导入 mongoose
const mongoose = require("mongoose");
//3. 连接数据库
mongoose.connect("mongodb://127.0.0.1:27017/bilibili");
//4. 设置连接回调
//连接成功
mongoose.connection.on("open", () => {console.log("连接成功");//5. 创建文档结构对象let BookSchema = new mongoose.Schema({title: String,author: String,price: Number,});//6. 创建文档模型对象let BookModel = mongoose.model("book", BookSchema);//7. 插入文档BookModel.create({title: "西游记",author: "吴承恩",price: 19.9,},(err, data) => {if (err) throw err;//输出 data 对象console.log(data);//8. 断开连接mongoose.disconnect();});
});
//连接出错
mongoose.connection.on("error", () => {console.log("连接出错~~");
});
//连接关闭
mongoose.connection.on("close", () => {console.log("连接关闭");
});
字段类型
title: String,price: Number,isHot: Boolean,category: Array,Date: Date,Buffer: Buffer,Mixed : mongoose.Schema.Types.Mixed, // 接收所有类型ObjectId: mongoose.Schema.Types.ObjectId, // 主键 对象ID 用来查询其他表Decimal: mongoose.Schema.Types.Decimal128, // 高精度类型有些键也可以写出对象的形式,进行字段验证
(1)必填项
title: {type: String,required: true // 设置必填项
}
(2)默认值
author: {type: String,default: '匿名' //默认值
}(3)枚举值
gender: {type: String,enum: ['男','女'] //设置的值必须是数组中的
}(4)唯一值
username: {type: String,unique: true
}
unique 需要 重建集合 才能有效果
(1)增加一条数据
mongoose.connection.on("open", () => {console.log("连接成功");let BookSchema = new mongoose.Schema({title: String,author: String,price: Number});let BookModel = mongoose.model('book', BookSchema);BookModel.create({title: "《水浒传》",price: 15,}).then((res) => {console.log(res);console.log("保存成功!");})});接下来以 模型.操作 为代码
(2)插入多个数据
BookModel.insertMany([{title: "《水浒传》",price: 15,isHot: true},{title: "《西游记》",price: 20,isHot: true}]).then((res) => {console.log(res);console.log("保存成功!");})(3)删除一条数据
BookModel.deleteOne({ _id: "64c604fb363d6aa46652f368" }).then((res) => { console.log(res);console.log("删除成功!");})(4)删除多个数据
isHot为false的全部删除
BookModel.deleteMany({ isHot: false }).then((res) => {console.log(res);console.log("删除多个成功!");})(5)更新数据
参数1:条件 ,参数2 更新内容
BookModel.updateOne({ _id: "64c604fb363d6aa46652f362" },{price:99}).then((res) => { console.log(res);console.log("更新成功!");})(6)更新多条数据
BookModel.updateMany({ isHot: true, },{isHot:false}).then((res) => {console.log(res);console.log("更新多个成功!");})(7)读取条件某一条数据
BookModel.findOne({ _id: "64c604fb363d6aa46652f362" }).then((res) => { console.log("读取成功!",res);})(8)根据id读取某一条数据
BookModel.findById("64c604fb363d6aa46652f362").then((res) => { console.log("读取成功!",res);})(9)读取多个数据
BookModel.find({ isHot: false, }).then((res) => {console.log("读取多个成功!",res);})(10)根据查询条件读取
一些条件不能用> < = 这些来使用判断 ,要有相对于的命令符号
- > 使用 $gt
- < 使用 $lt
- >= 使用 $gte
- <= 使用 $lte
- !== 使用 $ne
下面举例一些 运算的判断
// 1.多个条件的查询 价格大于20 并且 isHot 为 falseBookModel.find({ price: { $gt: 20 }, isHot: false }).then((res) => {console.log("价格大于20的", res);})// 2.多个条件的查询都要满足 价格大于20 或者 isHot 为 falseBookModel.find({ $and: [{ price: { $gt: 20 } }, { isHot: false }] }).then((res) => {console.log("价格大于20的", res); })// 3.多个条件的查询满足一个 价格大于20 或者 isHot 为 falseBookModel.find({ $or: [{ price: { $gt: 20 } }, { isHot: true }] }).then((res) => {console.log("价格大于20的", res);})// 4. 查询价格在 20 - 30 之间的数据BookModel.find({ price: { $gte: 20, $lte: 30 } }).then((res) => {console.log("价格大于20的", res);})// 5.正则查询BookModel.find({ title: { $regex: /三国/ } }).then((res) => {console.log("查询包含三国的", res);})(11)个性化读取
查找后也可以通过链式调用进行后续的操作,也是进行了Promise的封装
// 1.只读取出数据的某些字段BookModel.find().select({title:1,price:1,_id:0}).then((res) => {console.log("筛选结果", res);})// 2.排序 1 升序 -1 降序BookModel.find().select({title:1,price:1,_id:0}).sort({price:1}).then((res) => {console.log("筛选结果", res);})// 3.数据截取BookModel.find().select({title:1,price:1,_id:0}).limit(2).then((res) => {console.log("筛选结果", res);})// 4.截取3-4条BookModel.find().select({title:1,price:1,_id:0}).skip(2).limit(2).then((res) => {console.log("筛选结果", res);})(12)开发常见的操作
// 登录login: async ({ username, password }) => {return UserModel.find({ username, password });},// 更新个人用户信息updateUserInfo: async (info) => {// 如果没有上传头像,就删除avatar字段 就不更新了if (info.image == "") delete info.image;return UserModel.updateOne({ _id: info.id }, info).then((res) => {return UserModel.findOne({ _id: info.id });}).catch((err) => {console.log("修改失败了", err);});},// 获取用户列表getUserList: async ({ pageSize = 10, pageNum = 1, keyword = "" }) => {return {code: 200,msg: "获取成功",data: {pageNum: pageNum,pageSize: pageSize,total: await UserModel.find({username: { $regex: keyword },}).countDocuments(),userList: await UserModel.find({ username: { $regex: keyword } }).select("-password").skip((pageNum - 1) * pageSize).limit(pageSize),},};},// 添加用户addUser: async (info) => {return UserModel.find({ username: info.username }).then((res) => {console.log("res", res);if (res.length) {return { code: 500, msg: "用户名已存在" };} else {UserModel.create(info);return { code: 200, msg: "添加成功", data: { userInfo: info } };}});},// 删除用户deleteUser: async (info) => {return UserModel.deleteOne({ _id: info.id }).then((res) => {console.log(res, "res");if (res.deletedCount) {return { code: 200, msg: "删除成功" };} else {return { code: 500, msg: "删除失败" };}});},// 更新用户信息updateUser: async (info) => {if (info.password == "") delete info.password;return UserModel.updateOne({ _id: info._id }, info).then((res) => {console.log(res, "res");if (res.modifiedCount) {return { code: 200, msg: "更新成功" };} else {return { code: 500, msg: "更新失败" };}}).catch((err) => {console.log(err);});}
五、图形化管理
Robo 3T 免费 https://github.com/Studio3T/robomongo/releases
Navicat 收费(可以去某站安装破解版教程) https://www.navicat.com.cn/



![成功解决ubuntu-22.04的sudo apt-get update一直卡在【0% [Waiting for headers]】](https://img-blog.csdnimg.cn/897f684f80c94a43a3617cd129eeaee0.png)
![[LitCTF 2023]Http pro max plus](https://img-blog.csdnimg.cn/2dcea217854049c3a51f108bdbd80aec.png)

![[Microsoft][ODBC 驱动程序管理器] 未发现数据源名称并且未指定默认驱动程序](https://img-blog.csdnimg.cn/5d5e7339cb5048b88a3adce727c9ab6d.png)

