文章目录
- 1 Atomic 原子类介绍
- 2 基本类型原子类
- 2.1 基本类型原子类介绍
- 2.2 AtomicInteger 常见方法使用
- 2.3 基本数据类型原子类的优势
- 2.4 AtomicInteger 线程安全原理简单分析
- 3 数组类型原子类
- 3.1 数组类型原子类介绍
- 3.2 AtomicIntegerArray 常见方法使用
- 4 引用类型原子类
- 4.1 引用类型原子类介绍
- 4.2 AtomicReference 类使用示例
- 4.3 AtomicStampedReference 类使用示例
- 4.4 AtomicMarkableReference 类使用示例
- 5 对象的属性修改类型原子类
- 5.1 对象的属性修改类型原子类介绍
- 5.2 AtomicIntegerFieldUpdater 类使用示例
1 Atomic 原子类介绍
Atomic 翻译成中文是原子的意思。在化学上,我们知道原子是构成一般物质的最小单位,在化学反应中是不可分割的。在我们这里 Atomic 是指一个操作是不可中断的。即使是在多个线程一起执行的时候,一个操作一旦开始,就不会被其他线程干扰。
所以,所谓原子类说简单点就是具有原子/原子操作特征的类。
并发包 java.util.concurrent 的原子类都存放在java.util.concurrent.atomic下,如下图所示。
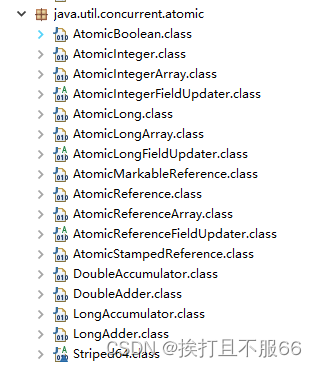
根据操作的数据类型,可以将JUC包中的原子类分为4类
基本类型
使用原子的方式更新基本类型
- AtomicInteger:整型原子类
- AtomicLong:长整型原子类
- AtomicBoolean :布尔型原子类
数组类型
使用原子的方式更新数组里的某个元素
- AtomicIntegerArray:整型数组原子类
- AtomicLongArray:长整型数组原子类
- AtomicReferenceArray :引用类型数组原子类
引用类型
- AtomicReference:引用类型原子类
- AtomicMarkableReference:原子更新带有标记的引用类型。该类将 boolean 标记与引用关联起来。
- AtomicStampedReference :原子更新带有版本号的引用类型。该类将整数值与引用关联起来,可用于解决原子的更新数据和数据的版本号,可以解决使用 CAS 进行原子更新时可能出现的 ABA 问题。
对象的属性修改类型
- AtomicIntegerFieldUpdater:原子更新整型字段的更新器
- AtomicLongFieldUpdater:原子更新长整型字段的更新器
- AtomicReferenceFieldUpdater:原子更新引用类型里的字段
    /**AtomicMarkableReference是将一个boolean值作是否有更改的标记,本质就是它的版本号只有两个,true和false,修改的时候在这两个版本号之间来回切换,这样做并不能解决ABA的问题,只是会降低ABA问题发生的几率而已@author : mazh@Date : 2020/1/17 14:41
*/public class SolveABAByAtomicMarkableReference {private static AtomicMarkableReference atomicMarkableReference = new AtomicMarkableReference(100, false);public static void main(String[] args) {Thread refT1 = new Thread(() -> {try {TimeUnit.SECONDS.sleep(1);} catch (InterruptedException e) {e.printStackTrace();}atomicMarkableReference.compareAndSet(100, 101, atomicMarkableReference.isMarked(), !atomicMarkableReference.isMarked());atomicMarkableReference.compareAndSet(101, 100, atomicMarkableReference.isMarked(), !atomicMarkableReference.isMarked());});Thread refT2 = new Thread(() -> {boolean marked = atomicMarkableReference.isMarked();try {TimeUnit.SECONDS.sleep(2);} catch (InterruptedException e) {e.printStackTrace();}boolean c3 = atomicMarkableReference.compareAndSet(100, 101, marked, !marked);System.out.println(c3); // 返回true,实际应该返回false});refT1.start();refT2.start();}}
CAS ABA 问题
- 描述: 第一个线程取到了变量 x 的值 A,然后巴拉巴拉干别的事,总之就是只拿到了变量 x 的值 A。这段时间内第二个线程也取到了变量 x 的值 A,然后把变量 x 的值改为 B,然后巴拉巴拉干别的事,最后又把变量 x 的值变为 A (相当于还原了)。在这之后第一个线程终于进行了变量 x 的操作,但是此时变量 x 的值还是 A,所以 compareAndSet 操作是成功。
- 例子描述(可能不太合适,但好理解): 年初,现金为零,然后通过正常劳动赚了三百万,之后正常消费了(比如买房子)三百万。年末,虽然现金零收入(可能变成其他形式了),但是赚了钱是事实,还是得交税的!
- 代码例子(以
AtomicInteger为例)
import java.util.concurrent.atomic.AtomicInteger;public class AtomicIntegerDefectDemo {public static void main(String[] args) {defectOfABA();}static void defectOfABA() {final AtomicInteger atomicInteger = new AtomicInteger(1);Thread coreThread = new Thread(() -> {final int currentValue = atomicInteger.get();System.out.println(Thread.currentThread().getName() + " ------ currentValue=" + currentValue);// 这段目的:模拟处理其他业务花费的时间try {Thread.sleep(300);} catch (InterruptedException e) {e.printStackTrace();}boolean casResult = atomicInteger.compareAndSet(1, 2);System.out.println(Thread.currentThread().getName()+ " ------ currentValue=" + currentValue+ ", finalValue=" + atomicInteger.get()+ ", compareAndSet Result=" + casResult);});coreThread.start();// 这段目的:为了让 coreThread 线程先跑起来try {Thread.sleep(100);} catch (InterruptedException e) {e.printStackTrace();}Thread amateurThread = new Thread(() -> {int currentValue = atomicInteger.get();boolean casResult = atomicInteger.compareAndSet(1, 2);System.out.println(Thread.currentThread().getName()+ " ------ currentValue=" + currentValue+ ", finalValue=" + atomicInteger.get()+ ", compareAndSet Result=" + casResult);currentValue = atomicInteger.get();casResult = atomicInteger.compareAndSet(2, 1);System.out.println(Thread.currentThread().getName()+ " ------ currentValue=" + currentValue+ ", finalValue=" + atomicInteger.get()+ ", compareAndSet Result=" + casResult);});amateurThread.start();}
}
输出内容如下:
Thread-0 ------ currentValue=1
Thread-1 ------ currentValue=1, finalValue=2, compareAndSet Result=true
Thread-1 ------ currentValue=2, finalValue=1, compareAndSet Result=true
Thread-0 ------ currentValue=1, finalValue=2, compareAndSet Result=true
下面我们来详细介绍一下这些原子类。
2 基本类型原子类
2.1 基本类型原子类介绍
使用原子的方式更新基本类型
- AtomicInteger:整型原子类
- AtomicLong:长整型原子类
- AtomicBoolean :布尔型原子类
上面三个类提供的方法几乎相同,所以我们这里以 AtomicInteger 为例子来介绍。
AtomicInteger 类常用方法
public final int get() //获取当前的值
public final int getAndSet(int newValue)//获取当前的值,并设置新的值
public final int getAndIncrement()//获取当前的值,并自增
public final int getAndDecrement() //获取当前的值,并自减
public final int getAndAdd(int delta) //获取当前的值,并加上预期的值
boolean compareAndSet(int expect, int update) //如果输入的数值等于预期值,则以原子方式将该值设置为输入值(update)
public final void lazySet(int newValue)//最终设置为newValue,使用 lazySet 设置之后可能导致其他线程在之后的一小段时间内还是可以读到旧的值。
2.2 AtomicInteger 常见方法使用
import java.util.concurrent.atomic.AtomicInteger;public class AtomicIntegerTest {public static void main(String[] args) {// TODO Auto-generated method stubint temvalue = 0;AtomicInteger i = new AtomicInteger(0);temvalue = i.getAndSet(3);System.out.println("temvalue:" + temvalue + "; i:" + i);//temvalue:0; i:3temvalue = i.getAndIncrement();System.out.println("temvalue:" + temvalue + "; i:" + i);//temvalue:3; i:4temvalue = i.getAndAdd(5);System.out.println("temvalue:" + temvalue + "; i:" + i);//temvalue:4; i:9}}
2.3 基本数据类型原子类的优势
通过一个简单例子带大家看一下基本数据类型原子类的优势
①多线程环境不使用原子类保证线程安全(基本数据类型)
class Test {private volatile int count = 0;//若要线程安全执行执行count++,需要加锁public synchronized void increment() {count++; }public int getCount() {return count;}
}
②多线程环境使用原子类保证线程安全(基本数据类型)
class Test2 {private AtomicInteger count = new AtomicInteger();public void increment() {count.incrementAndGet();}//使用AtomicInteger之后,不需要加锁,也可以实现线程安全。public int getCount() {return count.get();}
}
2.4 AtomicInteger 线程安全原理简单分析
AtomicInteger 类的部分源码:
// setup to use Unsafe.compareAndSwapInt for updates(更新操作时提供“比较并替换”的作用)private static final Unsafe unsafe = Unsafe.getUnsafe();private static final long valueOffset;static {try {valueOffset = unsafe.objectFieldOffset(AtomicInteger.class.getDeclaredField("value"));} catch (Exception ex) { throw new Error(ex); }}private volatile int value;
AtomicInteger 类主要利用 CAS (compare and swap) + volatile 和 native 方法来保证原子操作,从而避免 synchronized 的高开销,执行效率大为提升。
CAS的原理是拿期望的值和原本的一个值作比较,如果相同则更新成新的值。UnSafe 类的 objectFieldOffset() 方法是一个本地方法,这个方法是用来拿到“原来的值”的内存地址。另外 value 是一个volatile变量,在内存中可见,因此 JVM 可以保证任何时刻任何线程总能拿到该变量的最新值。
3 数组类型原子类
3.1 数组类型原子类介绍
使用原子的方式更新数组里的某个元素
- AtomicIntegerArray:整形数组原子类
- AtomicLongArray:长整形数组原子类
- AtomicReferenceArray :引用类型数组原子类
上面三个类提供的方法几乎相同,所以我们这里以 AtomicIntegerArray 为例子来介绍。
AtomicIntegerArray 类常用方法
public final int get(int i) //获取 index=i 位置元素的值
public final int getAndSet(int i, int newValue)//返回 index=i 位置的当前的值,并将其设置为新值:newValue
public final int getAndIncrement(int i)//获取 index=i 位置元素的值,并让该位置的元素自增
public final int getAndDecrement(int i) //获取 index=i 位置元素的值,并让该位置的元素自减
public final int getAndAdd(int i, int delta) //获取 index=i 位置元素的值,并加上预期的值
boolean compareAndSet(int i, int expect, int update) //如果输入的数值等于预期值,则以原子方式将 index=i 位置的元素值设置为输入值(update)
public final void lazySet(int i, int newValue)//最终 将index=i 位置的元素设置为newValue,使用 lazySet 设置之后可能导致其他线程在之后的一小段时间内还是可以读到旧的值。
3.2 AtomicIntegerArray 常见方法使用
import java.util.concurrent.atomic.AtomicIntegerArray;public class AtomicIntegerArrayTest {public static void main(String[] args) {// TODO Auto-generated method stubint temvalue = 0;int[] nums = { 1, 2, 3, 4, 5, 6 };AtomicIntegerArray i = new AtomicIntegerArray(nums);for (int j = 0; j < nums.length; j++) {System.out.println(i.get(j));}temvalue = i.getAndSet(0, 2);System.out.println("temvalue:" + temvalue + "; i:" + i);temvalue = i.getAndIncrement(0);System.out.println("temvalue:" + temvalue + "; i:" + i);temvalue = i.getAndAdd(0, 5);System.out.println("temvalue:" + temvalue + "; i:" + i);}}
4 引用类型原子类
4.1 引用类型原子类介绍
基本类型原子类只能更新一个变量,如果需要原子更新多个变量,需要使用 引用类型原子类。
- AtomicReference:引用类型原子类
- AtomicStampedReference:原子更新带有版本号的引用类型。该类将整数值与引用关联起来,可用于解决原子的更新数据和数据的版本号,可以解决使用 CAS 进行原子更新时可能出现的 ABA 问题。
- AtomicMarkableReference :原子更新带有标记的引用类型。该类将 boolean 标记与引用关联起来。
上面三个类提供的方法几乎相同,所以我们这里以 AtomicReference 为例子来介绍。
4.2 AtomicReference 类使用示例
import java.util.concurrent.atomic.AtomicReference;public class AtomicReferenceTest {public static void main(String[] args) {AtomicReference<Person> ar = new AtomicReference<Person>();Person person = new Person("SnailClimb", 22);ar.set(person);Person updatePerson = new Person("Daisy", 20);ar.compareAndSet(person, updatePerson);System.out.println(ar.get().getName());System.out.println(ar.get().getAge());}
}class Person {private String name;private int age;public Person(String name, int age) {super();this.name = name;this.age = age;}public String getName() {return name;}public void setName(String name) {this.name = name;}public int getAge() {return age;}public void setAge(int age) {this.age = age;}}
上述代码首先创建了一个 Person 对象,然后把 Person 对象设置进 AtomicReference 对象中,然后调用 compareAndSet 方法,该方法就是通过 CAS 操作设置 ar。如果 ar 的值为 person 的话,则将其设置为 updatePerson。实现原理与 AtomicInteger 类中的 compareAndSet 方法相同。运行上面的代码后的输出结果如下:
Daisy
20
4.3 AtomicStampedReference 类使用示例
import java.util.concurrent.atomic.AtomicStampedReference;public class AtomicStampedReferenceDemo {public static void main(String[] args) {// 实例化、取当前值和 stamp 值final Integer initialRef = 0, initialStamp = 0;final AtomicStampedReference<Integer> asr = new AtomicStampedReference<>(initialRef, initialStamp);System.out.println("currentValue=" + asr.getReference() + ", currentStamp=" + asr.getStamp());// compare and setfinal Integer newReference = 666, newStamp = 999;final boolean casResult = asr.compareAndSet(initialRef, newReference, initialStamp, newStamp);System.out.println("currentValue=" + asr.getReference()+ ", currentStamp=" + asr.getStamp()+ ", casResult=" + casResult);// 获取当前的值和当前的 stamp 值int[] arr = new int[1];final Integer currentValue = asr.get(arr);final int currentStamp = arr[0];System.out.println("currentValue=" + currentValue + ", currentStamp=" + currentStamp);// 单独设置 stamp 值final boolean attemptStampResult = asr.attemptStamp(newReference, 88);System.out.println("currentValue=" + asr.getReference()+ ", currentStamp=" + asr.getStamp()+ ", attemptStampResult=" + attemptStampResult);// 重新设置当前值和 stamp 值asr.set(initialRef, initialStamp);System.out.println("currentValue=" + asr.getReference() + ", currentStamp=" + asr.getStamp());// [不推荐使用,除非搞清楚注释的意思了] weak compare and set// 困惑!weakCompareAndSet 这个方法最终还是调用 compareAndSet 方法。[版本: jdk-8u191]// 但是注释上写着 "May fail spuriously and does not provide ordering guarantees,// so is only rarely an appropriate alternative to compareAndSet."// todo 感觉有可能是 jvm 通过方法名在 native 方法里面做了转发final boolean wCasResult = asr.weakCompareAndSet(initialRef, newReference, initialStamp, newStamp);System.out.println("currentValue=" + asr.getReference()+ ", currentStamp=" + asr.getStamp()+ ", wCasResult=" + wCasResult);}
}
输出结果如下:
currentValue=0, currentStamp=0
currentValue=666, currentStamp=999, casResult=true
currentValue=666, currentStamp=999
currentValue=666, currentStamp=88, attemptStampResult=true
currentValue=0, currentStamp=0
currentValue=666, currentStamp=999, wCasResult=true
4.4 AtomicMarkableReference 类使用示例
import java.util.concurrent.atomic.AtomicMarkableReference;public class AtomicMarkableReferenceDemo {public static void main(String[] args) {// 实例化、取当前值和 mark 值final Boolean initialRef = null, initialMark = false;final AtomicMarkableReference<Boolean> amr = new AtomicMarkableReference<>(initialRef, initialMark);System.out.println("currentValue=" + amr.getReference() + ", currentMark=" + amr.isMarked());// compare and setfinal Boolean newReference1 = true, newMark1 = true;final boolean casResult = amr.compareAndSet(initialRef, newReference1, initialMark, newMark1);System.out.println("currentValue=" + amr.getReference()+ ", currentMark=" + amr.isMarked()+ ", casResult=" + casResult);// 获取当前的值和当前的 mark 值boolean[] arr = new boolean[1];final Boolean currentValue = amr.get(arr);final boolean currentMark = arr[0];System.out.println("currentValue=" + currentValue + ", currentMark=" + currentMark);// 单独设置 mark 值final boolean attemptMarkResult = amr.attemptMark(newReference1, false);System.out.println("currentValue=" + amr.getReference()+ ", currentMark=" + amr.isMarked()+ ", attemptMarkResult=" + attemptMarkResult);// 重新设置当前值和 mark 值amr.set(initialRef, initialMark);System.out.println("currentValue=" + amr.getReference() + ", currentMark=" + amr.isMarked());// [不推荐使用,除非搞清楚注释的意思了] weak compare and set// 困惑!weakCompareAndSet 这个方法最终还是调用 compareAndSet 方法。[版本: jdk-8u191]// 但是注释上写着 "May fail spuriously and does not provide ordering guarantees,// so is only rarely an appropriate alternative to compareAndSet."// todo 感觉有可能是 jvm 通过方法名在 native 方法里面做了转发final boolean wCasResult = amr.weakCompareAndSet(initialRef, newReference1, initialMark, newMark1);System.out.println("currentValue=" + amr.getReference()+ ", currentMark=" + amr.isMarked()+ ", wCasResult=" + wCasResult);}
}
输出结果如下:
currentValue=null, currentMark=false
currentValue=true, currentMark=true, casResult=true
currentValue=true, currentMark=true
currentValue=true, currentMark=false, attemptMarkResult=true
currentValue=null, currentMark=false
currentValue=true, currentMark=true, wCasResult=true
5 对象的属性修改类型原子类
5.1 对象的属性修改类型原子类介绍
如果需要原子更新某个类里的某个字段时,需要用到对象的属性修改类型原子类。
- AtomicIntegerFieldUpdater:原子更新整形字段的更新器
- AtomicLongFieldUpdater:原子更新长整形字段的更新器
- AtomicReferenceFieldUpdater :原子更新引用类型里的字段的更新器
要想原子地更新对象的属性需要两步。第一步,因为对象的属性修改类型原子类都是抽象类,所以每次使用都必须使用静态方法 newUpdater()创建一个更新器,并且需要设置想要更新的类和属性。第二步,更新的对象属性必须使用 public volatile 修饰符。
上面三个类提供的方法几乎相同,所以我们这里以 AtomicIntegerFieldUpdater为例子来介绍。
5.2 AtomicIntegerFieldUpdater 类使用示例
import java.util.concurrent.atomic.AtomicIntegerFieldUpdater;public class AtomicIntegerFieldUpdaterTest {public static void main(String[] args) {AtomicIntegerFieldUpdater<User> a = AtomicIntegerFieldUpdater.newUpdater(User.class, "age");User user = new User("Java", 22);System.out.println(a.getAndIncrement(user));// 22System.out.println(a.get(user));// 23}
}class User {private String name;public volatile int age;public User(String name, int age) {super();this.name = name;this.age = age;}public String getName() {return name;}public void setName(String name) {this.name = name;}public int getAge() {return age;}public void setAge(int age) {this.age = age;}}
输出结果:
22
23
