目标检测YOLOv3基于DarkNet53模型测试-笔记
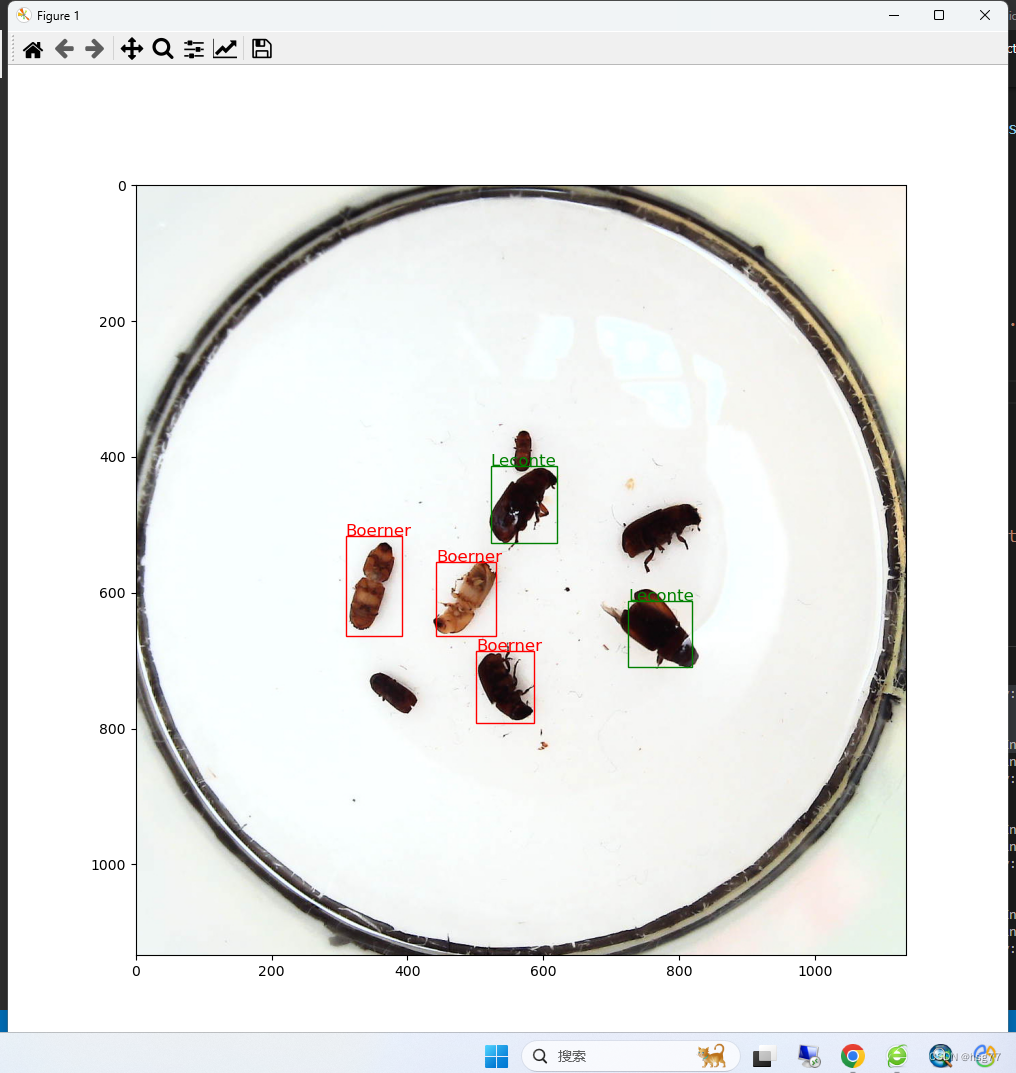
预测和试测结果:
预测代码如下所示:
testInsects.py
#YOLOv3网模型测试-单图片文件测试并显示测试结果
import time
import os
import paddle
import numpy as np
import cv2
import random
from PIL import Image, ImageEnhance
import xml.etree.ElementTree as ET
import matplotlib.pyplot as plt
import matplotlib.patches as patches
from matplotlib.image import imread
import YOLOv3  as dANCHORS = [10, 13, 16, 30, 33, 23, 30, 61, 62, 45, 59, 119, 116, 90, 156, 198, 373, 326]
ANCHOR_MASKS = [[6, 7, 8], [3, 4, 5], [0, 1, 2]]
VALID_THRESH = 0.01
NMS_TOPK = 400
NMS_POSK = 100
NMS_THRESH = 0.45
NUM_CLASSES = 7
#
# 定义画图函数
INSECT_NAMES = ['Boerner', 'Leconte', 'Linnaeus', 'acuminatus', 'armandi', 'coleoptera', 'linnaeus']# 定义画矩形框的函数
def draw_rectangle(currentAxis, bbox, edgecolor = 'k', facecolor = 'y', fill=False, linestyle='-'):# currentAxis,坐标轴,通过plt.gca()获取# bbox,边界框,包含四个数值的list, [x1, y1, x2, y2]# edgecolor,边框线条颜色# facecolor,填充颜色# fill, 是否填充# linestype,边框线型# patches.Rectangle需要传入左上角坐标、矩形区域的宽度、高度等参数rect=patches.Rectangle((bbox[0], bbox[1]), bbox[2]-bbox[0]+1, bbox[3]-bbox[1]+1, linewidth=1,edgecolor=edgecolor,facecolor=facecolor,fill=fill, linestyle=linestyle)currentAxis.add_patch(rect)# 定义绘制预测结果的函数
def draw_results(result, filename, draw_thresh=0.5):plt.figure(figsize=(10, 10))im = imread(filename)plt.imshow(im)currentAxis=plt.gca()colors = ['r', 'g', 'b', 'k', 'y', 'c', 'purple']for item in result:box = item[2:6]label = int(item[0])name = INSECT_NAMES[label]if item[1] > draw_thresh:draw_rectangle(currentAxis, box, edgecolor = colors[label])plt.text(box[0], box[1], name, fontsize=12, color=colors[label])# 读取单张测试图片
def single_image_data_loader(filename, test_image_size=608, mode='test'):"""加载测试用的图片,测试数据没有groundtruth标签"""batch_size= 1def reader():batch_data = []img_size = test_image_sizefile_path = os.path.join(filename)img = cv2.imread(file_path)img = cv2.cvtColor(img, cv2.COLOR_BGR2RGB)H = img.shape[0]W = img.shape[1]img = cv2.resize(img, (img_size, img_size))mean = [0.485, 0.456, 0.406]std = [0.229, 0.224, 0.225]mean = np.array(mean).reshape((1, 1, -1))std = np.array(std).reshape((1, 1, -1))out_img = (img / 255.0 - mean) / stdout_img = out_img.astype('float32').transpose((2, 0, 1))img = out_img #np.transpose(out_img, (2,0,1))im_shape = [H, W]batch_data.append((image_name.split('.')[0], img, im_shape))if len(batch_data) == batch_size:yield d.make_test_array(batch_data)batch_data = []return reader
#
if __name__ == '__main__':image_name = './ObjectCheck/data/insects/test/images/2592.jpeg'     #2599.jpeg    2592.jpeg   /3157.jpegparams_file_path = './yolo_epoch50.pdparams'model = d.YOLOv3(num_classes=NUM_CLASSES)model_state_dict = paddle.load(params_file_path)model.load_dict(model_state_dict)model.eval()total_results = []test_loader = single_image_data_loader(image_name, mode='test')for i, data in enumerate(test_loader()):img_name, img_data, img_scale_data = dataimg = paddle.to_tensor(img_data)img_scale = paddle.to_tensor(img_scale_data)outputs = model.forward(img)bboxes, scores = model.get_pred(outputs,im_shape=img_scale,anchors=ANCHORS,anchor_masks=ANCHOR_MASKS,valid_thresh = VALID_THRESH)bboxes_data = bboxes.numpy()scores_data = scores.numpy()results = d.multiclass_nms(bboxes_data, scores_data,score_thresh=VALID_THRESH, nms_thresh=NMS_THRESH, pre_nms_topk=NMS_TOPK, pos_nms_topk=NMS_POSK)result = results[0]
print(result.shape)
draw_results(result, image_name, draw_thresh=0.5)plt.show()
训练测试代码如下所示:
trans.py
############# 这段代码在本地机器上运行请慎重,容易造成死机#######################
import time
import os
import paddle
import numpy as np
import cv2
import random
from PIL import Image, ImageEnhance
import xml.etree.ElementTree as ET
import YOLOv3  as d
#数据处理
# 创建数据读取类     ANCHORS = [10, 13, 16, 30, 33, 23, 30, 61, 62, 45, 59, 119, 116, 90, 156, 198, 373, 326]ANCHOR_MASKS = [[6, 7, 8], [3, 4, 5], [0, 1, 2]]IGNORE_THRESH = .7
NUM_CLASSES = 7def get_lr(base_lr = 0.0001, lr_decay = 0.1):bd = [10000, 20000]lr = [base_lr, base_lr * lr_decay, base_lr * lr_decay * lr_decay]learning_rate = paddle.optimizer.lr.PiecewiseDecay(boundaries=bd, values=lr)return learning_rateif __name__ == '__main__':TRAINDIR = './ObjectCheck/data/insects/train'TESTDIR = './ObjectCheck/data/insects/test'VALIDDIR = './ObjectCheck/data/insects/val'paddle.device.set_device("gpu:0")# 创建数据读取类train_dataset = d.TrainDataset(TRAINDIR, mode='train')valid_dataset = d.TrainDataset(VALIDDIR, mode='valid')test_dataset = d.TrainDataset(VALIDDIR, mode='valid')# 使用paddle.io.DataLoader创建数据读取器,并设置batchsize,进程数量num_workers等参数train_loader = paddle.io.DataLoader(train_dataset, batch_size=10, shuffle=True, num_workers=0, drop_last=True, use_shared_memory=False)valid_loader = paddle.io.DataLoader(valid_dataset, batch_size=10, shuffle=False, num_workers=0, drop_last=False, use_shared_memory=False)model = d.YOLOv3(num_classes = NUM_CLASSES)  #创建模型learning_rate = get_lr()opt = paddle.optimizer.Momentum(learning_rate=learning_rate,momentum=0.9,weight_decay=paddle.regularizer.L2Decay(0.0005),parameters=model.parameters())  #创建优化器# opt = paddle.optimizer.Adam(learning_rate=learning_rate, weight_decay=paddle.regularizer.L2Decay(0.0005), parameters=model.parameters())MAX_EPOCH = 200for epoch in range(MAX_EPOCH):for i, data in enumerate(train_loader()):img, gt_boxes, gt_labels, img_scale = datagt_scores = np.ones(gt_labels.shape).astype('float32')gt_scores = paddle.to_tensor(gt_scores)img = paddle.to_tensor(img)gt_boxes = paddle.to_tensor(gt_boxes)gt_labels = paddle.to_tensor(gt_labels)outputs = model(img)  #前向传播,输出[P0, P1, P2]loss = model.get_loss(outputs, gt_boxes, gt_labels, gtscore=gt_scores,anchors = ANCHORS,anchor_masks = ANCHOR_MASKS,ignore_thresh=IGNORE_THRESH,use_label_smooth=False)        # 计算损失函数loss.backward()    # 反向传播计算梯度opt.step()  # 更新参数opt.clear_grad()if i % 10 == 0:timestring = time.strftime("%Y-%m-%d %H:%M:%S",time.localtime(time.time()))print('{}[TRAIN]epoch {}, iter {}, output loss: {}'.format(timestring, epoch, i, loss.numpy()))# save params of modelif (epoch % 5 == 0) or (epoch == MAX_EPOCH -1):paddle.save(model.state_dict(), 'yolo_epoch{}'.format(epoch))# 每个epoch结束之后在验证集上进行测试model.eval()for i, data in enumerate(valid_loader()):img, gt_boxes, gt_labels, img_scale = datagt_scores = np.ones(gt_labels.shape).astype('float32')gt_scores = paddle.to_tensor(gt_scores)img = paddle.to_tensor(img)gt_boxes = paddle.to_tensor(gt_boxes)gt_labels = paddle.to_tensor(gt_labels)outputs = model(img)loss = model.get_loss(outputs, gt_boxes, gt_labels, gtscore=gt_scores,anchors = ANCHORS,anchor_masks = ANCHOR_MASKS,ignore_thresh=IGNORE_THRESH,use_label_smooth=False)if i % 1 == 0:timestring = time.strftime("%Y-%m-%d %H:%M:%S",time.localtime(time.time()))print('{}[VALID]epoch {}, iter {}, output loss: {}'.format(timestring, epoch, i, loss.numpy()))model.train()'''
#输出结果:
PS E:\project\python> & D:/ProgramData/Anaconda3/python.exe e:/project/python/ObjectCheck/train.py
{'Boerner': 0, 'Leconte': 1, 'Linnaeus': 2, 'acuminatus': 3, 'armandi': 4, 'coleoptera': 5, 'linnaeus': 6}
W0808 17:32:42.379954 11784 gpu_resources.cc:61] Please NOTE: device: 0, GPU Compute Capability: 6.1, Driver API Version: 12.2, Runtime API Version: 10.2
W0808 17:32:42.388298 11784 gpu_resources.cc:91] device: 0, cuDNN Version: 7.6.
e:\project\python\ObjectCheck\YOLOv3.py:525: DeprecationWarning: LANCZOS is deprecated and will be removed in Pillow 10 (2023-07-01). Use Resampling.LANCZOS instead.crop[1] + crop[3])).resize(img.size, Image.LANCZOS)
D:\ProgramData\Anaconda3\lib\site-packages\paddle\nn\layer\norm.py:712: UserWarning: When training, we now always track global mean and variance.warnings.warn(
2023-08-08 17:33:00[TRAIN]epoch 0, iter 0, output loss: [17514.3]
2023-08-08 17:37:04[TRAIN]epoch 0, iter 10, output loss: [664.46826]
2023-08-08 17:41:14[TRAIN]epoch 0, iter 20, output loss: [178.863]
2023-08-08 17:45:23[TRAIN]epoch 0, iter 30, output loss: [96.15729]
2023-08-08 17:49:20[TRAIN]epoch 0, iter 40, output loss: [126.4073]
2023-08-08 17:53:24[TRAIN]epoch 0, iter 50, output loss: [99.16821]
2023-08-08 17:57:51[TRAIN]epoch 0, iter 60, output loss: [78.51326]
2023-08-08 18:01:54[TRAIN]epoch 0, iter 70, output loss: [73.76933]
2023-08-08 18:06:02[TRAIN]epoch 0, iter 80, output loss: [95.99153]
2023-08-08 18:10:03[TRAIN]epoch 0, iter 90, output loss: [65.16132]
2023-08-08 18:14:08[TRAIN]epoch 0, iter 100, output loss: [65.93103]
2023-08-08 18:18:14[TRAIN]epoch 0, iter 110, output loss: [71.1369]
2023-08-08 18:22:22[TRAIN]epoch 0, iter 120, output loss: [75.29985]
2023-08-08 18:26:25[TRAIN]epoch 0, iter 130, output loss: [53.242706]
2023-08-08 18:30:28[TRAIN]epoch 0, iter 140, output loss: [54.256916]
2023-08-08 18:34:25[TRAIN]epoch 0, iter 150, output loss: [69.66019]
2023-08-08 18:38:15[TRAIN]epoch 0, iter 160, output loss: [65.595924]
2023-08-08 18:42:06[VALID]epoch 0, iter 0, output loss: [69.894264]
PS E:\project\python>
'''
模型和相关函数定义文件
JOLOv3.py
import time
import os
import paddle
import numpy as np
import cv2
import random
from PIL import Image, ImageEnhance
import xml.etree.ElementTree as ET
import paddle.nn.functional as F#insect name to map number[0,6]
INSECT_NAMES = ['Boerner', 'Leconte', 'Linnaeus', 'acuminatus', 'armandi', 'coleoptera', 'linnaeus']def get_insect_names():"""return a dict, as following,{'Boerner': 0,'Leconte': 1,'Linnaeus': 2, 'acuminatus': 3,'armandi': 4,'coleoptera': 5,'linnaeus': 6}It can map the insect name into an integer label."""insect_category2id = {}for i, item in enumerate(INSECT_NAMES):insect_category2id[item] = ireturn insect_category2idcname2cid = get_insect_names()
print(cname2cid)   #{'Boerner': 0, 'Leconte': 1, 'Linnaeus': 2, 'acuminatus': 3, 'armandi': 4, 'coleoptera': 5, 'linnaeus': 6}
#=======================================================================================#网络模型设计
class YOLOv3(paddle.nn.Layer):def __init__(self, num_classes=7):super(YOLOv3,self).__init__()self.num_classes = num_classes# 提取图像特征的骨干代码self.block = DarkNet53_conv_body()self.block_outputs = []self.yolo_blocks = []self.route_blocks_2 = []# 生成3个层级的特征图P0, P1, P2for i in range(3):# 添加从ci生成ri和ti的模块yolo_block = self.add_sublayer("yolo_detecton_block_%d" % (i),YoloDetectionBlock(ch_in=512//(2**i)*2 if i==0 else 512//(2**i)*2 + 512//(2**i),ch_out = 512//(2**i)))self.yolo_blocks.append(yolo_block)num_filters = 3 * (self.num_classes + 5)# 添加从ti生成pi的模块,这是一个Conv2D操作,输出通道数为3 * (num_classes + 5)block_out = self.add_sublayer("block_out_%d" % (i),paddle.nn.Conv2D(in_channels=512//(2**i)*2,out_channels=num_filters,kernel_size=1,stride=1,padding=0,weight_attr=paddle.ParamAttr(initializer=paddle.nn.initializer.Normal(0., 0.02)),bias_attr=paddle.ParamAttr(initializer=paddle.nn.initializer.Constant(0.0),regularizer=paddle.regularizer.L2Decay(0.))))self.block_outputs.append(block_out)if i < 2:# 对ri进行卷积route = self.add_sublayer("route2_%d"%i,ConvBNLayer(ch_in=512//(2**i),ch_out=256//(2**i),kernel_size=1,stride=1,padding=0))self.route_blocks_2.append(route)# 将ri放大以便跟c_{i+1}保持同样的尺寸self.upsample = Upsample()def forward(self, inputs):outputs = []blocks = self.block(inputs)for i, block in enumerate(blocks):if i > 0:# 将r_{i-1}经过卷积和上采样之后得到特征图,与这一级的ci进行拼接block = paddle.concat([route, block], axis=1)# 从ci生成ti和riroute, tip = self.yolo_blocks[i](block)# 从ti生成piblock_out = self.block_outputs[i](tip)# 将pi放入列表outputs.append(block_out)if i < 2:# 对ri进行卷积调整通道数route = self.route_blocks_2[i](route)# 对ri进行放大,使其尺寸和c_{i+1}保持一致route = self.upsample(route)return outputsdef get_loss(self, outputs, gtbox, gtlabel, gtscore=None,anchors = [10, 13, 16, 30, 33, 23, 30, 61, 62, 45, 59, 119, 116, 90, 156, 198, 373, 326],anchor_masks = [[6, 7, 8], [3, 4, 5], [0, 1, 2]],ignore_thresh=0.7,use_label_smooth=False):"""使用paddle.vision.ops.yolo_loss,直接计算损失函数,过程更简洁,速度也更快"""self.losses = []downsample = 32for i, out in enumerate(outputs): # 对三个层级分别求损失函数anchor_mask_i = anchor_masks[i]loss = paddle.vision.ops.yolo_loss(x=out,  # out是P0, P1, P2中的一个gt_box=gtbox,  # 真实框坐标gt_label=gtlabel,  # 真实框类别gt_score=gtscore,  # 真实框得分,使用mixup训练技巧时需要,不使用该技巧时直接设置为1,形状与gtlabel相同anchors=anchors,   # 锚框尺寸,包含[w0, h0, w1, h1, ..., w8, h8]共9个锚框的尺寸anchor_mask=anchor_mask_i, # 筛选锚框的mask,例如anchor_mask_i=[3, 4, 5],将anchors中第3、4、5个锚框挑选出来给该层级使用class_num=self.num_classes, # 分类类别数ignore_thresh=ignore_thresh, # 当预测框与真实框IoU > ignore_thresh,标注objectness = -1downsample_ratio=downsample, # 特征图相对于原图缩小的倍数,例如P0是32, P1是16,P2是8use_label_smooth=False)      # 使用label_smooth训练技巧时会用到,这里没用此技巧,直接设置为Falseself.losses.append(paddle.mean(loss))  #mean对每张图片求和downsample = downsample // 2 # 下一级特征图的缩放倍数会减半return sum(self.losses) # 对每个层级求和def get_pred(self,outputs,im_shape=None,anchors = [10, 13, 16, 30, 33, 23, 30, 61, 62, 45, 59, 119, 116, 90, 156, 198, 373, 326],anchor_masks = [[6, 7, 8], [3, 4, 5], [0, 1, 2]],valid_thresh = 0.01):downsample = 32total_boxes = []total_scores = []for i, out in enumerate(outputs):anchor_mask = anchor_masks[i]anchors_this_level = []for m in anchor_mask:anchors_this_level.append(anchors[2 * m])anchors_this_level.append(anchors[2 * m + 1])boxes, scores = paddle.vision.ops.yolo_box(x=out,img_size=im_shape,anchors=anchors_this_level,class_num=self.num_classes,conf_thresh=valid_thresh,downsample_ratio=downsample,name="yolo_box" + str(i))total_boxes.append(boxes)total_scores.append(paddle.transpose(scores, perm=[0, 2, 1]))downsample = downsample // 2yolo_boxes = paddle.concat(total_boxes, axis=1)yolo_scores = paddle.concat(total_scores, axis=2)return yolo_boxes, yolo_scores# 定义数据读取类,继承Paddle.io.Dataset
class TrainDataset(paddle.io.Dataset):def  __init__(self, datadir, mode='train'):self.datadir = datadircname2cid = get_insect_names()self.records = get_annotations(cname2cid, datadir)self.img_size = 640  #get_img_size(mode)def __getitem__(self, idx):record = self.records[idx]# print("print: ", record)img, gt_bbox, gt_labels, im_shape = get_img_data(record, size=self.img_size)return img, gt_bbox, gt_labels, np.array(im_shape)def __len__(self):return len(self.records)# 非极大值抑制
def nms(bboxes, scores, score_thresh, nms_thresh, pre_nms_topk, i=0, c=0):"""nms"""inds = np.argsort(scores)inds = inds[::-1]keep_inds = []while(len(inds) > 0):cur_ind = inds[0]cur_score = scores[cur_ind]# if score of the box is less than score_thresh, just drop itif cur_score < score_thresh:breakkeep = Truefor ind in keep_inds:current_box = bboxes[cur_ind]remain_box = bboxes[ind]iou = box_iou_xyxy(current_box, remain_box)if iou > nms_thresh:keep = Falsebreakif i == 0 and c == 4 and cur_ind == 951:print('suppressed, ', keep, i, c, cur_ind, ind, iou)if keep:keep_inds.append(cur_ind)inds = inds[1:]return np.array(keep_inds)# 多分类非极大值抑制
def multiclass_nms(bboxes, scores, score_thresh=0.01, nms_thresh=0.45, pre_nms_topk=1000, pos_nms_topk=100):"""This is for multiclass_nms"""batch_size = bboxes.shape[0]class_num = scores.shape[1]rets = []for i in range(batch_size):bboxes_i = bboxes[i]scores_i = scores[i]ret = []for c in range(class_num):scores_i_c = scores_i[c]keep_inds = nms(bboxes_i, scores_i_c, score_thresh, nms_thresh, pre_nms_topk, i=i, c=c)if len(keep_inds) < 1:continuekeep_bboxes = bboxes_i[keep_inds]keep_scores = scores_i_c[keep_inds]keep_results = np.zeros([keep_scores.shape[0], 6])keep_results[:, 0] = ckeep_results[:, 1] = keep_scores[:]keep_results[:, 2:6] = keep_bboxes[:, :]ret.append(keep_results)if len(ret) < 1:rets.append(ret)continueret_i = np.concatenate(ret, axis=0)scores_i = ret_i[:, 1]if len(scores_i) > pos_nms_topk:inds = np.argsort(scores_i)[::-1]inds = inds[:pos_nms_topk]ret_i = ret_i[inds]rets.append(ret_i)return rets# 计算IoU,矩形框的坐标形式为xyxy,这个函数会被保存在box_utils.py文件中
def box_iou_xyxy(box1, box2):# 获取box1左上角和右下角的坐标x1min, y1min, x1max, y1max = box1[0], box1[1], box1[2], box1[3]# 计算box1的面积s1 = (y1max - y1min + 1.) * (x1max - x1min + 1.)# 获取box2左上角和右下角的坐标x2min, y2min, x2max, y2max = box2[0], box2[1], box2[2], box2[3]# 计算box2的面积s2 = (y2max - y2min + 1.) * (x2max - x2min + 1.)# 计算相交矩形框的坐标xmin = np.maximum(x1min, x2min)ymin = np.maximum(y1min, y2min)xmax = np.minimum(x1max, x2max)ymax = np.minimum(y1max, y2max)# 计算相交矩形行的高度、宽度、面积inter_h = np.maximum(ymax - ymin + 1., 0.)inter_w = np.maximum(xmax - xmin + 1., 0.)intersection = inter_h * inter_w# 计算相并面积union = s1 + s2 - intersection# 计算交并比iou = intersection / unionreturn iou
#
def get_annotations(cname2cid, datadir):filenames = os.listdir(os.path.join(datadir, 'annotations', 'xmls'))records = []ct = 0for fname in filenames:fid = fname.split('.')[0]fpath = os.path.join(datadir, 'annotations', 'xmls', fname)img_file = os.path.join(datadir, 'images', fid + '.jpeg')tree = ET.parse(fpath)if tree.find('id') is None:im_id = np.array([ct])else:im_id = np.array([int(tree.find('id').text)])objs = tree.findall('object')im_w = float(tree.find('size').find('width').text)im_h = float(tree.find('size').find('height').text)gt_bbox = np.zeros((len(objs), 4), dtype=np.float32)gt_class = np.zeros((len(objs), ), dtype=np.int32)is_crowd = np.zeros((len(objs), ), dtype=np.int32)difficult = np.zeros((len(objs), ), dtype=np.int32)for i, obj in enumerate(objs):cname = obj.find('name').textgt_class[i] = cname2cid[cname]_difficult = int(obj.find('difficult').text)x1 = float(obj.find('bndbox').find('xmin').text)y1 = float(obj.find('bndbox').find('ymin').text)x2 = float(obj.find('bndbox').find('xmax').text)y2 = float(obj.find('bndbox').find('ymax').text)x1 = max(0, x1)y1 = max(0, y1)x2 = min(im_w - 1, x2)y2 = min(im_h - 1, y2)# 这里使用xywh格式来表示目标物体真实框gt_bbox[i] = [(x1+x2)/2.0 , (y1+y2)/2.0, x2-x1+1., y2-y1+1.]is_crowd[i] = 0difficult[i] = _difficultvoc_rec = {'im_file': img_file,'im_id': im_id,'h': im_h,'w': im_w,'is_crowd': is_crowd,'gt_class': gt_class,'gt_bbox': gt_bbox,'gt_poly': [],'difficult': difficult}if len(objs) != 0:records.append(voc_rec)ct += 1return recordsdef get_bbox(gt_bbox, gt_class):# 对于一般的检测任务来说,一张图片上往往会有多个目标物体# 设置参数MAX_NUM = 50, 即一张图片最多取50个真实框;如果真实# 框的数目少于50个,则将不足部分的gt_bbox, gt_class和gt_score的各项数值全设置为0MAX_NUM = 50gt_bbox2 = np.zeros((MAX_NUM, 4))gt_class2 = np.zeros((MAX_NUM,))for i in range(len(gt_bbox)):gt_bbox2[i, :] = gt_bbox[i, :]gt_class2[i] = gt_class[i]if i >= MAX_NUM:breakreturn gt_bbox2, gt_class2def get_img_data_from_file(record):  """record is a dict as following,record = {'im_file': img_file,'im_id': im_id,'h': im_h,'w': im_w,'is_crowd': is_crowd,'gt_class': gt_class,'gt_bbox': gt_bbox,'gt_poly': [],'difficult': difficult}"""im_file = record['im_file']h = record['h']w = record['w']is_crowd = record['is_crowd']gt_class = record['gt_class']gt_bbox = record['gt_bbox']difficult = record['difficult']img = cv2.imread(im_file)img = cv2.cvtColor(img, cv2.COLOR_BGR2RGB)# check if h and w in record equals that read from imgassert img.shape[0] == int(h), \"image height of {} inconsistent in record({}) and img file({})".format(im_file, h, img.shape[0])assert img.shape[1] == int(w), \"image width of {} inconsistent in record({}) and img file({})".format(im_file, w, img.shape[1])gt_boxes, gt_labels = get_bbox(gt_bbox, gt_class)# gt_bbox 用相对值gt_boxes[:, 0] = gt_boxes[:, 0] / float(w)gt_boxes[:, 1] = gt_boxes[:, 1] / float(h)gt_boxes[:, 2] = gt_boxes[:, 2] / float(w)gt_boxes[:, 3] = gt_boxes[:, 3] / float(h)return img, gt_boxes, gt_labels, (h, w)# 将 list形式的batch数据 转化成多个array构成的tuple
def make_test_array(batch_data):img_name_array = np.array([item[0] for item in batch_data])img_data_array = np.array([item[1] for item in batch_data], dtype = 'float32')img_scale_array = np.array([item[2] for item in batch_data], dtype='int32')return img_name_array, img_data_array, img_scale_array#图像增广
def image_augment(img, gtboxes, gtlabels, size, means=None):# 随机改变亮暗、对比度和颜色等img = random_distort(img)# 随机填充img, gtboxes = random_expand(img, gtboxes, fill=means)# 随机裁剪img, gtboxes, gtlabels, = random_crop(img, gtboxes, gtlabels)# 随机缩放img = random_interp(img, size)# 随机翻转img, gtboxes = random_flip(img, gtboxes)# 随机打乱真实框排列顺序gtboxes, gtlabels = shuffle_gtbox(gtboxes, gtlabels)return img.astype('float32'), gtboxes.astype('float32'), gtlabels.astype('int32')
#======================================================================================
def random_distort(img):# 随机改变亮度def random_brightness(img, lower=0.5, upper=1.5):e = np.random.uniform(lower, upper)return ImageEnhance.Brightness(img).enhance(e)# 随机改变对比度def random_contrast(img, lower=0.5, upper=1.5):e = np.random.uniform(lower, upper)return ImageEnhance.Contrast(img).enhance(e)# 随机改变颜色def random_color(img, lower=0.5, upper=1.5):e = np.random.uniform(lower, upper)return ImageEnhance.Color(img).enhance(e)ops = [random_brightness, random_contrast, random_color]np.random.shuffle(ops)img = Image.fromarray(img)img = ops[0](img)img = ops[1](img)img = ops[2](img)img = np.asarray(img)return img# 随机填充
def random_expand(img,gtboxes,max_ratio=4.,fill=None,keep_ratio=True,thresh=0.5):if random.random() > thresh:return img, gtboxesif max_ratio < 1.0:return img, gtboxesh, w, c = img.shaperatio_x = random.uniform(1, max_ratio)if keep_ratio:ratio_y = ratio_xelse:ratio_y = random.uniform(1, max_ratio)oh = int(h * ratio_y)ow = int(w * ratio_x)off_x = random.randint(0, ow - w)off_y = random.randint(0, oh - h)out_img = np.zeros((oh, ow, c))if fill and len(fill) == c:for i in range(c):out_img[:, :, i] = fill[i] * 255.0out_img[off_y:off_y + h, off_x:off_x + w, :] = imggtboxes[:, 0] = ((gtboxes[:, 0] * w) + off_x) / float(ow)gtboxes[:, 1] = ((gtboxes[:, 1] * h) + off_y) / float(oh)gtboxes[:, 2] = gtboxes[:, 2] / ratio_xgtboxes[:, 3] = gtboxes[:, 3] / ratio_yreturn out_img.astype('uint8'), gtboxes# 随机裁剪
def random_crop(img,boxes,labels,scales=[0.3, 1.0],max_ratio=2.0,constraints=None,max_trial=50):if len(boxes) == 0:return img, boxesif not constraints:constraints = [(0.1, 1.0), (0.3, 1.0), (0.5, 1.0), (0.7, 1.0),(0.9, 1.0), (0.0, 1.0)]img = Image.fromarray(img)w, h = img.sizecrops = [(0, 0, w, h)]for min_iou, max_iou in constraints:for _ in range(max_trial):scale = random.uniform(scales[0], scales[1])aspect_ratio = random.uniform(max(1 / max_ratio, scale * scale), \min(max_ratio, 1 / scale / scale))crop_h = int(h * scale / np.sqrt(aspect_ratio))crop_w = int(w * scale * np.sqrt(aspect_ratio))crop_x = random.randrange(w - crop_w)crop_y = random.randrange(h - crop_h)crop_box = np.array([[(crop_x + crop_w / 2.0) / w,(crop_y + crop_h / 2.0) / h,crop_w / float(w), crop_h / float(h)]])iou = multi_box_iou_xywh(crop_box, boxes)if min_iou <= iou.min() and max_iou >= iou.max():crops.append((crop_x, crop_y, crop_w, crop_h))breakwhile crops:crop = crops.pop(np.random.randint(0, len(crops)))crop_boxes, crop_labels, box_num = box_crop(boxes, labels, crop, (w, h))if box_num < 1:continueimg = img.crop((crop[0], crop[1], crop[0] + crop[2],crop[1] + crop[3])).resize(img.size, Image.LANCZOS)img = np.asarray(img)return img, crop_boxes, crop_labelsimg = np.asarray(img)return img, boxes, labels# 随机缩放
def random_interp(img, size, interp=None):interp_method = [cv2.INTER_NEAREST,cv2.INTER_LINEAR,cv2.INTER_AREA,cv2.INTER_CUBIC,cv2.INTER_LANCZOS4,]if not interp or interp not in interp_method:interp = interp_method[random.randint(0, len(interp_method) - 1)]h, w, _ = img.shapeim_scale_x = size / float(w)im_scale_y = size / float(h)img = cv2.resize(img, None, None, fx=im_scale_x, fy=im_scale_y, interpolation=interp)return img# 随机翻转
def random_flip(img, gtboxes, thresh=0.5):if random.random() > thresh:img = img[:, ::-1, :]gtboxes[:, 0] = 1.0 - gtboxes[:, 0]return img, gtboxes# 随机打乱真实框排列顺序
def shuffle_gtbox(gtbox, gtlabel):gt = np.concatenate([gtbox, gtlabel[:, np.newaxis]], axis=1)idx = np.arange(gt.shape[0])np.random.shuffle(idx)gt = gt[idx, :]return gt[:, :4], gt[:, 4]#======================================================================================def get_img_data(record, size=640):img, gt_boxes, gt_labels, scales = get_img_data_from_file(record)img, gt_boxes, gt_labels = image_augment(img, gt_boxes, gt_labels, size)mean = [0.485, 0.456, 0.406]std = [0.229, 0.224, 0.225]mean = np.array(mean).reshape((1, 1, -1))std = np.array(std).reshape((1, 1, -1))img = (img / 255.0 - mean) / stdimg = img.astype('float32').transpose((2, 0, 1))return img, gt_boxes, gt_labels, scales# 定义上采样模块
class Upsample(paddle.nn.Layer):def __init__(self, scale=2):super(Upsample,self).__init__()self.scale = scaledef forward(self, inputs):# get dynamic upsample output shapeshape_nchw = paddle.shape(inputs)shape_hw = paddle.slice(shape_nchw, axes=[0], starts=[2], ends=[4])shape_hw.stop_gradient = Truein_shape = paddle.cast(shape_hw, dtype='int32')out_shape = in_shape * self.scaleout_shape.stop_gradient = True# reisze by actual_shapeout = paddle.nn.functional.interpolate(x=inputs, scale_factor=self.scale, mode="NEAREST")return out
#
#======================================================================================
#from paddle net from baidu.com codeclass ConvBNLayer(paddle.nn.Layer):def __init__(self, ch_in, ch_out, kernel_size=3, stride=1, groups=1,padding=0, act="leaky"):super(ConvBNLayer, self).__init__()self.conv = paddle.nn.Conv2D(in_channels=ch_in,out_channels=ch_out,kernel_size=kernel_size,stride=stride,padding=padding,groups=groups,weight_attr=paddle.ParamAttr(initializer=paddle.nn.initializer.Normal(0., 0.02)),bias_attr=False)self.batch_norm = paddle.nn.BatchNorm2D(num_features=ch_out,weight_attr=paddle.ParamAttr(initializer=paddle.nn.initializer.Normal(0., 0.02),regularizer=paddle.regularizer.L2Decay(0.)),bias_attr=paddle.ParamAttr(initializer=paddle.nn.initializer.Constant(0.0),regularizer=paddle.regularizer.L2Decay(0.)))self.act = actdef forward(self, inputs):out = self.conv(inputs)out = self.batch_norm(out)if self.act == 'leaky':out = F.leaky_relu(x=out, negative_slope=0.1)return outclass DownSample(paddle.nn.Layer):# 下采样,图片尺寸减半,具体实现方式是使用stirde=2的卷积def __init__(self,ch_in,ch_out,kernel_size=3,stride=2,padding=1):super(DownSample, self).__init__()self.conv_bn_layer = ConvBNLayer(ch_in=ch_in,ch_out=ch_out,kernel_size=kernel_size,stride=stride,padding=padding)self.ch_out = ch_outdef forward(self, inputs):out = self.conv_bn_layer(inputs)return outclass BasicBlock(paddle.nn.Layer):"""基本残差块的定义,输入x经过两层卷积,然后接第二层卷积的输出和输入x相加"""def __init__(self, ch_in, ch_out):super(BasicBlock, self).__init__()self.conv1 = ConvBNLayer(ch_in=ch_in,ch_out=ch_out,kernel_size=1,stride=1,padding=0)self.conv2 = ConvBNLayer(ch_in=ch_out,ch_out=ch_out*2,kernel_size=3,stride=1,padding=1)def forward(self, inputs):conv1 = self.conv1(inputs)conv2 = self.conv2(conv1)out = paddle.add(x=inputs, y=conv2)return outclass LayerWarp(paddle.nn.Layer):"""添加多层残差块,组成Darknet53网络的一个层级"""def __init__(self, ch_in, ch_out, count, is_test=True):super(LayerWarp,self).__init__()self.basicblock0 = BasicBlock(ch_in,ch_out)self.res_out_list = []for i in range(1, count):res_out = self.add_sublayer("basic_block_%d" % (i), # 使用add_sublayer添加子层BasicBlock(ch_out*2,ch_out))self.res_out_list.append(res_out)def forward(self,inputs):y = self.basicblock0(inputs)for basic_block_i in self.res_out_list:y = basic_block_i(y)return yclass YoloDetectionBlock(paddle.nn.Layer):# define YOLOv3 detection head# 使用多层卷积和BN提取特征def __init__(self,ch_in,ch_out,is_test=True):super(YoloDetectionBlock, self).__init__()assert ch_out % 2 == 0, \"channel {} cannot be divided by 2".format(ch_out)self.conv0 = ConvBNLayer(ch_in=ch_in,ch_out=ch_out,kernel_size=1,stride=1,padding=0)self.conv1 = ConvBNLayer(ch_in=ch_out,ch_out=ch_out*2,kernel_size=3,stride=1,padding=1)self.conv2 = ConvBNLayer(ch_in=ch_out*2,ch_out=ch_out,kernel_size=1,stride=1,padding=0)self.conv3 = ConvBNLayer(ch_in=ch_out,ch_out=ch_out*2,kernel_size=3,stride=1,padding=1)self.route = ConvBNLayer(ch_in=ch_out*2,ch_out=ch_out,kernel_size=1,stride=1,padding=0)self.tip = ConvBNLayer(ch_in=ch_out,ch_out=ch_out*2,kernel_size=3,stride=1,padding=1)def forward(self, inputs):out = self.conv0(inputs)out = self.conv1(out)out = self.conv2(out)out = self.conv3(out)route = self.route(out)tip = self.tip(route)return route, tip# 定义Sigmoid函数
def sigmoid(x):return 1./(1.0 + np.exp(-x))# 将网络特征图输出的[tx, ty, th, tw]转化成预测框的坐标[x1, y1, x2, y2]
def get_yolo_box_xxyy(pred, anchors, num_classes, downsample):"""pred是网络输出特征图转化成的numpy.ndarrayanchors 是一个list。表示锚框的大小,例如 anchors = [116, 90, 156, 198, 373, 326],表示有三个锚框,第一个锚框大小[w, h]是[116, 90],第二个锚框大小是[156, 198],第三个锚框大小是[373, 326]"""batchsize = pred.shape[0]num_rows = pred.shape[-2]num_cols = pred.shape[-1]input_h = num_rows * downsampleinput_w = num_cols * downsamplenum_anchors = len(anchors) // 2# pred的形状是[N, C, H, W],其中C = NUM_ANCHORS * (5 + NUM_CLASSES)# 对pred进行reshapepred = pred.reshape([-1, num_anchors, 5+num_classes, num_rows, num_cols])pred_location = pred[:, :, 0:4, :, :]pred_location = np.transpose(pred_location, (0,3,4,1,2))anchors_this = []for ind in range(num_anchors):anchors_this.append([anchors[ind*2], anchors[ind*2+1]])anchors_this = np.array(anchors_this).astype('float32')# 最终输出数据保存在pred_box中,其形状是[N, H, W, NUM_ANCHORS, 4],# 其中最后一个维度4代表位置的4个坐标pred_box = np.zeros(pred_location.shape)for n in range(batchsize):for i in range(num_rows):for j in range(num_cols):for k in range(num_anchors):pred_box[n, i, j, k, 0] = jpred_box[n, i, j, k, 1] = ipred_box[n, i, j, k, 2] = anchors_this[k][0]pred_box[n, i, j, k, 3] = anchors_this[k][1]# 这里使用相对坐标,pred_box的输出元素数值在0.~1.0之间pred_box[:, :, :, :, 0] = (sigmoid(pred_location[:, :, :, :, 0]) + pred_box[:, :, :, :, 0]) / num_colspred_box[:, :, :, :, 1] = (sigmoid(pred_location[:, :, :, :, 1]) + pred_box[:, :, :, :, 1]) / num_rowspred_box[:, :, :, :, 2] = np.exp(pred_location[:, :, :, :, 2]) * pred_box[:, :, :, :, 2] / input_wpred_box[:, :, :, :, 3] = np.exp(pred_location[:, :, :, :, 3]) * pred_box[:, :, :, :, 3] / input_h# 将坐标从xywh转化成xyxypred_box[:, :, :, :, 0] = pred_box[:, :, :, :, 0] - pred_box[:, :, :, :, 2] / 2.pred_box[:, :, :, :, 1] = pred_box[:, :, :, :, 1] - pred_box[:, :, :, :, 3] / 2.pred_box[:, :, :, :, 2] = pred_box[:, :, :, :, 0] + pred_box[:, :, :, :, 2]pred_box[:, :, :, :, 3] = pred_box[:, :, :, :, 1] + pred_box[:, :, :, :, 3]pred_box = np.clip(pred_box, 0., 1.0)return pred_box# 挑选出跟真实框IoU大于阈值的预测框
def get_iou_above_thresh_inds(pred_box, gt_boxes, iou_threshold):batchsize = pred_box.shape[0]num_rows = pred_box.shape[1]num_cols = pred_box.shape[2]num_anchors = pred_box.shape[3]ret_inds = np.zeros([batchsize, num_rows, num_cols, num_anchors])for i in range(batchsize):pred_box_i = pred_box[i]gt_boxes_i = gt_boxes[i]for k in range(len(gt_boxes_i)): #gt in gt_boxes_i:gt = gt_boxes_i[k]gtx_min = gt[0] - gt[2] / 2.gty_min = gt[1] - gt[3] / 2.gtx_max = gt[0] + gt[2] / 2.gty_max = gt[1] + gt[3] / 2.if (gtx_max - gtx_min < 1e-3) or (gty_max - gty_min < 1e-3):continuex1 = np.maximum(pred_box_i[:, :, :, 0], gtx_min)y1 = np.maximum(pred_box_i[:, :, :, 1], gty_min)x2 = np.minimum(pred_box_i[:, :, :, 2], gtx_max)y2 = np.minimum(pred_box_i[:, :, :, 3], gty_max)intersection = np.maximum(x2 - x1, 0.) * np.maximum(y2 - y1, 0.)s1 = (gty_max - gty_min) * (gtx_max - gtx_min)s2 = (pred_box_i[:, :, :, 2] - pred_box_i[:, :, :, 0]) * (pred_box_i[:, :, :, 3] - pred_box_i[:, :, :, 1])union = s2 + s1 - intersectioniou = intersection / unionabove_inds = np.where(iou > iou_threshold)ret_inds[i][above_inds] = 1ret_inds = np.transpose(ret_inds, (0,3,1,2))return ret_inds.astype('bool')def label_objectness_ignore(label_objectness, iou_above_thresh_indices):# 注意:这里不能简单的使用 label_objectness[iou_above_thresh_indices] = -1,#         这样可能会造成label_objectness为1的点被设置为-1了#         只有将那些被标注为0,且与真实框IoU超过阈值的预测框才被标注为-1negative_indices = (label_objectness < 0.5)ignore_indices = negative_indices * iou_above_thresh_indiceslabel_objectness[ignore_indices] = -1return label_objectness# DarkNet 每组残差块的个数,来自DarkNet的网络结构图
DarkNet_cfg = {53: ([1, 2, 8, 8, 4])}class DarkNet53_conv_body(paddle.nn.Layer):def __init__(self):super(DarkNet53_conv_body, self).__init__()self.stages = DarkNet_cfg[53]self.stages = self.stages[0:5]# 第一层卷积self.conv0 = ConvBNLayer(ch_in=3,ch_out=32,kernel_size=3,stride=1,padding=1)# 下采样,使用stride=2的卷积来实现self.downsample0 = DownSample(ch_in=32,ch_out=32 * 2)# 添加各个层级的实现self.darknet53_conv_block_list = []self.downsample_list = []for i, stage in enumerate(self.stages):conv_block = self.add_sublayer("stage_%d" % (i),LayerWarp(32*(2**(i+1)),32*(2**i),stage))self.darknet53_conv_block_list.append(conv_block)# 两个层级之间使用DownSample将尺寸减半for i in range(len(self.stages) - 1):downsample = self.add_sublayer("stage_%d_downsample" % i,DownSample(ch_in=32*(2**(i+1)),ch_out=32*(2**(i+2))))self.downsample_list.append(downsample)def forward(self,inputs):out = self.conv0(inputs)#print("conv1:",out.numpy())out = self.downsample0(out)#print("dy:",out.numpy())blocks = []for i, conv_block_i in enumerate(self.darknet53_conv_block_list): #依次将各个层级作用在输入上面out = conv_block_i(out)blocks.append(out)if i < len(self.stages) - 1:out = self.downsample_list[i](out)return blocks[-1:-4:-1] # 将C0, C1, C2作为返回值#
def multi_box_iou_xywh(box1, box2):"""In this case, box1 or box2 can contain multi boxes.Only two cases can be processed in this method:1, box1 and box2 have the same shape, box1.shape == box2.shape2, either box1 or box2 contains only one box, len(box1) == 1 or len(box2) == 1If the shape of box1 and box2 does not match, and both of them contain multi boxes, it will be wrong."""assert box1.shape[-1] == 4, "Box1 shape[-1] should be 4."assert box2.shape[-1] == 4, "Box2 shape[-1] should be 4."b1_x1, b1_x2 = box1[:, 0] - box1[:, 2] / 2, box1[:, 0] + box1[:, 2] / 2b1_y1, b1_y2 = box1[:, 1] - box1[:, 3] / 2, box1[:, 1] + box1[:, 3] / 2b2_x1, b2_x2 = box2[:, 0] - box2[:, 2] / 2, box2[:, 0] + box2[:, 2] / 2b2_y1, b2_y2 = box2[:, 1] - box2[:, 3] / 2, box2[:, 1] + box2[:, 3] / 2inter_x1 = np.maximum(b1_x1, b2_x1)inter_x2 = np.minimum(b1_x2, b2_x2)inter_y1 = np.maximum(b1_y1, b2_y1)inter_y2 = np.minimum(b1_y2, b2_y2)inter_w = inter_x2 - inter_x1inter_h = inter_y2 - inter_y1inter_w = np.clip(inter_w, a_min=0., a_max=None)inter_h = np.clip(inter_h, a_min=0., a_max=None)inter_area = inter_w * inter_hb1_area = (b1_x2 - b1_x1) * (b1_y2 - b1_y1)b2_area = (b2_x2 - b2_x1) * (b2_y2 - b2_y1)return inter_area / (b1_area + b2_area - inter_area)def box_crop(boxes, labels, crop, img_shape):x, y, w, h = map(float, crop)im_w, im_h = map(float, img_shape)boxes = boxes.copy()boxes[:, 0], boxes[:, 2] = (boxes[:, 0] - boxes[:, 2] / 2) * im_w, (boxes[:, 0] + boxes[:, 2] / 2) * im_wboxes[:, 1], boxes[:, 3] = (boxes[:, 1] - boxes[:, 3] / 2) * im_h, (boxes[:, 1] + boxes[:, 3] / 2) * im_hcrop_box = np.array([x, y, x + w, y + h])centers = (boxes[:, :2] + boxes[:, 2:]) / 2.0mask = np.logical_and(crop_box[:2] <= centers, centers <= crop_box[2:]).all(axis=1)boxes[:, :2] = np.maximum(boxes[:, :2], crop_box[:2])boxes[:, 2:] = np.minimum(boxes[:, 2:], crop_box[2:])boxes[:, :2] -= crop_box[:2]boxes[:, 2:] -= crop_box[:2]mask = np.logical_and(mask, (boxes[:, :2] < boxes[:, 2:]).all(axis=1))boxes = boxes * np.expand_dims(mask.astype('float32'), axis=1)labels = labels * mask.astype('float32')boxes[:, 0], boxes[:, 2] = (boxes[:, 0] + boxes[:, 2]) / 2 / w, (boxes[:, 2] - boxes[:, 0]) / wboxes[:, 1], boxes[:, 3] = (boxes[:, 1] + boxes[:, 3]) / 2 / h, (boxes[:, 3] - boxes[:, 1]) / hreturn boxes, labels, mask.sum()#