文章目录
- 初始化DefaultMQProducer实例
- 发送流程
- DefaultMQProducer#send
- DefaultMQProducerImpl#send
- MQClientInstance#updateTopicRouteInfoFromNameServer
- 使用特定 topic 获取路由信息
- 使用默认 topic 获取路由信息
- DefaultMQProducerImpl#sendDefaultImpl
- 发送流程总结
初始化DefaultMQProducer实例
详细内容见文章
RocketMQ 5.1.0 源码详解 | Producer 启动流程
第一部分
发送流程
DefaultMQProducer#send
只需要执行以下代码即可开始消息的发送流程
try {Message msg = new Message(TOPIC, TAG, "OrderID188", "Hello world".getBytes(StandardCharsets.UTF_8));SendResult sendResult = producer.send(msg);System.out.printf("%s%n", sendResult);
} catch (Exception e) {e.printStackTrace();
}
RocketMQ 发送普通消息有同步(Sync)发送、异步(Async)发送和单向(Oneway)发送三种方式,send() 方法中只传入 message 则默认为 SYNC 模式
producer 的 send 方法内容如下
public SendResult send(Message msg) throws MQClientException, RemotingException, MQBrokerException, InterruptedException {msg.setTopic(withNamespace(msg.getTopic()));return this.defaultMQProducerImpl.send(msg);
}
可以看到在发送消息时 DefaultMQProducer 也只是一个门面类,具体的实现都是由 DefaultMQProducerImpl 去做的
DefaultMQProducerImpl#send
DefaultMQProducerImpl 的 send 方法内容如下
public SendResult send(Message msg) throws MQClientException, RemotingException, MQBrokerException, InterruptedException {return send(msg, this.defaultMQProducer.getSendMsgTimeout());
}public SendResult send(Message msg,long timeout) throws MQClientException, RemotingException, MQBrokerException, InterruptedException {return this.sendDefaultImpl(msg, CommunicationMode.SYNC, null, timeout);
}
可以看到,基本就是继续调用了几个函数以补齐缺失的参数如超时时间、发送消息的类型和回调函数(由于是同步发送因此回调函数为 null),发送消息的逻辑则主要是在 sendDefaultImpl 方法中实现的
由于此方法内容太多,因此先看看整体的流程
private SendResult sendDefaultImpl(Message msg,final CommunicationMode communicationMode,final SendCallback sendCallback,final long timeout
) throws MQClientException, RemotingException, MQBrokerException, InterruptedException {// 确认生产者处于RUNNING状态this.makeSureStateOK();// 检查消息是否合法Validators.checkMessage(msg, this.defaultMQProducer);final long invokeID = random.nextLong();long beginTimestampFirst = System.currentTimeMillis();long beginTimestampPrev = beginTimestampFirst;long endTimestamp = beginTimestampFirst;// 获取topic的路由信息TopicPublishInfo topicPublishInfo = this.tryToFindTopicPublishInfo(msg.getTopic());// topicPublishInfo不为空且可用if (topicPublishInfo != null && topicPublishInfo.ok()) {...}// 校验 NameServer 配置是否正确validateNameServerSetting();throw new MQClientException("No route info of this topic: " + msg.getTopic() + FAQUrl.suggestTodo(FAQUrl.NO_TOPIC_ROUTE_INFO),null).setResponseCode(ClientErrorCode.NOT_FOUND_TOPIC_EXCEPTION);
}
首先检查生产者是否处于 RUNNING 状态,接着检查要发送的消息是否合法,然后会调用 tryToFindTopicPublishInfo 获取路由信息,如果获取成功则进入分支语句中的逻辑,否则校验 NameServer 配置是否正确。如果 NameServer 配置为空则抛出 No name server address 异常,否则抛出 No route info of this topic 异常
由于其他的逻辑相对容易,我们接下来先直接分析 tryToFindTopicPublishInfo 方法的内容
private TopicPublishInfo tryToFindTopicPublishInfo(final String topic) {// 从本地缓存(ConcurrentMap< String/* topic */,  TopicPublishInfo>)中尝试获取,第一次肯定为空TopicPublishInfo topicPublishInfo = this.topicPublishInfoTable.get(topic);if (null == topicPublishInfo || !topicPublishInfo.ok()) {this.topicPublishInfoTable.putIfAbsent(topic, new TopicPublishInfo());// 1.尝试从NameServer获取特定topic路由信息并更新本地缓存配置this.mQClientFactory.updateTopicRouteInfoFromNameServer(topic);topicPublishInfo = this.topicPublishInfoTable.get(topic);}// 如果找到可用的路由信息并返回if (topicPublishInfo.isHaveTopicRouterInfo() || topicPublishInfo.ok()) {return topicPublishInfo;} else { // 2.如果未找到路由信息,则再次尝试使用默认的topic获取路由信息this.mQClientFactory.updateTopicRouteInfoFromNameServer(topic, true, this.defaultMQProducer);topicPublishInfo = this.topicPublishInfoTable.get(topic);return topicPublishInfo;}
}
可以看到此方法首先会从本地的 topicPublishInfoTable 中寻找 topicPublishInfo,由于之前没有向 topic 发送过消息,因此第一次必然不会从本地找到
此时会首先向 topicPublishInfoTable 中添加空白 topicPublishInfo,然后再调用 mQClientFactory 对象的 updateTopicRouteInfoFromNameServer 方法来更新 topicPublishInfoTable 中 topicPublishInfo 的数据
又因为是向一个还不存在的 topic 发送消息,因此第一次尝试从 NameServer 获取配置信息并更新本地缓存配置失败,会进行尝试使用默认的 topic 去找路由配置信息
MQClientInstance#updateTopicRouteInfoFromNameServer
由上述章节可知此方法被调用了两次,第一次尝试从 NameServer 获取特定 topic 路由信息并更新本地缓存配置失败,第二次尝试使用默认的 topic 获取路由信息
使用特定 topic 获取路由信息
第一次尝试使用特定 topic 获取路由信息,调用方法为 updateTopicRouteInfoFromNameServer(topic)
public boolean updateTopicRouteInfoFromNameServer(final String topic) {return updateTopicRouteInfoFromNameServer(topic, false, null);
}
此方法又会调用其重载方法,即updateTopicRouteInfoFromNameServer(final String topic, boolean isDefault, DefaultMQProducer defaultMQProducer),其中 isDefault 传入的值为 false
由于方法的内容太多,因此我们只看代码走过的部分
TopicRouteData topicRouteData;
if (isDefault && defaultMQProducer != null) {// ...
} else {// 获取指定topic的配置信息topicRouteData = this.mQClientAPIImpl.getTopicRouteInfoFromNameServer(topic, clientConfig.getMqClientApiTimeout());
}
isDefault 的值为 false,因此进入 else 分支,尝试从 NameServer 中获取特定 topic 的路由信息,其中 getTopicRouteInfoFromNameServer 方法通过 Netty 使用 RPC 调用获取 Topic 路由信息,方法内容如下
public TopicRouteData getTopicRouteInfoFromNameServer(final String topic, final long timeoutMillis)throws RemotingException, MQClientException, InterruptedException {return getTopicRouteInfoFromNameServer(topic, timeoutMillis, true);
}public TopicRouteData getTopicRouteInfoFromNameServer(final String topic, final long timeoutMillis,boolean allowTopicNotExist) throws MQClientException, InterruptedException, RemotingTimeoutException, RemotingSendRequestException, RemotingConnectException {GetRouteInfoRequestHeader requestHeader = new GetRouteInfoRequestHeader();requestHeader.setTopic(topic);RemotingCommand request = RemotingCommand.createRequestCommand(RequestCode.GET_ROUTEINFO_BY_TOPIC, requestHeader);RemotingCommand response = this.remotingClient.invokeSync(null, request, timeoutMillis);assert response != null;switch (response.getCode()) {case ResponseCode.TOPIC_NOT_EXIST: {if (allowTopicNotExist) {log.warn("get Topic [{}] RouteInfoFromNameServer is not exist value", topic);}break;}//...}throw new MQClientException(response.getCode(), response.getRemark());
}
但是我们向一个不存在的 topic 发送消息,因此进入 case ResponseCode.TOPIC_NOT_EXIST 分支。又因为 allowTopicNotExist 传入的值为 true,所以打印警告并抛出异常,方法结束
使用默认 topic 获取路由信息
第二次获取时调用了 updateTopicRouteInfoFromNameServer(final String topic, boolean isDefault, DefaultMQProducer defaultMQProducer) ,其中 isDefault 传入的值为 true
TopicRouteData topicRouteData;
if (isDefault && defaultMQProducer != null) {// 从NameServer中获取默认的topic路由信息topicRouteData = this.mQClientAPIImpl.getDefaultTopicRouteInfoFromNameServer(defaultMQProducer.getCreateTopicKey(),clientConfig.getMqClientApiTimeout());if (topicRouteData != null) {// 修正topic路由信息中的读写队列数,使其最大不超过默认的topic队列数for (QueueData data : topicRouteData.getQueueDatas()) {int queueNums = Math.min(defaultMQProducer.getDefaultTopicQueueNums(), data.getReadQueueNums());data.setReadQueueNums(queueNums);data.setWriteQueueNums(queueNums);}}
}
上述代码分为两个步骤:
- 从 NameServer 中获取默认 topic 即 TBW102 的路由信息
- 修正获取到的默认 topic 路由信息
此时我们的 topicRouteData 不为空,且其 QueueData 属性也经过了修正,具体内容如下
TopicRouteData [orderTopicConf=null, queueDatas=[QueueData [brokerName=broker-a, readQueueNums=4, writeQueueNums=4, perm=6, topicSysFlag=0]], brokerDatas=[BrokerData [brokerName=broker-a, brokerAddrs={0=192.168.142.1:10911}, enableActingMaster=false]], filterServerTable={}, topicQueueMappingInfoTable=null
]
接着执行下面的代码
if (topicRouteData != null) {TopicRouteData old = this.topicRouteTable.get(topic);// 与本地缓存中的 topic 发布信息进行比较,如果有变化,则需要同步更新发送者、消费者关于该 topic 的缓存boolean changed = topicRouteData.topicRouteDataChanged(old);if (!changed) {changed = this.isNeedUpdateTopicRouteInfo(topic);} else {log.info("the topic[{}] route info changed, old[{}] ,new[{}]", topic, old, topicRouteData);}if (changed) { // 如果有变化,则需要同步更新发送者、消费者关于该 topic 的缓存for (BrokerData bd : topicRouteData.getBrokerDatas()) {// 更新broker地址this.brokerAddrTable.put(bd.getBrokerName(), bd.getBrokerAddrs());}// Update endpoint map{ConcurrentMap<MessageQueue, String> mqEndPoints = topicRouteData2EndpointsForStaticTopic(topic, topicRouteData);if (!mqEndPoints.isEmpty()) {topicEndPointsTable.put(topic, mqEndPoints);}}// Update Pub info{// 根据topic路由信息组装TopicPublishInfo对象TopicPublishInfo publishInfo = topicRouteData2TopicPublishInfo(topic, topicRouteData);publishInfo.setHaveTopicRouterInfo(true);for (Entry<String, MQProducerInner> entry : this.producerTable.entrySet()) {MQProducerInner impl = entry.getValue();if (impl != null) {// 更新DefaultMQProducerImpl的topicPublishInfoTable表impl.updateTopicPublishInfo(topic, publishInfo);}}}// Update sub info 生产者实例的consumerTable为空if (!consumerTable.isEmpty()) {//...}TopicRouteData cloneTopicRouteData = new TopicRouteData(topicRouteData);log.info("topicRouteTable.put. Topic = {}, TopicRouteData[{}]", topic, cloneTopicRouteData);this.topicRouteTable.put(topic, cloneTopicRouteData);return true;}
}
很明显新获取到的和本地缓存中的 topic 路由信息相比有变化,因此 changed 为 true
接着会根据 topicRouteData 组装TopicPublishInfo 对象,并将其保存到 DefaultMQProducerImpl 的 topicPublishInfoTable 中,key 为 topic 名称,value 为 TopicPublishInfo 对象
最后将 topicRouteData 保存在 topicRouteTable 中,方法结束
DefaultMQProducerImpl#sendDefaultImpl
现在我们已经获取到了要发送的 topic 的发布路由 topicPublishInfo,之后就开始发送了
boolean callTimeout = false;
MessageQueue mq = null;
Exception exception = null;
SendResult sendResult = null;
// 发送失败后重试最多的次数
int timesTotal = communicationMode == CommunicationMode.SYNC ? 1 + this.defaultMQProducer.getRetryTimesWhenSendFailed() : 1;
int times = 0;
String[] brokersSent = new String[timesTotal];
for (; times < timesTotal; times++) {String lastBrokerName = null == mq ? null : mq.getBrokerName();// 选择一个MessageQueue发送消息MessageQueue mqSelected = this.selectOneMessageQueue(topicPublishInfo, lastBrokerName);if (mqSelected != null) {//发送消息...} else {break;}
}
其中 selectOneMessageQueue 方法就是选择一个可用的 MessageQueue 发送消息
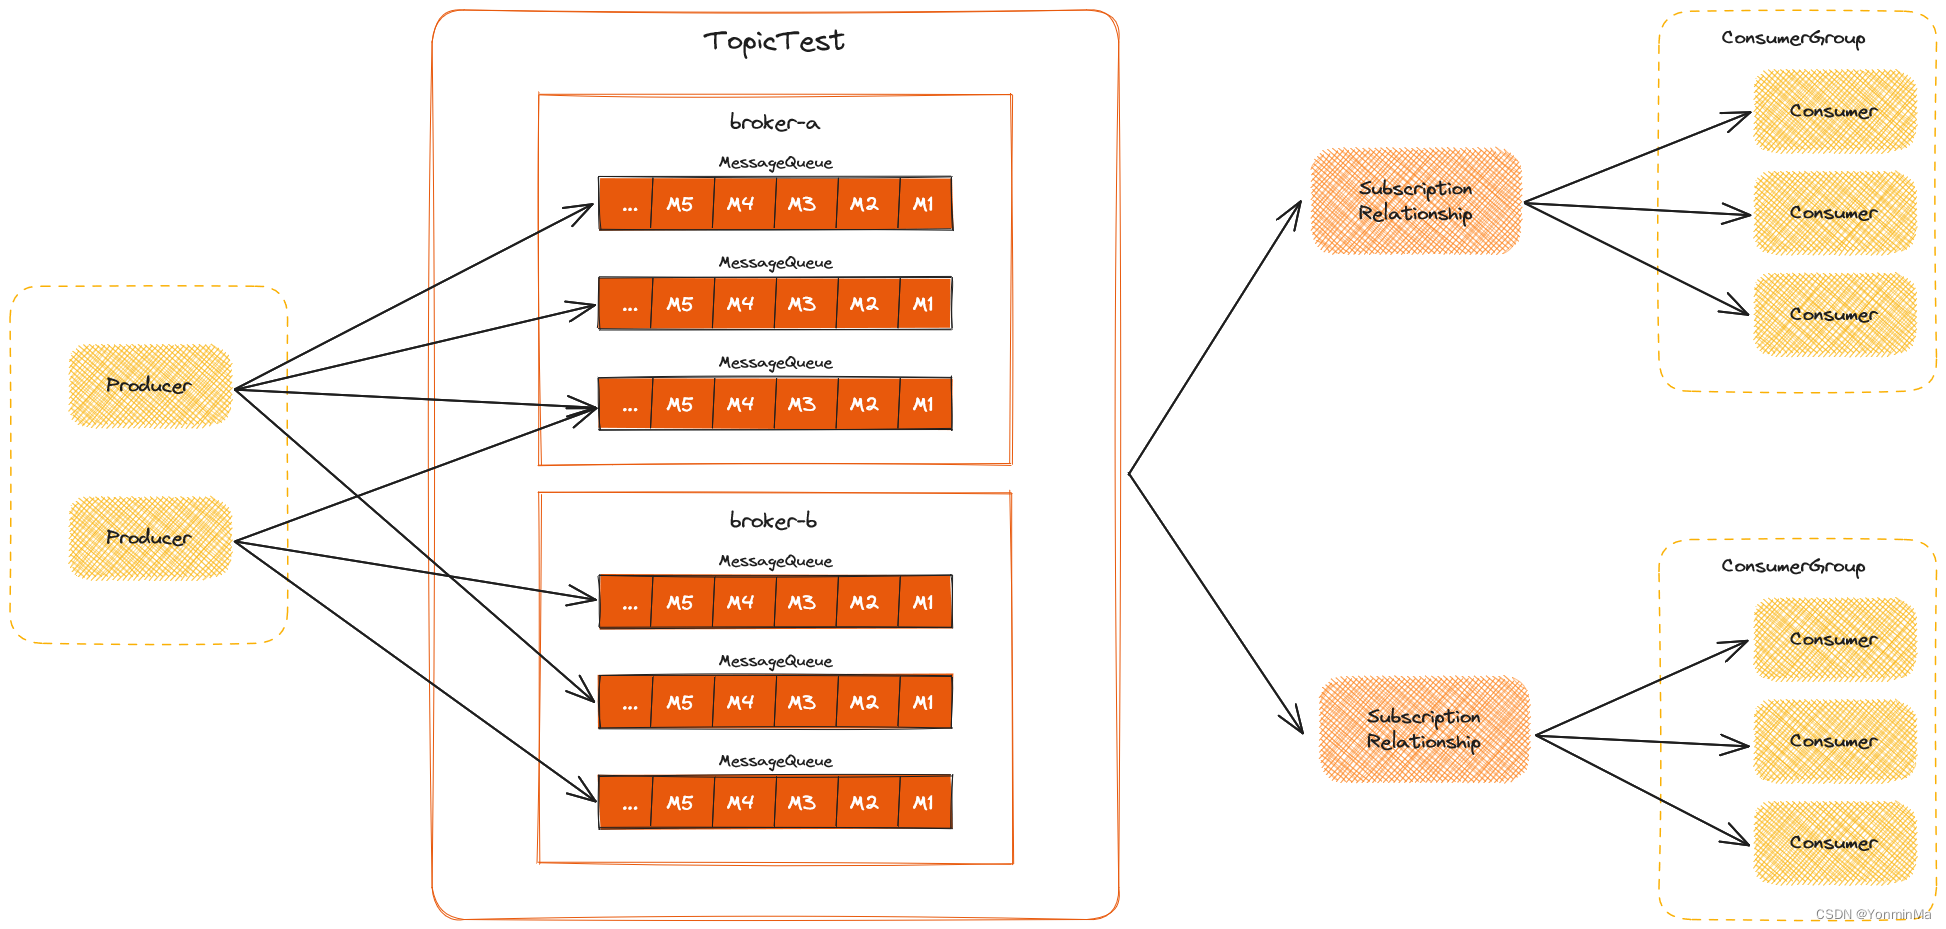
如上图所示,MessageQueue 有一个三元组标识唯一一个队列,即 (topic, brokerName, queueId),最上方的 MessageQueue 的三元组可能是 (TopicTest, broker-a, 0)
当我们得到了要发送的 MessageQueue 后就开始执行发送消息的步骤
mq = mqSelected;
brokersSent[times] = mq.getBrokerName();
try {beginTimestampPrev = System.currentTimeMillis();if (times > 0) {//Reset topic with namespace during resend.msg.setTopic(this.defaultMQProducer.withNamespace(msg.getTopic()));}long costTime = beginTimestampPrev - beginTimestampFirst;if (timeout < costTime) {callTimeout = true;break;}// 向 MessageQueue 发送消息sendResult = this.sendKernelImpl(msg, mq, communicationMode, sendCallback, topicPublishInfo, timeout - costTime);endTimestamp = System.currentTimeMillis();this.updateFaultItem(mq.getBrokerName(), endTimestamp - beginTimestampPrev, false);switch (communicationMode) {case ASYNC:return null;case ONEWAY:return null;case SYNC:// 同步调用方式(SYNC)下如果发送失败则执行失败重试策略,默认重试两次,即最多发送三次if (sendResult.getSendStatus() != SendStatus.SEND_OK) {if (this.defaultMQProducer.isRetryAnotherBrokerWhenNotStoreOK()) {continue;}}return sendResult;default:break;}
}
通过代码可以看出又调用了 sendKernelImpl 方法发送消息
private SendResult sendKernelImpl(final Message msg,final MessageQueue mq,final CommunicationMode communicationMode,final SendCallback sendCallback,final TopicPublishInfo topicPublishInfo,final long timeout) throws MQClientException, RemotingException, MQBrokerException, InterruptedException {long beginStartTime = System.currentTimeMillis();String brokerName = this.mQClientFactory.getBrokerNameFromMessageQueue(mq);String brokerAddr = this.mQClientFactory.findBrokerAddressInPublish(brokerName);if (null == brokerAddr) {tryToFindTopicPublishInfo(mq.getTopic());brokerName = this.mQClientFactory.getBrokerNameFromMessageQueue(mq);brokerAddr = this.mQClientFactory.findBrokerAddressInPublish(brokerName);}SendMessageContext context = null;if (brokerAddr != null) {// 根据配置判断是否使用VIP通道brokerAddr = MixAll.brokerVIPChannel(this.defaultMQProducer.isSendMessageWithVIPChannel(), brokerAddr);byte[] prevBody = msg.getBody();try {//for MessageBatch,ID has been set in the generating process// 检查消息是否为 MessageBatch 类型if (!(msg instanceof MessageBatch)) {MessageClientIDSetter.setUniqID(msg);}boolean topicWithNamespace = false;// 检查客户端配置中是否设置了命名空间if (null != this.mQClientFactory.getClientConfig().getNamespace()) {msg.setInstanceId(this.mQClientFactory.getClientConfig().getNamespace());topicWithNamespace = true;}// sysFlag是消息的系统标志位,包含压缩标志位、事务标志位、批量标志位、多队列标志位等int sysFlag = 0;boolean msgBodyCompressed = false;// 尝试压缩消息体if (this.tryToCompressMessage(msg)) {sysFlag |= MessageSysFlag.COMPRESSED_FLAG;sysFlag |= compressType.getCompressionFlag();msgBodyCompressed = true;}final String tranMsg = msg.getProperty(MessageConst.PROPERTY_TRANSACTION_PREPARED);// 检查消息是否为事务消息if (Boolean.parseBoolean(tranMsg)) {sysFlag |= MessageSysFlag.TRANSACTION_PREPARED_TYPE;}// 发送消息的校验钩子if (hasCheckForbiddenHook()) {CheckForbiddenContext checkForbiddenContext = new CheckForbiddenContext();checkForbiddenContext.setNameSrvAddr(this.defaultMQProducer.getNamesrvAddr());checkForbiddenContext.setGroup(this.defaultMQProducer.getProducerGroup());checkForbiddenContext.setCommunicationMode(communicationMode);checkForbiddenContext.setBrokerAddr(brokerAddr);checkForbiddenContext.setMessage(msg);checkForbiddenContext.setMq(mq);checkForbiddenContext.setUnitMode(this.isUnitMode());this.executeCheckForbiddenHook(checkForbiddenContext);}// 发送消息前的钩子if (this.hasSendMessageHook()) {context = new SendMessageContext();context.setProducer(this);context.setProducerGroup(this.defaultMQProducer.getProducerGroup());context.setCommunicationMode(communicationMode);context.setBornHost(this.defaultMQProducer.getClientIP());context.setBrokerAddr(brokerAddr);context.setMessage(msg);context.setMq(mq);context.setNamespace(this.defaultMQProducer.getNamespace());String isTrans = msg.getProperty(MessageConst.PROPERTY_TRANSACTION_PREPARED);if (isTrans != null && isTrans.equals("true")) {context.setMsgType(MessageType.Trans_Msg_Half);}if (msg.getProperty("__STARTDELIVERTIME") != null || msg.getProperty(MessageConst.PROPERTY_DELAY_TIME_LEVEL) != null) {context.setMsgType(MessageType.Delay_Msg);}this.executeSendMessageHookBefore(context);}// 设置发送消息的请求头SendMessageRequestHeader requestHeader = new SendMessageRequestHeader();requestHeader.setProducerGroup(this.defaultMQProducer.getProducerGroup());requestHeader.setTopic(msg.getTopic());requestHeader.setDefaultTopic(this.defaultMQProducer.getCreateTopicKey());requestHeader.setDefaultTopicQueueNums(this.defaultMQProducer.getDefaultTopicQueueNums());requestHeader.setQueueId(mq.getQueueId());requestHeader.setSysFlag(sysFlag);requestHeader.setBornTimestamp(System.currentTimeMillis());requestHeader.setFlag(msg.getFlag());requestHeader.setProperties(MessageDecoder.messageProperties2String(msg.getProperties()));requestHeader.setReconsumeTimes(0);requestHeader.setUnitMode(this.isUnitMode());requestHeader.setBatch(msg instanceof MessageBatch);requestHeader.setBname(brokerName);// 如果是重发消息,则设置重发消息的次数if (requestHeader.getTopic().startsWith(MixAll.RETRY_GROUP_TOPIC_PREFIX)) {// 重发消息的次数String reconsumeTimes = MessageAccessor.getReconsumeTime(msg);if (reconsumeTimes != null) {// 设置重发消息的次数requestHeader.setReconsumeTimes(Integer.valueOf(reconsumeTimes));// 清除消息的重发次数属性,因为消息的重发次数属性是在消息重发时设置的MessageAccessor.clearProperty(msg, MessageConst.PROPERTY_RECONSUME_TIME);}// 消息的最大重发次数String maxReconsumeTimes = MessageAccessor.getMaxReconsumeTimes(msg);if (maxReconsumeTimes != null) {// 设置消息的最大重发次数requestHeader.setMaxReconsumeTimes(Integer.valueOf(maxReconsumeTimes));// 清除消息的最大重发次数属性,因为消息的最大重发次数属性是在消息重发时设置的MessageAccessor.clearProperty(msg, MessageConst.PROPERTY_MAX_RECONSUME_TIMES);}}SendResult sendResult = null;switch (communicationMode) {case ASYNC:Message tmpMessage = msg;boolean messageCloned = false;if (msgBodyCompressed) {//If msg body was compressed, msgbody should be reset using prevBody.//Clone new message using commpressed message body and recover origin massage.//Fix bug:https://github.com/apache/rocketmq-externals/issues/66tmpMessage = MessageAccessor.cloneMessage(msg);messageCloned = true;// 防止压缩后的消息体重发时被再次压缩msg.setBody(prevBody);}if (topicWithNamespace) {if (!messageCloned) {tmpMessage = MessageAccessor.cloneMessage(msg);messageCloned = true;}// 防止设置了命名空间的topic重发时被再次设置命名空间msg.setTopic(NamespaceUtil.withoutNamespace(msg.getTopic(), this.defaultMQProducer.getNamespace()));}long costTimeAsync = System.currentTimeMillis() - beginStartTime;if (timeout < costTimeAsync) {throw new RemotingTooMuchRequestException("sendKernelImpl call timeout");}sendResult = this.mQClientFactory.getMQClientAPIImpl().sendMessage(brokerAddr,brokerName,tmpMessage,requestHeader,timeout - costTimeAsync,communicationMode,sendCallback,topicPublishInfo,this.mQClientFactory,this.defaultMQProducer.getRetryTimesWhenSendAsyncFailed(),context,this);break;case ONEWAY:case SYNC:long costTimeSync = System.currentTimeMillis() - beginStartTime;if (timeout < costTimeSync) {throw new RemotingTooMuchRequestException("sendKernelImpl call timeout");}sendResult = this.mQClientFactory.getMQClientAPIImpl().sendMessage(brokerAddr,brokerName,msg,requestHeader,timeout - costTimeSync,communicationMode,context,this);break;default:assert false;break;}// 发送消息后的钩子if (this.hasSendMessageHook()) {context.setSendResult(sendResult);this.executeSendMessageHookAfter(context);}return sendResult;} catch (RemotingException | InterruptedException | MQBrokerException e) {if (this.hasSendMessageHook()) {context.setException(e);this.executeSendMessageHookAfter(context);}throw e;} finally {msg.setBody(prevBody);msg.setTopic(NamespaceUtil.withoutNamespace(msg.getTopic(), this.defaultMQProducer.getNamespace()));}}throw new MQClientException("The broker[" + brokerName + "] not exist", null);
}
这段代码虽然比较长,但是结合注释还是挺容易理解的。不过其中在异步 (ASYNC) 发送消息时有下面一段代码可能会让人疑惑
Message tmpMessage = msg;
boolean messageCloned = false;
if (msgBodyCompressed) {//If msg body was compressed, msgbody should be reset using prevBody.//Clone new message using commpressed message body and recover origin massage.//Fix bug:https://github.com/apache/rocketmq-externals/issues/66tmpMessage = MessageAccessor.cloneMessage(msg);messageCloned = true;// 防止压缩后的消息体重发时被再次压缩msg.setBody(prevBody);
}if (topicWithNamespace) {if (!messageCloned) {tmpMessage = MessageAccessor.cloneMessage(msg);messageCloned = true;}// 防止设置了命名空间的topic重发时被再次设置命名空间msg.setTopic(NamespaceUtil.withoutNamespace(msg.getTopic(), this.defaultMQProducer.getNamespace()));
}
这段代码主要是克隆了一个和 msg 内容一样的 tmpMessage 并发送,而 msg 本身的 body 被设置成了压缩之前的 body,topic 也被设置成了添加命名空间之前的 topic
发送流程总结
- 检查消息是否合法
- 获取 topic 路由信息
- 先尝试从本地获取路由信息,没有则向 NameServer 获取
- 向 NameServer 获取路由信息并更新本地缓存,没有则抛出异常并返回
- 从本地获取路由信息
- 如果本地扔获取不到路由信息则获取默认路由信息
- 向 NameServer 获取默认路由信息,如果获取不到则抛出异常并返回
- 修改获取到的默认路由信息为新的 topic 的路由信息
- 更新本地路由信息缓存
- 先尝试从本地获取路由信息,没有则向 NameServer 获取
- 获取路由信息成功;失败则跳转到第4步
- 选择一个
MessageQueue - 向
MessageQueue发送消息- 根据配置判断是否使用 VIP 通道
- 检查消息是否为 MessageBatch 类型
- 检查客户端配置中是否设置了命名空间
- 设置消息的标志位
sysFlag- 尝试压缩消息体并更新
sysFlag - 检查消息是否为事务消息并更新
sysFlag
- 尝试压缩消息体并更新
- 调用钩子函数
- 设置消息请求头
- 根据发送消息的方式发送消息
- 选择一个
- 获取路由信息失败
- 校验 NameServer 配置是否正确
- 抛出异常结束