一、前言
Apache SkyWalking 是一个开源的分布式跟踪、监控和诊断系统,旨在帮助用户监控和诊断分布式应用程序、微服务架构和云原生应用的性能和健康状况。它提供了可视化的分析工具,帮助开发人员和运维团队深入了解应用程序的性能、调用链和异常情况
功能特点
分布式跟踪: SkyWalking 能够追踪分布式应用程序的请求调用链,显示每个请求从发起到结束的完整流程,包括各个组件和服务之间的调用关系。这有助于定位性能瓶颈和延迟问题
性能监控: SkyWalking 收集并展示应用程序的性能指标,如响应时间、吞吐量、错误率等,以图表和图形的形式呈现,帮助用户监控应用程序的健康状况
实时告警: SkyWalking 具备实时告警功能,可以根据用户定义的条件和阈值生成警报。当应用程序出现性能问题或异常时,系统会发送通知,让团队能够及时采取行动
多语言支持: SkyWalking 支持多种编程语言和技术栈,包括 Java、Python、Go、.NET 等。这使得它适用于各种类型的应用程序
可视化界面: SkyWalking 提供了直观的 Web 界面,用户可以通过图表、仪表盘和可视化的调用链图来查看和分析应用程序的性能数据
二、部署
部署skywalking之前需要先部署java环境,我用的是skywalking的9.4.0版本,所有需要使用jdk11本版的java环境
部署java参考:jdk1.8环境配置_Apex Predator的博客-CSDN博客
部署skywalking服务,需要先下载安装包,我这边使用的是9.4.0版本
下载路径参考:Downloads | Apache SkyWalking
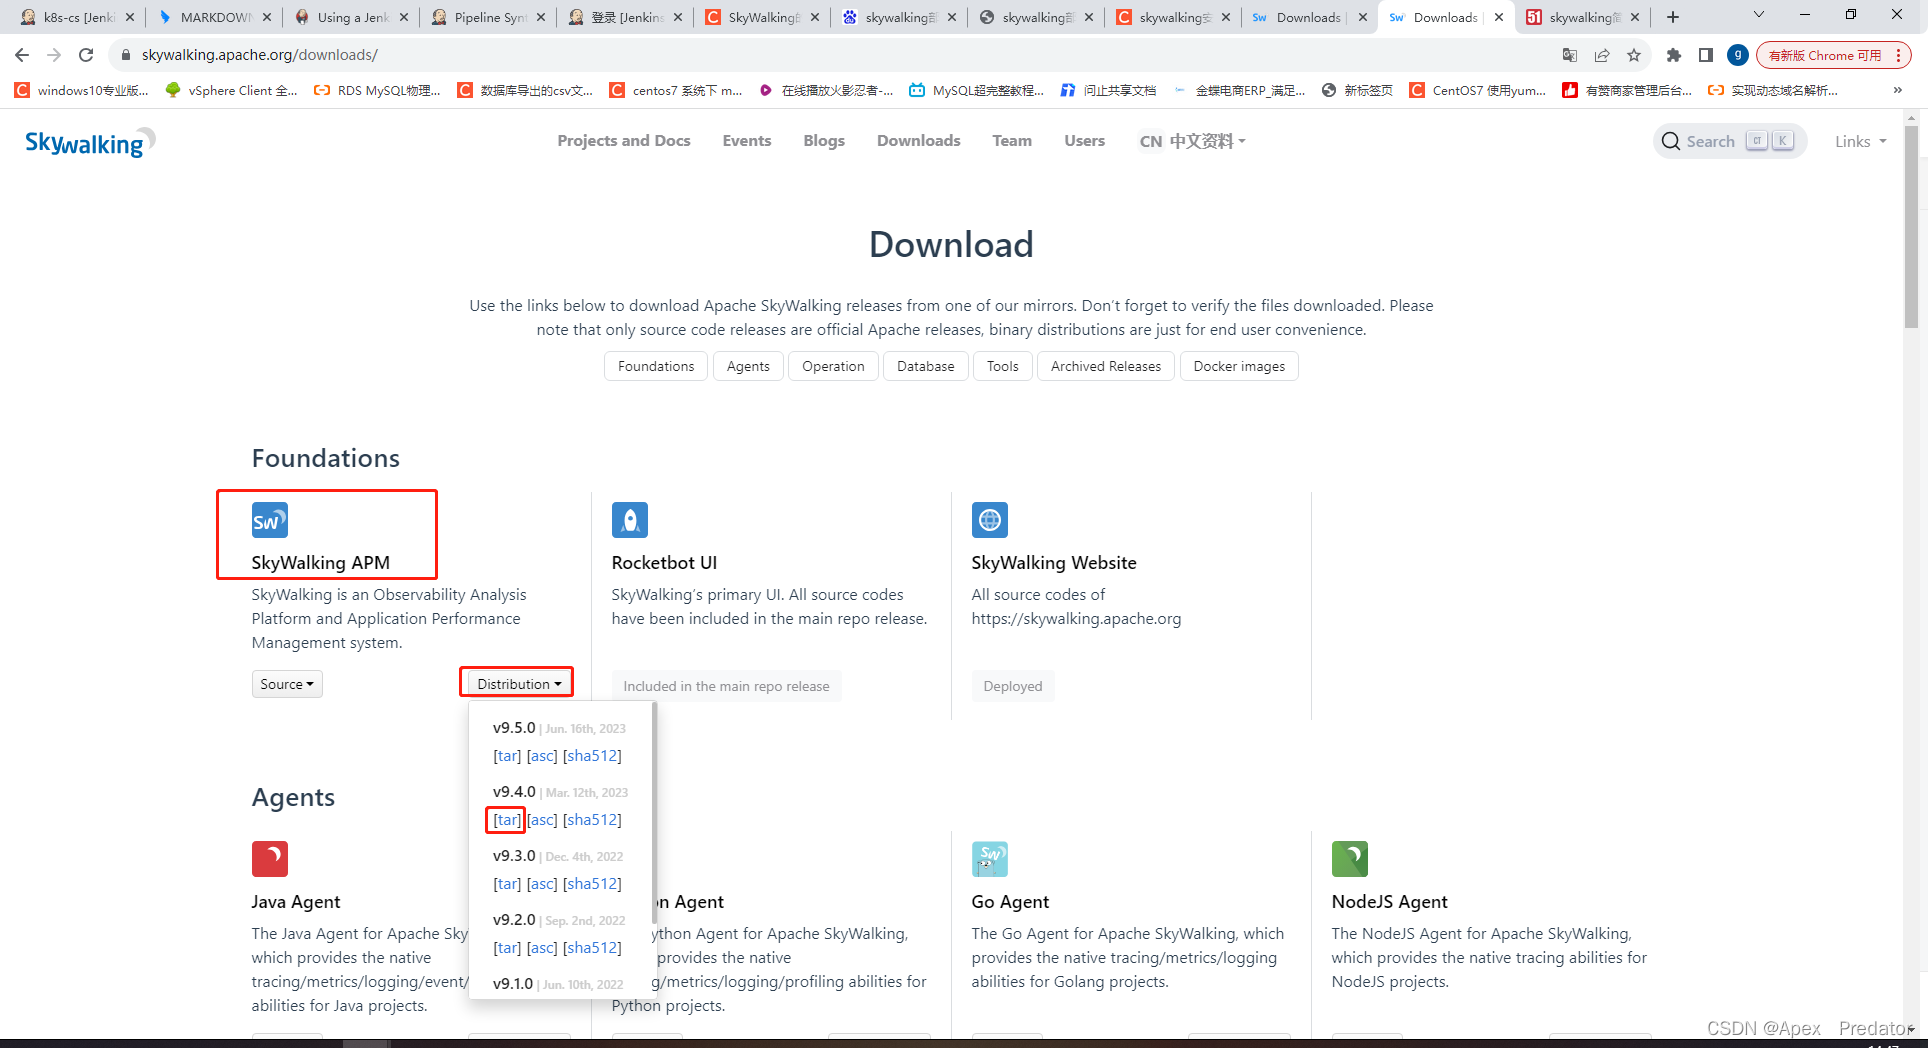
创建skywalking存放目录并将安装包放到该目录下解压
mkdir /opt/skywalking && cd /opt/skywalking
tar -zxvf apache-skywalking-apm-9.4.0.tar.gz && mv apache-skywalking-apm-9.4.0 skywalking
编辑skywalking配置文件,主要是配置数据存放的选择,默认使用自带的h2存储,我们这边改成使用elasticsearch作为存储
vi skywalking/config/application.yml
storage:selector: ${SW_STORAGE:elasticsearch} #配置为以下elasticsearch配置的名称elasticsearch: #将此项名称填入上面的配置中namespace: ${SW_NAMESPACE:""}clusterNodes: ${SW_STORAGE_ES_CLUSTER_NODES:10.1.60.114:9200,10.1.60.115:9200} #配置elasticsearch集群的地址protocol: ${SW_STORAGE_ES_HTTP_PROTOCOL:"http"}connectTimeout: ${SW_STORAGE_ES_CONNECT_TIMEOUT:3000}socketTimeout: ${SW_STORAGE_ES_SOCKET_TIMEOUT:30000}responseTimeout: ${SW_STORAGE_ES_RESPONSE_TIMEOUT:15000}numHttpClientThread: ${SW_STORAGE_ES_NUM_HTTP_CLIENT_THREAD:0}user: ${SW_ES_USER:""}password: ${SW_ES_PASSWORD:""}trustStorePath: ${SW_STORAGE_ES_SSL_JKS_PATH:""}trustStorePass: ${SW_STORAGE_ES_SSL_JKS_PASS:""}secretsManagementFile: ${SW_ES_SECRETS_MANAGEMENT_FILE:""} # Secrets management file in the properties format includes the username, password, which are managed by 3rd party tool.dayStep: ${SW_STORAGE_DAY_STEP:1} # Represent the number of days in the one minute/hour/day index.indexShardsNumber: ${SW_STORAGE_ES_INDEX_SHARDS_NUMBER:1} # Shard number of new indexesindexReplicasNumber: ${SW_STORAGE_ES_INDEX_REPLICAS_NUMBER:1} # Replicas number of new indexes# Specify the settings for each index individually.# If configured, this setting has the highest priority and overrides the generic settings.specificIndexSettings: ${SW_STORAGE_ES_SPECIFIC_INDEX_SETTINGS:""}# Super data set has been defined in the codes, such as trace segments.The following 3 config would be improve es performance when storage super size data in es.superDatasetDayStep: ${SW_STORAGE_ES_SUPER_DATASET_DAY_STEP:-1} # Represent the number of days in the super size dataset record index, the default value is the same as dayStep when the value is less than 0superDatasetIndexShardsFactor: ${SW_STORAGE_ES_SUPER_DATASET_INDEX_SHARDS_FACTOR:5} # This factor provides more shards for the super data set, shards number = indexShardsNumber * superDatasetIndexShardsFactor. Also, this factor effects Zipkin traces.superDatasetIndexReplicasNumber: ${SW_STORAGE_ES_SUPER_DATASET_INDEX_REPLICAS_NUMBER:0} # Represent the replicas number in the super size dataset record index, the default value is 0.indexTemplateOrder: ${SW_STORAGE_ES_INDEX_TEMPLATE_ORDER:0} # the order of index templatebulkActions: ${SW_STORAGE_ES_BULK_ACTIONS:5000} # Execute the async bulk record data every ${SW_STORAGE_ES_BULK_ACTIONS} requestsbatchOfBytes: ${SW_STORAGE_ES_BATCH_OF_BYTES:10485760} # A threshold to control the max body size of ElasticSearch Bulk flush.# flush the bulk every 5 seconds whatever the number of requestsflushInterval: ${SW_STORAGE_ES_FLUSH_INTERVAL:5}concurrentRequests: ${SW_STORAGE_ES_CONCURRENT_REQUESTS:2} # the number of concurrent requestsresultWindowMaxSize: ${SW_STORAGE_ES_QUERY_MAX_WINDOW_SIZE:10000}metadataQueryMaxSize: ${SW_STORAGE_ES_QUERY_MAX_SIZE:10000}scrollingBatchSize: ${SW_STORAGE_ES_SCROLLING_BATCH_SIZE:5000}segmentQueryMaxSize: ${SW_STORAGE_ES_QUERY_SEGMENT_SIZE:200}profileTaskQueryMaxSize: ${SW_STORAGE_ES_QUERY_PROFILE_TASK_SIZE:200}profileDataQueryBatchSize: ${SW_STORAGE_ES_QUERY_PROFILE_DATA_BATCH_SIZE:100}oapAnalyzer: ${SW_STORAGE_ES_OAP_ANALYZER:"{\"analyzer\":{\"oap_analyzer\":{\"type\":\"stop\"}}}"} # the oap analyzer.oapLogAnalyzer: ${SW_STORAGE_ES_OAP_LOG_ANALYZER:"{\"analyzer\":{\"oap_log_analyzer\":{\"type\":\"standard\"}}}"} # the oap log analyzer. It could be customized by the ES analyzer configuration to support more language log formats, such as Chinese log, Japanese log and etc.advanced: ${SW_STORAGE_ES_ADVANCED:""}# Enable shard metrics and records indices into multi-physical indices, one index template per metric/meter aggregation function or record.logicSharding: ${SW_STORAGE_ES_LOGIC_SHARDING:false}# Custom routing can reduce the impact of searches. Instead of having to fan out a search request to all the shards in an index, the request can be sent to just the shard that matches the specific routing value (or values).enableCustomRouting: ${SW_STORAGE_ES_ENABLE_CUSTOM_ROUTING:false}h2:properties:jdbcUrl: ${SW_STORAGE_H2_URL:jdbc:h2:mem:skywalking-oap-db;DB_CLOSE_DELAY=-1}dataSource.user: ${SW_STORAGE_H2_USER:sa}metadataQueryMaxSize: ${SW_STORAGE_H2_QUERY_MAX_SIZE:5000}maxSizeOfBatchSql: ${SW_STORAGE_MAX_SIZE_OF_BATCH_SQL:100}asyncBatchPersistentPoolSize: ${SW_STORAGE_ASYNC_BATCH_PERSISTENT_POOL_SIZE:1}配置skywalking web服务
vi skywalking/webapp/application.yml
serverPort: ${SW_SERVER_PORT:-18080}    #默认端口为8080,避免冲突改为18080# Comma seperated list of OAP addresses.
oapServices: ${SW_OAP_ADDRESS:-http://localhost:12800}  #这些配置保持默认即可zipkinServices: ${SW_ZIPKIN_ADDRESS:-http://localhost:9412}
启动skywalking服务
./skywalking/bin/startup.sh

可以看到oap服务和web服务都启动成功了
查看skywalking的端口
netstat -tlpn
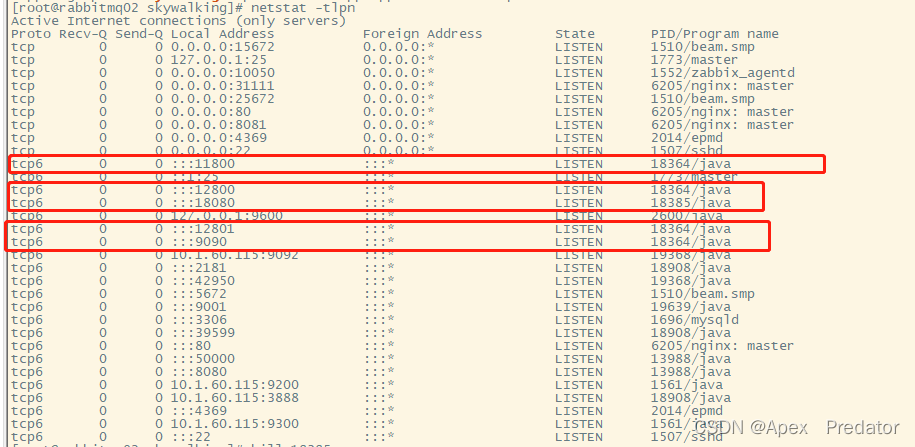
以上五个端口都是skywalking使用的服务端口,如果有端口被占用服务就会起不来
访问skywalking web服务
http://10.1.60.115:18080

我这边是已经配置了agent监控java服务,所以会有服务信息,配置agent监控java服务会在下一篇讲解
![[C++] STL_vector使用与常用接口的模拟实现](https://img-blog.csdnimg.cn/3214399b1a12489398b4248b9bf5d663.png)
