这里写目录标题
- Jenkins 安装的插件
- 发送消息到飞书
- 预览 1 (单Job)
- 预览 2 (多Job,概览)
Jenkins 安装的插件
| 插件名称 | 作用 |
|---|---|
| Rebuilder | |
-
Rebuilder。
官方地址:https://plugins.jenkins.io/rebuild
安装方式:在Jenkins插件当中直接搜索即可安装。
功能说明:此插件可以直接重复上次构建,也可以用于查看一些参数比较复杂的构建时,上次构建所选的参数是什么。非常nice的一个插件。 -
AnsiColor。
官方地址:https://plugins.jenkins.io/ansicolor
安装方式:在Jenkins插件当中直接搜索即可安装。
功能说明:扩展支持我们在shell当中定义的echo -e指令,从而给一定的输出上颜色。
使用方式:点此跳转到使用介绍。(opens new window) -
Maven Release Plug-in。
maven风格插件。
安装方式:在Jenkins插件当中直接搜索即可安装。 -
user build vars。
官方地址:https://wiki.jenkins.io/display/JENKINS/Build+User+Vars+Plugin
安装方式:在Jenkins插件当中直接搜索即可安装。
功能说明:通过此插件,让整个Jenkins系统中的用户参数成为一个可调用的变量。
使用方式:在构建环境中选中Set Jenkins user build variables。 -
Post build task
功能说明:此功能允许您关联 shell 或批处理脚本,这些脚本根据构建日志输出在 Hudson
上执行某些任务。如果日志文本与构建日志文件中的某处匹配,脚本将执行。例如:如果在日志文本中指定了“IOException”,并且构建日志文件包含字符串“IOException”,则脚本将执行。
允许使用 Java 正则表达式,并且可以将组用作脚本参数。如果文本是“Last Build : #(\d+)”并且脚本是“script.sh”,那么如果日志包含一行“Last
Build : #4”,脚本“script.sh 4”将被调用. -
MultiJob Phase
功能说明:上下游执行
发送消息到飞书
预览 1 (单Job)

- 对应shell
#!/usr/bin/env bash
url1="https://open.feishu.cn/open-apis/bot/v2/hook/"
url2="https://open.feishu.cn/open-apis/bot/v2/hook/" #  1. 消息 接收地址
webhook_list=($url1 $url2)# ========================
#  2. 消息 参数预处理
if [ ! "$GIT_BRANCH" ]; thenecho "----------------- GIT_BRANCH 为空"GIT_BRANCH="''"
fi
echo -e "GIT_BRANCH -> ${GIT_BRANCH}"
# ========================
#  3. 消息 执行发送
run_send_msg() {echo -e "\n 复制发送消息脚本 $HOME -> ${WORKSPACE}" && cp "$HOME"/send_msg_to_feishu.py "${WORKSPACE}"for ((i = 0; i < ${#webhook_list[@]}; i++)); dowebhook=${webhook_list[$i]}echo -e "发送中 --> $webhook"python3 send_msg_to_feishu.py "${webhook}" -job_name "${JOB_NAME}" -job_url "${JOB_URL}" -build_name "${BUILD_ID}" -branch "${GIT_BRANCH}"doneecho -e "发送完成 \n\n"
}run_send_msg- 对应python
#!/usr/bin/env python3
# -*- coding: utf-8 -*-
import argparse
import json
import timeimport requestsparser = argparse.ArgumentParser(description='Jenkins 发送消息到飞书',epilog="执行示例>>> python ${webhook} -job_name ${JOB_NAME} -job_url ${JOB_URL} -branch ${GIT_BRANCH} -build_name ${BUILD_NUMBER}  ")
parser.add_argument('webhook', help='机器人webhookURL')  # 必填
parser.add_argument('-job_name', '--JOB_NAME', help='作业Name', )  # 选填
parser.add_argument('-job_url', '--JOB_URL', help='作业URL', required=True, )  # 必填
parser.add_argument('-branch', '--GIT_BRANCH', help='git分支', default='')  # 选填
parser.add_argument('-build_name', '--BUILD_DISPLAY_NAME', help='编译Name')  # 选填
# parser.add_argument('-build_url', '--BUILD_URL', help='编译URL', required=True, )  # 必填webhook = parser.parse_args().webhook
JOB_NAME = parser.parse_args().JOB_NAME
JOB_URL = parser.parse_args().JOB_URL
GIT_BRANCH = parser.parse_args().GIT_BRANCH
BUILD_DISPLAY_NAME = parser.parse_args().BUILD_DISPLAY_NAME
# BUILD_URL = parser.parse_args().BUILD_URLBUILD_URL = JOB_URL + '/lastBuild'def set_msg():# ============ 数据获取 ============result = requests.get(f'{BUILD_URL}/api/json', auth=jenkins_auth).json()# print(BUILD_STATUS.request.url)try:shortDescription = result['actions'][0]['causes'][0]['shortDescription']  # 启动者except KeyError:  # 安装 `Multijob plugin` 后位置变更shortDescription = result['actions'][1]['causes'][0]['shortDescription']  # 启动者print(result['timestamp'])timestamp = time.strftime("%Y-%m-%d %H:%M:%S", time.localtime(result['timestamp'] / 1000))  # 编译开始时间print(timestamp)BUILD_STATUS = result['result']  # 编译状态print('build_status --> ', BUILD_STATUS)duration = result['duration']  # 编译持续时间build_duration = int(duration) // 1000  # 毫秒到秒minutes, seconds = divmod(build_duration, 60)hours, minutes = divmod(minutes, 60)print(f'build duration --> {hours}H:{minutes}M:{seconds}S')# ============ 设置样式 ============if "SUCCESS" in BUILD_STATUS:  # 成功template_color = "green"elif "FAILURE" in BUILD_STATUS:  # 失败template_color = "red"elif "ABORTED" in BUILD_STATUS:  # 终止template_color = "yellow"else:template_color = "grey"# ============ 卡片模板 ============card = json.dumps({"config": {"wide_screen_mode": True},"elements": [{"tag": "markdown","content": f"触发时间:{timestamp}\n"f"分支名称:{GIT_BRANCH}\n"f"构建编号:{BUILD_DISPLAY_NAME}\n"f"构建状态:<font color={template_color}>{BUILD_STATUS}</font>\n"},{"tag": "note","elements": [{"tag": "img","img_key": f"{img_icon}","alt": {"tag": "plain_text","content": f"{JOB_URL}"}},{"tag": "plain_text","content": f"{shortDescription}"}]},{"tag": "hr"},{"tag": "action","actions": [{"tag": "button","text": {"tag": "plain_text","content": "报告链接"},"type": "primary","multi_url": {"url": f"{BUILD_URL}/allure","pc_url": "","android_url": "","ios_url": ""}}],"layout": "bisected"}],"header": {"template": f"{template_color}","title": {"content": f"作业名称: {JOB_NAME}","tag": "plain_text"}}})body = json.dumps({"msg_type": "interactive", "card": card})headers = {"Content-Type": "application/json"}res = requests.post(url=webhook, data=body, headers=headers)print(res.text)if __name__ == '__main__':img_icon = 'img_v2_098e80ae-e583-4148-b822-xxxxxx'  # img_key_id jenkinsIconjenkins_auth = ('report', 'report')  # jenkins User:Pwdset_msg()
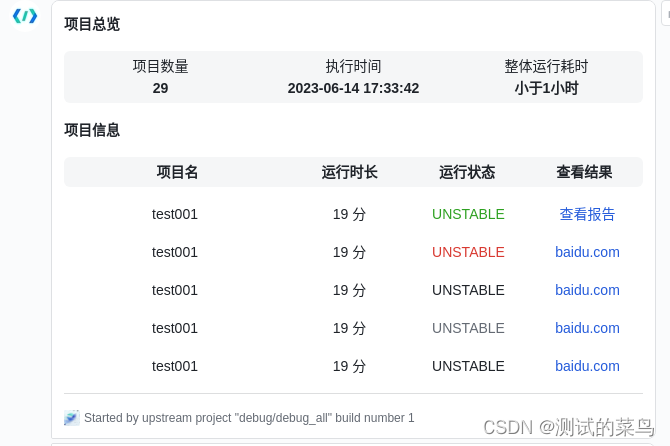
预览 2 (多Job,概览)
Jenkins 需安装
Multijob插件
Multijob https://plugins.jenkins.io/jenkins-multijob-plugin/
- 对应shell
#!/usr/bin/env bashecho -e "\n\n 消息处理"
# ========================
#  消息发送
# ========================#  1. 消息 接收地址
# -----------------------
group='https://open.feishu.cn/open-apis/bot/v2/hook/'webhook_list=($group)
py_send='SendMsgFeishu.py'# ========================
#  2. 文件处理
# -----------------------
echo -e "\n 复制发送消息脚本 $HOME -> ${WORKSPACE}" && cp "$HOME"/$py_send "${WORKSPACE}"# ========================
#  3. 消息 执行发送
# -----------------------
run_send_msg() {for ((i = 0; i < ${#webhook_list[@]}; i++)); dowebhook=${webhook_list[$i]}echo -e "发送中 --> $webhook"python3 $py_send "${webhook}" -job_url "${JOB_URL}"doneecho -e "发送完成 \n\n"
}run_send_msg
- 对应python
#!/usr/bin/env python3
# -*- coding: utf-8 -*-
import argparse
import datetime
import json
import subprocess
import time
from json import JSONDecodeErrorimport requestsparser = argparse.ArgumentParser(description='Jenkins 发送消息到飞书',epilog="执行示例>>> python ${webhook} -job_url ${JOB_URL}")
parser.add_argument('webhook', help='机器人webhookURL')  # 必填
parser.add_argument('-job_url', '--JOB_URL', help='作业URL', required=True, )  # 必填webhook = parser.parse_args().webhook
JOB_URL = parser.parse_args().JOB_URL
BUILD_URL = JOB_URL + '/lastBuild'job_name = []  # 运行名称
job_duration = []  # 运行时长
job_status = []  # 运行状态
job_url = []  # 运行结果
pass_rate = []  # 百分比显示print('修改时间:2023-07-04 10:02:43')def get_base_info():device_id = subprocess.getoutput('cat /etc/ding_issue')version_os = subprocess.getoutput('cat /etc/issue')version_browser = subprocess.getoutput('dingdao-dingtao-stable -version')device_sn = subprocess.getoutput('hostname').split('-')[-1]# print(deviceid,os_version,browser_version, sn)return device_id, version_os, version_browser, device_sndef sending_alarms(text=None):local_network_info = subprocess.getoutput("networkctl status")if text is None:text = f"网络异常: 无法访问\n{BUILD_URL}\n{local_network_info}"payload_message = {"msg_type": "text", "content": {"text": text}}headers = {"Content-Type": "application/json"}res = requests.post(url=webhook, data=json.dumps(payload_message), headers=headers)print(f"告警信息发送状态:{res.text}")def set_msg():get_result = requests.get(f'{BUILD_URL}/api/json', auth=jenkins_auth)# ------------------# ------ 数据获取 ------# ------------------JENKINS_URL = BUILD_URL.split('job')[0]  # JENKINS_URL# ------ begin 登陆异常 ------try:print(f"查询地址:{get_result.url}")result = get_result.json()# except JSONDecodeError:  # json解析失败 未登陆#     text = "Error 401 Unauthorized"#     sending_alarms(text)#     quit(text)# except RecursionError:  # BUG: https://github.com/jenkinsci/tikal-multijob-plugin/issues/255#     quit('递归错误:从 unicode 字符串解码 JSON 对象时超出最大递归深度')except OSError:  # 异常列表: 网络text = "No route to host"sending_alarms()quit(text)except Exception as e:  # 通用异常处理text = f"发生异常: {type(e).__name__} --> {str(e)}\n检查:{get_result.url}"sending_alarms(text)quit(text)# res = requests.get(f'{BUILD_URL}/api/json', auth=jenkins_auth)# if res.status_code == 401:#     quit('Error 401 Unauthorized')# else:#     result = res.json()# # ------ end 登陆异常 ------shortDescription = result['actions'][0]['causes'][0]['shortDescription']  # 启动者timestamp = time.strftime("%Y-%m-%d %H:%M:%S", time.localtime(result['timestamp'] / 1000))  # 编译开始时间# ------ begin 获取持续时间 ------if result['duration'] != 0:  # 获取字段duration = int(result['duration']) // 1000  # 编译持续时间minutes, seconds = divmod(duration, 60)hours, minutes = divmod(minutes, 60)build_duration = f'{hours}h {minutes}m {seconds}s'print(f"--> 通过响应值换算{build_duration}\n")else:  # 通过当前时间计算build_duration = datetime.datetime.now() - datetime.datetime.fromtimestamp(result['timestamp'] / 1000)build_duration = str(build_duration).split('.')[0]print(f"--> 通过当前时间计算耗时{build_duration}\n")# ------ end 获取持续时间 ------total_count = len(result['subBuilds'])  # 数量总计print(f'======= 项目概览 ======= \n'f'shortDescription:{shortDescription}\nbuild duration:{build_duration}\ntotal_count:{total_count}\ntimestamp:{timestamp}\n')print('提示: 没有allure就报错 无法运行 JSONDecodeError')for index in result['subBuilds']:  # 提取数据# print(index)# print(index['result'])# 数据预处理allure_summary = requests.get(f"{JENKINS_URL}{index['url']}/allure/widgets/summary.json").json()['statistic']allure_history_trend = requests.get(f"{JENKINS_URL}{index['url']}/allure/widgets/history-trend.json")# print(allure_history_trend.request.url)try:  # 获取历史数据allure_history_trend = allure_history_trend.json()[1]except IndexError:print('没有历史数据')allure_history_trend = allure_history_trend.json()[0]# 计算百分比if allure_summary['total'] != 0:  # 除数不能为0allure_pass_rate = allure_summary['passed'] / allure_summary['total']else:allure_pass_rate = 0  # 除数不能为0if allure_history_trend['data']['total'] != 0:allure_history = allure_history_trend['data']['passed'] / allure_history_trend['data']['total']else:allure_history = 0# ------------------# ------ 设置样式 ------# ------------------if "SUCCESS" == index['result']:  # 成功color = "green"elif "FAILURE" == index['result']:  # 失败color = "red"elif "ABORTED" == index['result']:  # 中止color = "yellow"else:  # 其他color = "grey"# 通过率对比allure_change = allure_pass_rate - allure_historyprint(f"{index['jobName']} --> 本次比上次通过率 {allure_change}")if allure_pass_rate > allure_history:allure_pass_rate = f'<font color=green>↑{allure_pass_rate:.2%}</font>'elif allure_pass_rate < allure_history or allure_pass_rate == 0:allure_pass_rate = f'<font color=red>↓{allure_pass_rate:.2%}</font>'else:allure_pass_rate = f' {allure_pass_rate:.2%}'# ------------------# ------ 载入数据 ------# ------------------job_name.append({"tag": "markdown", "content": f"{index['jobName']}", "text_align": "center"})job_duration.append({"tag": "markdown", "content": f"{index['duration']}", "text_align": "center"})job_status.append({"tag": "markdown", "content": f"<font color={color}>{index['result']}</font>", "text_align": "center"})job_url.append({"tag": "markdown", "content": f"[查看]({JENKINS_URL}{index['url']}/allure)", "text_align": "center"})pass_rate.append({"tag": "markdown","content": f"{allure_summary['passed']}/{allure_summary['total']}{allure_pass_rate} ","text_align": "center"})print(f'======= 项目详情 ======= \n{job_name}\n{job_duration}\n{job_status}\n{pass_rate}\n{job_url}\n')def set_msg_a(total_count=None, build_duration=None, timestamp=None, shortDescription=None):"""# ------------------# ------ 卡片模板 ------# ------------------total_count: 总数量build_duration: 持续时间timestamp: 开始时间shortDescription: 启动者"""card = json.dumps({"elements": [{"tag": "markdown","content": "**项目总览**\n"},{"tag": "column_set","flex_mode": "bisect","background_style": "grey","horizontal_spacing": "default","columns": [{"tag": "column","width": "weighted","weight": 1,"elements": [{"tag": "markdown","text_align": "center","content": f"项目数量\n**{total_count}**\n"}]},{"tag": "column","width": "weighted","weight": 1,"elements": [{"tag": "markdown","text_align": "center","content": f"运行耗时\n**{build_duration}**"}]},{"tag": "column","width": "weighted","weight": 1,"elements": [{"tag": "markdown","text_align": "center","content": f"执行时间\n**{timestamp}**\n"}]}]},{"tag": "markdown","content": "**项目信息**"},{"tag": "column_set","flex_mode": "none","background_style": "grey","columns": [{"tag": "column","width": "weighted","weight": 2,"vertical_align": "top","elements": [{"tag": "markdown","content": "**项目名**","text_align": "center"}]},{"tag": "column","width": "weighted","weight": 1,"vertical_align": "top","elements": [{"tag": "markdown","content": "**运行时长**","text_align": "center"}]},{"tag": "column","width": "weighted","weight": 1,"vertical_align": "top","elements": [{"tag": "markdown","content": "**运行状态**","text_align": "center"}]},{"tag": "column","width": "weighted","weight": 1,"vertical_align": "top","elements": [{"tag": "markdown","content": "**passed/total/通过率**","text_align": "center"}]},{"tag": "column","width": "weighted","weight": 1,"vertical_align": "top","elements": [{"tag": "markdown","content": "**Report**","text_align": "center"}]}]},{"tag": "column_set","flex_mode": "none","background_style": "default","columns": [{"tag": "column","width": "weighted","weight": 2,"vertical_align": "top","elements": job_name},{"tag": "column","width": "weighted","weight": 1,"vertical_align": "center","elements": job_duration},{"tag": "column","width": "weighted","weight": 1,"vertical_align": "top","elements": job_status},{"tag": "column","width": "weighted","weight": 1,"vertical_align": "top","elements": pass_rate},{"tag": "column","width": "weighted","weight": 1,"vertical_align": "top","elements": job_url}]},{"tag": "hr"},{"tag": "note","elements": [{"tag": "img","img_key": f"{img_icon}","alt": {"tag": "plain_text","content": ""}},{"tag": "plain_text","content": f"{shortDescription}\n颜色代表对比上次执行,绿色上升,红色下降"}]}]})card_id = json.dumps({"type": "template","data": {"template_id": "ctp_AA6DZMfkJekh",  # 卡片id,参数必填。可在搭建工具中通过“复制卡片ID”获取"template_variable":  # 卡片中绑定的变量的取值。如没有绑定变量,可不填此字段。{"total_count": "29","group_table": [{"jobName": "test001","duration": "小于1小时","build_url": "baidu.com","build_status": "SUCCESS","tmp_color": "green"},{"jobName": "test002","duration": "2小时","build_url": "baidu.com","build_status": "FAILURE","tmp_color": "red"},{"jobName": "test003","duration": "3小时","build_url": "baidu.com","build_status": "ABORTED","tmp_color": "yellow"},{"jobName": "test004","duration": "3小时","build_url": "baidu.com","build_status": "UNSTABLE","tmp_color": "grey"}],"duration": "15080","shortDescription": "Started by user admin","timestamp": "1686645721264","jobName": "","tmp_color": ""}}})body = json.dumps({"msg_type": "interactive", "card": card})  # 使用 当前模板# body = json.dumps({"msg_type": "interactive", "card": card_id})  # 使用 预置模板headers = {"Content-Type": "application/json"}res = requests.post(url=webhook, data=body, headers=headers)print(f'消息发送响应 -->\n\t {res.text}')if __name__ == '__main__':img_icon = 'img_v2_098e80ae-e583-4148-b822-f42a05298d3g'  # img_key_id jenkinsIconjenkins_auth = ('result', 'result')  # jenkins User:Pwd# get_base_info()set_msg()deviceid, os_version, browser_version, sn = get_base_info()print(deviceid, os_version, browser_version, sn)