👦个人主页:@Weraphael
✍🏻作者简介:目前学习C++和算法
✈️专栏:C++航路
🐋 希望大家多多支持,咱一起进步!😁
如果文章对你有帮助的话
欢迎 评论💬 点赞👍🏻 收藏 📂 加关注✨
目录
- 一、简单剖析list源码
- 二、准备工作
- 三、模拟实现list常见操作
- 3.1 默认构造函数
- 3.2 push_back - 尾插
- 3.3 迭代器(重点)
- 3.4 const的迭代器(重点)
- 3.5 insert - 插入
- 3.6 erase - 删除
- 3.7 头插 - push_front
- 3.8 尾删 - pop_back
- 3.9 头删 - pop_front
- 3.10 个数 - size
- 3.11 析构
- 3.12 清空 - clear
- 3.13 拷贝构造
- 3.14 交换
- 3.15 赋值运算符重载
- 四、源码
一、简单剖析list源码
在模拟vector容量讲过,要想快速了解STL源码,首先要看成员变量:
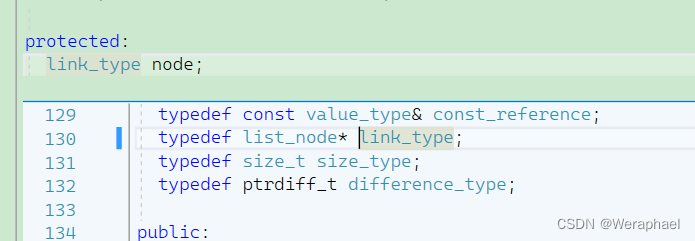
node从名字上猜测是一个节点,其类型是list_node。然后我发现list_node也是重命名出来的:

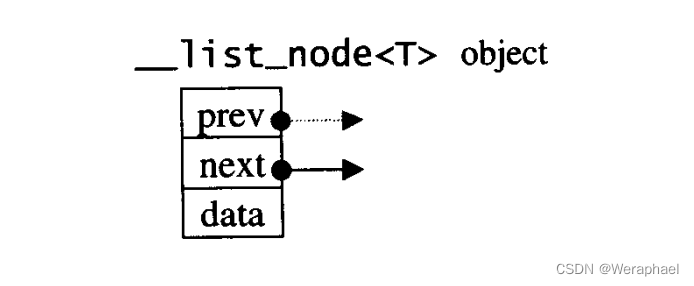
而__list_node<T>又是什么东西呢?如下所示:
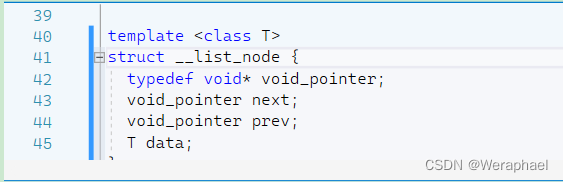
显然这是一个双向链表,并且__list_node是用来定义结点的
接下来就应该分析构造函数:
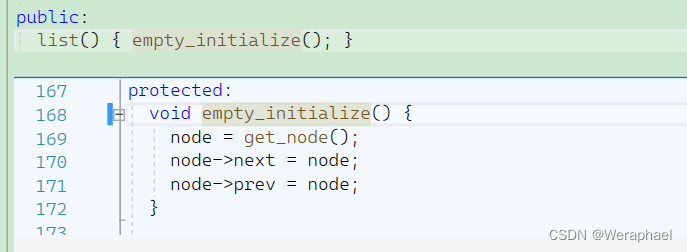
get_node从名字上是得到结点,那么应该是开辟空间的。我们可以简单看看:
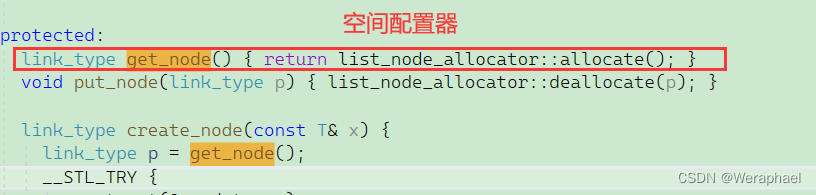
空间配置器讲起来有点麻烦,直接使用new和delete也是够用的
然后node的next和prev都指向自己。因此list的底层是一个带头(哨兵位)双向循环链表,因此list的成员变量应该是哨兵位结点。
大致结构我们已经知道了,不妨再来看看插入操作:
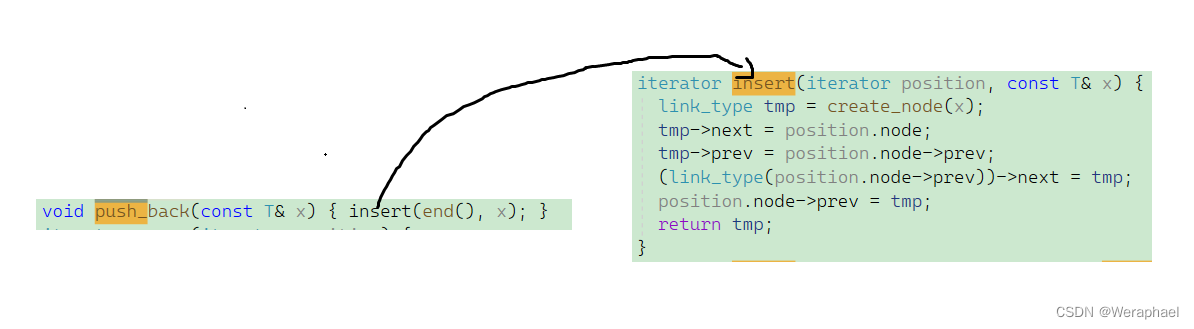
这和以往学习过的双向循环链表很相似,无非就是创造新的结点,然后再把它们链接起来。
大致内容已经了解了,直接开始实现吧~
二、准备工作
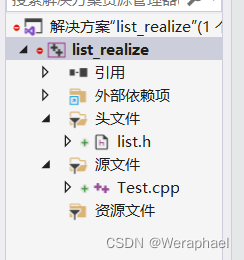
为了方便管理代码,分两个文件来写:
Test.cpp- 测试代码逻辑list.h- 模拟实现list
三、模拟实现list常见操作
3.1 默认构造函数
namespace wj
{template<class T>struct list_node // 定义结点{list_node<T>* _next; list_node<T>* _prev;T _val;};template<class T>class list{public:list(){// 为哨兵位头结点开空间_head = new list_node<T>;// 自己指向自己_head->_prev = _head;_head->_next = _head;}private:list_node<T> _head; // 哨兵位(不存储有效数据)};
}
定义结点的成员变量最好是公有的,方便类外可以随时访问。注意:此处的struct可不是C语言的结构体,在C++中已经升级成了类,并且默认成员都是公有的。当然使用class也是没问题的,只是要加上public。
以上代码还能简化,我们知道类模板和普通类是不同的,普通类的类名即是类型,而类模板的类名是类名<T>。而有许多人会很容易忘记加上<T>,因此我们可以对list_node<T>进行重命名typedef:
namespace wj
{template<class T>struct list_node // 定义结点{list_node<T>* _next; list_node<T>* _prev;T _val;};template<class T>class list{typedef list_node<T> Node;public:list(){// 为哨兵位头结点开空间_head = new Node;// 自己指向自己_head->_prev = _head;_head->_next = _head;}private:list_node<T> _head; // 哨兵位(不存储有效数据)};
}
- 为了防止与库的
list冲突,要重新写一个命名空间域wjtypedef在类中是有讲究的。如果typedef放在public段中,则可以在类外部使用;而如果放在private段中,则只能在类内使用。注意:上述代码是只能在类中使用!
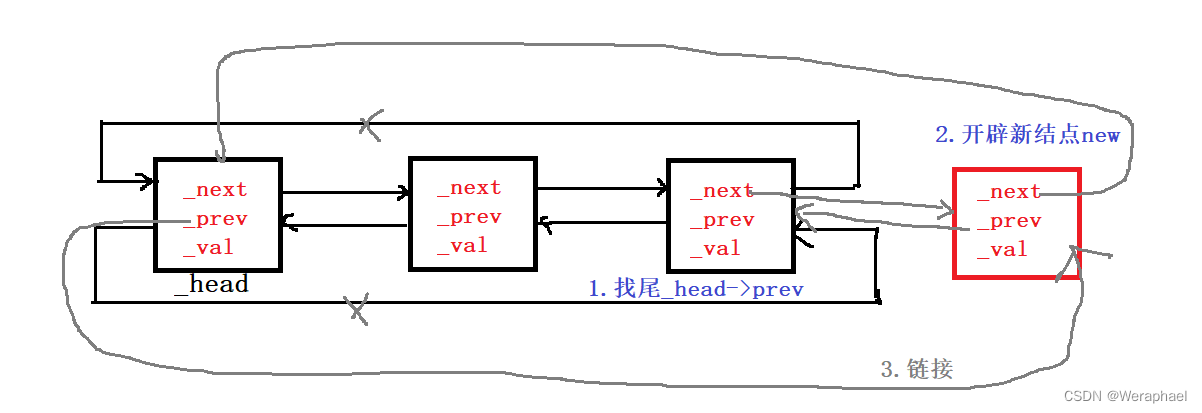
3.2 push_back - 尾插
void push_back(const T& val)
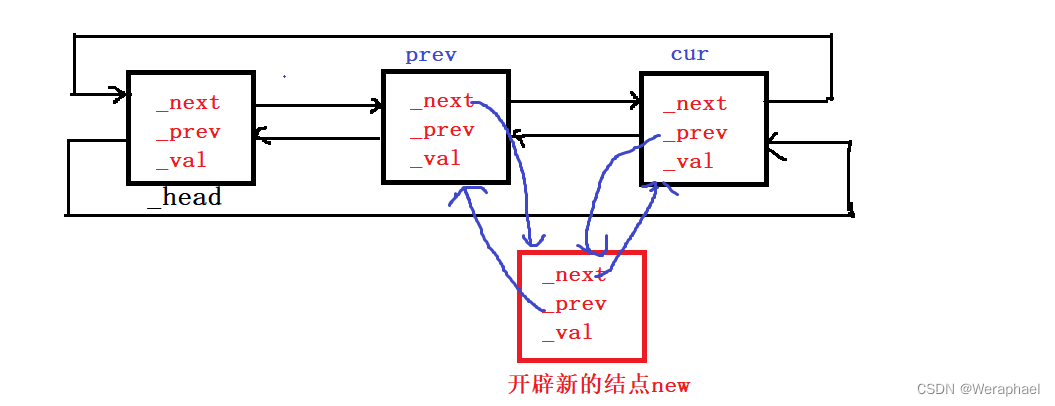
{//1. 找尾(哨兵位的prev)Node* tail = _head->_prev;// 2. 开辟一个新节点Node* newnode = new Node(val); // 3. 链接 _head tail newnodetail->_next = newnode;newnode->_prev = tail;newnode->_next = _head;_head->_prev = newnode;
}
尾插就容易多了,下面有图帮助大家理解:
注意:new对于自定义类型除了开空间,还会调用构造函数。初始化_val
struct list_node // 结点的定义
{list_node<T>* _next;list_node<T>* _prev;T _val; list_node(const T& val = T()):_next(nullptr), _prev(nullptr), _val(val){}
};
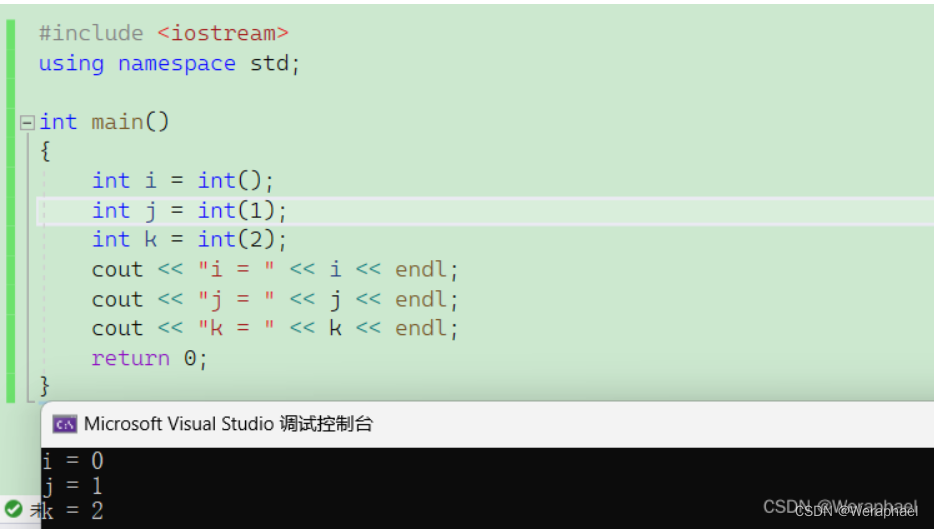
缺省值给T()相信看过模拟实现vector都不陌生。不能直接给0,这样就写死能,只能int类型适用,对于string就不行了。因此可以给个匿名对象,它会调用T类型的默认构造。内置类型也是有默认构造的:
3.3 迭代器(重点)
能否定义类似像vector的迭代器?如下所示:
typedef Node* iterator;
答案当然不行!list不能像vector一样以原生指针(普通指针)作为迭代器。
vector类似于数组,数据在内存中是连续存储的。对迭代器(指针)++,就可以跳过一个对象的大小,并且解引用也能得到对应的数据;然而,list的节点不能保证一定在内存空间中连续存在,导致++/--不一定能找到下一个节点,并且对其解引用得到的是结点而不是有效数据。
那问题来了,如何定义list的迭代器呢?
我们可以封装一个类,然后用重载运算符去改变指针的行为。为什么可以这样呢?原因是:内置类型的++是行为规定的,但是自定义类型的++是自己说的算。可以联想以往实现的日期类->点击跳转
auto it = l.begin();
while (it != l.end())
{cout << *it << ' ';++it;
}
我们可以对照以上代码一步一步实现迭代器
begin() + end()
在这个类中,只需要一个结点类的指针成员变量,用于指向list某一个结点, 在一开始定义迭代器时,需要一个构造函数,用于迭代器的初始化。注意:begin和end需要定义在list类中,因为它们本身就是list内置的接口函数
// 封装一个类实现迭代器
template<class T>
struct __list_iterator
{typedef list_node<T> Node;Node* _node; //指向某个节点的指针// 迭代器的初始化__list_iterator(Node* node) :_node(node){}
};template<class T>
class list
{typedef list_node<T> Node;
public:typedef __list_iterator<T> iterator; iterator begin(){return _head->_next;// return iterator(_head->_next);}iterator end(){return _head;//return iterator(_head);}
private:Node* _head;
};
这里还有一个知识点,begin和end返回类型为迭代器,怎么能返回结点的指针呢?— 这是因为单参数的构造函数支持隐式类型转换。
!=、==、*、++、--
封装一个类,然后用重载运算符去改变指针的行为
// 封装一个类实现迭代器
template<class T>
struct __list_iterator
{typedef list_node<T> Node;typedef __list_iterator<T> self;Node* _node; //指向某个节点的指针__list_iterator(Node* node) // 迭代器的初始化:_node(node){}
/// 用结点的指针比bool operator!=(const self& it) const{return _node != it._node;}bool operator==(const self& it) const{return _node == it._node;}
/T& operator*(){// 出了作用域,结点还在,引用返回return _node->_val;}
/// 迭代器++返回的还是迭代器self& operator++() //前置{_node = _node->_next;return *this;}self& operator--() // 前置{_node = _node->_prev;return *this;}self operator--(int) // 后置{self tmp(*this);_node = _node->_prev;return tmp;}self operator++(int) // 后置{self tmp(*this);_node = _node->_next;return tmp;}
};
前置++和后置++会发生一个问题:函数名会相同。因此,C++规定:后置(++/--)重载时多增加一个int类型的参数,但调用函数时该参数不用传递。
3.4 const的迭代器(重点)
现在又有一个问题,const的迭代器也能否像类似于vector一样设计?如下所示:
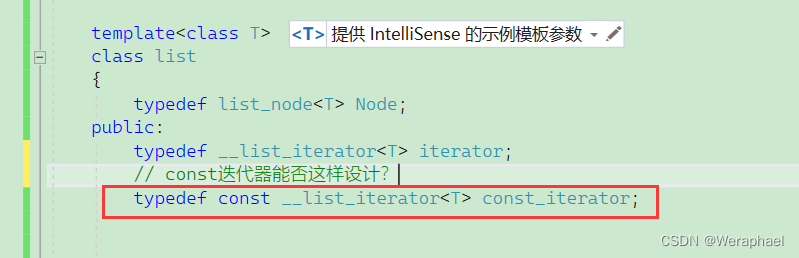
答案当然是不可以的!这是因为 const迭代器要求的是迭代器指向的内容不可以被修改,而对一个类加上一个const,这是让这个类对象无法被修改啊。也就是类的成员变量都不可以被修改,这样一来,这个迭代器里面的指针无法移动了。(const的迭代器指针是可以移动的,但是指向的内容不可被修改)
那么const的迭代器该如何设计呢?我们知道,list迭代器输出数据是依靠解引用的,因此可以在返回值加上const
template<class T>
struct __list_iterator
{typedef list_node<T> Node;typedef __list_iterator<T> selfNode* _node; //指向某个节点的指针__list_iterator(Node* node) // 迭代器的初始化:_node(node){}// 用结点的指针比bool operator!=(const self& it) const{return _node != it._node;}bool operator==(const self& it) const{return _node == it._node;}T& operator*(){// 出了作用域,结点还在,引用返回return _node->_val;}// 迭代器++返回的还是迭代器self& operator++() //前置{_node = _node->_next;return *this;}self& operator--() // 前置{_node = _node->_prev;return *this;}self operator--(int) // 后置{self tmp(*this);_node = _node->_prev;return tmp;}self operator++(int) // 后置{self tmp(*this);_node = _node->_next;return tmp;}
};template<class T>
struct __list_iterator
{typedef list_node<T> Node;typedef __list_iterator<T> self;Node* _node; //指向某个节点的指针__list_iterator(Node* node) // 迭代器的初始化:_node(node){}// 用结点的指针比bool operator!=(const self& it) const{return _node != it._node;}bool operator==(const self& it) const{return _node == it._node;}const T& operator*(){// 出了作用域,结点还在,引用返回return _node->_val;}// 迭代器++返回的还是迭代器self& operator++() //前置{_node = _node->_next;return *this;}self& operator--() // 前置{_node = _node->_prev;return *this;}self operator--(int) // 后置{self tmp(*this);_node = _node->_prev;return tmp;}self operator++(int) // 后置{self tmp(*this);_node = _node->_next;return tmp;}
};
但以上代码显得有点冗余,只有两个函数的返回值不一样,其它都是一样的。那还有什么别的设计方法呢?
注意:上面两个函数只要返回值的类型不一样,因此可以通过一个类型来控制返回值 -> 即增加一个模板参数(库里也是这么实现的~)
// 封装一个类实现迭代器
template<class T, class Ref> // 增加一个模板参数
struct __list_iterator
{typedef list_node<T> Node;typedef __list_iterator<T, Ref> self;Node* _node; //指向某个节点的指针__list_iterator(Node* node) // 迭代器的初始化:_node(node){}Ref operator*(){return _node->_val;}
}template<class T>
class list
{typedef list_node<T> Node;
public:typedef __list_iterator<T, T&> iterator;typedef __list_iterator<T, const T&> const_iterator;iterator begin(){return _head->_next;}const_iterator end() const{return _head;}const_iterator begin() const{return _head->_next;}iterator end(){return _head;}
private:list_node<T> _head; // 哨兵位(不存储有效数据)
};
补充:除了重载*运算符,当然也要重载->操作符
T* operator->()
{return &_node->_val;
}
那什么时候会用到->操作符呢?下面有个例子:
#include <iostream>
#include "list.h"
using namespace std;struct A
{A(int a = 0):_a(a){}int _a;
};
int main()
{wj::list<A> lt;lt.push_back(A(1));lt.push_back(A(2));lt.push_back(A(3));lt.push_back(A(4));lt.push_back(A(5));wj::list<A>::iterator it = lt.begin();while (it != lt.end()){cout << it->_a << " ";it++;}cout << endl;
}
【输出结果】
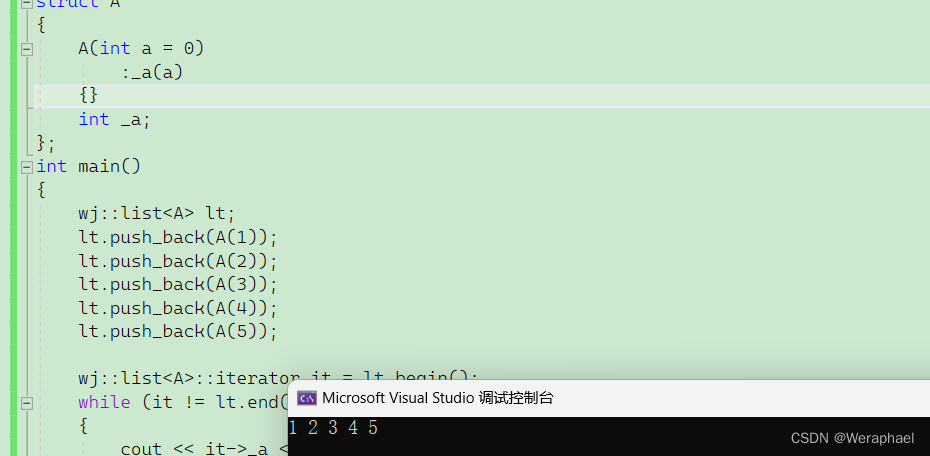
有没有发现operator->非常怪,首先我们这个运算符重载返回的是什么呢?是T*,也就是A*,也就是说它还需要一次->才能打印_a。严格来说,it->->_a,才是符合语法的。那么这里为什么还能编译通过呢?因为运算符重载要求可读性,那么编译器特殊处理,省略了一个->
但是以上代码还是不够完善,由于->只针对普通对象,如果是const对象,其返回值应该是const T*,这个问题就和运算符重载*类似了,再增加一个模板参数,因此完整代码如下:
template<class T, class Ref, class ptr>
struct __list_iterator // 迭代器
{typedef list_node<T> Node;typedef __list_iterator<T, Ref, ptr> self;Node* _node; //指向某个节点的指针__list_iterator(Node* node) // 迭代器的初始化:_node(node){}Ref operator*(){return _node->_val;// 出了作用域,结点还在,要加&}ptr operator->() {return &_node->_val;}
}template<class T> // 为list提供
class list
{typedef list_node<T> Node;
public:typedef __list_iterator<T, T&, T*> iterator; typedef __list_iterator<T, const T&, const T*> const_iterator; iterator begin(){// return iterator(_head->_next);return _head->_next;}iterator end(){// return iterator(_head);return _head;}
private:Node* _head; // 哨兵位(不存储有效数据)
};
3.5 insert - 插入
iterator insert(iterator pos, const T& x)
{// pos 不需要检查  // 假设在node前插入// head newnode node tail// 步骤如下// 1. 开辟新的结点Node* newnode = new Node(x);// 2. 找到要删除的结点nodeNode* cur = pos._node;// 3. 以及node的前一个节点Node* prev = cur->_prev;// 4. 链接prev->_next = newnode;newnode->_next = cur;cur->_prev = newnode;newnode->_prev = prev;return newnode;// 返回新插入元素的位置
}
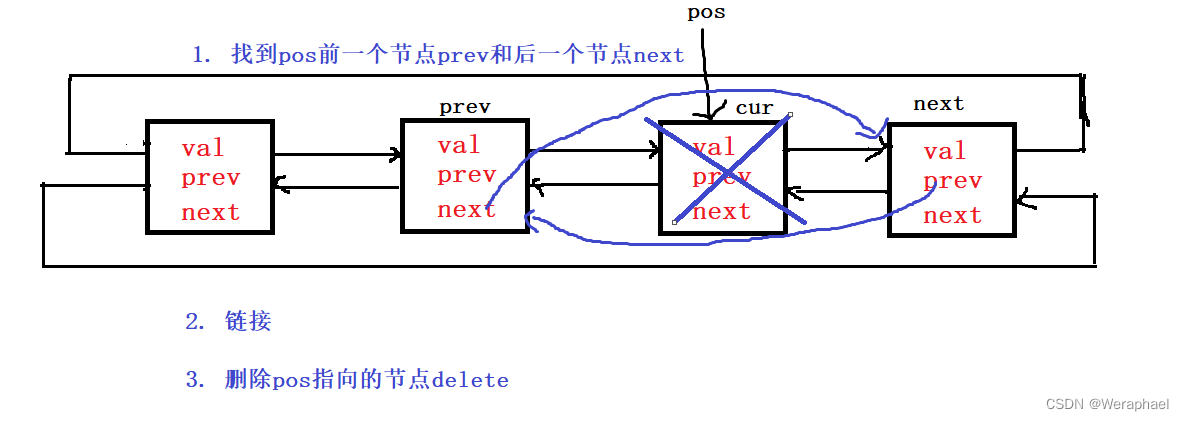
3.6 erase - 删除
iterator erase(iterator pos)
{// 检查pos的有效性assert(pos != end());// 1.分别找到pos的前一个节点和后一个节点Node* cur = pos._node;Node* prev = cur->_prev;Node* next = cur->_next;// 2, 链接prev->_next = next;next->_prev = prev;// 3. 删除delete cur;// 注意:list的erase会有迭代器失效问题// 返回删除元素的下一个位置return next;
}
3.7 头插 - push_front
复用insert
void push_front(const T& val)
{insert(begin(), val);
}
3.8 尾删 - pop_back
复用erase
void pop_back()
{erase(--end());
}
3.9 头删 - pop_front
void pop_front()
{erase(begin());
}
3.10 个数 - size
遍历即可
size_t size()
{size_t count = 0;iterator it = begin();while (it != end()){++count;++it;}return count;
}
或者还可以在成员变量中定义size_t _size,每次插入数据++,以及删除数据--即可
3.11 析构
~list()
{clear();delete _head;_head = nullptr;
}
3.12 清空 - clear
void clear()
{iterator it = begin();while (it != end()){it = erase(it);}
}
3.13 拷贝构造
list(const list<T>& it)
{_head = new Node;_head->_prev = _head;_head->_next = _head;for (auto& e : it){push_back(e);}
}
3.14 交换
void swap(list<T> it)
{std::swap(_head, it._head);std::swap(this->size(), it._size());
}
3.15 赋值运算符重载
list<T>& operator=(const list<T> it)
{swap(it);return *this;
}
四、源码
#pragma once
#include <assert.h>namespace wj
{template<class T> struct list_node {list_node<T>* _next;list_node<T>* _prev;T _val; list_node(const T& val = T()):_next(nullptr), _prev(nullptr), _val(val){}};template<class T, class Ref, class ptr>struct __list_iterator{typedef list_node<T> Node;typedef __list_iterator<T, Ref, ptr> self;Node* _node; __list_iterator(Node* node) :_node(node){}Ref operator*(){return _node->_val;}ptr operator->() {return &_node->_val;}self& operator++(){_node = _node->_next;return *this;}self& operator--(){_node = _node->_prev;return *this;}self& operator--(int){self tmp(*this);_node = _node->_prev;return tmp;}self operator++(int){self tmp(*this);_node = _node->_next;return tmp;}bool operator!=(const self& it) const{return _node != it._node;}bool operator==(const self& it) const{return _node == it._node;}};template<class T> class list{typedef list_node<T> Node; public:typedef __list_iterator<T, T&, T*> iterator; typedef __list_iterator<T, const T&, const T*> const_iterator; iterator begin(){// return iterator(_head->_next);return _head->_next;}iterator end(){// return iterator(_head);return _head;}const_iterator begin() const{//return _head->_next;return const_iterator(_head->_next);}const_iterator end() const{return _head;//return const_iterator(_head);}list(){_head = new Node;_head->_prev = _head;_head->_next = _head;_size = 0;}list(const list<T>& it){_head = new Node;_head->_prev = _head;_head->_next = _head;_size = 0;for (auto& x : it){push_back(x);}}void push_back(const T& val){Node* tail = _head->_prev;Node* newnode = new Node(val);tail->_next = newnode;newnode->_prev = tail;newnode->_next = _head;_head->_prev = newnode;_size++;}iterator insert(iterator pos, const T& x){Node* cur = pos._node;Node* prev = cur->_prev;Node* newnode = new Node(x);prev->_next = newnode;newnode->_next = cur;cur->_prev = newnode;newnode->_prev = prev;_size++;return newnode;}iterator erase(iterator pos){assert(pos != end());Node* cur = pos._node;Node* prev = cur->_prev;Node* next = cur->_next;prev->_next = next;next->_prev = prev;delete cur;_size--;return next;}void push_front(const T& val){insert(begin(), val);}void pop_back(){erase(--end());}void pop_front(){erase(begin());}size_t size(){/*size_t count = 0;iterator it = begin();while (it != end()){++count;++it;}return count;*/return _size;}~list(){clear();delete _head;_head = nullptr;}void clear(){iterator it = begin();while (it != end()){it = erase(it);}_size = 0;}void swap(list<T> it){std::swap(_head, it._head);std::swap(_size, it._size);}list<T>& operator=(const list<T> it){swap(it);return *this;}private:Node* _head; size_t _size;};
}
测试代码
#include <iostream>
using namespace std;
#include "list.h"int main()
{// 默认构造wj::list<int> ll;// 尾插测试ll.push_back(1);ll.push_back(2);ll.push_back(3);ll.push_back(4);// 迭代器测试wj::list<int>::iterator it = ll.begin();while (it != ll.end()){cout << *it << ' ';it++;}cout << endl;// 范围for(底层迭代器)for (auto& x : ll){cout << x << ' ';}cout << endl;// insert测试// 在3的前面插入30it = ll.begin();for (int i = 0; i < 2; i++){it++;}ll.insert(it, 30);for (auto& x : ll){cout << x << ' ';}cout << endl;//  erase测试it = ll.begin();// 删除30for (int i = 0; i < 2; i++){it++;}ll.erase(it);for (auto x : ll){cout << x << ' ';}cout << endl;// 头插测试// 头插100ll.push_front(100);for (auto x : ll){cout << x << ' ';}cout << endl;// 尾删测试ll.pop_back(); // 100 1 2 3for (auto x : ll){cout << x << ' ';}cout << endl;// 头删测试ll.pop_front(); // 1 2 3for (auto x : ll){cout << x << ' ';}cout << endl;// size测试cout << "个数为:" << ll.size() << endl; // 3// 清空ll.clear();for (auto x : ll){cout << x << ' '; // 无输出}cout << endl;// 拷贝构造ll.push_back(1);ll.push_back(2);ll.push_back(3);ll.push_back(4);ll.push_back(5);wj::list<int> lll(ll);for (auto x : lll){cout << x << ' '; // 1 2 3 4 5}cout << endl;// 赋值运算符重载wj::list<char> a;a.push_back('a');wj::list<char> b;b.push_back('b');b.push_back('b');b.push_back('b');a = b;for (auto x : a){cout << x << ' ';}cout << endl;// 交换wj::list<char> c;a.push_back('c');wj::list<char> d;b.push_back('d');b.push_back('d');b.push_back('d');d.swap(c);for (auto x : c){cout << x << ' ';}cout << endl;for (auto x : d){cout << x << ' ';}cout << endl;return 0;
}

![[管理与领导-52]:IT基层管理者 - 8项核心技能 - 7 - 决策](https://img-blog.csdnimg.cn/img_convert/f1b7ae8168218cb0e9b11d6fa23f2fd5.jpeg)