「作者主页」:士别三日wyx
「作者简介」:CSDN top100、阿里云博客专家、华为云享专家、网络安全领域优质创作者
「推荐专栏」:小白零基础《Python入门到精通》
表白代码
- 1、坐我女朋友好吗,不同意就关机.vbs
- 2、坐我女朋友好吗,不同意关不掉.vbs
- 3、动态粒子效果.html
- 4、爱心动态.html
- 5、爱心跳动.html
- 6、弹窗表白.py
- 7、一行代码实现心形.py
- 8、一箭穿心.py
- 9、爱心.py
- 10、爱心代码.py
- 11、爱心发射.py
- 12、玫瑰花.py
- 粉丝福利
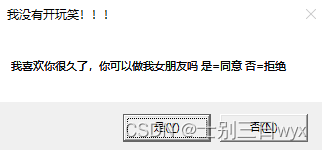
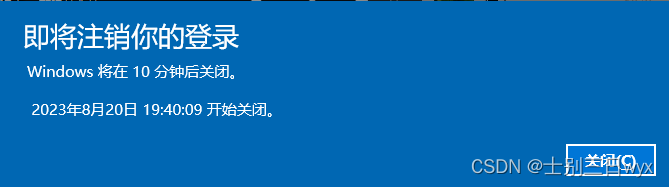
1、坐我女朋友好吗,不同意就关机.vbs
复制到文本文件,后缀名改成vbs就能运行,效果如下。
完整代码如下,复制就能用
Set Seven = WScript.CreateObject("WScript.Shell")
strDesktop = Seven.SpecialFolders("AllUsersDesktop")
set oShellLink = Seven.CreateShortcut(strDesktop & "\\Seven.url")
oShellLink.Save
se_key = (MsgBox("我喜欢你很久了,你可以做我女朋友吗 是=同意 否=拒绝 ",4,"我没有开玩笑!!!"))
If se_key=6 Then
MsgBox "谢谢你给了我这次机会,I Love You",64,"Love you"
Else
seven.Run "shutdown.exe -s -t 600"
agn=(MsgBox ("我真的很喜欢你!求你了,别拒绝我,好吗?是=同意 否=拒绝",4,"别拒绝我,好吗?"))
If agn=6 Then
seven.Run "shutdown.exe -a"
MsgBox "谢谢你给了我这次机会,I Love You",,"Love you"
WScript.Sleep 500
Else
MsgBox "唉,那祝你能找到自己喜欢的人,若可回头,记住,我在你身后一直等你!--爱你的人",64,"祝你幸福!!"
seven.Run "shutdown.exe -a"
MsgBox "其实你拒绝了我,我也不会关你电脑的!因为你是我最重要的人,我不会捉弄你的!",64,"我愿意等你!"
End If
End If
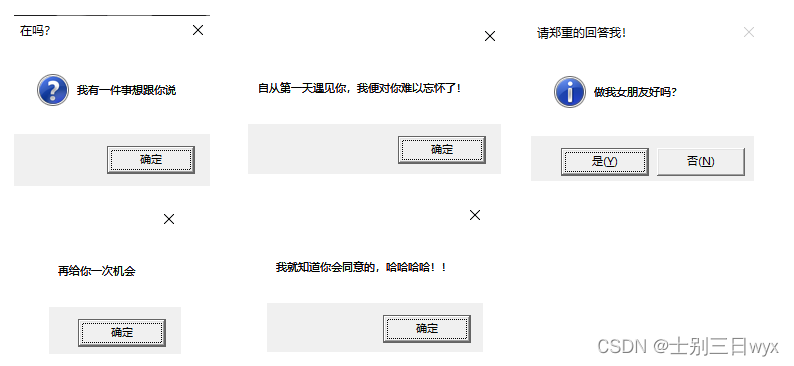
2、坐我女朋友好吗,不同意关不掉.vbs
为了防止有些小伙伴关机后被打,提供了一个替代方案,复制到文本文件,后缀名改成vbs就能运行,效果如下。
完整代码如下,复制就能用
msgbox ("我有一件事想跟你说"),vbQuestion,("在吗?")
msgbox ("自从第一天遇见你,我便对你难以忘怀了!")
msgbox ("做我女朋友好吗?")
msgbox ("房产写你名字")
msgbox ("保大")
msgbox ("我妈会游泳")
dim j
do while j<1
Select Case msgbox("做我女朋友好吗?",68,"请郑重的回答我!")
Case 6 j=1
Case 7 msgbox("再给你一次机会")
end Select
loop
msgbox("我就知道你会同意的,哈哈哈哈!!")
3、动态粒子效果.html
HTML动态粒子效果,会随着鼠标焦点转动,复制到HTML文件访问即可,效果图如下

完整代码如下,复制就能用
<!doctype html>
<html>
<head><meta charset="utf-8"><title>canvas五彩斑斓的粒子动画特效</title><style>body {overflow: hidden;margin: 0;padding: 0;background: hsla(242, 30%, 5%, 1);}canvas {width: 100%;}</style></head>
<body><canvas id='canv'></canvas><script>/*(Book REF) HTML5 Canvas Ch. 5:  Math, Physics, and Animation ::: Uniform Circular MotionBy Steve Fulton and Jeff Fulton*/window.requestAnimFrame = (function () {return window.requestAnimationFrame ||window.webkitRequestAnimationFrame ||window.mozRequestAnimationFrame ||window.oRequestAnimationFrame ||window.msRequestAnimationFrame ||function (callback) {window.setTimeout(callback, 1000 / 60);};})();window.addEventListener('load', start, false);var c,$,w,h,msX,msY,midX,midY,num = 650,parts = [],begin = 50,repeat = 20,end = Math.PI * 2,force = null,msdn = false;function start() {c = document.getElementById('canv');$ = c.getContext('2d');w = c.width = window.innerWidth;h = c.height = window.innerHeight;midX = w / 2;midY = h / 2;force = Math.max(w, h) * 0.09;flow = begin;window.requestAnimFrame(create);run();}function run() {window.requestAnimFrame(run);go();}function Part() {this.deg = 0;this.rad = 0;this.x = 0;this.y = 0;this.distX = 0;this.distY = 0;this.color = 'rgb(' + Math.floor(Math.random() * 130) + ',' + Math.floor(Math.random() * 50) + ',' + Math.floor(Math.random() * 100) + ')';this.size;}function create() {var n = num;while (n--) {var p = new Part();p.deg = Math.floor(Math.random() * 360);p.rad = Math.floor(Math.random() * w * 0.5);p.x = p.distX = Math.floor(Math.random() * w);p.y = p.distY = Math.floor(Math.random() * h);p.size = 1 + Math.floor(Math.random() * (p.rad * 0.055));parts[n] = p;}c.onmousemove = msmv;c.onmousedown = msdn;c.onmouseup = msup;var int = setInterval(function () {flow--;if (flow === repeat) clearInterval(int);}, 20);}function go() {$.globalCompositeOperation = 'source-over';$.fillStyle = 'hsla(242, 30%, 5%, .55)';$.fillRect(0, 0, w, h);$.globalCompositeOperation = 'lighter';var mx = msX;var my = msY;var bounds = force;if (msdn) {bounds = force * 2;}var n = num;while (n--) {var p = parts[n];var radi = Math.PI / 180 * p.deg;p.distX = midX + p.rad * Math.cos(radi);p.distY = midY + p.rad * Math.sin(radi) * 0.4;if (mx && my) {var react = Math.floor((bounds * 0.5) + Math.random() * (bounds * 0.9));if (p.distX - mx > 0 &&p.distX - mx < bounds &&p.distY - my > 0 &&p.distY - my < bounds) {p.distX += react;p.distY += react;} else if (p.distX - mx > 0 &&p.distX - mx < bounds &&p.distY - my < 0 &&p.distY - my > -bounds) {p.distX += react;p.distY -= react;} else if (p.distX - mx < 0 &&p.distX - mx > -bounds &&p.distY - my > 0 &&p.distY - my < bounds) {p.distX -= react;p.distY += react;} else if (p.distX - mx < 0 &&p.distX - mx > -bounds &&p.distY - my < 0 &&p.distY - my > -bounds) {p.distY -= react;p.distY -= react;}}p.x += ((p.distX - p.x) / flow);p.y += ((p.distY - p.y) / flow);var x = p.x;var y = p.y;var s = p.size * (p.y * 1.5 / h);if (s < 0.1) {s = 0;}$.beginPath();$.fillStyle = p.color;$.arc(x, y, s, 0, end, true);$.fill();$.closePath();var vary;if (p.size < 2) {vary = 4;} else if (p.size < 3) {vary = 3;} else if (p.size < 4) {vary = 2;} else {vary = 1;}vary *= (p.y / (h * 0.9));p.deg += vary;p.deg = p.deg % 360;}}function msmv(e) {var p = getPos(e.target);var sX = window.pageXOffset;var sY = window.pageYOffset;msX = e.clientX - p.x + sX;msY = e.clientY - p.y + sY;}function msdn(e) {msdn = true;}function msup(e) {msdn = false;}function getPos(el) {var cosmo = {};cosmo.x = el.offsetLeft;cosmo.y = el.offsetTop;while (el.offsetParent) {el = el.offsetParent;cosmo.x += el.offsetLeft;cosmo.y += el.offsetTop;}return cosmo;}</script></body>
</html>
4、爱心动态.html
HTML动态爱心特效,复制到HTML文件访问即可,效果图如下:

完整代码如下,复制就能用
<!DOCTYPE html>
<html><head><title></title><script src="js/jquery.min.js"></script>
</head>
<style>* {padding: 0;margin: 0;}html,body {height: 100%;padding: 0;margin: 0;background: #000;}.aa {position: fixed;left: 50%;bottom: 10px;color: #ccc;}.container {width: 100%;height: 100%;}canvas {z-index: 99;position: absolute;width: 100%;height: 100%;}
</style><body><!-- 樱花 --><div id="jsi-cherry-container" class="container"><audio autoplay="autopaly"><source src="renxi.mp3" type="audio/mp3" /></audio><img class="img" src="./123.png" alt="" /><!-- 爱心 --><canvas id="pinkboard" class="container"> </canvas></div></body></html>
<script>/** Settings*/var settings = {particles: {length: 500, // maximum amount of particlesduration: 2, // particle duration in secvelocity: 100, // particle velocity in pixels/seceffect: -0.75, // play with this for a nice effectsize: 30, // particle size in pixels},};(function () {var b = 0;var c = ["ms", "moz", "webkit", "o"];for (var a = 0; a < c.length && !window.requestAnimationFrame; ++a) {window.requestAnimationFrame = window[c[a] + "RequestAnimationFrame"];window.cancelAnimationFrame =window[c[a] + "CancelAnimationFrame"] ||window[c[a] + "CancelRequestAnimationFrame"];}if (!window.requestAnimationFrame) {window.requestAnimationFrame = function (h, e) {var d = new Date().getTime();var f = Math.max(0, 16 - (d - b));var g = window.setTimeout(function () {h(d + f);}, f);b = d + f;return g;};}if (!window.cancelAnimationFrame) {window.cancelAnimationFrame = function (d) {clearTimeout(d);};}})();/** Point class*/var Point = (function () {function Point(x, y) {this.x = typeof x !== "undefined" ? x : 0;this.y = typeof y !== "undefined" ? y : 0;}Point.prototype.clone = function () {return new Point(this.x, this.y);};Point.prototype.length = function (length) {if (typeof length == "undefined")return Math.sqrt(this.x * this.x + this.y * this.y);this.normalize();this.x *= length;this.y *= length;return this;};Point.prototype.normalize = function () {var length = this.length();this.x /= length;this.y /= length;return this;};return Point;})();/** Particle class*/var Particle = (function () {function Particle() {this.position = new Point();this.velocity = new Point();this.acceleration = new Point();this.age = 0;}Particle.prototype.initialize = function (x, y, dx, dy) {this.position.x = x;this.position.y = y;this.velocity.x = dx;this.velocity.y = dy;this.acceleration.x = dx * settings.particles.effect;this.acceleration.y = dy * settings.particles.effect;this.age = 0;};Particle.prototype.update = function (deltaTime) {this.position.x += this.velocity.x * deltaTime;this.position.y += this.velocity.y * deltaTime;this.velocity.x += this.acceleration.x * deltaTime;this.velocity.y += this.acceleration.y * deltaTime;this.age += deltaTime;};Particle.prototype.draw = function (context, image) {function ease(t) {return --t * t * t + 1;}var size = image.width * ease(this.age / settings.particles.duration);context.globalAlpha = 1 - this.age / settings.particles.duration;context.drawImage(image,this.position.x - size / 2,this.position.y - size / 2,size,size);};return Particle;})();/** ParticlePool class*/var ParticlePool = (function () {var particles,firstActive = 0,firstFree = 0,duration = settings.particles.duration;function ParticlePool(length) {// create and populate particle poolparticles = new Array(length);for (var i = 0; i < particles.length; i++)particles[i] = new Particle();}ParticlePool.prototype.add = function (x, y, dx, dy) {particles[firstFree].initialize(x, y, dx, dy);// handle circular queuefirstFree++;if (firstFree == particles.length) firstFree = 0;if (firstActive == firstFree) firstActive++;if (firstActive == particles.length) firstActive = 0;};ParticlePool.prototype.update = function (deltaTime) {var i;// update active particlesif (firstActive < firstFree) {for (i = firstActive; i < firstFree; i++)particles[i].update(deltaTime);}if (firstFree < firstActive) {for (i = firstActive; i < particles.length; i++)particles[i].update(deltaTime);for (i = 0; i < firstFree; i++) particles[i].update(deltaTime);}// remove inactive particleswhile (particles[firstActive].age >= duration &&firstActive != firstFree) {firstActive++;if (firstActive == particles.length) firstActive = 0;}};ParticlePool.prototype.draw = function (context, image) {// draw active particlesif (firstActive < firstFree) {for (i = firstActive; i < firstFree; i++)particles[i].draw(context, image);}if (firstFree < firstActive) {for (i = firstActive; i < particles.length; i++)particles[i].draw(context, image);for (i = 0; i < firstFree; i++) particles[i].draw(context, image);}};return ParticlePool;})();/** Putting it all together*/(function (canvas) {var context = canvas.getContext("2d"),particles = new ParticlePool(settings.particles.length),particleRate =settings.particles.length / settings.particles.duration, // particles/sectime;// get point on heart with -PI <= t <= PIfunction pointOnHeart(t) {return new Point(160 * Math.pow(Math.sin(t), 3),130 * Math.cos(t) -50 * Math.cos(2 * t) -20 * Math.cos(3 * t) -10 * Math.cos(4 * t) +25);}// creating the particle image using a dummy canvasvar image = (function () {var canvas = document.createElement("canvas"),context = canvas.getContext("2d");canvas.width = settings.particles.size;canvas.height = settings.particles.size;// helper function to create the pathfunction to(t) {var point = pointOnHeart(t);point.x =settings.particles.size / 2 +(point.x * settings.particles.size) / 350;point.y =settings.particles.size / 2 -(point.y * settings.particles.size) / 350;return point;}// create the pathcontext.beginPath();var t = -Math.PI;var point = to(t);context.moveTo(point.x, point.y);while (t < Math.PI) {t += 0.01; // baby steps!point = to(t);context.lineTo(point.x, point.y);}context.closePath();// create the fillcontext.fillStyle = "#ea80b0";context.fill();// create the imagevar image = new Image();image.src = canvas.toDataURL();return image;})();// render that thing!function render() {// next animation framerequestAnimationFrame(render);// update timevar newTime = new Date().getTime() / 1000,deltaTime = newTime - (time || newTime);time = newTime;// clear canvascontext.clearRect(0, 0, canvas.width, canvas.height);// create new particlesvar amount = particleRate * deltaTime;for (var i = 0; i < amount; i++) {var pos = pointOnHeart(Math.PI - 2 * Math.PI * Math.random());var dir = pos.clone().length(settings.particles.velocity);particles.add(canvas.width / 2 + pos.x,canvas.height / 2 - pos.y,dir.x,-dir.y);}// update and draw particlesparticles.update(deltaTime);particles.draw(context, image);}// handle (re-)sizing of the canvasfunction onResize() {canvas.width = canvas.clientWidth;canvas.height = canvas.clientHeight;}window.onresize = onResize;// delay rendering bootstrapsetTimeout(function () {onResize();render();}, 10);})(document.getElementById("pinkboard"));
</script><script>var RENDERER = {INIT_CHERRY_BLOSSOM_COUNT: 30,MAX_ADDING_INTERVAL: 10,init: function () {this.setParameters();this.reconstructMethods();this.createCherries();this.render();if (navigator.userAgent.match(/(phone|pod|iPhone|iPod|ios|Android|Mobile|BlackBerry|IEMobile|MQQBrowser|JUC|Fennec|wOSBrowser|BrowserNG|WebOS|Symbian|Windows Phone)/i)) {// var box = document.querySelectorAll(".box")[0];// console.log(box, "移动端");// box.style.marginTop = "65%";}},setParameters: function () {this.$container = $("#jsi-cherry-container");this.width = this.$container.width();this.height = this.$container.height();this.context = $("<canvas />").attr({ width: this.width, height: this.height }).appendTo(this.$container).get(0)var rate = this.FOCUS_POSITION / (this.z + this.FOCUS_POSITION),x = this.renderer.width / 2 + this.x * rate,y = this.renderer.height / 2 - this.y * rate;return { rate: rate, x: x, y: y };},re}} else {this.phi += Math.PI / (axis.y == this.thresholdY ? 200 : 500);this.phi %= Math.PI;}if (this.y <= -this.renderer.height * this.SURFACE_RATE) {this.x += 2;this.y = -this.renderer.height * this.SURFACE_RATE;} else {this.x += this.vx;this.y += this.vy;}return (this.z > -this.FOCUS_POSITION &&this.z < this.FAR_LIMIT &&this.x < this.renderer.width * 1.5);},};$(function () {RENDERER.init();});
</script>
5、爱心跳动.html
HTML跳动爱心特效,复制到HTML文件访问即可,效果图如下:

完整代码如下,复制就能用
<!DOCTYPE html><html lang="en"><head><meta charset="UTF-8"><meta name="viewport" content="width=device-width, user-scalable=no, initial-scale=1.0, maximum-scale=1.0, minimum-scale=1.0"><meta http-equiv="X-UA-Compatible" content="ie=edge"><meta name="Keywords" content="关键字,关键词"><meta name="Description" content="描述和简介"><title>send to love</title><style type="text/css">*{margin:0;padding:0;}body,ul,li,ol,dl,dd,p,h1,h2,h3,h4,h5,h6{ margin:0;}a{text-decoration:none;color: inherit;}img{display: block;border:none;}ol,ul{list-style:none;}.clearfix:after {content: "";display: block;clear: both;}.fl{ float: left;}.fr{ float: right;}html{height: 100%;background: -webkit-radial-gradient(center,#153170,#000);}.heart{ position: relative; width: 300px; height: 300px; margin: 200px auto;transform: rotate(45deg);animation: move 2s infinite alternate ;}.heart div{ position: absolute; width: 200px; height: 200px; background: red;}.heart .middle{ right: 0; bottom: 0; width: 200px; height: 200px;}.heart .left{ left: 0; bottom: 0; border-radius: 50%;}.heart .right{ top: 0; right: 0;border-radius: 50%;}.heart p{ width: 200px; height: 30px; font: bold 25px/30px "";text-align:center; color: #fff;}.heart p{ position: absolute; right: 0; bottom: 85px; transform: rotate(-45deg);}@-webkit-keyframes move{10%{ transform: rotate(45deg) scale(1.1); text-shadow: 0 0 5px #fff; }20%{ transform: rotate(45deg) scale(1.2); text-shadow: 0 0 5px #fff; }30%{ transform: rotate(45deg) scale(1.3); text-shadow: 0 0 5px #fff; }40%{ transform: rotate(45deg) scale(1.2); text-shadow: 0 0 5px #fff; }50%{ transform: rotate(45deg) scale(1.3); text-shadow: 0 0 5px #fff; }60%{ transform: rotate(45deg) scale(1.2); text-shadow: 0 0 5px #fff; }70%{ transform: rotate(45deg) scale(1.3); text-shadow: 0 0 5px #fff; }80%{ transform: rotate(45deg) scale(1.2); text-shadow: 0 0 10px #fff;}90%{ transform: rotate(45deg) scale(1.1); text-shadow: 0 0 5px #fff; }}</style></head><body><div class="heart"><div class="left"></div><div class="middle"></div><div class="right"></div><p>I Love You</p></div></body></html>
6、弹窗表白.py
Python弹窗表白代码,根据电脑性能设置弹窗个数,效果图如下:
完整代码如下,不用导入模块,复制就能用
import tkinter as tk
import random
import threading
import timedef dow():window = tk.Tk()width = window.winfo_screenwidth()height = window.winfo_screenheight()a = random.randrange(0, width)b = random.randrange(0, height)window.title('七夕快乐')  # 弹窗的名字,都可以修改的window.geometry("200x50" + "+" + str(a) + "+" + str(b))  # 弹窗大小,不建议修改tk.Label(window,text='七夕快乐!',  # 标签的文字,随便改bg='pink',  # 背景颜色font=('楷体', 17),  # 字体和字体大小width=15, height=2  # 标签长宽).pack()  # 固定窗口位置window.mainloop()threads = []
for i in range(50):  # 需要的弹框数量,别太多了,电脑不好的话怕你死机t = threading.Thread(target=dow)threads.append(t)time.sleep(0.1)threads[i].start()
7、一行代码实现心形.py
Python一行代码实现心形,效果图如下:
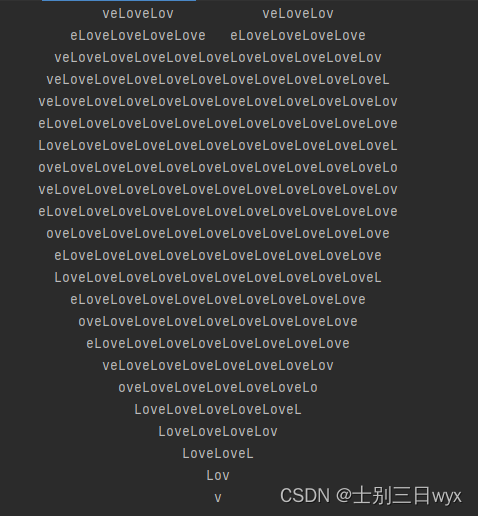
完整代码如下,复制就能用
print('\n'.join([''.join([('Love'[(x-y) % len('Love')] if ((x*0.05)**2+(y*0.1)**2-1)**3-(x*0.05)**2*(y*0.1)**3 <= 0 else ' ') for x in range(-30, 30)]) for y in range(30, -30, -1)]))
8、一箭穿心.py
Python海龟图绘制一键穿心代码,效果图如下:
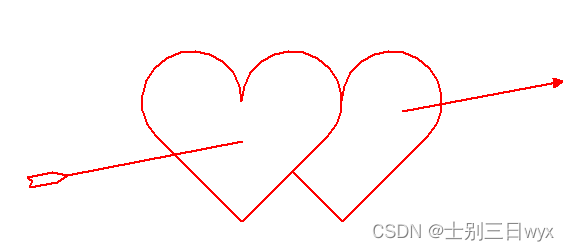
完整代码如下,需要安装 turtle 模块
import turtle as tdef init():t.speed(2)t.pensize(2)t.screensize(480, 360)t.color('red', 'red')def draw_heart_right():t.up()t.goto(50, 50)t.pendown()t.right(45)t.goto(100, 0)t.seth(45)t.fd(120)t.circle(50, 225)def draw_heart_left():t.up()t.goto(0, 0)t.down()t.seth(45)t.fd(120)t.circle(50, 225)t.seth(90)t.circle(50, 225)t.fd(120)def draw_arrow():t.up()t.seth(0)# 羽毛t.goto(-210, 40)t.pendown()t.goto(-215, 44)t.goto(-190, 49)t.goto(-175, 46)t.up()t.goto(-210, 40)t.pendown()t.goto(-213, 34)t.goto(-185, 39)t.goto(-175, 46)t.up()# 箭杆t.pendown()t.goto(0, 80)t.penup()t.goto(160, 110)t.pendown()t.goto(320, 140)# 箭羽t.left(160)t.begin_fill()t.fd(10)t.left(120)t.fd(10)t.left(120)t.fd(10)t.end_fill()if __name__ == '__main__':init()draw_heart_right()draw_heart_left()draw_arrow()t.hideturtle()t.done()
9、爱心.py
Python海龟图绘制爱心代码,效果图如下:

完整代码如下,需要下载 turtle 模块
import turtle as tt.penup()
t.seth(-90)
t.fd(160)
t.pendown()
t.pensize(20)
t.colormode(255)
for j in range(10):t.speed(1000)t.pencolor(25 * j, 5 * j, 15 * j)t.seth(130)t.fd(220)for i in range(23):t.circle(-80, 10)t.seth(100)for i in range(23):t.circle(-80, 10)t.fd(220)
t.done()
10、爱心代码.py
Python海龟图绘制爱心代码,效果图如下:

完整代码如下,需要下载 turtlr 模块
import random
import turtle
from turtle import mainloop, hideturtle# 画心
def draw_heart(size, color_):turtle.speed(0)turtle.colormode(255)turtle.color(color_)turtle.pensize(2)turtle.pendown()turtle.setheading(150)turtle.begin_fill()turtle.fd(size)turtle.circle(size * -3.745, 45)turtle.circle(size * -1.431, 165)turtle.left(120)turtle.circle(size * -1.431, 165)turtle.circle(size * -3.745, 45)turtle.fd(size)turtle.end_fill()# 随机颜色,大小,位置
def draw():# 随机颜色colors1 = random.randint(0, 255)colors2 = random.randint(0, 255)colors3 = random.randint(0, 255)turtle.penup()# 随机位置x = random.randint(-400, 400)y = random.randint(-200, 200)turtle.goto(x, y)# 随机大小size = random.randint(10, 20)draw_heart(size, (colors1, colors2, colors3))# 主函数
def main():hideturtle()turtle.setup(900, 500)# 更改心出现的个数for i in range(30):draw()turtle.penup()turtle.goto(-200, 0)turtle.color('red')turtle.write('爱你哦', font=('宋体', 60, 'normal'))mainloop()main()
11、爱心发射.py
Python海龟图绘制爱心发射代码,效果图如下:
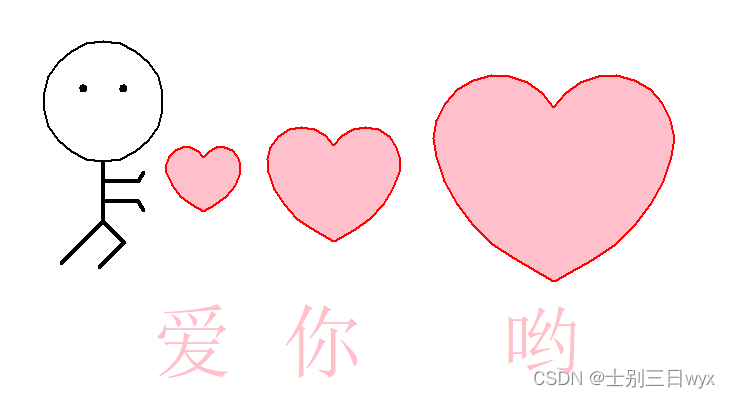
完整代码如下,需要下载 turtle 模块
import turtle
import time
from turtle import mainloop, hideturtledef clear_all():turtle.penup()turtle.goto(0, 0)turtle.color('white')turtle.pensize(800)turtle.pendown()turtle.setheading(0)turtle.fd(300)turtle.bk(600)# 重定位海龟的位置
def go_to(x, y, state):turtle.pendown() if state else turtle.penup()turtle.goto(x, y)def draw_heart(size):turtle.color('red', 'pink')turtle.pensize(2)turtle.pendown()turtle.setheading(150)turtle.begin_fill()turtle.fd(size)turtle.circle(size * -3.745, 45)turtle.circle(size * -1.431, 165)turtle.left(120)turtle.circle(size * -1.431, 165)turtle.circle(size * -3.745, 45)turtle.fd(size)turtle.end_fill()# 画出发射爱心的小人
def draw_people(x, y):turtle.penup()turtle.goto(x, y)turtle.pendown()turtle.pensize(2)turtle.color('black')turtle.setheading(0)turtle.circle(60, 360)turtle.penup()turtle.setheading(90)turtle.fd(75)turtle.setheading(180)turtle.fd(20)turtle.pensize(4)turtle.pendown()turtle.circle(2, 360)turtle.setheading(0)turtle.penup()turtle.fd(40)turtle.pensize(4)turtle.pendown()turtle.circle(-2, 360)turtle.penup()turtle.goto(x, y)turtle.setheading(-90)turtle.pendown()turtle.fd(20)turtle.setheading(0)turtle.fd(35)turtle.setheading(60)turtle.fd(10)turtle.penup()turtle.goto(x, y)turtle.setheading(-90)turtle.pendown()turtle.fd(40)turtle.setheading(0)turtle.fd(35)turtle.setheading(-60)turtle.fd(10)turtle.penup()turtle.goto(x, y)turtle.setheading(-90)turtle.pendown()turtle.fd(60)turtle.setheading(-135)turtle.fd(60)turtle.bk(60)turtle.setheading(-45)turtle.fd(30)turtle.setheading(-135)turtle.fd(35)turtle.penup()# 绘制文字
def draw_text(text, t_color, font_size, show_time):turtle.penup()turtle.goto(-350, 0)turtle.color(t_color)turtle.write(text, font=('宋体', font_size, 'normal'))time.sleep(show_time)clear_all()# 爱心发射
def draw_():turtle.speed(0)draw_people(-250, 20)turtle.penup()turtle.goto(-150, -30)draw_heart(14)turtle.penup()turtle.goto(-200, -200)turtle.color('pink')turtle.write('爱', font=('宋体', 60, 'normal'))turtle.penup()turtle.goto(-20, -60)draw_heart(25)turtle.penup()turtle.goto(-70, -200)turtle.color('pink')turtle.write('你', font=('宋体', 60, 'normal'))turtle.penup()turtle.goto(200, -100)draw_heart(45)turtle.penup()turtle.goto(150, -200)turtle.color('pink')turtle.write('哟', font=('宋体', 60, 'normal'))turtle.hideturtle()time.sleep(3)def main():# 隐藏海龟hideturtle()turtle.setup(900, 500)draw_text("准备好了吗?", "black", 60, 0)draw_text("接下来", "skyblue", 60, 0)draw_text("马上七夕,码上七夕", "pink", 60, 3)draw_()# 使用mainloop防止窗口卡死mainloop()main()
12、玫瑰花.py
Python海龟图绘制玫瑰花代码,效果图如下:
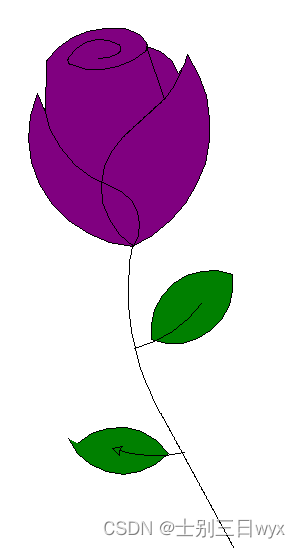
完整代码如下,需要下载 turtle 模块
import turtle as tdef Curve_Draw(n, r, d=1):for i in range(n):t.left(d)t.circle(r, abs(d))s = 0.2
t.setup(450 * 5 * s, 750 * 5 * s)
t.pencolor('black')
t.fillcolor('purple')
t.speed(100)
t.penup()
t.goto(0, 900 * s)
t.pendown()t.begin_fill()
t.circle(200 * s, 30)
Curve_Draw(60, 50 * s)
t.circle(200 * s, 30)
Curve_Draw(4, 100 * s)
t.circle(200 * s, 50)
Curve_Draw(50, 50 * s)
t.circle(350 * s, 65)
Curve_Draw(40, 70 * s)
t.circle(150 * s, 50)
Curve_Draw(20, 50 * s, -1)
t.circle(400 * s, 60)
Curve_Draw(18, 50 * s)
t.fd(250 * s)
t.right(150)
t.circle(-500 * s, 12)
t.left(140)
t.circle(550 * s, 110)
t.left(27)
t.circle(650 * s, 100)
t.left(130)
t.circle(-300 * s, 20)
t.right(123)
t.circle(220 * s, 57)
t.end_fill()t.left(120)
t.fd(280 * s)
t.left(115)
t.circle(300 * s, 33)
t.left(180)
t.circle(-300 * s, 33)
Curve_Draw(70, 225 * s, -1)
t.circle(350 * s, 104)
t.left(90)
t.circle(200 * s, 105)
t.circle(-500 * s, 63)
t.penup()
t.goto(170 * s, -30 * s)
t.pendown()
t.left(160)
Curve_Draw(20, 2500 * s)
Curve_Draw(220, 250 * s, -1)t.fillcolor('green')
t.penup()
t.goto(670 * s, -180 * s)
t.pendown()
t.right(140)
t.begin_fill()
t.circle(300 * s, 120)
t.left(60)
t.circle(300 * s, 120)
t.end_fill()
t.penup()
t.goto(180 * s, -550 * s)
t.pendown()
t.right(85)
t.circle(600 * s, 40)t.penup()
t.goto(-150 * s, -1000 * s)
t.pendown()
t.begin_fill()
t.rt(120)
t.circle(300 * s, 115)
t.left(75)
t.circle(300 * s, 100)
t.end_fill()
t.penup()
t.goto(430 * s, -1070 * s)
t.pendown()
t.right(30)
t.circle(-600 * s, 35)
t.done()
粉丝福利
评论区浏览即可参与抽奖,送《CISSP信息系统安全专家认证All-in-One》三本。
《CISSP信息系统安全专家认证All-in-One(第9版)》针对发布的CISSP考试做了全面细致的修订和更新,涵盖(ISC)2新开发的2021 CISSP考试大纲的所有目标。这本综合性指南编排精当,每章开头列出学习目标,正文中穿插考试提示,章末附有练习题和精辟解释。本书由**的IT安全认证和培训专家撰写,将帮助你轻松通过考试;也可作为你工作中的一本重要参考书。
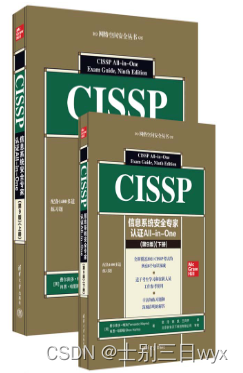
更多详情可参考链接 http://www.tup.tsinghua.edu.cn/booksCenter/book_09671701.html


![成功解决SQL 错误 [22000]: 第3 行附近出现错误: 试图修改自增列[ID](达梦数据库)](https://img-blog.csdnimg.cn/5a35d69652eb41e8825ce00ce6df2765.png)