目录
一、docker安装nexus本地私服,Idea通过maven配置deploy本地jar包(简单)
二、docker push镜像到第三方nexus远程私服(shell命令操作)
三、springboot通过maven插件自动生成docker镜像并push到nexus私服(难)
代码有代码的管理平台,比如GitHub、GitLab、码云等。镜像也有镜像的管理平台,比如DockerHub,以及本文中的nexus。 Nexus是当前最流行的Maven仓库管理软件。本文讲解使用nexus作为docker镜像仓库。
SNAPSHOT
快照版本,在 maven 中 SNAPSHOT 版本代表正式发布(release)的版本之前的开发版本,在 pom 中用 x.y-SNAPSHOT 表示。
RELEASE
发布版本,稳定版本,在 maven 中 RELEASE 代表着稳定的版本,unchange,不可改变的,在 maven 中 SNAPSHOT 与 RELEASE 版本在策略上是完全不同的方式,SNAPSHOT 会根据你的配置不同,频繁的从远程仓库更新到本地仓库;而 RELEASE 则只会在第一次下载到本地仓库,以后则会先直接从本地仓库中寻找。
一、docker安装nexus本地私服,Idea通过maven配置deploy本地jar包(简单)
使用docker将nexus拉取到本地,启动nexus容器,即可本地访问(注意初始登录密码在容器的哪个位置)。然后在Idea中进行settings.xml文件和pom.xml文件的配置。
1. 拉取nexus镜像
docker pull sonatype/nexus3
2. 启动容器
docker run -tid -p 8081:8081 -p 8082:8082 -p 8083:8083 -p 8084:8084 --privileged=true --name nexus3 -v /docker/nexus/nexus-data:/var/nexus-data --restart=always docker.io/sonatype/nexus3
-tid  :创建守护式容器 。
-p 8081:8081 :宿主机端口(对外访问端口):容器映射端口。这2个端口可不一样。浏览器访问URL用前面个端口 。8082~8084是仓库端口,如果不配置,后面访问不了
--privileged=true :容器访问宿主机的多级目录时可能会权限不足,故给 root 权限 。
--name nexus3 :给容器取名,可任意设定。
-v $PWD/nexus-data:/var/nexus-data :把容器中的 nexus-data 目录挂载到宿主机当前路径下的 nexus-data 下。方便以后查看相关数据。$PWD :取当前路径。此处可以写死为某个完整的确定的目录。 挂载格式为: -v  宿主机目录 :容器目录 。
--restart=always :服务挂后,自动重启 。
docker.io/sonatype/nexus3 :镜像名 。
3. 通过启动日志查看启动是否成功
docker logs -f nexus3
4. 本地访问并登陆(初始密码在容器的etc文件下,登录账户为admin)一定要先登录
http://ip:80815. 在idea的运行使用的settings文件上进行私服配置
<?xml version="1.0" encoding="UTF-8"?><settings xmlns="http://maven.apache.org/SETTINGS/1.0.0"xmlns:xsi="http://www.w3.org/2001/XMLSchema-instance"xsi:schemaLocation="http://maven.apache.org/SETTINGS/1.0.0 http://maven.apache.org/xsd/settings-1.0.0.xsd"><localRepository>D:\software\apache-maven-3.8.1\repository</localRepository><pluginGroups></pluginGroups><proxies></proxies><servers><server><id>jy-releases</id><username>admin</username><password>admin123</password></server><server><id>jy-snapshots</id><username>admin</username><password>admin123</password></server></servers><mirrors><mirror> <id>alimaven</id> <name>aliyun maven</name> <url>http://maven.aliyun.com/nexus/content/groups/public/</url> <mirrorOf>central</mirrorOf> </mirror></mirrors><profiles><profile><id>jy</id><activation><activeByDefault>false</activeByDefault></activation><!-- 私有库地址--><repositories><repository><id>jy</id><url>http://119.29.244.118:8081/repository/maven-public/</url><releases><enabled>true</enabled></releases><snapshots><enabled>true</enabled></snapshots></repository></repositories><!--插件库地址--><pluginRepositories><pluginRepository><id>jy</id><url>http://119.29.244.118:8081/repository/maven-public/</url><releases><enabled>true</enabled></releases><snapshots><enabled>true</enabled></snapshots></pluginRepository></pluginRepositories></profile><profile> <id>jdk-1.8</id> <activation> <activeByDefault>true</activeByDefault> <jdk>1.8</jdk> </activation> <properties> <maven.compiler.source>1.8</maven.compiler.source> <maven.compiler.target>1.8</maven.compiler.target> <maven.compiler.compilerVersion>1.8</maven.compiler.compilerVersion> </properties> </profile> </profiles><!-- 与上面的<profile><id>lee</id>相同--><activeProfiles><activeProfile>jy</activeProfile></activeProfiles></settings>
私服地址自己查看

为了速度更快,这里设置阿里云的镜像仓库而不是中央仓库
http://maven.aliyun.com/nexus/content/groups/public/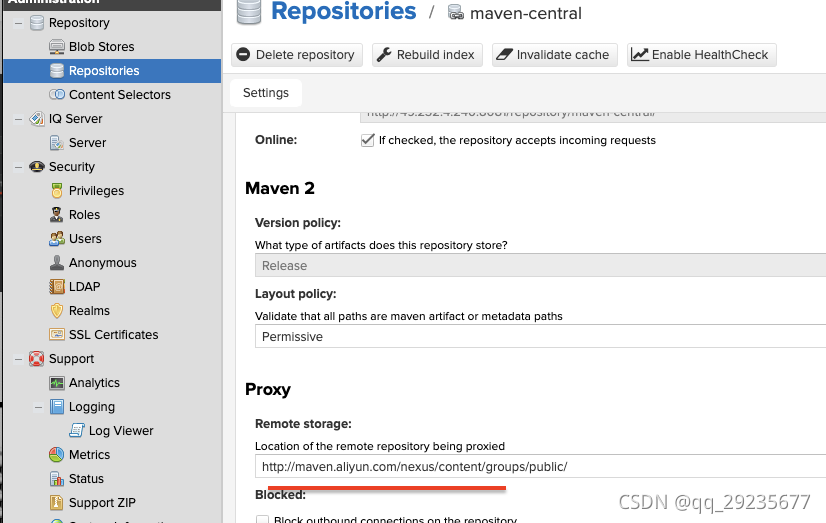
6. 在项目的pom.xml文件中配置推送url地址
<distributionManagement><repository><id>jy-releases</id><url>http://119.29.244.118:8081/repository/maven-releases/</url></repository><snapshotRepository><id>jy-snapshots</id><url>http://119.29.244.118:8081/repository/maven-snapshots/</url></snapshotRepository></distributionManagement>7. 执行命令,推送 jar 到私服
mvn clean deploy -Dmaven.test.skip=true
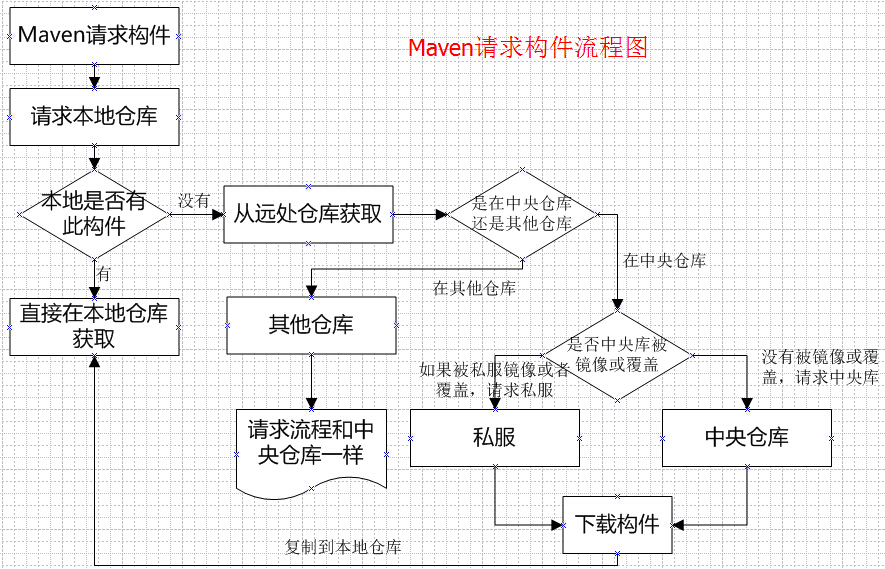
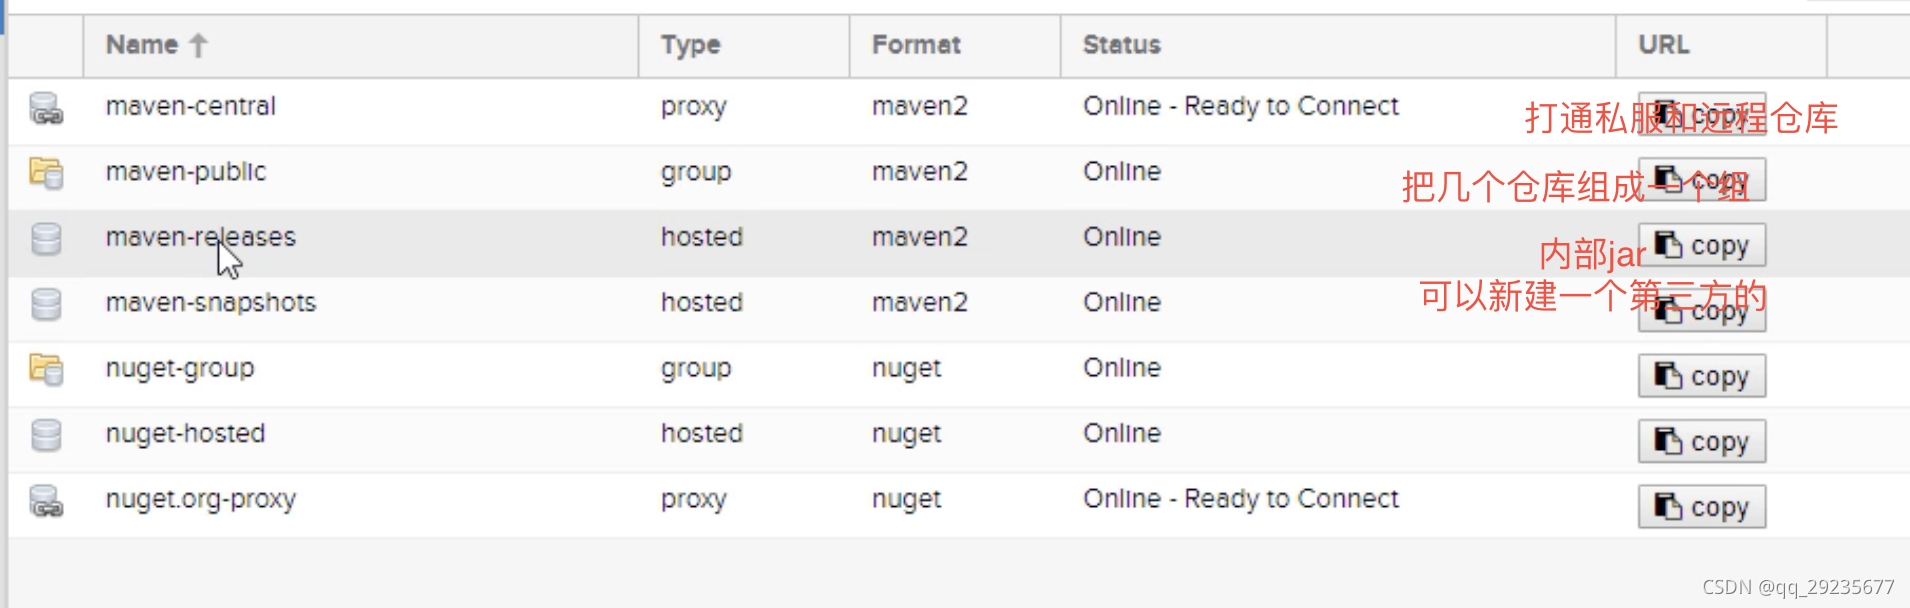
maven和nexus私服的简单说明
二、docker push镜像到第三方nexus远程私服(shell命令操作)
这里的nexus私服是公司配的,用于组内项目的jar包、镜像管理仓库。
step1: 本地登录nexus(输入用户名和密码)
docker login 119.29.244.118:8012
说明:8081是nexus的访问地址,8012端口是在nexus上设置的推送地址,也可用于登录。
step2:查看本地镜像(以镜像openjdk:8-jdk-alpine为例)
step3:tag镜像
-
docker tag openjdk:8-jdk-alpine 119.29.244.118:8012/ddpt/openjdk:8-jdk-alpinestep4:push镜像
-
docker push 119.29.244.118:8012/ddpt/openjdk:8-jdk-alpine三、springboot通过maven插件自动生成docker镜像并push到nexus私服(难)
需求:在Springboot项目中通过maven配置+Dockerfile文件+setting文件配置,实现Springboot项目的自动打包镜像,自动推送到远程nexus私服。
step1:Dockerfile文件编写。
FROM openjdk:8-jdk-alpine
VOLUME /tmp
#把当前项目下web-app-template-1.0.0.jar 改名为web-app-template.jar添加到镜像中
ADD web-app-template-1.0.0.jar web-app-template.jar
#指定端口,最好写与项目配置的端口
EXPOSE 8081
#在镜像中运行/web-app-template.jar包,这样在运行镜像的时候就可以启动好web-app-template.jar
#-Djava.security.egd=file:/dev/./urandom 是一个启动参数的优化,用于解决应用可能(在需要大量使用随机数的情况下)启动慢的问题
#(应用的sessionID是通过该参数的配置快速产生的随机数)
ENTRYPOINT ["java","-Djava.security.egd=file:/dev/./urandom","-jar","/web-app-template.jar"]
step2:settings.xml文件中配置用户名、密码和邮箱
<server><id>docker-nexus</id><username>p****DockerUser</username><password>l****pB</password><configuration><email>liu****@***.***.com</email></configuration></server>
step3:pom.xml文件配置
<properties><docker.repo>nexus.****.com:8012</docker.repo><docker.repository>webapptemplate</docker.repository><skipTests>true</skipTests></properties><!-- The configuration of maven-assembly-plugin --><plugin><groupId>com.spotify</groupId><artifactId>docker-maven-plugin</artifactId><version>0.4.13</version><configuration><imageName>${docker.repository}/${project.artifactId}:${project.version}_SNAPSHOT</imageName><!--指定dockerFile的路径 --><dockerDirectory>${project.basedir}/src/main/docker</dockerDirectory><!--docker server地址 docker服务端地址,即Docker安装地址,并开启2375端口(也可以安装在本地并开启2375端口)--><dockerHost>http://10.154.7.202:2375</dockerHost><serverId>docker-nexus</serverId><registryUrl>http://nexus.cmss.com:8082/webapptemplate/</registryUrl><resources><resource><targetPath>/</targetPath><directory>${project.build.directory}</directory><include>${project.build.finalName}.jar</include></resource></resources></configuration><executions><!--绑定Docker build镜像 命令到 Maven 的package阶段--><execution><id>build-image</id><phase>package</phase><goals><goal>build</goal></goals></execution><!--绑定Docker tag镜像 命令到 Maven 的package阶段--><execution><id>tag-image</id><phase>package</phase><goals><goal>tag</goal></goals><configuration><!--镜像名称--> <image>${docker.repository}/${project.artifactId}:${project.version}_SNAPSHOT</image><!--镜像Tag名称--> <newName>${docker.repo}/${docker.repository}/${project.artifactId}:${project.version}_SNAPSHOT</newName><forceTags>true</forceTags></configuration></execution><!--绑定Docker push镜像 命令到 Maven 的package阶段--><execution><id>push-image</id><phase>package</phase><goals><goal>push</goal></goals><configuration><imageName>${docker.repo}/${docker.repository}/${project.artifactId}:${project.version}_SNAPSHOT</imageName></configuration></execution></executions></plugin>
step4:打包并自动推送镜像
mvn clean deploy -Dmaven.test.skip=true
成功运行日志
"D:\Program Files\Java\jdk1.8.0_191\bin\java.exe" -Dmaven.multiModuleProjectDirectory=D:\CMSSGitLab\dig-common\template\web-app-template "-Dmaven.home=C:\IntelliJ IDEA 2020.1\plugins\maven\lib\maven3" "-Dclassworlds.conf=C:\IntelliJ IDEA 2020.1\plugins\maven\lib\maven3\bin\m2.conf" "-Dmaven.ext.class.path=C:\IntelliJ IDEA 2020.1\plugins\maven\lib\maven-event-listener.jar" "-javaagent:C:\IntelliJ IDEA 2020.1\lib\idea_rt.jar=12520:C:\IntelliJ IDEA 2020.1\bin" -Dfile.encoding=UTF-8 -classpath "C:\IntelliJ IDEA 2020.1\plugins\maven\lib\maven3\boot\plexus-classworlds-2.6.0.jar" org.codehaus.classworlds.Launcher -Didea.version2020.1 --update-snapshots -s C:\Users\Administrator\.m2\settings.xml package -P dev
[INFO] Scanning for projects...
[WARNING]
[WARNING] Some problems were encountered while building the effective model for com.chinamobile.cmss.dig:web-app-template:jar:1.0.0
[WARNING] 'build.plugins.plugin.(groupId:artifactId)' must be unique but found duplicate declaration of plugin org.springframework.boot:spring-boot-maven-plugin @ line 279, column 21
[WARNING]
[WARNING] It is highly recommended to fix these problems because they threaten the stability of your build.
[WARNING]
[WARNING] For this reason, future Maven versions might no longer support building such malformed projects.
[WARNING]
[INFO]
[INFO] -------------< com.chinamobile.cmss.dig:web-app-template >--------------
[INFO] Building web-app-template 1.0.0
[INFO] --------------------------------[ jar ]---------------------------------
[INFO]
[INFO] --- maven-resources-plugin:3.1.0:resources (default-resources) @ web-app-template ---
[INFO] Using 'UTF-8' encoding to copy filtered resources.
[INFO] Copying 1 resource
[INFO] Copying 6 resources
[INFO]
[INFO] --- maven-compiler-plugin:3.8.1:compile (default-compile) @ web-app-template ---
[INFO] Changes detected - recompiling the module!
[INFO] Compiling 25 source files to D:\CMSSGitLab\dig-common\template\web-app-template\target\classes
[INFO] /D:/CMSSGitLab/dig-common/template/web-app-template/src/main/java/com/chinamobile/cmss/dig/interceptor/HttpResponseInterceptor.java: D:\CMSSGitLab\dig-common\template\web-app-template\src\main\java\com\chinamobile\cmss\dig\interceptor\HttpResponseInterceptor.java使用了未经检查或不安全的操作。
[INFO] /D:/CMSSGitLab/dig-common/template/web-app-template/src/main/java/com/chinamobile/cmss/dig/interceptor/HttpResponseInterceptor.java: 有关详细信息, 请使用 -Xlint:unchecked 重新编译。
[INFO]
[INFO] --- maven-resources-plugin:3.1.0:testResources (default-testResources) @ web-app-template ---
[INFO] Using 'UTF-8' encoding to copy filtered resources.
[INFO] Copying 4 resources
[INFO]
[INFO] --- maven-compiler-plugin:3.8.1:testCompile (default-testCompile) @ web-app-template ---
[INFO] Changes detected - recompiling the module!
[INFO] Compiling 5 source files to D:\CMSSGitLab\dig-common\template\web-app-template\target\test-classes
[INFO]
[INFO] --- maven-surefire-plugin:2.18.1:test (default-test) @ web-app-template ---
[INFO] Tests are skipped.
[INFO]
[INFO] --- maven-jar-plugin:3.2.0:jar (default-jar) @ web-app-template ---
[INFO] Building jar: D:\CMSSGitLab\dig-common\template\web-app-template\target\web-app-template-1.0.0.jar
[INFO]
[INFO] --- spring-boot-maven-plugin:2.3.1.RELEASE:repackage (repackage) @ web-app-template ---
[INFO] Replacing main artifact with repackaged archive
[INFO]
[INFO] --- spring-boot-maven-plugin:2.3.1.RELEASE:repackage (default) @ web-app-template ---
[INFO] Replacing main artifact with repackaged archive
[INFO]
[INFO] --- maven-assembly-plugin:3.3.0:single (make-assembly) @ web-app-template ---
[INFO] Reading assembly descriptor: profile/dev/package.xml
[INFO] Building tar: D:\CMSSGitLab\dig-common\template\web-app-template\target\web-app-template-1.0.0-server.tar.gz
[INFO]
[INFO] --- docker-maven-plugin:0.4.13:build (build-image) @ web-app-template ---
[INFO] Copying D:\CMSSGitLab\dig-common\template\web-app-template\target\web-app-template-1.0.0.jar -> D:\CMSSGitLab\dig-common\template\web-app-template\target\docker\web-app-template-1.0.0.jar
[INFO] Copying D:\CMSSGitLab\dig-common\template\web-app-template\src\main\docker\Dockerfile -> D:\CMSSGitLab\dig-common\template\web-app-template\target\docker\Dockerfile
[INFO] Building image webapptemplate/web-app-template:1.0.0_SNAPSHOT
Step 1/5 : FROM openjdk:8-jdk-alpine---> a3562aa0b991
Step 2/5 : VOLUME /tmp---> Using cache---> 3a9992956a89
Step 3/5 : ADD web-app-template-1.0.0.jar web-app-template.jar---> 30b7fcaf08ed
Removing intermediate container c555a3b04b5a
Step 4/5 : EXPOSE 8081---> Running in d15cfd67a278---> 5d6a58f1218c
Removing intermediate container d15cfd67a278
Step 5/5 : ENTRYPOINT java -Djava.security.egd=file:/dev/./urandom -jar /web-app-template.jar---> Running in 2fbb8ceefe70---> c8cb14dd046c
Removing intermediate container 2fbb8ceefe70
Successfully built c8cb14dd046c
[INFO] Built webapptemplate/web-app-template:1.0.0_SNAPSHOT
[INFO]
[INFO] --- docker-maven-plugin:0.4.13:tag (tag-image) @ web-app-template ---
[INFO] Creating tag nexus.cmss.com:8012/webapptemplate/web-app-template:1.0.0_SNAPSHOT from webapptemplate/web-app-template:1.0.0_SNAPSHOT
[INFO]
[INFO] --- docker-maven-plugin:0.4.13:push (push-image) @ web-app-template ---
[INFO] Pushing nexus.cmss.com:8012/webapptemplate/web-app-template:1.0.0_SNAPSHOT
The push refers to a repository [nexus.cmss.com:8012/webapptemplate/web-app-template]
107680152efb: Preparing
ceaf9e1ebef5: Preparing
9b9b7f3d56a0: Preparing
f1b5933fe4b5: Preparing
ceaf9e1ebef5: Layer already exists
9b9b7f3d56a0: Layer already exists
f1b5933fe4b5: Layer already exists
107680152efb: Pushing [>                                                  ] 524.8 kB/58.48 MB
107680152efb: Pushing [=>                                                 ] 2.196 MB/58.48 MB
107680152efb: Pushing [===>                                               ] 3.867 MB/58.48 MB
107680152efb: Pushing [====>                                              ] 5.538 MB/58.48 MB
107680152efb: Pushing [======>                                            ] 7.209 MB/58.48 MB
107680152efb: Pushing [========>                                          ] 9.438 MB/58.48 MB
107680152efb: Pushing [=========>                                         ] 11.11 MB/58.48 MB
107680152efb: Pushing [===========>                                       ] 13.34 MB/58.48 MB
107680152efb: Pushing [=============>                                     ] 15.57 MB/58.48 MB
107680152efb: Pushing [==============>                                    ] 17.24 MB/58.48 MB
107680152efb: Pushing [================>                                  ] 19.46 MB/58.48 MB
107680152efb: Pushing [==================>                                ] 21.69 MB/58.48 MB
107680152efb: Pushing [====================>                              ] 23.92 MB/58.48 MB
107680152efb: Pushing [======================>                            ] 26.15 MB/58.48 MB
107680152efb: Pushing [========================>                          ] 28.38 MB/58.48 MB
107680152efb: Pushing [==========================>                        ] 30.61 MB/58.48 MB
107680152efb: Pushing [============================>                      ] 32.83 MB/58.48 MB
107680152efb: Pushing [=============================>                     ] 35.06 MB/58.48 MB
107680152efb: Pushing [===============================>                   ] 37.29 MB/58.48 MB
107680152efb: Pushing [=================================>                 ] 39.52 MB/58.48 MB
107680152efb: Pushing [===================================>               ] 41.75 MB/58.48 MB
107680152efb: Pushing [=====================================>             ] 43.98 MB/58.48 MB
107680152efb: Pushing [=======================================>           ]  46.2 MB/58.48 MB
107680152efb: Pushing [========================================>          ] 47.87 MB/58.48 MB
107680152efb: Pushing [==========================================>        ]  50.1 MB/58.48 MB
107680152efb: Pushing [============================================>      ] 52.33 MB/58.48 MB
107680152efb: Pushing [==============================================>    ] 54.56 MB/58.48 MB
107680152efb: Pushing [================================================>  ] 56.23 MB/58.48 MB
107680152efb: Pushing [=================================================> ] 58.46 MB/58.48 MB
107680152efb: Pushing [==================================================>] 58.48 MB
107680152efb: Pushed
1.0.0_SNAPSHOT: digest: sha256:769e960e2d4981611f4312cfa1da2f752829a7d799e63bee0d7d4d139ca5fec2 size: 1159
null: null
[INFO] ------------------------------------------------------------------------
[INFO] BUILD SUCCESS
[INFO] ------------------------------------------------------------------------
[INFO] Total time:  48.692 s
[INFO] Finished at: 2020-07-09T10:14:03+08:00
[INFO] ------------------------------------------------------------------------
![[Linux]进程地址空间](https://img-blog.csdnimg.cn/img_convert/ed51984a4e3fa0f90d2c3d939a4b6291.png)


![[ACL2023] Exploring Lottery Prompts for Pre-trained Language Models](https://img-blog.csdnimg.cn/7bad4bb5346f4e9081126103c162b419.png)