在开发布料模拟之前,我想使用 WebGPU 开发强大的代码基础。 这就是为什么我想从 Wavefront .OBJ 文件加载器开始渲染 3D 模型。 这样,我们可以快速渲染 3D 模型,并构建一个简单而强大的渲染引擎来完成此任务。 一旦我们有了扎实的基础,我们就可以轻松实现布料模拟部分了。

推荐:用 NSDT编辑器 快速搭建可编程3D场景
1、Wavefront .OBJ 文件
.OBJ 是一种文件格式,包含由 Wavefront Technologies 公司创建的 3D 几何图形的描述。 典型的 .OBJ 文件的结构包含一组:
- 顶点
- 法线
- 纹理坐标
- 面
让我们看一个例子。 .obj 金字塔定义如下:
v 0 0 0
v 1 0 0
v 1 1 0
v 0 1 0
v 0.5 0.5 1.6
f 4// 1// 2//
f 3// 4// 2//
f 5// 2// 1//
f 4// 5// 1//
f 3// 5// 4//
f 5// 3// 2//
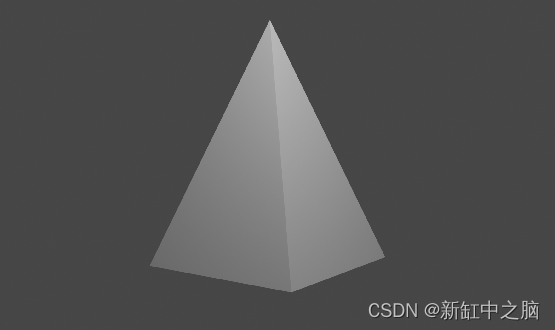
渲染此文件,我们可能会看到一个如下图所示的金字塔:
那么问题出现了🤔:
我们如何将这种文件格式加载到我们的程序中?
我们将了解如何使用现成的 .OBJ 文件来执行此操作,以渲染复杂的几何图形。 利用别人的劳动来免除我们的辛苦工作的美妙之处。 💅
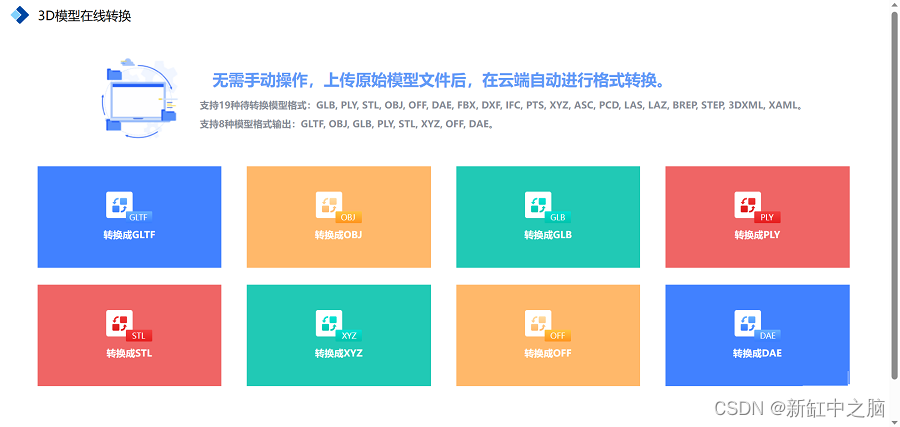
如果你手头有FBX、GLTF等其他格式的模型,可以使用NSDT 3DConvert这个在线3D格式转换工具将其转换为.OBJ文件:
2、我们如何找到 .OBJ 文件?
我使用 Google 查找 .OBJ 文件。 也就是说,如果我找到一个我喜欢的文件,我必须将其加载到 Blender 等软件中,原因如下:
- 格式一致性:当使用 Google 查找 .OBJs 文件时,它们都有一些小的格式特性。 例如,他们可以定义带或不带斜线的顶点和面。 我想用Blender加载和导出以保证文件内容的格式。 📁
- 几何体的定位:有时,模型的定位方式是我们不想要的。 纠正 Blender 中的初始位置可以节省我们一些时间和代码。
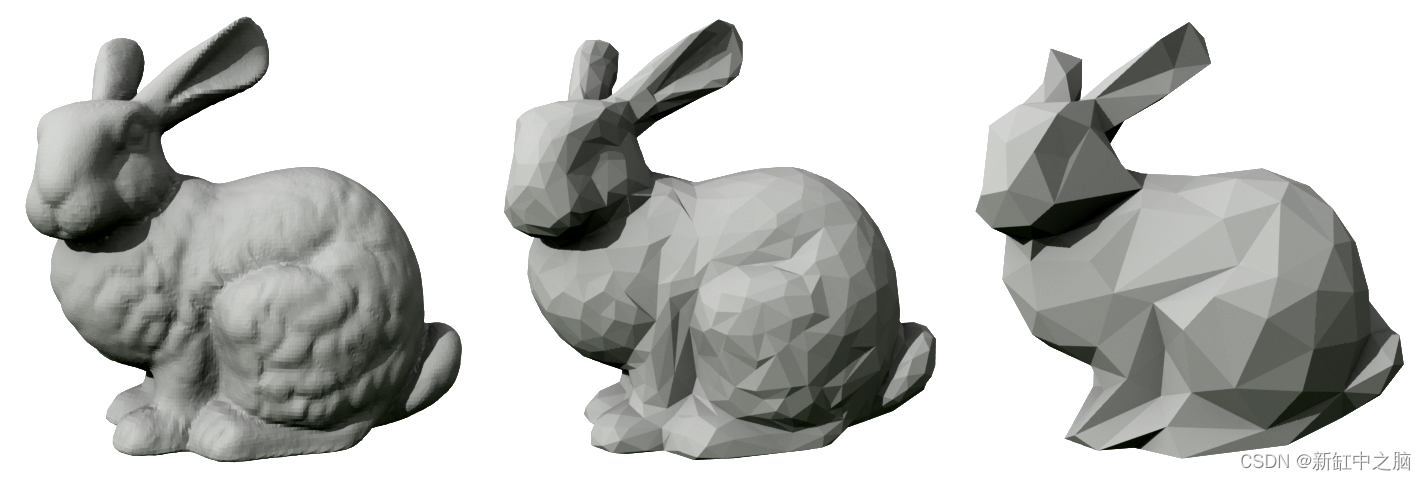
让我们看一个例子。 对于这个项目,我想使用著名的斯坦福兔子。 该文件可以在这里找到:
3、如何在 Blender 中准备几何体
下载文件后,我们需要在Blender等3D软件中打开它进行检查。 我们立刻就可以看到这个位置有问题:
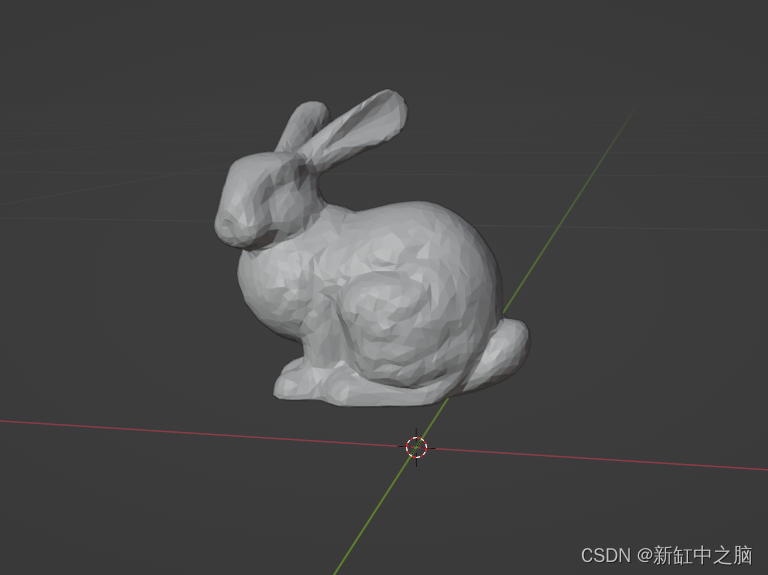
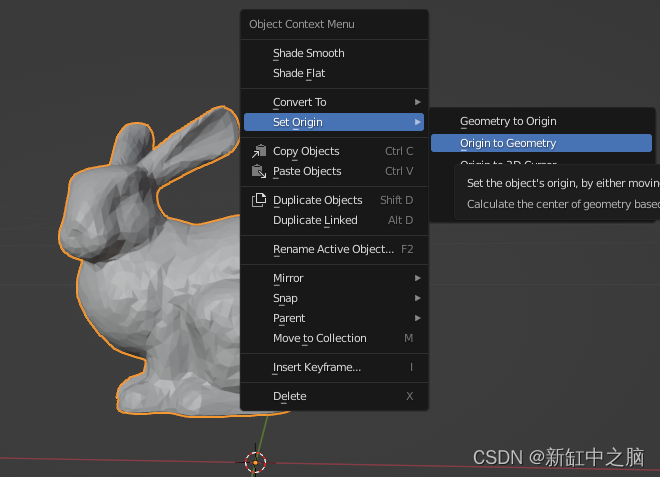
我想将兔子居中,使其身体位于原点。 要做到这一点非常简单。 以下是这些步骤:
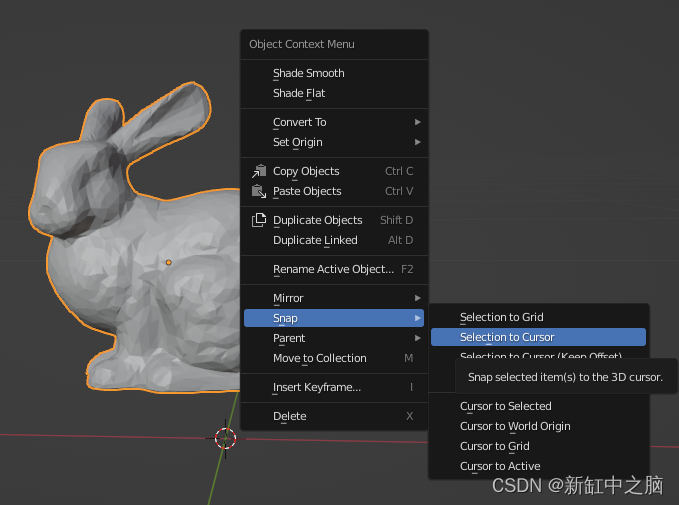
将原点放在兔子上。 右键单击,然后导航到“设置原点”>“原点到几何体”。
将兔子移动到场景原点。 右键单击,然后导航至“捕捉”>“光标选择”。
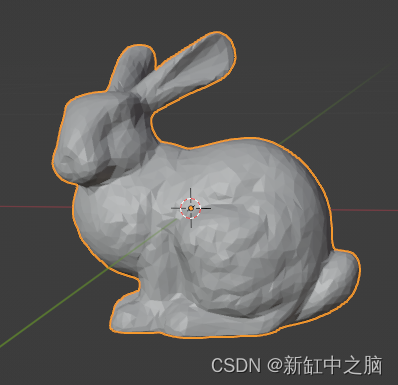
兔子现在以原点为中心🎯:
最后,一个好主意是检查与模型相关的法线。 我们可以通过在 Blender 中进入编辑模式(按 TAB 键)并导航到“网格”>“法线”>“重新计算外部”来重做计算:
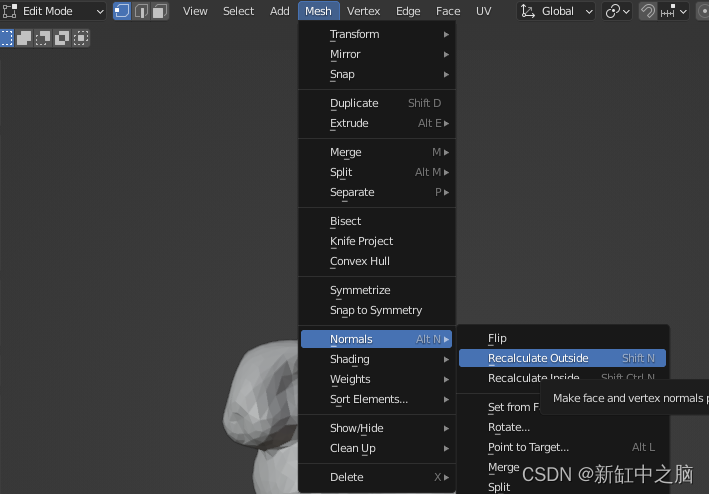
导航到文件 > 导出 > Wavefront (.obj)。 可以使用以下设置导出文件:
✅ 应用修饰符
✅ 写法线
✅ 包括 UV
✅ 撰写材质
✅ 三角面
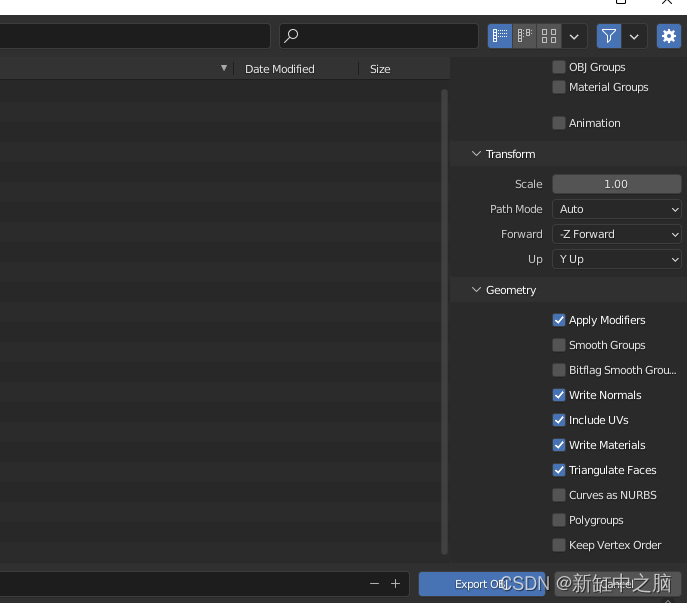
之后,你应该准备好使用 WebGPU 在浏览器中渲染的 .OBJ 文件。 🥳
4、WebGPU 代码
💡代码现在假设该文件是由 Blender 准备的。 如果没有,请参阅上一节。
目标是将 .OBJ 文件中的所有数据存储在缓冲区中。 幸运的是,这些数据很容易读取。 我将系统设计为两部分:
- 加载器 - 我们加载文件并将其文本存储在内存中,以便我们可以处理它。
- 解析器 - 将文本存储在内存中,我们可以解析文本行并将它们存储在缓冲区中。
interface Mesh {positions: Float32Array;uvs: Float32Array;normals: Float32Array;indices: Uint16Array;
}type ObjFile = string
type FilePath = stringtype CachePosition = number
type CacheFace = string
type CacheNormal = number
type CacheUv = number
type CacheArray<T> = T[][]type toBeFloat32 = number
type toBeUInt16 = number/*** ObjLoader to load in .obj files. This has only been tested on Blender .obj exports that have been UV unwrapped* and you may need to throw out certain returned fields if the .OBJ is missing them (ie. uvs or normals)*/
export default class ObjLoader {constructor() {}/*** Fetch the contents of a file, located at a filePath.*/async load(filePath: FilePath): Promise<ObjFile> {const resp = await fetch(filePath)if (!resp.ok) {throw new Error(`ObjLoader could not fine file at ${filePath}. Please check your path.`)}const file = await resp.text()if (file.length === 0) {throw new Error(`${filePath} File is empty.`)}return file}/*** Parse a given obj file into a Mesh*/parse(file: ObjFile): Mesh {const lines = file?.split("\n")// Store what's in the object file hereconst cachedPositions: CacheArray<CachePosition> = []const cachedFaces: CacheArray<CacheFace> = []const cachedNormals: CacheArray<CacheNormal> = []const cachedUvs: CacheArray<CacheUv> = []// Read out data from file and store into appropriate source buckets{for (const untrimmedLine of lines) {const line = untrimmedLine.trim() // remove whitespaceconst [startingChar, ...data] = line.split(" ")switch (startingChar) {case "v":cachedPositions.push(data.map(parseFloat))breakcase "vt":cachedUvs.push(data.map(Number))breakcase "vn":cachedNormals.push(data.map(parseFloat))breakcase "f":cachedFaces.push(data)break}}}// Use these intermediate arrays to leverage Array API (.push)const finalPositions: toBeFloat32[] = []const finalNormals: toBeFloat32[] = []const finalUvs: toBeFloat32[] = []const finalIndices: toBeUInt16[] = []// Loop through faces, and return the buffers that will be sent to GPU for rendering{const cache: Record<string, number> = {}let i = 0for (const faces of cachedFaces) {for (const faceString of faces) {// If we already saw this, add to indices list.if (cache[faceString] !== undefined) {finalIndices.push(cache[faceString])continue}cache[faceString] = ifinalIndices.push(i)// Need to convert strings to integers, and subtract by 1 to get to zero index.const [vI, uvI, nI] = faceString.split("/").map((s: string) => Number(s) - 1)vI > -1 && finalPositions.push(...cachedPositions[vI])uvI > -1 && finalUvs.push(...cachedUvs[uvI])nI > -1 && finalNormals.push(...cachedNormals[nI])i += 1}}}return {positions: new Float32Array(finalPositions),uvs: new Float32Array(finalUvs),normals: new Float32Array(finalNormals),indices: new Uint16Array(finalIndices),}}
}
5、加载器
让我们看一下 load() 函数:
async function load(filePath: FilePath): Promise<ObjFile> {const resp = await fetch(filePath);if (!resp.ok) {throw new Error(`ObjLoader could not fine file at ${filePath}. Please check your path.`);}const file = await resp.text();
if (file.length === 0) {throw new Error(`${filePath} File is empty.`);}
return file;
}
这段代码的想法只是获取位于 filePath 的文件的内容。 我将文件存储在硬盘上,但可以通过 HTTP 请求数据。
6、解析器
这是代码的第一部分:
parse(file: ObjFile): Mesh {const lines = file?.split("\n");
// Store what's in the object file hereconst cachedVertices: CacheArray<CacheVertice> = [];const cachedFaces: CacheArray<CacheFace> = [];const cachedNormals: CacheArray<CacheNormal> = [];const cachedUvs: CacheArray<CacheUv> = [];
// Read out data from file and store into appropriate source buckets{for (const untrimmedLine of lines) {const line = untrimmedLine.trim(); // remove whitespaceconst [startingChar, ...data] = line.split(" ");switch (startingChar) {case "v":cachedVertices.push(data.map(parseFloat));break;case "vt":cachedUvs.push(data.map(Number));break;case "vn":cachedNormals.push(data.map(parseFloat));break;case "f":cachedFaces.push(data);break;}}}
... Rest of code
}
这部分包括简单地从内存中读取数据并将它们存储在相应的数组中。 幸运的是,每行文本都标有其关联的类型:
- v - 顶点的位置
- vt - 纹理坐标(uv)
- vn - 法线向量(法线)
- f - 面(形成三角形的三个顶点)
这是其余的代码:
... the code before// Use these intermediate arrays to leverage Array API (.push)const finalVertices: toBeFloat32[] = [];const finalNormals: toBeFloat32[] = [];const finalUvs: toBeFloat32[] = [];const finalIndices: toBeUInt16[] = [];
// Loop through faces, and return the buffers that will be sent to GPU for rendering{const cache: Record<string, number> = {};let i = 0;for (const faces of cachedFaces) {for (const faceString of faces) {// If we already saw this, add to indices list.if (cache[faceString] !== undefined) {finalIndices.push(cache[faceString]);continue;}
cache[faceString] = i;finalIndices.push(i);
// Need to convert strings to integers, and subtract by 1 to get to zero index.const [vI, uvI, nI] = faceString.split("/").map((s: string) => Number(s) - 1);
vI > -1 && finalVertices.push(...cachedVertices[vI]);uvI > -1 && finalUvs.push(...cachedUvs[uvI]);nI > -1 && finalNormals.push(...cachedNormals[nI]);
i += 1;}}}
return {vertices: new Float32Array(finalVertices),uvs: new Float32Array(finalUvs),normals: new Float32Array(finalNormals),indices: new Uint16Array(finalIndices),};}
接下来,我们迭代面部以创建数据并将其存储在最终缓冲区中。 我们使用称为索引缓冲区的东西,这是避免存储重复数据的一种方法。 我们稍后会看到如何进行。
7、缓冲器类型
正如我们在讨论中看到的,我们在 WebGPU 中渲染了一个三角形,我们使用缓冲区来存储每个顶点的属性。
更具体地,使用一个或多个顶点缓冲对象(VBO)和索引缓冲对象(IBO)。 我们使用 IBO 中的索引来索引 VBO 以避免存储重复数据。
让我们看一个例子:
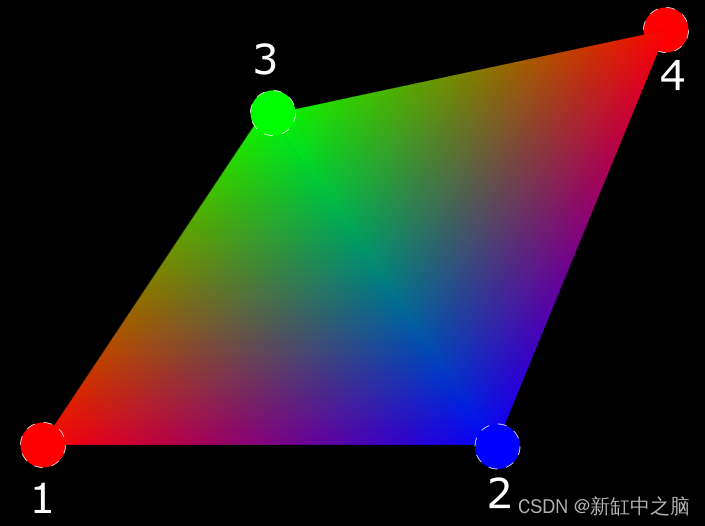
标签为 2 的顶点位于两个三角形中(一个由顶点 1、2、3 形成,另一个由顶点 3、2、4 形成)。 我们将数据定义如下:
position_vbo = [-1, 0, 0, #v11, 0, 0, #v20, 1, 0, #v32, 1, 0, #v4]
color_vbo = [1, 0, 0, #v10, 0, 1, #v21, 1, 0, #v32, 1, 0, #v4]
indices_ibo = [0, 1, 2, # triangle 12, 1, 3 # triangle 2
]
原文链接:WebGPU加载.OBJ模型 — BimAnt
